
Having good AI for our characters is more than just giving them simple tasks to perform; we'd like to have our characters realistically react to the game environment. Game events such as seeing new objects appear or having a bomb go off in a scene should cause a reaction in the AI. Having the AI adapt to the environment is a huge topic, but we will focus on the basic ways to have AI adapt to the environment. In this chapter, we will look at taking AI skills we learned in previous chapters and combining them to create AI characters that adapt to the game environment in a realistic way, changing their tasks based on game events.
In this chapter, you will be:
- Creating AI characters that react and adapt to multiple game events
- Setting up more complex AI characters in RAIN
- Getting to know the importance of creating larger AI scenes with REACT AI
In previous chapters, we looked at how to do different specific AI tasks. We learned how to make characters patrol a path, have them wander an environment, change state with behavior trees, and sense objects in the game environment. These are all important, but it's more important to understand how we can combine these different elements to make AI that works well in a large game environment. We will need characters that can navigate an environment to perform tasks but then change based on game events that occur. To do this, the game needs to be designed at a high level, defining what the different AI character's main goals and actions are. These high-level goals are things such as wanting an enemy to patrol an area until it sees the player and then start to chase and attack him. From there, the different aspects of sensing need to be designed for the level, deciding what objects need to be tagged, so they can be used by the AI system. The characters then need sensors defined for the AI characters and high-level goals can be created using existing nodes and custom actions.
One of the ways we can define our character's adaptive behavior with RAIN is using RAIN's motor system. We have been using the motor system with the move node but not directly. The motor system controls moving the character, and it is available through the motion panel in RAIN, the icon with two feet. This is how the motion panel in RAIN looks:
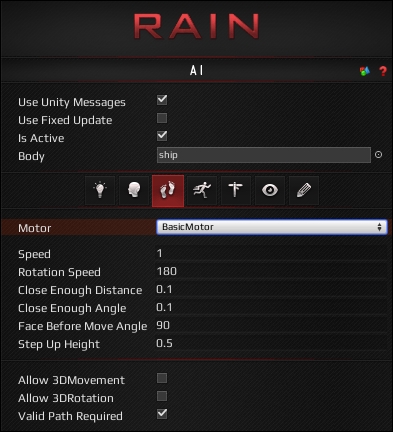
RAIN supports three different kinds of motors:
- A basic motor, which we will use for most cases
- A character controller that uses the standard Unity character controller for movement
- A Mecanim controller (we will discuss Mecanim with RAIN in Chapter 10, Animation and AI)
The movement is target based: you give the motor a target position to go to and use the motor to get there.
The fields for motors are pretty straightforward:
- Speed / Rotation Speed: This specifies how fast the character should move and rotate.
- Close Enough Distance / Close Enough Angle: This specifies how close the character needs to move to a target.
- Face Before Move Angle: This specifies how much of an angle the character needs to be facing its target before moving. This prevents weird movements with very close targets.
- Step Up Height: This specifies how much the character can step up; this is used to customize behavior for things such as steep terrain and staircases. We will discuss step up heights more in Chapter 11, Advanced NavMesh Generation.
We use the motor system from a Custom Action option in our demo, but you can use motors to move the character from any component.
Here's a little snippet that shows how to move from a standard Unity character script:
AIRigaiRig = GetComponentInChildren<AIRig>();
…
aiRig.AI.Motor.UpdateMotionTransforms();

aiRig.AI.Motor.MoveTarget.VectorTarget = targetPositon;
aiRig.AI.Motor.Move();
aiRig.AI.Motor.ApplyMotionTransforms();
First, we get AIRig attached to the character. Then, we call UpdateMotionTransforms() to make sure that the AI system has the latest transforms (position and rotation) from the character before updating. Next, we set VectorTarget to a Vector3 variable as targetPosition, so the AI system knows where we want to go. Then, we call Move() to update the character's transforms in the AI system, and finally, we call ApplyMotionTransforms() to update our game to show the new transforms from the AI system. Using these methods, we can update game characters at any time.
With customized movements, we can have our characters adapt in any way we want. The best way to see how this works is to look at a demo. The demo that we will look at in this chapter is an extension of the ship demo from Chapter 6, Sensors and Activities. We will have a ship in a level searching for gold pieces, but we'll extend it to make the gold pieces appear more random and dynamic in the level over time. Then, we will have a bomb with a timer and when it goes off all of ships will be destroyed and stop updating their AI. This will illustrate how we can have AI characters react to game events.