
Organizations rely on different software applications, each with their own business purpose. These different software applications run on different platforms and operating systems, and are implemented in different programming languages. So, it is very difficult for different applications to communicate with each other and share their resources in a coordinated way. Heterogeneous applications can communicate with each other via web services. The following are the web service characteristics:
- Web services are web application components
- Web services communicate using open standards, such as XML, SOAP, and HTTP
- Web services are self-contained and self-describing
- HTTP and XML are the basis for web services
Web services are client and server applications that communicate over HyperText Transfer Protocol (HTTP) and provide a standard means for interoperating between software applications running on a variety of platforms and frameworks. Web services are characterized by interoperability and extensibility.
We'll be looking at two of the most common tools for building web services in Java, namely, the Java API for XML Web Services (JAX-WS) and Java API for RESTful Web Services (JAX-RS):
- JAX-WS: This uses XML messages that follow the client-to-server communication that is done through messages the Simple Object Access Protocol (SOAP) standard. The SOAP message architecture and message formats are defined in XML. Each web service operation has a machine-readable description written in the Web Services Description Language (WSDL), which is an XML format for defining interfaces syntactically.
- JAX-RS: This provides the functionality for Representational State Transfer (RESTful) web services. REST is well suited for basic, ad hoc integration scenarios. RESTful web services are better integrated with HTTP than SOAP-based services. REST web services do not require XML messages or WSDL service-API definitions. JavaScript Object Notation (JSON) is typically the XML alternative of choice for all data transfer that is required in RESTful web services.
Visit the following URL for more details on JAX-WS and JAX-RS:
http://docs.oracle.com/javaee/6/tutorial/doc/gijti.html
In the following section, we'll explore the JAX-WS web services with Eclipse.
JAX-WS web services require a service description written in WSDL.
A WSDL document defines services as collections of network endpoints or ports. In WSDL, the abstract definition of endpoints and messages is separated from their concrete network deployment or data format bindings. This allows the reuse of abstract definitions: messages, which are abstract descriptions of the data being exchanged and port types, which are abstract collections of operations.
A WSDL document uses the following elements in the definition of network services:
- Types: This is a container for data type definitions (such as XSD or schemas).
- Message: This is an abstract, typed definition of the data being communicated.
- Operation: This is an abstract description of an action supported by the service.
- Port type: This is an abstract set of operations supported by one or more endpoints.
- Port: This is a single endpoint defined as a combination of a binding and a network address.
- Binding: This is a concrete protocol and data format specification for a particular port type. The binding is usually SOAP, and the encoding and data formatting regulations used (also known as the style) are usually literal (this includes document/literal, and sometimes RPC/literal).
- Service: This is a collection of related endpoints.
JAX-WS web services can be developed using two approaches:
- Top-down approach or contract-first web services: In this, Schema/XSD, WSDL, and message formats are defined; and then, using tools, the Java service skeletons are generated
- Bottom-up approach or contract-last web services: The Java services are developed first, then using tools/wizards, the WSDL and the web service are created from the Java classes
In this section, we'll follow the bottom-up approach.
To develop a web service in Eclipse, the following components should be installed on your machine:
- You need Apache Tomcat, and you can visit the Tomcat website for installation and setup instructions; the URL is http://tomcat.apache.org/.
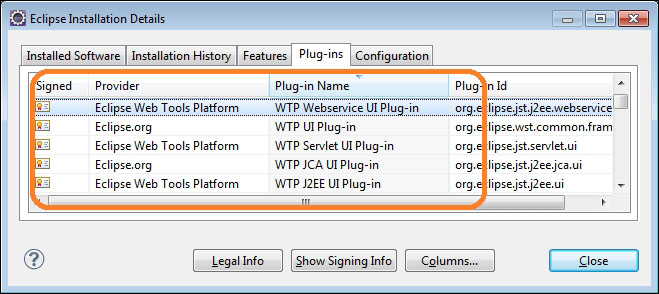
- Your Eclipse should have the web tool platform component installed. You can go to the About Eclipse menu and click on the Installation Details button for details on the WTP components, under the Plug-ins tab. The following is the screenshot of the installation details. For details on Eclipse, visit http://www.eclipse.org/webtools/.
The following are steps to create a web service with Apache Axis and Apache Tomcat:
- Create a dynamic web project in Eclipse and enter the project name as
DNACheckWS. - We'll create a DNA fingerprint service to verify a DNA sample with the existing database for a match. The DNA sample will hold a DNA profile of DNA elements, each element will have a genetic marker, such as
TH01, and correspondingallele Aandallele Bvalues such asTH01,8, and11. The DNA profile will be examined against the database, and if the exact match is found, the person's details will be sent back as a response. - Create a
ProfileElementclass in thecom.packt.webservice.jaxws.dtopackage, add three string attributesgeneticMarker,alleleA, andalleleB, and generate getters and setters for the three attributes. The following is the code for the class details:package com.packt.webservice.jaxws.dto; public class ProfileElement { private String geneticMarker; private String alleleA; private String alleleB; //The getters and setters are ignored for brevity }
- Create a
DNAProfileclass with an array ofProfileElements. The following is the code for the class details:package com.packt.webservice.jaxws.dto; public class DNAProfile { private ProfileElement[] dnaElements; //The getters and setters are ignored for brevity }
- Create an empty service
DNAFingerPrintServicefor matching a DNA profile with an existing set of DNAs; it just returns a fixed value here. The following are the details:package com.packt.webservice.jaxws.service; import com.packt.webservice.jaxws.dto.DNAProfile; public class DNAFingerPrintService { public String findMatch(DNAProfile dnaProfile){ return "sujoy"; } }
- We'll create a web service out of
DNAFingerPrintServicewith runtime Axis and Tomcat. Right-click on the project and select the Web Services menu, expand the menu, and select Create Web Service. The following screenshot displays the steps: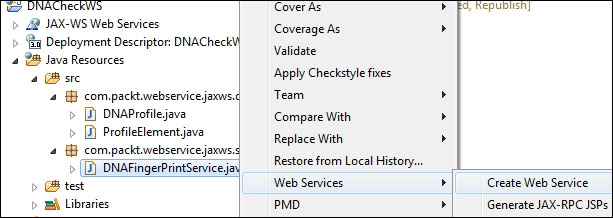
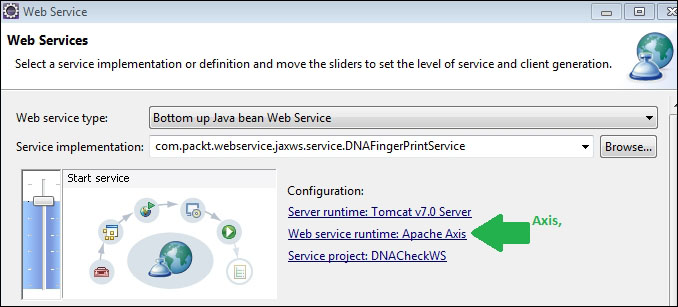
- A wizard will open; select the web service type as Bottom up Java bean Web Service and choose the server runtime as Tomcat and the web service runtime as Apache Axis. You can deploy the web service to IBM WebSphere or choose the web service runtime as Apache CFX, as shown in the following screenshot:
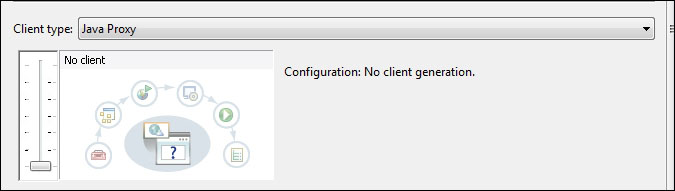
Do not generate the client; set the slider to No client:
- In the next section, select the
findMatchmethod, select the Style and use option as document/literal (wrapped), and hit the Next or Finish button: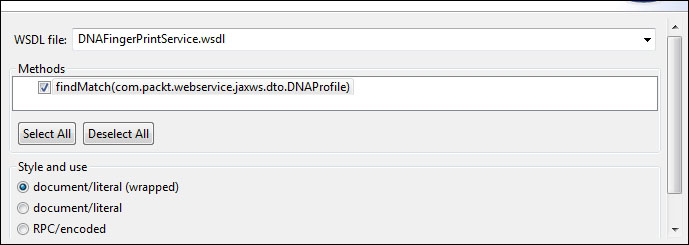
- You can see that the following files are newly generated. These are required for the server to run the web service and deploy the module into the web server container. The most important file created here is DNAFingerPrintService.wsdl:

- Click on DNAFingerPrintService.wsdl and open it in the Eclipse editor; check that the web service URL is defined as
http://localhost:8080/DNACheckWS/services/DNAFingerPrintService: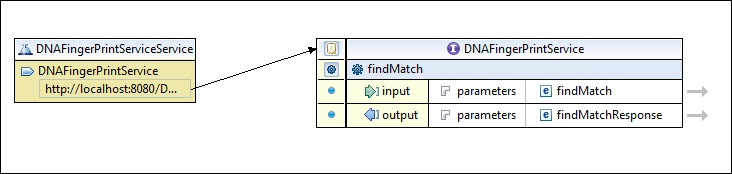
- Deploy the project in Tomcat, right-click on the project, and select Run on Server. Once the server is started, open a web browser and type the following URL to verify that the web service is deployed:
http://localhost:8080/DNACheckWS/services/DNAFingerPrintService?wsdlThe following is the WSDL output:

We're done with the web service server component; next we'll build the client component to invoke the web service:
- Create a Java project
DNAWsClient. - We'll generate the client stubs from the web service and, in turn, it will create the remote interface to call the business methods, namely, a server proxy class (the intermediate between the client and the server) and a service locator class (contains the details of the server). However, to generate the client stub, we need a
wsdlfile. Copy thewsdlfolder from theDNACheckWSproject'sWebContentfolder to theDNAWsClientproject'ssrcfolder, as shown in the following screenshot: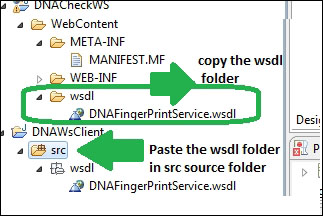
- Right-click on the
wsdlfile and select Web Services | Generate Client, as shown in the following screenshot: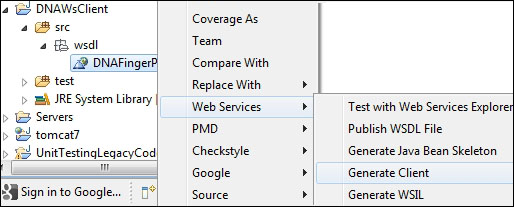
- The Eclipse plugin will generate the
dtoclasses and stubs. The following are the generated classes: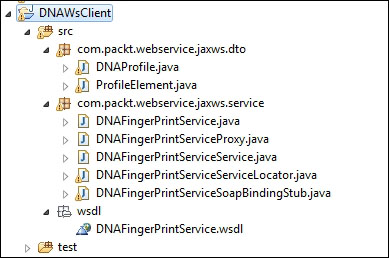
- Now create a client class named
DNAFingerPrintWsInvokerto invoke the web service. TheDNAFingerPrintServiceServiceLocatorclass is a facade class and it hides the underlying service invocation details. We'll create afindMatchmethod to invoke the web service and return the result. The following is the client code:package com.packt.webservice.jaxws.client; import java.rmi.RemoteException; import javax.xml.rpc.ServiceException; import com.packt.webservice.jaxws.dto.DNAProfile; import com.packt.webservice.jaxws.service.DNAFingerPrintServiceServiceLocator; public class DNAFingerPrintWsInvoker { public String findMatch(DNAProfile dnaProfile) throws RemoteException, ServiceException { DNAFingerPrintServiceServiceLocator locator = new DNAFingerPrintServiceServiceLocator(); return locator.getDNAFingerPrintService().findMatch(dnaProfile); } }
- Our client code is ready for testing, but to JUnit test the web service call, we need to refactor the code, as the
findMatchmethod instantiates theDNAFingerPrintServiceServiceLocatorclass and delegates call to the locator for accessing the web service. TheDNAFingerPrintServiceServiceLocatorclass makes a network call and, hence, it can be considered as a testing impediment. We need to bypass the instantiation of the testing impediments, to make our test reliable, with a mock object. Add Mockito and JUnit JAR files to the project's classpath and create a test classDNAFingerPrintWsInvokerTestunder thetestsource package. - Refactor the
DNAFingerPrintWsInvokerclass and extract a protected methodgetServiceLocator()to return a new instance of theDNAFingerPrintServiceServiceLocatorclass. Replace the newDNAFingerPrintServiceServiceLocator()call with thegetServiceLocator()call. The following code shows the modified class. Also, as a better alternative,DNAFinderPrintWsInvokercould take aDNAFingerPrintServiceServiceLocationcall as a constructor argument, which is to be provided by whoever uses it. The tests can then provide a stub to that constructor. This reduces coupling between the test and the class under the test's internals and ensures that we're actually definitely testing the code, which is as close as possible to what's going to be running in production:public class DNAFingerPrintWsInvoker { public String findMatch(DNAProfile dnaProfile) throws RemoteException, ServiceException { return getServiceLocator().getDNAFingerPrintService().findMatch(dnaProfile); } protected DNAFingerPrintServiceServiceLocator getServiceLocator() { return new DNAFingerPrintServiceServiceLocator(); } }
- Modify the test as follows:
@RunWith(MockitoJUnitRunner.class)
public class DNAFingerPrintWsInvokerTest {

  DNAFingerPrintWsInvoker invoker;
  @Mock DNAFingerPrintService mockService;
  @Mock DNAFingerPrintServiceServiceLocator mockLocator;

  @Before
  public void setup() throws ServiceException {
    invoker = new DNAFingerPrintWsInvoker(){
      protected DNAFingerPrintServiceServiceLocator getServiceLocator() {
        return mockLocator;
      }
    };

    when(mockLocator.getDNAFingerPrintService()).thenReturn(mockService);
  }

  @Test
  public void finds_DNA_match() throws Exception {
    when(mockService.findMatch(isA(DNAProfile.class))).thenReturn("Sherlock");
    assertEquals("Sherlock", invoker.findMatch(new DNAProfile()));
  }
}
We created a fake instance of the invoker to return a mock service locator class, stubbed the service locator to return a mock web service, and finally, from the JUnit test, we stubbed the mock service to return the name
Sherlockfor any DNA profile. - We are done with client-side JUnit testing; now its time to verify the integration. Rerun the web application and create a JUnit test to invoke the service. Create a source folder
slowtestand add the testDNAFingerPrintWsInvokerIntegrationTestunder thecom.packt.webservice.jaxws.clientpackage. The following is the integration test. Do you remember we hardcoded the web service to returnsujoy? Check theDNAFingerPrintServiceclass at step 5. You need to make sure that you still have the web service running at this stage, as we should not break the functionality for JUnit testing.public class DNAFingerPrintWsInvokerIntegrationTest { DNAFingerPrintWsInvoker invoker; @Before public void setup() throws ServiceException { invoker = new DNAFingerPrintWsInvoker(); } @Test public void finds_DNA_match() throws Exception { assertEquals("sujoy", invoker.findMatch(new DNAProfile())); } }
The following is the integration test output:

We are done with the testing and client validation. We can start writing JUnit for the server side; but the server-side code is not tied up with the web service APIs, so we can easily write the JUnit test for the server side, hence skipping the topic.
Representational State Transfer (REST) is an architectural style consisting of a coordinated set of architectural constraints applied to components, connectors, and data elements, within a distributed hypermedia system.
REpresentational State Transfer (REST) / RESTful web services are built to work best on the Web. REST is an architectural style that specifies constraints (such as the uniform interface) that, if applied to a web service, induces desirable properties, such as performance, scalability, and modifiability, which enable services to work best on the Web.
In REST, architectural data and functionality are considered resources and are accessed using Uniform Resource Identifiers (URIs) and hyperlinks on the Web. The REST architectural style has a constraint to have a stateless HTTP communication protocol in a client/server architecture. In the REST architectural style, clients and servers exchange representations of resources by using a standardized interface and protocol.
Basically, RESTful web services consist of the following components:
- Resource URLs: A resource URL represents a resource. Basically, a noun is used to represent a resource, for example, a collection of resources can be represented as http://my.colleage.com/students/ and a specific resource can be represented as http://my.colleage.com/students/101.
- Operations/HTTP headers: RESTful web services use the following HTTP headers:
POST: This signifies aCREATEoperation or a new resource creation. For example, an HTTP POST operation on the http://my.colleage.com/students URL with the following data will create a student with the roll number102:{ "roleNumber": "102", "name": "Bob Biswas", "class" : "XII", "email" : "[email protected]" }
GET: This implies aREADoperation. For example, an HTTP GET operation on the http://my.colleage.com/students URL will return the following data:{ students =[ { "roleNumber": "101", "name": "Leo Anthony", "class" : "X", "email" : "[email protected]" }, { "roleNumber": "102", "name": "Bob Biswas", "class" : "XII", "email" : "[email protected]" }, }
PUT: This stands for theMODIFY/UPDATEoperation. For example, an HTTP PUT operation that can help us to update the e-mail ID of the student whose roll number is101.DELETE: This represents aDELETEoperation. For example, an HTTP DELETE operation on the http://my.colleage.com/students/101 URL will delete the student whose roll number is101.
- Media types: Hypermedia as the Engine of Application State (HATEOAS) is a constraint of the REST application architecture. A hypermedia-driven site provides information to navigate the site's REST interfaces dynamically by including hypermedia links with the responses. The responses of a RESTful web service are media types such as JSON or XML.
- HTTP status codes: Every RESTful web service call returns a status code. The status codes given in the following table are very useful:
Status code
Description
200
OK
201
Created
202
Accepted
203
Non-authoritative Information
204
No Content
205
Reset Content
300
Multiple Choices
304
Not Modified
400
Bad Request
401
Unauthorized
403
Forbidden
404
Not Found
405
Method Not Allowed
408
Request Timeout
409
Conflict
500
Internal Server Error
501
Not Implemented
For RESTful web service details, visit the following URL:http://docs.oracle.com/javaee/6/tutorial/doc/gijqy.html
Spring MVC was built to provide a flexible framework for web application developers. Spring's DispatcherServlet class acts as a front controller; it receives all the incoming requests and delegates the processing of the requests to handlers. It allows developers to concentrate on business logic rather than work on the boilerplate of a custom front controller. This section describes the Spring MVC architecture and how RESTful web applications can be unit tested using Spring MVC.
In Spring MVC, the following is a pattern of a simplified request handling mechanism:
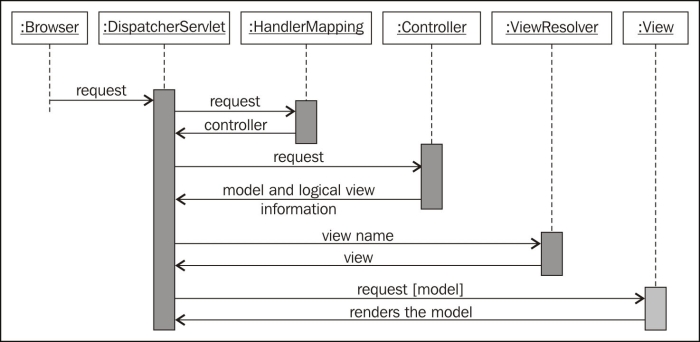
DispatcherServletreceives a request, confers with handler mappings to find out which controller can handle the request, and then passes the request to the selected controller.- The selected controller performs the business logic (can delegate the request to a service or business logic processor) and returns some information back to
DispatcherServletfor user display or response. Instead of sending the information (model) directly to the user, the controller returns a view name that can render the model. DispatcherServletthen resolves the physical view from the view name and passes the model object to the view. This way,DispatcherServletis decoupled from the view implementation. The view renders the model. A view could be a JSP page, a servlet, a PDF file, an Excel report, or any presentable component.The following sequence diagram represents the flow and interaction of the Spring MVC components:
For a RESTful web service, instead of forwarding the model and the view object or the logical view name from controller, we can directly return response data from the controller using Spring's @ResponseBody annotation.
We'll build a Spring RESTful web service and unit test the code using JUnit. The following are the steps to be performed:
- Launch Eclipse and create a dynamic web project named
RESTfulStudentWS. - Open
web.xmland enter the following lines:<display-name>RESTfulStudentWS</display-name> <servlet> <servlet-name>rest</servlet-name> <servlet-class> org.springframework.web.servlet.DispatcherServlet </servlet-class> <load-on-startup>1</load-on-startup> </servlet> <servlet-mapping> <servlet-name>rest</servlet-name> <url-pattern>/</url-pattern> </servlet-mapping> <context-param> <param-name>contextConfigLocation</param-name> <param-value> /WEB-INF/rest-servlet.xml </param-value> </context-param> </web-app>The dispatcher is named
rest, and it maps all requests. Note thecontextConfigLocationparameter; it indicates that the Spring beans are defined in/WEB-INF/rest-servlet.xml. - Create an XML file named
rest-servlet.xmlinWEB-INFand add the following lines:<?xml version="1.0"encoding="UTF-8"?> <beans xmlns="http://www.springframework.org/schema/beans" xmlns:context="http://www.springframework.org/schema/context" xmlns:xsi="http://www.w3.org/2001/XMLSchema-instance" xsi:schemaLocation="http://www.springframework.org/schema/beans http://www.springframework.org/schema/beans/spring-beans-3.0.xsd http://www.springframework.org/schema/context http://www.springframework.org/schema/context/spring-context-3.0.xsd"> <context:component-scan base-package="com.packt.restful.controller" /> <bean class= "org.springframework.web.servlet.view.InternalResourceViewResolver"> "" <mvc:annotation-driven /> </beans>The preceding XML code instructs the Spring configuration that all beans are configured under the
com.packt.restful.controllerpackage with the Spring annotations. - Copy the following Spring JAR files from the Spring download site and put them under the
/WEB-INF/libfolder:
- Create a Java class
com.packt.restful.model.Studentand add the following members and getters/setters in it:private String roleNumber; private String name; private String className; private String emailId;
- Create a data access class
StudentDaoto mimic the JDBC data access. We'll set up a map of students to bypass the real database interaction. Add the following lines to theStudentDaoclass. Note that theretrieveAllandretrieve(roleId)methods are public methods for retrieving all the students and a specific student respectively.@Component public class StudentDao { private Map<String, Student> database = new HashMap<String, Student>(); public StudentDao(){ load(); } public Collection<Student> retrieveAll() { return database.values(); } public Student retrieve(String roleId) { return database.get(roleId); } private void load() { Student student = new Student(); student.setClassName("X"); student.setEmailId("[email protected]"); student.setName("Sujoy Acharya"); student.setRoleNumber("100"); database.put(student.getRoleNumber(), student); student = new Student(); student.setClassName("XII"); student.setEmailId("[email protected]"); student.setName("Leo Anthony"); student.setRoleNumber("101"); database.put(student.getRoleNumber(), student); student = new Student(); student.setClassName("XII"); student.setEmailId("[email protected]"); student.setName("John Paul"); student.setRoleNumber("7"); database.put(student.getRoleNumber(), student); student = new Student(); student.setClassName("XII"); student.setEmailId("[email protected]"); student.setName("Subodh Chavan"); student.setRoleNumber("3"); database.put(student.getRoleNumber(), student); } }
- Create a controller class for exposing the student's data as a RESTful service. Create a
StudentControllerclass and annotate the class with@Controllerto notify the Spring framework that the class is a Spring controller class. Also annotate the class with@RequestMapping("/college")to map requests for"/college"toStudentController. The following is the class:@Controlle @RequestMapping("/college") public class StudentController { @Autowired StudentDao studentDao; @RequestMapping(value = "/students/{roleNumber}", method = RequestMethod.GET) public @ResponseBody Student retrieve(@PathVariable String roleNumber) { return studentDao.retrieve(roleNumber); } @RequestMapping(value = "/students/", method = RequestMethod.GET) public @ResponseBody List<Student> retrieveAll() { return new ArrayList<Student>(studentDao.retrieveAll()); } }
Note that the methods are annotated with
@RequestMapping; this annotation maps a URL to a method. An HTTP GET request with the/college/students/nURL (wherenis a roll number) will be handled by theretrieve()method. We can change the method type to POST in order to handle HTTP POST requests; the default method type is GET.In MVC, controller methods return a model and a view object or a logical view name, but when we annotate a method with
@ResponseBody, it implies that the response will be sent back directly to the caller instead of getting processed by a view. - Start the web application in Tomcat and type the URL
http://localhost:8080/RESTfulStudentWS/college/students/. Please change the server name and port as per your Tomcat settings. You will get a JSON response back for all the students; the following is the output:
- Now pass a roll number to the URL to get a student's details. The following is the output when we pass
7as the roll number:
- When we pass a roll number that doesn't exist, it returns
null. The following URL passes the number1000and gets the following output:
In real life application, the StudentDao class will be replaced by a real database access class. The real DAO class makes unit testing the controller difficult. Separating the data access layer from the business logic layer helps us change the database without affecting the business logic layer and allows us to unit test the business logic layer in isolation from the database. Suppose you are using the MySQL database and you want to migrate to SQLServer, then you don't have to touch the business logic layer. We'll use Mockito to isolate the DAO layer from the service layer; the following are the steps to be performed:
- Create a test class
StudentControllerTestunder the source foldertestand addmockito-all-1.9.5.jarto thelibfolder underWEB-INF. The controller class calls thestudentDaoclass and Spring autowires the DAO layer to the controller class. We need to modify the controller class to pass as a setter from the JUnit tests. The following is the modified controller class (other methods are skipped for brevity):@Controller @RequestMapping("/college") public class StudentController { @Autowired private StudentDao studentDao; public void setStudentDao(StudentDao studentDao) { this.studentDao = studentDao; } }
- In the test, create a mock instance of the DAO class and pass it on to the controller as a setter injection. The following is the test:
@RunWith(MockitoJUnitRunner.class)
public class StudentControllerTest {
  @Mock
  StudentDao studentDao;

  @InjectMocks
  StudentController controller;
}
The
@RunWith(MockitoJUnitRunner.class)annotation allows us to use the@Mockannotation to automatically mock the objects. The@InjectMocksannotation injects the mock objects as a setter, constructor, or property injection. - Now, stub the
retrieveAllmethod of the DAO class to return the students. The following is the modified test:@RunWith(MockitoJUnitRunner.class) public class StudentControllerTest { @Mock StudentDao studentDao; @InjectMocks StudentController controller; @Before public void setUp(){ Student student = new Student(); student.setClassName("X"); student.setEmailId("[email protected]"); student.setName("sujoy"); student.setRoleNumber("7"); Collection<Student> studentColl = new ArrayList<Student>(); studentColl.add(student); when(studentDao.retrieveAll()).thenReturn(studentColl); } @Test public void retrieves_students() throws Exception { List<Student> retrieveAll = controller.retrieveAll(); assertFalse(retrieveAll.isEmpty()); } }
- Similarly, add more tests to verify that a specific student's details are retrieved when the roll number matches what is passed, and, also,
nullis returned when the roll number doesn't match. The following is the test:@Test public void retieves_a_student() throws Exception { when(studentDao.retrieve(eq("100"))).thenReturn(new Student()); assertNotNull(controller.retrieve("100")); } @Test public void when_invalid_role_number_returns_null(){ assertNull(controller.retrieve("100")); }