
We'll develop an application in Eclipse. Visit the following URL to download the Google Plugin for Eclipse:
https://developers.google.com/eclipse/docs/download
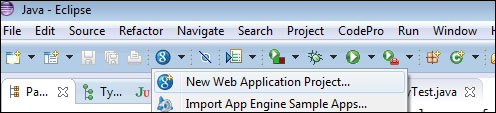
Install the plugin and create a new web application. The following screenshot shows this:
A new application wizard will appear on the screen. To create a new web application, perform the following steps:
- Enter the project name as
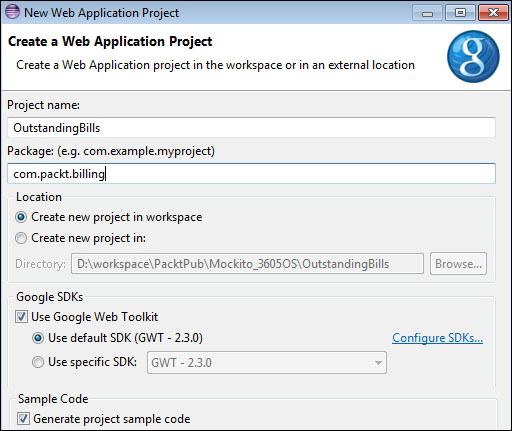
OutstandingBillsand the package name ascom.packt.billing. - Check the Google SDKs checkbox and select the default SDK radio button.
- If you have downloaded a separate GWT binary, provide the path and configure the SDK. Also, check the Generate project sample code checkbox; it will create the necessary files we need to develop a GWT application. We'll change the filenames as required.
The following screenshot displays the settings:
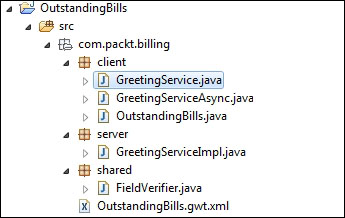
The preceding steps will generate the following project structure:
- Open the
OutstandingBill.gwt.xmlfile; this file contains the project metadata, for example, the<entry-point>classname. TheEntryPointis the starting point in GWT applications. - Open the
com.packt.billing.client.OutstandingBillsentry-point class. It implements theEntryPointinterface and overrides theonModuleLoad()method. This method is invoked during a GWT application loading.GWT applications make asynchronous calls to the server and process responses with service callbacks. When the server response comes back, a callback processes the response. All callbacks implement the
AsyncCallbackinterface and theonSuccess()andonFailure()methods. TheonFailuremethod is called when the server encounters any error and throws an exception or error. TheonFailuremethod can take care of the server failure, for example, it can show a proper error message to the user. TheonSuccessmethod is called when the server returns a response and no error occurs on the server side. - Check that Eclipse has generated two interfaces,
GreetingServiceandGreetingServiceAsync, for service invocation. Conventionally, the<ServiceName>Serviceinterface defines the service methods and extends theRemoteServiceinterface as follows:@RemoteServiceRelativePath("greet") public interface GreetingService extends RemoteService { String greetServer(String name) throws IllegalArgumentException; }A server-side class implements the interface.
The other
<ServiceName>ServiceAsyncinterface redefines the method, but all methods become void; yet they all take an additional parameter calledAsyncCallback:public interface GreetingServiceAsync { void greetServer(String input, AsyncCallback<String> callback) throws IllegalArgumentException; }
Note that
greetServer()is a void method and it takes an additional parameter'sAsyncCallback<String>callback. If a service method returnsArrayList<Integer>, the callback will look likeAsyncCallback<ArrayList<Integer>>. We would rather define the service interface and the async interface relation as follows:@RemoteServiceRelativePath("name") public interface SomeService extends RemoteService { T someMethod(String name) throws E; }In the preceding code,
Tis any Java type, such as object, integer, or string, andEis any exception, such asIllegalStateException.The async interface will look like the following code snippet:
public interface SomeServiceAsync {
  void someMethod (String input, AsyncCallback<T> callback) throws E;
}
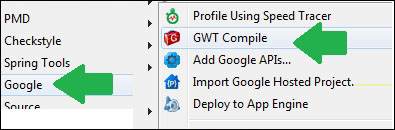
- The GWT compiler translates the Java code to JavaScript. Select the project and click on the red-colored GWT Compile icon from the toolbar, or you can right-click on the project and then select Google from the pop-up menu and click on the GWT Compile menu item, as shown in the following screenshot:
The preceding step will compile the code and generate JavaScript under the
warfolder; the following screenshot displays the location: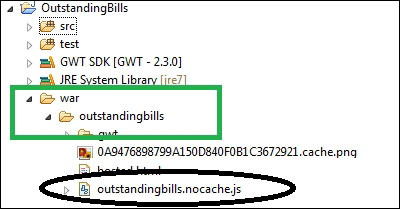
Note that the compilation has generated a JavaScript file called
outstandingbills.nocache.js. This JavaScript file is responsible for rendering the application. From the HTML or JSP file, you need to provide the path of the script file, as shown in the following line of code:<script type="text/javascript" language="javascript" src="outstandingbills/outstandingbills.nocache.js"></script>
We'll now build an application to handle outstanding hotel bills. The user interface will display a textbox and a Query Bill button. The user will enter a room number and then hit the button to query the current outstanding bill. A pop up will be displayed with the bill details and payment options. The following are the steps to build the application:
- Create a serializable class
Billin thecom.packt.billing.clientpackage, and add the following members and getters/setters:private String details; private BigDecimal payable;
- Create a service interface to retrieve the outstanding bills and make the payment. Create a
BillingServiceinterface in thecom.packt.billing.clientpackage with the following details:@RemoteServiceRelativePath("bill") public interface BillingService extends RemoteService { public Bill retrieve(String roomNumber); public boolean pay(String roomNumber, BigDecimal amount); } - Create an async interface with the following information:
public interface BillingServiceAsync {
  public void retrieve(String roomNumber, AsyncCallback<Bill> callback);
  public void pay(String roomNumber, BigDecimal amount, AsyncCallback<Boolean> callback);
}
- Create a service implementation class
com.packt.billing.server.BillingServiceImpl, implementingBillingService:@SuppressWarnings("serial") public class BillingServiceImpl extends RemoteServiceServlet implements BillingService { @Override public Bill retrieve(String rommNumber) { // TODO Auto-generated method stub return null; } @Override public boolean pay(String roomNumber, BigDecimal amount) { // TODO Auto-generated method stub return false; } }Usually, two separate projects should be created for the GWT service and service implementation, namely, a contract project with service and async interfaces, and an implementation project that implements the service interface. Both the projects should be deployed in the web/application server.
- Modify the
web.xmlfile under thewarfolder and add the following entries to define theBillingServiceImplservlet and to map the URL toBillingServiceImpl. All HTTP requests with the/outstandingbills/billURL pattern will be mapped to theBillingServiceImplservlet:<servlet> <servlet-name>billingServlet</servlet-name> <servlet-class> com.packt.billing.server.BillingServiceImpl </servlet-class> </servlet> <servlet-mapping> <servlet-name>billingServlet</servlet-name> <url-pattern>/outstandingbills/bill</url-pattern> </servlet-mapping>
- Open the
OutstandingBillsclass and replace allGreetingServicereferences withBillingService; remove everything from theonModuleLoad()method. The following is the modified class:public class OutstandingBills implements EntryPoint { private final BillingServiceAsync service = GWT .create(BillingService.class); /*** This is the entry point method. ***/ @Override public void onModuleLoad() { } }
Did you notice the service definition? The
BillingServiceAsyncinterface is created withGWT.create(BillingService.class). Basically, a remote service proxy is created to talk to the server-sideBillingServiceImplclass. TheBillingServiceinterface is annotated with@RemoteServiceRelativePath("bill"). Any service call will have the/billtoken in the URL. We will set upweb.xmlto map/billto theBillingServiceImplservlet. - Now modify the
BillingServiceImplclass to have some hardcoded room numbers and bills. In constructor, populate a HashMap with room numbers and payable bill amounts. We'll use room numbers from1to5000and generate random payable amounts. Theretrievemethod will look up the HashMap for the outstanding payable and thepaymethod will deduct the amount from the HashMap. The following is the modified class:public class BillingServiceImpl extends RemoteServiceServlet implements BillingService { private Map<String, BigDecimal> billMap = new HashMap<String, BigDecimal>(); public BillingServiceImpl() { Random random = new Random(); for (int i = 1; i < 5000; i++) { billMap.put(String.valueOf(i),new BigDecimal(random.nextInt(1000000))); } } @Override public Bill retrieve(String roomNumber) { BigDecimal payable = billMap.get(roomNumber); Bill bill = new Bill(); if (payable != null) { bill.setDetails("Accomodation charge for room#" + roomNumber + " and payable amount="+ payable.doubleValue()); } bill.setPayable(payable); return bill; } @Override public boolean pay(String roomNumber, BigDecimal amount) { BigDecimal payable = billMap.get(roomNumber); if(payable != null){ payable = payable.subtract(amount); billMap.put(roomNumber, payable); return true; } return false; } }
We will have two views—the initial query view with the room number textbox and query button, and the bill details view with bill details, payment textbox, and the make payment button; we'll call them
QueryViewandDetailsView, respectively.We've already talked about the view interfaces in the MVP section. We'll create two view interfaces with abstract DOM elements, such as
HasClickHandlersorHasValue, to representQueryViewandDetailsViewin thecom.packt.billing.client.viewpackage. - We need the room number when the Query button is pressed. So we'll add a method to the view to get the room number value. We need to intercept the button click, so we'll add a method to the view to get a clickable object, so that we can add a handler to the object to intercept the button click. The view should not add any handlers to any DOM object. Rather, it should provide the handle to the presenter to handle the logic. The following is the
QueryViewbody:public interface QueryView { Widget asWidget(); HasClickHandlers getQueryButton(); HasValue<String> getRoomNumber(); }The
asWidget()method returns a widget. We'll add the widget to the container. ThegetQueryButton()method represents the Query button and thegetRoomNumber()represents the value entered in the room number textbox. Now we need the actual view implementation. - Create a
QueryViewImplclass in thecom.packt.billing.client.viewpackage, implementing theQueryViewinterface and extending theCompositeclass:A
Compositeclass is a type of a widget that can wrap another widget, hiding the wrapped widget's methods. When added to a panel, aCompositeclass behaves exactly as it should if the widget it wraps had been added. TheCompositeclass is useful for creating a single widget out of an aggregate of multiple other widgets contained in a single panel.We'll use the
Label,TextBox,Button,FlexTable, andHorizontalPanelGWT widgets to represent the view. TheLabel,TextBox, andButtonGWT widgets will be added toFlexTable. Flexible table creates cells on demand. It can be jagged (that is, each row can contain a different number of cells), and individual cells can be set to span multiple rows or columns. TheFlexTablewidget will be added to theHorizontalPanelwidget. The following is the implementation. The beauty of having a view interface is that you can change the view implementation without altering the code in the presenter. You can use aTextboxorPasswordTextBoxwidget to representHasValue; the presenter won't know about the actual implementation. This is how the view is abstracted from the presenter or rather, the view is loosely coupled from the business logic/presenter:public class QueryViewImpl extends Composite implements QueryView { private HorizontalPanel mainPanel; private TextBox roomNumber= new TextBox(); private Button query = new Button("Query"); public QueryViewImpl(){ mainPanel = new HorizontalPanel(); mainPanel.setWidth("100%"); mainPanel.setHorizontalAlignment(HasHorizontalAlignment .ALIGN_LEFT); FlexTable mainTable = new FlexTable(); mainTable.setWidth("100%"); mainTable.setWidget(0, 0, new Label("Room#")); mainTable.setWidget(0, 1, roomNumber ); mainTable.setWidget(0, 2, query ); mainTable.getCellFormatter().setWidth(0, 0, "5%"); mainTable.getCellFormatter().setWidth(0, 1, "10%"); mainPanel.add(mainTable); initWidget(mainPanel); } @Override public Widget asWidget() { return this; } @Override public HasClickHandlers getQueryButton() { return query; } @Override public HasValue<String> getRoomNumber() { return roomNumber; } }
We'll define the view interface and implementation of
DetailsViewin the next section when the application is up and running withQueryView. - Similarly, we need two presenters to present the views. We'll define a
Presenterinterface in thepresenterpackage with following details:public interface Presenter { void render(final HasWidgets container); }HasWidgetsrepresents a DOM element on the HTML page, such as a<div>element. GWT renders UI components in that DOM container; we'll refer to it ascontainer. TheQueryPresenterwill present the initial view and implement thePresenterinterface. We need to pass a view interface to the presenter, so we'll pass aQueryViewinstance to theQueryPresenter. The following is the presenter:public class QueryPresenter implements Presenter { private final QueryView queryView; bv public QueryPresenter(QueryView queryView) { this.queryView = queryView; } @Override public void render(HasWidgets container) { container.clear(); container.add(queryView.asWidget()); } }
In the next section, we'll create the
DetailsPresenterto represent theDetailsView. - In a browser, we hit the back button to go back to the previous page. In GWT, there is no previous page, as a single HTML/JSP page displays many views. So to go back or forward to the previous or next view so that we can browse the history. The
com.google.gwt.user.client.Historyclass represents the browser history. This class allows you to interact with the browser's history stack. Each item on the stack is represented by a single string referred to as a token. You can create new history items (which have a token associated with them when they are created), and you can programmatically force the current history to move backward or forward.History token change is handled by implementing the
ValueChangeHandler<T>interface:public interface ValueChangeHandler<T> extends EventHandler { void onValueChange(ValueChangeEvent<T> event); }
When a history token is changed, the
ValueChangeHandlerinterface is notified. However, before that, the handler needs to be registered toHistoryusing the following syntax:History.addValueChangeHandler(this);
- We'll create an
ApplicationControllerclass. This class will implement thePresenterinterface and provide the concrete implementation of therender()method. Also, the class will implement theValueChangeHandlerinterface and register itself toHistoryto interact with the history. Therendermethod will put a new tokenSTARTto theHistorystack to start the view transition. TheonValueChange(ValueChangeEvent event)method will be invoked onHistoryvalue change; this method will check the token valueSTARTand create a newPresenterinterface to display the initial view. The following is theApplicationControllerclass:public class ApplicationController implements Presenter, ValueChangeHandler<String>{ private static final String BLANK = ""; private static final String START = "START"; private HasWidgets container; public ApplicationController(){ History.addValueChangeHandler(this); } }
The
render()method stores thecontainerand checks theHistorytoken. If the application is invoked the first time, theHistorystack will contain a blank string, and then therender()method will add a new token item "START"to theHistorystack. Otherwise, when you hit refresh, the current state of theHistorystack is fired so that the same view is rerendered. That way, a user doesn't lose any data. When a new item is pushed or a current history item is fired, the history value changes and then theonValueChangemethod is invoked:@Override public void render(HasWidgets container) { this.container = container; if (BLANK.equals(History.getToken())) { History.newItem(START); } else { History.fireCurrentHistoryState(); } }
The
onValueChangemethod checks the history token. If the token is"START", it creates theQueryViewImplview, instantiates theQueryPresenter, and finally, calls thepresenter.render()method to display the view. For multiple views, the history token value will be changed, and depending upon the token value, the appropriate presenter will be instantiated and finally, therender()method will be invoked on the presenter:@Override public void onValueChange(ValueChangeEvent<String> event) { String token = event.getValue(); container.clear(); Presenter presenter = null; if (START.equals(token)) { presenter = new QueryPresenter(new QueryViewImpl()); } if (presenter != null) { presenter.render(container); } }
- Modify the
onModuleLoad()method of theOutstandingBillsEntryPoint class to create an instance ofApplicationControllerand invoke therendermethod with a DOM ID. The following is the modified method:@Override public void onModuleLoad() { Presenter presenter = new ApplicationController(); presenter.render(RootPanel.get("dom")); }
- Modify the
OutstandingBills.htmlfile to add adivwithid="dom":<html> <head> <meta http-equiv="content-type" content="text/html; charset=UTF-8"> <link type="text/css" rel="stylesheet" href="OutstandingBills.css"> <script type="text/javascript" language="javascript" src="outstandingbills/outstandingbills.nocache.js"/> </head> <body> <iframe src="javascript:''" id="__gwt_historyFrame" tabIndex='-1'style="position:absolute;width:0;height:0;border:0"> </iframe> <h1>Web Application Starter Project</h1> <div id="dom"></div> </body> </html>Note that the
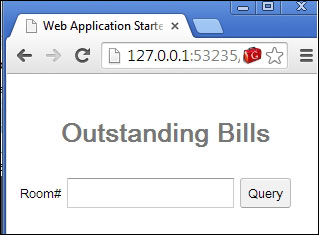
<script>tag loads the GWT script and the<iframe>tag enables the history mechanism. If this entry is missing, the history token management will not work and the MVP pattern's purpose will be violated. - Right-click on the project and run it as GWT web application, then copy the URL and paste it to a web browser. The following output will be displayed:
- Now we have the application configured. The next step is to build the
DetailsViewinterface and enable the view transition. We'll start with the new view. Create an interfaceDetailsViewand add the following lines:public interface DetailsView { Widget asWidget(); HasClickHandlers getPaymentButton(); HasClickHandlers getCloseButton(); HasValue<String> getPaymentAmount(); void populate(Bill bill); }The
populate()method is used to populate the bill details to the UI, thegetCloseButton()method is used to get hold of the close button, thegetPaymentButton()method is for the payment button, thegetPaymentAmount()method is for the payment textbox, and theasWidgetmethod is used to return the composite. - Create the
DetailsViewImplclass for displaying thedetailsview. The following is the code:public class DetailsViewImpl extends Composite implements DetailsView { private VerticalPanel mainPanel; private TextBox amount = new TextBox(); private Button payment = new Button("Pay"); private Button close = new Button("Close"); private Label desc = new Label(); private Label dueAmt = new Label(); public DetailsViewImpl() { mainPanel = new VerticalPanel(); mainPanel.setWidth("100%"); FlexTable mainTable = new FlexTable(); mainTable.setWidth("100%"); mainTable.setWidget(0,0, new Label("Desc#")); mainTable.setWidget(0,1, desc); mainTable.setWidget(1,0, new Label("Due#")); mainTable.setWidget(1,1, dueAmt); mainTable.setWidget(2,0,new Label("Pay amount#")); mainTable.setWidget(2,1, amount); mainTable.setWidget(3,0, payment); mainTable.setWidget(3,1, close); mainTable.getCellFormatter().setWidth(0,0, "5%"); mainTable.getCellFormatter().setWidth(0,1, "60%"); mainTable.getCellFormatter().setWidth(1,0, "5%"); mainTable.getCellFormatter().setWidth(1,1, "60%"); mainTable.getCellFormatter().setWidth(2,0, "5%"); mainTable.getCellFormatter().setWidth(2,1, "60%"); mainTable.getCellFormatter().setWidth(3,0, "25%"); mainTable.getCellFormatter().setWidth(3,1, "60%"); mainTable.getCellFormatter().setAlignment(3, 0, HasHorizontalAlignment.ALIGN_RIGHT, HasVerticalAlignment.ALIGN_MIDDLE); mainTable.getCellFormatter().setAlignment(3, 1, HasHorizontalAlignment.ALIGN_LEFT, HasVerticalAlignment.ALIGN_MIDDLE); mainPanel.add(mainTable); initWidget(mainPanel); } @Override public Widget asWidget() { return this; } @Override public HasClickHandlers getPaymentButton() { return payment; } @Override public HasValue<String> getPaymentAmount() { return amount; } @Override public void populate(Bill bill) { desc.setText(bill.getDetails()); dueAmt.setText(""+bill.getPayable().doubleValue()); } @Override public HasClickHandlers getCloseButton() { return close; } }
GWT fires
GwtEventsto indicate the completion of the task. The class,com.google.gwt.event.shared.GwtEvent, represents the event. This is the root of all GWT events. The user can create custom events to notify if a view change is required (to interact with other views).An event is always defined with an event handler such as the following:
public class SearchEvent extends GwtEvent<SearchEventHandler> {
}
Every event comes up with an event handling contract. This contract is known as an event handler.
Event handlers extend a marker interface
com.google.gwt.event.shared.EventHandler.The following is an example of an event handler contract:
public interface SearchEventHandler extends EventHandler {
  void onSearch(SearchEvent event);
}
Events are fired to an event bus class:
com.google.gwt.event.shared.HandlerManager.HandlerManager(also known asevent bus) is responsible for adding handlers to event sources and associating those handlers to pass in events.The following code snippet is an example of firing events:
eventBus.fireEvent(new SearchEvent(getSearchText()));The following is an example of event handling:
eventBus.addHandler(SearchEvent.TYPE, new SearchEventHandler() { public void onSearch(SearchEvent event) { doSearch(event.getRoomNumber()); } });Our
QueryViewneeds to notify the view change when the user hits the Query button. We'll create a GWT event calledSearchEventand aSearchEventHandler:public class SearchEvent extends GwtEvent<SearchEventHandler> { private String roomNumber; public static Type<SearchEventHandler> TYPE = new Type<SearchEventHandler>(); @Override public com.google.gwt.event.shared.GwtEvent.Type<SearchEventHandler> getAssociatedType() { return TYPE; } @Override protected void dispatch(SearchEventHandler handler) { handler.onSearch(this); } public String getRoomNumber() { return roomNumber; } public void setRoomNumber(String roomNumber) { this.roomNumber = roomNumber; } }
The event handler will look like this:
public interface SearchEventHandler extends EventHandler {
  void onSearch(SearchEvent event);
}
- We'll modify the
QueryPresenterto fire theSearchEventwith theroomNumberwhen the user hits the Query button. To fire the event, the presenter needs an event bus. Modify the constructor to pass aHandlerManagerinstance. The following is the modified constructor:public QueryPresenter(QueryView view,HandlerManager bus) { this.queryView = view; this.eventBus = bus; queryView.getQueryButton().addClickHandler(new ClickHandler() { @Override public void onClick(ClickEvent event) { SearchEvent searchEvent = new SearchEvent(); searchEvent.setRoomNumber(queryView.getRoomNumber().getValue()); eventBus.fireEvent(searchEvent); } }); }
- Modify the
ApplicationControllerto create aHandlerManagerinstance and pass it to the modified presenter. The following are the modified constructor and class level members forroomNumberandHandlerManager:private HandlerManager eventBus; private String roomNumber; public ApplicationController(){ History.addValueChangeHandler(this); this.eventBus = new HandlerManager(this); eventBus.addHandler(SearchEvent.TYPE, new SearchEventHandler() { @Override public void onSearch(SearchEvent event) { roomNumber = event.getRoomNumber(); History.newItem(SEARCH); } }); }
- Create a
DetailsPresenterto handle the view. The presenter needs to make a service call to check the bill, so we need to pass theBillingServiceAsyncinstance to the presenter, and we also need to pass theroomNumberstring for which the view will be rendered. The following is the presenter:public class DetailsPresenter implements Presenter { private final DetailsView detailsView; private final BillingServiceAsync billingService; private final String roomNumber; public DetailsPresenter(BillingServiceAsync billingService, DetailsView detailsView, String roomNumber) { this.detailsView = detailsView; this.billingService = billingService; this.roomNumber = roomNumber; } @Override public void render(final HasWidgets container) { container.clear(); container.add(detailsView.asWidget()); billingService.retrieve(roomNumber, new AsyncCallback<Bill>(){ @Override public void onSuccess(Bill bill) { detailsView.populate(bill); } @Override public void onFailure(Throwable caught) { Window.alert("Error occured "+caught); } }); } }
The
render()method makes a service call to get the bill information and then passes that information to the view by making a call to thepopulate()method. - Modify the
ApplicationControllerto intercept the history value change for theSearchtoken. Modify the constructor to inject theBillingServiceinterface:public ApplicationController(BillingServiceAsync billingService){ this.billingServiceAsync = billingService; }
Modify the
onValueChange()method to handle theSearchhistory token class.@Override public void onValueChange(ValueChangeEvent<String> event) { String token = event.getValue(); container.clear(); Presenter presenter = null; if (START.equals(token)) { presenter = new QueryPresenter(new QueryViewImpl(), eventBus); } if(SEARCH.equals(token)){ presenter = new DetailsPresenter(billingServiceAsync, new DetailsViewImpl(), roomNumber); } if (presenter != null) { presenter.render(container); } }
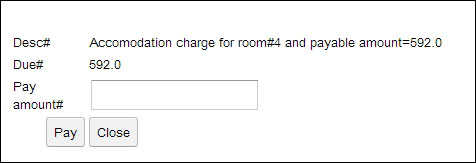
The following will be the output of the new changes:
- Modify the
DetailsPresenterinterface to handle the Pay and Close button click. On the Pay button click, we'll make a service call, display the message, and close the view. On the Close button click, we'll put aSTARTitem to the history to go back to the initial state. The following is the modified constructor:public DetailsPresenter(BillingServiceAsync service, DetailsView view, String rn) { this.detailsView = view; this.billingService = service; this.roomNumber = rn; detailsView.getCloseButton().addClickHandler(new ClickHandler() { @Override public void onClick(ClickEvent event) { History.newItem("START"); } }); detailsView.getPaymentButton().addClickHandler(new ClickHandler() { @Override public void onClick(ClickEvent event) { String amount = detailsView.getPaymentAmount().getValue(); billingService.pay(roomNumber, new BigDecimal(amount), new AsyncCallback<Boolean>() { @Override public void onFailure(Throwable caught) { Window.alert("Error "+caught); } @Override public void onSuccess(Boolean result) { if(result){ Window.alert("Posted payment"); History.newItem("START"); }else{ Window.alert("Could not post payment"); } } }); } }); }
We are done with MVP. We should add the validation logic for user entry fields for blank or invalid input. For instance, an error message should be displayed when the room number textbox is blank but a user hits the Query button, or when the payment amount textbox is blank and a user hits the Pay button.