Even though they are outside the topic of this book, virtual machines are a powerful tool and a first-class citizen in a good development environment. They provide dynamic and easy-to-use resources in isolated systems so they can be used and dropped at the time we need them. This helps developers to focus on their tasks instead of wasting their time creating or installing required services from scratch. This is the reason why virtual machines have found room in here. We want to take advantage of them to keep you focused on the code.
In order to have the same environment no matter the OS you're using, we'll be creating virtual machines with Vagrant and deploying required applications with Docker. We chose Ubuntu as a base operating system in our examples, just because it is a popular, commonly used Unix-like distribution. Most of these technologies are platform-independent, but occasionally you won't be able to follow the instructions found here because you might be using some other operating system. In that case, your task is to find what the differences are between Ubuntu and your operating system and act accordingly.
Vagrant is the tool we are going to use for creating the development environment stack. It is an easy way to initialize ready-to-go virtual machines with minimum effort using preconfigured boxes. All boxes and configurations are placed in one file, called Vagrant file.
Here is an example of creating a simple Ubuntu box. We made an extra configuration for installing MongoDB using Docker (the usage of Docker will be explained shortly). We assume that you have VirtualBox (https://www.virtualbox.org) and Vagrant (https://www.vagrantup.com) installed on your computer and that you have Internet access.
In this particular case, we are creating an instance of Ubuntu 64-bits using the Ubuntu box (ubuntu/trusty64) and specifying that the VM should have 1 GB of RAM:
  config.vm.box = "ubuntu/trusty64"

  config.vm.provider "virtualbox" do |vb|
  vb.memory = "1024"
  end
Further on, we're exposing MongoDB's default port in the Vagrant machine and running it using Docker:
  config.vm.network "forwarded_port", guest: 27017, host: 27017
  config.vm.provision "docker" do |d|
    d.run "mongoDB", image: "mongo:2", args: "-p 27017:27017"
  end
Finally, in order to speed up the Vagrant setup, we're caching some resources. You should install the plugin called cachier. For further information, visit https://github.com/fgrehm/vagrant-cachier.
  if Vagrant.has_plugin?("vagrant-cachier")
    config.cache.scope = :box
  end
Now it's time to see it working. It usually takes a few minutes to run it for the first time because the base box and all the dependencies need to be downloaded and installed:
$> vagrant plugin install vagrant-cachier
$> git clone thttps://bitbucket.org/vfarcic/tdd-java-ch02-example-vagrant.git
$> cd tdd-java-ch02-example-vagrant
$> vagrant up
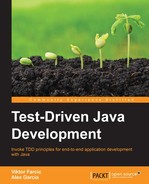
When this command is run, you should see the following output:
Be patient until the execution is finished. Once done, you'll have a new virtual machine with Ubuntu. Docker and one MongoDB instance up and running. The best part is that all this was accomplished with a single command.
To see the status of the currently running VM, we can use the status argument:
$> vagrant status
Current machine states:
default                   running (virtualbox)
Virtual machine can be accessed either through SSH or by using Vagrant commands as in the following example:
$> vagrant ssh
Welcome to Ubuntu 14.04.2 LTS (GNU/Linux 3.13.0-46-generic x86_64)

 * Documentation:  https://help.ubuntu.com/

 System information disabled due to load higher than 1.0

  Get cloud support with Ubuntu Advantage Cloud Guest:
    http://www.ubuntu.com/business/services/cloud

0 packages can be updated.
0 updates are security updates.

vagrant@vagrant-ubuntu-trusty-64:~$
Finally, to stop the virtual machine, exit from it and run the vagrant halt command:
$> exit
$> vagrant halt
==> default: Attempting graceful shutdown of VM…
$>
Note
For the list of Vagrant boxes or further details about configuring Vagrant, visit https://www.vagrantup.com.
Once the environment is set, it is time to install the services and the software that we need. This can be done using Docker, a simple and portable way to ship and run many applications and services in isolated containers. We will use it to install the required databases, web servers, and all the other applications required throughout this book, in a virtual machine created using Vagrant. In fact, the Vagrant VM that was previously created already has an example of getting up and running an instance of MongoDB using Docker.
Let's bring up the VM again (we stopped it previously with the vagrant halt command) and also MongoDB:
$> vagrant up
$> vagrant ssh
 vagrant@vagrant-ubuntu-trusty-64:~$ docker start mongoDB
 vagrant@vagrant-ubuntu-trusty-64:~$ docker ps
CONTAINER ID        IMAGE           COMMAND                CREATED
360f5340d5fc        mongo:2         "/entrypoint.sh mong   41 minutes ago

STATUS              PORTS                      NAMES
Up 41 minutes       0.0.0.0:27017->27017/tcp   mongoDB
vagrant@vagrant-ubuntu-trusty-64:~$ exit
With docker start, we started the container; with docker ps, we listed all the running processes.
By using this kind of procedure, we are able to reproduce a full-stack environment in the blink of an eye. You may be wondering if this is as awesome as it sounds. The answer is yes, it is. Vagrant and Docker allow developers to focus on what they are supposed to do and forget about complex installations and tricky configurations. Furthermore, we made an extra effort to provide you with all necessary steps and resources to reproduce and test all the code examples and demonstrations in this book.