There are two major components required for JBehave to run BDD stories: runners and steps. A runner is a class that will parse the story, run all scenarios, and generate a report. Steps are code methods that match steps written in scenarios. The project already contains all Gradle dependencies so we can dive right into creating the JBehave runner.
JBehave is no exception to the rule that every type of test needs a runner. In the previous chapters, we used JUnit and TestNG runners. While neither of those needed any special configuration, JBehave is a bit more demanding and forces us to create a class that will hold all the configuration required for running stories.
The following is the Runner code that we'll use throughout this chapter:
public class Runner extends JUnitStories {

    @Override
    public Configuration configuration() {
        return new MostUsefulConfiguration()
                .useStoryReporterBuilder(getReporter())
                .useStoryLoader(new LoadFromURL());
    }

    @Override
    protected List<String> storyPaths() {
        String path = "stories/**/*.story";
        return new StoryFinder().findPaths(
            CodeLocations
                    .codeLocationFromPath("")
                    .getFile(),
            Collections
                    .singletonList(path),
            new ArrayList<String>(),
            "file:"
        );
    }

    @Override
    public InjectableStepsFactory stepsFactory() {
        return new InstanceStepsFactory(
                configuration(),
                new Steps()
        );
    }

    private StoryReporterBuilder getReporter() {
        return new StoryReporterBuilder()
            .withPathResolver(
                new FilePrintStreamFactory
                        .ResolveToSimpleName()
            )
            .withDefaultFormats()
            .withFormats(Format.CONSOLE, Format.HTML);
    }

}
It is a very uneventful code, so we'll comment only on a few important parts. Overridden method storyPaths has the location to our story files set to the stories/**/*.story path. This is a standard Apache Ant (http://ant.apache.org/) syntax that, when translated to plain language, means that any file ending with .story inside the stories directory or any subdirectory (**) will be included. Another important overridden method is stepsFactory, which is used to set classes containing the steps definition (we'll work with them very soon). In this case, we set it to the instance of a single class called Steps (the repository already contains an empty class that we'll use later on).
The source code can be found in the 01-runner branch of the tdd-java-ch07-books-store Git repository: https://bitbucket.org/vfarcic/tdd-java-ch07-books-store/branch/01-runner.
Now that we have our runner done, it is time to fire it up and see what the result is.
We can run our scenarios with the following Gradle command:
$ gradle clean test
Gradle runs only tasks that changed from the last execution. Since our source code will not always change (we often modify only stories in text format), the clean task is required to be run before the test so that the cache is removed.
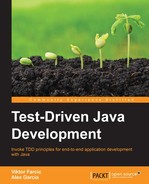
JBehave creates a nice report for us and puts it into the target/jbehave/view directory. Open the reports.html file in your favorite browser.
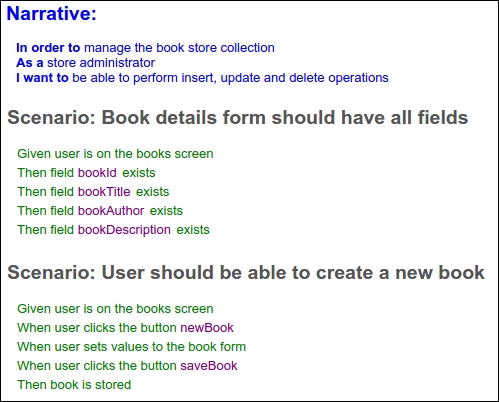
The initial page of the report displays a list of our stories (in our case, only Administration) and two predefined ones called BeforeStories and
AfterStories. Their purpose is similar to the @BeforeClass and @AfterClass JUnit annotated methods. They are run before and after stories and can be useful for setting up and tearing down data, servers, and so on.
This initial reports page shows that we have five scenarios and all of them are in the Pending status. This is JBehave's way of telling us that they were neither successful nor failed, but that there is code missing behind the steps we used.
The last column in each row contains a link that allows us to see details of each story.
In our case, all the steps are marked as pending. JBehave even puts a suggestion of a method that we need to create for each pending step.
To recapitulate, at this point, we wrote one story with five scenarios. Each of those scenarios is equivalent to a specification that will be used both as a definition that should be developed and to verify that the development was done correctly. Each of those scenarios consists of several steps that define preconditions (Given), actions (When), and the expected outcome (Then).
Now it is time to write the code behind our steps. However, before we start coding, let us get introduced to Selenium and Selenide.
Selenium is a set of drivers that can be used to automate browsers. We can use them to manipulate browsers and page elements by, for example, clicking on a button or a link, filling up a form field, opening a specific URL, and so on. There are drivers for almost any browser: Android, Chrome, FireFox, Internet Explorer, Safari, and many more. Our favorite is PhantomJS, which is a headless browser that works without any UI. Running stories with it is faster than with traditional browsers, and we often use it to get fast feedback on the readiness of web application. If it works as expected, we can proceed and try it out in all the different browsers and versions that our application is supposed to support.
More information about Selenium can be found at http://www.seleniumhq.org/ with the list of supported drivers at http://www.seleniumhq.org/projects/webdriver/.
While Selenium is great for automating browsers, it has its downsides, one of them being that it is operating at a very low level. Clicking on a button, for example, is easy and can be accomplished with a single line of code:
selenium.click("myLink")If the element with the ID myLink does not exist, Selenium will throw an exception and the test will fail. While we want our tests to fail when the expected element does not exist, in many cases it is not so simple. For example, our page might load dynamically with that element appearing only after an asynchronous request to the server got a response. For this reason, we might not only want to click on that element but also wait until it is available, and fail only if a timeout is reached. While this can be done with Selenium, it is tedious and error prone. Besides, why would we do the work that is already done by others? Say hello to Selenide.
Selenide (http://selenide.org/) is a wrapper around Selenium WebDrivers with a more concise API, support for Ajax, selectors that use JQuery style, and so on. We'll use Selenide for all our Web steps and you'll get more familiar with it soon.
Now, let us write some code.
Before we start writing steps, install the PhantomJS browser. The instructions for your operating system can be found at http://phantomjs.org/download.html.
With PhantomJS installed, it is time to specify a few Gradle dependencies:
dependencies {
    testCompile 'junit:junit:4.+'
    testCompile 'org.jbehave:jbehave-core:3.+'
    testCompile 'com.codeborne:selenide:2.+'
    testCompile 'com.codeborne:phantomjsdriver:1.+'
}
You are already familiar with JUnit and jbehave-core, which was set up earlier. Two new additions are Selenide and PhantomJS. Refresh Gradle dependencies so that they are included in your IDEA project.
Now, it is time to add the PhantomJS WebDriver to our Steps class;
public class Steps {

    private WebDriver webDriver;

    @BeforeStory
    public void beforeStory() {
        if (webDriver == null) {
            webDriver = new PhantomJSDriver();
            WebDriverRunner.setWebDriver(webDriver);
            webDriver.manage().window().setSize(
                    new Dimension(1024, 768)
            );
        }
    }

}
We're utilizing the @BeforeStory annotation to define the method that we're using to do some basic setup. If a driver is not already specified, we're setting it up to be PhantomJSDriver. Since this application will look different on smaller devices (phones, tablets, and so on), it is important that we specify clearly what the size of the screen is. In this case, we're setting it to be a reasonable desktop/laptop monitor screen resolution of 1024 x 768.
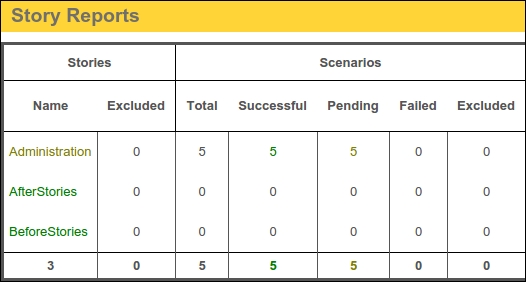
With setup out of the way, let us code our first pending step. We can simply copy and paste the first method JBehave suggested for us in the report:
    @Given("user is on the books screen")
    public void givenUserIsOnTheBooksScreen() {
        // PENDING
    }
Imagine that our application will have a link that will open the books screen. To do that, well need to perform two steps:
- Open the Website home page.
- Click on the books link in the menu.
We'll specify that this link will have the ID books. IDs are very important as they allow us to easily locate an element on the page.
The steps we described above can be translated to the following code:
    private String url = "http://localhost:9001";

    @Given("user is on the books screen")
    public void givenUserIsOnTheBooksScreen() {
        open(url);
        $("#books").click();
    }
We're assuming that our application will run on the 9001 port on the localhost. Therefore, we are first opening the home page URL and then clicking on the element with the ID books.(Selenide/JQuery syntax for specifying an ID is #).
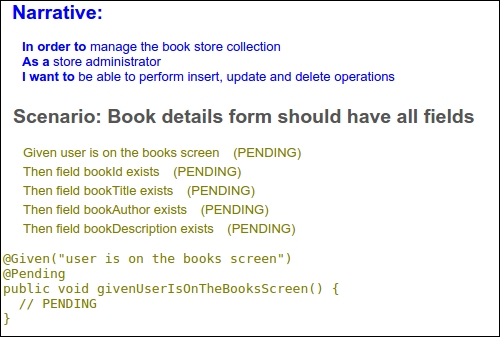
If we run our runner again, we'd see that the first step failed and the rest is still in the pending state. Now, we are in the red state of the red-green-refactor cycle.
Let us continue working on the rest of the steps used in the first scenario. The second one can be the following:
    @Then("field bookId exists")
    public void thenFieldBookIdExists() {
        $("#books").shouldBe(visible);
    }
The third one is almost the same, so we can refactor the previous method and convert an element ID into a variable:
    @Then("field $elementId exists")
    public void thenFieldExists(String elementId) {
        $("#" + elementId).shouldBe(visible);
    }
With this change, all the steps in the first scenario are done. If we run our tests again, the result is the following:
The first step failed since we did not even start working on the implementation of our Books Store application. Selenide has a nice feature, creating a screenshot of the browser every time there is a failure. We can see the path in the report. The rest of the steps are in the not performed state since the execution of the scenario stopped on failure.
What should be done next depends on the structure of the team. If the same person is working both on functional tests and the implementation, he could start working on the implementation and write just enough code to make this scenario pass. In many other situations, separate people are working on functional specification and the implementation code. In that case, one could continue working on the missing steps for the rest of the scenarios, while the other would start working on the implementation. Since all scenarios are already written in a text form, a coder already knows what should be done and the two can work in parallel. We'll take the former route and write the code for the rest of the pending steps.
Let's go through the next scenario;
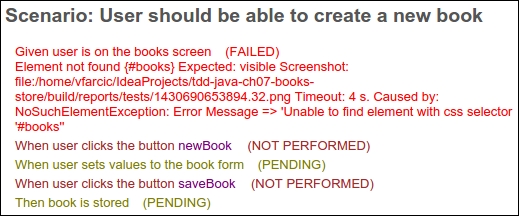
We already have half of the steps done from the previous scenario, so there are only two pending. After we click on the newBook button, we should set some values to the form, click on the saveBook button, and verify that the book was stored correctly. We can do the last part by checking whether it appeared in the list of available books.
The missing steps can be the following:
    @When("user sets values to the book form")
    public void whenUserSetsValuesToTheBookForm() {
        $("#bookId").setValue("123");
        $("#bookTitle").setValue("BDD Assistant");
        $("#bookAuthor").setValue("Viktor Farcic");
        $("#bookDescription").setValue(
            "Open source BDD stories editor and runner"
        );
    }
    @Then("book is stored")
    public void thenBookIsStored() {
        $("#book123").shouldBe(present);
    }
The second step assumes that each of the available books will have an ID in the format book[ID].
Let us take a look at the next scenario:
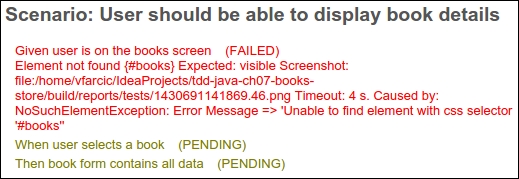
Like in the previous one, there are two steps pending to be developed. We need to have a way to select a book and to verify that data in the form is correctly populated:
    @When("user selects a book")
    public void whenUserSelectsABook() {
        $("#book1").click();
    }

    @Then("book form contains all data")
    public void thenBookFormContainsAllData() {
        $("#bookId").shouldHave(value("1"));
        $("#bookTitle").shouldHave(
            value("TDD for Java Developers")
        );
        $("#bookAuthor").shouldHave(value("Viktor Farcic"));
        $("#bookDescription").shouldHave(value("Cool book!"));
    }
These two methods are interesting because they not only specify the expected behavior (when a specific book link is clicked, then a form with its data is displayed), but also expect certain data to be available for testing. When this scenario is run, a book with an ID 1, title TDD for Java Developers, author Viktor Farcic, and description Cool book! should already exist. We can choose to add that data to the database or use a mock server that will serve the predefined values. No matter what the choice of how to set test data is, we can finish with this scenario and jump into the next one.

The implementation of the pending steps could be the following:
    @When("user sets new values to the book form")
    public void whenUserSetsNewValuesToTheBookForm() {
        $("#bookTitle").setValue(
            "TDD for Java Developers revised"
        );
        $("#bookAuthor").setValue(
            "Viktor Farcic and Alex Garcia"
        );
        $("#bookDescription").setValue("Even better book!");
        $("#saveBook").click();
    }

    @Then("book is updated")
    public void thenBookIsUpdated() {
        $("#book1").shouldHave(
            text("TDD for Java Developers revised")
        );
        $("#book1").click();
        $("#bookTitle").shouldHave(
            value("TDD for Java Developers revised")
        );
        $("#bookAuthor").shouldHave(
            value("Viktor Farcic and Alex Garcia")
        );
        $("#bookDescription").shouldHave(
            value("Even better book!")
        );
    }
Finally, there is only one scenario left:
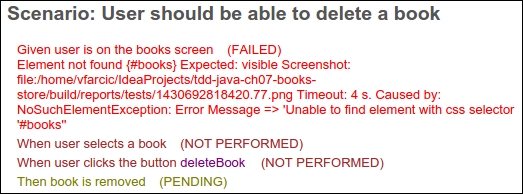
We can verify that a book is removed by verifying that it is not in the list of available books:
    @Then("book is removed")
    public void thenBookIsRemoved() {
        $("#book1").shouldNotBe(visible);
    }
We're finished with the steps code. Now, the person who is developing the application not only has requirements but also has a way to validate each behavior (scenario). He can be moving through the red-green-refactor cycle one scenario at a time.
The source code can be found in the 02-steps branch of the tdd-java-ch07-books-store Git repository: https://bitbucket.org/vfarcic/tdd-java-ch07-books-store/branch/02-steps.
Let us imagine that a different person worked on the code that should fulfil the requirements set by our scenarios. This person picked one scenario at the time, developed the code, ran that scenario, and confirmed that his implementation was correct. Once the implementation of all scenarios has been done, it is time to run the whole story and do the final validation.
The application has been packed as a Docker file and we prepared a Vagrant virtual machine that will run it.
Check out the branch at https://bitbucket.org/vfarcic/tdd-java-ch07-books-store/branch/03-validation and run Vagrant:
$ vagrant up
The output should be similar to the following:
==> default: Importing base box 'ubuntu/trusty64'...
==> default: Matching MAC address for NAT networking...
==> default: Checking if box 'ubuntu/trusty64' is up to date...
…
==> default: Running provisioner: docker...
    default: Installing Docker (latest) onto machine...
    default: Configuring Docker to autostart containers...
==> default: Starting Docker containers...
==> default: -- Container: books-fe
Once Vagrant is finished, we can see the application by opening http://localhost:9001 in our browser of choice:
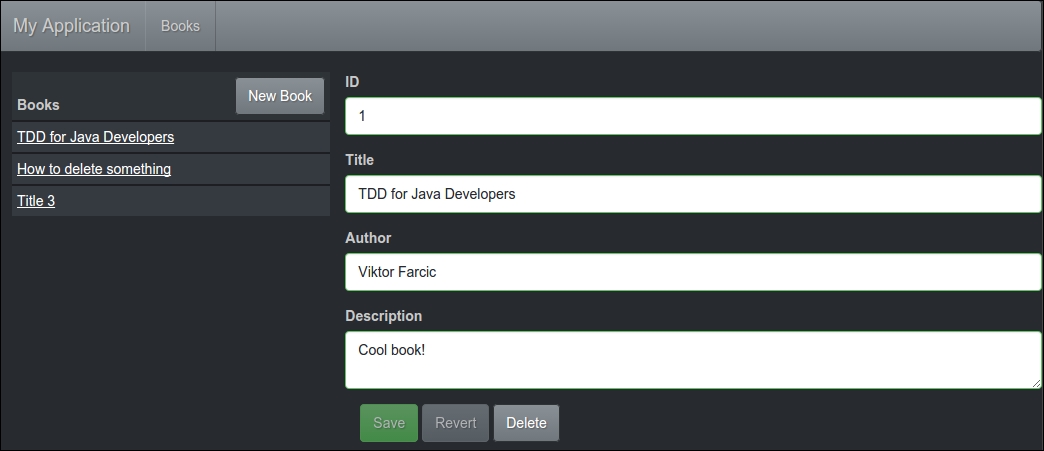
Now, let us run our scenarios again;
$ gradle clean test
This time there were no failures and all scenarios ran successfully:
Once all scenarios are passing, we meet the acceptance criteria and the application can be delivered to production.