
In the previous chapter, we saw that we could make use of sed to edit files from within our scripts. The
sed command is the Stream Editor and opens the file line by line to search or edit the file contents. Historically, this goes way back to Unix where systems may not have had enough RAM to open very large files. Using sed was absolutely required to carry out edits. Even today, we will use sed to make changes and display data from files with hundreds and thousands of entries. It is simpler and easier and more reliable than a human trying to do the same thing. Most importantly, as we have seen, we can use sed in scripts to edit the files automatically, no human interaction is required.
We will start by looking at grep and search the files for text. The re in grep command is short for
Regular Expression. This introduces the power of POSIX Compliant Regular Expressions before we look at sed. Even though we are not looking at scripting in this chapter, we will be covering some very important tools that we can use with scripts. In the next chapter, we will see the practical implementation of sed in scripts.
For the moment, we have enough queued and we will cover the following topics in this chapter:
- Using
grepto display text - Using regular expressions
- Understanding the basics of
sed
Welcome back and welcome to the power of using regular expressions in the command line. We will be beginning this journey by looking at the grep command. This will enable us to grasp some simple concepts of searching through the text before moving onto more complex regular expressions and the editing file with sed.
Global Regular Expression Print (grep), or what we more commonly call the command grep, is a command line tool used to search globally (across all the lines in a file) and print the result to STDOUT. The search string is a regular expression.
The grep command is such a common tool that it has many simple examples and numerous occasions where we can use it each day. In the following section, we have included some simple and useful examples with explanations.
In this example, we will print just the received data from the eth0 interface.
Note
This is the interface that is my primary network connection to the Raspberry Pi that we are using in this course. If you are uncertain of your interface name, you can use the ifconfig -a command to display all the interfaces and choose the correct interface name on your system. If ifconfig is not found, try typing the full path /sbin/ifconfig.
Using just the ifconfig eth0 command, a heap of data can be printed to the screen. To show just the packets received, we can isolate the lines that contain RX packets (RX for received). This is where grep comes in:
$ ifconfig eth0 | grep "RX packets"
Using the pipe or vertical bars we can take the output of the ifconfig command and send it to the input of the grep command. In this case, grep is searching for a very simple regular expression, "RX packet". The search string is case-sensitive, so we need to get this right or use the -i option with grep to run the search as case-insensitive, as shown in the following example:
$ ifconfig eth0 | grep -i "rx packets"
We can see the result of the initial command in the following screenshot, confirming that we have been able to isolate just the single line of output, as shown:

The local user account database in Linux is the /etc/passwd file and this is readable by all user accounts. If we want to search for the line that contains our own data, we can use either our own login name in the search or use parameter expansion and the $USER variable. We can see this is the following command example:
$ grep "$USER" /etc/passwd
In this example, the input to grep comes from the /etc/passwd file and we search for the value of the $USER variable. Again, in this case, it is a simple text but it is still the regular expression, just without any operators.
For completeness, we include the output in the following screenshot:

We can extend this a little using this type of query as a condition within a script. We can use this to check if a user account exists before trying to create a new account. To keep the script as simple as possible and to ensure that the administrative rights are not required, creating the account will display just the prompt and conditional test in the following command-line example:
$ bash
$ read -p "Enter a user name: "
$ if (grep "$REPLY" /etc/passwd > /dev/null) ; then
>  echo "The user $REPLY exists"
>  exit 1
>fi
The grep search now makes use of the $REPLY variable populated by read. If I enter the name pi, a message will be displayed and we will exit because my user account is also called pi. There is no need to display the result from grep, we are just looking for a return code that is either true or false. To ensure that we do not see any unnecessary output if the user is in the file, we redirect the output from grep to the special device file /dev/null.
If you want to run this from the command line, you should start a new bash shell first. You can do this by simply typing bash. In this way, when the exit command runs it will not log you out but close the newly opened shell. We can see this happening and the results when specifying an existing user within the following graphic:

Another really useful feature is that grep can count the matching lines and not display them. We can use this to count the number of CPU or CPU cores we have on a system. Each core or CPU is listed with a name in the /proc/cpuinfo file. We can then search for the text name and count the output; the -c option used is shown in the following example:
$ grep -c name /proc/cpuinfo
I am using a Raspberry Pi 2 and this has four cores, as shown in the following output:

If we use the same code on a Raspberry Pi Model B that has a single core, we will see the following output:

We can again make use of this in a script to verify if enough cores are available before running a CPU intensive task. To test this from the command line, we can use the following code that we execute on the Raspberry Pi with just the single core:
$ bash
$ CPU_CORES=$(grep -c name /proc/cpuinfo)
$ if (( CPU_CORES < 4 )) ; then
> echo "A minimum of 4 cores are required"
> exit 1
> fi
We only run bash at the start to ensure that we are not logged out of the system with the exit command. If this was in a script, this will not be required, as we will exit the script and not our shell session.
By running this on the Model B, we can see the results of the script and also the indication that we do not have the required number of cores:

If you had a requirement to run this check in more than one script, then you could create a function in a shared script and source the script holding the shared functions within the script that requires to be checked:
function check_cores {
 [ -z $1 ] && REQ_CORES=2
CPU_CORES=$(grep -c name /proc/cpuinfo)
if (( CPU_CORES < REQ_CORES  )) ; then
echo "A minimum of $REQ_CORES cores are required"
exit 1
fi
}
If a parameter is passed to the function, then it is used as the required number of cores; otherwise, we set the value to 2 as the default. If we define this as a function in the shell on the Model B Raspberry Pi and display the details with the command type, we should see this as shown in the following screenshot:

If we run this on a single-core system and specify the requirement of just the single core, we will see that there is no output when we meet the requirement. If we do not specify the requirement, then it will default to 2 cores and we will fail to meet the requirement and we exit the shell.
We can see the output of the function when run with the argument of 1 and then without arguments, as shown in the following screenshot:

We can see how useful even the basics of grep can be within the scripts and how we can use what we have learned to start creating usable modules to add to our scripts.
We will now look at creating a script to parse or format a CSV file. The formatting of the file will add new lines, tabs, and color to the output, so that it is more readable. We can then use grep to display single items from the CSV file. The practical application here is a catalog system based on the CSV files.
The CSV file or list of comma separated values will come from the file tools that we have in a current directory. This is a catalog of products that we sell. The file contents are shown in the following output:
drill,99,5
hammer,10,50
brush,5,100
lamp,25,30
screwdriver,5,23
table-saw,1099,3
This is just a simple demonstration, so we don't expect too much data but each item in the catalog consists of the following:
- Name
- Price
- Units in stock
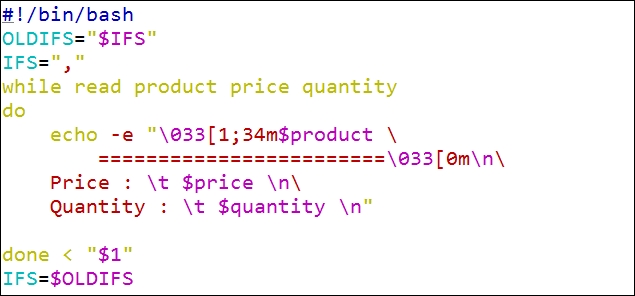
We can see that we have a drill which costs $99 and we have five units in stock. If we list the file with cat it is not very friendly; however, we can write a script to display the data in a more appealing way. We can create a new script called $HOME/bin/parsecsv.sh:
#!/bin/bash
OLDIFS="$IFS"
IFS=","
while read product price quantity
do
echo -e "�33[1;33m$product
========================�33[0m
Price : $price
Quantity : $quantity
"
done <"$1"
IFS=$OLDIFSLet's works through this file and look at the pertinent steps:
|
Element |
Meaning |
|---|---|
|
|
The |
|
|
We set the separator to a comma to match what we need with a CSV file. |
|
|
We enter a |
|
|
The |
|
|
This is where we read the input file, which we pass as an argument to the script. |
The script is shown in the following screenshot:
We can execute the script with the tools catalog file located in the current directory using the following command:
$ parsecsv.sh tools
To look at how this will display, we can view the partial output from the following screenshot:

We are now starting to get the idea that we have a lot of power at the command line to format files in a more readable way and a plain text file does not need to be plain.
If we need to search for one entry, then we need more than just one line. The entry is in three lines. So, if we search for the hammer, we need to go to the hammer line and the two lines that follow. We do this using the -A option to grep. We need to display the matching line and two lines after. This will be expressed by the following code:
$ parsecsv.sh tool | grep -A2 hammer
This is displayed in the following screenshot:
