
Now that we have had an introduction to Grunt, and Grunt dependencies, in Chapter 1, Grunt Dependencies we can move forward and look at how we can set up a project scaffold and be ready to begin development. While this chapter deals with the creation of an Angular.JS application, your project does not have to be an Angular application in order to use Grunt. We are simply using Angular as an example as it is such a popular frontend framework. As such, we won't get too deep into Angular.JS since the scope of information is broad enough that we could write an entirely separate book. It should also be noted that Grunt exists as the build system used in a project called Yeoman. Yeoman combines scaffolding (yo), build systems (Grunt), and a package manager, for example, for a complete application generator solution. As we are focused on Grunt, we will not be using Yeoman in the following examples. Be sure to check out Yeoman at http://yeoman.io/, however, as it does provide a full suite of functionality.
There are a few things that we will have a look at in this chapter. We will be using Git, which is what is known as a distributed version control system. Distributed version control describes a peer-to-peer system of managing code repositories. What this means is that each user of the system has their own local clone of the code repository. This differs from a centralized version control system in that a single central repository exists on a server in which clients must check out and commit changes but they do not have the entire repository history stored locally.
Some readers may be familiar with version control systems such as Subversion (SVN) or CVS. Like SVN and CVS, Git is a version control system that can be used locally, for your own small projects, or for enterprise-level applications. Using any version control system is better than no system of managing versions at all. It is my opinion that version control should be used for any software application project, regardless of whether you are writing for yourself or a client. The benefits of version control are worth the small bit of effort needed in order to install a version control system.
Git happens to be very simple to install, with a few potential roadblocks to overcome. For the purposes of this book, we will be using a small subset of Git commands in order to accomplish some tasks; learning Git is beyond the scope of this book. GitHub has a great resource to learn Git, which can be found at https://try.github.io/levels/1/challenges/1. More information on Git can be found on the Git website: http://git-scm.com/.
We will use Git as a means to install the Angular Seed Project. This is a project that creates an Angular project scaffold (skeleton) for us automatically using Node.js and NPM. Angular Seed will set us up with an example project that we can use to get started quickly without the need to manually create all of the project files and directory tree. This will help us keep the setting up to a simple process and provide a starting point for an app that can be modified to suit individual needs:
- Installing Git
- Creating the Angular Seed Project
- Installation summary for more advanced users
Git is a distributed version control system that allows developers to manage changes to files. Git provides you with a means to store application versions so that we can track changes as backups and share updates within teams and with users. We will be using Git in this chapter in order to install an application called Angular Seed. Angular Seed will create an application scaffold for us so that we can quickly create our starting application files and directories automatically. As we are really interested in automating processes, including Angular Seed makes sense to get us going quickly. It should be noted that there used to be a Grunt plugin project named grunt-angular-seed. However, it is no longer maintained and has been deprecated. As a result, we will simply use Git to clone the Angular Seed project in our project's root directory. At that point, we will be able to go through the simple installation process for Angular Seed.
On Mac, if you have Xcode installed, you will be using the Xcode command-line developer tools. If you do not already have git installed, or if it is installed but you have uninstalled Xcode since installing Git, you will receive an error that Xcode is required in order to run the git command. Proceed with the following process to check for an existing installation and make the following modifications if necessary:
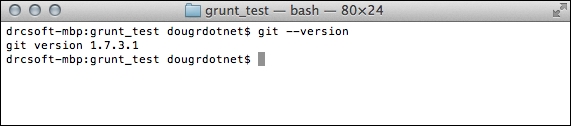
git -–version
If you have git installed already, you should get an output similar to the following:
If you mistype git or Git is not installed, you will get the following error:

If Xcode cannot find the Git installation or Xcode was previously installed and then uninstalled, you may see the following error message:
If this is the case, you will be prompted to install Xcode and/or the command-line developer tools with the following popup:

If you wish to install Xcode, then proceed by clicking on Get Xcode. It is, however, not necessary to install Xcode. You can install only the command-line tools by clicking on Install and proceeding through the installation process. Another option to use Git and not install Xcode is to create an alias to your Git install location. If you do not have Git installed yet and you receive this popup after going through the installation process that we will cover shortly, come back to this section to refer to creating aliases to your Git installation.
To add a temporary alias we need to write the following command:
alias git="/usr/local/git/bin/git"
The alias command maps the shortcut git to the "/usr/local/git/bin/git" path, which is the default installation location of Git. You can then use the git command from any location on your system for the remainder of your Terminal session.
While this is useful, in this case, it is probably not exactly what you want. You can use Git often for many years to come through many different terminal sessions. You may recall from Adding your installation path to your $PATH variable section from Chapter 1, Grunt Dependencies we stepped through the process of adding the installation path of Node to your $PATH variable. We need to do the same for git in order to make a permanent alias. Let's walk through the process again using the path required for Git.
As we did previously, we will edit the $PATH variable using the Nano editor from within Terminal.
- Check your existing $PATH variable value:
$ echo $PATH - Your resulting
$PATHvariable may resemble the following terminal output:$ /usr/bin:/bin:/usr/sbin:/sbin:/usr/local/bin - Change directories to the home directory, which is where .bash_profile already exists or will be created (
cdis the command to change directories):$ cd - If it does not exist,
.bash_profilefile will be created. If it does exist,.bash_profilewill be edited. Simply enter the following in Terminal to create or open the file to edit:$ nano .bash_profile
The contents of your .bash_profile file should appear in the Nano editor. If the file is empty, then you are in the process of creating a new file. If there is content in the file, then you already have an existing .bash_profile. In the following example, note that git has already been added to my path (PATH = $PATH:/usr/local/git/bin/).
- Add the path location for Git to your
.bash_profilefile: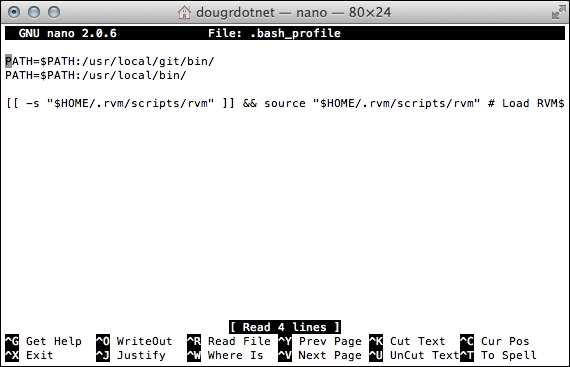
- Save the file in nano by pressing Ctrl + O and confirm the filename to be saved as
.bash_profileby hitting return. Exit nano by pressing Ctrl + X. Remember to restart terminal or enter the following command to reload your.bash_profile:$ source .bash_profile - Note that you can also add the alias to your
.bash_profileusing the same syntax that was used to create the temporary one. So, instead of adding to your path variable as described previously, simply add the following to your.bash_profile:alias git="/usr/local/git/bin/git"
If Git is not installed on your system, then the easiest way to get Git is from the Git website:
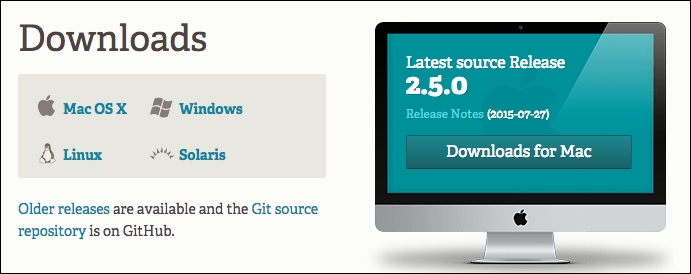
Navigate to the Git downloads page, http://git-scm.com/downloads, and choose the correct installer for your system.
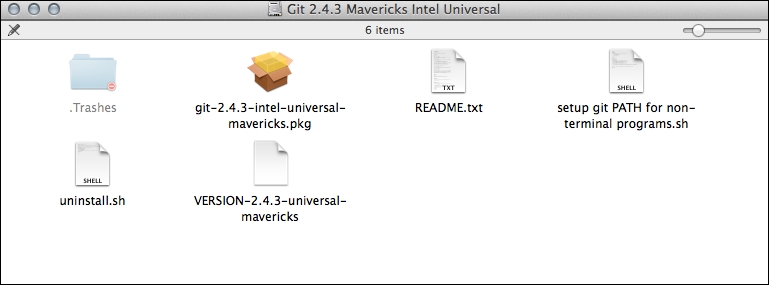
Be sure to follow the installation instructions provided in README.txt that is included with the installer download for your platform. We will outline the install process using the Mac package installer.Once downloaded, run the installer image file (.dmg) that you downloaded.
This will open the image in Finder where you can access the installation files. Be sure to review README.txt before proceeding. You should see the following in the Finder window that opens when running the installation image. Double-click on the git-2.4.3-universal-mavericks.pkg file in order to run the package installer:
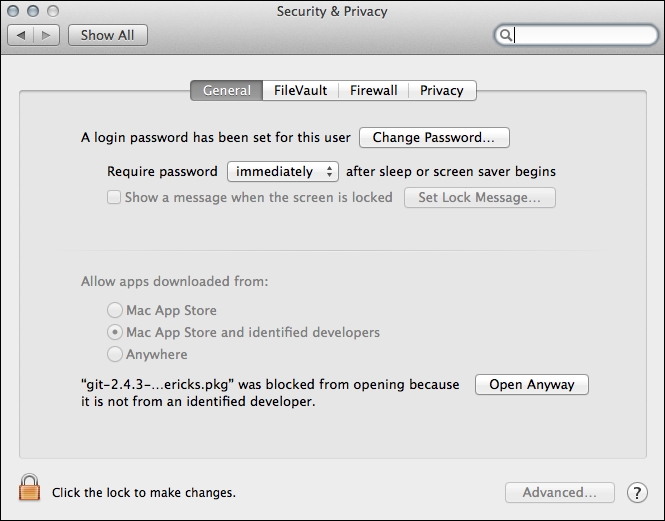
Depending upon your security preferences for the installation of applications outside the Mac App Store, your installation may not be allowed and you will see the following pop-up message:

If this is the case, it will be necessary to override your security settings for this installation from System Preferences. Open Security and Privacy preferences to allow the installation. Choose Open Anyway in order to allow the installer to run:
You will now be presented with the installation dialog:

Follow the step-by-step installation as guided by the dialog in order to install Git.
Congratulations, you have installed git!