
Now that we have installed Git, we can check out the Angular Seed Project from its GitHub repository. The project is located at https://github.com/angular/angular-seed. Angular Seed is an application that will generate an Angular.JS project scaffold, also known as a skeleton. The generated application skeleton is a simple project that includes a couple of views and controllers that provide examples of how to use the Angular framework. Angular Seed also creates some ready-to-run unit tests. We won't get into the topic of unit testing here as we simply wish to scaffold an example project that we can then use to illustrate Grunt with. For more information on unit testing configured with Angular Seed, see the project unit testing section at https://github.com/angular/angular-seed#running-unit-tests.
The only Angular Seed dependencies are Git and Node.js (along with NPM). In Chapter 1, Grunt Dependencies we went through the installation of Node.js in detail. If you have not yet installed Node.js or are unsure, refer to Chapter 1, Grunt Dependencies to make sure that you have the necessary dependencies installed and configured for your system. Not only do we need Node.js for Angular Seed, but we also need it for the remainder of this book's primary topic, Grunt.
The first task that we need to complete is to create our project root directory. Given that the example will be a web application, I suggest creating the project root in the location where you manage your web project directories. For this project, I will create a sample_project root directory in my 4875_CH2_Project folder. You can name your project directory anything you like. Note that, when you clone the Angular Seed project, you will create a new directory in the process.
Once we have created the project root directory, we need to open a Terminal window and change directories to the new location.
Your paths may differ so simply change the paths in the following examples to the location where your root directory is located.
Note that, in both Windows and Mac, it is possible to drag a folder to the command prompt or Terminal and have it complete the path for you so that you do not need to type the entire path:
cd /path/to/your/project/directory/

Now that we are inside the directory that we wish to clone the Angular Seed project to, we will use Git to clone the directory from its repository location to the current directory.
When you clone a project with Git, you will get all of the project history along with it as Git is a version control system. For our needs, we do not need all of the history so we will specify that we only want a depth of one revision. It is perfectly fine to get all of the history but it won't be necessary as we aren't working on the Angular Seed project itself; we are only using it for the scaffolding of our custom project. In order to clone the project with only the latest revision of the branch that we are cloning, we will use the following Git command syntax. Be sure to change [Your Project Name] to the name of your project:
git clone --depth=1 https://github.com/angular/angular-seed.git [Your Project Name]
- In my example, I created a project named sample_project in my project directory using the following syntax:
git clone --depth=1 https://github.com/angular/angular-seed.git sample_project - At this point, you will have the Angular Seed project cloned and ready to finish setting up:

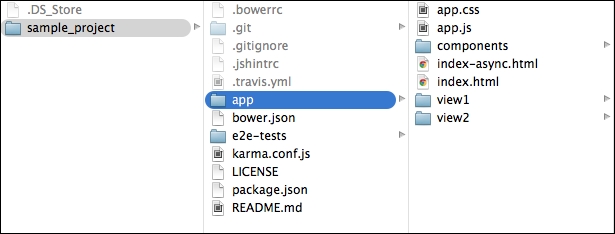
You should now have a project tree which looks as follows:
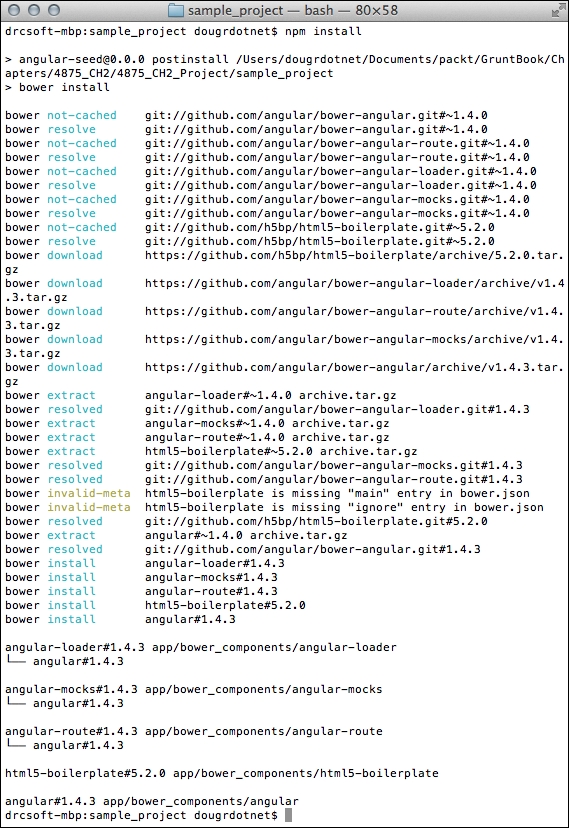
Before we can run our sample application, we need to complete the installation of dependencies for Angular Seed. We will use npm to install our dependencies. From our new project directory, we simply need to run the npm install command. When we run npm install, we will get two things: tools that are needed by Angular Seed and the actual Angular code that is obtained though another package manager automatically. The other package manager is Bower. Like NPM, Bower manages packages. As we are using NPM, we will not address Bower further. Suffice it to say that the Angular-Seed project requires it; therefore, you will see Bower in your project tree. NPM is designed to manage Node packages where Bower's purpose is to manage frontend JavaScript packages. We will get the developer tools needed via NPM and the Angular code from Bower; we will get both with one single command.
- First, let's change directories to our new project folder, where
[Your Project Directory]is the name of your directory:cd [Your Project Directory] - I changed directories to sample_project, which is the name of my project directory:

If you have any confusion as to what directory you should be in at this time, know that the npm install command will be looking for a package.json file. If you refer back to the Cloning the Angular Seed Project section, you will see that the package.json file resides directly under my project folder named sample_project. If you are not in the correct location to run npm install, then you will receive an error as follows:
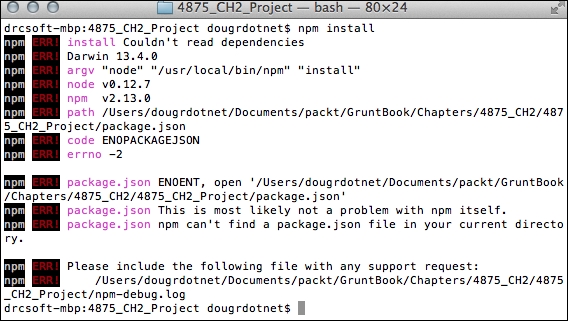
You will also find a new error log file in the location where you attempted to run the npm install command, named npm-debug.log. This log file is an output of the error; review the file and feel free to discard when you have completed the review.
Once you are in the correct location, you can complete the Angular Seed installation with the following command:
npm install
Is this your reaction? Whoa! I ran into problems here! If so, continue reading; we will get it sorted out.
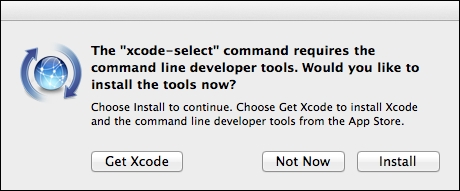
At this point, if on Mac, it is possible that you might receive an error like we described earlier, related to Xcode and no developer tools found. This can occur because Bower is using Git to install the Angular code and is not mapping Git on our path as we wish. It is possible to install the Xcode developer tools without installing Xcode. Apple has made these separate packages.
- We can install the developer tools by issuing the following command:
xcode-select –install - Your output should look similar to the following:

- You will then be presented with a popup to install the Xcode developer tools. Click on Install to begin the installation:
- Click on Agree in the license agreement in the next window and complete the installation.
Alternatively, if you run into problems trying to install only the developer tools via the command line, you can visit https://developer.apple.com/downloads/ and obtain the developer tools installer for your operating system version:
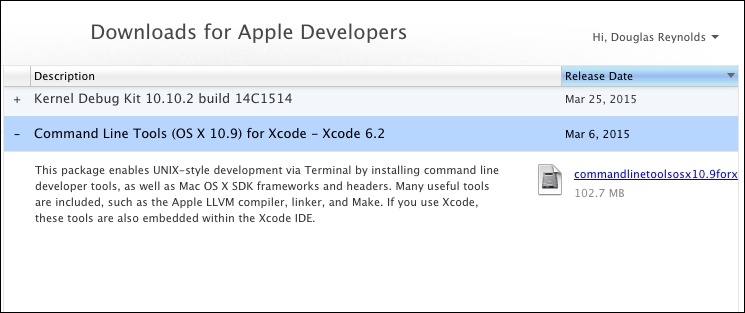
I am going to describe the download installer process as I am not on the most recent version of OS X and need to install via the download. I downloaded the .dmg image file from the developer downloads shown previously.
- Double-clicking on the installer opens up a window with the Command Line Tools package installer:

- In the next step, note the size of the installation and accept the default installation location by clicking on Install: (You may need to enter your username and password to allow the installation.)

- This will complete your installation of the Apple Developer Command Line Tools:

Now we can get back to installing the Angular Seed dependencies. If you had to go through all of the Command Line Tools installation, then you are back at running the npm install command from within your project folder.
So let's run the install command:
npm install
You should get a series of Terminal output related to the Bower installation of all the Angular code needed for the sample application:
Congratulations! You have installed the Angular Seed application!
We are now ready to run our sample application to ensure that everything has been installed correctly. One of the beautiful things about Node is that it is possible to create a locally running HTTP server without the need for a server application such as Apache, or having to use IIS on Windows. With Node, a server can be created easily and used to run and test your web applications in your browser.
- The Angular Seed application has a preconfigured server ready for us; all we need to do is start the server with this command:
npm startThis will create a running server.
- Verify that you have a similar output as shown here:

You can see in the output that an HTTP server was created at localhost using port 8000. This means that you can browse to localhost with this port assignment to launch the sample application.
- Open your browser and enter (or click on this URL if you are reading this as an e-book)
http://localhost:8000/app/index.html. You will be presented with the Angular Seed skeleton web application:
Now we have a running web application with a couple of views that are wired to controllers and navigable by the links at the top of the application page. We will be able to use this application as our base to learn how to add Grunt automated tasks. You will learn more about tasks in the upcoming chapter.
- In order to stop the server, hit Ctrl + C in Terminal:

You can also quit the running Terminal/command prompt application and the server will be stopped.
Congratulations! You have successfully installed the Angular Seed application!