
Creating the default task is as simple as loading tasks. Grunt has a registerTask method that we use to name (alias) the task and provide a list of one or more tasks to be run. When the task alias is run, all of the associated tasks in its list are run. In this way we can create a single command that runs the task(s) in the associated list. Additionally, the order of the tasks in the list defines the order in which the tasks are run; this provides us with even more refined control.
The basic task configuration syntax is:
grunt.registerTask(task_name, task_list);
In order to define the default task, the task name given should be 'default'. This task will run all of the associated tasks in its list even if no tasks are specified. For example, in order to run the default task, all that is needed is to issue the grunt command in the command prompt. The list argument to the registerTask method is an array of tasks. This syntax looks like the following example:
grunt. registerTask (taskName, [task1, task2, task3, etc...]);
So, for instance, our default task for sample_project would be configured like this:
grunt.registerTask('default',['jshint','uglify', 'less', 'imagemin', 'notify', 'open', 'watch']);In this example the default task alias is created and the list of the jshint, uglify, less, imagemin, notify, open, and watch tasks will be run in that same order listed. Even if only a single task is specified, it must be contained within an array. Task arguments may be run directly from within the task list as well. For instance, the uglify dist argument could be passed directly by calling the uglify task with the dist parameter as follows:
grunt.registerTask('default',['uglify:dist']);The default task configuration is added following the task loading so that the tasks are registered prior to attempting to run them. The very last line of our sample_project Gruntfile will be the default task example as provided earlier. This code looks like the following now:

At this point we are ready to begin functional testing on our Gruntfile, but before we begin that process let's look at creating custom tasks.
Custom tasks are just like the default task; however, we can define subsets of tasks or special functionality that we wish to run to provide specific build functionality. For instance, consider the use case of building for a development server versus building for test or production servers. It may not be desirable to have minified code on the development server so that it is easier to debug code. We could define a custom task named dev that will not include any minification of JavaScript or CSS but still provides tasks for linting of JavaScript, compiling LESS, compressing images, and so on. An example custom task might look like the following:
grunt.registerTask('dev',['jshint','less', 'imagemin', 'notify', 'open', 'watch']);If you wish, you can add a function callback to your custom task to add additional logic or run other tasks. For example, we could write the preceding custom task with the following syntax:
grunt.registerTask('dev', 'description of dev task', function() {
  grunt.task.run(['jshint', 'less', 'imagemin', 'notify', 'open', 'watch']);
});
A custom task callback may also take arguments so that you could pass in task names to be run as needed from the command line, for example. If running jshint, less, and open were the only tasks needed for a particular local development process, a task could be created like this:
grunt.registerTask('local', 'description of local task', function(a, b, c) {
  grunt.task.run([a, b, c]);
});
You could then enter the following command at the command prompt to launch your set of tasks:
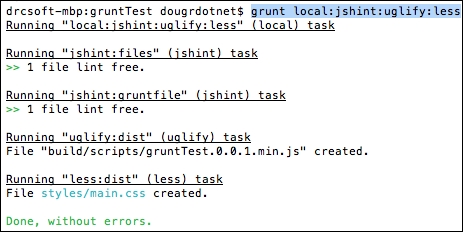
grunt local:jshint:uglify:less
The result of running this custom task would look similar to this screenshot:
Custom tasks can be taken further to add custom logic and functionality. We will have a look at a more advanced custom task in the next chapter.