
We have reached a point in our sample_project Gruntfile setup where we are ready to begin testing the functionality of each registered task to ensure that we are meeting the project requirements. Recall that we have implemented the following plugins:
- contrib-jshint
- contrib-uglify
- contrib-less
- contrib-imagemin
- notify
- open
- contrib-watch
Starting at the top, we will test each requirement individually, then we will begin adding in the entire stack to create our automated build process. We do have a banner option that is not a task; it is simply a property with a value that we can use elsewhere. In the case of our configuration, the banner is used by contrib-uglify. We will start with contrib-jshint testing.
The process for testing individual tasks is simple: we will only register the task we wish to test and then inspect the result of the task to ensure that what we expected to happen has indeed happened. Our custom task with a callback function that takes arguments is a handy way to test each task; we will set that up now so that we can call each task independently.
grunt.registerTask('testing', 'testing individual tasks', function(a) {
  grunt.task.run([a]);
});
As you can see, our custom register task method will take a single argument that will be the task we wish to run, then the callback will run that task for us. The terminal syntax for testing each plugin configuration will be the same, the only difference being the name of the plugin that gets passed in to the callback function. For each plugin the syntax will be as follows:
grunt testing:plugin-name
We will then inspect the resulting output; for instance, with contrib-jshint we will ensure that it runs and detects errors. For contrib-uglify we will inspect the output file contents to ensure that the banner was created correctly and that our JavaScript code was minified. We will continue through all of the plugins in this fashion.
First, let's make a small change to the path of the file parameter of the jshint configuration. We want to check that our JavaScript files are lint-free and we will start by adding app.js to the files to lint. The path change will point to our app directory where app.js resides:
jshint: {
  files: ['app/app.js'],
  gruntfile: {
    options: {
       jshintrc: '.jshintrc'
    },
    src: 'Gruntfile.js'
  }
},
Let's do a preliminary run of jshint. There may be some errors and warnings that we will need to debug until jshint is lint free. Ensure you are in the correct directory location in Terminal and change directories if needed to the root of sample_project:
cd path/to/sample_project/
Then, using the syntax illustrated earlier, run the jshint task:
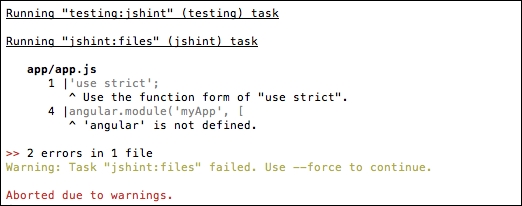
grunt testing:jshint
Immediately, there are errors and warnings that will need to be addressed. The following output is telling us that use strict should be wrapped inside the function instead of being used outside the function scope. In this case it is pointing to the use strict that is found at the head of our app.js file.
Here is the output:
Since we know that we will not have any issues with use strict in Gruntfile.js or app.js, we can safely suppress the error by adding the .jshintrc option to the main body of the jshint configuration like this:
jshint: {
      files: ['app/app.js'],
      options: {
          jshintrc: '.jshintrc'
        },
      gruntfile: {
        options: {
          jshintrc: '.jshintrc'
        },
        src: 'Gruntfile.js'
      }
    },
The reason this will work is because, if you notice, we already provide a jshintrc option to the gruntfile property, which also has use strict at the head of the file. Looking at the .jshintrc file, which if you recall is used to define jshint options, there is a line which suppresses strict error messages:
"strict": false,
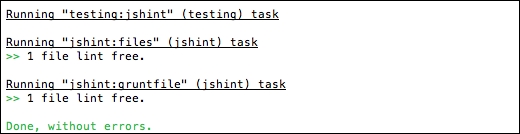
Now, run the jshint task again and check the output. Notice that the use strict error is no longer present in the lint message. We can clean up the jshint a bit now because we no longer need the gruntfile option for jshintrc, given that we added the jshintrc option to the main body of the jshint configuration.
Remove the gruntfile jshintrc option:
jshint: {
      files: ['app/app.js'],
      options: {
          jshintrc: '.jshintrc'
        },
      gruntfile: {
        src: 'Gruntfile.js'
      }
    },
The jshint class runs without errors since they are suppressed by the configuration in jshintrc.
The final step is to add to the path array, any additional files that should be linted. In the case of sample_app, these are located in the app/view1 and app/view2 directories:
jshint: {
  files: ['app/app.js', 'app/view1/*.js', 'app/view2/*.js'],
  options: {
     jshintrc: '.jshintrc'
  },
  gruntfile: {
     src: 'Gruntfile.js'
  }
},
As is illustrated by the
files configuration, the use of wildcards is a perfectly acceptable and efficient way to include files in the configuration.
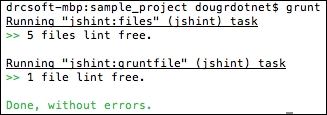
In this case, there will be a total of five files plus the gruntfile linted that completes our functional testing of jshint:
For the purposes of illustrating the configuration of contrib-uglify, let's say that we need our JavaScript files in a scripts directory that the HTML files will use on the Test and Production servers. The contrib-uglify plugin will minify our development JavaScript and put it in our distribution location: dist/scripts. Then for production, the related HTML files would be modified to use the relative links to the minified JavaScript files in the dist/scripts directory. Don't worry about creating any directories; when we configure uglify to use the dist/scripts path, it will be created for us automatically if it does not already exist.
The first thing to do is modify the uglify configuration with the new directory paths, and set up dynamic naming for our generated, minified, JavaScript file:
uglify: {
   options: {
      banner: '<%= banner %>'
   },
   dist: {
      src: ['app/app.js', 'app/view1/view1.js', 'app/view2/view2.js'],
      dest: 'dist/scripts/<%= pkg.name %>.<%= pkg.version %>.min.js'
   },
},
In the dist configuration the src property is changed to an array of source files to be minified. The three sample_project JavaScript files of interest are app.js, view1.js, and view2.js. These three files will be minified and concatenated together into a file created and named dynamically using properties from package.json, via our pkg variable. Additionally, the banner we created previously will be prepended to the minified file.
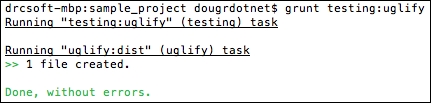
Run the uglify task:
grunt testing:uglify
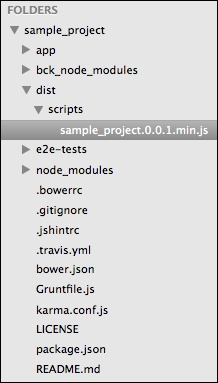
Now have a look at the file tree to see the new destination directory and minified file that were created:
Modify sample_project's index.html to point to the new minified JavaScript file and comment out the imports for the three source files:

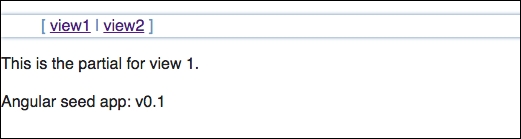
Navigate to http://localhost:8000/app/#/view1 and test the application.
Have a look at the minified JavaScript file, sample_project.0.0.1.min.js, located in the dist/scripts directory. Notice that the banner has been prepended and the three files have been minified and concatenated together:
/*! *** DO NOT EDIT THIS FILE ***
It is automatically generated in the build
sample_project - v0.0.1 - 2015-12-29
https://myrepository.dr-int/project/sample_project
* Copyright (c) 2015 Douglas Reynolds;*/
"use strict";angular.module("myApp",["ngRoute","myApp.view1","myApp.view2","myApp.version"]).config(["$routeProvider",function(a){a.otherwise({redirectTo:"/view1"})}]),angular.module("myApp.view1",["ngRoute"]).config(["$routeProvider",function(a){a.when("/view1",{templateUrl:"view1/view1.HTML",controller:"View1Ctrl"})}]).controller("View1Ctrl",[function(){}]),angular.module("myApp.view2",["ngRoute"]).config(["$routeProvider",function(a){a.when("/view2",{templateUrl:"view2/view2.HTML", controller:"View2Ctrl"})}]).controller("View2Ctrl",[function(){}]);This section assumes a little knowledge about LESS; however, the example will be very simple and I will walk through each line to explain what is going on. Even if you don't use LESS, this is a good example of the power of automated tasks.
The process for configuring and testing contrib-less will be similar to uglify. It will be necessary to modify the existing app.css by adding some LESS and renaming the file to app.less so that it will be compiled by the LESS processor. A distribution directory will be created with a style directory where the compiled CSS file will be generated. The path will be dist/styles.
To begin, rename app.css to change the file extension to .less. When complete the file will be named app.less. Next, add some LESS.
Here is the example that will be used to style the menu:
@blue: #5B83AD;

.box-shadow(@style, @a) {
  -webkit-box-shadow: @style @a;
  box-shadow:         @style @a;
}
.menu {
  @light-blue: (@blue + #111);
  color: saturate(@light-blue, 5%);
  border-color: lighten(@light-blue, 30%);
  .box-shadow(0 0 5px, @blue);
}
A quick walk-through is in order. The first line creates a variable for a blue color. The @ designates that it is a variable, blue is the variable name, and its value is the hexadecimal color #5B83AD.
Next is a mixin .box-shadow that takes arguments, much like a function. Because it behaves like a function, we could have many different callers of .box-shadow that pass in different values for arguments that will be used within their particular element style.
Finally, we have the .menu element style declaration, which creates a new color of light-blue from our base blue color. Then the color style is assigned the light-blue color within the saturate method, saturating the color by 5%. The menu border color is assigned the light-blue color and lightened, using the lighten method, by 30%. The box-shadow mixin is called and arguments passed for the box-shadow style. The style definition for box-shadow is:
box-shadow: none|h-shadow v-shadow blur spread color
In the example we pass in h-shadow of 0, v-shadow of 0, blur of 5px, and the color. Spread is optional and omitted:
.box-shadow(0 0 5px, @blue);
This line is of particular interest because it is here we are calling the mixin and passing in the arguments. The result of the mixin will become the .box-shadow style defined within the .menu style declaration.
The entire contents of app.less will now look like the following:
@blue: #5B83AD;

.box-shadow(@style, @color) {
  -webkit-box-shadow: @style @color;
  box-shadow:         @style @color;
}
.menu {
  @light-blue: (@blue + #111);
  color: saturate(@light-blue, 5%);
  border-color: lighten(@light-blue, 30%);
  .box-shadow(0 0 5px, #5B83AD);
}

.menu:before {
  content: «[«;
}

.menu:after {
  content: «]»;
}

.menu > li {
  display: inline;
}

.menu > li:before {
  content: "|";
  padding-right: 0.3em;
}

.menu > li:nth-child(1):before {
  content: "";
  padding: 0;
}
At this point, it is time to go back to Gruntfile.js and make the necessary modifications to the LESS configuration. First, we will need to set the options paths property to be the directory that contains the input file; in this case, app.less exists with the app directory. We will then need to define the dist properties for the source and destination paths. The source is located in app/app.less and the destination will be dist/styles/main.css.
The LESS configuration section will be as follows:
less: {
   options: {
      paths: ["app"]
   },
   dist: {
     src: 'app/app.less',
     dest: 'dist/styles/main.css'
   }
},
Once the LESS configuration and app.less have been modified and saved, it is time to run the task to inspect the resulting behavior and generated file:
grunt testing:less
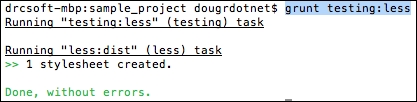
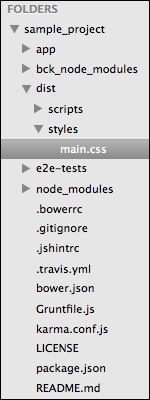
If all has gone well, a new directory, named styles, will be created under the dist directory. The dist directory will be created for you if it does not already exist. Then the app.less file is compiled into main.css, which is then written to dist/styles/main.css.
Now
main.css may be inspected to view the compiled result:
/* app css stylesheet */
.menu {
  color: #6794c3;
  border-color: #d6e1ed;
  -webkit-box-shadow: 0 0 5px #5B83AD;
  box-shadow: 0 0 5px #5B83AD;
}
.menu:before {
  content: «[«;
}
.menu:after {
  content: «]»;
}
.menu > li {
  display: inline;
}
.menu > li:before {
  content: "|";
  padding-right: 0.3em;
}
.menu > li:nth-child(1):before {
  content: "";
  padding: 0;
}
Modify the index.html file to use the newly generated CSS created by the LESS task. Simply comment out the existing import and add the new import as follows:

Now navigate to http://localhost:8000/app/#/view1 and view the style change to the menu, which now has a light blue box-shadow style:
The new directory structure will now look as follows:
The process for testing the imagemin configuration will be extremely simple. We will need to create a directory for the images that will be used in sample_project and then add some test source images into the directory. We can get the images from the SpaceX public domain image site located at: https://www.flickr.com/photos/spacexphotos. Choose any photos you like and as many as you wish to use. This example will use the following two images:
https://www.flickr.com/photos/spacexphotos/23802553412/

https://www.flickr.com/photos/spacexphotos/23604164970/

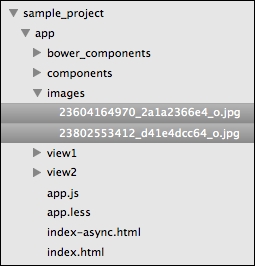
First, create a directory named images located within the app directory. The path will be sample_project/app/images. Then, download the full-size Original source files from the SpaceX photos into the newly created images directory:
During the writing of this section, a bug was found in the version of contrib-imagemin being used. It was necessary to run an update of imagemin from version 0.9.4 to 1.0.1. This is accomplished by the following process:
In the terminal, issue the following command in order to get the current versions and any available updates to existing packages in the project:
npm outdated
This will provide output similar to this example:
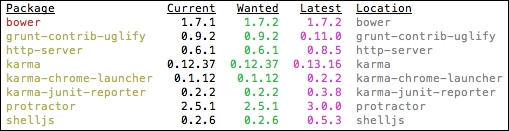
Then, using the version found in the Latest column of the output, update the version number used in package.json. In this case the modification was to update imagemin registration in devDependencies to 1.0.0, as follows:
"grunt-contrib-imagemin": "^1.0.0",
Finally, running the npm command to update grunt-contrib-imagemin will then get the version from package.json and update the package in the node_modules directory:
npm update grunt-contrib-imagemin
This process may be used to update any specific package manually. Now we can return to testing imagemin with our images.
Next, modify the imagemin configuration in Gruntfile.js to point to the correct path for the source image files and also the path for the distribution directory, as follows:
imagemin: {
      dynamic: {
        files: [{
          expand: true,
          cwd: 'app/images/',
          src: ['**/*.{png,jpg,gif}'],
          dest: 'dist/images/'
        }]
      }
    },
Notice that the src property configuration is a glob of file extensions that may be used for matching an expression to files in the source directory. The source directory is relative to the configuration for the
Current Working Directory (cwd), which is app/images/. Then the destination directory path is defined as the location where optimized images will be written.
Save your changes and then run the following command to run the imagemin task:
grunt testing:imagemin
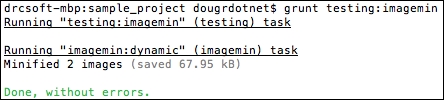
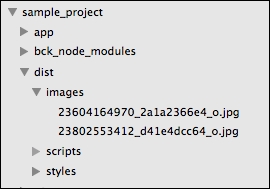
For these two images, imagemin reports that a total of 67.95 kB was saved in optimization. The images directory was dynamically created on the first run. Now that the task has been run, the directory tree will be as follows:
The notify configuration is very simple; all that is needed is to declare the tasks and define the notification title and message. The title and task messages may be any text you wish to be displayed in the notification.
For the sample_project notify configuration, the following was used:
notify: {
      jshint: {
        options: {
          title: 'Linting Complete',
          message: 'jshint finished',
        }
      },
      uglify: {
        options: {
          title: 'Minification Complete',
          message: 'JavaScript is minified'
        }
      },
      less: {
        options: {
          title: 'LESS Compiled',
          message: 'CSS is generated'
        }
      },
      imagemin: {
        options: {
          title: 'Images Minified',
          message: 'Images are minified'
        }
      },
      watch: {
        options: {
          title: 'Watch Started',
          message: 'Watch is running'
        }
      }
    },
A small modification needs to be made to our registerTask callback in Gruntfile.js: an additional parameter needs to be added to the function and that argument variable needs to be added to the array of tasks in the run method. The modification will look like this when complete:
grunt.registerTask('testing', 'testing individual tasks', function(a, b) {
    grunt.task.run([a,b]);
  });
This will now allow us to run two tasks, passing both in one Terminal command like this:
grunt testing:jshint:notify
In this example, both jshint and notify were run in a single command. jshint was passed into argument a and notify was passed into argument b. Then, jshint was run first with notify being run following the successful completion of jshint. The terminal output from this test should look like the following:
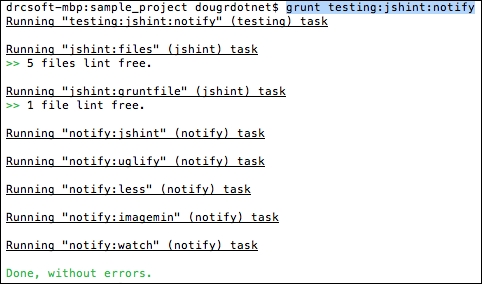
The notify command will create a system notification using the configured title and message for each task defined within notify. For this example, growl is being used on this system, so the notification appears on screen and looks like the following:

This is a really convenient feature because, when the sample_project automated build is fully configured, the build process will not need user interaction for each change. The process will launch automatically and the notifications will provide information about the task process. If there is an error, an error message will be included in the notification instead of the user-configured message:

Upon notification, information may be obtained from the terminal about the error. Otherwise, you, the developer, don't have to monitor the terminal for each build.
The open command is the simplest configuration of all the tasks that are being used in sample_project. All that is needed is to define the URL to open when the task is run along with the browser application name that should open the URL:
open : {
   dev : {
      path: 'http://localhost:8000/app/index.HTML',
      app: 'Google Chrome'
   }
},
In the case of sample_project, the HTTP server runs on localhost port 8000, with the homepage located in the path /app/index.HTML. The open command is configured to open Google Chrome in this example. No changes to Gruntfile.js are necessary at this time; simply run the following command for our setup used in notify, passing in two task arguments with the second one being open:
grunt testing:jshint:open
Once run, and assuming there are no errors in the jshint task for this example, the open command will launch Google Chrome and run the current version of sample_project in the running browser.
The
watch is the task that brings everything together for our truly automated build. Once configured, watch will continue running after the first manual build and automatically build when any of the configured files it is watching change. watch will also run any tasks configured to run when it detects changes in files. For sample_project, watch configuration should include any files that require other tasks to be run when files have been changed. The watch configuration will be configured like this:
watch: {
   gruntfile: {
      files: 'Gruntfile.js',
      tasks: ['jshint'],
   },
   scripts: {
      files:['app/app.js', 'app/view1/*.js', 'app/view2/*.js', 'app/app.less'],
      tasks: ['default']
   }
},
In this configuration, if Gruntfile.js itself changes, then it should be linted to ensure no errors are introduced. Additionally, if any defined scripts change then the default task should be run. The default task configuration needs to be changed in order to include all of the tasks needed to run by default for sample_project. The registerTask method changes will look like the following:
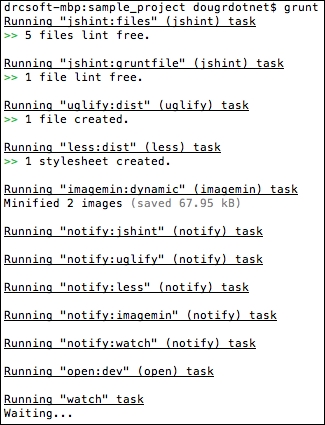
grunt.registerTask('default',['jshint','uglify', 'less', 'imagemin', 'notify', 'open', 'watch']);Running the default task only takes a single command from Terminal:
grunt
Once the default command runs for the first time, watch will continue to run and monitor for changes. The output for sample_project's first run will look like this example:
Next, make a small change to Gruntfile that adds an error. Remove a semi-colon, for example. Once saved, an error notification will be presented from notify. Inspect the terminal for the error:
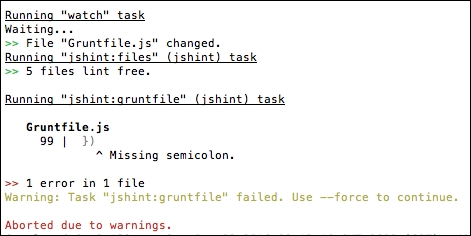
Revert the change made to Gruntfile.js so that there will be no errors and save the file:
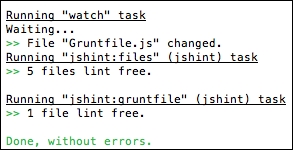
Notice that notify did not run now that there was no error. This is because watch does not specify notify to run when only Gruntfile.js is changed. Next, we will make a change to one of the files configured in the scripts property of watch. This time it is expected that the default task will run, launching all of our configured tasks. Open up app.js and place a comment at the top of the file:
'use strict';
// comment added for testing
// Declare app level module which depends on views, and components
angular.module('myApp', [
'ngRoute',
'myApp.view1',
'myApp.view2',
'myApp.version'
]).
config(['$routeProvider', function($routeProvider) {
$routeProvider.otherwise({redirectTo: '/view1'});
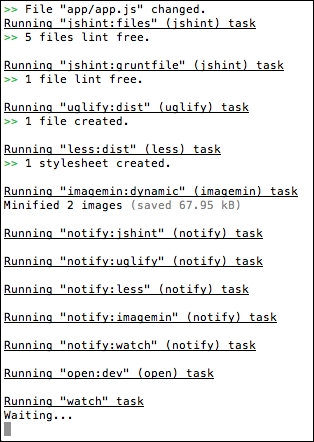
}]);Save the change and then notice that the default task runs automatically. A notification will be presented for each task and the terminal output will provide logging for the completion of each task. watch will continue to monitor for changes and you can continue working without having to manually run any of your tasks:
Lets have a look at the code for the Gruntfile.js file:
module.exports = function(grunt) {
  'use strict';

  grunt.initConfig({
    // Metadata.
    pkg: grunt.file.readJSON('package.json'),
    banner: '/*! *** DO NOT EDIT THIS FILE ***
' +
    'It is automatically generated in the build
' +
    '<%= pkg.name %> - v<%= pkg.version %> - ' +
      '<%= grunt.template.today("yyyy-mm-dd") %>
' +
      '<%= pkg.repository %>
' +
      '* Copyright (c) <%= grunt.template.today("yyyy") %> <%= pkg.author.name %>;*/
',
    // Task configuration.
    jshint: {
      files: ['app/app.js', 'app/view1/*.js', 'app/view2/*.js'],
      options: {
          jshintrc: '.jshintrc'
        },
      gruntfile: {
        src: 'Gruntfile.js'
      }
    },
    uglify: {
      options: {
        banner: '<%= banner %>'
      },
      dist: {
        src: ['app/app.js', 'app/view1/view1.js', 'app/view2/view2.js'],
        dest: 'dist/scripts/<%= pkg.name %>.<%= pkg.version %>.min.js'
      },
    },
    less: {
      options: {
        paths: ["app"]
      },
      dist: {
        src: 'app/app.less',
        dest: 'dist/styles/main.css'
      }
    },
    imagemin: {
      dynamic: {
        files: [{
          expand: true,
          cwd: 'app/images/',
          src: ['**/*.{png,jpg,gif}'],
          dest: 'dist/images/'
        }]
      }
    },
    notify: {
      jshint: {
        options: {
          title: 'Linting Complete',
          message: 'jshint finished',
        }
      },
      uglify: {
        options: {
          title: 'Minification Complete',
          message: 'JavaScript is minified'
        }
      },
      less: {
        options: {
          title: 'LESS Compiled',
          message: 'CSS is generated'
        }
      },
      imagemin: {
        options: {
          title: 'Images Minified',
          message: 'Images are minified'
        }
      },
      watch: {
        options: {
          title: 'Watch Started',
          message: 'Watch is running'
        }
      }
    },
    open : {
      dev : {
        path: 'http://localhost:8000/app/index.HTML',
        app: 'Google Chrome'
      }
    },
    watch: {
      gruntfile: {
        files: 'Gruntfile.js',
        tasks: ['jshint'],
      },
      scripts: {
        files:['app/app.js', 'app/view1/*.js', 'app/view2/*.js', 'app/app.less'],
        tasks: ['default']
      }
    },
  });

  grunt.loadNpmTasks('grunt-contrib-jshint'),
  grunt.loadNpmTasks('grunt-contrib-uglify'),
  grunt.loadNpmTasks('grunt-contrib-less'),
  grunt.loadNpmTasks('grunt-contrib-imagemin'),
  grunt.loadNpmTasks('grunt-contrib-watch'),
  grunt.loadNpmTasks('grunt-notify'),
  grunt.loadNpmTasks('grunt-open'),

  grunt.registerTask('default',['jshint','uglify', 'less', 'imagemin', 'notify', 'open', 'watch']);

};