As previously mentioned, we will use a lot of brushes that behave differently in order to sculpt our alien. In this section, we will take our hands over the settings that are shared between all the brushes with the Sculpt/Draw brush as an example. Let's perform the following set of steps:
- In order to do our experimentation, we will use a Cube primitive. In the Object Mode, we place our cursor at the center of the scene (Shift + C) and we add a Cube (Shift + A). Note that you can use the one placed by default in any new scene if you want.
- The Cube has a low polygonal resolution so we will have to subdivide it by going in to the Edit Mode, select all its components, and use the Subdivide Smooth option under the Specials menu (the W key). We will repeat this action six times in order to have a good density of polygons.
- In the Sculpt Mode, we will then select the Standard brush (if not already selected) in the left panel of the 3D viewport by clicking on the brush icon button under the Tools tab (refer to 1 in the following screenshot).
- We can now draw on the subdivided cube. As you can see, it pushes the geometry. This is because our brush has the Add option activated by default. If we want to go deeper, we will need to switch to the Subtract mode. The Subtract option simply reverses the behavior of the brush. Both the options are placed under the Brush subpanel in the Tools tab (refer to 2 and 3 in the following screenshot). It's not very convenient to click on buttons in order to do such a simple manipulation, so we encourage you to use the Ctrl key while sculpting on your mesh to switch between these modes.
- As you may have seen, we are not really precise because of the size of our brush.
- In order to change the size, we will use the corresponding slider under the brush icon called Radius (refer to 4 in the following screenshot ). We can (and recommend this to you) use the F key as a shortcut.
- Now that we have more control over the size of our brush, we will change its Strength under the Radius slider (refer to 5 in the following screenshot). We can use the Shift + F key as a shortcut. As you can see, on the right-hand side of both sliders (Strength and Radius), there is a little icon that allow us to use the pen tablet sensitivity in order to dynamically change these options. We will only use this for the Strength option, so when we lightly press on the pen tablet, we will have less strength than if we were pressing it harder.

Brush options
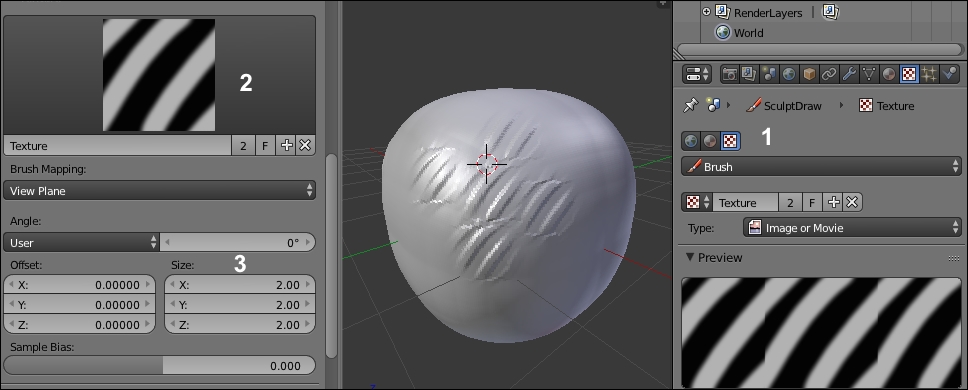
- Another interesting thing that we can set for our brushes is Texture (also called an alpha). An alpha is usually a black and white image that is useful while adding details such as skin pores or patterns to an object. When an alpha is added to a brush, the black pixels will remove the brush behavior during sculpting. To import an alpha, we will first need to go in the Textures subpanel of the Properties panel (on the far left of the interface, by default) and click on the third icon (a checker pattern) (refer to 1 in the following screenshot).
- We can now add a new texture, and under the Image subpanel, we can open an image. We can now go under the Textures subpanel of the Tools tab in order to select our newly imported texture (refer to 2 in the following screenshot).
- If we want, we can also change the repetition of our alpha by changing the X, Y, and Z size sliders (refer to 3 in the following screenshot).

Adding a Texture (alpha) to our brush
- The last setting that we will test is the Curve profile of our brush. The curve of the brush is located under the Curve subpanel in the Tools tab. Changing the curve profile allows us to change the behavior of the brush. For instance, with our current brush, Sculpt/Draw, if we click on the last icon (the flat curve) under the curve, we can see that the brush is harder while sculpting over our cube.
- To understand this setting better, imagine that this is half of the profile of a real brush (see the following screenshot). We can select each point that composes the curve and move it to change the curve profile. We can also add a new point on the curve by clicking anywhere on it. When a point is selected, we can remove it by clicking on the X button. This curve is called a Bezier curve, so we can also change the smoothness of a point using the Tool icon and choosing the handle type that we want.

A modified curve of a brush.
In order to test our brush settings, we subdivided our cube by hand but it's not practical while sculpting an object because we didn't have enough control over the subdivision. In order to have control over our mesh, Blender gives us two main methods, the Multires (a.k.a. Multiresolution) modifier and Dyntopo.
The Multires modifier is added to the modifier stack of an object and allows us to maintain subdivision levels of sculpture. For instance, we can sculpt at a low level (with a low resolution), and the details will be transferred to the higher levels and vice versa. We will test it right now! This is done as follows:
- We will first create a new Blender file (by navigating to File | New) and then with the default cube selected, we will go to the Properties panel in order to add a Multires modifier.
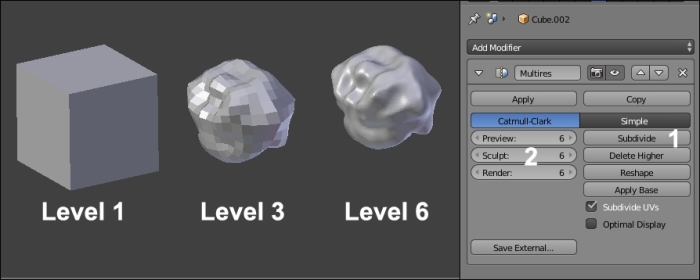
- We will subdivide our cube six times with the Subdivide button (refer to 1 in the following screenshot). If we were using a Subdivision surface modifier, our cube will be rounder. To test this out, we can go into the sculpt mode and start sculpting our cube with the Draw brush.
- We can now move between the different subdivision levels with the Sculpt slider of the Multires modifier (refer to 2 in the following screenshot). As you can see, we don't lose our sculpted information while changing levels, we are just changing the amount of details of the object. Of course, when you are at a lower level, you won't have as much detail as at the higher levels. The goal of all of this is to give you the possibility of changing the main shape of your sculpture at a low resolution without overwhelming yourself with all the details that you have sculpted at the higher levels. So don't try to add details too early in order to get the shape right and progressively increase the subdivisions.

The Multires modifier with an example of three different levels of subdivisions
The Dyntopo method will generate details according to the amount that we choose. The geometry will be subdivided when we sculpt an object and will be located where we have placed our mouse pointer. We will be using this method for our alien soon, so let's test this to get used to it:
- We will first create a new Blender file (by navigating to File | New).
- The cube is a little bit low in resolution, so we will subdivide it twice with the Subdivide Smooth option (the W key).
- In the Tools tab, under the Dyntopo subpanel, we can activate Dyntopo by clicking on the Enable Dyntopo button. Our cube will now be converted to triangles (this is not a problem because remember, while sculpting an object, we don't care about its topology, we care about its shape). If you want to look at the wireframe of the object, use the Z key or simply go into the Edit Mode.
- By default, we are in Relative Details as you can see in the second drop-down menu. This option means that the amount of detail will be proportional to the distance of your working camera view. If we sculpt near the object, the amount of detail will be much more important than if we sculpt far from the object.
- This method is nice, but there is another method that allows us to control the amount of detail without caring about our distance from the object. This is the constant details option (we will use this one for the alien). We can change from Relative details to Constant Details in the Sculpt details drop-down menu.

The Dyntopo settings
- As you can see, we now have the detail size slider expressed by a percentage that allows us to change the amount of detail that our brush will generate on our mesh. With a small percentage, we will have finer details and vice versa.

A Dyntopo mesh with different levels of sculpted details.
