Before continuing with the alien creation, some basic knowledge of anatomy can be very useful. It is a basic discipline for a character artist. Don't worry, we will clarify the concerned parts of the body for each step with illustrations.
Of course it is an alien, so we can accept the fact that we don't always have to respect human anatomy for specific parts. He has a huge head, only two fingers and a thumb, and very different feet. His humanoid appearance imposes some anatomical likelihood. This is especially useful if you plan to animate it later on. Improving your knowledge of this topic will help you to understand the movements and postures better.
In the early 16th century, Leonardo Da Vinci was one of the first artists who tried to understand the human anatomy. While religious obscurantism prohibited the examination of corpses, he dared to defy this. By dissection and observation, he did many illustrations detailing the positioning of muscles, joints, nerves, and organs.
It won't be necessary in our case to know the scientific names by heart. It's rather important to know and understand their general forms. Overall, it's more about the comprehension of human body mechanisms.
We are continuing the modeling of our alien using Dyntopo as we had previously mentioned. This will allow the creation of the antennae very easily while they are not yet present in the base mesh.
The following is the preparation of our environment before sculpting:
- We will set the optimizing options that were previously explained.
- We can adjust the lens parameter in the right panel of the 3D viewport (N). A high value lessens the focal deformations.
- We must check the mirror options in the left panel of the 3D viewport (T) to Symmetry/Lock by choosing the axis of symmetry. It is very important in order to save time.
- We will then activate the Dyntopo option in the left panel of the viewport. A detail size of around 25 percent is enough to start. It depends on the size of your model.
For a better understanding, we are going to start sculpting by adding details by iteration.
We start defining the jaw and chin with the Clay Strips brush (refer to 1 in the following screenshot). It is unnecessary to have too many details for the moment. While sculpting, always remember to define the main shapes (the volumes) and then gradually move towards the details.
We then accentuate the delimitation between the jaw and neck without exaggeration. A strength of 0.5 is enough.

- In order to dig into the polygons, we press Ctrl while sculpting. It allows us to switch to the Subtract mode on the fly.
- Then we slightly smooth the added geometry with the Smooth brush for a better blend of the created shape. You need to remember to smooth the shape very often in order to avoid having something too grainy.
Note
The Smooth brush
This is often a very useful brush. It allows you to soften and smooth your shapes. This brush is so useful that there is a special shortcut that you absolutely need to know. Hold the Shift key while sculpting in order to use it. It works while using any brush. When you use it over a big density of polygons, it will be harder to smooth your shape, so it will be mainly useful before working on the details.

- Now that the jaw is sketched, we will go to the side view. Then we have to adjust the silhouette of the neck, as well as the skull with the Grab brush. Our alien has a very curved neck.
- We will adjust the shape of our model little by little by turning it around. It's very important to observe your model from different points of view.
Do not hesitate a moment to look at the reference sketch and position the alien in a very similar pose. You can also create a new 3D view editor to keep an eye on the view of your choice (in our case, we've used the orthographic side view).
Note
The Grab brush
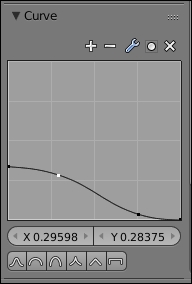
This is often a very useful brush when you start a new model. It works a little bit in the same way that the Proportional Editing tool does. If you have any difficulties using it, you can go to the Curve options in the left panel of the viewport and modify the curve to decrease its profile.

In our case, we are going to use a very soft curve for the Smooth brush.

- Again, we will take the Clay Strips brush to keep going on the face of the alien in order to dig the orbits and accentuate the eyebrows by adding matter (refer to 2 and 3 in the previous screenshot). Be careful to not add too much volume at this place. Do not hesitate to decrease the strength (Shift + F) of your brush, if necessary.

- We will also start to sketch the nose and the mouth (refer to 3 in the previous screenshot). Before detailing the lips, we need to start adding some new volume. We form a rounded edge created by the maxilla and the jaw. Remember that the front of a set of teeth has almost a semi-cylindrical shape. It's easier to create the mouth rounded volume from the bottom view.
- Once this is done, we can start sketching the opening of the mouth with the Crease brush, which allows us to draw a mined line. Consider the fact that the geometry is dynamic, so don't hesitate to add some resolution and pinch your shapes in order to make them more accentuated.
- We will again use the Clay Strips brush in order to give some volume to the lips.
Remember to leave a little gap between the lower lip and the top lip. The top lip is a little bit more forward than the lower lip from a profile view.
- In the face view (refer to 5 in the previous screenshot), we will go back to the Object Mode (Tab) and place the 3D cursor where we want the eye at the middle of the orbit. It doesn't matter if the orbit is not completely dug.
- We will add UVSphere (Shift + A). We will resize this with the Scale Tool (S), and we will position it (G) in the front view (1) just as in the side view (3). For a good placement of the eye, looking at the wireframe can be helpful. You only need to go to the Object Data tab and then to the Group in the Properties editor, and check the Wire and Draw all Edges option.
- Then, we can sculpt around the eyelids with the Clay Strips brush by being careful to accentuate the outside and inside corner (the lacrimale caruncle) (refer to 7 in the following screenshot).
- In order to accentuate the eyes, let's pinch the upper and lower eyelids with the Crease brush (refer to 8 in the following screenshot).

Finding a good position of the eye is not an easy task. You can move the facial structure with the Grab brush if you have problems. The top eyelid must be slightly forward. Conceptually, the eyes are inordinately big, so be careful that they don't touch each other.
- Now that the face begins to take shape, we will continue with the neck. We adjust the shape a little bit more with the Grab brush, then we start sculpting the muscles and bones of the neck. We carve the clavicles with the Clay Strips brush.
- Then we will move on the sterno-mastoid muscles. It is a muscle group that starts from the mastoid near the ear and attaches to the sternum and the clavicle. We keep working with the Clay Strips brush (refer to 9 and 10 in the following screenshot).
- In the side view, we can polish the silhouette of the neck with the Grab brush (refer to 11 in the following screenshot).

Now let's refine the face:
- We will come back to the mouth by adding some volume to accentuate the circular muscles around the mouth. Be careful to adjust the level details of Dyntopo to around 10 percent (refer to 13 in the following screenshot). As you may have seen, when you are sculpting an object, you don't directly get the shape that you want, so you always need to go back and forth over the different parts.

- This brings us to accentuating the wrinkles that make the junction with the cheeks.
- Then we will go and pinch the upper lips with the Pinch/Magnify brush. The lower lip doesn't need to be as pinched like the upper one. Again, you can increase the level detail of Dyntopo to around 7%.
Note
The Pinch/Magnify brush
This brush allow us to pinch the polygons outwards or inwards (in the Subtract mode). It is perfect in our case to detail the lips, the wrinkles, or accentuate the contour of muscles. It is often used to get a cartoon style or for a hard surface modeling where you need to sculpt angular surfaces.


- We will take a moment to turn the head, including the top view (16); then we adjust the round shape of the skull with the Grab brush.
- Now, it's time to add the antennae (refer to 17 in the following image). For this, we are going to use the Snake Hook brush with a Dyntopo level detail of around 14%. The difficulty will be to find a good point of view of the head because we can't move the view while extracting the geometry with the Snake Hook brush. We must be positioned on the side in order to be able to extract the matter from a little area on the top of the forehead and stretch it outwards in a good direction. Do not hesitate to make several tries if this does not suit you. You can always adjust the size of the brush and the level of detail.

Note
Undo while being in the Sculpt Mode
Unfortunately, the Undo function of Blender is not very optimized for the moment in the Sculpt Mode. It can be very slow, so do not use it too often. In many cases, you can probably quickly fix your mistakes without Undo.
The Snake Hook brush
This is very useful to sculpt horns or tentacles. This brush is more interesting with Dyntopo. The problem with a mesh that uses a Multires modifier is that topology problems quickly appear with a lack of geometry. As long as the topology is dynamic, we can easily create an arm, a leg, or anything else. We can extend this as long as we wish the shape of our model to be.

- Once the antennae are sculpted, we will add some polygons with the Clay Strips brush, then we will smooth them with the Smooth brush. We will magnify the extremity with the Inflate/Deflate brush (refer to 18 in the preceding screenshot).
- We will end this by digging forward a little bit with the Clay Strips brush in order to break the rounded shape.
Note
The Inflate/Deflate brush
This brush will allow you to inflate volumes by pushing the polygons in the normal's direction, or the inverse in the opposite direction in the Subtract mode. It can be very useful for meshes with closely spaced surfaces that are difficult to sculpt. This gives a very fast volume that makes it much more comfortable for sculpting.

So our little alien has now its telepathy organs. We are going to sculpt the torso.
We will start the torso by sketching the pectoralis major muscle:
- We will start by smoothing the surface and adding enough details.
- With the Clay Strips brush, we will dig the dividing lines with the clavicle and the shoulder. (refer to 19 in the following screenshot).
- Then gradually, we will add some volume accentuating the muscle fibers. The brush strokes start from the bottom of the shoulder at the clip with the biceps and go to the center of the chest (refer to 20 in the following screenshot). Get used to guiding your brush movements in the direction of the muscle.

- Once the pectoral is sculpted, we will slightly accentuate the bottom of the chest and the abs with very light touches of the Clay Strip brush. This is to suggest forms rather than showing them (refer to 21 in the preceding screenshot).
- We will then work on the back part of the alien. It is a complex part of the body. So we will start to draw the muscles (refer to 22 and 23 in the following screenshots) to gain visibility with the Crease brush. We can soften and smooth the muscle shapes. Then we will accentuate the spine with the Pinch/Magnify brush.

- Now we will sculpt the buttocks. Avoid putting too much volume here. Turn the model around and observe the side view a moment, if necessary adjust the silhouette. Remember to draw a pinch line to accentuate the bottom of the buttocks with the Pinch/Magnify brush. This forms a fold between the buttock and the thigh (refer to 24 in the following screenshot).
- We will add a few folds to show that it is a combination.
- We will use the Pinch brush to accentuate the lower abdomen and pelvic bones (refer to 25 in the following screenshot). Unless you desire a different sexual orientation for our alien, feel free to add some volume to his crotch, it brings a little more realism. Don't be shy.

Now, let's start the arms. We can see in the drawing that they are pretty fine and not very muscular. His hands have two fingers and a thumb.
We won't need a lot of muscle details. We will be just interested in the major forms.
Let's begin the process:
- We will start by digging the part between the shoulder and the biceps with the Clay brush (refer to 26 in the following screenshot). This accentuates the shoulders.
- We will smooth a little, and then add some volume to the biceps (refer to 27 in the following screenshot). Slightly, we mark the outline of the muscles with the Crease brush and adjust the shape with the Grab brush.

- Then we will work on the triceps that is located at the back of the arm. It is a muscle connected to the deltoid and covers the entire rear portion of the upper arm. We give it some volume by drawing the muscle fibers with some touches of the Clay Strips brush.
- The forearm is a complex area of human anatomy. It is usually quite difficult to sculpt. It consists of several muscles that twist to ensure the mobility of the hand and the fingers. For our alien, we simplified it by lessening the muscle visibility. With the Clay Strips brush, we will draw the long supinator that emerges because it forms the junction with the end of the biceps (refer to 28 in the preceding screenshot) near the elbow. We will then add some volume to the elbow.
- We will start from the elbow, and we mark a slight stroke of the Clay Strips brush in the direction of the wrist.
- The wrist is reinforced by slightly accentuating the bones on the sides of the upper part.
- We go and dig and slightly flatten the lower part of the wrist. (Refer to 30 in the following screenshot.)
The hand is also a fairly complex part of the body. We will not detail the anatomy here. We will try to focus on the main forms that compose it. Observe your own hands for better understanding of the forms.

Now, we will begin forming gristle on the upper part of the hand with the Clay Strips brush.
- We have placed a bit of volume to the different phalanges in order to accentuate them. (Refer to 29 in the preceding screenshot.)
- There is some skin between the two fingers and between the index finger and thumb that we will dig. This skin allows the flexibility and elasticity of finger movements.
- We will take the Crease brush and mark the lower part of the phalanges where the folds of fingers will be.
- We will keep working with the Crease brush and draw the lines of the hands. The three main lines are enough to give the appearance of a palm (refer to 30 in the preceding screenshot).
We continue our sculpture with the legs. We can see that he has quite muscular thighs. The feet have a dynamic style that reflects the legs of a rabbit.
- As with other parts of the body previously created, we will adjust the silhouette of the legs with the Grab brush before detailing the shapes.
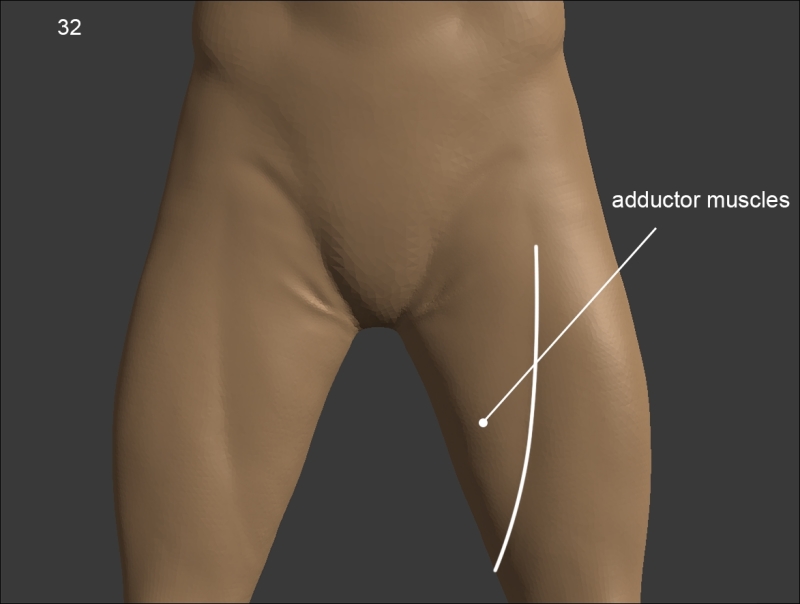
- We will slightly dig a line from the hip to the inside of the thigh that allows us to accentuate the adductor muscles (refer to the following screenshot).

- Now it is time to use the Mask brush that will be only shown without our Matcap activated, that's why you can't see the Matcap in the following screenshots. The boots are up to the knees and have a window over the calves (refer screenshot 34). It is necessary to have enough polygons in order to get the mask contour sharp.
- In order to highlight the edges of boots, we will reverse the mask with the shortcut Ctrl + I (refer to 35).

Note
The Mask brush
This is a quite special brush. It allows us to mask an area of the mesh. It means that this area stays unchanged when any other brush is used as long as it is masked. Thus, we can create shapes that would be impossible to do otherwise. The uses are many. It is very useful for extruding surfaces.


- With the Grab brush, we will pull the polygons at the edge of the masking. Then we slightly raise them (refer to screenshot 36).
- We increase the level of detail to enhance the edges of the boots. We mark the separation with the Flatten/Contrast brush. We need to zoom enough and adjust the brush size (F) accordingly.
By using the same technique, we can sculpt the collar in the neck area.
The belt needs to be treated separately because it's not about sculpting. We are going to use more the traditional tools that we saw in the previous chapter. But as you'll see, it is very interesting to mix the different techniques that you've learned in this chapter with polygonal modeling tools. That's why we are going to use the Grab brush in order to wrap the belt around his waist.

We will start the modeling of the belt with a primitive circle. After this, we will then place our cursor at the center of the character in the Object Mode from the top view in order to add a new circle with 32 vertices.
- In the Edit Mode (Tab), and with the Wireframe option of Viewport Shading on, we will adjust the size of the circle by scaling on the Y axis (S + Y). We then rotate it a little bit in order to match with the shape of the alien (refer to 39 in the preceding screenshot).
- We will then extrude the circle to form the height and the thickness of the belt. As we said before, we can now use the Grab brush (in the Sculpt Mode) in order to stick the belt to the waist. In our case, it's as if we were using the Proportional Editing tool (refer to 40 of the preceding screenshot).
- Then we will go back to the Edit Mode in order to add more resolution with the Loop Cut tool (Ctrl + R). We will also place a loop cut in the middle of the belt on which we will add a little Bevel (Ctrl + B).
- In the middle of the bevel, we will add a new edge loop that we will scale along the normals (Alt + S) (refer to 41 in the preceding screenshot).
- We can now switch back to the Sculpt Mode, and with the X symmetry option off, we can move the right-hand side down a little with the Grab brush.

Now that we've finished the belt, it's now time to add the belt buckle as follows:
- In the Object Mode, we will add a new plane.
- Then we will go in the Edit Mode (Tab) and add a horizontal and a vertical edge loop (Ctrl + R).
- We will then resize these edge loops so that they form a diamond shape (refer to 42 in the preceding screenshot).
- It's now time to add a Subdivision Surface modifier.
- We will then add some edge loops on both sides in order to maintain the diamond shape.
- In order to add thickness to the buckle, we will do some extrusions of the whole geometry (A and E). As always, we will maintain the shape with the Loop Cut tool (Ctrl + R).
- We will also scale the front polygons of the buckle.
- Finally, we can place our belt buckle at the right place in the Object Mode.
There you go! Our little alien is ready for crazy galactic adventures!

A render of the final alien sculpt with Blender Internal Renderer


