In the previous recipe, we modeled the character's eye and we had already modeled the teeth in Chapter 2, Sculpting the Character's Base Mesh, because we needed them, at that moment, to go on with the sculpting; they had been made with simple Cube primitives quickly scaled and tweaked in Edit Mode.
It is now time to model the armor for our warrior. Let's begin by creating the hard metal plates. We are going to use an approach similar to the modeling of the fangs, which is by starting with a Cube primitive and subdividing it to have more geometry to be edited in the proper shape, and we'll also use the LoopTools add-on to simplify some processes.
We will carry on with the Gidiosaurus_modeling.blend file:
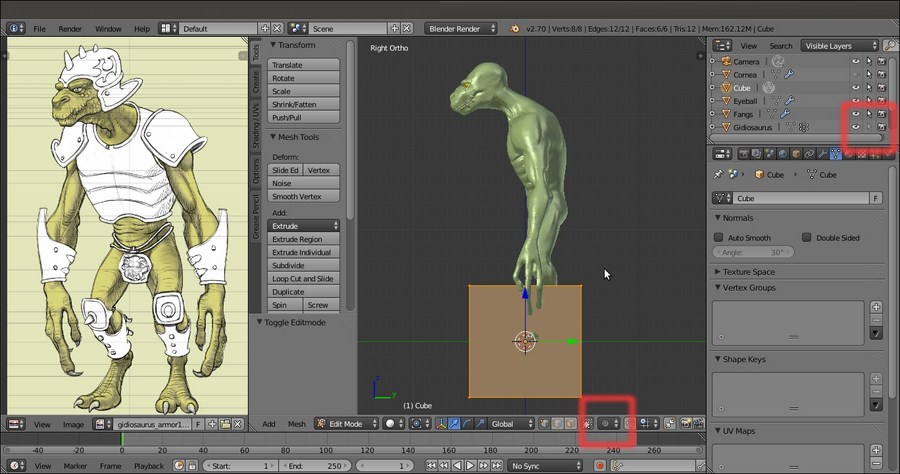
- Press 3 on the numpad to go in Side view.
- By scrolling the middle mouse wheel, zoom back to frame the Gidiosaurus mesh in the 3D window.
- In the Outliner, click on the arrow icon on the right-hand side of the Gidiosaurus item to make it unselectable.
Now, we can start to build the armor; let's go with the chest piece:
- Note that the 3D Cursor is in the middle of the scene, at the character's pivot location (Shift + S | Cursor to Selected or also Cursor to Active, just in case).
- Press O to disable the Proportional Editing tool; go to the 3D viewport toolbar to verify that the tool button is grayed.
- Press Shift + A and add a Cube primitive to the scene.
- Press Tab to go in Edit Mode and scale all the vertices to 0.500 (or press S | .5 | Enter).

Adding the Cube primitive to the scene
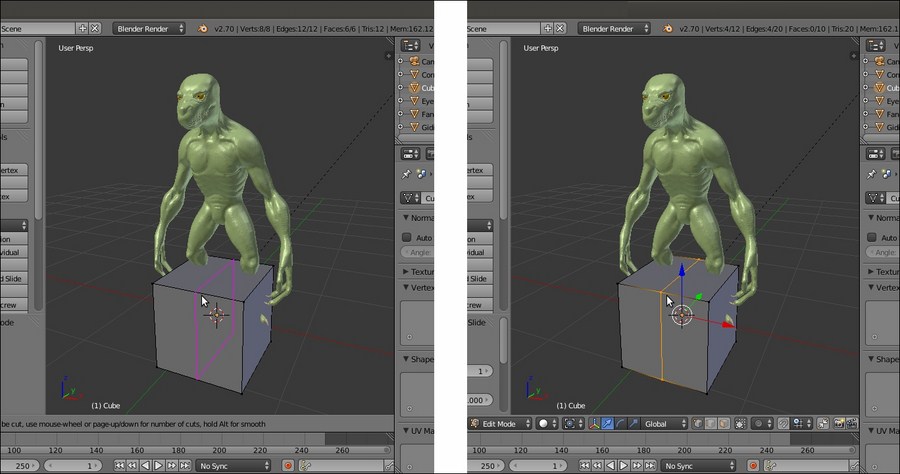
- Press Ctrl + R to add a loop along the y axis and then left-click twice to confirm it at the middle of the object:

Adding a central vertical edge-loop to the Cube
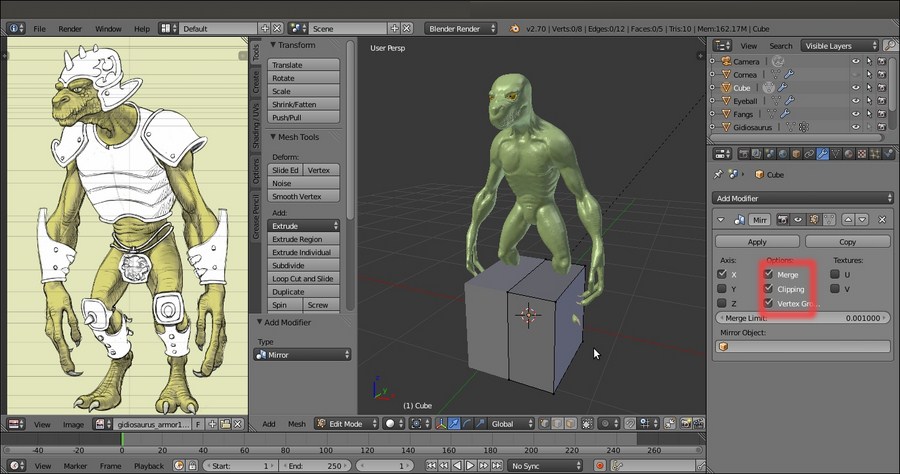
- Select the right-side vertices of the Cube and delete them; then, assign a Mirror modifier and check the Clipping item:

The Cube with the Mirror modifier
- Go again in Side view and press Z to go in the Wireframe viewport shading mode; select all the vertices and move them upward.
- Rotate the vertices to reflect the angle of the character's chest.
- Select the upper vertices and scale and rotate them to fit the creature's neck area.
- Select the bottom vertices and scale and rotate them to fit the base of the chest:

Starting to model the armor from the Cube primitive
- Press Ctrl + R to add a new horizontal edge-loop at the middle of the Cube; scale it bigger to fit the shape of the creature's chest.
- While still in Side view, grab and move the vertices to conform them to the chest shape.
- Press 1 to go in Front view and again move the vertices to adjust them consistently to the character's chest shape:

Adding more geometry and shape to the Cube
- Select the 2 middle outer vertices and move them down, in order to place the edge connecting them just below the character's armpit.
- Press Ctrl + R to add a loop along the x axis; click twice to confirm it at the middle of the lateral side:

Adding more geometry again
- Press the slash key (/) on the numpad to go in Local view with the selected object (in this case, even if still in Edit Mode, it is the Cube) and select the upper outer edge-loop.
- Go to the Tool Shelf panel and scroll down the Tools tab to find the LoopTools subpanel (the LoopTools items are available also in the Specials menu that we can call by pressing the W key in Edit Mode); click on the Circle button to make the selection on a circular path:

Using the LoopTools add-on
- Do the same also with the middle and the bottom edge-loop; then, select the central upper and bottom pole's vertices and delete them:

Going on with the modeling
- Press the slash key (/) on the numpad to go out of Local view.
- Press Tab to go out of Edit Mode and go to the Object Modifiers window under the main Properties panel; click on the Apply button to apply the Mirror modifier.
- Go back in Edit Mode and press Ctrl + R to add a horizontal edge-loop to the upper half of the mesh.
- Scale the new edge-loop to 1.100:

Adapting the shape of the armor to the chest by adding more geometry as edge-loops
- Add a new horizontal edge-loop also to the lower half of the mesh.
- Select the middle edge-loop and scale it smaller on the x axis, to 0.900.
- Select the bottom edge-loop and scale it smaller on the x axis as well.
- Select the last edge-loop and repeat the operation.

Going on with the modeling by adding edge-loops
- Press 3 on the numpad to go in Side view and Z to go in the Wireframe viewport shading mode.
- If not already, enable the widget in the toolbar of the 3D window; set the Transformation manipulators to scaling (the last icon to the right) and the Transform Orientation option to Normal.
- Select all the vertices and by moving the green scaling manipulator of the widget, scale smaller all the edge-loops on the normal y axis; small enough to almost reach the character's back and chest surfaces.
- Deselect everything and then select the middle edge-loop (press Alt + right-click); scale it again by using the widget to get close to the torso shape:

Adjusting the chest armor depth
- Do the same with the other edge-loops by selecting them individually, rotating and scaling them, and also by moving the vertices.

Refining the lateral profile of the armor
- Press the slash (/) key on the numpad to go again in Local view.
- Select the right-side vertices of the Cube and delete them.
- Go to the Object Modifiers panel and assign a new Mirror modifier; as usual, check the Clipping item.
- Select the central vertex on the upper-side part and delete it.
- Select the resulting loop of edges around the resulting hole (you can press Alt + right-click and then Shift + right-click to add the remaining unselected top vertex to the selection; it doesn't get selected with the edge-loop because there are no faces connecting it to the other vertices, but only edges).
- Press E and then S to extrude new faces and scale them (about 0.600).
- Select the new edge-loop and go to the LoopTools panel under the Tools tab of the Tool Shelf panel; click on the Circle button to make it rounded:

Adding the arm's holes
- Go in Front view and move the edge-loop outward.
- Go out of Edit Mode and press the slash (/) key on the numpad to go out of Local view.
- Press 1 on the numpad to go again in Front view. Go to the Object Modifiers panel and assign a Shrinkwrap modifier to the Cube; check the Keep Above Surface item and in the Target field, select the Gidiosaurus name:

Assigning the Shrinkwrap modifier to the chest armor
- Set the Offset value to 0.05.
- Move the Shrinkwrap modifier to the top of the modifier stack and click on the Apply button.
- Go in Edit Mode and select the shoulder edge-loop; go to the LoopTools panel and click on the Flatten button:

Refining the modeling through the LoopTools add-on
- Fix, below the armpit, the lateral vertices that are curved inwards, by using the Alt + S shortcut to move them outward along their normal, the 3D Cursor and the Snap pop-up menu (Shift + S) to place them midway from other vertices, and the Shift + V shortcut to slide them along the edges:

Tweaking vertices
- Press the K key to activate the Knife Topology Tool; by keeping the Ctrl key pressed to constrain the cuts to the middle of the edges, cut a new edge-loop as shown in the following screenshot (each time, press Enter to confirm the cut and then pass to the following one):

Using the Knife tool
- Press Alt + J to join the already selected triangular faces into quads:

Joining two triangular faces into one quad face
- Select all the vertices and press Ctrl + N to recalculate the normals.
- Deselect all the vertices and go to the Object Modifiers window; assign a Subdivision Surface modifier, set the Subdivisions level for View to 2, and check the Optimal Display item. Click on the Adjust edit cage to modifier result icon, the last one to the right with the editing triangle, in order to see the effect of the modifier in Edit Mode.
- Go out of Edit Mode and then go to the Tools tab under the Tool Shelf; under the Edit subpanel, select the Smooth shading.
- Go back in Edit Mode and select the vertices (in our case, mainly on the side and back) corresponding to areas where the sculpted mesh is overlapping the armor. Press Alt + S to scale their position along their normals and so fix the overlapping; then, select the upper vertices of the shoulder and move them closer to the character's shoulder surface:

Tweaking vertices with the visible cage of the Subdivision Surface modifier
- Repeat the operations of the previous step on all the vertices that need it; select the vertices on the belly and press Shift + V to move them upward, but along the edges to model the arc shape at the bottom of the plate:

Sliding the vertices and adjusting the polygonal flow through the LoopTools add-on
- Select the edges of the front and back and click on the Space button in the LoopTools add-on panel; if needed, tweak the value of the Influence slider at the bottom of the Tools tab to set the amount for the operation.
- Add edge-loops at the bottom of the armor and at the shoulder opening to create a rim; extrude the neck opening upwards to create a kind of short collar:

Extruding geometry
- Add edge-loops on the front of the chest plate as shown in the following screenshot (Ctrl + R and then slide it to 0.500) and then select the front vertices of the alternate edge-loops and in Side view, move them forward.
- Select the last bottom edge-loop and scale it bigger (to 1.100):

Adding edge-loops to add detailing to the armor
- Move the front vertices of the breast and belly downward, using the image loaded in UV/Image Editor as reference. Add more edge-loops to add definition to the front of the chest plate (in the following screenshot, the three added edge-loops are selected at the same time only to highlight them; in Blender, they must be added one at a time). Then, smooth the resulting oddly spaced back vertices by using the Space button of the LoopTools add-on:

Making the edges' length even through the LoopTools add-on
- In the Outliner, rename the Cube item as Breastplate (by either double-left-clicking or by pressing Ctrl + left-click on the item).
- Then, go to the Material window under the main Properties panel and assign a new material to the Breastplate object; rename the material as
Armor_dark. Set the diffuse color to RGB 0.605, 0.596, 0.686 and the Diffuse Shader Model option to Oren-Nayar; set the specular color to RGB 0.599, 0.857, 1.000 and the Specular Shader Model option to WardIso; set the Intensity value to 0.164 and the Slope value to 0.100. Under the Shading subpanel, check the Cubic Interpolation item. - Go to the Object Modifiers window and assign a Solidify modifier; move it up in the stack, before the Subdivision Surface modifier. Set the Thickness value to 0.0150 and check the Even Thickness item.
- Set Viewport Shading to Rendered to have a quick preview (be sure to have the proper scene layers activated, that is, the 6th for the lighting and the 11th and 13th for the character and armor). Then, go to the World window under the main Properties panel and activate the Indirect Lighting tab; then, click on the Approximate button under the Gather subpanel. For the moment, leave the rest as it is:

The Rendered result so far, with some World Lighting setting
- Save the file.
This is the usual polygonal modeling process that is common to most aspects of 3D packages. Starting from a Cube primitive, we moved and arranged the vertices to model the chest armor plate, extruding and also adding new edge-loops by using the Knife Topology Tool and the Ctrl + R shortcut.
We used the Mirror modifier to work only on half of the mesh and to have the other half automatically updated. In some cases, we had to temporarily apply the Mirror modifier to better scale the edges as complete circles (otherwise, they would have been half circles with odd scaling pivot points); then, we had to delete the vertices from one side and assign the Mirror modifier again.
At a certain point, as the armor's shape got more defined, we started to tweak the vertices in Edit Mode, but with the Subdivision Surface modifier applied to the editing cage in order to have the right feedback while conforming the armor's shape to the character's shape.
We also used a few of the options available in the LoopTools add-on that has been revealed to be an incredibly handy aid in the modeling process.
