
Chapter 4: Advanced MVVM Concepts
After learning the basics of the MVVM pattern and its implementation in WinUI, it's now time to build on that knowledge base to handle some more advanced techniques. Now you will learn how to keep components loosely coupled and testable when adding new dependencies to the project.
Few modern applications have only a single page or window. There are MVVM techniques that can be leveraged to navigate between pages from a ViewModel command without being coupled with the UI layer.
In this chapter, you will learn the following concepts:
- Understanding the basics of Dependency Injection (DI)
- Leveraging DI to expose view model classes to WinUI views
- Using MVVM and x:Bind to handle more UI events with event handlers in the view model
- Navigating between pages with MVVM and DI
By the end of this chapter, you will have a deeper understanding of the MVVM pattern and will know how to decouple your view models from any external dependencies.
Technical requirements
To follow along with the examples in this chapter, please reference the technical requirements in Chapter 2, Configuring the Development Environment and Creating the Project.
You will find the code files of this chapter here: https://github.com/PacktPublishing/-Learn-WinUI-3.0/tree/master/Chapter04.
Understanding the basics of DI
Before starting down the path of using DI in our project, we should take some time to understand what DI is and why it is fundamental for building modern applications. You will often see DI referenced with another related concept, Inversion of Control (IoC). Let's discuss these two concepts, clarify the relationship between them, and prepare you to use DI properly in this chapter.
DI is used by method developers to inject dependent objects into a class rather than creating instances of the objects inside of the class. There are different ways to inject those objects:
- Method injection: Objects are passed as parameters to a method in the class.
- Property injection: Objects are set through properties.
- Constructor injection: Objects are passed as constructor parameters.
The most common method of DI is constructor injection. In this chapter, we will be using both property injection and constructor injection. Method injection will not be used because it is not common to use methods to set a single object's value in .NET projects. Most developers use properties for this purpose.
IoC is the concept that a class should not be responsible for (or have knowledge of) the creation of its dependencies. You're inverting control over object creation. This sounds a bit like DI, doesn't it? Well, DI is one method of achieving this IoC in your code. There are other ways to implement IoC, including the following:
- Delegate: This holds a reference to a method that can be used to create and return an object.
- Event: Similar to delegates, they are typically used in association with user input or other outside actions.
- Service Locator Pattern: This is used to inject the implementation of a service at runtime.
When you separate the responsibilities of object creation and use, it facilitates code reuse and increases testability.
The classes that will be taking advantage of DI in this chapter are views and view models. So, if we will not be creating instances of objects in those classes, where will they be created? Aren't we just moving the tight coupling somewhere else? In a way, that is true, but the coupling will be minimized by centralizing it to one part of the project, the App.xaml.cs file. If you remember from the previous chapter, the App class is where we handle application-wide actions and data.
We are going to use a DI container in the App class to manage the application's dependencies. A DI container is responsible for creating and maintaining the lifetime of the objects it manages. The object's lifetime in the container is usually either per instance (each object request returns a new instance of the object) or a singleton (every object request returns the same instance of the object). The container is set up in the App class, and it makes instances available to other classes in the application.
It is time to see DI and DI containers in practice.
Using DI with ViewModel classes
All of the popular MVVM frameworks include a DI container to manage dependencies. Because we are handing MVVM ourselves, we will use a DI container that isn't bundled with any MVVM framework. Microsoft has included its own DI container in ASP.NET Core that is lightweight and easy to use. Luckily, this container is also available to other types of .NET projects, via a NuGet package.
In the MyMediaCollection project, open NuGet Package Manager and search for Microsoft.Extensions.DependencyInjection:
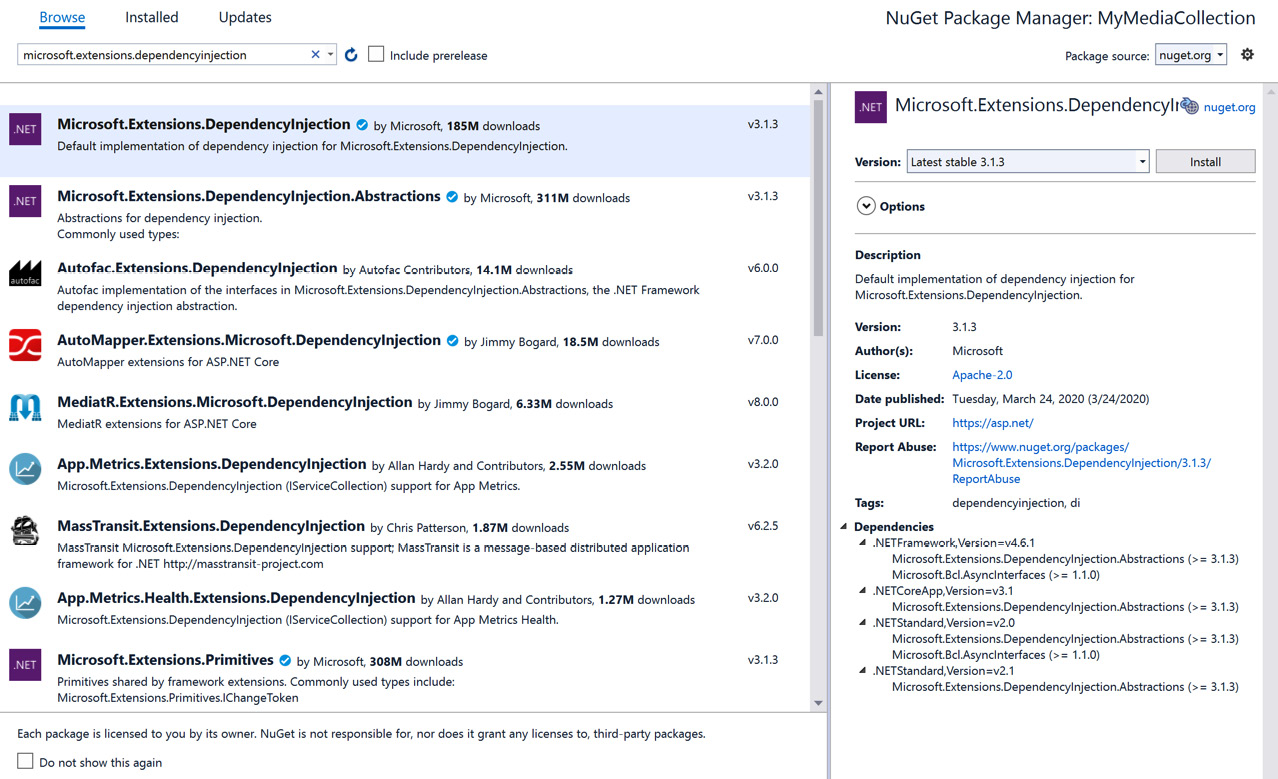
Figure 4.1 – Microsoft's DI NuGet package
Select the package and install the latest available version. After the installation completes, close the NuGet Package Manager tab and open App.xaml.cs. We have to make a few changes here to start using the DI container.
Microsoft implements a DI container through a class called ServiceCollection. As the name implies, it is intended to create a collection of services for the application. However, we can add any type of class to the container. Its use is not restricted to services. ServiceCollection builds the container, implementing the IServiceProvider interface. In the following steps, you will add support for DI to the application:
- The first thing you should do is add a public property to the App class that makes the container available to the project:
/// <summary>
/// This DI container manages the project's
dependencies.
/// </summary>
public IServiceProvider Container { get; private set; }
Here, get is public, but the property has a private set accessor. This restricts the creation of the container to the App class. Don't forget to add a using statement to the class:
using Microsoft.Extensions.DependencyInjection;
- The next step is to create a new method that initializes the container and to add our first dependency:
/// <summary>
/// Initializes the DI container.
/// </summary>
/// <returns>An instance implementing
IServiceProvider.</returns>
private IServiceProvider RegisterServices()
{
var services = new ServiceCollection();
services.AddTransient<MainViewModel>();
return services.BuildServiceProvider();
}
In the RegisterServices method, we are creating ServiceCollection, registering MainViewModel as a transient (per instance) object and using the BuildServiceProvider method of the ServiceCollection class to create and return the DI container.
- Finally, you will call RegisterServices from the App.OnLaunched event handler:
protected override void
OnLaunched(LaunchActivatedEventArgs e)
{
Container = RegisterServices();
Frame rootFrame = Window.Current.Content as Frame;
...
}
That's all of the code needed to create and expose the DI container to the application. Now that we are delegating the creation of MainViewModel to the container, you can remove the property of the App class, exposing the instance of MainViewModel.
Using the view model controlled by the container is simple. Go ahead and open MainPage.xaml.cs and update the ViewModel property to use the container's GetService<T> method:
public MainViewModel ViewModel { get; } =
(Application.Current as
App).Container.GetService<MainViewModel>();
Don't forget to add a using statement for the DI package:
using Microsoft.Extensions.DependencyInjection;
If you build and run the application now, it will work just as it did before. However, now all of our object instances will be registered in the App class and managed by the container. As new view models, services, and other dependencies are added to the project, they will be added to the RegisterServices method.
We will be adding a second page to the app later in this chapter. First, let's discuss the event-to-command pattern.
Leveraging x:Bind with events
In the previous chapter, we bound view model commands to the Command properties of the Add and Delete buttons. This works great and keeps the view model decoupled from the UI, but what happens if you need to handle an event that isn't exposed through a Command property? For this scenario, you have two options:
- Use Binding in the view to bind to a command on the view model.
- Use x:Bind in the view to bind directly to an event handler on the view model.
If you are planning to share view models between WinUI and WPF, binding to commands is recommended because both app models support the Binding syntax. If your view models are only going to be used in a WinUI application, you should use x:Bind. This option will provide compile-time type checking and added performance.
We want to give users of the My Media Collection application the option to double-click (or double-tap) a row on the list to view or edit its details. The new Item Details page will be added in the next section. Until then, double-clicking an item will invoke the same code as the Add button, as this will become the Add/Edit button later:
- Start by adding an ItemRowDoubleTapped event handler to the MainViewModel class that calls the existing AddOrEditItem method:
public void ListViewDoubleTapped(object sender,
DoubleTappedRoutedEventArgs e)
{
AddOrEditItem();
}
- Next, bind the ListView.DoubleTapped event to the view model:
<ListView Grid.Row="1" ItemsSource="{x:Bind
ViewModel.Items}"
SelectedItem="{x:Bind
ViewModel.SelectedMediaItem,
Mode=TwoWay}"
DoubleTapped="{x:Bind
ViewModel.ListViewDoubleTapped}">
- Finally, to ensure that the double-clicked row is also selected, modify Grid inside ListView.ItemTemplate to set the IsHitTestVisible property:
<ListView.ItemTemplate>
<DataTemplate x:DataType="model:MediaItem">
<Grid IsHitTestVisible="False">
...
</Grid>
</DataTemplate>
</ListView.ItemTemplate>
Now when you run the application, you can either click the Add button or double-click a row in the list to add new items. In the next section, you will update the Add button to be an Add/Edit button.
Page navigation with MVVM and DI
Until this point, the application has consisted of only a single page. It is now time to add a second page to handle adding new items or editing existing items. The page will be accessible from the Add/Edit button or by double-clicking on an item in the list.
Adding ItemDetailsPage
The full ItemDetailsPage.xaml code can be found on GitHub (https://github.com/PacktPublishing/-Learn-WinUI-3.0/blob/master/Chapter04/Complete/MyMediaCollection/Views/ItemDetailsPage.xaml). You can follow along with the steps in this section or review the final code on GitHub.
Note
The project will not compile successfully until we have added the new view model to the project and added it to the DI container for consumption by the view. Before we add the view model, we need to create a couple of services to enable page navigation and data persistence between pages.
To add ItemDetailsPage, let's follow these steps:
- Add a new folder to the project named Views.
- Right-click the new folder and select Add | New Item.
- On the new item dialog, select Blank Page (WinUI) and name the page ItemDetailsPage:
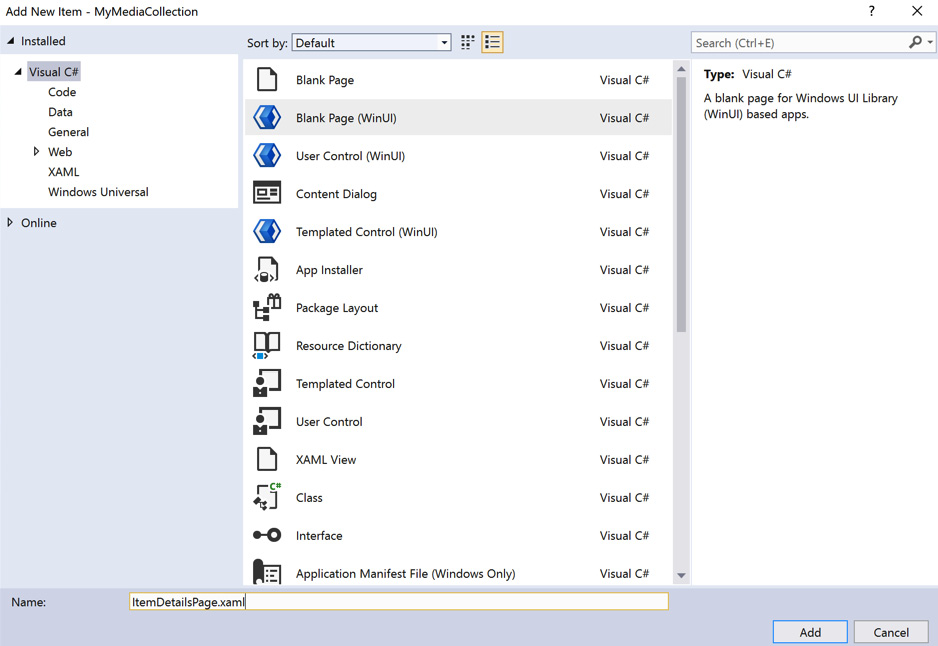
Figure 4.2 – Create an Item Details page
- There are going to be several input controls with some common attributes on the page. Start by adding three styles to a Page.Resources section just before the top-level Grid control:
<Page.Resources>
<Style x:Key="AttributeTitleStyle"
TargetType="TextBlock">
<Setter Property="HorizontalAlignment"
Value="Right"/>
<Setter Property="VerticalAlignment"
Value="Center"/>
</Style>
<Style x:Key="AttributeValueStyle"
TargetType="TextBox">
<Setter Property="HorizontalAlignment"
Value="Stretch"/>
<Setter Property="Margin" Value="8"/>
</Style>
<Style x:Key="AttributeComboxValueStyle"
TargetType="ComboBox">
<Setter Property="HorizontalAlignment"
Value="Stretch"/>
<Setter Property="Margin" Value="8"/>
</Style>
</Page.Resources>
In the next step, we can assign AttributeTitleStyle to each TextBlock, AttributeValueStyle to each TextBox, and AttributeComboValueStyle to each ComboBox. If you need to add any other attributes to input labels later, you only have to update AttributeTitleStyle to have the attributes apply to every applicable TextBlock.
- The top-level Grid will contain three child Grid controls to partition the view into three areas—a header, the input controls, and the Save and Cancel buttons at the bottom. The input area will be given the bulk of the available space, so define Grid.RowDefinitions like this:
<Grid.RowDefinitions>
<RowDefinition Height="Auto"/>
<RowDefinition Height="*"/>
<RowDefinition Height="Auto"/>
</Grid.RowDefinitions>
The header area will contain only a TextBlock. You are welcome to design this area however you like:
<TextBlock Text="Item Details" FontSize="18"
Margin="8"/>
The input area contains a Grid with four RowDefinitions and two ColumnDefinitions, for the labels and input controls for the four fields that users can currently edit:
<Grid Grid.Row="1">
<Grid.RowDefinitions>
<RowDefinition Height="Auto"/>
<RowDefinition Height="Auto"/>
<RowDefinition Height="Auto"/>
<RowDefinition Height="Auto"/>
</Grid.RowDefinitions>
<Grid.ColumnDefinitions>
<ColumnDefinition Width="200"/>
<ColumnDefinition Width="*"/>
</Grid.ColumnDefinitions>
<TextBlock Text="Name:" Style="{StaticResource
AttributeTitleStyle}"/>
<TextBox Grid.Column="1" Style="{StaticResource
AttributeValueStyle}" Text="{x:Bind
ViewModel.ItemName, Mode=TwoWay,
UpdateSourceTrigger=PropertyChanged}"/>
<TextBlock Text="Media Type:" Grid.Row="1"
Style="{StaticResource AttributeTitleStyle}"/>
<ComboBox Grid.Row="1" Grid.Column="1"
Style="{StaticResource
AttributeComboxValueStyle}"
ItemsSource="{x:Bind ViewModel.ItemTypes}"
SelectedValue="{x:Bind ViewModel.
SelectedItemType, Mode=TwoWay}"/>
<TextBlock Text="Medium:" Grid.Row="2"
Style="{StaticResource AttributeTitleStyle}"/>
<ComboBox Grid.Row="2" Grid.Column="1"
Style="{StaticResource
AttributeComboxValueStyle}"
ItemsSource="{x:Bind ViewModel.Mediums}"
SelectedValue="{x:Bind ViewModel.
SelectedMedium, Mode=TwoWay}"/>
<TextBlock Text="Location:" Grid.Row="3"
Style="{StaticResource AttributeTitleStyle}"/>
<ComboBox Grid.Row="3" Grid.Column="1"
Style="{StaticResource
AttributeComboxValueStyle}"
ItemsSource="{x:Bind
ViewModel.LocationTypes}"
SelectedValue="{x:Bind
ViewModel.SelectedLocation,
Mode=TwoWay}"/>
</Grid>
- The item's Name is a free-text entry field, while the others are ComboBox controls to allow the user to pick values from lists bound to ItemsSource. The final child element of the top-level Grid is a right-aligned horizontal StackPanel containing the Save and Cancel buttons:
<StackPanel Orientation="Horizontal"
Grid.Row="2" HorizontalAlignment="Right">
<Button Content="Save"
Margin="8,8,0,8"
Command="{x:Bind ViewModel.SaveCommand}"/>
<Button Content="Cancel"
Margin="8"
Command="{x:Bind ViewModel.CancelCommand}"/>
</StackPanel>
The first step after this is to add interfaces and services, so let's check this next.
Adding new interfaces and services
Now that we have more than a single page to manage in the application, we need a couple of services to centralize that management and abstract the details from the view model code. Start by creating Services and Interfaces folders in the project. Each service will implement an interface. This interface will be used for DI and later when we add new unit tests to the test project.
Creating a navigation service
The first service we need is a navigation service. Start by defining the INavigationService interface in the Interfaces folder. The interface defines methods to get the current page name, navigate to a specific page, or navigate back to the previous page:
public interface INavigationService
{
string CurrentPage { get; }
void NavigateTo(string page);
void NavigateTo(string page, object parameter);
void GoBack();
}
Now, create a NavigationService class in the Services folder. In the class definition, make sure that NavigationService implements the INavigationService interface. The full class can be viewed on GitHub (https://github.com/PacktPublishing/-Learn-WinUI-3.0/blob/master/Chapter04/Complete/MyMediaCollection/Services/NavigationService.cs). Let's discuss a few highlights.
The purpose of a navigation service in MVVM is to store a collection of available pages in the application so when its NavigateTo method is called, the service can find a page that matches the requested Name or Type and navigate to it.
The collection of pages will be stored in a ConcurrentDictionary<T> collection. The ConcurrentDictionary<T> functions like the standard Dictionary<T>, but it can automatically add locks to prevent changes to the dictionary simultaneously across multiple threads:
private readonly IDictionary<string, Type> _pages = new
ConcurrentDictionary<string, Type>();
The Configure method will be called when you create NavigationService before adding it to the DI container. This method is not a part of the INavigationService interface and will not be available to classes that consume the service from the container. There is a check here to ensure views are only added to the service once. We check the dictionary to determine whether any pages of the same data type exist. If this condition is true, then the page has already been registered:
public void Configure(string page, Type type)
{
if (_pages.Values.Any(v => v == type))
{
throw new ArgumentException($"The
{type.Name} view has already been
registered under another name.");
}
_pages[page] = type;
}
These are the implementations of the three navigation methods in the service. The two NavigateTo methods navigate to a specific page, with the second providing the ability to pass a parameter to the page. The third is GoBack, which does what you would think. It navigates to the previous page in the application. They wrap the Frame navigation calls to abstract the UI implementation from the view models that will be consuming this service:
public void NavigateTo(string page)
{
NavigateTo(page, null);
}
public void NavigateTo(string page, object parameter)
{
if (!_pages.ContainsKey(page))
{
throw new ArgumentException($"Unable to
find a page registered with the name {page}.");
}
AppFrame.Navigate(_pages[page], parameter);
}
public void GoBack()
{
if (AppFrame?.CanGoBack == true)
{
AppFrame.GoBack();
}
}
We're ready to start using NavigationService, but first, let's create a data service for the application.
Note
You can jump ahead to implementing the services in the next section if you like. The DataService and IDataService code is available in the completed solution on GitHub: https://github.com/PacktPublishing/-Learn-WinUI-3.0/tree/master/Chapter04/Complete/MyMediaCollection.
Creating a data service
The data on MainPage of My Media Collection currently consists of a few sample records created and stored in MainViewModel. This isn't going to work very well across multiple pages. By using a data service, the view models will not need to know how the data is created or stored.
For now, the data will still be sample records that are not saved in between sessions. Later, we can update the data service to save and load data from a database without any changes to the view models that use the data.
The first step is to add an interface named IDataService to the Interfaces folder:
public interface IDataService
{
IList<MediaItem> GetItems();
MediaItem GetItem(int id);
int AddItem(MediaItem item);
void UpdateItem(MediaItem item);
IList<ItemType> GetItemTypes();
Medium GetMedium(string name);
IList<Medium> GetMediums();
IList<Medium> GetMediums(ItemType itemType);
IList<LocationType> GetLocationTypes();
int SelectedItemId { get; set; }
}
These methods should look familiar to your from previous chapters, but let's briefly review the purpose of each:
- GetItems: Returns all of the available media items
- GetItem: Finds a media item with the provided id
- AddItem: Adds a new media item to the collection
- UpdateItem: Updates a media item in the collection
- GetItemTypes: Gets the list of media item types
- GetMedium: Gets a Medium with the provided name
- GetMediums: These two methods either get all available mediums or any available for the provided ItemType
- GetLocationTypes: Gets all of the available media locations
- SelectedItemId: Persists the ID of the selected item on MainPage
Now, create the DataService class in the Services folder. Make sure that DataService implements IDataService in the class definition.
Again, we will only review parts of the code. You can review the entire implementation on GitHub (https://github.com/PacktPublishing/-Learn-WinUI-3.0/blob/master/Chapter04/Complete/MyMediaCollection/Services/DataService.cs). The data in DataService will be persisted in four lists and the SelectedItemId property:
private IList<MediaItem> _items;
private IList<ItemType> _itemTypes;
private IList<Medium> _mediums;
private IList<LocationType> _locationTypes;
public int SelectedItemId { get; set; }
Copy the PopulateItems method from MainViewModel and modify it to use List<T> collections and to add the Location property assignment to each item.
Start by creating the three MediaItem objects:
var cd = new MediaItem
{
Id = 1,
Name = "Classical Favorites",
MediaType = ItemType.Music,
MediumInfo = _mediums.FirstOrDefault(m => m.Name ==
"CD"),
Location = LocationType.InCollection
};
var book = new MediaItem
{
Id = 2,
Name = "Classic Fairy Tales",
MediaType = ItemType.Book,
MediumInfo = _mediums.FirstOrDefault(m => m.Name ==
"Hardcover"),
Location = LocationType.InCollection
};
var bluRay = new MediaItem
{
Id = 3,
Name = "The Mummy",
MediaType = ItemType.Video,
MediumInfo = _mediums.FirstOrDefault(m => m.Name ==
"Blu Ray"),
Location = LocationType.InCollection
};
Then initialize the _items list and add the three MediaItem objects you just created:
_items = new List<MediaItem>
{
cd,
book,
bluRay
};
There are three other methods to pre-populate the sample data: PopulateMediums, PopulateItemTypes, and PopulateLocationTypes. All of these are called from the DataService constructor. These methods will be updated later to use a SQLite data store for data persistence.
Most of the Get method implementations are very straightforward. The GetMediums(ItemType itemType) method uses Language Integrated Query (LINQ) to find all Medium objects for the selected ItemType:
public IList<Medium> GetMediums(ItemType itemType)
{
return _mediums
.Where(m => m.MediaType == itemType)
.ToList();}
Note
If you are not familiar with LINQ expressions, Microsoft has some good documentation on the topic: https://docs.microsoft.com/en-us/dotnet/csharp/programming-guide/concepts/linq/.
The AddItem and UpdateItems methods are also fairly simple, adding to or updating the _items collection:
public int AddItem(MediaItem item)
{
item.Id = _items.Max(i => i.Id) + 1;
_items.Add(item);
return item.Id;
}
public void UpdateItem(MediaItem item)
{
var idx = -1;
var matchedItem =
(from x in _items
let ind = idx++
where x.Id == item.Id
select ind).FirstOrDefault();
if (idx == -1)
{
throw new Exception("Unable to update item. Item
not found in collection.");
}
_items[idx] = item;
}
The AddItem method has some basic logic to find the highest Id and increment it by 1 to use at the new item's Id. Id is also returned to the calling method in case the caller needs the information.
The services are all created. It is time to set them up when the application launches and consume them in the view models.
Increasing maintainability by consuming services
Before using the services in the view models, open the RegisterServices method in App.xaml.cs and add the following code to register the new services in the DI container, register a new ItemDetailsViewModel (yet to be created), and register the two views with NavigationService:
private IServiceProvider RegisterServices()
{
var services = new ServiceCollection();
var navigationService = new NavigationService();
navigationService.Configure(nameof(MainPage),
typeof(MainPage));
navigationService.Configure(nameof(ItemDetailsPage),
typeof(ItemDetailsPage));
services.AddSingleton<INavigationService>(navigationService
);
services.AddSingleton<IDataService, DataService>();
services.AddTransient<MainViewModel>();
services.AddTransient<ItemDetailsViewModel>();
return services.BuildServiceProvider();
}
Both INavigationService and IDataService are registered as singletons. This means that there will be a single instance of each stored in the container. Any state held in these services is shared across all classes that consume them.
You will notice that when we're registering INavigationService, we are passing the instance we already created to the constructor. This is a feature of Microsoft's DI container and most other DI containers, to allow for initialization and configuration of instances before they are added.
We need to make a few changes to BindableBase and MainViewModel to consume IDataService and INavigationService, update the PopulateData method, and navigate to ItemDetailsPage when AddEditCommand is invoked:
- Start by adding protected properties to BindableBase for INavigationService and IDataService so they are available to every ViewModel:
protected INavigationService _navigationService;
protected IDataService _dataService;
Don't forget to add a using statement for MyMediaCollection.Interfaces.
- Next, update MainViewModel to receive and store the services:
public MainViewModel(InavigationService
navigationService, IDataService dataService)
{
_navigationService = navigationService;
_dataService = dataService;
PopulateData();
DeleteCommand = new RelayCommand(DeleteItem,
CanDeleteItem);
AddEditCommand = new RelayCommand(AddOrEditItem);
}
Wait, we've added two parameters to the constructor but haven't changed the code that adds them to the DI container. How does that work? Well, the container is smart enough to pass them because both of those interfaces are also registered. Pretty cool!
- Next, update PopulateData to get the data the view model needs from _dataService:
public void PopulateData()
{
items.Clear();
foreach(var item in _dataService.GetItems())
{
items.Add(item);
}
allItems = new
ObservableCollection<MediaItem>(Items);
mediums = new ObservableCollection<string>
{
AllMediums
};
foreach(var itemType in
_dataService.GetItemTypes())
{
mediums.Add(itemType.ToString());
}
selectedMedium = Mediums[0];
}
You have to add the AllMediums string constant with a value of "All" to the mediums collection because it is not part of the persisted data. It is only needed for the UI filter. Be sure to add this constant definition to the ViewModel.
- Finally, when AddEditCommand calls the AddOrEditItem method, instead of adding hardcoded items to the collection, you will pass selectedItemId as a parameter when navigating to ItemDetailsPage:
private void AddOrEditItem()
{
var selectedItemId = -1;
if (SelectedMediaItem != null)
{
selectedItemId = SelectedMediaItem.Id;
}
_navigationService.NavigateTo("ItemDetailsPage",
selectedItemId);
}
That's it for MainViewModel. The only change you need to make in the MainPage.xaml file is to change Content of the Add button to Add/Edit Item.
Handling parameters in ItemDetailsPage
To accept a parameter passed from another page during navigation, you must override the OnNavigatedTo method in ItemDetailsPage.xaml.cs. The NavigationEventArgs parameter contains a property named Parameter. In our case, we passed an int containing the selected item's Id. Cast this Parameter property to int and pass it to a method on the ViewModel named InitializeItemDetailData, which will be created in the next section:
protected override void OnNavigatedTo(NavigationEventArgs
e)
{
base.OnNavigatedTo(e);
var selectedItemId = (int)e.Parameter;
if (selectedItemId > 0)
{
ViewModel.InitializeItemDetailData(selectedItemId);
}
}
In the next section, you will add the final piece of the puzzle, the ItemDetailsViewModel class.
Creating the ItemDetailsViewModel class
To add or edit items in the application, you will need a view model to bind to ItemDetailsPage. Right-click the ViewModels folder in Solution Explorer and add a new class named ItemDetailsViewModel.
The class will inherit from BindableBase like MainViewModel. The full class can be found on GitHub at https://github.com/PacktPublishing/-Learn-WinUI-3.0/blob/master/Chapter04/Complete/MyMediaCollection/ViewModels/ItemDetailsViewModel.cs. Let's review some of the important members of the class.
The constructor receives the two services from the container and initializes commands:
public ItemDetailsViewModel(InavigationService
navigationService, IDataService dataService)
{
_navigationService = navigationService;
_dataService = dataService;
SaveCommand = new RelayCommand(SaveItem, CanSaveItem);
CancelCommand = new RelayCommand(Cancel);
PopulateLists();
PopulateExistingItem(dataService);
IsDirty = false;
}
A public method named InitializeItemDetailData will accept the selectedItemId parameter passed by ItemDetailsPage.OnNavigatedTo. It will call methods to populate the lists and initializes an _isDirty flag to help to enable SaveCommand:
public void InitializeItemDetailData(int selectedItemId)
{
_selectedItemId = selectedItemId;
PopulateLists();
PopulateExistingItem(_dataService);
IsDirty = false;
}
The two populate methods set up the list data for the three ComboBox controls and add existing item data if the page is in edit mode:
private void PopulateExistingItem(IDataService dataService)
{
if (_selectedItemId > 0)
{
var item = _dataService.GetItem(_selectedItemId);
Mediums.Clear();
foreach (string medium in
dataService.GetMediums(item.MediaType).
Select(m => m.Name))
Mediums.Add(medium);
_itemId = item.Id;
ItemName = item.Name;
SelectedMedium = item.MediumInfo.Name;
SelectedLocation = item.Location.ToString();
SelectedItemType = item.MediaType.ToString();
}
}
private void PopulateLists()
{
ItemTypes.Clear();
foreach (string iType in
Enum.GetNames(typeof(ItemType)))
ItemTypes.Add(iType);
LocationTypes.Clear();
foreach (string lType in
Enum.GetNames(typeof(LocationType)))
LocationTypes.Add(lType);
Mediums = new TestObservableCollection<string>();
}
Most of this view model's properties are pretty simple, but SelectedItemType has some logic to repopulate the list of Mediums based on the ItemType selected. For instance, if you are adding a book to the collection, there's no need to see the DVD or CD mediums in the selection list:
public string SelectedItemType
{
get => _selectedItemType;
set
{
if (!SetProperty(ref _selectedItemType, value,
nameof(SelectedItemType)))
return;
IsDirty = true;
Mediums.Clear();
if (!string.IsNullOrWhiteSpace(value))
{
foreach (string med in
_dataService.GetMediums((ItemType)Enum.
Parse(typeof(ItemType), SelectedItemType)).
Select(m => m.Name))
Mediums.Add(med);
}
}
}
Lastly, let's look at the code that SaveCommand and CancelCommand will invoke to save and navigate back to MainPage:
private void SaveItem()
{
MediaItem item;
if (_itemId > 0)
{
item = _dataService.GetItem(_itemId);
item.Name = ItemName;
item.Location = (LocationType)Enum.Parse(typeof
(LocationType), SelectedLocation);
item.MediaType =
(ItemType)Enum.Parse(typeof(ItemType),
SelectedItemType);
item.MediumInfo =
_dataService.GetMedium(SelectedMedium);
_dataService.UpdateItem(item);
}
else
{
item = new MediaItem
{
Name = ItemName,
Location = (LocationType)Enum.Parse(typeof
(LocationType), SelectedLocation),
MediaType =
(ItemType)Enum.Parse(typeof(ItemType)
, SelectedItemType),
MediumInfo =
_dataService.GetMedium(SelectedMedium)
};
_dataService.AddItem(item);
}
_navigationService.GoBack();
}
private void Cancel()
{
_navigationService.GoBack();
}
The other change needed before you run the application to test the new page is to consume ItemDetailsViewModel from ItemDetailsPage.xaml.cs:
public ItemDetailsViewModel ViewModel { get; } =
(Application.Current as
App)?.Container.GetService<ItemDetailsViewModel>();
Now, run the app and try to add or edit an item—you should see the new page. If you are editing, you should also see the existing item data in the controls:
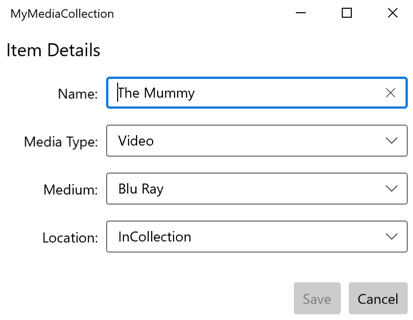
Figure 4.3 – The Item Details page with edit data populated
Great! Now when you save, you should see any added records or edited data appear on MainPage. Things are really starting to take shape in our project. Let's review what we have learned about WinUI and MVVM in this chapter.
Summary
You have learned quite a bit about MVVM and WinUI page navigation in this chapter. You also learned how to create and consume services in your application, and you leveraged DI and DI containers to keep your ViewModels and services loosely coupled. Understanding and using DI is key to build testable, maintainable code. At this point, you should have enough knowledge to create a robust, testable WinUI application.
In the next chapter, you will learn about more of the available controls and libraries in WinUI 3.0.
Questions
- How do DI and IoC relate?
- How do you navigate to the previous page in a WinUI application?
- What object do we use to manage dependencies?
- With Microsoft's DI container, what method can you call to get an object instance?
- What is the name of the framework that queries objects in memory?
- What event argument property can you access to get a parameter passed to a new Page?
- Which dictionary type is safe to use across threads?