Chapter 8: Deploying the Application on AWS
This chapter will teach you how to deploy the API on Amazon Web Services (AWS). It also goes on to explain how to serve the application through HTTPS using a custom domain name, and scale the Gin-based API on Kubernetes and Amazon Elastic Container Service (Amazon ECS).
As such, we will focus on the following topics:
- Deploying a Gin web application on an Amazon Elastic Compute Cloud (Amazon EC2) instance
- Deploying on Amazon ECS (Elastic Container Service)
- Deploying on Kubernetes with Amazon Elastic Kubernetes Service (Amazon EKS)
Technical requirements
To follow the instructions in this chapter, you will need the following:
- A complete understanding of the previous chapter—this chapter is a follow-up to the previous one and it will use the same source code. Hence, some snippets won't be explained, to avoid repetition.
- Previous experience of using AWS is mandatory.
- A basic understanding of Kubernetes is required.
The code bundle for this chapter is hosted on GitHub at https://github.com/PacktPublishing/Building-Distributed-Applications-in-Gin/tree/main/chapter08.
Deploying on EC2 instance
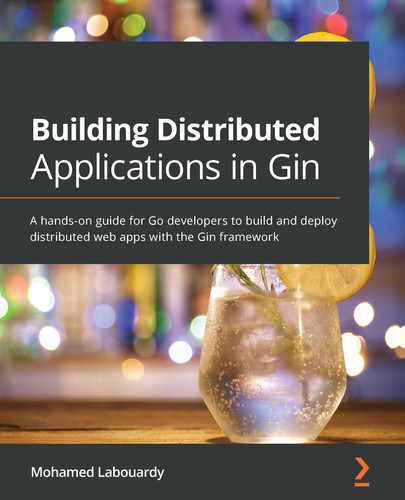
Throughout the course of the book, you have learned how to build a distributed web application using the Gin framework and how to scale the API for loading and testing it locally. In this section, we will cover how to deploy the following architecture on the cloud and serve it to external users.
An overview of the application architecture can be seen here:
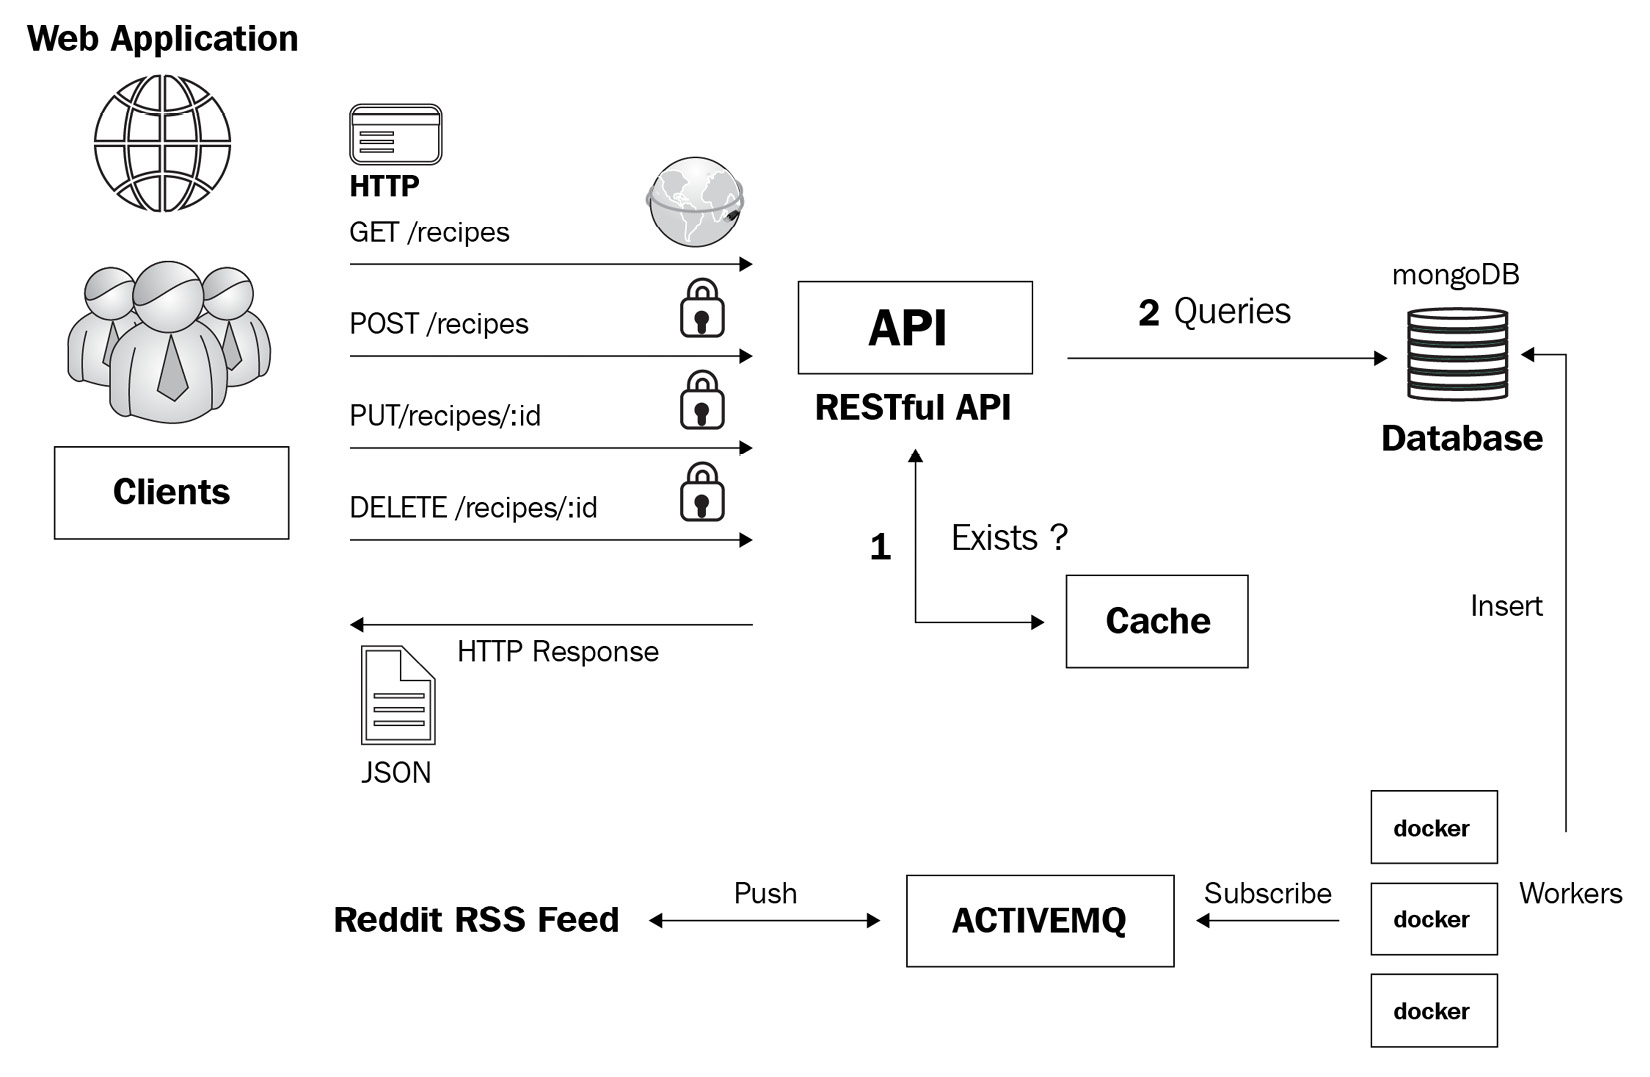
Figure 8.1 – Application architecture
AWS is the leader when it comes to cloud providers—it offers a huge range of infrastructure services such as load balancers, servers, databases, and network services.
To get started, create an AWS account (https://aws.amazon.com). Most AWS services offer an abundance of Free Tier resources, so deploying your application will cost you little or nothing.
Launching an EC2 instance
With the AWS account created, you are now ready to launch an EC2 instance. To do so, proceed as follows:
- Sign in to the AWS Management Console (https://console.aws.amazon.com) and search for EC2. In the EC2 dashboard, click on the Launch Instance button to provision a new EC2 instance.
- Choose Amazon Linux 2 AMI as an Amazon Machine Image (AMI). This is the operating system (OS) that will run the EC2 instance. The following screenshot provides an overview of this:
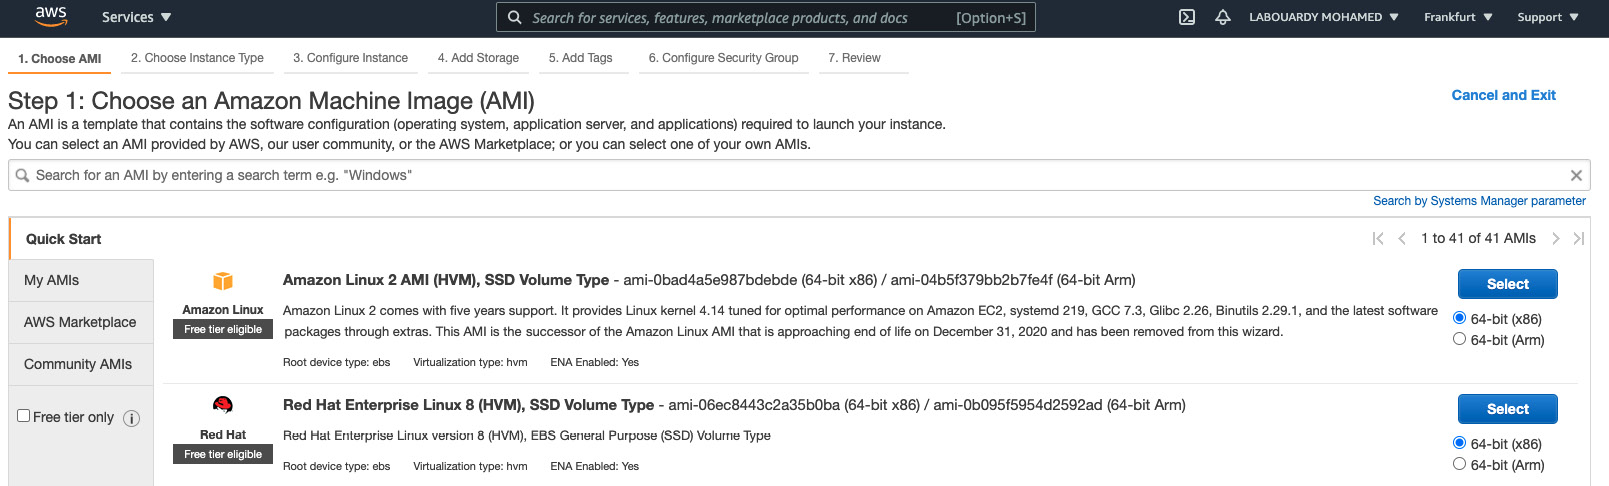
Figure 8.2 – AMI
- Next, select an instance type. You can start with a t2.micro instance and upgrade later if needed. Then, click on Configure Instance Details and leave the settings at their defaults, as illustrated in the following screenshot:
Figure 8.3 – Instance configuration
- Now, click on the Add Storage button and leave the Elastic Block Store (EBS) volume size as 8 gigabytes (GB). For Volume type, you might change it from GP2 to GP3 or provisioned IOPS.
Note
MongoDB requires fast storage. Therefore, if you're planning to host a MongoDB container on EC2, an EBS-optimized type can improve the input/output (I/O) operations.
- Then, click on Add Tags and create a new one called Name=application-sg, as illustrated in the following screenshot. Leave the security group at its default setting (allow inbound traffic on port 22 for SSH). Then, click on Review and launch:
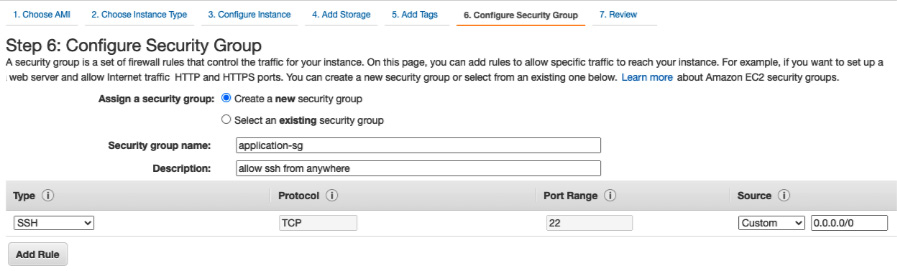
Figure 8.4 – Security group
Note
As a best practice, you should always restrict Secure Shell (SSH) solely to known static Internet Protocol (IP) addresses or networks.
- Click on Launch and assign a key pair or create a new SSH key pair. Then, click on Create instance.
- Head back to the Instances dashboard by clicking on the View instances button—it will take a few seconds for the instance to be up and running but you should then see it on the screen, as per the following screenshot:

Figure 8.5 – EC2 dashboard
- Once the instance is ready, open your terminal session and SSH to the instance using the public IP version 4 (IPv4) address. Replace key.pem with your SSH key pair, as illustrated here:
ssh ec2-user@IP –I key.pem
- A confirmation message will appear—enter Yes. Then, issue the following commands to install Git, Docker Community Edition (Docker CE), and Docker Compose:
sudo su
yum update -y
yum install -y docker git
usermod –a -G docker ec2-user
service docker restart
curl -L "https://github.com/docker/compose/releases/download/1.29.0/docker-compose-$(uname -s)-$(uname -m)" -o /usr/bin/docker-compose
chmod +x /usr/bin/docker-compose
Note
The sudo su command is used to provide the privileges at the root level.
Here, we are using the Docker 19.03.13-ce and Docker Compose 1.29.0 versions:

Figure 8.6 – Docker version
You have successfully provisioned and launched an EC2 instance.
With the EC2 instance up and running, you can deploy your Docker Compose stack covered in Chapter 6, Scaling a Gin Application. To do so, perform the following steps:
- Clone the following GitHub repository, which includes the components and files for the distributed Gin web application:
git clone https://github.com/PacktPublishing/Building-Distributed-Applications-in-Gin.git
cd Building-Distributed-Applications-in-Gin/chapter06
Here is the content of the chapter06/docker-compose.yml file:
version: "3.9"
services:
api:
image: api
environment:
- MONGO_URI=mongodb://admin:password
@mongodb:27017/test?authSource=admin
&readPreference=primary&ssl=false
- MONGO_DATABASE=demo
- REDIS_URI=redis:6379
external_links:
- mongodb
- redis
scale: 5
dashboard:
image: dashboard
redis:
image: redis
mongodb:
image: mongo:4.4.3
environment:
- MONGO_INITDB_ROOT_USERNAME=admin
- MONGO_INITDB_ROOT_PASSWORD=password
nginx:
image: nginx
ports:
- 80:80
volumes:
- $PWD/nginx.conf:/etc/nginx/nginx.conf
depends_on:
- api
- dashboard
The stack consists of the following services:
a. RESTful API written with Go and the Gin framework
b. A dashboard written with JavaScript and the React framework
c. MongoDB for data storage
d. Redis for in-memory storage and API caching
e. Nginx as a reverse proxy
- Before deploying the stack, build the Docker images for the RESTful API and the web dashboard. Head to the corresponding folder of each service and run the docker build command. For instance, the following commands are used to build the Docker image for the RESTful API:
cd api
docker build -t api .
The command output is shown here:
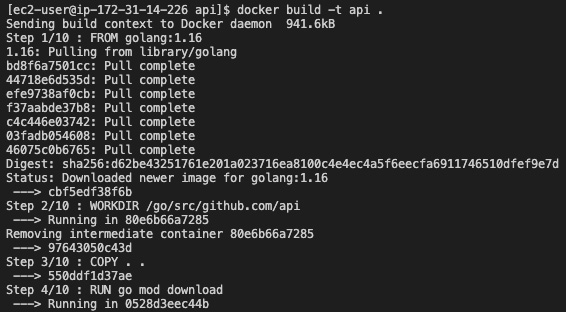
Figure 8.7 – Docker build logs
- After building the images, issue the following command:
cd ..
docker-compose up –d
The services will be deployed, and five instances of the API will be created, as illustrated in the following screenshot:
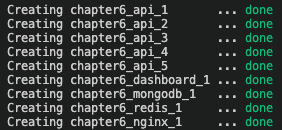
Figure 8.8 – Docker application
With the application up and running, go to the web browser and paste the IP address that is used to connect to your EC2 instance. You should then see the following error message:

Figure 8.9 – Request timeout
To fix that, you need to allow inbound traffic on port 80, which is the port the nginx proxy is exposed to. Head to Security Groups from the EC2 dashboard and search for the security group assigned to the EC2 instance in which the application is running. Once found, add an inbound rule, as follows:
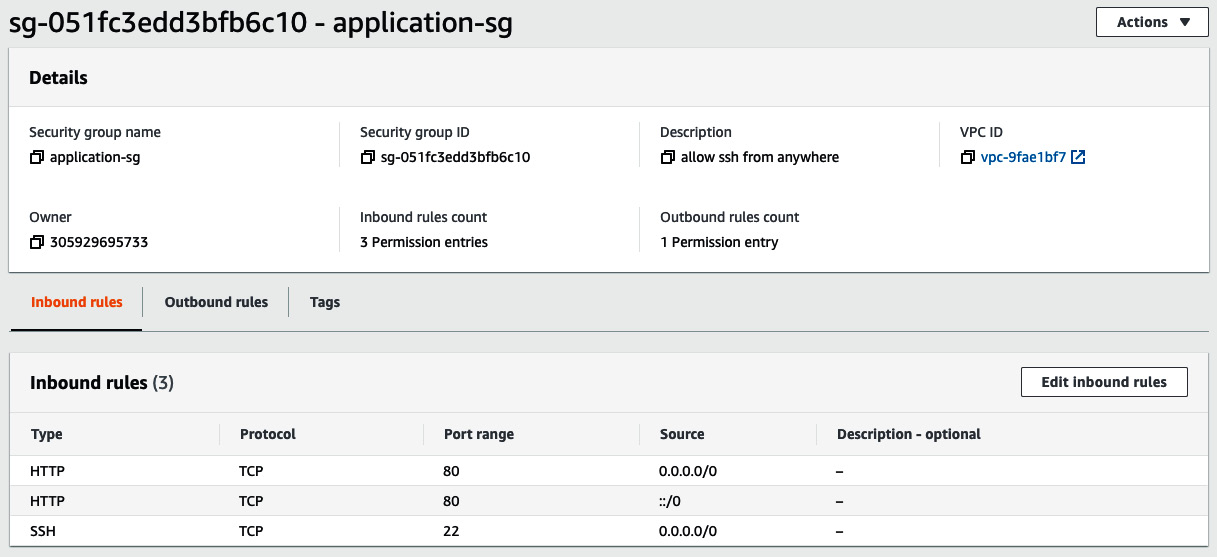
Figure 8.10 – Inbound rule on port 80
Head back to your web browser and issue an HTTP request to the instance IP. This time, the nginx proxy will be hit and a response will be returned. If you issue a request to the /api/recipes endpoint, an empty array should be returned, as illustrated in the following screenshot:

Figure 8.11 – RESTful API response
The MongoDB recipes collection is empty. So, create a new recipe by issuing a POST request on the /api/recipes endpoint with the following JSON payload:
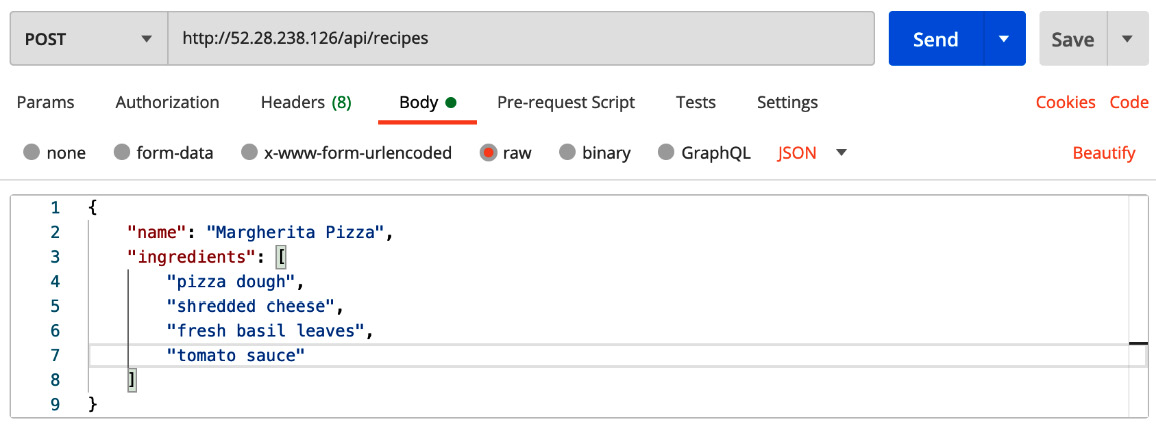
Figure 8.12 – A POST request to create a new recipe
Make sure to include an Authorization header in the POST request. Refresh the web browser page and a recipe should then be returned on the web dashboard, as illustrated in the following screenshot:

Figure 8.13 – New recipe
Now, click on the Login button, and you should have an unsecure origin error, as follows:
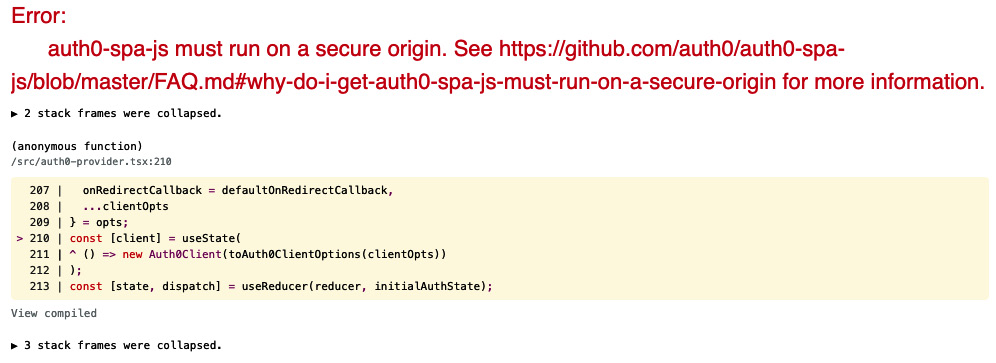
Figure 8.14 – Auth0 requires the client to be run though HTTPS
The error is due to Auth0 needing to be run on a web application served through the HTTPS protocol. You can serve the application through HTTPS by setting up a load balancer on top of the EC2 instance.
SSL offloading with an application load balancer
To run the API through HTTPS, we need a Secure Sockets Layer (SSL) certificate. You can easily get an SSL certificate with AWS Certificate Manager (ACM). This service makes it easy to provision, manage, and deploy SSL/Transport Layer Security (TLS) certificates on AWS-managed resources. To generate an SSL certificate, proceed as follows:
- Head to the ACM dashboard and request a free SSL certificate for your domain name by clicking on the Request a certificate button and choosing Request a public certificate.
- On the Add domain names page, enter a fully qualified domain name (FQDN), such as domain.com.
Note
The domain.com domain name can have multiple subdomains, such as sandbox.domain.com, production.domain.com, and api.domain.com.
- On the Select validation method page, choose DNS validation and add a Canonical Name (CNAME) record provided by ACM to your Domain Name System (DNS) configuration. Issuing public certificates might take a few minutes, but once the domain name is validated, the certificate will be issued and will appear in the ACM dashboard with the status set to Issued, as illustrated in the following screenshot:
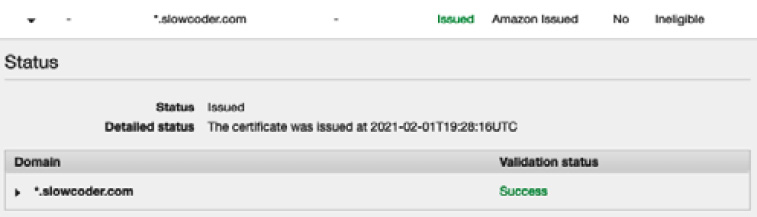
Figure 8.15 – Requesting a public certificate with ACM
- Next, create an application load balancer from the Load Balancers section within the EC2 dashboard, as illustrated in the following screenshot:
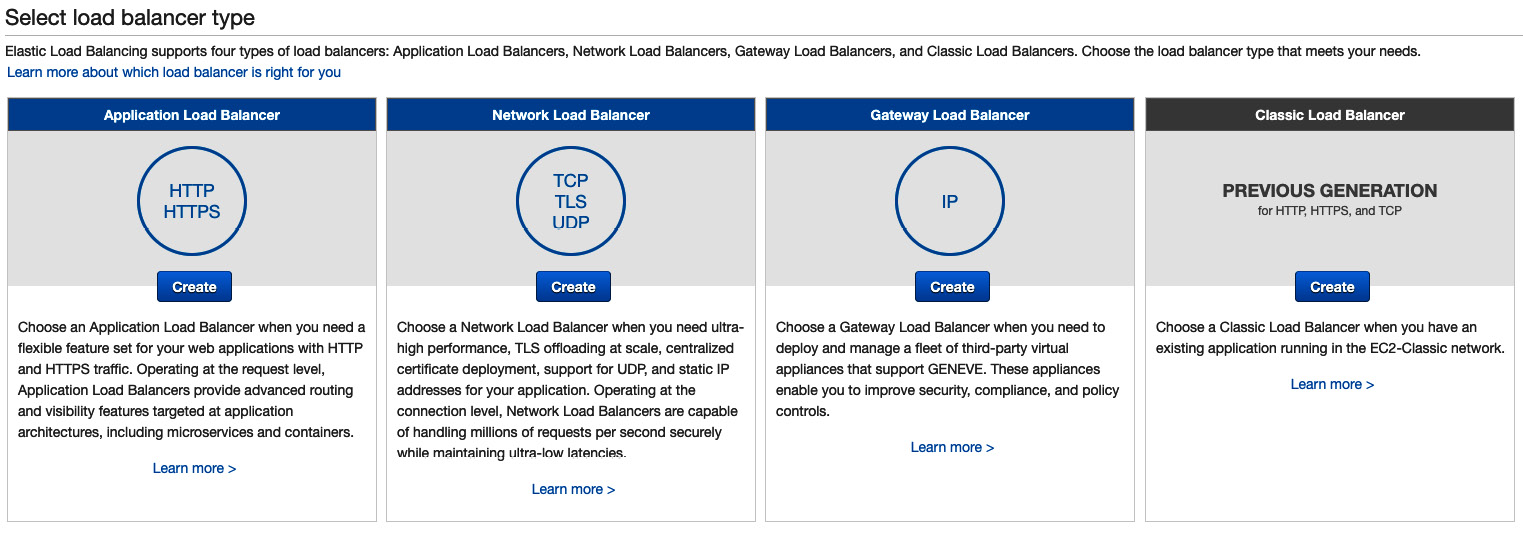
Figure 8.16 – Application load balancer
- On the subsequent page, enter a name for the load balancer and specify the scheme as Internet facing from the drop-down list. In the Availability Zones section, select a subnet from each availability zone (AZ) for resiliency. Then, under the Listeners section, add an HTTPS listener and an HTTP listener on ports 443 and 80, respectively, as illustrated in the following screenshot:
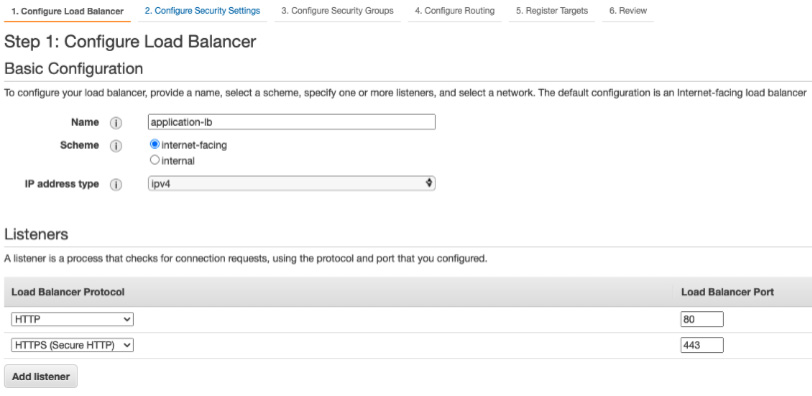
Figure 8.17 – HTTP and HTTPS listeners
- Click on the Configure Security Settings button to proceed and select the certificate created in ACM from the drop-down list, as illustrated in the following screenshot:
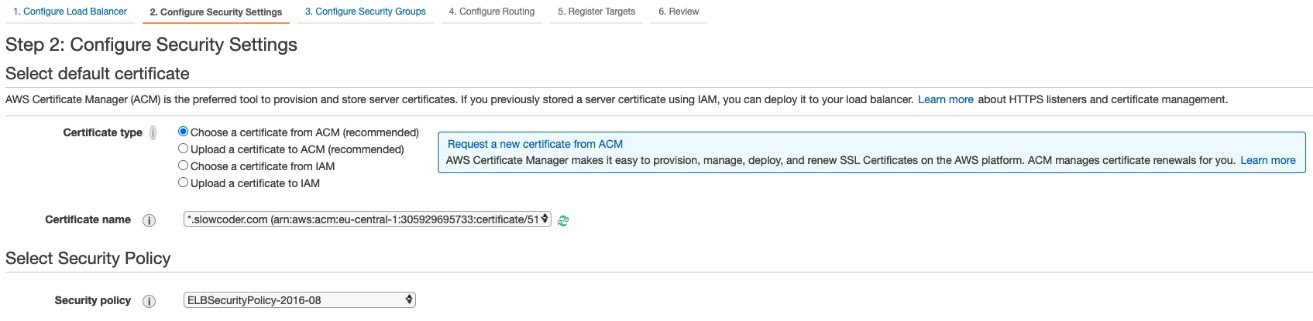
Figure 8.18 – Certificate configuration
- Now, click on Configure Routing and create a new target group called application. Ensure the protocol is set to HTTP and the port to 80 because the nginx proxy is listening on port 80. With this configuration, traffic between the load balancer and the instance will be transmitted using HTTP, even for HTTPS requests made by the client to the load balancer. You can see the configuration in the following screenshot:
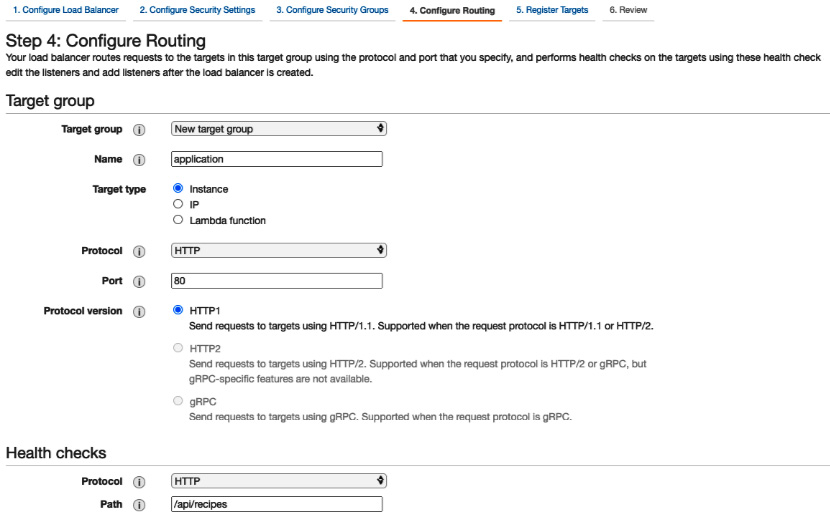
Figure 8.19 – Configuring a target group
- In the Health checks section, define the protocol as HTTP and the path as /api/recipes.
- Click on Register Targets, select the EC2 instance on which the application is running, and click on Add to registered, as follows:
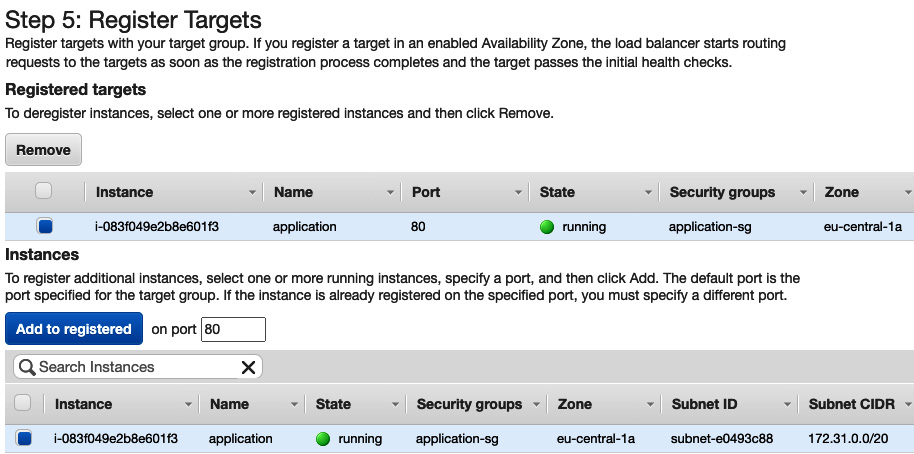
Figure 8.20 – Registering an EC2 instance
- When you have finished selecting instances, choose Next: Review. Review the settings that you selected and click on the Create button. The provisioning process should take a few minutes, but you should then see a screen like this:

Figure 8.21 – Load balancer DNS name
- Once the state is active, copy the load balancer DNS name and create an A record that points to the public DNS name of the load balancer in Route 53 (https://aws.amazon.com/route53/) or in your DNS registrar, as illustrated in the following screenshot:
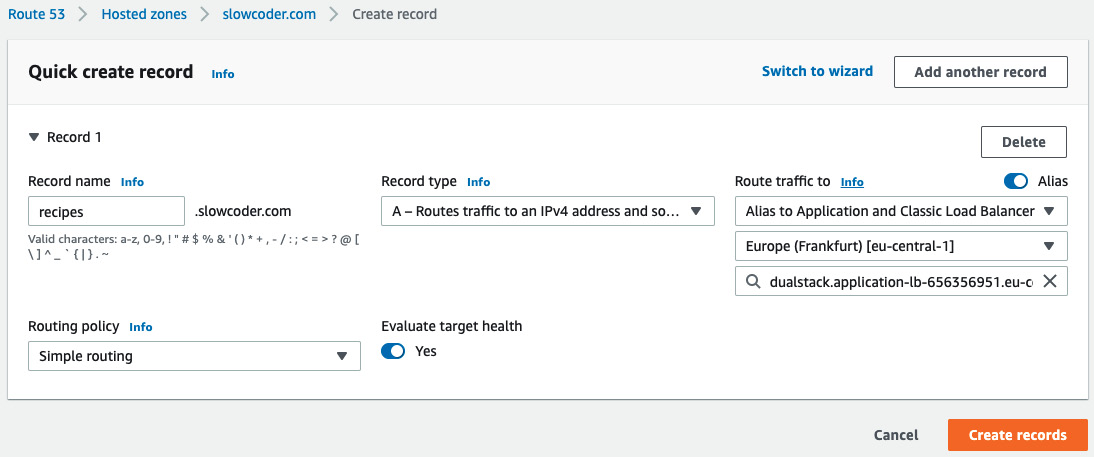
Figure 8.22 – Route 53 new A record
Once you make the necessary changes, it can take up to 48 hours for the change to propagate across other DNS servers.
Verify that the changes to your domain name record have propagated by browsing to HTTPS://recipes.domain.com. This should result in the load balancer displaying the secure web dashboard of the application. Click on the padlock icon in the browser address bar and it should display the details of the domain and the SSL certificate, as illustrated in the following screenshot:
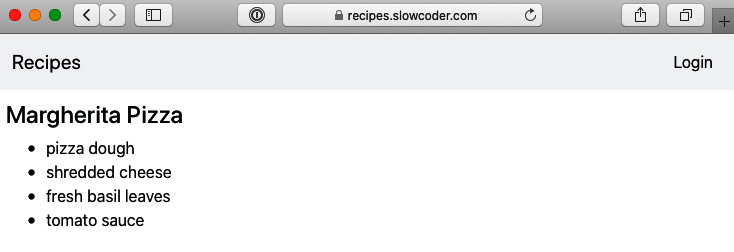
Figure 8.23 – Serving through HTTPS
Your application load balancer has now been configured with an SSL certificate for your Gin application running on AWS. You can use the Auth0 service to sign in and add new recipes from the web dashboard.
Deploying on Amazon ECS
In the previous section, we learned how to deploy an EC2 instance and configure it to run our Gin application on it. In this section, we will learn how to get the same results without managing an EC2 instance. AWS proposes two container orchestration services: ECS and EKS.
In this section, you will learn about ECS, which is a fully managed container orchestration service. Before deploying our application to ECS, we need to store the application Docker images in a remote repository. That's where an Elastic Container Registry (ECR) repository comes into play.
Storing images in a private repository
ECR is a widely used private Docker registry. To store images in a private repository, you need to create a repository in ECR first. To achieve that, follow these steps:
- Jump to the ECR dashboard from the AWS Management Console, click on the Create repository button, and choose mlabouardy/recipes-api as a name for your Gin RESTful API repository, as illustrated in the following screenshot:
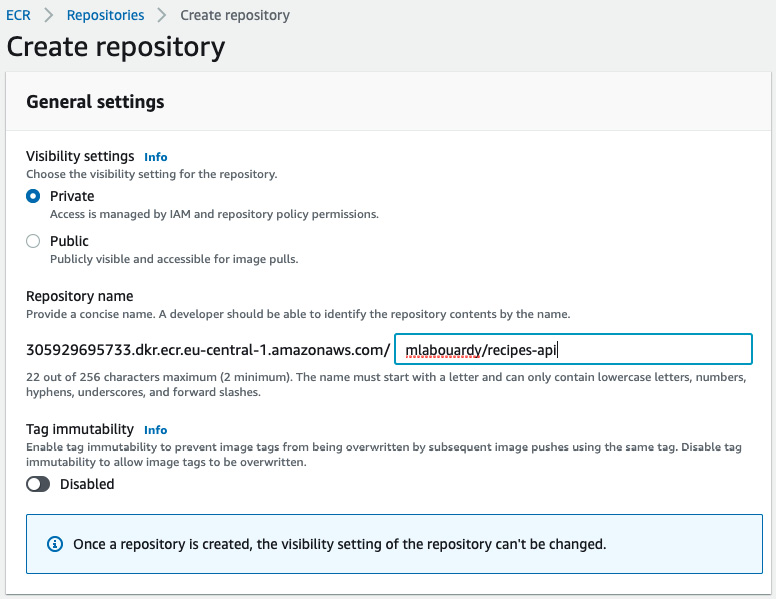
Figure 8.24 – New ECR repository
Note
You can host your Docker images in Docker Hub. If you go with this approach, you can skip this part.
- Click on the Create repository button, and then select the repository and click on View push commands. Copy the commands to authenticate and push the API image to the repository, as illustrated in the following screenshot:

Figure 8.25 – ECR login and push commands
Note
For a step-by-step guide on how to install the AWS command-line interface (CLI), refer to the official documentation at https://docs.aws.amazon.com/cli/latest/userguide/cli-configure-files.html.
- Follow the commands shown in Figure 8.25 to authenticate with ECR. Tag the image and push it to the remote repository, as follows (substitute the ID, REGION, and USER variables with your own values):
aws ecr get-login-password --region REGION | docker login --username AWS --password-stdin ID.dkr.ecr.REGION.amazonaws.com
docker tag api ID.dkr.ecr.REGION.amazonaws.com/USER/recipes-api:latest
docker push ID.dkr.ecr.REGION.amazonaws.com/USER/recipes-api:latest
The command logs are shown here:

Figure 8.26 – Pushing an image to ECR
The image will now be available on ECR, as illustrated in the following screenshot:
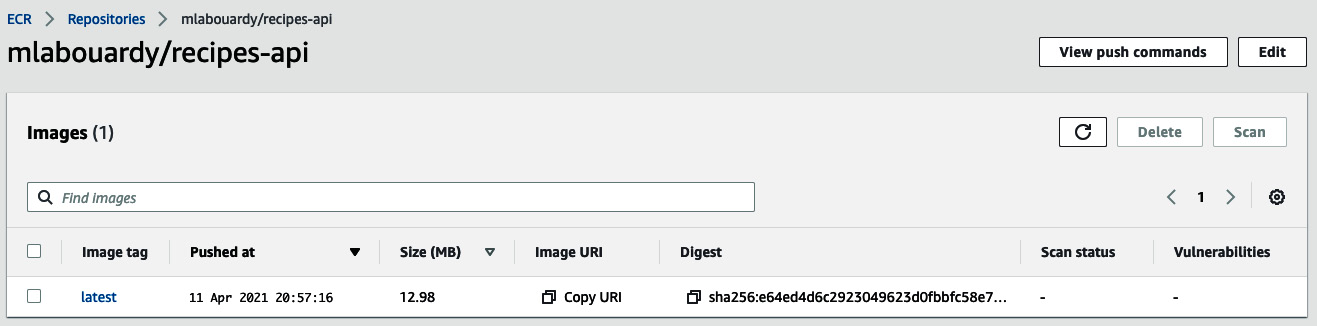
Figure 8.27 – Image stored on ECR
With the Docker image stored in ECR, you can go ahead and deploy the application in ECS.
Now, update the docker-compose.yml file to reference the ECR repository URI in the image section, as follows:
version: "3.9"
services:
api:
image: ACCOUNT_ID.dkr.ecr.eu-central-1.amazonaws.com/
mlabouardy/recipes-api:latest
environment:
- MONGO_URI=mongodb://admin:password@mongodb:27017/
test?authSource=admin&readPreference=
primary&ssl=false
- MONGO_DATABASE=demo
- REDIS_URI=redis:6379
external_links:
- mongodb
- redis
scale: 5
dashboard:
image: ACCOUNT_ID.dkr.ecr.eu-central-1.amazonaws.com/
mlabouardy/dashboard:latest
Creating an ECS cluster
Our docker-compose.yml file now references the images stored in ECR. We're ready to spin up the ECS cluster and deploy the application on it.
You can deploy an ECS cluster either manually from the AWS Management Console or through the AWS ECS CLI. Follow the official instructions to install the Amazon ECS CLI based on your OS from https://docs.aws.amazon.com/AmazonECS/latest/developerguide/ECS_CLI_installation.htm.
Once installed, configure the Amazon ECS CLI by providing the AWS credentials and the AWS region in which to create the cluster, as follows:
ecs-cli configure profile --profile-name default --access-key KEY --secret-key SECRET
Before provisioning an ECS cluster, define a task execution IAM role to allow the Amazon ECS container agent to make AWS API calls on our behalf. Create a file named task-execution-assule-role.json with the following content:
{
"Version": "2012-10-17",
"Statement": [
{
"Sid": "",
"Effect": "Allow",
"Principal": {
"Service": "ecs-tasks.amazonaws.com"
},
"Action": "sts:AssumeRole"
}
]
}
Create a task execution role using the JSON file, and attach the AmazonECSTaskExecutionRolePolicy task execution role policy to it, as follows:
aws iam --region REGION create-role --role-name ecsTaskExecutionRole --assume-role-policy-document file://task-execution-assume-role.json
aws iam --region REGION attach-role-policy --role-name ecsTaskExecutionRole --policy-arn arn:aws:iam::aws:policy/service-role/AmazonECSTaskExecutionRolePolicy
Complete the configuration with the following command, the default cluster name, and launch type. Then, create an Amazon ECS cluster with the ecs-cli up command:
ecs-cli configure --cluster sandbox --default-launch-type FARGATE --config-name sandbox --region REGION
ecs-cli up --cluster-config sandbox --aws-profile default
This command may take a few minutes to complete as your resources (EC2 instances, load balancers, security groups, and so on) are created. The output of this command is shown here:

Figure 8.28 – Creating an ECS cluster
Jump to the ECS dashboard—the sandbox cluster should be up and running, as it is in the following screenshot:

Figure 8.29 – Sandbox cluster
To deploy the application, you can use the docker-compose file provided in the previous section. In addition to that, there are certain parameters specific to Amazon ECS that you need to provide in the config file, such as the following:
- Subnets: To be replaced with a list of public subnets where the EC2 instances should be deployed
- Security group and resource usage: Central processing unit (CPU) and memory
Create an ecs-params.yml file with the following content:
version: 1
task_definition:
task_execution_role: ecsTaskExecutionRole
ecs_network_mode: awsvpc
task_size:
mem_limit: 2GB
cpu_limit: 256
run_params:
network_configuration:
awsvpc_configuration:
subnets:
- "subnet-e0493c88"
- "subnet-7472493e"
security_groups:
- "sg-d84cb3b3"
assign_public_ip: ENABLED
Next, deploy the docker compose file to the cluster with the following command. The --create-log-groups option creates the CloudWatch log groups for the container logs:
ecs-cli compose --project-name application -f
docker-compose.ecs.yml up --cluster sandbox
--create-log-groups
The deployment logs are shown here:

Figure 8.30 – Task deployment
An application task will be created. A task is a set of metadata (memory, CPU, port mapping, environment variables) that describes how a container should be deployed. You can see an overview of this here:
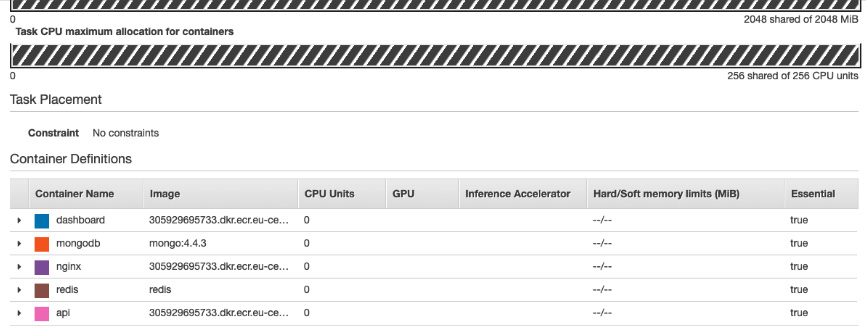
Figure 8.31 – Task definition
Using the AWS CLI, add a security group rule to allow inbound traffic on port 80, as follows:
aws ec2 authorize-security-group-ingress --group-id SG_ID --protocol tcp --port 80 --cidr 0.0.0.0/0 --region REGION
Issue the following command to view the containers that are running in ECS:
ecs-cli compose --project-name application service ps –cluster--config sandbox --ecs-profile default
The command will list the containers running and also the IP address and port of the nginx service. If you point your web browser at that address, you should see the web dashboard.
Great! You now have a running ECS cluster with the Dockerized Gin application.
Deploying on Kubernetes with Amazon EKS
ECS might be a good solution for beginners and small workloads. However, for large deployment and at a certain scale, you might want to consider shifting to Kubernetes (also known as K8s). For those of you who are AWS power users, Amazon EKS is a natural fit.
AWS offers a managed Kubernetes solution under the EKS service.
To get started, we need to deploy an EKS cluster, as follows:
- Jump to the EKS dashboard and create a new cluster with the following parameters:
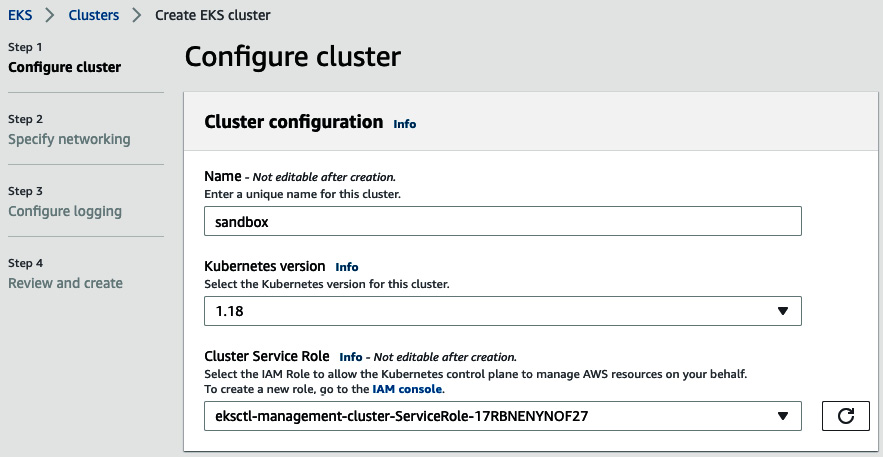
Figure 8.32 – EKS cluster creation
The cluster IAM role should include the following Identity and Access Management (IAM) policies: AmazonEKSWorkerNodePolicy, AmazonEKS_CNI_Policy, and AmazonEC2ContainerRegistryReadOnly.
- On the Specify networking page, select an existing virtual private cloud (VPC) to use for the cluster and subnets, as illustrated in the following screenshot. Leave the rest at their default settings:
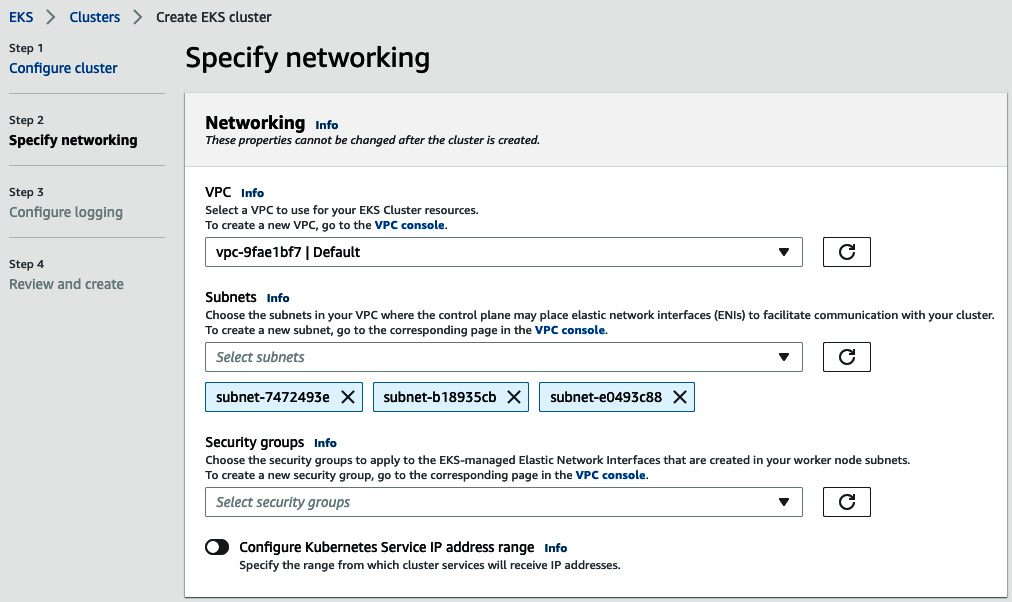
Figure 8.33 – EKS network configuration
- For cluster endpoint access, enable public access for simplicity. For a production usage, restrict access to your network Classless Inter-Domain Routing (CIDR) or enable only private access to the cluster API.
- Then, on the Configure Logging page, enable all log types to be able to troubleshoot or debug network issues from the CloudWatch console easily.
- Review the information and click on Create. The status file will show Creating while the cluster provisioning process is running. Once completed, the status will become Active, as illustrated in the following screenshot:
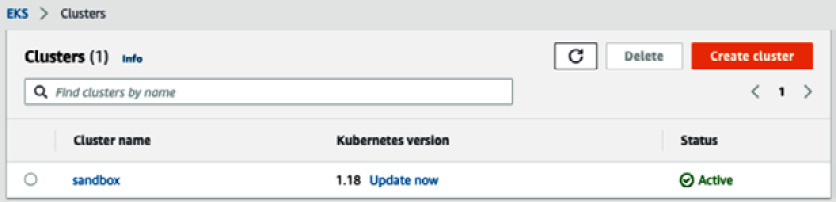
Figure 8.34 – New EKS cluster
Optionally, create an EKS cluster with the EKS CLI through a single command, as follows:
eksctl create cluster --name sandbox --version 1.19 --with-oidc --region REGION
Note
For a step-by-step guide on how to provision EKS with eksctl, head over to the official guide at https://docs.aws.amazon.com/eks/latest/userguide/create-cluster.html.
- Once the cluster is in an Active state, create a managed Node Group on which the containers will be running.
- Click on the cluster name and select the Configuration tab. On the Compute tab, click on Add Node Group. Set the group name to workers and create a Node IAM role, as illustrated in the following screenshot:
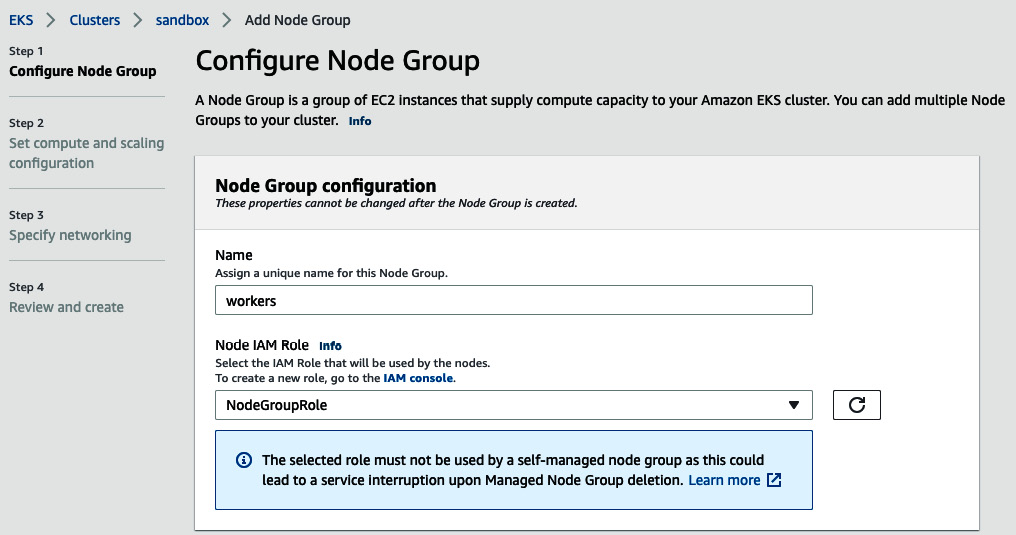
Figure 8.35 – EKS Node Group
Note
For more information on how to configure a Node Group, refer to the official documentation at https://docs.aws.amazon.com/eks/latest/userguide/create-node-role.html#create-worker-node-role.
- On the subsequent page, choose Amazon Linux 2 as an AMI and select t3.medium On-Demand instances, as illustrated in the following screenshot:
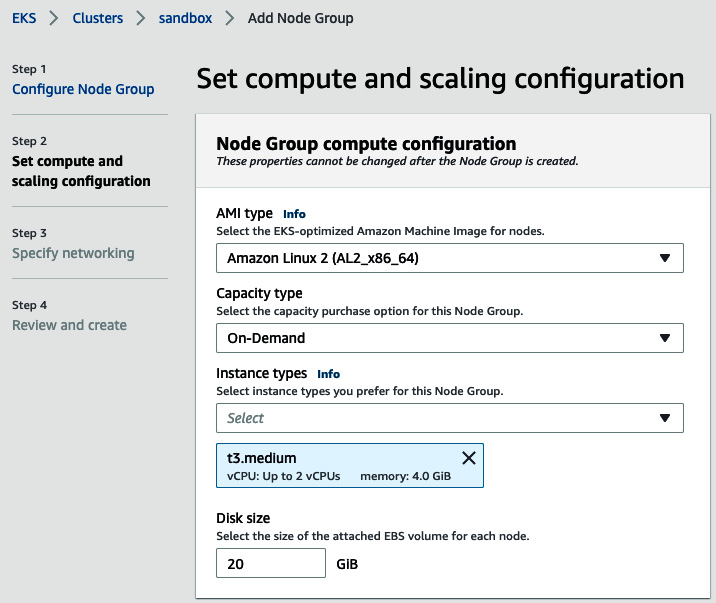
Figure 8.36 – Workers configuration
Note
For a production usage, you might use Spot-Instances instead of On-Demand. Spot-Instances usually comes with a good discount in price because of possibile spontaneous interruptions. Those interruptions can be gracefully handled by Kubernetes, leaving you with extra money.
The following figure shows how configuration is scaled:
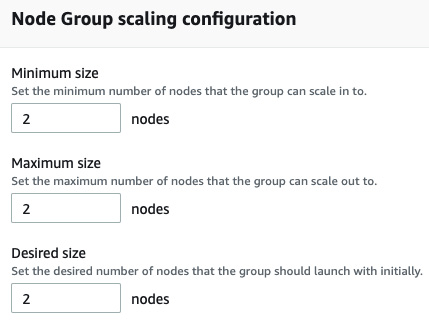
Figure 8.37 – Scaling configuration
- Finally, specify the subnets where the two nodes will be deployed. On the Review and create page, review your managed Node Group configuration and click on Create.
Now that you've provisioned your EKS cluster, you need to configure kubectl.
Configuring kubectl
kubectl is a command-line utility for communicating with the cluster API server. To install the utility, execute the following commands:
curl -LO "https://dl.k8s.io/release/$(curl -L -s https://dl.k8s.io/release/stable.txt)/bin/darwin/amd64/kubectl
chmod +x ./kubectl
mv kubectl /usr/local/bin/
In this book, we are using the latest version of kubectl, which is 1.21.0, as you can see here:
Client Version: version.Info{Major:"1", Minor:"21", GitVersion:"v1.21.0", GitCommit:"cb303e613a121a29364f75cc67d3d580833a7479", GitTreeState:"clean", BuildDate:"2021-04-08T16:31:21Z", GoVersion:"go1.16.1", Compiler:"gc", Platform:"darwin/amd64"}
Next, generate a kubeconfig file with the needed credentials for kubectl to interact with the EKS cluster, as follows:
aws eks update-kubeconfig --name sandbox --region eu-central-1
You can now test the credentials by listing the nodes of the cluster with the following command:
kubectl get nodes
The command will list two nodes as expected, as we can see here:

Figure 8.38 – EKS nodes
Awesome! You have successfully configured kubectl.
Now that you've set up your EKS cluster, to run services on Kubernetes, you will need to translate your compose service definition to Kubernetes objects. Kompose is an open source tool that can speed up the translation process.
Note
Instead of writing multiple Kubernetes YAML Ain't Markup Language (YAML) files, you can package your whole application in a Helm chart (https://docs.helm.sh/) and store it in a remote registry for distribution.
Migrating a Docker Compose workflow to Kubernetes
Kompose is an open source tool that converts docker-compose.yml files into Kubernetes deployment files. To get started with Kompose, proceed as follows:
- Navigate to the project's GitHub release page (https://github.com/kubernetes/kompose/releases) and download the binary based on your OS. Here, version 1.22.0 is used:
curl -L https://github.com/kubernetes/kompose/releases/download/v1.22.0/kompose-darwin-amd64 -o kompose
chmod +x kompose
sudo mv ./kompose /usr/local/bin/kompose
- With Kompose installed, convert your service definitions with the following command:
kompose convert -o deploy
- After running this command, Kompose will output information about the files it has created, as follows:
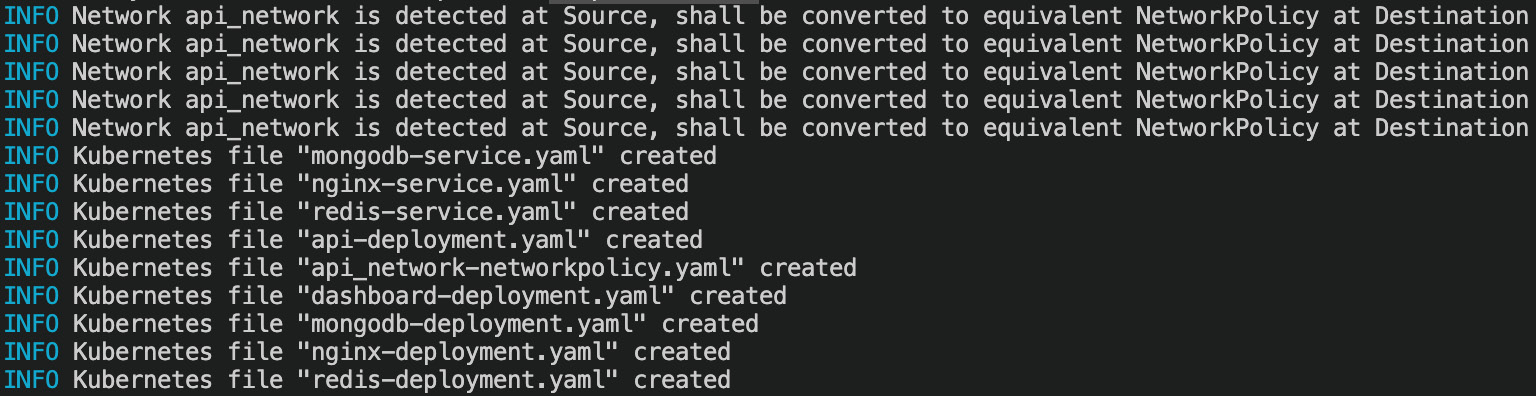
Figure 8.39 – Translating Docker Compose to Kubernetes resources with Kompose
Here is an example of a generated Deployment file:
apiVersion: apps/v1
kind: Deployment
metadata:
annotations:
kompose.cmd: kompose convert
kompose.version: 1.22.0 (955b78124)
creationTimestamp: null
labels:
io.kompose.service: api
name: api
spec:
replicas: 1
selector:
matchLabels:
io.kompose.service: api
strategy: {}
template:
metadata:
annotations:
kompose.cmd: kompose convert
kompose.version: 1.22.0 (955b78124)
creationTimestamp: null
labels:
io.kompose.network/api_network: "true"
io.kompose.service: api
spec:
containers:
- env:
- name: MONGO_DATABASE
value: demo
- name: MONGO_URI
value: mongodb://admin:password
@mongodb:27017/test?authSource=admin
&readPreference=primary&ssl=false
- name: REDIS_URI
value: redis:6379
image: ID.dkr.ecr.REGION.amazonaws.com/USER
/recipes-api:latest
name: api
resources: {}
restartPolicy: Always
status: {}
- Now, create Kubernetes objects and test whether your application is working as expected by issuing the following command:
kubectl apply -f .
You will see the following output, indicating that the objects have been created:
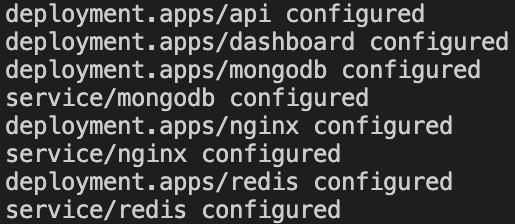
Figure 8.40 – Deployments and services
- To check that your Pods are running, deploy the Kubernetes dashboard with the following command:
kubectl apply -f https://raw.githubusercontent.com/kubernetes/dashboard/v2.0.5/aio/deploy/recommended.yaml
- Next, create an eks-admin service account and cluster role binding that you can use to securely connect to the dashboard with admin-level permissions, as follows:
apiVersion: v1
kind: ServiceAccount
metadata:
name: eks-admin
namespace: kube-system
---
apiVersion: rbac.authorization.k8s.io/v1beta1
kind: ClusterRoleBinding
metadata:
name: eks-admin
roleRef:
apiGroup: rbac.authorization.k8s.io
kind: ClusterRole
name: cluster-admin
subjects:
- kind: ServiceAccount
name: eks-admin
namespace: kube-system
- Save the content in an eks-admin-service-account.yml file and apply the service account to your cluster with the following command:
kubectl apply -f eks-admin-service-account.yml
- Before connecting to the dashboard, retrieve an authentication token with the following command:
kubectl -n kube-system describe secret $(kubectl -n kube-system get secret | grep eks-admin | awk '{print $1}')
Here's how the Kubernetes dashboard token looks like:
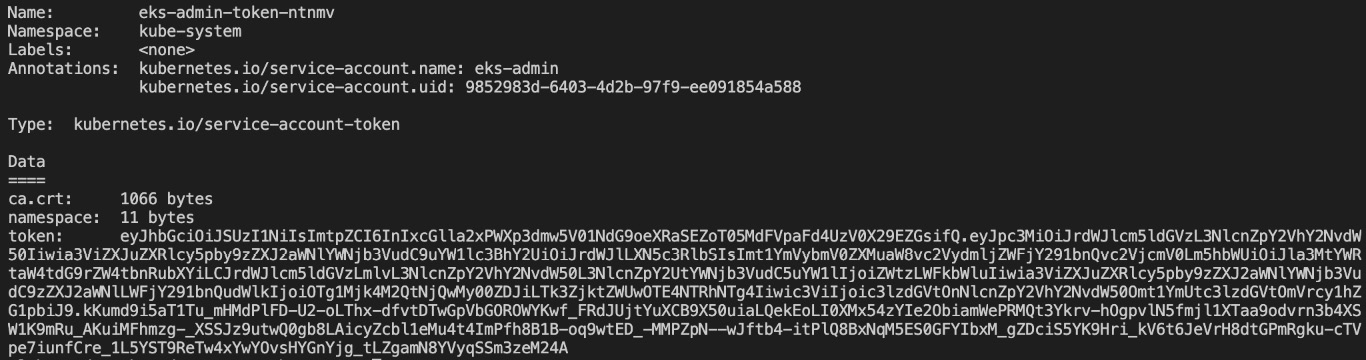
Figure 8.41 – Kubernetes dashboard token
- Run the proxy locally with the following command:
kubectl proxy
- Go to http://localhost:8001/api/v1/namespaces/kubernetes-dashboard/services/https:kubernetes-dashboard:/proxy/#!/login and paste the authentication token.
You should be redirected to the dashboard where you can view the distributed application containers, as well as their metrics and status, as illustrated in the following screenshot:
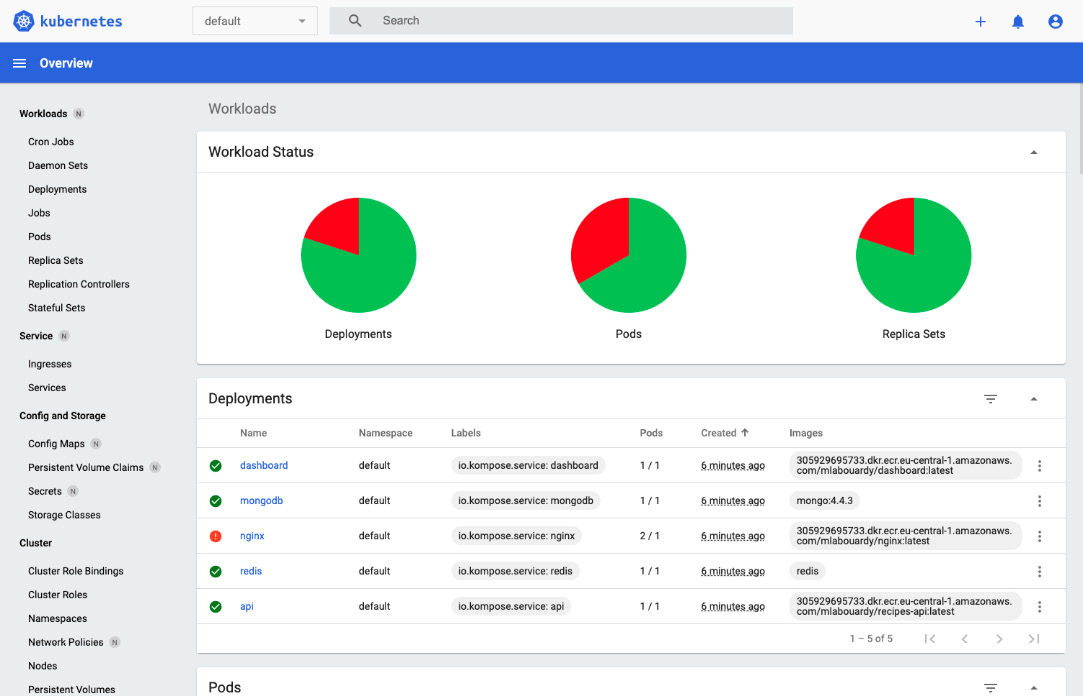
Figure 8.42 – Kubernetes dashboard
You can monitor your application running in EKS easily and scale the API Pods if needed.
Note
When you're done experimenting with EKS, it's a good idea to remove all the resources you created so that AWS doesn't charge you for them.
Summary
In this chapter, you learned how to run a Gin web application on AWS using the Amazon EC2 service and how to serve it though HTTPS with an application load balancer and ACM.
You have also explored how to deploy the application to a managed cluster with ECS without managing the underlying EC2 nodes. Along the way, you covered how to store the Docker images in a remote registry with ECR, and how to deploy the application for scale with Amazon EKS.
In the next chapter, you will see how to automate the deployment of your Gin application on AWS with a continuous integration/continuous deployment (CI/CD) pipeline.
Questions
- How will you configure a persistent volume for MongoDB container data?
- Deploy RabbitMQ on AWS EC2.
- Create MongoDB credentials with Kubernetes Secrets.
- Scale the API pods with kubectl to five instances.
Further reading
- Docker for Developers, by Richard Bullington-McGuire, Andrew K. Dennis, and Michael Schwartz. Packt Publishing
- Mastering Kubernetes – Third Edition, by Gigi Sayfan. Packt Publishing
- Docker on Amazon Web Services, by Justin Menga. Packt Publishing