
Chapter 11: A Complete Real-World Example
I remember clearly the feeling I used to get in college and law school when walking into the classroom on exam day. I do not mean the sense of anguish and panic someone might feel when they are unprepared. Rather, I mean the build-up of excitement to tackle the unknown and solve difficult problems. It is the exhilarating feeling after a semester of learning and studying that I would get as I prepared to face what lies ahead. Armed with the confidence from my studies and preparations, I clearly remember sitting with a pen in hand looking forward to the challenge of proving myself. I feel this way every time that I begin a brand-new web application project.
With the knowledge and practice of the previous chapters, I hope you feel this too. I hope that you are feeling excited and empowered. You should be confident that the material we have covered has equipped you with the tools that you need to build, deploy, and maintain a web application. You indeed are ready to build something awesome.
Of course, web application development is not truly a test, but if we did want to draw a comparison, then it would be more like an open-book exam. It is okay to feel anxious or nervous, or even unsure and underprepared on some topics. Anytime that you need to reference material, look it up. The most important key to success is knowing how to tackle a problem and not memorizing the actual code needed to solve it. I urge you to prepare yourself with tools at the ready: keep this book next to your keyboard, become familiar with the Sanic User Guide (https://sanic.dev/en/), and join the Sanic community forums or Discord server to ask questions or float ideas.
In the end, the person scoring your exam is you, so there are no right or wrong answers. Way back in Chapter 1, Introduction to Sanic and Async Frameworks, we looked at one of the maxims from the Zen of Python and redefined it: "There should be one … obvious way for you to do it." This is a very important concept that I hope you can internalize and apply throughout your own careers.
Although I have been building web applications since the late 1990s, I began my career as a practicing attorney and only later changed professions to software engineering. When people learn this about me, their first question will often be, "How?" I agree that it does not outwardly seem like a standard career path, since it is not an obvious progression. But for me, it was. What I loved about lawyering is closely aligned with what I love about web development: problem-solving. My career has been a journey that has admittedly taken twists and turns that I could not and did not foresee from the beginning. However, from my perspective, the progression has been entirely logical, consistent, and ongoing. I encourage you to take a similar feeling and approach with you on your journey. You plan, you execute, and you adapt to the ever-changing circumstances. Most importantly, you constantly evaluate your options and choose or invent the path that makes sense for your individual needs and circumstances.
In this final chapter, I hope to bring together everything learned from the earlier chapters and present you with a final working web application. The web application presented in this chapter is not the only way to build, but it is the obvious way for me to build. With my 25 years of experience, I hope that there is some wisdom and useful patterns for you to use in building out your web applications. But my solutions may not meet your needs. Please feel free to reuse, improve, and ignore whatever code I have shared with you.
We will discuss the following main topics in this chapter:
- The process of building a web application
- Highlighting select features of the Booktracker
Technical requirements
This chapter does not introduce any new technologies. All of the source code is available at https://github.com/PacktPublishing/Web-Development-with-Sanic/tree/main/Chapter11. More importantly, the final working application is hosted online and fully functional at https://sanicbook.com. Please feel free to poke around on the application to see how it works.
The process of building a web application
Now that all of the preparations and learning is complete, it is time to write the final web application. Just like the big exam at the end of a semester of hard work and study, it is time to prove what we have been working toward. I always did best in exams when I entered the classroom with a process in my head. I may not know what challenges or problems would await me, but I knew the process that I would use to break apart the issues on my way toward a solution. For me, I found a direct correlation between having a defined process for approaching the course's subject matter and the ultimate grade that I received on the exam.
We need a process. Over the years, I have developed a process that I like to take when building a web application. It is broken down into eight steps:
- Define the functionality and workflow.
- Decide on the technology stack.
- Architect the data structures.
- Plan and build the User Interface (UI).
- Build the application infrastructure.
- Prototype the minimally viable backend features.
- Create continuous integration, deployment, and automation tools.
- Iterate, iterate, iterate.
These steps are a starting point and more of a suggested course of action. You will often find while completing one of the steps that you may need to revisit an earlier one. This is okay. For example, in step 2, we need to decide upon the technology stack for our application. That does not mean that we must foresee every possible component from the beginning. Of course, if a need arises to add some new technology, then repeat the step and add the technology. Similarly, I try to build as much of the frontend UI through mockups or working code as possible. This helps me to evaluate all of the use cases that may arise. I also know that I will need to come back and revise the work.
Some people might take the approach that their design stage must cover every possible edge case. They need to plan for all contingencies, and the entire scope of the project must be defined at the beginning. In my opinion, this is both impossible and entirely impractical. Even if you can anticipate every feature that you need to build and can, therefore, predetermine all of the planning needed to account for it, this inflexible approach is destined for failure. The needs of an application are constantly changing, and therefore, the design is a living and evolving organism. It must be adaptable, and you must be flexible enough to realize that, sometimes, your early design decisions will need to be reevaluated.
Of course, this also means that, sometimes, your early design decisions can have a large impact on later choices. You will often find that your choices will need to account for something that could have been decided differently: "If only I had used X instead of Y." My caution to you is to not second-guess these choices. Instead, embrace them as a challenge to overcome. Building within the confines of earlier decisions will help you refine your own decision-making skills for the next web application process.
We will take a walk through each step of my process to see what the major goals and milestones are that we need to pass on our way toward a completed project. The very first set of examples in this book in Chapter 2, Organizing a Project, relate to a discussion about how to organize a project. Our theoretical use case is an application that I am calling the Booktracker. The remainder of this chapter will focus on the building of this application. There is a fully developed application with the source code available at https://github.com/ahopkins/sanicbook. Furthermore, I have gone through and deployed this application live, meaning that you can interact with it and see how it works. It can be accessed here: https://sanicbook.com.
Step 1—Define the functionality and workflow
The very first step in building an application seems axiomatic: you must decide what you want to build. What I suggest that we do is dig in a little deeper to flesh out the idea. It may be tempting to skip this step, especially if you have a general idea in your head of what you want to build. You do—after all—know what you want to build, so your mind is already spinning with the specifics of how you will build your web application. I personally take a lot of enjoyment from the problem-solving aspect of web development. Therefore, answering the how does it work? question is one of the most fun parts for me. My mind likes to jump ahead to crafting solutions, which means I may skip over the part where I actually define the problem.
We will slow down and try to take a methodical approach to define the problem that our web application might solve. Let's say that you and some friends share a favorite hobby: extreme ironing (yes, it's a real thing—go search it online). You have decided that you want to enable fellow extreme-ironers from all over the world to share photos and experiences. Before we can figure out how we are going to store images, there are two basic questions that you must answer:
- What is my application?
- Why do people need or want to use it?
By asking and answering these questions, you can identify the problem that your web application will solve. It is only by clearly knowing the problem that you can develop a properly suited solution. It is now your job to stay focused on that problem as you begin to flesh out the idea with features. I would suggest that you make two lists of features right now. The first list is the set of features without which your application has no use. The second list is reserved for everything else. Since this second list is defined as the alternative to the first, we will focus upon the first list.
At the beginning of your project, you will define a hyper-focused list of features that serve as a starting point. These features are going to be the first ones that you develop to get the application off the ground and organized. I am not suggesting that you must go to market with a minimal product. You may be familiar with the concept of a Minimally Viable Product (MVP). The features required to get the application off the ground are related to the MVP but are not the same. An MVP is a concept commonly used in software development where you launch a product with the least amount of features needed to attract early users and begin a feedback loop with them. This is important and is, of course, something you should be working toward. This process helps you work toward that MVP, but the first list of features that we want to develop is only a small subset of it. The second list should really be split into two lists: items that belong in the MVP and wish-list items. There are, therefore, three lists of features that need to be created:
- Features that are minimally necessary to make the application functional
- Features that fulfill the requirements of an MVP
- Features that are for future development (often called the wish list)
The first list of features that I would like you to create will be narrowly defined and should be the most basic set of features of the MVP. Your initial feature list is merely the compilation of the items that you need to make the application operational. If you remove one feature, then the application cannot even start to run. This is what the first list should contain. There is an extreme amount of power in being able to build something, then stand it up, and actually see and interact with it. Once you achieve this level, it then becomes much easier to iterate over your feature list. After seeing an operational web server, it becomes much easier to work on it. When we get to building features in step 6, your first accomplishment will be to build the first list. Only after that will you get to the second list.
It is also worth mentioning that the second list should itself only be what is needed to reach your MVP. If you have an idea of something you might like to build, put that away on a third list. If it does not fulfill the need of the MVP, then you need to actually have a launched web application to decide whether it is even something worth building. For example, maybe you think it would be a really awesome feature to allow people to live-stream their extreme-ironing expeditions. That may sound nice, but it also may be a lot of work for something that does not meet the community's needs. Focus upon the simple use cases for the second list before tackling the hard use cases.
Answering questions about the Booktracker application
When building out the Booktracker, I needed to ask myself these two questions so that I knew what problem I wanted to solve. Let's ask them now and see how we can define the problem that the Booktracker is meant to solve:
- Q: What is my application?
The Booktracker is a web-based portal and API that enables users to keep track of the books that are in their personal collection, that they would like to read, or that they have already read. Okay, so we know that the application will center around books, and the idea of tying book ownership or readership is paramount. I have also defined that the application should both be usable from a web portal and that I want users to be able to directly integrate with the API. Let's move on to the next question, and then we can start to look at some features.
- Q: Why do people need or want to use it?
Users will use the Booktracker to maintain digital lists of the books in their personal library, books that they would like to borrow or purchase to read in the future, and books that they may have lent to their friends so that they know where all of their books are.
Aha! Now, we are starting to see the beginning of some features that we will need. We will need to have things such as the following:
- Login and authentication, perhaps with social media to make it easier.
- Adding and updating books.
- Tracking the read/unread status.
- Tracking the ownership and location of a book, or who has borrowed a book.
- Perhaps we also need some social management, since users might be interacting with other users; this might even include some discussion forums or live chat.
Our list is starting to lose a little focus. I think that it is okay to define a long list of features, but you should be realistic about what is necessary and what is required. For example, I cannot launch my application if users cannot register, log in, and add books. This would be something that is a part of my MVP. Creating a social network does not seem so critical for the first stage, and this should probably appear on the third list.
So, what is the list of features that should be on the second list? It is common to think of features within the FRUD system, which stands for function, reliability, usability, and delightfulness. Features will primarily fall into one of these categories. They can be arranged in a pyramid, as shown in Figure 11.1:

Figure 11.1 – Features displayed in the FRUD system, with the MVP shown in black
When building an MVP, you must pick features that touch all of the categories. If you instead focus just on the base layer of the pyramid (functional features), then you will have a hard time attracting users. The pyramid on the left in Figure 11.1 shows an MVP where the application only focuses on function. This application would be completely unusable. Instead, by selecting a small number of features from each of the categories, the application can be something that attracts users.
But what are the features that an application needs to start? What are the features that should be on my first hyper-focused list of to-dos on the first list? I would suggest that those are a subset of the functional and reliable features of your MVP. They are the items needed to run the most basic iteration of the web application. Even before login and even before being able to add a book, I think that the first feature we need to build is to be able to display a list of books. This is where the development process will begin. I will start by building a database to store books and a method to display them to the user.
But what about login? A social login does seem like it might be extraneous, and perhaps that is something that should wait until after the MVP. It clearly is a feature that belongs in one of the top categories of the pyramid. Oftentimes, it is probably advisable to leave social sign-on features until after the MVP. However, the reason that I want to have a social login is so that I do not need to develop a system for registering, storing, and validating passwords. Therefore, for my application, that will be an item on the second list. My lists now look like this:
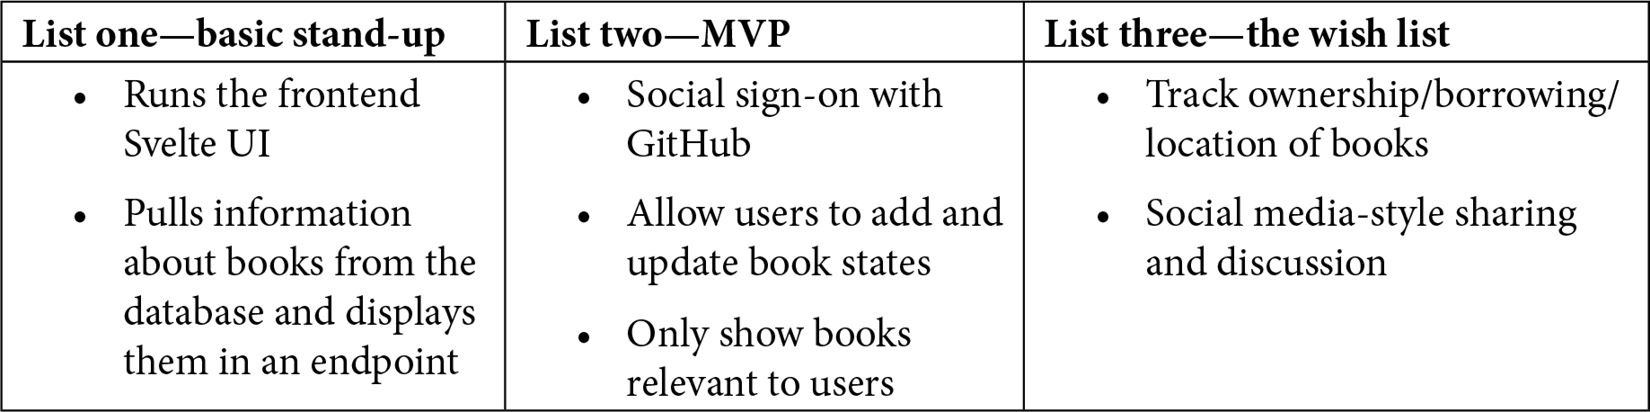
Table 11.1 – The list of features for the Booktracker application
Moving to the next step, it is time for me to decide on my technology stack.
Step 2—Decide on the technology stack
The next step is to decide on the technology stack. You must explore the technologies that will be used to build the application and loosely how they will function together. A technology stack is the list of tools that are used to build the application. For example, deciding that your backend application will be powered with a Python asynchronous web application called Sanic is part of your stack. What other technologies are needed?
You will need to decide how users are going to interact with the application. Will there be a frontend web UI? Will it power a mobile application? Or, perhaps, will it be accessed by other applications? Think about what you need to use to enable the type of user interactions you are looking to build. You also need to think about the technologies that are needed to power the set of features that you want. One of the most critical components of a web application is, of course, the database or storage engines that will be needed. Other important parts of the stack are the tools that may be used to monitor and maintain it. Of course, these features can always be added later. But if you know that you want to use a specific tool for tracking your logs or performing application tracing, perhaps you should plan for it upfront.
Building a stack for the Booktracker
I know that the application will be powered by Sanic, so that becomes the first item in my stack. I also know that I want users to be able to interact via a Web API but also by accessing a frontend browser-based application. Therefore, my stack should include a web UI, but it also probably needs an OpenAPI Specification (OAS) that helps anyone who is interacting directly with the API.
How should I build these two frontend components? My personal favorite framework for frontend applications is Svelte, so I will use that. As for the OAS, I will use Sanic extensions, which will help me to easily build and document the API. While thinking more about the frontend, I also know that I am going to want to make it look attractive and presentable. There are a lot of great CSS frameworks out there to help jump-start a platform. The Booktracker uses Bulma (https://bulma.io/) because it is both attractive and easy to work with.
For storage, I think that most of the data that I need is highly relational—that is to say that objects in my datastore will relate to each other through ordinary foreign-key relationships. Since I am most comfortable using PostgreSQL for this type of data, that is what I will use. However, I also foresee the need to use more transient data for caching, so I will also include a Redis backend.
I decided that I do not want to handle managing passwords on my own. First of all, it would be much simpler for the user if they do not need to create and remember yet another login. That is certainly a more delightful experience. Second, it is also less of a liability for me if there is a data breach at some point. Of course, I plan to take reasonable steps to secure the application, but it is one more precaution I can take by not ever needing to deal with passwords to begin with. Because I need to factor in how users will interact and log in to my application via GitHub, that should be added to my stack and flow chart.
The technology stack so far looks like this:
- Bulma (CSS)
- Svelte (JS)
- Sanic Extensions (OpenAPI)
- Sanic (Python)
- GitHub (authentication)
- PostgreSQL
- Redis
It is also helpful at this point to start creating some flow charts. These will serve both as a visual representation of my application and help to develop the concept of what needs to be built. Remember, this is an iterative process, so what I create now can always be revised later.
I might create a flow chart of the Booktracker that looks like this:

Figure 11.2 – A flowchart of the Booktracker stack
One thing to note is the directions of the arrows. These are meant to show the direction in which requests for information flows. A user requests information from the API, which, in turn, needs to request information from the database. It's worth noting that GitHub will both push and pull information from the web application.
Step 3—Architect the data structures
It is a very helpful step to start thinking about what types of objects your application will deal with. If you are dealing with extreme ironing, you might need to think about photos and locations. If you are building a restaurant review system, you will need restaurants, patrons, and menu items. Oftentimes, these types of data structures will also be some of the first endpoints that you need to build.
Designing data for the Booktracker
For the Booktracker, the most obvious three entities that I can think of are users, books, and authors. When I actually look at my physical bookshelf, however, I see that I also have a lot of books that belong to a similar series of books, and therefore, they are arranged to sit next to each other. I will need to think of a way to tie books together.
The schema that I have ultimately decided that will work for my application looks like this:

Figure 11.3 – A schema for the Booktracker database
There is perhaps little that is surprising going on in this simple schema between users, authors, books, and series. But, there were a few interesting decisions that I needed to make. For example, what if both you and I are using the Booktracker and we both own the same book? Let's call that book Python Web Development with Sanic, or PyWDS for short. How many instances of PyWDS should be in the database—one or two? From a user's perspective, what is important is that they can control their relationship to the book. As the operator of the application, it might be helpful to have a single instance of PyWDS so that I know how many users across the platform have it on their shelves. Therefore, I need to make a relationship from user to book through a third many-to-many table that contains information about whether the user loves the book and what state of reading the book is in.
Another interesting feature of my schema for the Booktracker to note is that I am going to make an effort to not leak any state about the application to users via object IDs. A common practice in relational databases is to increment rows with a sequential primary key. This allows very easy ordering and referencing.
Let's suppose we have an endpoint that looks like this:
@app.get("/book/<book_id:int>)
async def book_details(request, book_id):
...
Now, imagine that you have just added two books to the application. You can access details about that book as /book/1234 and /book/1236. Just by looking at book_id, you now know that there must be a book with an ID of 1235 and presumably for 1233, 1232, and so on. By allowing access to users to see and interact with sequential primary keys, information about the state of your application has been leaked to the public. This is generally considered a bad practice. At best, it is inappropriate for users to have that information. At worst, it could raise a business or security concern.
To overcome this issue, the frontend will exclusively deal with what I am calling an eid or external ID. The idea is that an eid is some set of random characters that uniquely identify an object in the system. Unlike a sequential ID—which is an incremented version of the last ID in the sequence—an eid does not identify objects in relation to any other object. To manage eids, I have created a single table in my database. Every record in one of my object tables will reference a record in this table. This way, when I want to look something up by eid, it is very simple to join from that table to the object table using the ref_id sequential. My queries will generally look like this:
SELECT e.eid, b.*
FROM books b
JOIN eids e ON b.ref_id = e.ref_id
WHERE e.eid = $1;
In the past, I have also solved this problem by creating eids using PostgreSQL itself to populate columns on every table with an eid. However, for this project, I thought that might be a little more complex than necessary. It does also make an interesting point in that I also now know that before I can go much further in building the first list of highly focused initial stand-up features, I will need a way to generate an eid. I should go back now to revise my list of features and add eid generation to the first list.
Step 4—Plan and build the user interface
Admittedly, this next step is not something we will spend much time learning about. Since this book is about building with Sanic, we will leave aside the wealth of discussion points that you might have about how to create an ideal UI and User Experience (UX). Suffice it to say that I think this is an incredibly helpful step in building a proper backend. Even if the UI is not browser-based and the main interaction is only through the API, you must spend some time planning exactly how users are going to interact with the application. The main goal of this step (as a backend developer) is to determine what interactions will need to be supported. Until you know what the frontend UI is going to do, you cannot realistically make decisions about what endpoints to build.
Designing the Booktracker
I like to think that having built web applications for a number of years, I have learned some tricks of the trade and that my ability to create a frontend application is pretty good. That does not mean that I am in any way a UX guru, and therefore, I will not attempt to claim what does and does not constitute good web design. I also would like to warn any UX mavens out there that the design of the Booktracker app is admittedly simplistic, since its function is meant to be very utilitarian. The web UI that I built—which is available at https://sanicbook.com—is meant to be helpful as a tool in backend development learning. Therefore, I admittedly did not spend so much time designing it.
However, I do want to stress that I strongly believe that a decent frontend design—whether through mockups or wireframes—is critical for backend development. If I had built my Booktracker backend first and only then begun to work on the frontend, I likely would have ended up with something rather odd. These sorts of applications often feel disjointed and lead to a mess of code. They are usually very difficult to maintain, refactor, and iterate new features upon. The process of building the frontend is meant to shine a spotlight upon areas where the UI needs help from the backend. If you are not going to be the person building the web UI, then I highly suggest that you sit down with that person and get a clear idea of what their needs and expectations are. One of the most frustrating things as a web developer is when you try to mash together a frontend and backend that are not compatible.
In many cases, this is a good place for wireframing. Many people like to build out mockups with images and online wireframing platforms. For the more humble needs of the Booktracker, I found it far more practical and simple to just build out mockups in HTML and CSS. With the basic mockups in place, I was able to build out the backend to power the frontend with specific knowledge of what was needed.
One word of caution here is warranted: be careful not to fall into the trap of tightly coupling together frontend and backend functionality. Ideally, you should have endpoints that have no knowledge of the existence of the frontend. Your backend indeed should not even know that the frontend exists. It should instead present layers of information that may be needed and can be organized logically.
Step 5—Build the application infrastructure
It is not until step 5 that we begin to write some Python code. By this point, you should have a pretty good outline of what needs to be built. The first Python code that we need to write is for all of the infrastructure—that is to say that we need to now build some of the non-business logic stuff that our application will need. For example, we have talked about the following topics throughout the book:
- The application factory
- Logging
- Exception handling
- Blueprint organization
These are all topics that you should be thinking about right now. In addition, we need to set up some basics for creating a connection pool to both of our databases and start thinking about how to tie our database schema to models. Will there be an Object Relational Mapping (ORM) involved? If yes, it is time to start setting it up. If not, what will be used instead?
At this stage, there is a lot to do. Remember, the first goal is to get an application to an operational stage. That means that the application will start without any exceptions. If there is a startup time error, fix it.
I usually use this time to start building a HelloWorld endpoint. It is not something that will likely end up in the final application. Nonetheless, it is something that I can trigger from curl to see the application working. This is where I will start testing DB connections to make sure that they perform as I expect them to:
bp = Blueprint("HelloWorld", url_prefix="/hello")
class HelloView(HTTPMethodView, attach=bp):
async def get(
request: Request,
):
return json({"hello": "world"})
This simplistic endpoint will be the beginning of my application but will eventually be removed.
In regards to the Booktracker application, this stage looks very much like the hiking app from Chapter 9, Best Practices to Improve Your Web Applications. If you would like a refresher, the code for it is available in the GitHub repository: https://github.com/PacktPublishing/Python-Web-Development-with-Sanic/tree/main/Chapter09/hikingapp. What is important to note is that I use this step to make sure that all of my services are running. I want all of the databases to be live and for the backend application to establish connections to them. Largely, this means building out infrastructure that we have seen through this book. Logging is usually one of the first items in step 5, as well as structuring a factory pattern. Once that is complete, I can move on to the feature development of step 6.
Step 6—Prototype the minimally viable backend features
Now that we know the groundwork has been laid, it is time to start building that first layer of features. Here is where we want to focus on the very first layer of our application features. Take a look back at Figure 11.1 to remind yourself of what this looks like. When deciding upon the features that must be a part of your MVP, you need to balance the needs for function, reliability, usability, and delightfulness. These are all important but with varying degrees of weight. Right now, the most important (although not the only) need is for features that are functional. We will start here.
From step 6 through to step 8, we are about to enter into a bit of a loop. This will be an iterative process to build out our MVP features. The first time through step 6, we will focus on those features that are in the bottom-most category. In this first sweep through the loop, we only care about functionality—that is to say, all we want to see are results on screen with no errors. There likely will be some ugly patterns and some hard-coding of values here. Beautiful code abstraction is not important right now, since we mainly care about just getting something on screen. Remember, we are not building a product yet, just a prototype.
Prototyping the Booktracker
If you look at the Booktracker app, you will see that there are several endpoints. So, which was the first one that I built, and why? The core of the application is the delivery of information about books. Therefore, the most fundamental feature is provided by the GET /v1/books endpoint. It is designed to retrieve a list of books and output them as JSON. Because of its central importance to the application and its relative simplicity, it is precisely where I decided to begin building the application.
If we take a look at the code in GitHub, it looks roughly like this:
bp = Blueprint("Books", url_prefix="/books")
class BookListView(HTTPMethodView, attach=bp):
@staticmethod
@inject_user()
async def get(
request: Request,
pagination: Optional[Pagination] = None,
user: Optional[User] = None,
):
executor = BookExecutor(request.app.ctx.postgres, BookHydrator())
kwargs = {**pagination.to_dict()} if pagination else {}
getter: Callable[..., Awaitable[List[Book]]] = executor.get_all_books
if title := request.args.get("title"):
kwargs["title"] = title
getter = executor.get_books_by_title
elif user:
payload = await request.app.ctx.auth.extract_payload(request)
user_executor = UserExecutor(request.app.ctx.postgres)
user = await user_executor.get_by_eid(eid=payload["eid"])
kwargs["user_id"] = user.user_id
getter = executor.get_all_books_for_user
try:
books = await getter(**kwargs)
except NotFound:
books = []
output = [book.to_dict(include_null=False) for book in books]
return json({"meta": pagination, "books": output})
This request handler may look complicated at first glance, but it is actually very simple. It is designed to return a list of books in the application. There are a few different filters to help with different use cases. For example, you can supply a title query argument to filter for specific book titles. This is helpful for our frontend to be able to have an autocomplete feature for the user. The endpoint also will filter the books that are linked to a specific user. This will be used by the frontend to show a user which books they have. Once the books have been fetched, the handler will serialize them and deliver them as a JSON response.
I can assure you that the preceding code is definitely not the first version of this endpoint. In fact, the version that you see is probably the result of four or five iterations through my development process. As you will see, the endpoint includes the ability to easily paginate through results as to not overwhelm the database and response size. The first pass at developing this endpoint was much simpler and did not include pagination or filtering. It instead looked like this:
bp = Blueprint("Books", url_prefix="/books")
class BookListView(HTTPMethodView, attach=bp):
@staticmethod
async def get(
request: Request,
):
executor = BookExecutor(request.app.ctx.postgres, BookHydrator())
books = await executor.get_all_books()
output = [book.to_dict() for book in books]
return json({"books": output})
This route handler looks somewhat similar to what we saw with the hiking app in Chapter 9, Best Practices to Improve Your Web Applications. It is meant to be a sort of bare minimum so that I can see data properly flowing from the database to the frontend.
As we advance through the iterations, there will be a need to add other features. For example, the next one to work on is the authentication flow. Then, once we have access to users, we can start to provide only books that are linked to users in the /books endpoint. And, again down the road, we may have the need to paginate this response so that responses are more controlled. Hopefully, you can see that just as we created a pyramid of FRUD for our application, the same could be said to exist at the micro level for each endpoint. First, we build a minimally functional version to prove the concept, and only then can we build the full FRUD version that will make it to the MVP.
It is difficult to determine exactly where to draw the line, and it is easy to get carried away too soon. Especially when I am in the early iterations of development, I like to ask myself a simple question: Does this feature make my application better? If the answer is yes and I am in one of the early iterations, then warning bells are going off in my head that I am headed in the wrong direction. At the outset of a project, I want the answer to that question to be, No, this does not make it better; it makes it something. In other words, I try to draw a distinction between an improvement and something without which the application does not exist.
Once there is some sort of minimal features in the application, what's next?
Step 7—Create continuous integration, deployment, and automation tools
Application development often does not exist purely within the confines of the service that you are working on. Usually, you will need to work on some tooling that helps support the life cycle of the application. Before we get too far into the development process, I want to shift gears to focus upon some of the scripts, manifests, and utilities that will be needed to operationalize and deploy the application.
Therefore, by this stage, you should have decided exactly where you want to run the application. You also need to decide how you plan to get your application to that location.
I have decided to deploy my application using a Platform as a Service (PaaS) solution, and a small VPS to run my two databases. This is mainly because this application is meant to be a Proof of Concept (POC) and will not carry much traffic or demand. This decision is therefore based upon a desire to keep the hosting costs to a minimum while still keeping it easy for me to deploy changes. To learn more about deploying a PaaS, please see the Platform as a service section in Chapter 8, Running a Sanic Server.
Step 8—Iterate, iterate, iterate
This final step is really the continuation of the process as a whole. More specifically, however, you should find yourself in a loop that starts in step 6. Once you have a running version of the application, you should continue to iterate on it with small incremental changes. Each change should be the addition or correction of a feature that matches your pyramid. For example, remember the two versions of the GET /v1/books endpoint I showed? There is the completed version that you can access today online and the simple version that was my first iteration. To get from one to the other was not a single iteration through the process; it instead took three passes to get to the final endpoint. Let's examine the evolution of this endpoint:
- We will begin with a reminder of what it looked like after the first iteration:
class BookListView(HTTPMethodView, attach=bp):
@staticmethod
async def get(
request: Request,
):
executor = BookExecutor(request.app.ctx.postgres, BookHydrator())
books = await executor.get_all_books()
output = [book.to_dict() for book in books]
return json({"books": output})
- In the first revision, there was a need to add pagination. I used a really helpful feature of Sanic extensions to simplify this. I added a setup_pagination(app) function in my create_app factory. The purpose of this was to automatically read the request's query parameters looking for limit and offset. When present, those values should be read into a model and auto-injected into a route handler. This is very convenient because it now can easily be reproduced on any endpoint that needs to handle pagination requests:
@dataclass
class Pagination(BaseModel):
limit: int = field(default=15)
offset: int = field(default=0)
@staticmethod
async def from_request(request: Request):
args = {
key: int(value)
for key in ("limit", "offset")
if (value := request.args.get(key))
}
return Pagination(**args)
def setup_pagination(app: Sanic):
app.ext.add_dependency(Pagination, Pagination.from_request)
What this tells Sanic to do is look for Pagination as a type annotation in the request handlers. If that exists, then it should call Pagination.from_request(request) and inject the return value of that method as the argument that was annotated as Pagination. Adding this to the handler, it now looks like this:
class BookListView(HTTPMethodView, attach=bp):
@staticmethod
async def get(
request: Request,
pagination: Optional[Pagination] = None,
):
executor = BookExecutor(request.app.ctx.postgres, BookHydrator())
kwargs = {**pagination.to_dict()} if pagination else {}
books = await executor.get_all_books(**kwargs)
output = [book.to_dict() for book in books]
return json({"books": output})
- In the second revision, I decided that if the user is logged in, then the endpoint should only return books related to the current user. Because my application uses Sanic JWT—more on this package later in the Authentication flow section—there happens to be a convenient decorator that I can use. By wrapping my handler with @inject_user(), Sanic will now automatically inject the currently authenticated user into my handler:
class BookListView(HTTPMethodView, attach=bp):
@staticmethod
@inject_user()
async def get(
request: Request,
pagination: Optional[Pagination] = None,
user: Optional[User] = None,
):
executor = BookExecutor(request.app.ctx.postgres, BookHydrator())
kwargs = {**pagination.to_dict()} if pagination else {}
getter = executor.get_all_books
if user:
payload = await request.app.ctx.auth.extract_payload(request)
user_executor = UserExecutor(request.app.ctx.postgres)
user = await user_executor.get_by_eid(eid=payload["eid"])
kwargs["user_id"] = user.user_id
getter = executor.get_all_books_for_user
try:
books = await getter(**kwargs)
except NotFound:
books = []
output = [book.to_dict() for book in books]
return json({"books": output})
With this revision, it is now clear that I needed to add a new SQL statement to be able to fetch books based upon the user. Therefore, I needed to add a new function to my executor. That is why I assign the methods to the getter variable: so that the variable can be changed if needed.
- On the final revision, I decided that this endpoint should also be able to handle incoming search queries for looking up books by titles. This means that we need a third getter. Since I already established the pattern for changing the getter, this change was simple:
class BookListView(HTTPMethodView, attach=bp):
@staticmethod
@inject_user()
async def get(
request: Request,
pagination: Optional[Pagination] = None,
user: Optional[User] = None,
):
executor = BookExecutor(request.app.ctx.postgres, BookHydrator())
kwargs = {**pagination.to_dict()} if pagination else {}
getter = executor.get_all_books
if title := request.args.get("title"):
kwargs["title"] = title
getter = executor.get_books_by_title
elif user:
payload = await request.app.ctx.auth.extract_payload(request)
user_executor = UserExecutor(request.app.ctx.postgres)
user = await user_executor.get_by_eid(eid=payload["eid"])
kwargs["user_id"] = user.user_id
getter = executor.get_all_books_for_user
try:
books = await getter(**kwargs)
except NotFound:
books = []
output = [book.to_dict() for book in books]
return json({"books": output})
The change in this revision was just to add the check for a title in the query arguments. There is one very important item worth mentioning here. This one endpoint is really doing lifting for three things. In many application architectures, it might actually be easier to split this up into multiple endpoints each with a much cleaner and narrow focus. It is ideal for a single handler to have a single responsibility. However, sometimes rules can be broken, and in this instance, I decided it was a better learning experience to handle all of these responsibilities together.
Sometimes, while iterating through a step, you will need to revisit a step even earlier than step 6. And many times, you will find that you are not yet ready to deploy that code to a production-ready server. Both of these changes to the process are good and to be expected.
The /v1/books process shows how you can take the concept of an MVP for an application and apply it to even a single endpoint. The first use case was displaying books. Features were iteratively added to the endpoint until there was an MVP for how I would like it to operate on the production application. Try to resist the temptation to overbuild it too early. The consequence of that is usually a bunch of overly complicated code that you do not know how to maintain in six months when you need to fix a bug or add a new feature.
With the basics of the process that I used to build the web application out of the way, let's next take a look at some of the decisions and features that were actually implemented.
Highlighting select features of the Booktracker
The Booktracker app attempts to approximate real-world concerns of web application development. The main goal of the project is to provide a bit of source data that can be coupled with a backend server to provide a realistic API and frontend web application. What we will do now is step through parts of the application and discuss some important challenges and how solutions were developed.
Development environment
The obvious place to start is by developing a working development environment. To determine how to structure the project directory and bring up a working application, I needed to consider what exactly it was that I needed to build. As a reminder, the Booktracker is an application built from the following:
- A Svelte-based frontend UI
- A Sanic-based backend Web API
- A PostgreSQL database
- A Redis datastore
Let's take a look at how I created a development environment for these services.
Organizing the application
There are four different services that I need to be concerned with. When I need to locally run a web server and a database, I almost always will reach for Docker Compose. We will do that here. However, since I intend to serve all of my static content—meaning the frontend Svelte UI—from Sanic, I only need three services. Let's quickly look at how I am organizing the project:
./booktracker
├── application
│ ├── booktracker
│ │ └── ...
│ ├── node_modules
│ │ └── ...
│ ├── ui
│ │ └── ...
│ ├── Dockerfile
│ ├── package.json
│ ├── requirements.txt
│ ├── rollup.config.js
│ └── yarn.lock
├── postgres
│ ├── Dockerfile
│ └── initial.sql
├── docker-compose.yml
└── README.md
As you can see here, in the root of the project, there are two main directories: ./application and ./postgres. This is to clearly define the two Docker images that will need to be built, and you will see that each of these folders has a Dockerfile in it. Since Sanic is powering both my frontend and backend, the application directory contains both a ./booktracker directory (the Web API) and a ./ui directory (the frontend). All of the configurations live in this directory so that the subdirectories can be devoted to the application code. Since we do not care too much about the frontend right now, please feel free to browse the source code at https://github.com/PacktPublishing/Web-Development-with-Sanic/tree/main/Chapter11 to see more details about how I accomplished it.
The ./booktracker directory is designed almost exactly the same way that it was built way back in Chapter 2, Organizing a Project. Here is a general layout:
./booktracker
├── blueprints
│ ├── author
│ │ ├── queries
│ │ │ └── ...sql
│ │ ├── executor.py
│ │ ├── model.py
│ │ └── view.py
│ ├── book
│ │ ├── queries
│ │ │ └── ...sql
│ │ ├── executor.py
│ │ ├── hydrator.py
│ │ ├── model.py
│ │ └── view.py
│ ├── frontend
│ │ ├── reload.py
│ │ └── view.py
│ ├── user
│ │ ├── queries
│ │ │ └── ...sql
│ │ ├── executor.py
│ │ └── model.py
│ └── view.py
├── common
│ ├── auth
│ │ ├── endpoint.py
│ │ ├── handler.py
│ │ ├── model.py
│ │ └── startup.py
│ ├── dao
│ │ ├── decorator.py
│ │ ├── executor.py
│ │ └── hydrator.py
│ ├── base_model.py
│ ├── cache.py
│ ├── cookie.py
│ ├── csrf.py
│ ├── eid.py
│ ├── log.py
│ └── pagination.py
├── middleware
│ └── request_context.py
├── worker
│ ├── module.py
│ ├── postgres.py
│ ├── redis.py
│ └── request.py
└── server.py
There are four main divisions in the application, and I tried to keep them logically arranged, as follows:
- ./blueprints: This directory—contrary to what the name implies—does not simply contain blueprint objects. The main goal of this is to contain all of my endpoints and views. Perhaps a better name might be ./views, but I particularly do not like looking at from booktracker.views.view import bp. It is where all of my domain-specific logic belongs.
- ./common: For modules that are not domain-specific and may have more general applicability, I group them into the common module.
- ./middleware: Like ./blueprints, this directory name might be a little confusing because it is not the only location where you will find middleware. Instead, it contains the middleware that is of general applicability. Where a piece of middleware is limited to a blueprint, it will be grouped within that domain, or, if it is closely tied to a specific module, it lives alongside it. A good example is the middleware used for CSRF protection. That code lives in ./common/csrf.py.
- ./worker: The ./worker directory contains the modules that mainly pertain to the proper setup of a worker instance. This includes things such as setting up connection pools, but it also contains some utilities that help tie the rest of the application together.
And just how does the application get tied together? We will look at how I accomplished that using factory patterns in the Creating a better factory pattern with setup functions section. Next, we will review how the frontend application is being served from Sanic.
Serving Svelte from Sanic
In Chapter 10, Implementing Common Use Cases with Sanic, we reviewed how it was possible to use Sanic as a development server for Svelte (or any frontend) applications. If you recall, this was accomplished by running two Sanic applications side by side. One of them runs the main application and serves all of the Web API and frontend content, while the second is a livereload server and sends messages to the browser to refresh the page every time a file is saved.
In the earlier version, we served all of the frontend files simply using the static handler:
app.static("/", app.config.FRONTEND_DIR / "public")
For this project, I wanted something a little more robust. Particularly, I wanted the ability to serve the index.html content from a bare directory. I began by setting up a frontend module inside of the ./blueprints directory. The view module for the frontend looks like this:
from logging import getLogger
from pathlib import Path
from sanic import Blueprint, Request
from sanic.response import file
from .reload import setup_livereload
logger = getLogger("booktracker")
bp = Blueprint("Frontend")
setup_livereload(bp)
@bp.get("/<path:path>")
async def index(request: Request, path: str):
base: Path = request.app.config.UI_DIR / "public"
requested_path = base / path
logger.debug(f"Checking for {requested_path}")
html = (
requested_path
if path and requested_path.exists() and not requested_path.is_dir()
else base / "index.html"
)
return await file(html)
So, what is going on? First, I define my blueprint as usual. I then call a function called setup_livereload. This function does most of the same work that we saw in the Powering a progressive web application section in Chapter 10, Implementing Common Use Cases with Sanic. You can also check the source code of the Booktracker app to remind yourself how that works.
To achieve the goal of serving index.html from a directory, I set up an endpoint on the blueprint that will act as a catch-all. Using /<path:path> will allow this handler to catch any calls to the application that do not have another specified route. This means I will be relying upon the frontend to catch anything that does not exist in the backend. This is really important, especially for a PWA. I want all of my routing to be controlled by the frontend application, and therefore we need to send all non-matched requests to it.
Creating a better factory pattern with setup functions
We have explored the factory pattern for creating Sanic applications earlier in this book a few times. If you recall, the idea is that we create a function that generates the Sanic application instance and then do all of the importing afterward, so that objects such as routes, middleware, signals, and listeners can attach properly. For example, the hiking app that we saw in Chapter 10, Implementing Common Use Cases with Sanic, looks like this:
from sanic import Sanic
from hiking.common.log import setup_logging
def create_app():
app = Sanic(__name__)
setup_logging(app)
from hiking.middleware import request_context # noqa
from hiking.blueprints.view import bp # noqa
from hiking.worker import postgres # noqa
from hiking.worker import redis # noqa
app.blueprint(bp)
return app
This, of course, does work, but it is kind of ugly to have all those imports inside of the function. Note how each line has a # noqa comment at the end. That is because without it, Python linters will throw up errors because your imports are not at the top of the file. Unfortunately, if you place those imports where they should be (at the top of the file), then the objects cannot attach, since the Sanic application instance does not exist yet.
One alternative I have seen to overcome this is to not use Sanic's decorators when making an object. For example, the handler would be a function without a decorator:
async def some_handler(request: Request):
...
Then, it is attached inside of the factory:
from somewhere import some_handler
def create_app():
app = Sanic(__name__)
app.add_route(some_handler, "/something")
Again, this works, but it has two problems in my opinion:
- It removes some information that is pertinent to the object (whether it is a route, middleware, and so on) and places it in a separate location. You can no longer easily identify what a function is without looking it up inside of the factory as well.
- This pattern tends to lead to very lengthy factories that are nothing more than a bunch of add_route and register_middleware calls, and so on. These long lists can become very difficult to maintain and even harder to track down a bug when there is a problem.
I am going to show you my preferred pattern that solves all of these problems. Before doing that, however, I want to remind you how all of the blueprints are being linked up.
Organizing blueprints
There are three main blueprints in the Booktracker application: Authors, Books, and Frontend. There could be 50 more, and I still think this pattern works best. Each of the blueprints is very similar in how they are organized. As shown earlier when reviewing the folder organization, there is a file called ./view.py that contains the blueprint instance. Let's take a look at the Authors blueprint as an example.
Inside of ./blueprints/author/view.py, there is the following:
bp = Blueprint("Authors", url_prefix="/authors")
Attached to that, there is a view. I tend to prefer Class-Based Views (CBVs), but regular functional handlers are perfectly acceptable. In our case, it looks something like this:
class AuthorListView(HTTPMethodView, attach=bp):
@staticmethod
async def get(request: Request, pagination: Pagination):
...
Now, each of these blueprints is ultimately loaded into ./blueprints/view.py. That file looks like this in its entirety:
from sanic import Blueprint
from .author.view import bp as author_bp
from .book.view import bp as book_bp
from .frontend.view import bp as frontend_bp
api = Blueprint.group(author_bp, book_bp, version=1, version_prefix="/api/v")
bp = Blueprint.group(frontend_bp, api)
As you can see, the idea is that there is a single location where all of the blueprints are loaded. All of the API endpoints are bundled into a group that gets a version number and a prefix. This will make it so that all of my API endpoints will begin with /api/v1. Then, both the API group and my frontend blueprint are loaded into another blueprint group called bp. I tend to use bp consistently to mean the blueprint that I intend to import somewhere else. For example, take a look at how I imported all of the blueprints and renamed them. The single blueprint group called bp in this module will become important soon.
Attaching objects in the factory
We now turn our attention toward our application factory. It has a couple of key features to take notice of:
- All regular imports take place at the top of the file, where they should be.
- No actual Sanic objects (routes, middleware, listeners, signals, and so on) are actually imported at all.
- Instead, there are setup_* functions that do the work of creating and linking some of the objects.
- Alternatively, objects that exist in the global scope will be imported programmatically.
- The factory pattern is highly testable.
Here is what it looks like:
from pathlib import Path
from typing import Optional, Sequence, Tuple
from sanic import Sanic
from booktracker.common.auth.startup import setup_auth
from booktracker.common.csrf import setup_csrf
from booktracker.common.log import setup_logging
from booktracker.common.pagination import setup_pagination
from booktracker.worker.module import setup_modules
from booktracker.worker.request import BooktrackerRequest
DEFAULT: Tuple[str, ...] = (
"booktracker.blueprints.view",
"booktracker.middleware.request_context",
"booktracker.worker.postgres",
"booktracker.worker.redis",
)
def create_app(module_names: Optional[Sequence[str]] = None) -> Sanic:
if module_names is None:
module_names = DEFAULT
app = Sanic("BooktrackerApp", request_class=BooktrackerRequest)
app.config.UI_DIR = Path(__file__).parent.parent / "ui"
app.config.CSRF_REF_PADDING = 12
app.config.CSRF_REF_LENGTH = 18
if not app.config.get("CORS_ORIGINS"):
app.config.CORS_ORIGINS = "http://localhost:7777"
setup_logging(app)
setup_pagination(app)
setup_auth(app)
setup_modules(app, *module_names)
setup_csrf(app)
return app
The list of module names is important. When running the application, the server will just fall back and use the predefined DEFAULT modules. However, allowing for the list of modules to be imported dynamically by passing them to create_app, I have made it much simpler to perform very targeted unit tests.
Let's take a quick look at one of these modules, booktracker.middleware.request_context, to see what is happening:
from contextvars import ContextVar
from sanic import Request, Sanic
app = Sanic.get_app("BooktrackerApp")
@app.after_server_start
async def setup_request_context(app, _):
app.ctx.request = ContextVar("request")
@app.on_request
async def attach_request(request: Request):
request.app.ctx.request.set(request)
As you can see, we are using Sanic.get_app("BooktrackerApp") to fetch our application instance. This will work fine because this module will not be loaded until after the application instance is created. If you mess up your import ordering, then you will end up with an exception that looks like this:
Traceback (most recent call last):
File "/path/to/module.py", line 5, in <module>
app = Sanic.get_app("BooktrackerApp")
File "/path/to/sanic/app.py", line 1676, in get_app
raise SanicException(f'Sanic app name "{name}" not found.')
sanic.exceptions.SanicException: Sanic app name "BooktrackerApp" not found.
The way that this actually gets imported is by loading this module—and all of the other module strings, including the blueprint view we saw earlier—dynamically with the setup_modules function. This function is very simple:
from importlib import import_module
from sanic import Sanic
def setup_modules(app: Sanic, *module_names: str) -> None:
for module_name in module_names:
module = import_module(module_name)
if bp := getattr(module, "bp", None):
app.blueprint(bp)
Its job is to simply import the module from a string. As we already know, Sanic will take care of linking up the objects, since we have an application instance present to use the built-in decorators. The one place we need to take an additional step is with blueprints, since they need to be manually attached to the application instance by calling app.blueprint(bp). This is why I said earlier that it is important that I chose bp as the name for all blueprints that I intended to attach directly to the application instance.
I really like this pattern for defining modules and importing them dynamically because it leads to orderly application organization. I can easily open up a module and see exactly what is available, and adding new modules is relatively simple. There is, however, another pattern that I sometimes find useful.
Somewhat similar to setup_modules, there is a setup_csrf function. Take a look at the factory pattern we are working through now to remind yourself where this function is being called. I pass the app instance to the function, which means that I can do something like this:
def setup_csrf(app: Sanic) -> None:
@app.on_request
async def check_request(request: Request):
request.ctx.from_browser = (
"origin" in request.headers or "browser_check" in request.cookies
)
@app.on_response
async def mark_browser(_, response: HTTPResponse):
set_cookie(
response=response, key="browser_check", value="1", httponly=True
)
Now, instead of using Sanic.get_app and defining everything in the global scope of the module, we define it all inside of the local scope of the function. In the Booktracker application, I used both of these options. Some modules are imported dynamically by string, and some are set up via functions such as setup_csrf. I would encourage you to pause reading right now and to head to the factory source at https://github.com/ahopkins/wds-finalapp/blob/main/application/booktracker/common/csrf.py. Afterward, I suggest that you look at each of the setup_* functions and their source code to see what they are doing. In my opinion, both of these are good options, and I urge you to experiment with them both to see which you prefer in your own application development.
Just as an example, remember my ./blueprints/view.py? It can just as easily look like this:
from sanic import Blueprint, Sanic
from .author.view import bp as author_bp
from .book.view import bp as book_bp
from .frontend.view import bp as frontend_bp
api = Blueprint.group(author_bp, book_bp, version=1, version_prefix="/api/v")
bp = Blueprint.group(frontend_bp, api)
# this next part is all new (you will not find it in the repo source)
def setup_views(app: Sanic):
app.blueprint(bp)
In this case, the module would not need to be imported via string using setup_modules.
The data access layer
When discussing the database schema, I mentioned that the Booktracker application attempts to avoid data leakage by not ever showing an incremental object identifier to the client. This means that the backend API must have some other form of communication with a client to reference a specific object in the database. There are certainly many forms that this could take.
A common use case—especially for blogs and news websites—is to concatenate an article title to a slug. This bit of text is a helpful way to have a human-friendly string that uniquely identifies a specific article. This usually takes the form of an all-lowercase string, where all non-characters have been converted to a hyphen—for example, this-is-a-slug. While this method is great for objects that have titles (especially long ones), it is not suitable for general applicability.
A widely accepted practice is to use a Universally Unique Identifier (UUID). You have probably seen (and likely used) them before. They are simple to create and extremely unlikely to cause a name collision. You can safely assume that if you run the following code, every single UUID generated will be unique:
from uuid import uuid4
print(uuid4())
You may be wondering, why UUID version 4? What is even the difference between the UUID versions? A good reference material is this website: https://www.uuidtools.com/what-is-uuid. If you are interested, please feel free to read up on the other versions that allow you to add namespaces to them. For our use case, we will use UUID version 4 because it represents a completely random (so far as any computer is random) set of characters. But a UUID is not just a set of random characters; it actually represents a number that has been formatted to meet a very specific specification. If it is a number, then we know that there are some useful ways that we can represent it.
Given the UUID 06adf00c-0f43-47d7-941a-ce76346f3fb3, we can express that in a few ways:
- As a hexadecimal value: 06adf00c0f4347d7941ace76346f3fb3
- As an integer value: 8878504065002459431209101741502971827
- As a binary value: 0110101011011111000000001100000011110100001101000111110101111001010000011010110011100111011000110100011011110011111110110011
We can use this fact to solve what I feel is the most annoying part of UUIDs: they are not user-friendly. I have three main problems with them:
- They are very long.
- They are hard to copy and paste.
- They are not human-friendly and are difficult to remember.
As a developer who is debugging a platform and using UUIDs to reference objects or requests, it is harder to copy and paste a value with multiple hyphens than a single value. Usually, you cannot just double-click a UUID value to select the whole string. A single value without hyphens usually can be double-clicked to select the whole thing. To make my life easier, and to save space when sending UUIDs, I decided to use the numeric property of them to shorten the value by expanding the characters they can use.
In booktracker.common.eid, you will find this function:
import uuid
from string import ascii_letters, digits
REQUEST_ID_ALPHABET = ascii_letters + digits
REQUEST_ID_ALPHABET_LENGTH = len(REQUEST_ID_ALPHABET)
def generate(width: int = 0, fillchar: str = "x") -> str:
"""
Generate a UUID and make it smaller
"""
output = ""
uid = uuid.uuid4()
num = uid.int
while num:
num, pos = divmod(num, REQUEST_ID_ALPHABET_LENGTH)
output += REQUEST_ID_ALPHABET[pos]
eid = output[::-1]
if width:
eid = eid.rjust(width, fillchar)
return eid
What this does is generate a UUID and then convert it into a shorter string, using all of the ASCII letters and digits. This will turn 06adf00c-0f43-47d7-941a-ce76346f3fb3 into mLBFLEq8vnXHPHzbvN7ap. This, in turn, brings a 36-character string down to 21 characters. It saves space and, in my opinion, is easier to use. The only problem with this algorithm is that the length of the output might vary in length. For example, it can generate strings of 19 or 20 characters. I would prefer that all eids have a constant length in my database. Therefore, I will left-pad them to the desired length if needed. My database stores eids as 24 characters. The UUID that we have been working with will be stored in my database as xxxmLBFLEq8vnXHPHzbvN7ap.
Now that you understand how the application passes these eids around, you should be able to piece together the flow from the endpoint, through the executor, to the database. Let's take a look at how this happens by getting a book. Here is the endpoint for getting details about a book from the API:
class BookDetailsView(HTTPMethodView, attach=bp, uri="/<eid>"):
@staticmethod
@inject_user()
async def get(request: Request, eid: str, user: Optional[User]):
executor = BookExecutor(request.app.ctx.postgres, BookHydrator())
getter: Callable[..., Awaitable[Book]] = executor.get_book_by_eid
kwargs: Dict[str, Any] = {"eid": eid}
if user:
getter = executor.get_book_by_eid_for_user
kwargs["user_id"] = user.user_id
book = await getter(**kwargs)
return json({"book": book.to_dict(include_null=False)})
The first thing that we notice is that this is a CBV that is attached to the blueprint instance stored as the bp variable. We also see that it is capturing the eid from the URL and then injecting that into the handler arguments. What about the decorators? A CBV can have its methods defined either as a regular instance method or a static method. Both of the following solutions are okay:
class SomeView(HTTPMethodView, attach=bp):
@staticmethod
async def get(request: Request):
...
async def post(self, request: Request):
...
I tend to prefer using a staticmethod if I am not going to need the self argument, since the CBV is more a tool to encapsulate similar endpoint handlers as opposed to more traditional object-oriented programming style encapsulation. The @inject_user decorator comes from another project of mine called Sanic JWT that provides some helpful utilities around authentication. It is not important for the current discussion, other than to say that if a request comes in from an authenticated user, it will automatically query the database and inject the User object.
The next main thing to note is that we are setting up an executor. If you recall from the Hiking app, the executor is responsible for connecting call methods with raw SQL. It then executes them and hydrates the data into a model instance.
Tip
We can improve upon this endpoint further with Sanic extensions. One of the features there allows us to define commonly used items (such as BookExecutor) upfront in our application and auto-inject them into the route handler when necessary. That looks something like this:
def getter(request):
return BookExecutor(request.app.ctx.postgres, BookHydrator())
app.ext.add_dependency(BookExecutor, getter)
It will be appropriate to set these up in a setup_* function from the factory pattern previously discussed.
For the most part, you will find that the data access layer in the Booktracker app is nearly identical in implementation to the Hiking app. It is probably not so critical to our discussion here, but I would suggest taking a look if you are not interested in a full ORM.
Authentication flow
When thinking about user authentication for this application, I knew that I wanted it to be simple. After all, there is no reason to make someone go through the process of registering, selecting yet another username and password, validating an email, and so on. That flow is valid and necessary in some locations but clearly too complicated for this use case. Implementing a social media sign-on was clearly the best option for me. For the intended audience of my application (such as you, reading this book), a GitHub account seems like the perfect prerequisite.
Knowing that GitHub would be used to verify users, I needed to think about how I wanted to actually handle authentication in the application. In Chapter 7, Dealing with Security Concerns, there is a lengthy discussion in the Protecting your Sanic app with authentication section about which authentication systems are good in different situations. For my use case, I decided a simple JWT would be best. Specifically, I decided to implement the split-JWT cookie discussed in that chapter's Solving for JWTs in browser-based applications section. This will be very easy to set up using Sanic JWT. This tool will create the authentication endpoints and provide me with the tooling (such as decorators) that I need to implement my authentication scheme.
Because JWTs are best when they expire quickly, I knew that I would need to implement refresh tokens. The frontend application was going to need to be responsible for keeping the token fresh. With a basic understanding of what my requirements were, I was ready to start building the authentication flow. Let's look at the first part, the setup_auth method:
from sanic_jwt import Initialize
def setup_auth(app: Sanic):
Initialize(
app,
url_prefix="/api/v1/auth",
authenticate=authenticate,
retrieve_user=retrieve_user,
extend_payload=payload_extender,
store_refresh_token=store_refresh_token,
retrieve_refresh_token=retrieve_refresh_token,
class_views=[("/github", GitHubOAuthLogin)],
...
)
Here is only a portion of the configuration. You can see the full thing in the repository. The point that I want to discuss here is that I needed to create a bunch of handlers that will be responsible for hooking into Sanic JWT. In addition, I needed to add a new endpoint: /api/v1/auth/github.
The first step that a user takes is to click a link to /api/v1/auth/github. This new endpoint sets some CSRF cookies and then forwards the user to the GitHub Single Sign-On (SSO) page. The user is presented with the option to sign into my application and provide access to read the user profile. Once they click the button, they are redirected back to the application, where they are presented with a screen like this:
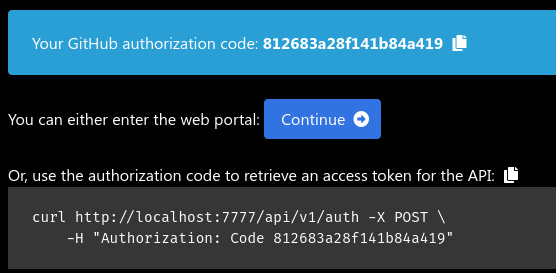
Figure 11.4 – A screenshot of the Booktracker authentication page
This page provides two options: an authorization code to run directly against the API or a button that the user can use to follow via the UI. By clicking the Continue button, the user is doing the same action as running the curl command: sending the code that GitHub generated to the /api/v1/auth endpoint. That endpoint executes the authenticate handler. You can see the full source of it here: https://github.com/ahopkins/wds-finalapp/blob/main/application/booktracker/common/auth/handler.py.
Let's step through that handler to see what is going on:
- First, the handler does some checking to make sure it has the correct context and the GitHub code:
async def authenticate(request: Request) -> User:
invalid = Unauthorized("Missing or invalid authorization code")
auth_header = request.headers.get("authorization", "")
if not auth_header or not auth_header.lower().startswith("code"):
raise invalid
_, code = auth_header.split(" ")
- Once it has that code, it can take the next step in the GitHub authentication flow by sending that code along with the client_id and client_secret that GitHub provided. Upon a successful exchange, GitHub will issue an access_token that can be used to send authenticated requests to the GitHub API:
# Exchange the authorization code for an access token
async with httpx.AsyncClient() as session:
response = await session.post(
"https://github.com/login/oauth/access_token",
json={
"client_id": request.app.config.GITHUB_OAUTH_CLIENT_ID,
"client_secret": request.app.config.GITHUB_OAUTH_SECRET,
"code": code,
},
headers={"accept": "application/json"},
)
if b"error" in response.content or response.status_code != 200:
logger.error(response.content)
raise invalid
- After this request is complete, the application needs to send a request to fetch the user details from GitHub:
async with httpx.AsyncClient() as session:
response = await session.get(
"https://api.github.com/user",
headers={
"Authorization": f"token {response.json()['access_token']}"
},
)
if b"error" in response.content or response.status_code != 200:
logger.error(response.content)
raise invalid
data = response.json()
- With the user data in hand, the authenticate handler can take its final step—fetch a user from the database or create a new user:
executor = UserExecutor(request.app.ctx.postgres)
try:
user = await executor.get_by_login(login=data["login"])
logger.info(f"Found existing user: {user=}")
except NotFound:
user = await executor.create_user(
login=data["login"],
name=data["name"],
avatar=data["avatar_url"],
profile=data["html_url"],
)
logger.info(f"Created new user: {user=}")
return user
When this is complete, we now have the ability to issue tokens from Sanic JWT. These tokens will provide access to the application, both directly to the API using an Authorization header and through secure cookies. If you have not yet, I highly encourage you to follow the example on the live web application. You should then obtain a working access token and use it to explore the API. I find it incredibly helpful to learn something when I can both interact with it and take it apart to see its component parts. This is exactly the reason why I felt it necessary to maintain a live-running version of this web application. I want you to review the API documentation, play with the application in the browser, and interact with the API directly. This should be done while you simultaneously review the relevant source code. In this way, I hope that you will learn some techniques that will be successful for you throughout your journey.
Summary
The finished web application is available for usage at https://sanicbook.com. Perhaps most importantly, you can take a look at the OpenAPI documentation at https://sanicbook.com/docs. You should find some really helpful information there about how you can interact with the API. I hope that you feel very comfortable making direct HTTP requests using curl or another tool and will take some time to explore the API. I highly suggest that you open the GitHub repository, the OpenAPI documentation, and a terminal to start playing with the API.
The source code will be memorialized at the time of publishing this book in the GitHub repository. This is for your benefit so that you can always see exactly what the code was like when this book was written. But as we know, web applications are constantly evolving. There are bugs to fix, features to implement, upgrades to perform, and other reasons to change code. Therefore, the actual deployment of the application will be from my personal GitHub repository: https://github.com/ahopkins/sanicbook. If you want to see the version of the code that is deployed, you should look there.
Putting it all together
Web development is a journey. That is true on many levels. On the surface, we can say that developing a web application requires you to journey through a process of iterating on features and bug fixes. As we just saw, web development is a process that aims to balance the FRUD demands of functionality, reliability, and usability, and provide a delightful experience.
On a deeper level, web development is a journey through society. It is an ever-changing field that has progressed over the last few decades to keep pace with the world around us. In many ways, the pace at which the world advances is directly tied to the technologies we are building for the web.
But it is on the personal level that I find web development's journey to be most impactful. I began building websites in high school, at a completely amateur level. And even though I embarked upon a career as a lawyer, it was ultimately web development that I journeyed back to. I can look back at the past 25 years and not only marvel at the advancements we have made but also the changes that I have made, as a husband, a father, a son, a brother, and a human being.
And this brings me to my final point that I hope to impart upon you. Web development is a journey. That means there is no end. There is always more to build, more to improve, and more to learn. So please, do not stop learning with this book. I urge you to pick up another book, find some articles or online courses, and attend meetups or conferences, all so that you can continue to learn. And while you are in that process of learning, take some time to give back to the community. One of the most worthwhile efforts I ever made was to have the courage to contribute to open source software. That too has been a wild and amazing journey. Along the way, I have met good people from all over the globe. And, once again, the most important thing is that I have learned a lot. To become a great developer, you must become a great learner.
The Sanic project maintains a Discord server and community forums. If you are not already a member, come join us. I hope you will introduce yourself to me and the community, and share your experiences with Sanic and web development. Whether you have a question, a complaint, need some help, or just want to say hi, please share it. As the Sanic website makes clear: "The project is maintained and run by the community for the community."