
Chapter 6: Operating Outside the Response Handler
The basic building block of application development within Sanic is the response handler, which is sometimes known as a route handler. Those terms can be used interchangeably and mean the same thing. It is the function that Sanic runs when a request has been routed to your application to be handled and responded to. This is where business logic and HyperText Transfer Protocol (HTTP) logic combine to allow the developer to dictate how responses should be delivered back to the client. It is the obvious place to start when learning how to build with Sanic.
However, response handlers alone do not provide enough power to create a polished application experience. To build out an application that is polished and professional, we must break outside the handler to see which other tools Sanic has to offer. It is time to think about the HTTP request/response cycle as not being confined to a single function. We will broaden our scope so that responding to a request is not the responsibility of just the handler, but the entire application. We already got a taste of this when we caught a glimpse of middleware.
In this chapter, we are going to cover the following topics:
- Making use of ctx
- Altering requests and responses with middleware
- Leveraging signals for intra-worker communication
- Mastering HTTP connections
- Implementing proper exception handling
- Background task processing
Of course, not all projects will need features such as these, but when used in the right place, they can be extremely powerful. Have you ever worked on a Do It Yourself (DIY) project around your home and not quite had the right tools for the job? It can be super frustrating and inefficient when you need a Phillips head screwdriver, but all you have are flat head screwdrivers. Not having the right tool for the job can make your task harder, but it also sometimes decreases the quality of the work that you can perform.
Think of the features that we explore in this chapter as tools. There is a common saying you may have heard: "If you are holding a hammer, then every problem looks like a nail." Luckily for us, we have a bunch of tools, and our job now is to learn how to use them. We are about to go explore the Sanic tool belt and see what kinds of problems we can solve.
Technical requirements
In this chapter, you should have at your disposal the same tools available as in the previous chapters in order to be able to follow along with the examples (integrated development environment (IDE), modern Python, and curl).
You can access the source code for this chapter on GitHub at https://github.com/PacktPublishing/Python-Web-Development-with-Sanic/tree/main/Chapter06.
Making use of ctx
Before we begin with the tool belt, there is one more concept that we must become familiar with. It is fairly ubiquitous in Sanic, and you will see it in a lot of places. I am talking about: ctx. What is it?
It stands for context. These ctx objects can be found in several places, and it is impractical to build a professional-grade Sanic web application without making good use of them. What they enable is the passing of state from one location in your application to another. They exist for your own usage as a developer, and you should feel free to use them however you wish. That is to say that the ctx objects are yours to add information to without worrying about name collisions or otherwise impacting the operation of Sanic.
The most common example that comes to mind is your database connection object. You create it once, but you want to have access to it in many places. How does this work? Have a look at the following code snippet:
@app.before_server_start
async def setup_db(app, loop):
app.ctx.db = await setup_my_db()
Now, anywhere you can access the application instance, you can access the db instance. For example, you can access it inside a function somewhere, like this:
from sanic import Sanic
async def some_function_somewhere():
app = Sanic.get_app()
await app.ctx.db.execute(...)
Or, perhaps you need it in your route handler, as illustrated here:
bp = Blueprint("auth")
@bp.post("/login")
async def login(request: Request):
session_id = await request.app.ctx.db.execute(...)
...
Here is a list of all locations that have a ctx object:

Table 6.1 – Sanic features with a ctx object
We will continue to come back to ctx objects often. They are a very important concept in Sanic to allow the passing of arbitrary data and objects. Not all of them are created equal, and you will likely find yourself using app.ctx and request.ctx much more often than any of the others.
Now that we have this basic building block behind us, we will see what it actually looks like to pass these objects around. In the next section regarding middleware, we will see how the Request object—and therefore also request.ctx—can be accessed in multiple places from your application.
Altering requests and responses with middleware
If you have been following along with the book up until now, the concept of middleware should be familiar. This is the first tool in the tool belt that you should become familiar with.
Middleware is snippets of code that can be run before and after route handlers. Middleware comes in two varieties: request and response.
Request middleware
The request middleware executes in the order in which it was declared, before the route handler, as shown here:
@app.on_request
async def one(request):
print("one")
@app.on_request
async def two(request):
print("two")
@app.get("/")
async def handler(request):
print("three")
return text("done")
When we try to reach this endpoint, we should see the following in the Terminal:
one
two
three
(sanic.access)[INFO][127.0.0.1:47194]: GET http://localhost:7777/ 200 4
But this only tells a part of the story. Sometimes, we may need to add some additional logic to only some parts of our application. Let's pretend we are working on building an e-commerce application. As with other online stores, we will need to build a shopping cart that holds products that are going to be purchased. For the sake of our example, we will imagine that when the user logs in, we create a cart in our database and store a reference to it in a cookie. We discussed how to add a cookie to a Sanic response object in Chapter 5, Building Response Handlers, in the Setting response headers and cookies section. To achieve the goal of setting the cookie on login, it could look something like this:
@app.post("/login")
async def login(request):
user = await do_some_fancy_login_stuff(request)
cart = await generate_shopping_cart(request)
response = text(f"Hello {user.name}")
response.cookies["cart"] = cart.uid
return responses
Don't get too tied up in the details here. The point is that on every subsequent request, there will be a cookie called cart that we can use to fetch data from our database.
Now, suppose that we want all endpoints on our /cart path to have access to the shopping cart. We might have endpoints for adding items, removing items, changing quantities, and so on. However, we will always need access to the cart. Rather than repeating the logic in every handler, we can do it once on the blueprint. Adding middleware to all the routes on a single blueprint looks and functions similarly to application-wide middleware, as the following code snippet illustrates:
bp = Blueprint("ShoppingCart", url_prefix="/cart")
@bp.on_request
async def fetch_cart(request):
cart_id = request.cookies.get("cart")
request.ctx.cart = await fetch_shopping_cart(cart_id)
@bp.get("/")
async def get_cart(request):
print(request.ctx.cart)
...
As we would expect, every endpoint that is attached to the ShoppingCart blueprint will fetch the cart before it runs the handler and stores it in the local request context. I am sure you can see the value in this sort of pattern. Where you can identify a group of routes that need similar functionality, sometimes it is best to pull that out into middleware. Doing this will make solving bugs or adding new features much easier, as you only have a single function to update and not all of the individual route handlers. This is a good time to also point out that this works also with blueprint groups. We could change the middleware to the following and have the same impact:
group = Blueprint.group(bp)
@group.on_request
async def fetch_cart(request):
cart_id = request.cookies.get("cart")
request.ctx.cart = await fetch_shopping_cart(cart_id)
Just as we would expect, endpoints that are within that blueprint group will now have the shopping cart accessible to them.
Knowing that we can execute middleware that is both application-wide and blueprint-specific leads to an interesting question: in what order is it applied? No matter the order in which it is declared, all application-wide middleware will always run before blueprint-specific middleware. To illustrate this point, we will use an example here that mixes the two types:
bp = Blueprint("Six", url_prefix="/six")
@app.on_request
async def one(request):
request.ctx.numbers = []
request.ctx.numbers.append(1)
@bp.on_request
async def two(request):
request.ctx.numbers.append(2)
@app.on_request
async def three(request):
request.ctx.numbers.append(3)
@bp.on_request
async def four(request):
request.ctx.numbers.append(4)
@app.on_request
async def five(request):
request.ctx.numbers.append(5)
@bp.on_request
async def six(request):
request.ctx.numbers.append(6)
@app.get("/")
async def app_handler(request):
return json(request.ctx.numbers)
@bp.get("/")
async def bp_handler(request):
return json(request.ctx.numbers)
app.blueprint(bp)
As you can see in this example, we interspersed declaring application and blueprint middleware by alternating between them: first, application middleware, then blueprint middleware, and so on. While the code lists the functions in sequential order (1, 2, 3, 4, 5, 6), our output will not be in sequence. You should be able to anticipate how our endpoints will respond, with the application numbers appended before the blueprint numbers. Sure enough, that is the case, as we can see here:
$ curl localhost:7777
[1,3,5]
$ curl localhost:7777/six
[1,3,5,2,4,6]
It is also really helpful to point out that since middleware is just passing along the Request object, subsequent middleware has access to whatever changes earlier middleware performed. In this example, we created a list of numbers in one function, which was then available to all of the middleware.
Response middleware
On the other side of the HTTP life cycle, we have response middleware. The same rules for request middleware apply, as outlined here:
- It is executed based upon the order of declaration, although it is reverse order!
- Response middleware can be both application-wide or blueprint-specific.
- All application-wide middleware will run before any blueprint-specific middleware.
In the last section, we counted from 1 through 6 using middleware. We will take the exact same code (order is important!), but change from request to response, as follows:
bp = Blueprint("Six", url_prefix="/six")
@app.on_response
async def one(request, response):
request.ctx.numbers = []
request.ctx.numbers.append(1)
@bp.on_response
async def two(request, response):
request.ctx.numbers.append(2)
@app.on_response
async def three(request, response):
request.ctx.numbers.append(3)
@bp.on_response
async def four(request, response):
request.ctx.numbers.append(4)
@app.on_response
async def five(request, response):
request.ctx.numbers.append(5)
@bp.on_response
async def six(request, response):
request.ctx.numbers.append(6)
@app.get("/")
async def app_handler(request):
return json(request.ctx.numbers)
@bp.get("/")
async def bp_handler(request):
return json(request.ctx.numbers)
Now, when we hit our endpoint, we will see a different order, as illustrated here:
$ curl localhost:7777
500 — Internal Server Error
===========================
'types.SimpleNamespace' object has no attribute 'numbers'
AttributeError: 'types.SimpleNamespace' object has no attribute 'numbers' while handling path /
Traceback of __main__ (most recent call last):
AttributeError: 'types.SimpleNamespace' object has no attribute 'numbers'
File /path/to/sanic/app.py, line 777, in handle_request
response = await response
File /path/to/server.py, line 48, in app_handler
return json(request.ctx.numbers)
Uh oh—what happened? Well, since we did not define our ctx.numbers container until the response middleware, it was not available inside the handlers. Let's make a quick change. We will create that object inside of a request middleware. For the sake of our example, we will create our response from our last middleware and ignore the response from the handler. In the following example, the last middleware to respond will be the first blueprint response middleware declared:
@bp.on_response
async def complete(request, response):
return json(request.ctx.numbers)
@app.on_request
async def zero(request):
request.ctx.numbers = []
@app.on_response
async def one(request, response):
request.ctx.numbers.append(1)
@bp.on_response
async def two(request, response):
request.ctx.numbers.append(2)
@app.on_response
async def three(request, response):
request.ctx.numbers.append(3)
@bp.on_response
async def four(request, response):
request.ctx.numbers.append(4)
@app.on_response
async def five(request, response):
request.ctx.numbers.append(5)
@bp.on_response
async def six(request, response):
request.ctx.numbers.append(6)
@bp.get("/")
async def bp_handler(request):
request.ctx.numbers = []
return json("blah blah blah")
Take a close look at the preceding code. We still have a mixture of application and blueprint middleware. We create a numbers container inside of the handler. Also, it is important to note that we are using the exact same ordering that we used for the request middleware that yielded 1, 3, 5, 2, 4, 6. The changes here merely show us how the response middleware reverses its order. Can you guess what order our numbers will be in? Let's check here:
$ curl localhost:7777/six
[5,3,1,6,4,2]
First, all of the application-wide response middleware runs (in reverse order of declaration). Second, all of the blueprint-specific middleware runs (in reverse order of declaration). Keep this distinction in mind when you are creating your response middleware if it is connected with blueprint-specific middleware.
Whereas a common use case for request middleware is to add some data to the request object for further processing, this is not so practical for response middleware. Our preceding example is a bit odd and impractical. What, then, is response middleware good for? Probably the most common use case is setting headers and cookies.
Here is a simple (and very common) use case:
@app.on_response
async def add_correlation_id(request: Request, response: HTTPResponse):
header_name = request.app.config.REQUEST_ID_HEADER
response.headers[header_name] = request.id
Why would you want to do this? Many web application programming interfaces (APIs) use what is known as a correlation ID to help identify individual requests. This is helpful for logging purposes, for tracking a request as it trickles through various systems in your stack, and also for clients that are consuming your API to keep track of what is happening. Sanic latches onto this principle and will set the request.id value automatically for you. This value will either be the incoming correlation ID from the incoming request headers or a unique value generated per request. By default, Sanic will generate a universally unique ID (UUID) for this value. You usually need not worry about this unless you want to use something other than a UUID for correlating web requests. If you are interested in how you can override Sanic's logic for generating these, check out Chapter 11, A Complete Real-World Example.
Coming back to our aforementioned example, we see that we are simply grabbing that value and appending it to our response headers. We can now see it in action here:
$ curl localhost:7777 -i
HTTP/1.1 200 OK
X-Request-ID: 1e3f9c46-1b92-4d33-80ce-cca532e2b93c
content-length: 9
connection: keep-alive
content-type: text/plain; charset=utf-8
Hello, world.
This small snippet is something I would highly encourage you to add to all of your applications. It is extremely beneficial when you pair it with request ID logging. This is also something we will add to our application in Chapter 11, A Complete Real-World Example.
Responding early (or late) with middleware
When we explored the response middleware-ordering example from the last section, did you notice something peculiar happening with our responses? You may have seen this:
@bp.on_response
async def complete(request, response):
return json(request.ctx.numbers)
...
@bp.get("/")
async def bp_handler(request):
request.ctx.numbers = []
return json("blah blah blah")
We had a nonsensical response from the handler, but it was not returned. That is because in our middleware we returned an HTTPResponse object. Whenever you return a value from middleware—whether request or response—Sanic will assume that you are trying to end the HTTP life cycle and return immediately. Therefore, you should never return anything from middleware that meets the following criteria:
This rule, however, does not apply to None values. You can still return None if you simply want to halt the execution of the middleware, as follows:
@app.on_request
async def check_for_politeness(request: Request):
if "please" in request.headers:
return None
return text("You must say please")
Tip
A good thing to know about HTTP headers is that they are case-insensitive. Even though we did a check for the please header, we could just as well have received the same result using the following code:
if "Please" in request.headers:
Let's see how this middleware plays out now when we access the endpoint, as follows:
$ curl localhost:7777/show-me-the-money
You must say please
$ curl localhost:7777/show-me-the-money -H "Please: With a cherry on top"
The second request, it was allowed to proceed because it had the correct header. Therefore, we can see that returning None is also acceptable from middleware. If you are familiar with using continue inside of a Python loop, it has roughly the same impact: halt the execution and move onto the next step.
Important Note
Even though we were looking for the please value in the request headers, we were able to pass Please and for it to still work since headers are always case-insensitive.
Middleware and streaming responses
There is one more gotcha that you should know about middleware. Remember how we simply said that the middleware basically wraps before and after the route handler? This is not entirely true.
In truth, the middleware wraps the generation of the response. Since this usually happens in the return statement of a handler, that is why we take the simplistic approach.
This point can be easily seen if we revisit the Chapter 5, Building Response Handlers example with our streaming handler. Here is where we started:
@app.get("/")
async def handler(request: Request):
resp = await request.respond()
for _ in range(4):
await resp.send(b"Now I'm free, free-falling")
await asyncio.sleep(1)
await resp.eof()
Let's add some print statements and some middleware so that we can examine the order of execution, as follows:
@app.get("/")
async def handler(request: Request):
print("before respond()")
resp = await request.respond()
print("after respond()")
for _ in range(4):
print("sending")
await resp.send(b"Now I'm free, free-falling")
await asyncio.sleep(1)
print("cleanup")
await resp.eof()
print("done")
@app.on_request
async def req_middleware(request):
print("request middleware")
@app.on_response
async def resp_middleware(request, response):
print("response middleware")
Now, we will hit the endpoint and look at our Terminal logs, as follows:
request middleware
before respond()
response middleware
after respond()
sending
(sanic.access)[INFO][127.0.0.1:49480]: GET http://localhost:7777/ 200 26
sending
sending
sending
cleanup
done
As we would expect, the request middleware runs first, and then we begin the route handler. But the response middleware runs immediately after we call request.respond(). For most use cases of response middleware (such as adding headers), this should not matter. It will, however, pose a problem if you absolutely must execute some bit of code after the route handler is complete. If this is the case, then your solution is to use signals, which we will explore in the next section. Specifically, we will see in the Using built-in signals section that the http.lifecycle.response signal will help us to execute the code after the handler in this situation.
Signals are sometimes a great replacement for middleware. While middleware is essentially a tool that allows us to extend business logic outside the confines of the route handler and to share it among different endpoints, we will learn that signals are more like breakpoints that allow us to inject code into the Sanic life cycle.
Leveraging signals for intra-worker communication
In general, Sanic tries to make it possible for developers to extend its capabilities to create custom solutions. This is the reason that when interfacing with Sanic, there are several options to inject custom classes to overtake, change, or otherwise extend its functionality. For example, did you know that you could swap out its HTTP protocol to essentially turn Sanic into a File Transfer Protocol (FTP) server (or any other Transmission Control Protocol (TCP)-based protocol)? Or, maybe you want to extend the router capabilities?
These sorts of customizations are rather advanced. We will not cover them in this book since for most use cases, it is the equivalent of hanging a picture nail on your wall with a sledgehammer.
The Sanic team introduced signals as a method to extend the functionality of the platform in a more user-friendly format. Very intentionally, setting up a signal handler looks and feels like a route handler, as illustrated in the following code snippet:
@app.signal("http.lifecycle.begin")
async def connection_begin(conn_info):
print("Hello from http.lifecycle.begin")
You may be asking: What exactly is this, and how can I use it? In this example, we learn that http.lifecycle.begin is an event name. When Sanic opens an HTTP connection to a client, it dispatches this signal. Sanic will then look to see if any handlers are waiting for it and run them. Therefore, all we did was set up a handler to attach to that event. We will dig a little more into pre-defined events in this chapter, but first, let's have a closer examination of the structure and operation of signals.
Signal definitions
All signals are defined by their event name, which is composed of three segments. We just saw a signal event called http.lifecycle.begin. Obviously, the three segments are http, lifecycle, and begin. An event will only ever have three segments.
This is important to know because even though Sanic ships with a bunch of signals out of the box, it also allows us to create our own signals along the way. Therefore, we will need to follow the pattern. It is helpful to think of the first segment as a namespace, the middle as a reference, and the last as an action, sort of like this:
namespace.reference.action
Thinking in these terms helps me conceptualize them. I like to think of them as routes. In fact, they actually are! Under the hood, Sanic deals with signal handlers the same way as it does with route handlers because they inherit from the same base class.
If a signal is essentially a route, does that mean it can look for dynamic path parameters too? Yes! Check this out:
@app.signal("http.lifecycle.<foo>")
async def handler(**kwargs):
print("Hello!!!")
Go hit any route in your application now, and we should see the following in our Terminal:
[DEBUG] Dispatching signal: http.lifecycle.begin
Hello!!!
[DEBUG] Dispatching signal: http.lifecycle.read_head
Hello!!!
[DEBUG] Dispatching signal: http.lifecycle.request
Hello!!!
[DEBUG] Dispatching signal: http.lifecycle.handle
Hello!!!
Request middleware
response middleware
[DEBUG] Dispatching signal: http.lifecycle.response
Hello!!!
[INFO][127.0.0.1:39580]: GET http://localhost:7777/ 200 20
[DEBUG] Dispatching signal: http.lifecycle.send
Hello!!!
[DEBUG] Dispatching signal: http.lifecycle.complete
Hello!!!
Before continuing on to see what kinds of signals are available, there is one more thing we need to be aware of: the condition. The app.signal() method accepts a keyword argument called condition that can help in limiting events that match on it. Only an event that is dispatched with the same condition will be executed.
We will look at a concrete example here:
- Start by adding some request middleware, like this:
@app.on_request
async def req_middleware(request):
print("request middleware")
- Then, add a signal to attach to our middleware (this is a built-in, as we will see later), as follows:
@app.signal("http.middleware.before")
async def handler(**kwargs):
print("Hello!!!")
- Now, let's go take a look at our Terminal after we hit an endpoint, as follows:
[DEBUG] Dispatching signal: http.middleware.before
request middleware
Hmmm—we see that the signal was dispatched and that our middleware ran, but our signal handlers did not. Why? http.middleware.* events are special in that they will only run when a specific condition is met. Therefore, we need to amend our signal definition to include the required condition.
- Change your signal to add the condition, like this:
@app.signal("http.middleware.before", condition={"attach_to": "request"})
async def handler(**kwargs):
print("Hello!!!")
- Hit the endpoint again. We should now see the text as anticipated, as illustrated here:
[DEBUG] Dispatching signal: http.middleware.before
Hello!!!
request middleware
Conditions are something that you can also add to your custom signal dispatches (keep reading ahead to the Custom signals section to learn more). It would look like this:
app.dispatch("custom.signal.event", condition={"foo": "bar"})
Most signal use cases will not need this approach. However, if you find the need for additional control on signal dispatching, it might just be the right tool for the job. Let's turn our attention back to Sanic's built-in signals and see what other kinds of events we can attach signals to.
Using built-in signals
There are many built-in signals that we can use. Take a look at the following tables and dog-ear this page in the book. I highly encourage you to come back to these tables often and look at your options when trying to solve a problem. While the implementations and usages we come up with in this book may be small, it is your job to learn the process so that you can more effectively solve your own application needs.
First are the signals related to routing that will execute on every request. You can see these here:

Table 6.2 – Available built-in routing signals
Second, we have the signals that are specifically related to the request/response life cycle, listed here:
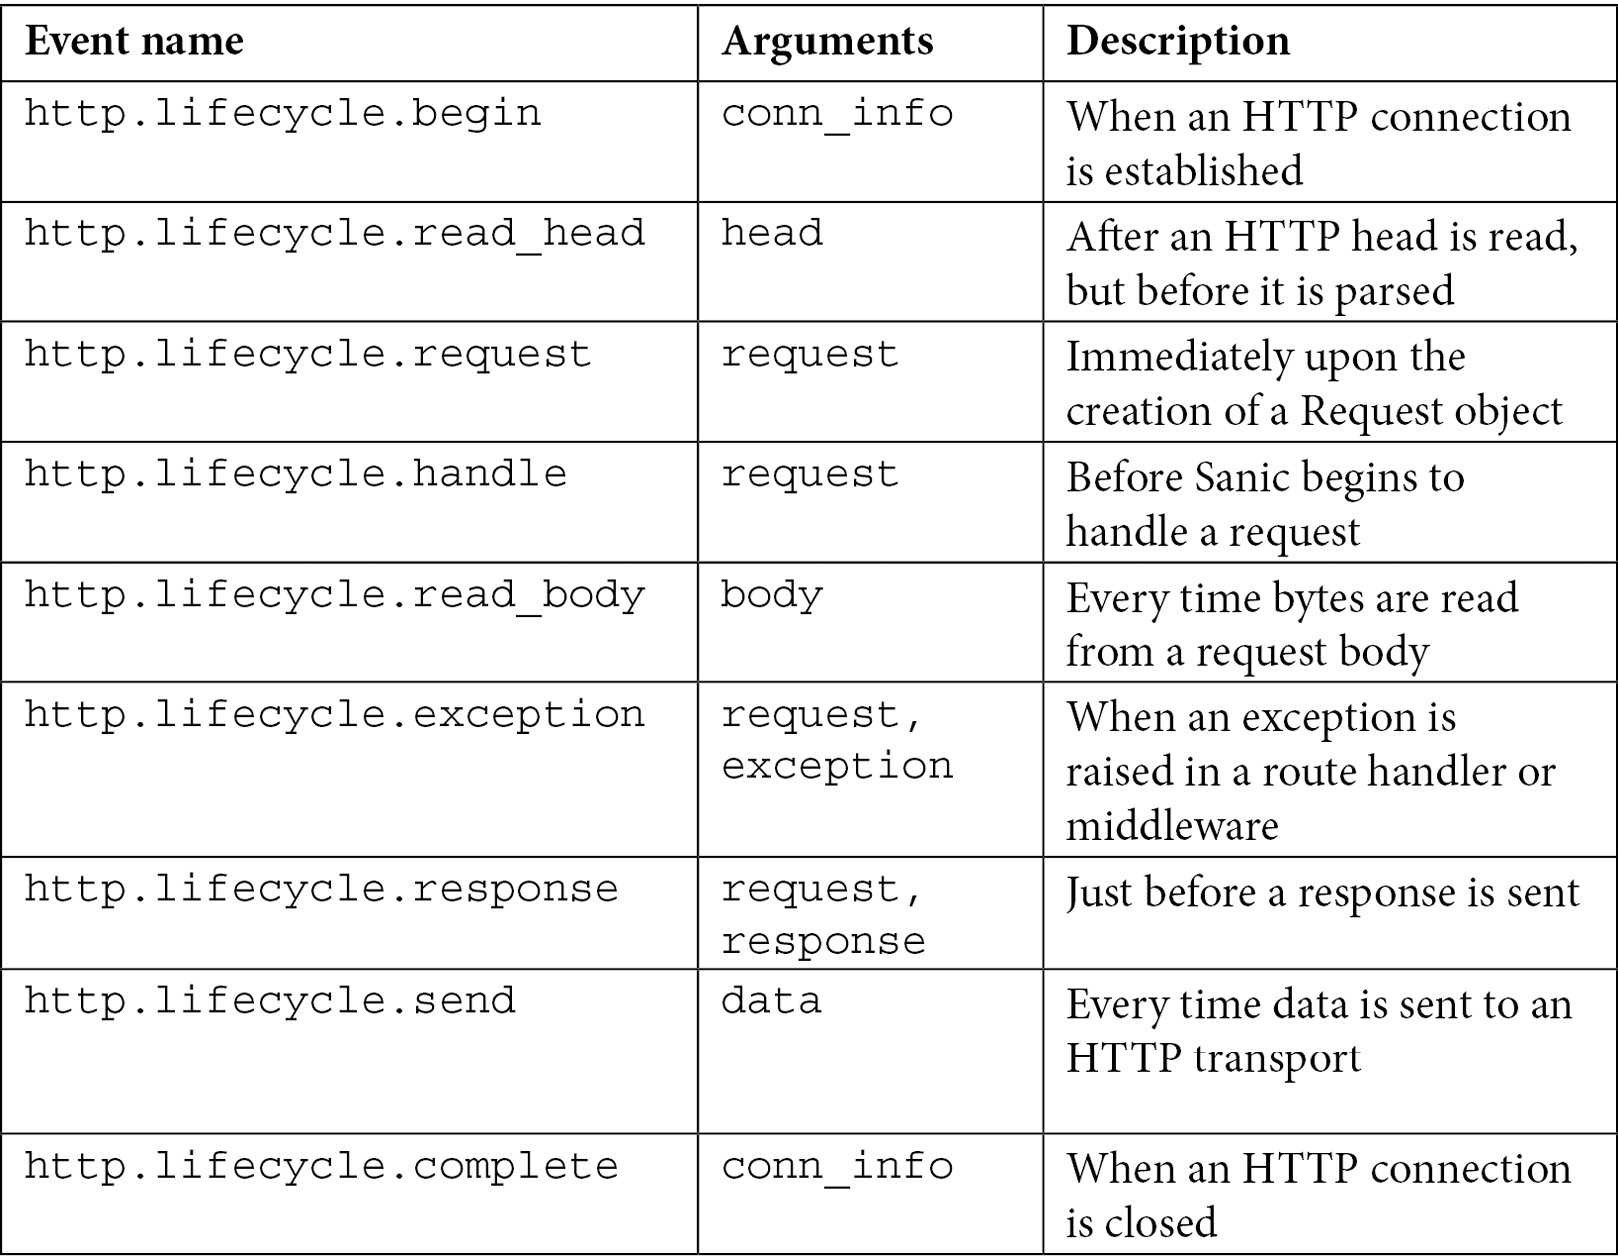
Table 6.3 – Available built-in request/response life cycle signals
Third, we have the events that wrap around each middleware handler. These are not likely signals that you will use often. Instead, they primarily exist for the benefit of Sanic plugin developers. You can see them listed here:

Table 6.4 – Available built-in middleware signals
Finally, we have the server events. These signals are a one-to-one match with the listener events. Although you can call them as any other signal, there is a convenient decorator for each of them, as indicated in the descriptions in the following table:

Table 6.5 – Available built-in server life cycle signals
I want to share an anecdote that exemplifies the power of signals. I do a lot of support for Sanic users. If you have spent any time looking over the community resources (either the forums or the Discord server), you likely have seen me helping developers solve their problems. I really do enjoy this aspect of being involved in open source software (OSS).
On one occasion, I was contacted by someone who was having trouble with middleware. The goal was to use response middleware to log out helpful information about responses as they were being delivered from the server. The problem is that when an exception is raised in the middleware, it will halt the rest of the middleware from running. Therefore, this individual was not able to log every response. The requests that raised an exception in other response middleware never made it to the logger. The solution—as you have probably guessed—was to use signals. In particular, the http.lifecycle.response event worked perfectly for this use case.
To illustrate the point, here is some code:
- Set up two middleware, one for logging and one for causing an exception. Remember—they need to be in reverse order from how you want them to run. Here's how to do this:
@app.on_response
async def log_response(request, response):
logger.info("some information for your logs")
@app.on_response
async def something_bad_happens_here(request, response):
raise InvalidUsage("Uh oh")
- When we hit any endpoint, log_response will never be run.
- To solve this, change log_response from middleware into a signal (which is as easy as changing the decorator), as follows:
@app.signal("http.lifecycle.response")
async def log_response(request, response):
logger.info("some information for your logs")
- Now, when we access the endpoint and experience the exception, we still get our logs as expected, as illustrated here:
[ERROR] Exception occurred in one of response middleware handlers
Traceback (most recent call last):
File "/home/adam/Projects/Sanic/sanic/sanic/request.py", line 183, in respond
response = await self.app._run_response_middleware(
File "_run_response_middleware", line 22, in _run_response_middleware
from ssl import Purpose, SSLContext, create_default_context
File "/tmp/p.py", line 23, in something_bad_happens_here
raise InvalidUsage("Uh oh")
sanic.exceptions.InvalidUsage: Uh oh
[DEBUG] Dispatching signal: http.lifecycle.response
[INFO] some information for your logs
[INFO][127.0.0.1:40466]: GET http://localhost:7777/ 200 3
We can also use this exact same signal to solve one of our earlier problems. Remember when we were examining response middleware and had somewhat surprising results with a streaming handler? Earlier in the chapter, in the Middleware and streaming responses section, we noticed that the response middleware was actually called when the response object was created, not after the handler completed. We could use http.lifecycle.response to wrap up after our lyrics are done streaming, as follows:
@app.signal("http.lifecycle.response")
async def http_lifecycle_response(request, response):
print("Finally... the route handler is over")
This might be another good time for you to put the book down and do some exploration. Go back to that earlier example with the streaming handler and play around with some of these signals. Take a look at the arguments they receive and think about how you might make use of them. It is also, of course, important to understand the order in which they are dispatched.
After you complete that, we will take a look at creating custom signals and events.
Custom signals
So far, we have been looking specifically at built-in signals, but they are sort of a narrow implementation of what Sanic signals have to offer. While it is helpful to think of them as breakpoints that allow us to insert functionality into Sanic itself, in truth, there is a more general concept at play.
Signals allow for intra-application communication. Because they can be dispatched asynchronously as background tasks, it can become a convenient method for one part of your application to inform another that something has happened. This introduces another important concept of signals: they can be dispatched as inline or as tasks.
So far, every single example we have seen with built-in signals is inline—that is to say that Sanic will halt the processing of a request until the signals are complete. This is how we can add functionality into the lifecycle while maintaining a consistent flow.
This might not always be desirable. In fact, often, when you want to implement your own solution with custom signals, having them run as a background task gives the application the ability to continue responding to the request while it goes and does something else.
Let's take logging, for example. Imagine that we are back in our example where we are building an e-commerce application. We want to augment our access logs to include information about the authenticated use (if any) and the number of items they have in their shopping cart. Let's take our earlier middleware example and convert it to signals, as follows:
- We need to create a signal to pull the user and shopping cart information onto our request object. Again, we just need to change the first line so that the code looks like this:
@app.signal("http.lifecycle.handle")
async def fetch_user_and_cart(request):
cart_id = request.cookies.get("cart")
session_id = request.cookies.get("session")
request.ctx.cart = await fetch_shopping_cart(cart_id)
request.ctx.user = await fetch_user(session_id)
- For the sake of our example, we want to throw together some quick models and fake getters, like this:
@dataclass
class Cart:
items: List[str]
@dataclass
class User:
name: str
async def fetch_shopping_cart(cart_id):
return Cart(["chocolate bar", "gummy bears"])
async def fetch_user(session_id):
return User("Adam")
- This will be enough to get our example operational, but we want to be able to see it. For now, we will add a route handler that just outputs our request.ctx object, as follows:
@app.get("/")
async def route_handler(request: Request):
return json(request.ctx.__dict__)
- We should now see that our fake user and cart are available, as expected. The following snippet confirms this is the case:
$ curl localhost:7777 -H 'Cookie: cart=123&session_id=456'
{
"cart": {
"items": [
"chocolate bar",
"gummy bears"
]
},
"user": {
"name": "Adam"
}
}
- Since we want to use our own access logs, we should turn off Sanic's access logs. Back in Chapter 2, Organizing a Project, we decided we were going to run all of our examples like this:
$ sanic server:app -p 7777 --debug --workers=2
We are going to change that now. Add --no-access-logs, as follows:
$ sanic server:app -p 7777 --debug --workers=2 --no-access-logs
- Now, we are going to add our own request logger. But to illustrate the point we are trying to make, we will manually make our signal take a while to respond, as shown in the following code snippet:
@app.signal("http.lifecycle.handle")
async def access_log(request):
await asyncio.sleep(3)
name = request.ctx.user.name
count = len(request.ctx.cart.items)
logger.info(f"Request from {name}, who has a cart with {count} items")
- When you access the endpoint, you will see the following output in your logs. You should also experience a delay before the logging appears and before your response is delivered:
[DEBUG] Dispatching signal: http.lifecycle.request
[DEBUG] Dispatching signal: http.lifecycle.handle
[INFO] Request from Adam, who has a cart with 2 items
- To fix this, we will create a custom signal for our logger and dispatch the event from fetch_user_and_cart. Let's make the following changes:
@app.signal("http.lifecycle.request")
async def fetch_user_and_cart(request):
cart_id = request.cookies.get("cart")
session_id = request.cookies.get("session")
request.ctx.cart = await fetch_shopping_cart(cart_id)
request.ctx.user = await fetch_user(session_id)
await request.app.dispatch(
"olives.request.incoming",
context={"request": request},
inline=True,
)
@app.signal("olives.request.incoming")
async def access_log(request):
await asyncio.sleep(3)
name = request.ctx.user.name
count = len(request.ctx.cart.items)
logger.info(f"Request from {name}, who has a cart with {count} items")
- This time, when we go and access the endpoint, there are two things you need to pay attention to. First, your response should return almost immediately. The delayed response we experienced earlier should be gone. Second, the delay in the access log should remain.
What we have effectively done here is take any input/output (I/O) wait time in the logging away from the request cycle. To do this, we created a custom signal. That signal was called olives.request.incoming. There is nothing special about this—it is entirely arbitrary. The only requirement, as we discussed, is that it has three parts.
To execute the signal, we just need to call app.dispatch with the same name, as follows:
await app.dispatch("olives.request.incoming")
Because we wanted to have access to the Request object in access_log, we used the optional argument context to pass the object.
So, why did the http.lifecycle.handle signal delay the response but olives.request.incoming did not? Because the former was executed inline and the latter as a background task. Under the hood, Sanic calls dispatch with inline=True. Go ahead and add that to the custom dispatch to see how that impacts the response. Once again, both the logging and the response are now delayed. You should use this when you want your application to pause on the dispatch until all signals attached to it are done running. If that order is not important, you will achieve more performance if you leave it out.
There are a few more arguments that dispatch takes that might be helpful for you. Here is the function signature:
def dispatch(
event: str,
*,
condition: Optional[Dict[str, str]] = None,
context: Optional[Dict[str, Any]] = None,
fail_not_found: bool = True,
inline: bool = False,
reverse: bool = False,
):
The arguments that this function accepts are outlined here:
- condition: Used as seen with the middleware signals to control additional matching (we saw this used by the http.middleware.* signals).
- context: Arguments that should be passed to the signal.
- fail_not_found: What if you dispatch an event that does not exist? Should it raise an exception or fail silently?
- inline: Run in a task or not, as discussed already.
- reverse: When there are multiple signals on an event, what order should they run in?
Signals are not the only way that you can take action on an event in Sanic. There are also tools that will allow you to wait for an event in arbitrary locations in your code. In the next section, we will look at how this can be accomplished.
Waiting on events
The last helpful thing about dispatching a signal event is that it can also be used like asyncio events to block until it is dispatched. The use case for this is different than with dispatching. When you dispatch a signal, you are causing some other operation to occur, usually in a background task. You should wait on a signal event when you want to pause an existing task until that event happens. This means that it will block the currently existing task, whether that is a background task or the actual request that is being handled. If this is used inside of a request/response life cycle—for example, if it were inside of a route handler or middleware—then the entire request would be blocked until the event is resolved. This may or may not be your desired behavior, so you should understand its impact.
The easiest way to show this is with a super simple loop that runs constantly in your application. Follow these next steps:
- Set up your loop as shown in the following code snippet. Notice that we are using app.event with our event name. For simplicity, we are using a built-in signal event, but it could also be a custom one. For this to work, we would just need an app.signal method to be registered with the same name:
async def wait_for_event(app: Sanic):
while True:
print("> waiting")
await app.event("http.lifecycle.request")
print("> event found")
@app.after_server_start
async def after_server_start(app, loop):
app.add_task(wait_for_event(app))
- Now, when we hit our endpoint, we should see this in the logs:
> waiting
[INFO] Starting worker [165193]
[DEBUG] Dispatching signal: http.lifecycle.request
> event found
> waiting
This might be a helpful tool especially if your application uses WebSockets. You might, for example, want to keep track of the number of open sockets. Feel free to turn back to the WebSockets example and see if you can integrate some events and signals into your implementation.
One more helpful use case is where you have a number of things that need to happen in your endpoint before you respond. You want to push off some work to a signal, but ultimately, it does need to be complete before responding.
We could do something like this. Set up the following handlers and signals:
@app.signal("registration.email.send")
async def send_registration_email(email, request):
await asyncio.sleep(3)
await request.app.dispatch("registration.email.done")
@app.post("/register")
async def handle_registration(request):
await do_registration()
await request.app.dispatch(
"registration.email.send",
context={
"email": "[email protected]",
"request": request,
},
)
await do_something_else_while_email_is_sent()
print("Waiting for email send to complete")
await request.app.event("registration.email.done")
print("Done.")
return text("Registration email sent")
Now, when we look at the Terminal, we should see this:
do_registration
Sending email
do_something_else_while_email_is_sent
Waiting for email send to complete
Done.
Since we know that sending the email will be an expensive operation, we send that off to the background while continuing with processing the request. By using app.event, we were able to wait for the registration.email.done event to be dispatched before responding that the email had in fact been sent.
One thing that you should make note of is that in this example, there is not actually a signal attached to registration.email.done. Out of the box, Sanic will complain and raise an exception. If you would like to use this pattern, you have three options, as outlined here:
- Register a signal, like this:
@app.signal("registration.email.done")
async def noop():
...
- Since we do not need to actually execute anything, we do not need a handler, so we can execute the following code:
app.add_signal(None, "registration.email.done")
- Tell Sanic to automatically create all events when there is a dispatch, regardless of whether there is a registered signal. Here's how to do this:
app.config.EVENT_AUTOREGISTER = True
Now that we know there are several ways to control the execution of business logic within an HTTP life cycle, we will next explore some other things we can do to exploit our newfound tools.
Mastering HTTP connections
Earlier, in Chapter 4, Ingesting HTTP Data, we discussed how the HTTP life cycle represents a conversation between a client and a server. The client requests information, and the server responds. In particular, we likened it to a video chat with bi-directional communication. Let's dig into this analogy a little deeper to expand our understanding of HTTP and Sanic.
Rather than thinking about an HTTP request as the video chat, it is better to think of it as an individual conversation or—better yet—a single question and answer. It could go something like this:
Client: Hi, my session ID is 123456, and my shopping cart ID is 987654. Can you tell me what other items I can buy?
Server: Hi, Adam—you have pure olive oil and extra virgin olive oil in your cart already. You can add balsamic vinegar or red wine vinegar.
Sanic is a "performant" web framework because it is capable of having these conversations with multiple clients at the same time. While it is fetching the results for one client, it can begin conversations with other clients, like this:
Client 1: What products do you sell?
Client 2: How much does a barrel of olive oil cost?
Client 3: What is the meaning of life?
By being capable of corresponding within multiple video chat sessions simultaneously, the server has become more efficient at responding. But what happens when one client has multiple questions? Starting and stopping the video chat for each conversation would be time-consuming and costly, as illustrated here:
Start video chat
Client: Here are my credentials—can I log in?
Server: Hi, Adam—nice to see you again. Here is a session ID: 123456. Goodbye.
Stop video chat
Start video chat
Client: Hi, my session ID is 123456. Can I update my profile information?
Server: Oops, bad request. Looks like you did not send me the right data. Goodbye.
Stop video chat
Every time that the video chat starts and stops, we are wasting time and resources. HTTP/1.1 sought to solve this problem by introducing persistent connections. This is accomplished with the Keep-Alive header. We do not need to worry specifically about how this header works from the client or server, as Sanic will take care of responding appropriately.
What we do need to understand is that it exists and that it includes a timeout. This means that Sanic will not close the connection to the client if another request comes within some timeout period. Here's an illustration of this:
Start video chat
Client: Here are my credentials—can I log in?
Server: Hi, Adam—nice to see you again. Here is a session ID: 123456.
Server: waiting…
Server: waiting…
Server: waiting…
Server: Goodbye.
Stop video chat
We have now created efficiency within a single video chat to allow for multiple conversations.
There are two practical concerns we need to think about here, as follows:
- How long should the server wait?
- Can we make the connection more efficient?
Keep-Alive within Sanic
Sanic will keep HTTP connections alive by default. This makes operations more performant, as we saw earlier. There may, however, be instances where this is undesirable. Perhaps you never want to keep these connections open. If you know that your application will never handle more than one request per client, then perhaps it is wasteful to use precious memory to keep open a connection that will never be reused. To turn it off, just set a configuration value on your application instance, like this:
app.config.KEEP_ALIVE = False
As you can probably guess, even the most basic web applications will never fall into this category. Therefore, even though we have the ability to turn off KEEP_ALIVE, you probably should not.
What you are more likely going to want to change is the timeout. By default, Sanic will keep connections open for 5 seconds. This may not seem long, but it should be long enough for most use cases without being wasteful. This is, however, Sanic just making a complete guess. You are more likely to know and understand the needs of your application, and you should feel free to tune this number to your needs. How? Again, with a simple configuration value, as illustrated here:
app.config.KEEP_ALIVE_TIMEOUT = 60
To give you some context, here is a snippet from the Sanic user guide that provides some insight into how other systems operate:
Apache httpd server default keepalive timeout = 5 seconds
Nginx server default keepalive timeout = 75 seconds
Nginx performance tuning guidelines uses keepalive = 15 seconds
IE (5-9) client hard keepalive limit = 60 seconds
Firefox client hard keepalive limit = 115 seconds
Opera 11 client hard keepalive limit = 120 seconds
Chrome 13+ client keepalive limit > 300+ seconds
Source: https://sanic.dev/en/guide/deployment/configuration.html#keep-alive-timeout
How do you know if you should increase the timeout? If you are building a single-page application (SPA) where your API is meant to power a JavaScript frontend, there is a high likelihood that your browser will make a lot of requests. This is generally the nature of how these frontend applications work. This would be especially true if you expect users to click a button, browse through some content, and click some more. The first thing that comes to my mind would be a web portal-type application where a single user might need to make dozens of calls within a minute, but they might be spaced out by some interval of browsing time. In this case, increasing the timeout to reflect the expected usage might make sense.
This does not mean that you should increase it too far. First, as we have seen previously, browsers generally have a limit on the maximum amount of time they will hold a connection open. Second, going too far with connection length can be wasteful and harmful to your memory performance. It is a balance that you are after. There is no one good answer, so you may need to experiment to see what works.
Caching data per connection
If you are thinking about ways you might exploit some of these tools for your application's needs, you might have noticed a potential efficiency you can create. Back at the beginning of this chapter, there is a table that lists all of the context (ctx) objects that are available to you in Sanic. One of them is connection-specific.
This means that not only are you able to create stateful requests, but you can also add state into a single connection. Our simple example will be a counter. Follow these next steps:
- Start by creating a counter when the connection is established. We will use a signal for this, as follows:
from itertools import count
@app.signal("http.lifecycle.begin")
async def setup_counter(conn_info):
conn_info.ctx._counter = count()
- Next, we will increment the counter on every request using middleware, like this:
@app.on_request
async def increment(request):
request.conn_info.ctx.count = next(
request.conn_info.ctx._counter
)
- Then, we will output that in our request body so that we can see what this looks like. Here's the code to do this:
@app.get("/")
async def handler(request):
return json({"request_number": request.conn_info.ctx.count})
- Now, we will issue multiple requests using curl. To do that, we just give it the Uniform Resource Locator (URL) multiple times, like this:
$ curl localhost:7777 localhost:7777
{"request_number":0}
{"request_number":1}
This is, of course, a trivial example, and we could get that information from Sanic easily enough by executing the following code:
@app.get("/")
async def handler(request):
return json(
{
"request_number": request.conn_info.ctx.count,
"sanic_count": request.protocol.state["requests_count"],
},
)
This could be extremely useful if you have some data that might be expensive to obtain but want it available for all requests. Coming back to our earlier roleplay model, it would be as if your server fetched some details when the video chat started. Now, every time the client asks a question, the server already has the details on hand in the cache.
Important Note
This does come with a warning. If your application is exposed through a proxy, it could be connection pooling. That is to say that the proxy could be taking requests from differing clients and bundling them together in one connection. Think of this as if your video chat session were not in someone's private home, but instead in the foyer of a large university dormitory. Anyone could walk up to the single video chat session and ask a question. You might not be guaranteed to have the same person all the time. Therefore, before you expose any sort of sensitive details on this object, you must know that it will be safe. A best practice might just be to keep the sensitive details on request.ctx.
Handling exceptions like a pro
In an ideal world, our applications would never fail, and users would never submit bad information. All endpoints would return a 200 OK response all the time. This is, of course, pure fantasy, and no web application would be complete if it did not address the possibility of failures. In real life, our code will have bugs, there will be edge cases not addressed, and users will send us bad data and misuse the application. In short: our application will fail. Therefore, we must think about this constantly.
Sanic does, of course, provide some default handling for us. It includes a few different styles of exception handlers (HyperText Markup Language (HTML), JavaScript Object Notation (JSON), and text), and can be used both in production and development. It is of course unopinionated, and therefore likely inadequate for a decently sized application. We will talk more about fallback error handling in the Fallback handling section later. As we just learned, handling exceptions in an application is critical to the quality (and ultimately security) of a web application. We will now learn more about how to do that in Sanic.
Implementing proper exception handling
Before we look at how to handle exceptions with Sanic, it is important to consider that a failure to properly address this could become a security problem. The obvious way would be through inadvertent disclosure of sensitive information, which is known as leaking. This occurs when an exception is raised (by mistake or on purpose by the user) and your application reports back, exposing details about how the application is built or the data stored.
In a real-world worst-case scenario, I once had an old forgotten endpoint that no longer worked in one of my web applications. No one used it anymore, and I simply forgot that it existed or was even still live. The problem was that the endpoint did not have proper exception handling and errors were directly reported as they occurred. That means even Failure to connect to database XYZ using username ABC and password EFG messages were flowing right to anyone that accessed the endpoint. Oops!
Therefore, even though we do not discuss security concerns in general until Chapter 7, Dealing with Security Concerns, it does extend into the current exploration of exception handling. There are two main concerns here: providing exception messages with tracebacks or other implementation details, and incorrectly using 400 series responses.
Bad exception messages
While developing, it is super helpful to have as much information about your request as possible. This is why it would be desirable to have exception messages and tracebacks in your responses. When you are building your applications in debug mode, you will get all of these details, but make sure you turn it off in production! Just as I wish my applications only served a 200 OK response all the time, I wish I never stumbled onto a website that accidentally leaked debug information to me. It happens out there in the wild, so be careful not to fall into that mistake.
What is perhaps more common is failing to properly consider the content of errors when responding. When writing messages that will reach the end user, keep in mind that you do not want to accidentally disclose implementation details.
Misusing statuses
Closely related to bad exceptions are exceptions that leak information about your application. Imagine that your bank website has an endpoint of /accounts/id/123456789. They do their due diligence and properly protect the endpoint so that only you can access it. That is not a problem. But what happens to someone that cannot access it? What happens when I try to access your bank account? Obviously, I would get a 401 Unauthorized error because it is not my account. However, as soon as you do that, the bank is now acknowledging that 123456789 is a legitimate account number. Therefore, I highly encourage you to use the following information and commit it to memory:

Table 6.6 – Sanic exceptions for common 400 series HTTP responses
Perhaps the biggest failure here is when people inadvertently expose the existence of a hidden resource with a 401 or 403 error code. Your bank should have instead sent me a 404 error code and directed me to a page not found response. This is not to say that you should always favor a 404 error code, but it is to your benefit from a security perspective to think about who could be accessing the information, and what they should or should not know about it. Then, you can decide which error response is appropriate.
Responses through raising an exception
One of the most convenient things about exception handling in Sanic is that it is relatively trivial to get started. Remember—we are just coding a Python script here, and you should treat it like you might anything else. What should you do when something goes wrong? Raise an exception! Here is an example:
- Make a simple handler—we will ignore the return value here since we do not need it to prove our point. Use your imagination for what could be beyond the ... shown here:
@app.post("/cart)
async def add_to_cart(request):
if "name" not in request.json:
raise InvalidUsage("You forgot to send a product name")
...
- Next, we will submit some JSON to the endpoint, leaving out the name property. Make sure to use -i so that we can inspect the response headers, as illustrated in the following code snippet:
$ curl localhost:7777/cart -X POST -d '{}' -i
HTTP/1.1 400 Bad Request
content-length: 83
connection: keep-alive
content-type: text/plain; charset=utf-8
400 — Bad Request
=================
You forgot to send a product name
Take note of how we received a 400 response but did not actually return a response from the handler. This is because if you raise any exception from sanic.exceptions, it could be used to return an appropriate status code. Furthermore, you will find that many of the exceptions in that module (such as InvalidUsage) have a default status_code value. This is why when you raise InvalidUsage, Sanic will respond with a 400 error code. You could, of course, override the status code by passing a different value. Let's see how that would work.
- Set up this endpoint and change status_code to something other than 400, as illustrated here:
@app.post("/coffee")
async def teapot(request):
raise InvalidUsage("Hmm...", status_code=418)
- Now, let's access it as follows:
$ curl localhost:777/coffee -X POST -i
HTTP/1.1 418 I'm a teapot
content-length: 58
connection: keep-alive
content-type: text/plain; charset=utf-8
418 — I'm a teapot
==================
Hmm...
As you can see, we passed the 418 status code to the exception. Sanic took that code and properly converted it to the appropriate HTTP response: 418 I'm a teapot. If you did not catch the HTTP humor when we discussed it earlier, you can look it up in Request for Comments (RFC) 7168, § 2.3.3 (https://datatracker.ietf.org/doc/html/rfc7168#section-2.3.3).
Here is a reference of all of the built-in exceptions and their associated response codes:


Table 6.7 – Sanic exceptions with built-in HTTP responses
It is, therefore, a really good practice to make usage of these status codes. An obvious example might be when you are looking up something in your database that does not exist, as illustrated in the following code snippet:
@app.get("/product/<product_id:uuid>")
async def product_details(request, product_id):
try:
product = await Product.query(product_id=product_id)
except DoesNotExist:
raise NotFound("No product found")
Using Sanic exceptions is perhaps one of the easiest solutions to getting appropriate responses back to the users.
We could, of course, go one step further. We can make our own custom exceptions that subclass from the Sanic exceptions to leverage the same capability.
- Create an exception that subclasses one of the existing Sanic exceptions, as follows:
from sanic.exceptions import InvalidUsage
class MinQuantityError(InvalidUsage):
...
- Raise it when appropriate, like this:
@app.post("/cart")
async def add_to_cart(request):
if request.json["qty"] < 5:
raise MinQuantityError(
"Sorry, you must purchase at least 5 of this item"
)
- Here, see the error when we have a bad request (fewer than 5 items):
$ curl localhost:777/cart -X POST -d '{"qty": 1}' -i
HTTP/1.1 400 Bad Request
content-length: 98
connection: keep-alive
content-type: text/plain; charset=utf-8
400 — Bad Request
=================
Sorry, you must purchase at least 5 of this item
Using and reusing exceptions that inherit from SanicException is highly encouraged. It not only is a good practice because it provides a consistent and clean mechanism for organizing your code, but it also makes it easy to provide the appropriate HTTP responses.
So far throughout this book, when we have hit an exception with our client (such as in the last example), we have received a nice textual representation of that error. In the next section, we will learn about the other types of exception output and how we can control this.
Fallback handling
Let's face it: formatting exceptions is mundane. There is little doubt that using the skills we have learned so far, we could build our own set of exception handlers. We know how to use templates, catch exceptions, and return HTTP responses with an error status. But creating those takes time and a lot of boilerplate code.
This is why it is nice that Sanic offers three different exception handlers: HTML, JSON, and plain text. For the most part, the examples in this book have used the plain text handlers only because this has been a more suitable form for presenting information in a book. Let's go back to our example where we raised a NotFound error and see what it might look like with each of the three types of handlers.
HTML
- Let's set up our endpoint to raise an exception, as follows:
@app.get("/product/<product_name:slug>")
async def product_details(request, product_name):
raise NotFound("No product found")
- Tell Sanic to use HTML formatting. We will look into configurations in more detail in Chapter 8, Running a Sanic Server. For now, we will just set the value right after our Sanic instance, like this:
app = Sanic(__name__)
app.config.FALLBACK_ERROR_FORMAT = "html"
- Open up a web browser and go to our endpoint. You should see something like this:

Figure 6.1 – Example 404 HTML page in Sanic
JSON
- Use the same setup as before, as shown here, but change the fallback format to json:
app.config.FALLBACK_ERROR_FORMAT = "json"
- This time, we will access the endpoint with curl, as follows:
$ curl localhost:7777/product/missing-product
{
"description": "Not Found",
"status": 404,
}
Instead of the nicely formatted HTML that we saw with the previous example, our exception has been formatted into JSON. This is more appropriate if your endpoint will—for example—be used by a JavaScript browser application.
Text
- Again using the same setup, we will change the fallback format to text, as follows:
app.config.FALLBACK_ERROR_FORMAT = "text"
- We will again use curl to access the endpoint, like this:
$ curl localhost:7777/product/missing-product
404 — Not Found
===============
No product found
As you can see, there are three convenient formatters for our exceptions that may be appropriate in different circumstances.
Auto
The previous three examples used FALLBACK_ERROR_FORMAT to show that there are three types of built-in error formats. There is a fourth option for setting FALLBACK_ERROR_FORMAT: auto. It would look like this:
app.config.FALLBACK_ERROR_FORMAT = "auto"
When the format is set to auto, Sanic will look at the routing handler and the incoming request to determine what is likely to be the most appropriate handler to use. For example, if a route handler always uses the text() response object, then Sanic will assume that you want the exceptions to also be formatted in text format. The same applies to html() and json() responses.
Sanic will even go one step further than that when in auto mode. It will analyze the incoming request to look at the headers to make sure that what it thinks is correct matches with what the client said that it wants to receive.
Manual override per route
The last option we have is to set the error format on an individual route inside of the route definition. This would allow us to be specific and deviate from the fallback option if needed. Follow these steps:
- Consider the example where we set the fallback to html, as shown here:
app.config.FALLBACK_ERROR_FORMAT = "html"
- Let's now change our route definition from the beginning of this section to look like the following with a specific defined error_format value:
@app.get("/product/<product_name:slug>", error_format="text")
async def product_details(request, product_name):
raise NotFound("No product found")
- As you might already be able to guess, we will not see a formatted HTML page, but instead will see the plain text from earlier, as illustrated here:
$ curl localhost:7777/product/missing-product
404 — Not Found
===============
No product found
If you are using Sanic to develop an API to power a browser-based or mobile user interface (UI), then you likely will not need to have route-level overrides. In this instance, you would usually want to see the FALLBACK_ERROR_FORMAT value for the entire application. This pattern, however, could be helpful if you have some endpoints that will be returning HTML content. In the next section, we will take exceptions one step further to see how we can intercept them to provide appropriate responses to our end users.
Catching exceptions
Although Sanic conveniently handles a lot of exceptions for us, it goes without saying that it cannot anticipate every error that could be raised in an application. We thus need to think about how we want to handle exceptions that come from outside of Sanic or, rather, how to handle exceptions that are not manually raised by our application using one of the Sanic exceptions that conveniently adds a response code.
Returning to our e-commerce example, let's imagine that we are using a third-party vendor for handling our credit card transactions. They have conveniently provided us with a module that we can use to process credit cards. When something goes wrong, their module will raise a CreditCardError response. Our job now is to make sure that our application is ready to handle this error.
Before we do that, however, let's see why this is important, as follows:
- Imagine that this is our endpoint:
@app.post("/cart/complete")
async def complete_transaction(request):
...
await submit_payment(...)
...
- Now, we access the endpoint, and if there is an error, we get this response:
$ curl localhost:7777/cart/complete -X POST
500 — Internal Server Error
============================
The server encountered an internal error and cannot complete your request.
That is not a very helpful message. If we look at our logs, however, we might see this:
[ERROR] Exception occurred while handling uri: 'http://localhost:7777/cart/complete'
Traceback (most recent call last):
File "handle_request", line 83, in handle_request
"""
File "/path/to/server.py", line 19, in complete_transaction
await submit_payment(...)
File "/path/to/server.py", line 13, in submit_payment
raise CreditCardError("Expiration date must be in format: MMYY")
CreditCardError: Expiration date must be in format: MMYY
[INFO][127.0.0.1:58334]: POST http://localhost:7777/cart/complete 500 144
That error looks potentially far more helpful to our users. It specifically has information that might be pertinent to return to the user.
One solution could, of course, just be to catch the exception and return the response that we want, like this:
@app.post("/cart/complete")
async def complete_transaction(request):
...
try:
await submit_payment(...)
except CreditCardError as e:
return text(str(e), status=400)
...
This pattern is not ideal, however. It would require a lot of extra code when we need to catch every potential exception in various locations in the application to cast them to responses. This also would turn our code into a giant mess of try/except blocks and make things harder to read and, ultimately, maintain. In short, it would go against some of the development principles we established early on in this book.
A better solution would be to add an application-wide exception handler. This tells Sanic that anytime this exception bubbles up, it should catch it and respond in a certain way. It looks very much like a route handler, as we can see here:
@app.exception(CreditCardError)
async def handle_credit_card_errors(request, exception):
return text(str(exception), status=400)
Sanic has now registered this as an exception handler and will use it anytime that a CreditCardError response is raised. Of course, this handler is super simplistic, but you might imagine that it could be used for the following: extra logging, providing request context, sending out an emergency alert notification to your development-operations (DevOps) team at 3 a.m., and so on.
Tip
Error handlers are not limited to your application instance. Just as with other regular route handlers, they can be registered on your blueprint instances to be able to customize error handling for a specific subset of your application.
Exception handling is an incredibly important part of application development. It is an immediate differentiator between amateur applications and professional applications. We now know how we can use exceptions to provide not only helpful messages to our users but also to provide proper HTTP response codes. We now move on to another topic (background processing) that can really help to take your applications to the next level.
Background task processing
There comes a time in the development of most applications where the developers or users start to notice the application is feeling a bit slow. Some operations seem to take a long time and it is harming the usability of the rest of the application. It could be computationally expensive, or it could be because of a network operation reaching out to another system.
Let's imagine that you are in this scenario. You have built a great application and an endpoint that allows users to generate a Portable Document Format (PDF) report with the click of a button, showing all kinds of fancy data and graphs. The problem is that to retrieve all the data and then crunch the numbers seems to take 20 seconds. That's an eternity for an HTTP request! After spending time squeezing as much performance out of the report generator as you can, you are finally at the conclusion that it runs as fast as it can. What can you do?
Push it to the background.
When we say background processing, what we really mean is a solution that allows the current request to complete without having finalized whatever needs to be done. In this example, it would mean completing the request that starts the report generation before it is actually finished. Whenever and wherever you can, I recommend pushing work to the background. Earlier, in the Waiting on events section of this chapter, we saw a use case for sending out registration emails in the background. Indeed, the usage of signals (as described earlier) is a form of background processing. It is, however, not the only tool Sanic provides.
Adding tasks to the loop
As you may already know, one of the cornerstones of the asyncio library is tasks. They are essentially the unit of processing that is responsible for running asynchronous work on the loop. If the concept of a task or task loop is still foreign to you, it might be a good time to do a little research on the internet before continuing.
In a typical scenario, you can generate a task by getting access to the event loop and then calling create_task, as seen here:
import asyncio
async def something():
...
async def main():
loop = asyncio.get_running_loop()
This is probably not new to you, but what this does is start running something in a task outside of the current one.
Sanic adds a simple interface for creating tasks, as shown here:
async def something():
...
app.add_task(something)
This is probably the simplest form of background processing and is a pattern that you should get comfortable using. Why use this over create_task? For these three reasons:
- It is easier since you do not need to fetch the loop.
- It can be used in the global scope before the loop has started.
- It can be called or not called, and also with or without the application instance as an argument.
To illustrate the flexibility, contrast the previous example with this:
from sanic import Sanic
from my_app import something
app = Sanic("MyAwesomeApp")
app.add_task(something(app))
Tip
If the task is not called, as in the first example, Sanic will introspect the function to see if it expects the app instance as an argument and inject it.
asyncio tasks are very helpful, but sometimes you need a more robust solution. Let's see what our other options are.
Integrating with an outside service
If there is work to be done by your application, but it is outside of the scope of your API for whatever reason, you might want to turn to an off-the-shelf solution. This comes in the form of another service that is running somewhere else. The job of your web API now is to feed work into that service.
In the Python world, the classic framework for this kind of work is Celery. It is of course not the only option, but since this book is not about deciding what to use, we will show Celery as an example because it is widely used and known. In short, Celery is a platform with workers that read messages from a queue. Some client is responsible for pushing work to the queue, and when a worker receives the message, it executes the work.
For Celery to operate, it runs a process on a machine somewhere. It has a set of known operations that it can perform (that are also called tasks). To initiate a task, an outside client needs to connect to it through a broker and send instructions to run the task. A basic implementation might look like this:
- We set up a client to be able to communicate with the process. A common place to put this is on the application.ctx object to make it usable anywhere in the application, as illustrated in the following code snippet:
from celery import Celery
@app.before_server_start
def setup_celery(app, _):
app.ctx.celery = Celery(...)
- To use it, we simply call the client from the route handler to push some work to Celery, like this:
@app.post("/start_task")
async def start_task(request):
task = request.app.ctx.celery.send_task(
"execute_slow_stuff",
kwargs=request.json
)
return text(f"Started task with {task.id=}", status=202)
An important thing to point out here is that we are using a 202 Accepted status to tell whoever requested it that the operation has been accepted for processing. No guarantee is being made that it is done or will be done.
After examining Celery, you may be thinking that it is overkill for your needs, but app.add_task does not seem to be enough. Next, we look at how you could develop your own in-process queue system.
Designing an in-process task queue
Sometimes, the obvious goldilocks solution for your needs is to build something entirely confined to Sanic. It will be easier to manage if you have only one service to worry about instead of multiples. You may still want to keep the idea of workers and a task queue without the overhead required in implementing a service such as Celery. So, let's build something that you can hopefully use as a launching point for something even more amazing in your applications.
Before we go any further, let's change the name from task queue to job queue. We do not want to confuse ourselves with asyncio tasks, for example. For the rest of this section, the word task will relate to an asyncio task.
To begin, we will develop a set of needs for our job queue, as follows:
- There should be one or more workers that are capable of executing jobs outside of the request/response cycle.
- They should execute jobs in a first-in, first-out (FIFO) order.
- The completion order of jobs is not important (for example, job A starts before job B, but it does not matter which one finishes first).
- We should be able to check on the state of a job.
Our strategy to achieve this will be to build out a framework where we have a worker that is itself a background task. Its job will be to look for jobs inside of a common queue and execute them. The concept is very similar to Celery, except we are handling it all within our Sanic application with asyncio tasks. We are going to walk through the source code to accomplish this, but not all of it. Implementation details not relevant to this discussion will be skipped here. For full details, please refer to the source code in the GitHub repository at https://github.com/PacktPublishing/Web-Development-with-Sanic/tree/main/Chapter06/inprocess-queue.
Follow these next steps:
- To begin, let's set up a very simple application with a single blueprint, as follows:
from sanic import Sanic
from job.blueprint import bp
app = Sanic(__name__)
app.config.NUM_TASK_WORKERS = 3
app.blueprint(bp)
- That blueprint will be the location where we will attach some listeners and our endpoints, as illustrated here:
from sanic import Blueprint
from job.startup import (
setup_task_executor,
setup_job_fetch,
register_operations,
)
from job.view import JobListView, JobDetailView
bp = Blueprint("JobQueue", url_prefix="/job")
bp.after_server_start(setup_job_fetch)
bp.after_server_start(setup_task_executor)
bp.after_server_start(register_operations)
bp.add_route(JobListView.as_view(), "")
bp.add_route(JobDetailView.as_view(), "/<uid:uuid>")
As you can see, we have three listeners that we need to run: setup_job fetch, setup_task_executor, and register_operations. We also have two views: one is a list view and the other a detail view. Let's take each of these items in turn to see what they are, as follows:
- Since we want to store the state of our tasks, we need some sort of a datastore. To keep things really simple, I created a file-based database called FileBackend, as illustrated in the following code snippet:
async def setup_job_fetch(app, _):
app.ctx.jobs = FileBackend("./db")
- The functionality of this job management system will be driven from our job queue, which will be implemented with asyncio.Queue. So, we next need to set up our queue and workers. Here's the code we need to accomplish this:
async def setup_task_executor(app, _):
app.ctx.queue = asyncio.Queue(maxsize=64)
for x in range(app.config.NUM_TASK_WORKERS):
name = f"Worker-{x}"
print(f"Starting up executor: {name}")
app.add_task(worker(name, app.ctx.queue, app.ctx.jobs))
After creating our queue, we create one or more background tasks. As you can see, we are simply using Sanic's add_task method to create a task from the worker function. We will see that function in just a moment.
- The last listener we need will set up an object that will be used to hold all of our potential operations, as illustrated in the following code snippet:
async def register_operations(app, _):
app.ctx.registry = OperationRegistry(Hello)
To remind you, an Operation is something that we want to run in the background. In this example, we have one operation: Hello. Before looking at the operation, let's look at the two views.
- The list view will have a POST call that is responsible for pushing a new job into the queue. You can also imagine that this would be an appropriate place to make an endpoint that lists all of the existing jobs (paginated, of course). First, it will need to get some data from the request, with the following code:
class JobListView(HTTPMethodView):
async def post(self, request):
operation = request.json.get("operation")
kwargs = request.json.get("kwargs", {})
if not operation:
raise InvalidUsage("Missing operation")
Here, we perform some very simple data validation. In a real-world scenario, you might want to do some more to make sure that the request JSON conforms to what you are expecting.
- After validating the data, we can push information about the job to the queue, like this:
uid = uuid.uuid4()
await request.app.ctx.queue.put(
{
"operation": operation,
"uid": uid,
"kwargs": kwargs,
}
)
return json({"uid": str(uid)}, status=202)
We created a UUID. This unique ID will be used both in storing the job in our database and retrieving information about it later. Also, it is important to point out that we are using the 202 Accepted response since it is the most appropriate form.
- The detail view is very simple. Using the unique ID, we simply look it up in the database and return it, like this:
class JobDetailView(HTTPMethodView):
async def get(self, request, uid: uuid.UUID):
data = await request.app.ctx.jobs.fetch(uid)
return json(data)
- Coming back to our Hello operation, we will build it now, like this:
import asyncio
from .base import Operation
class Hello(Operation):
async def run(self, name="world"):
message = f"Hello, {name}"
print(message)
await asyncio.sleep(10)
print("Done.")
return message
As you can see, it is a simple object that has a run method. That method will be called by the worker when running a job.
- The worker is really nothing more than an async function. Its job will be to run a never-ending loop. Inside that loop, it will wait until there is a job in the queue, as illustrated in the following code snippet:
async def worker(name, queue, backend):
while True:
job = await queue.get()
if not job:
break
size = queue.qsize()
print(f"[{name}] Running {job}. {size} in queue.")
- Once it has the information about how to run a job, it needs to create a job instance and execute it, as follows:
job_instance = await Job.create(job, backend)
async with job_instance as operation:
await job_instance.execute(operation)
Once this is complete, we can finally start to interact with the API. Now is your chance to play with the server that we just created. Here are a few helpful curl commands you can try on your own:
$ curl localhost:7777/job -X POST -d '{"operation": "hello"}'
$ curl localhost:7777/job -X POST -d '{"operation": "hello", "kwargs": {"name": "Adam"}}'
$ curl localhost:7777/job/<UID FROM PREVIOUS COMMANDS>
A couple of final things to say about this solution: one of its biggest faults is that it has no recovery. If your application crashes or restarts, there is no way to continue processing a job that had already begun. In a true task management process, this is usually an important feature. Therefore, in the GitHub repository, in addition to the source used to build this solution, you will find source code for a subprocess task queue. I will not walk you through the steps to build it since it is largely a similar exercise, with a lot of the same code. However, it differs from this solution in two important ways: it does have the ability to recover and restart an unfinished job, and instead of running in asyncio tasks, it leverages Sanic's process management listeners to create a subprocess using multiprocessing techniques. Please take some time to look through the source code there as you continue to learn and work your way through this book.
Summary
In my opinion, one of the biggest leaps that you can make as an application developer is devising strategies to abstract a solution to a problem and reusing that solution in multiple places. If you have ever heard of the Don't Repeat Yourself (DRY) principle, this is what I mean. Applications are seldom ever complete. We develop them, maintain them, and change them. If we have too much repetitive code or code that is too tightly coupled to a single use case, then it becomes more difficult to change it or adapt it to different use cases. Learning to generalize our solutions mitigates this problem.
In Sanic, this means taking logic out of the route handlers. It is best if we can minimize the amount of code in individual handlers, and instead place that code in other locations where it can be reused by other endpoints. Did you notice how the route handlers in the final example in the Designing an in-process task queue section had no more than a dozen lines? While the exact length is not important, it is helpful to keep these clean and short and place your logic somewhere else.
Perhaps one of the biggest takeaways from this chapter should be that there is usually not a single way to do something. Often, we can use a mixture of methodologies to achieve our goal. It is then the job of the application developer to look at the tool belt and decide which tool is best for any given situation.
For this reason, as a Sanic developer, you should learn how to devise strategies to respond to web requests outside of the route handler. In this chapter, we learned about some tools to help you accomplish this using middleware, built-in and custom signals, connection management, exception handling, and background processing. Again, think of these as your core tools in your tool belt. Got a screw that needs tightening? Pull out your middleware. Need to drill a hole in some wood? Time to grab for signals. The more familiar you become with basic building blocks such as these in Sanic, the greater your understanding will be of how to piece together a professional-grade application.
It is your job now to play with these and internalize them on your way to becoming a better developer.
We have scratched the surface of security-related issues. In the next chapter, we will take a closer look at how we can protect our Sanic applications.