6
Designing Argo CD Delivery Pipelines
In this chapter, we will use the infrastructure we created in Chapter 5, Argo CD Bootstrap K8s Cluster, to demonstrate real deployment strategies using Argo CD and get familiarized with Argo Rollouts. We will define a hypothetical scenario of real engineering with multiple teams and microservices and write a real CI pipeline that interacts with Argo CD, leveraging the Argo CLI and Argo RBAC security for different Argo Projects.
At the end, we will try to tackle the challenges of GitOps, as everything is in a Git repository and we need to find a way to keep the secrets of our services safe.
The main topics we will cover are the following:
- Motivation
- Deployment strategies
- Keeping secrets safe
- Real CI/CD pipeline
- Microservices CI/CD in practice
Technical requirements
For this chapter, we assume that you have already installed the Helm CLI and you have already run the Terraform scripts from Chapter 5, Argo CD Bootstrap K8s Cluster. Additionally, you will need the following:
- Basic Golang
- GitHub Actions: https://docs.github.com/en/actions
- External Secrets: https://github.com/external-secrets/external-secrets
- curl: https://curl.se/
The code can be found at https://github.com/PacktPublishing/ArgoCD-in-Practice in the ch05 and ch06 folders.
Motivation
Some companies are already trying to transition their services from traditional VMs in the cloud or other container orchestration tools (for example, AWS ECS, Azure CI, and so on) to K8s clusters. One of the biggest problems though in moving to K8s is how we can set up more sophisticated deployment strategies, as the standard rolling updates provided for free by K8s would not work in some cases. For example, what if I want to deploy a new version of a service but I want to first test that it’s functional and then switch to the new version and, in parallel, destroy the old one? This is called blue/green deployment and can give me the power to reduce downtime and not even impact my end users.
In the next section, we will see how we can achieve this in K8s using only the K8s objects and how we can deploy a service with blue/green deployment.
Simple blue-green in K8s
I have created a small Golang app that serves a simple HTTP server and returns the version of the application under localhost:3000/version. I am leveraging Go build tags so I can have two variants for the different versions and responses of the HTTP server. The main code base is as follows:
package main
import (
       "fmt"
       "net/http"
)
var BuildVersion = "test"
func main() {
       http.HandleFunc("/version", version)
       http.ListenAndServe(":3000", nil)
}
func version(w http.ResponseWriter, r *http.Request) {
       fmt.Fprintf(w, BuildVersion)
}
Then, we will use Golang ldflags to change the response of the endpoint based on the different versions we want to have:
TAG=v1.0 make build-linux # or build-mac for Mac users
TAG=v2.0 make build-linux # or build-mac for Mac users
You can find a Makefile in the repository folder I mentioned earlier, which will build a Docker image for each different version. You can do this with the following command:
TAG=v1.0 make build-image # For v1.0 version
TAG=v2.0 make build-image # For v2.0 version
For your convenience, I have already built the Docker images and pushed them into Docker Hub as public images.
Now it’s time to experiment with blue/green. First, let’s set up our environment again so we can have access to the K8s cluster:
export KUBECONFIG= <your-path-to-book-repo>/ArgoCD-in-Practice/ch05/terraform/kubeconfig_packt-cluster
Now, let’s create a separate namespace to run the K8s manifest for the v1.0 version (blue) of the service:
kubectl create ns ch06-blue-green
Then apply blue.yaml under ch06/simple-blue-green/deployments with the following command:
kubectl apply -f blue.yaml
After applying it, you should be able to successfully see two Pods running with the v1.0 service version. The output would be similar to this:
NAME READY STATUS RESTARTS AGE
app-f6c66b898-2gwtz 1/1 Running 0 108s
app-f6c66b898-fg2fv 1/1 Running 0 108s
Right now, it’s time to deploy the K8s service, which will expose the set of deployed Pods as a network service. Now is the time to apply service.yaml under ch06/ simple-blue-green/deployments and then check under the newly created AWS load balancer to see that we deployed the right version of the service:
kubectl apply -f service-v1.yaml
After the apply, an EXTERNAL-IP will be generated and, more specifically, an AWS load balancer as the K8s service is set as LoadBalancer. In my case, the output Loadbalancer, EXTERNAL-IP, is an AWS Elastic Load Balancer (ELB) (https://aws.amazon.com/elasticloadbalancing/) like this: aa16c546b90ba4b7aa720b21d93787b8-1761555253.us-east-1.elb.amazonaws.com. Let’s run an HTTP request under /version so we can validate the version of the service:
Request:
curl aa16c546b90ba4b7aa720b21d93787b8-1761555253.us-east-1.elb.amazonaws.com:3000/version
Response:
v1.0
Now it’s time to run the K8s manifest for the v2.0 version (green) of the service:
kubectl apply -f green.yaml
Now we have two extra Pods that run the v2.0 (green) version of the service. Let’s see the output after running kubectl -n ch06-blue-green get po:
NAME READY STATUS RESTARTS AGE
app-f6c66b898-2gwtz 1/1 Running 0 12h
app-f6c66b898-fg2fv 1/1 Running 0 12h
app-v2-6c4788bf64-ds4dj 1/1 Running 0 3s
app-v2-6c4788bf64-lqwvf 1/1 Running 0 3s
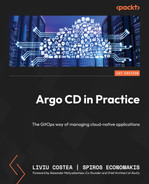
If we make a request again with the AWS ELB, we will still see v1.0 as the K8s service still matches the deployment of v1.0 because of the following matching labels:
selector:
app: app
version: "1.0"
Now, let’s look at the current state of our deployment, as shown in Figure 6.1:
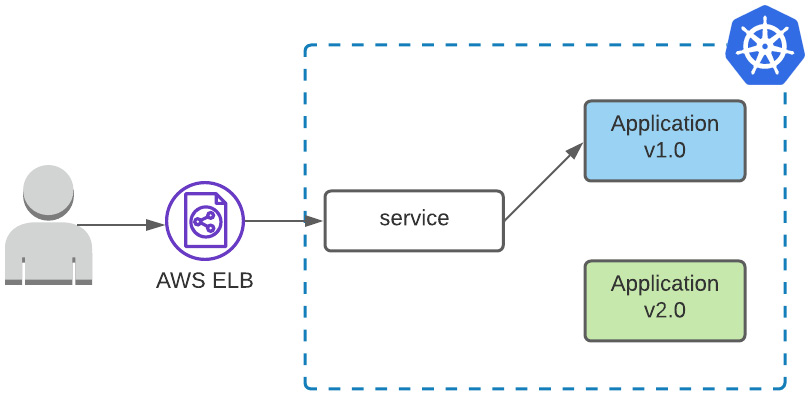
Figure 6.1 – Deployment serves blue version
Most engineering teams in this state will run automated or manual tests to validate that v2.0 is functional and won’t cause any issues. Assuming that everything is functional, we can serve v2.0 of the service, and we need to change the selector labels in the K8s service to the following:
selector:
app: app
version: "2.0"
After we have made the change, it’s time to apply the service again:
kubectl apply -f service-v2.yaml
Let’s run an HTTP request under /version so we can validate the version of the service:
Request:
curl aa16c546b90ba4b7aa720b21d93787b8-1761555253.us-east-1.elb.amazonaws.com:3000/version
Response:
v2.0
Here, we have a new state diagram:
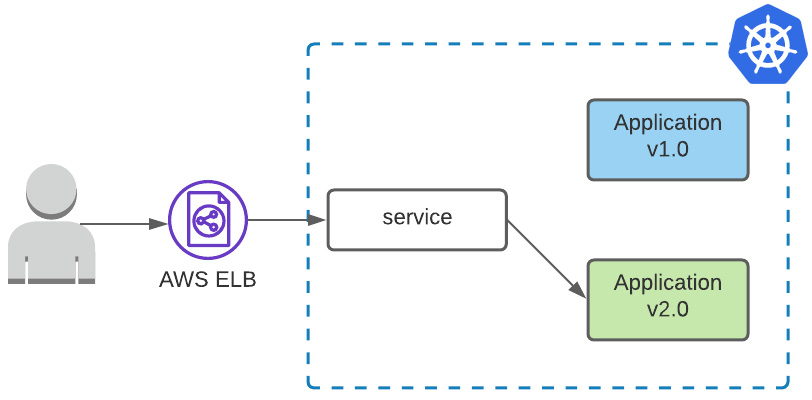
Figure 6.2 – Deployment serves green version, switching traffic
That’s it! We just completed the first blue/green deployment in a K8s cluster. All the actions we took were manual, but we could automate these steps in a CI/CD pipeline, although that could be very complex and hard to maintain in the long run. Apart from this, we are not following GitOps principles, and we also need the K8s credentials exposed in CI/CD.
Here comes the Argo project that introduced Argo Rollouts, which is a K8s controller that will help us to make a progressive delivery of our services with more complex deployment strategies than the one we described here. Let’s see in detail how Argo Rollouts work in the next section.
Deployment strategies
In this section, we will explain what Argo Rollouts is and take a deep dive into the architecture. We will also learn about the supported deployment strategies. At the end, we will run a real example of delivering microservices with a progressive delivery approach and recover automatically from failed deployments.
What is Argo Rollouts?
Argo Rollouts is a Kubernetes controller similar to the K8s Deployment objects but is a Custom Resource Definition (CRD) developed by the Argo project team. This CRD has extended capabilities so it can provide progressive delivery in Deployments such as the following:
- Blue-green deployments
- Canary deployments
- Weighted traffic shift
- Automatic rollbacks and promotions
- Metric analysis
Next, we will explain the reasons to use Argo Rollouts and the limitations of the default K8s rolling update strategy.
Why Argo Rollouts?
The standard K8s Deployment object only gives us the ability for the RollingUpdate strategy, which supports basic safety requirements during an update of a deployment such as a readiness probe. The rolling update strategy has many limitations though:
- There is no way to control how fast or slow we can make a rollout.
- Not able to have traffic switch in a newer version for cases such as canary or blue-green.
- There is no input by metrics that we can use for the rollout.
- Only the ability to halt the progression but there is no way to automatically abort and roll back an update.
For large-scale environments, the rolling update strategy is risky as it cannot provide control over the blast radius of a deployment. Next, we will see an overview of the Argo Rollouts architecture.
The architecture of Argo Rollouts
In practice, the Argo Rollouts controller is responsible for managing the life cycle of ReplicaSets as the typical K8s deployment object does. In Figure 6.3, we can see the architecture diagram for a canary deployment strategy, which we will explain in detail later:

Figure 6.3 – Deployment serves green version, switching traffic
Let’s see the purpose of each component in the architecture so we can understand how Argo Rollouts works:
- Argo Rollouts controller: As with every controller in K8s, this one also observes whether there are new object resources (custom resources) of a type called Rollout; the controller will then check the declaration of the Rollout and will try to bring the cluster to the declared state.
- Rollouts resource (CRD): This is compatible with the typical K8s deployment object but it includes some extra fields that can control the stages and thresholds of the deployment strategies such as blue-green or canary. So, in practice, to leverage Argo Rollouts, you need to migrate your existing K8s deployments objects to the Rollouts resource object so they can be managed.
- ReplicaSets: This is the standard K8s ReplicaSet resource with extra metadata so the Argo Rollouts controller can track the different versions that are part of a deployment/application.
- Analysis: This is the intelligent part of Argo Rollouts that connects the Rollouts controller with our preferred metrics provider so we can define the metrics that would get a decision on whether the update completed successfully or not. If the metrics are validated and are good, then it will progress to deliver. On the other side, it will roll back if there is a failure or pause the rollout if the metrics provider cannot give an answer. This needs two K8s CRDs: AnalysisTemplate and AnalysisRun. AnalysisTemplate contains the details for which metric to query so it can get back a result, which is called AnalysisRun. The template can be defined in a specific rollout or globally on the cluster so it can be shared by multiple rollouts.
- Metrics providers: Integrations with tools such as Prometheus and Datadog that we can use in the Analysis component and do the clever part of automatically promoting or rolling back a rollout.
In the next section, we will use the blue-green deployment strategy supported by Argo Rollouts so that we can demonstrate how we can reduce the amount of time running multiple versions in parallel and, of course, deliver a stable newer version.
Blue-green deployment strategy
As we described earlier, the blue-green deployment has two versions of the application in parallel at the same time, specifically the old one and the new one. The production traffic for some time flows to the old version until the test suite runs (manually or automated) against the new version and then switches the traffic to the latest version.
We can achieve this with the Argo Rollouts controller. An example of the blue-green Rollout CRD is as follows:
kind: Rollout
metadata:
  name: rollout-bluegreen
spec:
  replicas: 2
  revisionHistoryLimit: 2
  selector:
    matchLabels:
      app: bluegreen
  template:
    metadata:
      labels:
        app: bluegreen
    spec:
      containers:
      - name: bluegreen-demo
        image: spirosoik/cho06:v1.0
        imagePullPolicy: Always
        ports:
        - containerPort: 8080
  strategy:
    blueGreen:
      activeService: bluegreen-v1
      previewService: bluegreen-v2
      autoPromotionEnabled: false
The key difference from the typical K8s Deployment resource is the strategy where we define the deployment type and the two services that are used for the blue-green versions and that, in parallel, the Argo Rollouts controller will be triggered when we change the version of the image set in template.spec. The important fields in blueGreen are the following:
- activeService: This is the current blue version that will be served until the time we will run the promotion.
- previewService: This is the new green version that will be served after we promote it.
- autoPromotionEnabled: This decides whether the green version will be promoted immediately after ReplicaSet is completely ready and available. In the next section, we will describe what a canary deployment is and how we can define this in Argo Rollouts.
Canary deployment strategy
The idea behind the canary release is that we can serve a version/deployment to only a subset of end users while we serve the rest of the traffic to the old version. With the canary release, we can validate in reality whether the new version works correctly, and we can gradually increase the adoption of the end users and completely replace the old version. An example of a canary release is described in Figure 6.4:
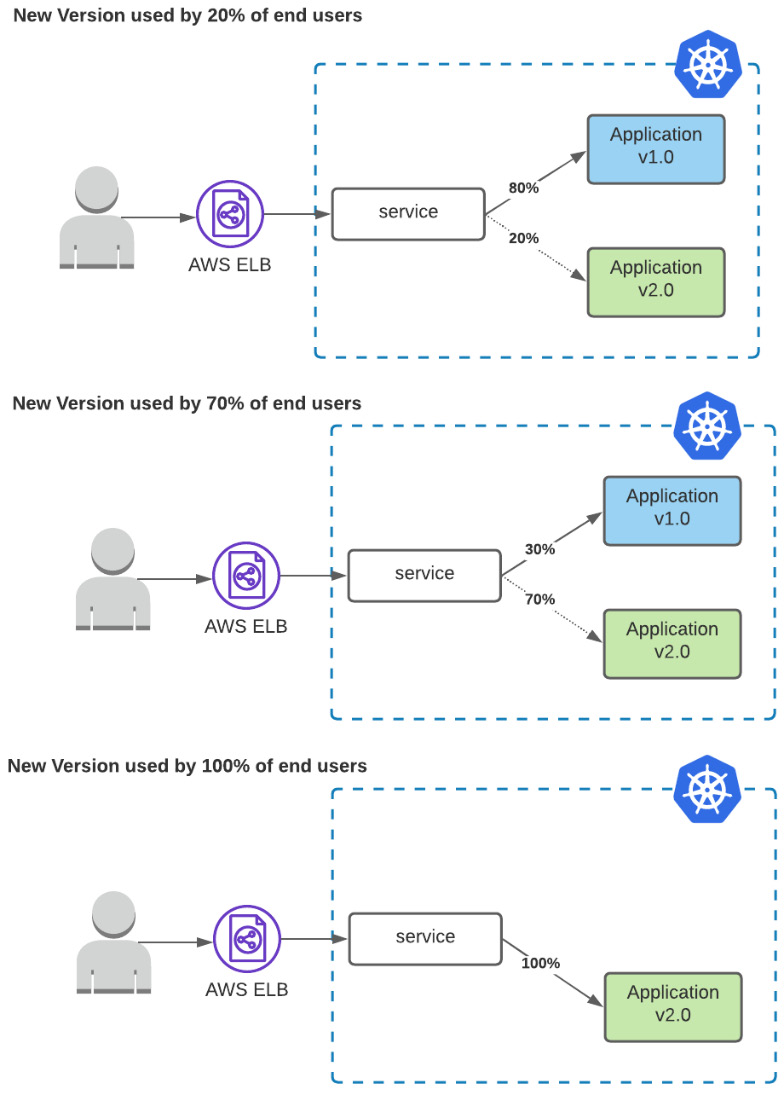
Figure 6.4 – Canary release
We can achieve this with the Argo Rollouts controller. An example of the canary Rollout CRD is as follows:
apiVersion: argoproj.io/v1alpha1
kind: Rollout
metadata:
  name: rollout-canary
spec:
  replicas: 5
  revisionHistoryLimit: 2
  selector:
    matchLabels:
      app: rollout-canary
  template:
    metadata:
      labels:
        app: rollout-canary
    spec:
      containers:
      - name: rollouts-demo
        image: spirosoik/ch06:blue
        imagePullPolicy: Always
        ports:
        - containerPort: 8080
  strategy:
    canary:
      steps:
      - setWeight: 20
      - pause: {}
      - setWeight: 40
      - pause: {duration: 40s}
      - setWeight: 60
      - pause: {duration: 20s}
      - setWeight: 80
      - pause: {duration: 20s}
The main difference here is the canary section; let’s describe the steps for canary definition. The current rollout will start with a canary weight of 20% and as you can see the pause is set to {}, which means the rollout will pause indefinitely. We can explicitly resume the rollout with the following:
$ kubectl argo rollouts promote rollout-canary
After running this command, the rollout will start performing an automated 20% increase gradually until it reaches 100%.
Enough with the theory, we have the fundamental knowledge to proceed to a real use case in the next section, which ties Argo CD and Argo Rollouts in a production CI/CD pipeline.
A real CI/CD pipeline
We discussed Argo Rollouts and how it works, and the deployment strategies, but how can we adapt all these in a real production environment? How can we integrate Argo Rollouts and automate the rollout without the need for manual approval? In this section, we will minimize failed deployments with Argo Rollouts and Argo CD and bootstrap our K8s cluster ready with Argo Rollouts.
Setting up Argo Rollouts
In Chapter 5, Argo CD Bootstrap K8s Cluster, we bootstrapped the EKS cluster we created with Terraform, and we will evolve this to include Argo Rollouts in the bootstrap. So, we will create another new Argo application for Argo Rollouts under the ch05/terraform/k8s-bootstrap/base directory. The following declarative manifest is the Argo application for bootstrapping the cluster with Argo Rollouts:
apiVersion: argoproj.io/v1alpha1
kind: Application
metadata:
  name: argo-cd
  finalizers:
    - resources-finalizer.argocd.argoproj.io
spec:
  project: default
  source:
    repoURL: https://github.com/PacktPublishing/ArgoCD-in-Practice.git
    targetRevision: HEAD
    path: ch05/applications/argo-rollouts
  destination:
    namespace: argo-rollouts
    server: https://kubernetes.default.svc
  syncPolicy:
    automated:
      prune: true
      selfHeal: true
    syncOptions:
      - CreateNamespace=true
Finally, update kustomization.yaml to include the new application during the bootstrap:
namespace: argocd
bases:
  - https://raw.githubusercontent.com/argoproj/argo-cd/v2.1.7/manifests/install.yaml
resources:
  - namespace.yaml
  - argocd.yaml
  - argo-rollouts.yaml
  - master-utilities.yaml
Now, it’s time to apply the Terraform script:
$ terraform apply -auto-approve
So, now we have Argo Rollouts deployed in the cluster ready to start using it later in this section. Now, we will create an Argo Project so we can have the separation by the team and give the freedom to the team to manage their services by themselves in their own pipelines. After the script application, we need to check that the Argo application is healthy and synced, as we can see in Figure 6.5:
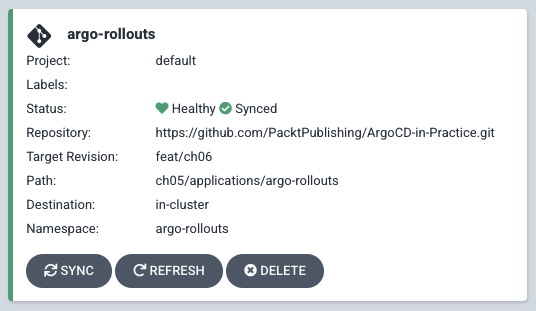
Figure 6.5 – Bootstrap cluster with Argo Rollouts and a demo app
In the next section, we will talk about team separation and implement a CI/CD pipeline with GitHub Actions.
Automated blue-green promotion with GitHub Actions
When we are in a big engineering team, we want freedom within our team to manage and deploy the Argo applications we need accordingly. That’s why (as we discussed in Chapter 2, Getting Started with Argo CD, and Chapter 4, Access Control), we can use Argo Project and Project roles and tokens in the CI system we use. With this approach, we will fully utilize the multitenancy of Argo CD. We will assume that the project we will create for this case is for our team only:
apiVersion: argoproj.io/v1alpha1
kind: AppProject
metadata:
  name: team
spec:
  destinations:
  - namespace: team-*
    server: '*'
  sourceRepos:
  - https://github.com/PacktPublishing/ArgoCD-in-Practice.git
  roles:
  - name: team-admin
    policies:
    - p, proj:team:team-admin, applications, *, team/*, allow
  - name: ci-role
    description: Create and Sync apps
    policies:
    - p, proj:team:ci-role, applications, sync, team/*, allow
    - p, proj:team:ci-role, applications, get,  team/*, allow
    - p, proj:team:ci-role, applications, create, team/*, allow
    - p, proj:team:ci-role, applications, update, team/*, allow
    - p, proj:team:ci-role, applications, delete, team/*, allow
After creating this, we need to generate a Project token that we can use in the CI and, more specifically, use ci-role, which has limited permissions to create, update, delete, and sync applications under every namespace that matches the following simple team-* regex. The command to generate a token, for example, for a day is the following:
argocd proj role create-token team ci-role -e 1d
The output will be the following, and keep in mind that these tokens are not stored anywhere in Argo CD:
Create token succeeded for proj:team:ci-role.
ID: 3f9fe741-4706-4bf3-982b-655eec6fd02b
Issued At: 2021-12-12T00:05:41+02:00
Expires At: 2021-12-13T00:05:41+02:00
Token: <your-generated-token>
We will set this as a secret in GitHub Actions. Now is the time to define the CI/CD paths for a blue-green deployment so we can start implementing it later.
We are going to use the application we created in the previous section for blue-green deployment. For this example, we are going to use GitHub Actions as a pipeline, and we will define the following steps:
- Lint
- Build
- Deploy
We will set up two workflows with GitHub Actions. The first workflow will be defined in ci.yaml and will be responsible for creating artifacts (Docker images) for pull requests and the main branch. We are talking about the CI part of our pipeline that needs to run in every new change we raise in the repository. Here is the part that we define to run only on pull requests and the main branch:
name: main
on:
  push:
    branches: [ main ]
  pull_request:
    branches: [ '*' ]
Then, we have the lint step of the pipeline and the Jobs of the workflow:
jobs:
  lint:
    name: Lint
    runs-on: ubuntu-latest
    steps:
      ... more ...
      - name: Lint
        run: make lint
The last step is to build the Docker image and push it to Docker Hub, as shown in the following:
  build:
    name: Build
    runs-on: ubuntu-latest
    needs: ["lint"]
    steps:
      ... more ...
    - name: Log in to Docker Hub
      uses: docker/login-action@v1
      with:
        username: ${{ secrets.DOCKER_USERNAME }}
        password: ${{ secrets.DOCKER_PASSWORD }}
    - name: Build and Push docker image
      run: |
        TAG=${BRANCH_NAME} make push-docker         env: |
          BRANCH_NAME= ${{ steps.branch.outputs.current_branch }}
With the next step, each team will be totally self-managed to deploy their services after code reviews by the relevant teams. Although in the case of a K8s cluster failure, it will be a bit harder to bootstrap a new K8s cluster or it will need some extra manual steps, so it’s a good practice to always keep the right state of the Git repository used for the bootstrap. We will use the Argo CD CLI to create the Argo application under the team’s project, and this will run only on the main branch. Here are the last steps:
- name: Download Argo CD CLI
    run: |
    make download-argo-cli
- name: Create Argo app
    run: |
    make create-argo-app
    env:
    PROJ: team
    APP: blue-green
    ROLE: ci-role
    JWT: ${{ secrets.ARGOCD_TOKEN }}
    ARGOCD_SERVER: ${{ secrets.ARGOCD_SERVER }}
    ARGOCD_PATH: "deployments/argo"
The make create-argo-app command uses the Argo CD CLI to create a new Argo app and sync it:
.PHONY: create-argo-app
create-argo-app:
@echo Deploying Argo App
argocd app create ${APP}
--repo https://github.com/spirosoik/argocd-rollouts-cicd.git
--path ${ARGOCD_PATH}
--dest-namespace team-demo
--dest-server https://kubernetes.default.svc
--sync-option CreateNamespace=true
--project ${PROJ}
--auth-token ${JWT}
--upsert
Lastly, if we had multiple clusters defined here, we could deploy the main branch to a dev cluster and tags to the production cluster in the CI/CD workflows. As long as the files under deployments/argo don’t change, we will keep the old version served by both services as it’s the first-time deployment. So, if we try to make a request, we will see the same version for both:
$ kubectl -n team-demo port-forward svc/rollout-bluegreen-active 3000:80
$ curl localhost:3000 # In separate terminal
v1.0
Let’s do the same for the preview service:
$ kubectl -n team-demo port-forward svc/rollout-bluegreen-preview 3000:80
$ curl localhost:3000 # In separate terminal
Also, as we didn’t promote the green version, the state of the Argo application will be suspended and we will get a message in the Argo CD events:
Rollout is paused (BlueGreenPause)
In Figure 6.6, you will see that the status of the Argo app is suspended:
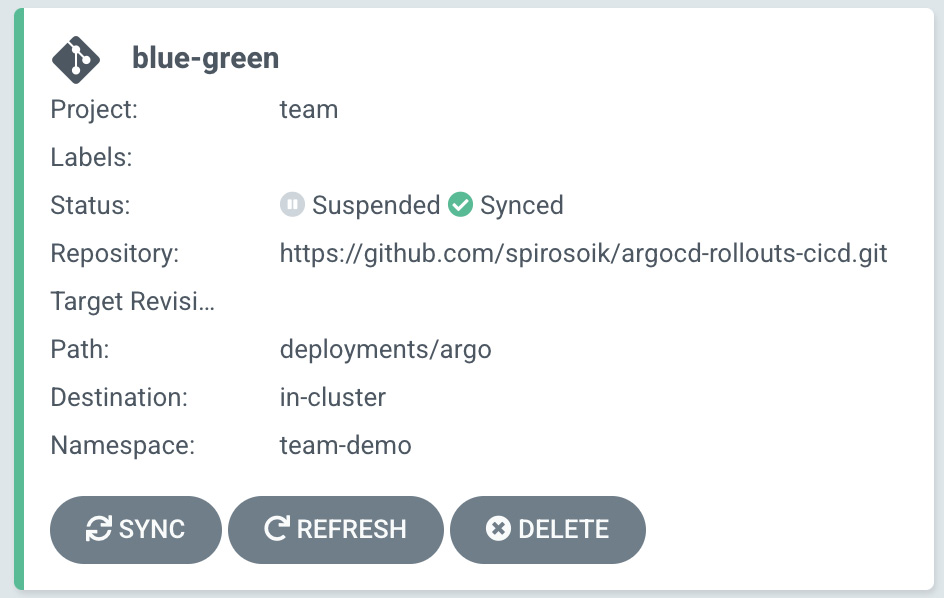
Figure 6.6 – Argo Rollouts suspended
The full example of the CI can be found at https://github.com/PacktPublishing/ArgoCD-in-Practice in the ch06/automated-blue-green/.github/workflows/ci.yaml folder.
The second workflow will be defined in cd.yaml and will be responsible for creating artifacts (Docker images) when we create new tags and then deploy using the blue-green strategy. Then, we will run a smoke test and if everything is alright, we will promote the green version to production deployment automatically.
The CD process for tags only is mostly the same, but there are two extra steps in the GitHub workflow:
- Deploy
- Smoke test
The deploy step is when there is a change of the tag that is served by the Argo Rollouts manifest, and it is replaced with the one we built. So, we change the tag and commit this change to the repository. Argo CD is responsible for observing the change and syncing everything to the proper state, the GitOps way:
    - name: Download Argo CD CLI
      run: |
        make download-argo-cli
    - name: Update Docker Tag
      run: |
        TAG="${GITHUB_REF##*/}" BUILD_NUMBER=${GITHUB_RUN_NUMBER} make update-docker-tag
    - name: Deploy Argo App
      run: |
        make deploy-argo-app
      env:
        PROJ: team
        APP: blue-green
        ROLE: ci-role
        JWT: ${{ secrets.ARGOCD_TOKEN }}
        ARGOCD_SERVER: ${{ secrets.ARGOCD_SERVER }}
deploy-argo-app will sync and wait for the suspended state, as we discussed before:
@echo Syncing Argo App
argocd app sync ${APP} --auth-token ${JWT}
@echo Waiting Argo App to be healthy
argocd app wait ${APP} --auth-token ${JWT} --suspended --timeout=120s
So far, we didn’t run any blue-green switch, but we just deployed a new version, but we still have the old version active. Let’s give it a try:
$ kubectl -n team-demo port-forward svc/rollout-bluegreen-active 3000:80
$ curl localhost:3000 # In separate terminal
v1.0
Let’s do the same for the preview service:
$ kubectl -n team-demo port-forward svc/rollout-bluegreen-preview 3000:80
$ curl localhost:3000 # In separate terminal
V2.0
Now, it’s time to run the smoke tests and roll out the green version if everything is alright. The smoke test for the sake of the example will be just a URL to the services and validate that we get the v2.0 response back. In a production environment, most of the time, we have a set of integration tests that we can run in the green version and validate that the service is functional and ready.
Now, it’s time to do the rollout and, to do this, we need the kubectl plugin for Argo Rollouts. But wait! For kubectl, we need kubeconfig, so we will expose, even with limited access, the credentials in the CI/CD system instead of respecting the pull approach of GitOps. But how can we avoid using kubeconfig in this case? For example, we need to run the following command to roll out:
kubectl argo rollouts promote app -n team-demo
The same question is relevant for smoke tests: what we will do if the services are only for internal access, and we are using a managed CI/CD system such as GitHub Actions? The answer again probably is that we need kubeconfig and to port-forward the services and run the tests, right?
Here comes the power of resource hooks and sync-waves in Argo CD, which will help us include everything as part of Argo CD and avoid having kubeconfig in the external CI/CD system. Let’s see the implementation in the next section.
Automated rolling out with sync phases
In Chapter 2, Getting Started with Argo CD, we discussed resource hooks and how we can create some workflows based on the sync phases. As a reminder, Figure 6.7 will remind you of how sync phases work:
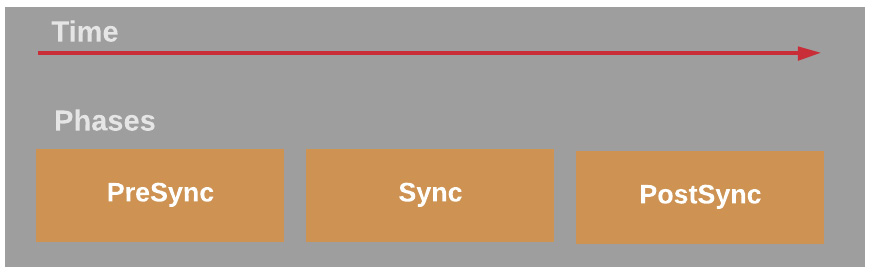
Figure 6.7 – Argo CD sync phases
In our case, we will run the integration tests as a separate Argo CD app and will use Sync and PostSync phases. In the Sync phase, we will run the integration tests and if the sync has been completed with a healthy state, then will proceed to the PostSync phase, where we will promote the new version. With this practice, we minimize the failed deployments with Argo Rollouts and smoke tests. If the tests fail, PostSync will never run, and by utilizing Argo CD resource hooks, we will keep the containers to debug the issue. What we described is the superpower of Argo CD combined with other Argo Projects such as Argo Rollouts.
Let’s see the manifest we will use to run the integration tests with just a simple smoke test:
apiVersion: batch/v1
kind: Job
metadata:
  generateName: integration-tests
  namespace: team-demo
  annotations:
    argocd.argoproj.io/hook: Sync
    argocd.argoproj.io/hook-delete-policy: HookSucceeded
spec:
  template:
    spec:
      containers:
      - name: run-tests
        image: curlimages/curl
        command: ["/bin/sh", "-c"]
        args:
          - if [ $(curl -s -o /dev/null -w '%{http_code}'  rollout-bluegreen-preview/version) != "200" ]; then exit 22; fi;
            if [[ "$(curl -s rollout-bluegreen-preview/version)" != "APP_VERSION" ]]; then exit 22; fi;
            echo "Tests completed successfully"
      restartPolicy: Never
  backoffLimit: 2
The main part here is the two annotations we have in the K8s job:
argocd.argoproj.io/hook: Sync
argocd.argoproj.io/hook-delete-policy: HookSucceeded
These two indicate that the job will run in the Sync phase and if it successfully completed, the job will be automatically deleted by the HookSucceeded resource hook. The last part is to roll out the app in the PostSync phase. Here is the job for rolling out the new version:
apiVersion: batch/v1
kind: Job
metadata:
  generateName: rollout-promote
  namespace: team-demo
  annotations:
    argocd.argoproj.io/hook: PostSync
    argocd.argoproj.io/hook-delete-policy: HookSucceeded
spec:
  template:
    spec:
      containers:
      - name: promote-green
        image:  quay.io/argoproj/kubectl-argo-rollouts:v1.1.1
        command: ["/bin/sh", "-c"]
        args:
          - kubectl-argo-rollouts promote app -n team-demo;
      restartPolicy: Never
  backoffLimit: 2
The main part here is the two annotations we have in the K8s job:
argocd.argoproj.io/hook: PostSync
argocd.argoproj.io/hook-delete-policy: HookSucceeded
So, the GitHub Action CD is pretty simple; check Figure 6.8 for what it looks like:
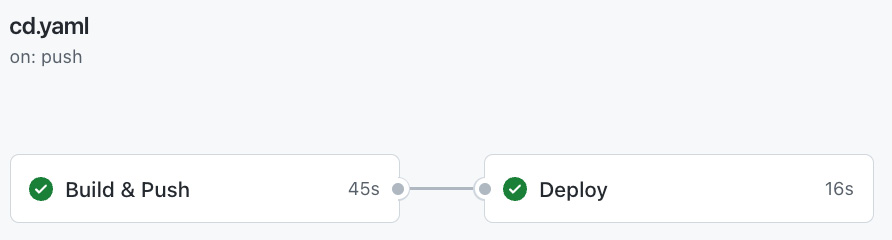
Figure 6.8 – GitHub actions pipeline
You can see the full list of steps of the Deploy job in Figure 6.9:
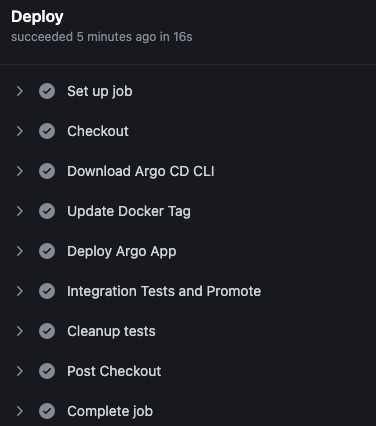
Figure 6.9 – GitHub Actions pipeline steps
That was an awesome journey to build a close-to-reality CI/CD pipeline utilizing Argo CD and Argo Rollouts and minimizing the failed deployments with Argo CD Sync phases. Now it’s time to jump to the next section, where we will see how we can keep the secrets safe in the Git repository when we apply GitOps practices.
Keeping secrets safe
As we are talking about GitOps and declarative configuration (K8s manifests, Helm, and so on) in a Git repository, the first problem we need to address is how we can store the secrets safely. Let’s see how we can achieve this in GitOps.
Storing secrets safely
The most secure way to store them is to keep them in a secret management tool such as Vault, AWS Secrets Manager, Azure Key Vault, or Google’s Secret Manager. But how can you do this integration with Kubernetes Secrets and a declarative manifest and utilize GitOps practices?
There is a tool called External Secrets Operator. As the K8s operator is designed for automation, External Secrets Operator more specifically will synchronize secrets from external APIs such as AWS Secret Manager, Vault, and a couple of others into Kubernetes Secret resources.
The whole idea is that there are a few new K8s custom resources that will define where the secret is and how to complete the synchronization. Let’s see the resource data model so that we can understand the mechanics of it a bit more in Figure 6.10:
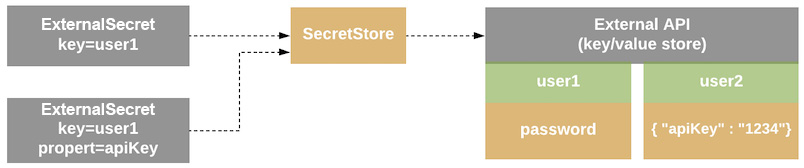
Figure 6.10 – Resource model
The components of the resource model are the following:
- SecretStore: This is the authentication part of the external API so that we can retrieve the actual secret. It will check for new secret resources under the same namespace where it’s created. Finally, it can be referenced only in the same namespace.
- ExternalSecret: This is the way to define what data to retrieve from an external API, and it interacts with SecretStore.
- ClusterSecretStore: This is a global secret and can be referenced by any namespace in the cluster.
An example of SecretStore is the following manifest:
apiVersion: external-secrets.io/v1alpha1
kind: SecretStore
metadata:
  name: secretstore-sre
spec:
  controller: dev
  provider:
    aws:
      service: SecretsManager
      role: arn:aws:iam::123456789012:role/sre-team
      region: us-east-1
      auth:
        secretRef:
          accessKeyIDSecretRef:
            name: awssm-secret
            key: access-key
          secretAccessKeySecretRef:
            name: awssm-secret
            key: secret-access-key
The relevant ExternalSecret resource that will use the SecretStore example is the following:
apiVersion: external-secrets.io/v1alpha1
kind: ExternalSecret
metadata:
  name: db-password
spec:
  refreshInterval: 1h
  secretStoreRef:
    name: secretstore-sre
    kind: SecretStore
  target:
    name: secret-sre
    creationPolicy: Owner
  data:
  - secretKey: dbPassword
    remoteRef:
      key: devops-rds-credentials
property: db.password
The example we have is separated by teams, which is a nice logical separation of your secrets so you can group the secrets of the team. This, of course, is not ideal for every team because you may want to keep some secrets safe only for specific people.
The idea behind the external secrets is similar to what we discussed with Argo about reconciliation and keeping the state always synced but, in this case, the External Secrets controller will update the secrets every time they change in a particular secret manager in order to keep the same state.
Next, we will discuss how we can use External Secrets Operator along with Argo CD, and the benefits of using it.
Argo CD and External Secrets Operator
Argo CD relies on Git state, and we cannot save plain passwords or sometimes even encrypted passwords in our repositories. External Secrets Operator comes in to solve this problem and it has several advantages, such as the following:
- Minimizes security risks
- Fully automated
- Use the same tool across every environment
All these are nice but how can I solve the problem of creating the secrets that I need first and then the application that will use them? Of course, again, here sync-waves and sync phases come in as we discussed earlier in this chapter to give the solution and orchestrate the order of the deployments so we can do this.
In order to bootstrap a cluster and have the operator before every other deployment because we may need it to get a secret, we need to use sync-waves so it can be installed first.
Let’s assume that we want to deploy, for example, Grafana, an nginx to access it, and finally, we need to get a password for the admin; we will follow this in Figure 6.11:
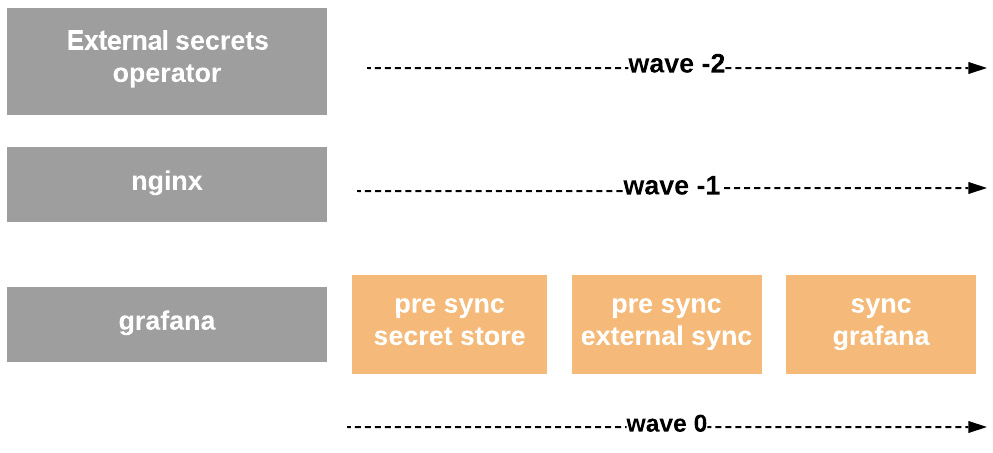
Figure 6.11 – Argo CD, External Secrets with sync-waves and phases
We then leverage the order of the waves and the PostSync phase to first create SecretStore and ExternalSecret in the order the Kubernetes Secret will be created to be ready for use by Grafana.
Time to see another example of a microservice CI/CD pipeline with multiple K8s and how Argo CD comes in to solve this problem.
Microservices CI/CD
In this section, we will look at how the new Argo ApplicationSet controller (which we described in Chapter 5, Argo CD Bootstrap K8s Cluster) evolves the pattern to be more flexible and support more use cases such as monorepos with microservices, which we will discuss in the next section.
Monorepo microservices
Many companies out there host everything under one monorepo instead of creating multiple repositories for each microservice and sometimes infrastructure scripts in addition to microservices. Argo CD with sync-waves and ApplicationSet makes the orchestration and the deployment of multiple services easy.
First, let’s install the ApplicationSet controller in the cluster by bootstrapping it. In the Deployment strategies section earlier in this chapter, we created multiple Argo applications for the following:
- Master Utilities, which is an App of Apps pattern
- Argo Rollouts, which is an Argo application
- Blue-green application
Imagine that we can have a couple more here that will grow significantly. Let’s change this with the ApplicationSet CRD. First, we will simplify the kustomize manifest to this:
apiVersion: kustomize.config.k8s.io/v1beta1
kind: Kustomization
namespace: argocd
bases:
  - https://raw.githubusercontent.com/argoproj/argo-cd/v2.1.7/manifests/install.yaml
resources:
  - namespace.yaml
  - argo-applicationset.yaml
  - bootstrap-applicationset.yaml
The difference is that we removed all the other resources and added two new ones: argo-applicationset.yaml and bootstrap-applicationset.yaml. The first part is related to installing the Argo ApplicationSet controller in the cluster. The second part is the transformation from many apps to ApplicationSet and using the generators to exclude some directories and include a specific cluster. See the following ApplicationSet manifest:
apiVersion: argoproj.io/v1alpha1
kind: ApplicationSet
metadata:
  name: bootstrap
spec:
  generators:
   - matrix:
        generators:
          - git:
              repoURL: https://github.com/PacktPublishing/ArgoCD-in-Practice.git
              revision: HEAD
              directories:
                - path: ch05/applications/*
                - path: ch05/applications/istio-control-plane
                  exclude: true
                - path: ch05/applications/argocd-ui
                  exclude: true
          - list:
              elements:
              - cluster: engineering-dev
                url: https://kubernetes.default.svc
  template:
    metadata:
      name: '{{path.basename}}'
    spec:
      project: default
      source:
        repoURL: https://github.com/PacktPublishing/ArgoCD-in-Practice.git
        targetRevision: HEAD
        path: '{{path}}'
      destination:
        server: '{{url}}'
        namespace: '{{path.basename}}'
We combined two different generators with a matrix generator, and we are leveraging the ability to create applications while iterating the directories under ch05/applications/*. This is awesome as now we don’t need to create an Argo application for each one, just the ApplicationSet controller, which is responsible for doing it automatically for us.
Let’s assume that we have a microservices monorepo where we have multiple microservices and, in parallel, multiple clusters to deploy them with the following structure, and there are a few dependencies to each other microservices (like they need to start in a specific order):
|- service1
     |
      -- helm
         |-- values-dev.yaml
         |-- values-staging.yaml
      -- application
|- service2
     |
      -- helm
         |-- values-dev.yaml
         |-- values-staging.yam
      -- application
|- service3
     |
      -- helm
         |-- values-dev.yaml
         |-- values-staging.yam
      -- application
The ApplicationSet controller CRD should be defined as in the following:
apiVersion: argoproj.io/v1alpha1
kind: ApplicationSet
metadata:
  name: bootstrap
spec:
  generators:
   - matrix:
        generators:
          - git:
              repoURL: https://github.com/PacktPublishing/ArgoCD-in-Practice.git
              revision: HEAD
              directories:
                - path: '*'
          - list:
              elements:
              - cluster: dev
                url: https://kubernetes.default.svc
              - cluster: staging
                url: https://9.8.7.6
  template:
    metadata:
      name: '{{path.basename}}'
    spec:
      project: default
      source:
        repoURL: https://github.com/PacktPublishing/ArgoCD-in-Practice.git
        targetRevision: HEAD
        path: '{{path}}/helm'
        helm:
          valueFiles:
            - values-{{cluster}}.yaml
      destination:
        server: '{{url}}'
        namespace: '{{path.basename}}'
The last thing is to solve the dependencies between each other microservice where, again, we are relying on sync-waves of Argo CD so we can respect the microservices’ interdependencies, as Figure 6.12 represents:
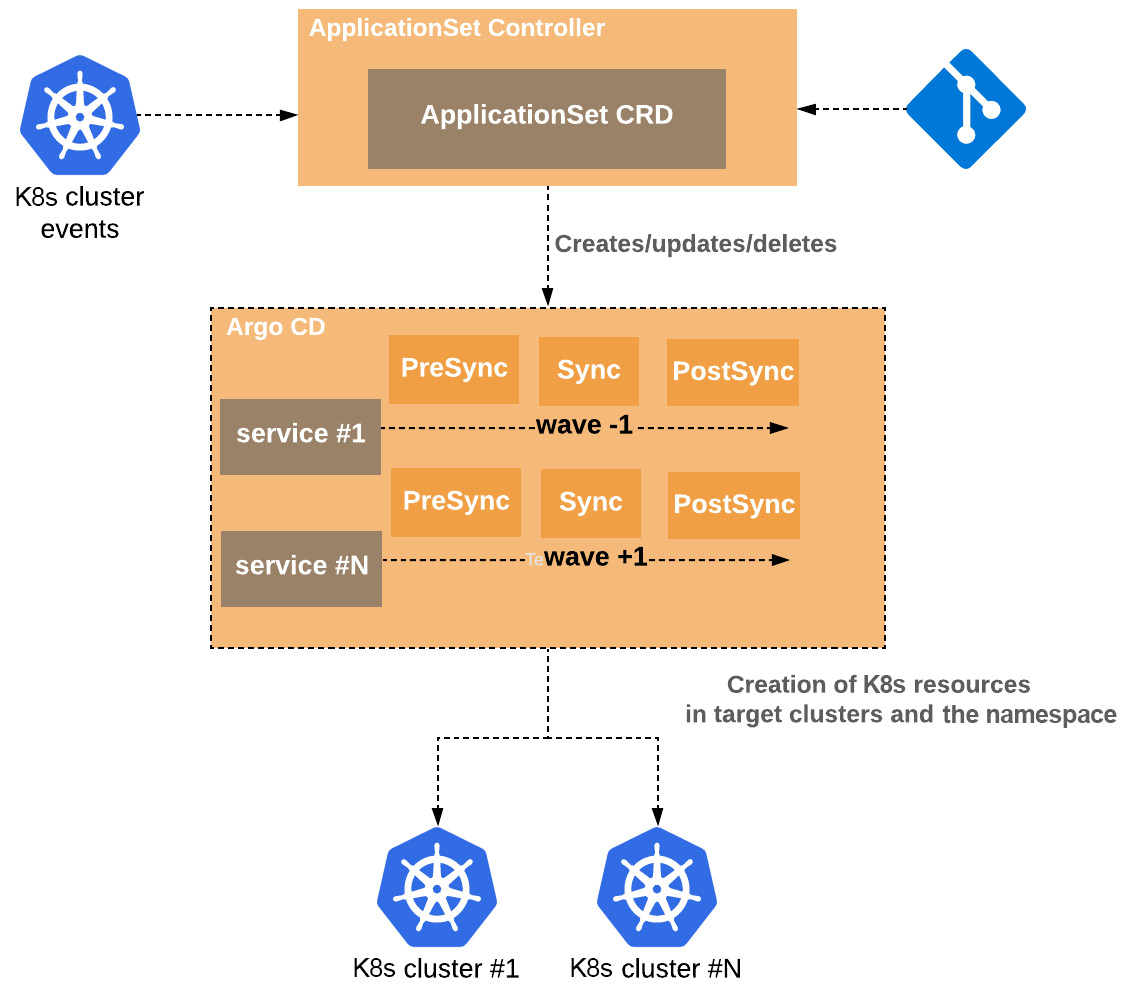
Figure 6.12 – Microservices CI/CD with ApplicationSet in a monorepo
We see again that we utilize sync-waves to order the deployment of the services and for each of them, we use the Sync phases to end up in a healthy state and continue to the deployment of the next service.
We just checked how we can use ApplicationSet and the great power it gives us to avoid too many apps and the easy way to deploy with the DRY approach in multiple clusters. Now it’s time to summarize what we have learned and wrap up the most practical chapter so far with CI/CD.
Summary
In this chapter, we learned about the deployment strategies we can follow with Argo CD combined with Argo Rollouts and how we can minimize deployment failures with automation. We created a real CI/CD pipeline in GitHub Actions, and we implemented a full blue-green deployment in Argo CD with GitOps practices. We did a logical group separation in Argo CD with Argo Projects, and we gave limited to access with the Project tokens in a CI/CD system.
We leveraged Sync phases and resource hooks in order to run integration tests and fail the pipeline if those tests failed and most importantly, keep the resource to debug the reasons for the failure in the PreSync phase. The hook policy of Argo CD gave us the power to delete the redundant completed-with-success integration tests so we could keep our cluster clean. In the PostSync phase, when all phases ran successfully, we were able to roll out the latest version of our application without any failures. Also, we used ApplicationSet to use one single K8s manifest and deploy with the DRY approach to multiple clusters and multiple applications and support easier monorepos for microservices.
We hoped to achieve having a CI/CD pipeline close to production and to inspire you to approach your challenges safely.
Further reading
- Argo Rollouts: https://argoproj.github.io/argo-rollouts/
- Minimize failed deployments with Argo Rollouts and smoke tests: https://codefresh.io/continuous-deployment/minimize-failed-deployments-argo-rollouts-smoke-tests/
- Canary CI/CD: https://github.com/codefresh-contrib/argo-rollout-canary-sample-app
- Traffic management: https://argoproj.github.io/argo-rollouts/features/traffic-management/
- ApplicationSet: https://argocd-applicationset.readthedocs.io/en/stable/