
Chapter 9: Advanced Continuous Delivery
In the previous chapters, we started with nothing and ended with a complete continuous delivery pipeline. Now, it's time to present a mixture of different aspects that are also very important in the continuous delivery process, but which haven't been described yet.
This chapter covers the following points:
- Managing database changes
- Pipeline patterns
- Release patterns
- Working with legacy systems
Technical requirements
To follow along with the instructions in this chapter, you'll need the following:
- Java 8+
- A Jenkins instance
All the examples and solutions to the exercises can be found on GitHub at https://github.com/PacktPublishing/Continuous-Delivery-With-Docker-and-Jenkins-3rd-Edition/tree/main/Chapter09.
Code in Action videos for this chapter can be viewed at https://bit.ly/3NVVOyi.
Managing database changes
So far, we have focused on a continuous delivery process that was applied to a web service. A simple factor in this was that web services are inherently stateless. This fact means that they can easily be updated, restarted, cloned in many instances, and recreated from the given source code. A web service, however, is usually linked to its stateful part: a database that poses new challenges to the delivery process. These challenges can be grouped into the following categories:
- Compatibility: The database schema, and the data itself, must be compatible with the web service all the time.
- Zero-downtime deployment: In order to achieve zero-downtime deployment, we use rolling updates, which means that a database must be compatible with two different web service versions at the same time.
- Rollback: A rollback of a database can be difficult, limited, or sometimes even impossible because not all operations are reversible (for example, removing a column that contains data).
- Test data: Database-related changes are difficult to test because we need test data that is very similar to production data.
In this section, I will explain how to address these challenges so that the continuous delivery process will be as safe as possible.
Understanding schema updates
If you think about the delivery process, it's not really the data itself that causes difficulties, because we don't usually change the data when we deploy an application. The data is something that is collected while the system is live in production, whereas, during deployment, we only change the way we store and interpret this data. In other words, in the context of the continuous delivery process, we are interested in the structure of the database, not exactly in its content. This is why this section concerns mainly relational databases (and their schemas) and focuses less on other types of storage, such as NoSQL databases, where there is no structure definition.
To better understand this, think of Hazelcast, which we have already used in this book. It stored the cached data so, effectively, it was a database. Nevertheless, it required zero effort from the continuous delivery perspective since it didn't have any data structure. All it stored were the key-value entries, which do not evolve over time.
Information
NoSQL databases usually don't have any restricting schema, and therefore, they simplify the continuous delivery process because there is no additional schema update step required. This is a huge benefit; however, it doesn't necessarily mean that writing applications with NoSQL databases is simpler because we have to put more effort into data validation in the source code.
Relational databases have static schemas. If we would like to change it (for example, to add a new column to the table), we need to write and execute a SQL data definition language (DDL) script. Doing this manually for every change requires a lot of work and leads to error-prone solutions in which the operations team has to keep the code and the database structure in sync. A much better solution is to automatically update the schema in an incremental manner. Such a solution is called database migration.
Introducing database migration
Database schema migration is a process of incremental changes to the relational database structure. Let's take a look at the following diagram to understand it better:
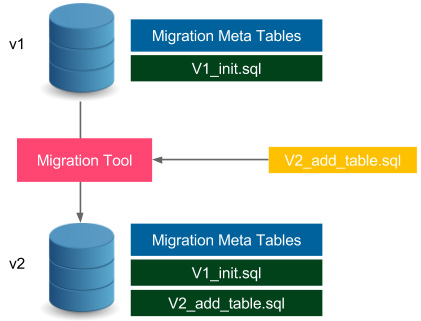
Figure 9.1 – Database schema migration
The database in version v1 has the schema defined by the V1_init.sql file. Additionally, it stores the metadata related to the migration process, for example, its current schema version and the migration changelog. When we want to update the schema, we provide the changes in the form of a SQL file, such as V2_add_table.sql. Then, we need to run the migration tool that executes the given SQL file on the database (it also updates the metatables). In effect, the database schema is a result of all subsequently executed SQL migration scripts. Next, we will see an example of migration.
Information
Migration scripts should be stored in the version control system, usually in the same repository as the source code.
Migration tools and the strategies they use can be divided into two categories:
- Upgrade and downgrade: This approach (as used by the Ruby on Rails framework, for example) means that we can migrate up (from v1 to v2) and down (from v2 to v1). It allows the database schema to roll back, which may sometimes end in data loss (if the migration is logically irreversible).
- Upgrade only: This approach (as used by the Flyway tool, for example) only allows us to migrate up (from v1 to v2). In many cases, the database updates are not reversible, for example, when removing a table from the database. Such a change cannot be rolled back, because even if we recreate the table, we have already lost all the data.
There are many database migration tools available on the market, the most popular of which are Flyway, Liquibase, and Rail Migrations (from the Ruby on Rails framework). As a next step to understanding how such tools work, we will look at an example based on the Flyway tool.
Information
There are also commercial solutions provided for the particular databases, for example, Redgate (for SQL Server) and Optim Database Administrator (for DB2).
Using Flyway
Let's use Flyway to create a database schema for the calculator web service. The database will store the history of all operations that were executed on the service: the first parameter, the second parameter, and the result.
We show how to use the SQL database and Flyway in three steps:
- Configuring the Flyway tool to work with Gradle
- Defining the SQL migration script to create the calculation history table
- Using the SQL database inside the Spring Boot application code
Let's get started.
Configuring Flyway
In order to use Flyway with Gradle, we need to add the following content to the build.gradle file:
buildscript {
dependencies {
classpath('com.h2database:h2:1.4.200')
}
}
...
plugins {
id "org.flywaydb.flyway" version "8.5.0"
}
...
flyway {
url = 'jdbc:h2:file:/tmp/calculator'
user = 'sa'
}
Here are some quick comments on the configuration:
- We used the H2 database, which is an in-memory (and file-based) database.
- We store the database in the /tmp/calculator file.
- The default database user is called sa (system administrator).
Tip
In the case of other SQL databases (for example, MySQL), the configuration would be very similar. The only difference is in the Gradle dependencies and the JDBC connection.
After this configuration is applied, we should be able to run the Flyway tool by executing the following command:
$ ./gradlew flywayMigrate -i
The command created the database in the /tmp/calculator.mv.db file. Obviously, it has no schema, since we haven't defined anything yet.
Information
Flyway can be used as a command-line tool, via the Java API, or as a plugin for the popular building tools Gradle, Maven, and Ant.
Defining the SQL migration script
The next step is to define the SQL file that adds the calculation table to the database schema. Let's create the src/main/resources/db/migration/V1__Create_calculation_table.sql file, with the following content:
create table CALCULATION (
ID int not null auto_increment,
A varchar(100),
B varchar(100),
RESULT varchar(100),
primary key (ID)
);
Note the migration file naming convention, <version>__<change_description>.sql. The SQL file creates a table with four columns, ID, A, B, and RESULT. The ID column is an automatically incremented primary key of the table. Now, we are ready to run the flyway command to apply the migration:
$ ./gradlew flywayMigrate -i
...
Migrating schema "PUBLIC" to version "1 - Create calculation table"
Successfully applied 1 migration to schema "PUBLIC", now at version v1 (execution time 00:00.018s)
The command automatically detected the migration file and executed it on the database.
Information
The migration files should be always kept in the version control system, usually with the source code.
Accessing the database
We have executed our first migration, so the database is prepared. To see the complete example, we should also adapt our project so that it can access the database.
Let's first configure the Gradle dependencies to use h2database from the Spring Boot project:
- We can do this by adding the following lines to the build.gradle file:
dependencies {
implementation 'org.springframework.boot:spring-boot-starter-data-jpa'
implementation 'com.h2database:h2:1.4.200'
}
- The next step is to set up the database location and the startup behavior in the src/main/resources/application.properties file:
spring.datasource.url=jdbc:h2:file:/tmp/calculator;DB_CLOSE_ON_EXIT=FALSE
spring.jpa.hibernate.ddl-auto=validate
spring.datasource.username=sa
The second line means that Spring Boot will not try to automatically generate the database schema from the source code model. On the contrary, it will only validate if the database schema is consistent with the Java model.
- Now, let's create the Java ORM entity model for the calculation in the new src/main/java/com/leszko/calculator/Calculation.java file:
package com.leszko.calculator;
import javax.persistence.Entity;
import javax.persistence.GeneratedValue;
import javax.persistence.GenerationType;
import javax.persistence.Id;
@Entity
public class Calculation {
@Id
@GeneratedValue(strategy= GenerationType.IDENTITY)
private Integer id;
private String a;
private String b;
private String result;
protected Calculation() {}
public Calculation(String a, String b, String result) {
this.a = a;
this.b = b;
this.result = result;
}
}
The Entity class represents the database mapping in the Java code. A table is expressed as a class, with each column as a field. The next step is to create the repository for loading and storing the Calculation entities.
- Let's create the src/main/java/com/leszko/calculator/CalculationRepository.java file:
package com.leszko.calculator;
import org.springframework.data.repository.CrudRepository;
public interface CalculationRepository extends CrudRepository<Calculation, Integer> {}
- Finally, we can use the Calculation and CalculationRepository classes to store the calculation history. Let's add the following code to the src/main/java/com/leszko/calculator/CalculatorController.java file:
...
class CalculatorController {
...
@Autowired
private CalculationRepository calculationRepository;
@RequestMapping("/sum")
String sum(@RequestParam("a") Integer a, @RequestParam("b") Integer b) {
String result = String.valueOf(calculator.sum(a, b));
calculationRepository.save(new Calculation(a.toString(), b.toString(), result));
return result;
}
}
- Now, we can finally start the service, for example, using the following command:
$ ./gradlew bootRun
When we have started the service, we can send a request to the /sum endpoint. As a result, each summing operation is logged into the database.
Tip
If you would like to browse the database content, you can add spring.h2.console.enabled=true to the application.properties file, and then browse the database via the /h2-console endpoint.
We explained how the database schema migration works and how to use it inside a Spring Boot project built with Gradle. Now, let's take a look at how it integrates within the continuous delivery process.
Changing the database in continuous delivery
The first approach to use database updates inside the continuous delivery pipeline is to add a stage within the migration command execution. This simple solution works correctly for many cases; however, it has two significant drawbacks:
- Rollback: As mentioned before, it's not always possible to roll back the database change (Flyway doesn't support downgrades at all). Therefore, in the case of service rollback, the database becomes incompatible.
- Downtime: The service update and the database update are not executed at exactly the same time, which causes downtime.
This leads us to two constraints that we will need to address:
- The database version needs to be compatible with the service version all the time.
- The database schema migration is not reversible.
We will address these constraints for two different cases: backward-compatible updates and non-backward-compatible updates.
Backward-compatible changes
Backward-compatible changes are simpler. Let's look at the following figure to see how they work:
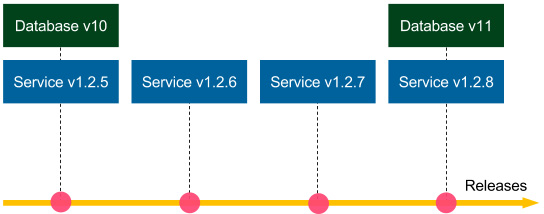
Figure 9.2 – Backward-compatible database migration
Suppose that the Database v10 schema migration is backward-compatible. If we need to roll back the Service v1.2.8 release, then we deploy Service v1.2.7, and there is no need to do anything with the database (database migrations are not reversible, so we keep Database v11). Since the schema update is backward-compatible, Service v.1.2.7 works perfectly fine with Database v11. The same applies if we need to roll back to Service v1.2.6, and so on. Now, suppose that Database v10 and all other migrations are backward-compatible; then we could roll back to any service version, and everything would work correctly.
There is also no problem with downtime. If the database migration has zero-downtime itself, then we can execute it first, and then use the rolling updates for the service.
Let's look at an example of a backward-compatible change. We will create a schema update that adds a created_at column to the calculation table. The src/main/resources/db/migration/V2__Add_created_at_column.sql migration file looks as follows:
alter table CALCULATION
add CREATED_AT timestamp;
Aside from the migration script, the calculator service requires a new field in the Calculation class:
...
private Timestamp createdAt;
...
We also need to adjust its constructor, and then its usage in the CalculatorController class:
calculationRepository.save(new Calculation(a.toString(), b.toString(), result, Timestamp.from(Instant.now())));
After running the service, the calculation history is stored with the created_at column. Note that the change is backward-compatible because, even if we reverted the Java code and left the created_at column in the database, everything would work perfectly fine (the reverted code does not address the new column at all).
Non-backward-compatible changes
Non-backward-compatible changes are way more difficult. Looking at the previous diagram, if the v11 database change was backward-incompatible, it would be impossible to roll back the service to 1.2.7. In this case, how can we approach non-backward-compatible database migrations so that rollbacks and zero-downtime deployments would be possible?
To cut a long story short, we can address this issue by converting a non-backward-compatible change into a change that is backward-compatible for a certain period of time. In other words, we need to put in the extra effort and split the schema migration into two parts:
- Backward-compatible update executed now, which usually means keeping some redundant data
- Non-backward-compatible update executed after the rollback period time that defines how far back we can revert our code
To better illustrate this, let's look at the following diagram:
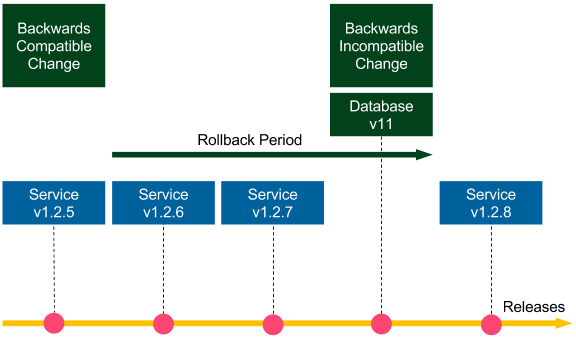
Figure 9.3 – Non-backward-compatible database migration
Let's consider an example of dropping a column. A proposed method would include two steps:
- Stop using the column in the source code (v1.2.5, backward-compatible update, executed first).
- Drop the column from the database (v11, non-backward-compatible update, executed after the rollback period).
All service versions until Database v11 can be rolled back to any previous version; the services starting from Service v1.2.8 can only be rolled back within the rollback period. Such an approach may sound trivial because all we did was delay the column removal from the database. However, it addresses both the rollback issue and the zero-downtime deployment issue. As a result, it reduces the risk associated with the release. If we adjust the rollback period to a reasonable amount of time (for example, in the case of multiple releases per day to 2 weeks), then the risk is negligible. We don't usually roll many versions back.
Dropping a column was a very simple example. Let's take a look at a more difficult scenario and rename the result column in our calculator service. We show how to do this in a few steps:
- Adding a new column to the database
- Changing the code to use both columns
- Merging the data in both columns
- Removing the old column from the code
- Dropping the old column from the database
Let's look at these steps in detail.
Adding a new column to the database
Let's suppose that we need to rename the result column to sum. The first step is to add a new column that will be a duplicate. We must create a src/main/resources/db/migration/V3__Add_sum_column.sql migration file:
alter table CALCULATION
add SUM varchar(100);
As a result, after executing the migration, we will have two columns: result and sum.
Changing the code to use both columns
The next step is to rename the column in the source code model and to use both database columns for the set and get operations. We can change it in the Calculation class:
public class Calculation {
...
private String sum;
...
public Calculation(String a, String b, String sum, Timestamp createdAt) {
this.a = a;
this.b = b;
this.sum = sum;
this.result = sum;
this.createdAt = createdAt;
}
public String getSum() {
return sum != null ? sum : result;
}
}
Tip
To be 100% accurate, in the getSum() method, we should compare something like the last modification column date. (It's not exactly necessary to always take the new column first.)
From now on, every time we add a row into the database, the same value is written to both the result and sum columns. While reading sum, we first check whether it exists in the new column, and if not, we read it from the old column.
Tip
The same result can be achieved with the use of database triggers that would automatically write the same values into both columns.
All the changes that we have made so far are backward-compatible, so we can roll back the service anytime we want, to any version we want.
Merging the data in both columns
This step is usually done after some time when the release is stable. We need to copy the data from the old result column into the new sum column. Let's create a migration file called V4__Copy_result_into_sum_column.sql:
update CALCULATION
set CALCULATION.sum = CALCULATION.result
where CALCULATION.sum is null;
We still have no limits for the rollback; however, if we need to deploy the version before the change in step 2, then this database migration needs to be repeated.
Removing the old column from the code
At this point, we already have all data in the new column, so we can start to use it without the old column in the data model. In order to do this, we need to remove all code related to result in the Calculation class so that it would look as follows:
public class Calculation {
...
private String sum;
...
public Calculation(String a, String b, String sum, Timestamp createdAt) {
this.a = a;
this.b = b;
this.sum = sum;
this.createdAt = createdAt;
}
public String getSum() {
return sum;
}
}
After this operation, we will no longer use the result column in the code. Note that this operation is only backward-compatible up to step 2. If we need to roll back to step 1, then we could lose the data stored after this step.
Dropping the old column from the database
The last step is to drop the old column from the database. This migration should be performed after the rollback period when we are sure we won't need to roll back before step 4.
Information
The rollback period can be very long since we aren't using the column from the database anymore. This task can be treated as a cleanup task, so even though it's non-backward-compatible, there is no associated risk.
Let's add the final migration, V5__Drop_result_column.sql:
alter table CALCULATION
drop column RESULT;
After this step, we will have finally completed the column renaming procedure. Note that the steps we took complicated the operation a little bit in order to stretch it in time. This reduced the risk of backward-incompatible database changes and allowed for zero-downtime deployments.
Separating database updates from code changes
So far, in all images, we showed that database migrations are run with service releases. In other words, each commit (which implies each release) took both database changes and code changes. However, the recommended approach is to make a clear separation that a commit to the repository is either a database update or a code change. This method is presented in the following diagram:
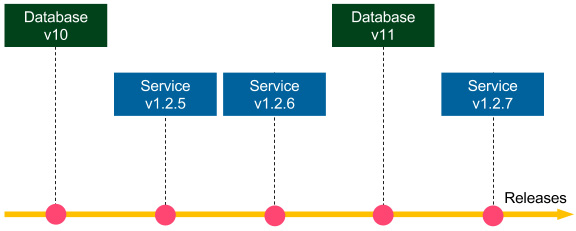
Figure 9.4 – Separating database updates and code changes
The benefit of database-service change separation is that we get the backward-compatibility check for free. Imagine that the v11 and v1.2.7 changes concern one logical change, for example, adding a new column to the database. Then, we first commit Database v11, so the tests in the continuous delivery pipeline check whether Database v11 works correctly with Service v.1.2.6. In other words, they check whether the Database v11 update is backward-compatible. Then, we commit the v1.2.7 change, so the pipeline checks whether Database v11 works with Service v1.2.7.
Information
The database-code separation does not mean that we must have two separate Jenkins pipelines. The pipeline can always execute both, but we should keep it as a good practice that a commit is either a database update or a code change.
To sum up, the database schema changes should never be done manually. Instead, we should always automate them using a migration tool executed as a part of the continuous delivery pipeline. We should also avoid non-backward-compatible database updates, and the best way to ensure this is to commit the database and code changes into the repository separately.
Avoiding a shared database
In many systems, we can spot that the database becomes the central point that is shared between multiple services. In such a case, any update to the database becomes much more challenging, because we need to coordinate it between all services.
For example, imagine we are developing an online shop, and we have a Customers table that contains the following columns: first name, last name, username, password, email, and discount. There are three services that are interested in the customer's data:
- Profile manager: This enables editing user's data.
- Checkout processor: This processes the checkout (reads username and email).
- Discount manager: This analyzes the customer's orders and applies a suitable discount.
Let's look at the following diagram that shows this situation:
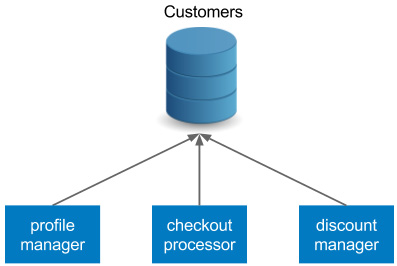
Figure 9.5 – Shared database anti-pattern
The three services are dependent on the same database schema. There are at least two issues with such an approach:
- When we want to update the schema, it must be compatible with all three services. While all backward-compatible changes are fine, any non-backward-compatible update becomes far more difficult, or even impossible.
- Each service has a separate delivery cycle and a separate continuous delivery pipeline. So, which pipeline should we use for the database schema migrations? Unfortunately, there is no good answer to this question.
For the reasons mentioned previously, each service should have its own database and the services should communicate via their APIs. Using our example, we could apply the following refactoring:
- The checkout processor should communicate with the profile manager's API to fetch the customer's data.
- The discount column should be extracted to a separate database (or schema), and the discount manager should take ownership.
The refactored version is presented in the following diagram:
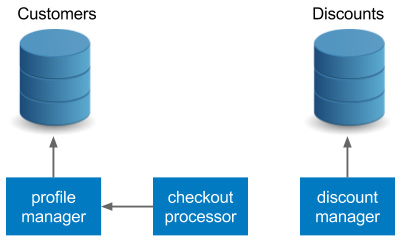
Figure 9.6 – Database per service pattern
Such an approach is consistent with the principles of the microservice architecture and should always be applied. Communication over APIs is far more flexible than direct database access.
Information
In the case of monolithic systems, a database is usually the integration point. Since such an approach causes a lot of issues, it's considered an anti-pattern.
Preparing test data
We have already presented database migrations that keep the database schema consistent between the environments as a side effect. This is because if we run the same migration scripts on the development machine, in the staging environment, or in the production, then we would always get the result in the same schema. However, the data values inside the tables differ. How can we prepare the test data so that it would effectively test our system? This will be the focus of the next section.
The answer to this question depends on the type of test, and it is different for unit testing, integration/acceptance testing, and performance testing. Let's examine each case.
Unit testing
In the case of unit testing, we don't use the real database. We either mock the test data on the level of the persistence mechanism (repositories and data access objects) or we fake the real database with an in-memory database (for example, an H2 database). Since unit tests are created by developers, the exact data values are also usually invented by developers and aren't as important.
Integration/acceptance testing
Integration and acceptance tests usually use the test/staging database, which should be as similar to the production as possible. One approach, adopted by many companies, is to snapshot the production data into staging that guarantees that it is exactly the same. This approach, however, is treated as an anti-pattern, for the following reasons:
- Test isolation: Each test operates on the same database, so the result of one test may influence the input of the others.
- Data security: Production instances usually store sensitive information and are, therefore, better secured.
- Reproducibility: After every snapshot, the test data is different, which may result in flaky tests.
For these reasons, the preferred approach is to manually prepare the test data by selecting a subset of the production data with the customer or the business analyst. When the production database grows, it's worth revisiting its content to see if there are any reasonable cases that should be added.
The best way to add data to the staging database is to use the public API of a service. This approach is consistent with acceptance tests, which are usually black-box. Furthermore, using the API guarantees that the data itself is consistent and simplifies database refactoring by limiting direct database operations.
Performance testing
The test data for the performance testing is usually similar to acceptance testing. One significant difference is the amount of data. In order to test the performance correctly, we need to provide a sufficient volume of input data, as large as is available on the production (during the peak time). For this purpose, we can create data generators, which are usually shared between acceptance and performance tests.
We have covered a lot about databases in the continuous delivery process. Now, let's move to something completely different. Let's move to the topic of improving our Jenkins pipeline using well-known pipeline patterns.
Pipeline patterns
We already know everything necessary to start a project and set up the continuous delivery pipeline with Jenkins, Docker, Kubernetes, Ansible, and Terraform. This section is intended to extend this knowledge with a few of the recommended Jenkins pipeline practices.
Parallelizing pipelines
In this book, we have always executed the pipeline sequentially, stage by stage, step by step. This approach makes it easy to reason the state and the result of the build. If there is first the acceptance test stage and then the release stage, it means that the release won't ever happen until the acceptance tests are successful. Sequential pipelines are simple to understand and usually do not cause any surprises. That's why the first method to solve any problem is to do it sequentially.
However, in some cases, the stages are time-consuming and it's worth running them in parallel. A very good example is performance tests. They usually take a lot of time, so, assuming that they are independent and isolated, it makes sense to run them in parallel. In Jenkins, we can parallelize the pipeline on two different levels:
- Parallel steps: Within one stage, parallel processes run on the same agent. This method is simple because all Jenkins workspace-related files are located on one physical machine. However, as always with vertical scaling, the resources are limited to that single machine.
- Parallel stages: Each stage can be run in parallel on a separate agent machine that provides horizontal scaling of resources. We need to take care of the file transfer between the environments (using the stash Jenkinsfile keyword) if a file created in the previous stage is needed on the other physical machine.
Let's see how this looks in practice. If we want to run two steps in parallel, the Jenkinsfile script should look as follows:
pipeline {
agent any
stages {
stage('Stage 1') {
steps {
parallel (
one: { echo "parallel step 1" },
two: { echo "parallel step 2" }
)
}
}
stage('Stage 2') {
steps {
echo "run after both parallel steps are completed"
}
}
}
}
In Stage 1, with the use of the parallel keyword, we execute two parallel steps, one and two. Note that Stage 2 is only executed after both parallel steps are completed. That's why such solutions are perfectly safe to run tests in parallel; we can always be sure that the deployment stage only runs after all parallelized tests have already passed.
The preceding code sample concerned the parallel steps level. The other solution would be to use parallel stages, and therefore, run each stage on a separate agent machine. The decision on which type of parallelism to use usually depends on two factors:
- How powerful the agent machines are
- How much time the given stage takes
As a general recommendation, unit tests are fine to run in parallel steps, but performance tests are usually better off on separate machines.
Reusing pipeline components
When the Jenkinsfile script grows in size and becomes more complex, we may want to reuse its parts between similar pipelines.
For example, we may want to have separate (but similar) pipelines for different environments (development, QA, and production). Another common example in the microservice world is that each service has a very similar Jenkinsfile. Then, how do we write Jenkinsfile scripts so that we don't repeat the same code all over again? There are two good patterns for this purpose: parameterized builds, and shared libraries. Let's go over them individually.
Build parameters
We already mentioned in Chapter 4, Continuous Integration Pipeline, that a pipeline can have input parameters. We can use them to provide different use cases with the same pipeline code. As an example, let's create a pipeline parameterized with the environment type:
pipeline {
agent any
parameters {
string(name: 'Environment', defaultValue: 'dev', description: 'Which environment (dev, qa, prod)?')
}
stages {
stage('Environment check') {
steps {
echo "Current environment: ${params.Environment}"
}
}
}
}
The build takes one input parameter, Environment. Then, all we do in this step is print the parameter. We can also add a condition to execute different code for different environments.
With this configuration, when we start the build we will see a prompt for the input parameter, as follows:

Figure 9.7 – Jenkins parametrized build
A parameterized build can help us reuse the pipeline code for scenarios that differ just a little bit. However, this feature should not be overused, because too many conditions can make a Jenkinsfile difficult to understand.
Shared libraries
The other solution to reuse the pipeline is to extract its parts into a shared library.
A shared library is a Groovy code that is stored as a separate, source-controlled project. This code can later be used in many Jenkinsfile scripts as pipeline steps. To make it clear, let's take a look at an example. A shared library technique always requires three steps:
- Create a shared library project.
- Configure the shared library in Jenkins.
- Use the shared library in a Jenkinsfile.
Creating a shared library project
We start by creating a new Git project, in which we put the shared library code. Each Jenkins step is expressed as a Groovy file located in the vars directory.
Let's create a sayHello step that takes the name parameter and echoes a simple message. This should be stored in the vars/sayHello.groovy file:
/**
* Hello world step.
*/
def call(String name) {
echo "Hello $name!"
}
Information
Human-readable descriptions for shared library steps can be stored in the *.txt files. In our example, we could add the vars/sayHello.txt file with the step documentation.
When the library code is done, we need to push it to the repository, for example, as a new GitHub project.
Configure the shared library in Jenkins
The next step is to register the shared library in Jenkins. We open Manage Jenkins | Configure System and find the Global Pipeline Libraries section. There, we can add the library giving it a chosen name, as follows:
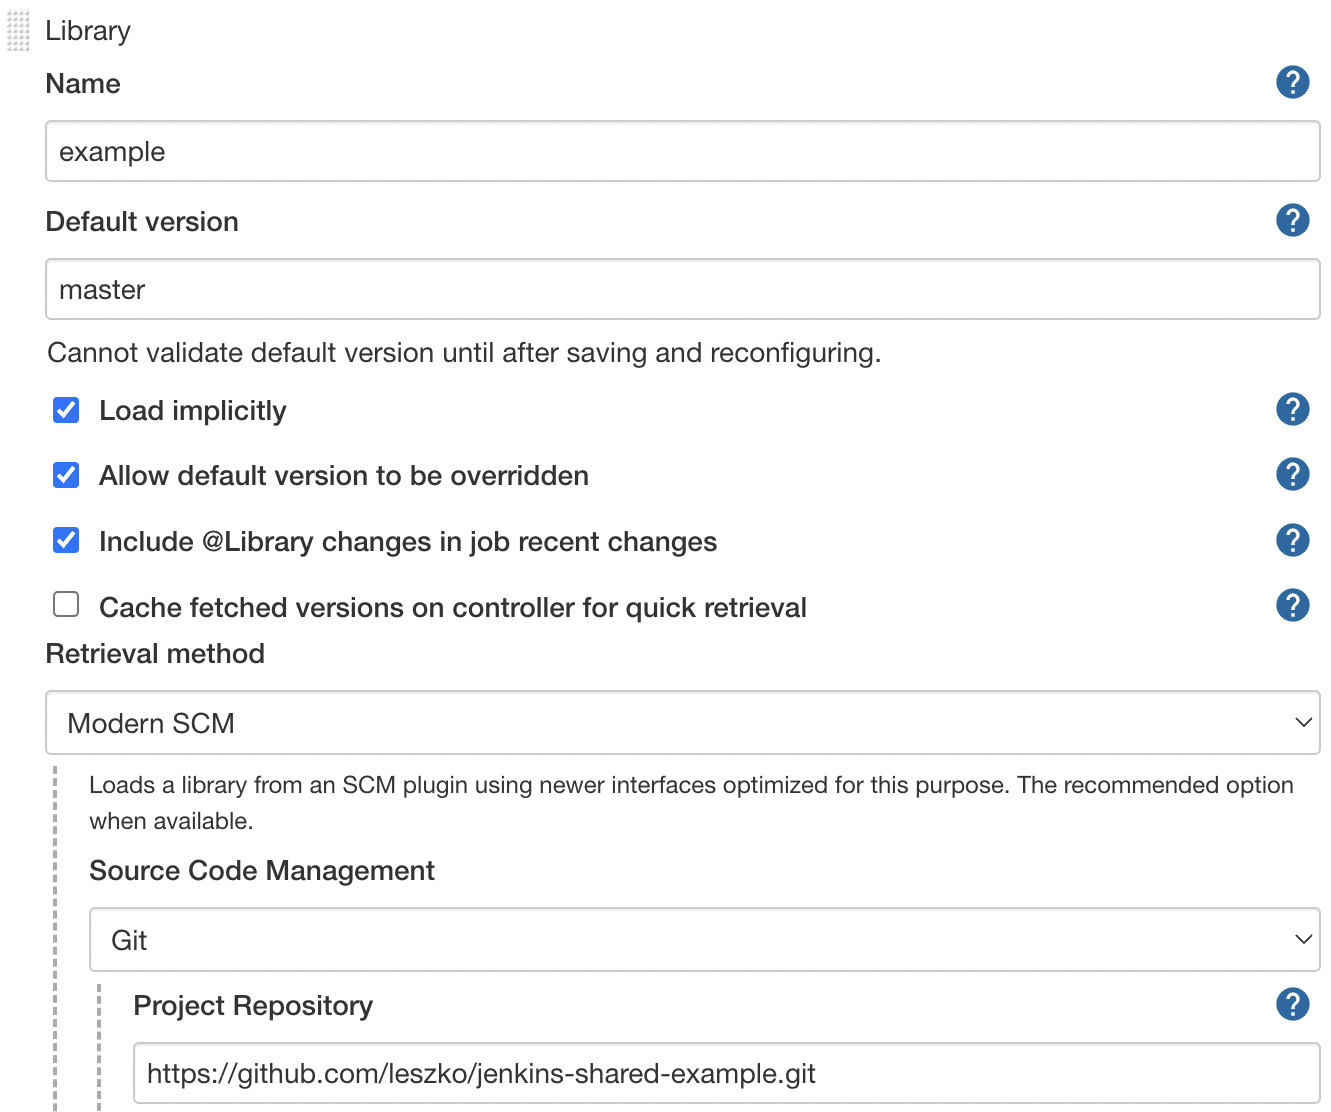
Figure 9.8 – Jenkins global pipeline library configuration
We specified the name under which the library is registered and the library repository address. Note that the latest version of the library will automatically be downloaded during the pipeline build.
Information
We showed importing the Groovy code as a Global Shared Library, but there are also other solutions. Read more at https://www.jenkins.io/doc/book/pipeline/shared-libraries/.
Using the shared library in a Jenkinsfile
Finally, we can use the shared library in a Jenkinsfile:
pipeline {
agent any
stages {
stage("Hello stage") {
steps {
sayHello 'Rafal'
}
}
}
}
Tip
If Load implicitly hadn't been checked in the Jenkins configuration, then we would need to add @Library('example') _ at the beginning of the Jenkinsfile script.
As you can see, we can use the Groovy code as a sayHello pipeline step. Obviously, after the pipeline build completes, we should see Hello Rafal! in the console output.
Information
Shared libraries are not limited to one step. Actually, with the power of the Groovy language, they can even act as templates for entire Jenkins pipelines.
After describing how to share the Jenkins pipeline code, let's also write a few words on rolling back deployments during the continuous delivery process.
Rolling back deployments
I remember the words of my colleague, a senior architect—You don't need more QAs, you need a faster rollback. While this statement is oversimplified and the QA team is often of great value, there is a lot of truth in this sentence. Think about it; if you introduce a bug in the production but roll it back soon after the first user reports an error, then usually, nothing bad happens. On the other hand, if production errors are rare but no rollback is applied, then the process to debug the production usually ends in long, sleepless nights and some dissatisfied users. That's why we need to think about the rollback strategy upfront while creating the Jenkins pipeline.
In the context of continuous delivery, there are two moments when the failure can happen:
- During the release process, in the pipeline execution
- After the pipeline build is completed, in production
The first scenario is pretty simple and harmless. It concerns a case when the application is already deployed to production but the next stage fails, for example, the smoke test. Then, all we need to do is execute a script in the post pipeline section for the failure case, which downgrades the production service to the older Docker image version. If we use blue-green deployment (as we will describe later in this chapter), the risk of any downtime is minimal, since we usually execute the load-balancer switch as the last pipeline stage after the smoke test.
The second scenario, in which we notice a production bug after the pipeline is successfully completed, is more difficult and requires a few words of comment. Here, the rule is that we should always release the rolled-back service using exactly the same process as the standard release. Otherwise, if we try to do something manually in a faster way, we are asking for trouble. Any non-repetitive task is risky, especially under stress when production is out of order.
Information
As a side note, if the pipeline completes successfully but there is a production bug, then it means that our tests are not good enough. So, the first thing after the rollback is to extend the unit/acceptance test suites with the corresponding scenarios.
The most common continuous delivery process is a single, fully automated pipeline that starts by checking out the code and ends with release to the production.
The following diagram shows how this works:

Figure 9.9 – Continuous delivery pipeline
We already presented the classic continuous delivery pipeline in this book. If the rollback should use exactly the same process, then all we need to do is revert the latest code change from the repository. As a result, the pipeline automatically builds, tests, and finally, releases the right version.
Information
Repository reverts and emergency fixes should never skip the testing stages in the pipeline, otherwise, we may end up with a release that is still not working correctly due to another issue that makes debugging even harder.
The solution is very simple and elegant. The only drawback is the downtime that we need to spend on the complete pipeline build. This downtime can be avoided if we use blue-green deployment or canary releases, in which cases, we only change the load balancer setting to address the healthy environment.
The rollback operation becomes far more complex in the case of orchestrated releases, during which many services are deployed at the same time. This is one of the reasons why orchestrated releases are treated as an anti-pattern, especially in the microservice world. The correct approach is to always maintain backward compatibility, at least for a time (as we showed for the database at the beginning of this chapter). Then, it's possible to release each service independently.
Adding manual steps
In general, the continuous delivery pipelines should be fully automated, triggered by a commit to the repository, and end after the release. Sometimes, however, we can't avoid having manual steps. The most common example is the release approval, which means that the process is fully automated, but there is a manual step to approve the new release. Another common example is manual tests. Some of them may exist because we operate on a legacy system; some others may occur when a test simply cannot be automated. No matter what the reason is, sometimes, there is no choice but to add a manual step.
Jenkins syntax offers an input keyword for manual steps:
stage("Release approval") {
steps {
input "Do you approve the release?"
}
}
The pipeline will stop execution on the input step and wait until it's manually approved.
Remember that manual steps quickly become a bottleneck in the delivery process, and this is why they should always be treated as a solution that is inferior to complete automation.
Tip
It is sometimes useful to set a timeout for the input to avoid waiting forever for the manual interaction. After the configured time is elapsed, the whole pipeline is aborted.
We have covered a lot of important pipeline patterns; now, let's focus on different deployment release patterns.
Release patterns
In the last section, we discussed the Jenkins pipeline patterns used to speed up the build execution (parallel steps), help with the code reuse (shared libraries), limit the risk of production bugs (rollback), and deal with manual approvals (manual steps). This section will focus on the next group of patterns; this time, related to the release process. They are designed to reduce the risk of updating the production to a new software version.
We already described one of the release patterns, rolling updates, in Chapter 6, Clustering with Kubernetes. Here, we will present two more: blue-green deployment and canary releases.
Information
A very convenient way to use the release patterns in Kubernetes is to use the Istio service mesh. Read more at https://istio.io/.
Blue-green deployment
Blue-green deployment is a technique to reduce the downtime associated with the release. It concerns having two identical production environments—one called green, the other called blue—as presented in the following diagram:
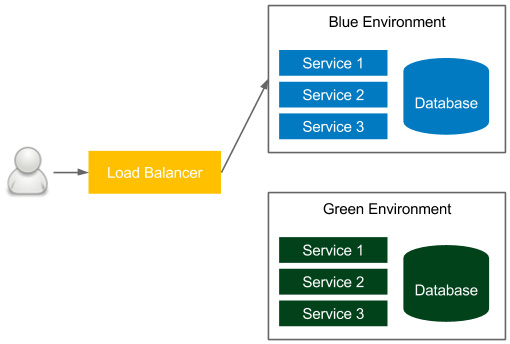
Figure 9.10 – Blue-green deployment
In the figure, the currently accessible environment is blue. If we want to make a new release, then we deploy everything to the green environment and, at the end of the release process, change the load balancer to the green environment. As a result, the user suddenly starts using the new version. The next time we want to make a release, we make changes to the blue environment and, in the end, we change the load balancer to blue. We proceed the same every time, switching from one environment to another.
Information
The blue-green deployment technique works correctly with two assumptions: environmental isolation and no orchestrated releases.
This solution provides the following benefits:
- Zero downtime: All the downtime, from the user perspective, is a moment of changing the load balance switch, which is negligible.
- Rollback: In order to roll back one version, it's enough to change back the load balance switch.
Note that the blue-green deployment must include the following:
- Database: Schema migrations can be tricky in case of a rollback, so it's worth using the patterns discussed at the beginning of this chapter.
- Transactions: Running database transactions must be handed over to the new database.
- Redundant infrastructure/resources: We need to have double the resources.
There are techniques and tools to overcome these challenges, so the blue-green deployment pattern is highly recommended and is widely used in the IT industry.
Information
You can read more about the blue-green deployment technique on the excellent blog from Martin Fowler, at https://martinfowler.com/bliki/BlueGreenDeployment.html.
Canary release
Canary release is a technique to reduce the risk associated with introducing a new version of the software. Similar to blue-green deployment, it uses two identical environments, as presented in the following diagram:

Figure 9.11 – Canary release
Also, similar to the blue-green deployment technique, the release process starts by deploying a new version in the environment that is currently unused. Here, however, the similarities end. The load balancer, instead of switching to the new environment, is set to link only a selected group of users to the new environment. The rest still use the old version. This way, a new version can be tested by some users and, in case of a bug, only a small group will be affected. After the testing period, all users are switched to the new version.
This approach has some great benefits:
- Acceptance and performance testing: If the acceptance and performance testing are difficult to run in the staging environment, then it's possible to test them in production, minimizing the impact on a small group of users.
- Simple rollback: If a new change causes a failure, then rolling back is done by switching all users back to the old version.
- A/B testing: If we are not sure whether the new version is better from the UX or the performance perspective, then it's possible to compare it with the old version.
Canary release shares the same drawbacks as the blue-green deployment. The additional challenge is that we have two production systems running at the same time. Nevertheless, canary release is an excellent technique used in most companies to help with the release and testing.
Information
You can read more about the canary release technique on Martin Fowler's blog, at https://martinfowler.com/bliki/CanaryRelease.html.
Working with legacy systems
Everything we have described so far applies to greenfield projects, for which setting up a continuous delivery pipeline is relatively simple.
Legacy systems are, however, far more challenging, because they usually depend on manual tests and manual deployment steps. In this section, we will walk through the recommended scenario to incrementally apply continuous delivery to a legacy system.
As the first step, I recommend reading a great book by Michael Feathers, Working Effectively with Legacy Code. His ideas on how to deal with testing, refactoring, and adding new features address most of the concerns about how to automate the delivery process for legacy systems.
Information
For many developers, it may be tempting to completely rewrite a legacy system rather than refactor it. While the idea is interesting from a developer's perspective, it is usually a bad business decision that results in a product failure. You can read more about the history of rewriting the Netscape browser in a brilliant blog post by Joel Spolsky, Things You Should Never Do, at https://www.joelonsoftware.com/2000/04/06/things-you-should-never-do-part-i.
The way to apply the continuous delivery process depends a lot on the current project's automation, the technology used, the hardware infrastructure, and the current release process. Usually, it can be split into three steps:
- Automating build and deployment
- Automating tests
- Refactoring and introducing new features
Let's look at these in detail.
Automating build and deployment
The first step includes automating the deployment process. The good news is that in most legacy systems that I have worked with, there was already some automation in place (for example, in the form of shell scripts).
In any case, the activities for automated deployment include the following:
- Build and package: Some automation usually already exists, in the form of Makefile, Ant, Maven, or any other build tool configuration, or a custom script.
- Database migration: We need to start incrementally managing the database schema. This requires putting the current schema as an initial migration and making all the further changes with tools such as Flyway or Liquibase, as already described in this chapter.
- Deployment: Even if the deployment process is fully manual, then there is usually a text/wiki page description that needs to be converted into an automated script.
- Repeatable configuration: In legacy systems, configuration files are usually changed manually. We need to extract the configuration and use a configuration management tool, as described in Chapter 7, Configuration Management with Ansible.
After the preceding steps, we can put everything into a deployment pipeline and use it as an automated phase after a manual user acceptance testing (UAT) cycle.
From the process perspective, it's already worth starting to release more often. For example, if the release is yearly, try to do it quarterly, then monthly. The push for that factor will later result in faster-automated delivery adoption.
Automating tests
The next step, usually much more difficult, is to prepare the automated tests for the system. It requires communicating with the QA team in order to understand how they currently test the software so that we can move everything into an automated acceptance test suite. This phase requires two steps:
- Acceptance/sanity test suite: We need to add automated tests that replace some of the regression activities of the QA team. Depending on the system, they can be provided as a black-box Selenium test or a Cucumber test.
- (Virtual) test environments: At this point, we should already be thinking of the environments in which our tests would run. Usually, the best solution to save resources and limit the number of machines required is to virtualize the testing environment using Vagrant or Docker.
The ultimate goal is to have an automated acceptance test suite that will replace the whole UAT phase from the development cycle. Nevertheless, we can start with a sanity test that will check if the system is correct, from the regression perspective.
Information
While adding test scenarios, remember that the test suite should execute in a reasonable time. For sanity tests, it is usually less than 10 minutes.
Refactoring and introducing new features
When we have the fundamental regression testing suite (at a minimum), we are ready to add new features and refactor the old code. It's always better to do it in small pieces step by step, because refactoring everything at once usually ends up in chaos, and that leads to production failures (not related to any particular change).
This phase usually includes the following activities:
- Refactoring: The best place to start refactoring the old code is where the new features are expected. Starting this way prepares us for the new feature requests yet to come.
- Rewrite: If we plan to rewrite parts of the old code, we should start from the code that is the most difficult to test. This way, we can constantly increase the code coverage in our project.
- Introducing new features: During the new feature implementation, it's worth using the feature toggle pattern. Then, if anything bad happens, we can quickly turn off the new feature. The same pattern should also be used during refactoring.
Information
For this phase, it's worth reading a very good book by Martin Fowler, Refactoring: Improving the Design of Existing Code.
While touching on the old code, it's good to follow the rule to always add a passing unit test first, and only then change the code. With this approach, we can rely on automation to check that we don't accidentally change the business logic.
Understanding the human element
While introducing the automated delivery process to a legacy system, you may feel the human factor more than anywhere else. In order to automate the build process, we need to communicate well with the operations team, and they must be willing to share their knowledge. The same story applies to the manual QA team; they need to be involved in writing automated tests because only they know how to test the software. If you think about it, both the operations and QA teams need to contribute to the project that will later automate their work. At some point, they may realize that their future in the company is not stable and become less helpful. Many companies struggle with introducing the continuous delivery process because teams do not want to get involved enough.
In this section, we discussed how to approach legacy systems and the challenges they pose. If you are in the process of converting your project and organization to the continuous delivery approach, then you may want to take a look at the Continuous Delivery Maturity Model, which aims to give some structure to the process of adopting automated delivery.
Summary
This chapter has been a mixture of various continuous delivery aspects that were not previously covered. The key takeaways from the chapter are as follows:
- Databases are an essential part of most applications, and should, therefore, be included in the continuous delivery process.
- Database schema changes are stored in the version control system and managed by database migration tools.
- There are two types of database schema changes: backward-compatible and backward-incompatible. While the first type is simple, the second requires a bit of overhead (split to multiple migrations spread over time).
- A database should not be the central point of the whole system. The preferred solution is to provide each service with its own database.
- The delivery process should always be prepared for a rollback scenario.
- Three release patterns should always be considered: rolling updates, blue-green deployment, and canary release.
- Legacy systems can be converted to the continuous delivery process in small steps, rather than all at once.
Next, for the last part of the book, we will look into the best practices for your continuous delivery process.
Exercises
In this chapter, we covered various aspects of the continuous delivery process. Since practice makes perfect, we recommend the following exercises:
- Use Flyway to create a non-backward-compatible change in the MySQL database:
- Use the official Docker image, mysql, to start the database.
- Configure Flyway with a proper database address, username, and password.
- Create an initial migration that creates a USERS table with three columns: ID, EMAIL, and PASSWORD.
- Add sample data to the table.
- Change the PASSWORD column to HASHED_PASSWORD, which will store the hashed passwords.
- Split the non-backward-compatible change into three migrations, as described in this chapter.
- You can use MD5 or SHA for hashing.
- Check that the database doesn't store any passwords in plain text as a result.
- Create a Jenkins shared library with steps to build and unit test Gradle projects:
- Create a separate repository for the library.
- Create two files in the library: gradleBuild.groovy and gradleTest.groovy.
- Write the appropriate call methods.
- Add the library to Jenkins.
- Use the steps from the library in a pipeline.
Questions
To verify the knowledge from this chapter, please answer the following questions:
- What are database (schema) migrations?
- Can you name at least three database migration tools?
- What are the main two types of changes to the database schema?
- Why should one database not be shared between multiple services?
- What is the difference between the test data for unit tests and integration/acceptance tests?
- What Jenkins pipeline keyword do you use to make the steps run in parallel?
- What are different methods to reuse Jenkins pipeline components?
- What Jenkins pipeline keyword do you use to make a manual step?
- What are the three release patterns mentioned in this chapter?
Further reading
To read more about the advanced aspects of the continuous delivery process, please refer to the following resources:
- Databases as a Challenge for Continuous Delivery: https://phauer.com/2015/databases-challenge-continuous-delivery/.
- Zero Downtime Deployment with a Database: https://spring.io/blog/2016/05/31/zero-downtime-deployment-with-a-database.
- Canary Release: https://martinfowler.com/bliki/CanaryRelease.html.
- Blue-Green Deployment: https://martinfowler.com/bliki/BlueGreenDeployment.html.