
6
Using a Non-Relational Database
So far, we have learned that relational databases store data using table columns and rows. All these table records are structurally optimized and designed using different keys, such as primary, unique, and composite keys. The tables are connected using foreign/reference keys. Foreign key integrity plays a significant role in the table relationship of a database schema because it gives consistency and integrity to the data that’s persisted in the tables. Chapter 5, Connecting to a Relational Database, provided considerable proof that FastAPI can connect to relational databases using any of the present ORMs smoothly without lots of complexities. This time, we will focus on using non-relational databases as data storage for our FastAPI microservice application.
If FastAPI uses ORM for relational databases, it uses Object Document Mapping (ODM) to manage data using non-relational data stores or NoSQL databases. There are no tables, keys, and foreign key constraints involved in ODM, but a JSON document is needed to hold the various pieces of information. Different NoSQL databases vary in the storage model type that’s used to store data. The simplest among these databases manages data as key-value pairs, such as Redis, while complicated databases utilize schema-free document structures easily mapped to objects. This is usually done in MongoDB. Some use columnar data stores such as Cassandra, while some have graph-oriented data storage such as Neo4j. However, this chapter will focus on the FastAPI-MongoDB connectivity and the different ODM we can apply to pursue data management with a document-based database.
The main objective of this chapter is to study, formalize, and scrutinize different ways to use MongoDB as a database for our FastAPI application. Building the repository layer and showcasing the CRUD implementation will be the main highlight.
In this chapter, we will cover the following topics:
- Setting up the database environment
- Applying the PyMongo driver for synchronous connections
- Creating asynchronous CRUD transactions using Motor
- Implementing CRUD transactions using MongoEngine
- Implementing asynchronous CRUD transactions using Beanie
- Building an asynchronous repository for FastAPI using ODMantic
- Creating CRUD transactions using MongoFrames
Technical requirements
This chapter focuses on an eBookstore web portal, online book reselling system, where users can sell and buy books from home through the internet. The virtual store allows users to view the sellers' profiles, book catalogs, list of orders, and archive of purchases. When it comes to the e-commerce side, the user can select their preferred books and add them to a cart. Then, they can check out the items as orders and pursue the payment transaction afterward. All the data is stored in a MongoDB database. The code for this chapter can be found at https://github.com/PacktPublishing/Building-Python-Microservices-with-FastAPI in the ch06 project.
Setting up the database environment
Before we start discussing the application’s database connectivity, we need to download the appropriate MongoDB database server from https://www.mongodb.com/try/download/community. online book reselling system uses MongoDB 5.0.5 for a Windows platform. The installation will provide default service configuration details for the service name, data directory, and log directory. However, it is advised that you use different directory paths instead of the default ones.
After the installation, we can start the MongoDB server by running /bin/mongod.exe. This will automatically create a database directory called /data/db in the C:/ drive (Windows). We can place the /data/db directory in some other location, but be sure to run the mongod command with the --dbpath option while specifying <new path>/data/db.
The MongoDB platform has utilities that can aid in managing database collections, and one of them is MongoDB Compass. It can provide a GUI experience that allows you to browse, explore, and easily manipulate the database and its collections. Also, it has built-in performance metrics, query views, and schema visualization features that can help with scrutinizing the correctness of the database structure. The following screenshot shows the dashboard for MongoDB Compass version 1.29.6:
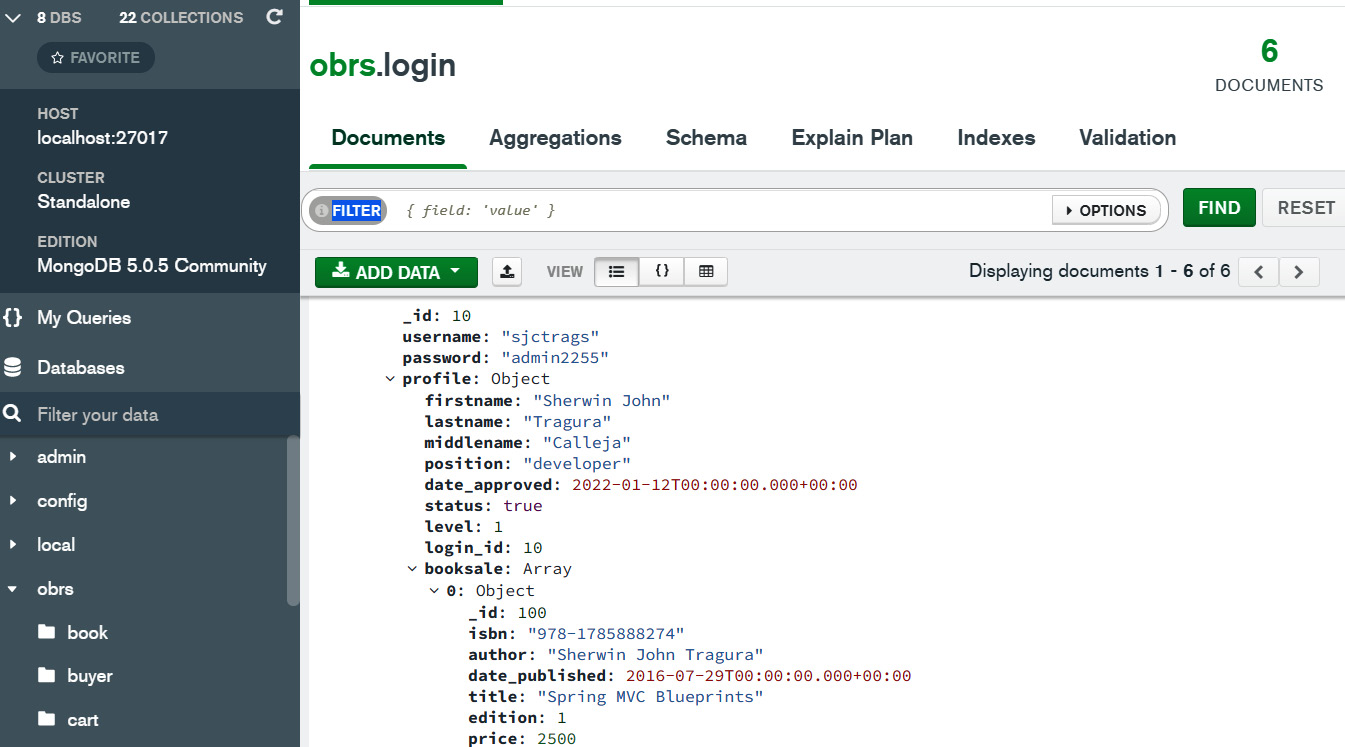
Figure 6.1 – The MongoDB Compass dashboard
The preceding dashboard shows the document structure of the login collection, which is part of the obrs database. It gives us the spread of the data, which is an easy way to view its embedded documents, such as profile and list of books for sale.
Once the server and utility have been installed, we need to design the data collections for our database using the class diagram. A class diagram is a UML approach to describing the components of a class and visualizing the associations and structures of the model classes involved in a system. The class diagram is one of the solutions that’s used to design the document structure of the MongoDB database since there are no records, tables, or keys involved that are essential for ERD, like in a relational database. Designing a NoSQL database always requires an equal balance between the data retrieval methods and the data composition of the database. Data that will be stored in MongoDB always needs an ideal, feasible, and appropriate document structure, associations, aggregations, and layout. The following diagram shows the class diagram for our application’s MongoDB database, obrs:
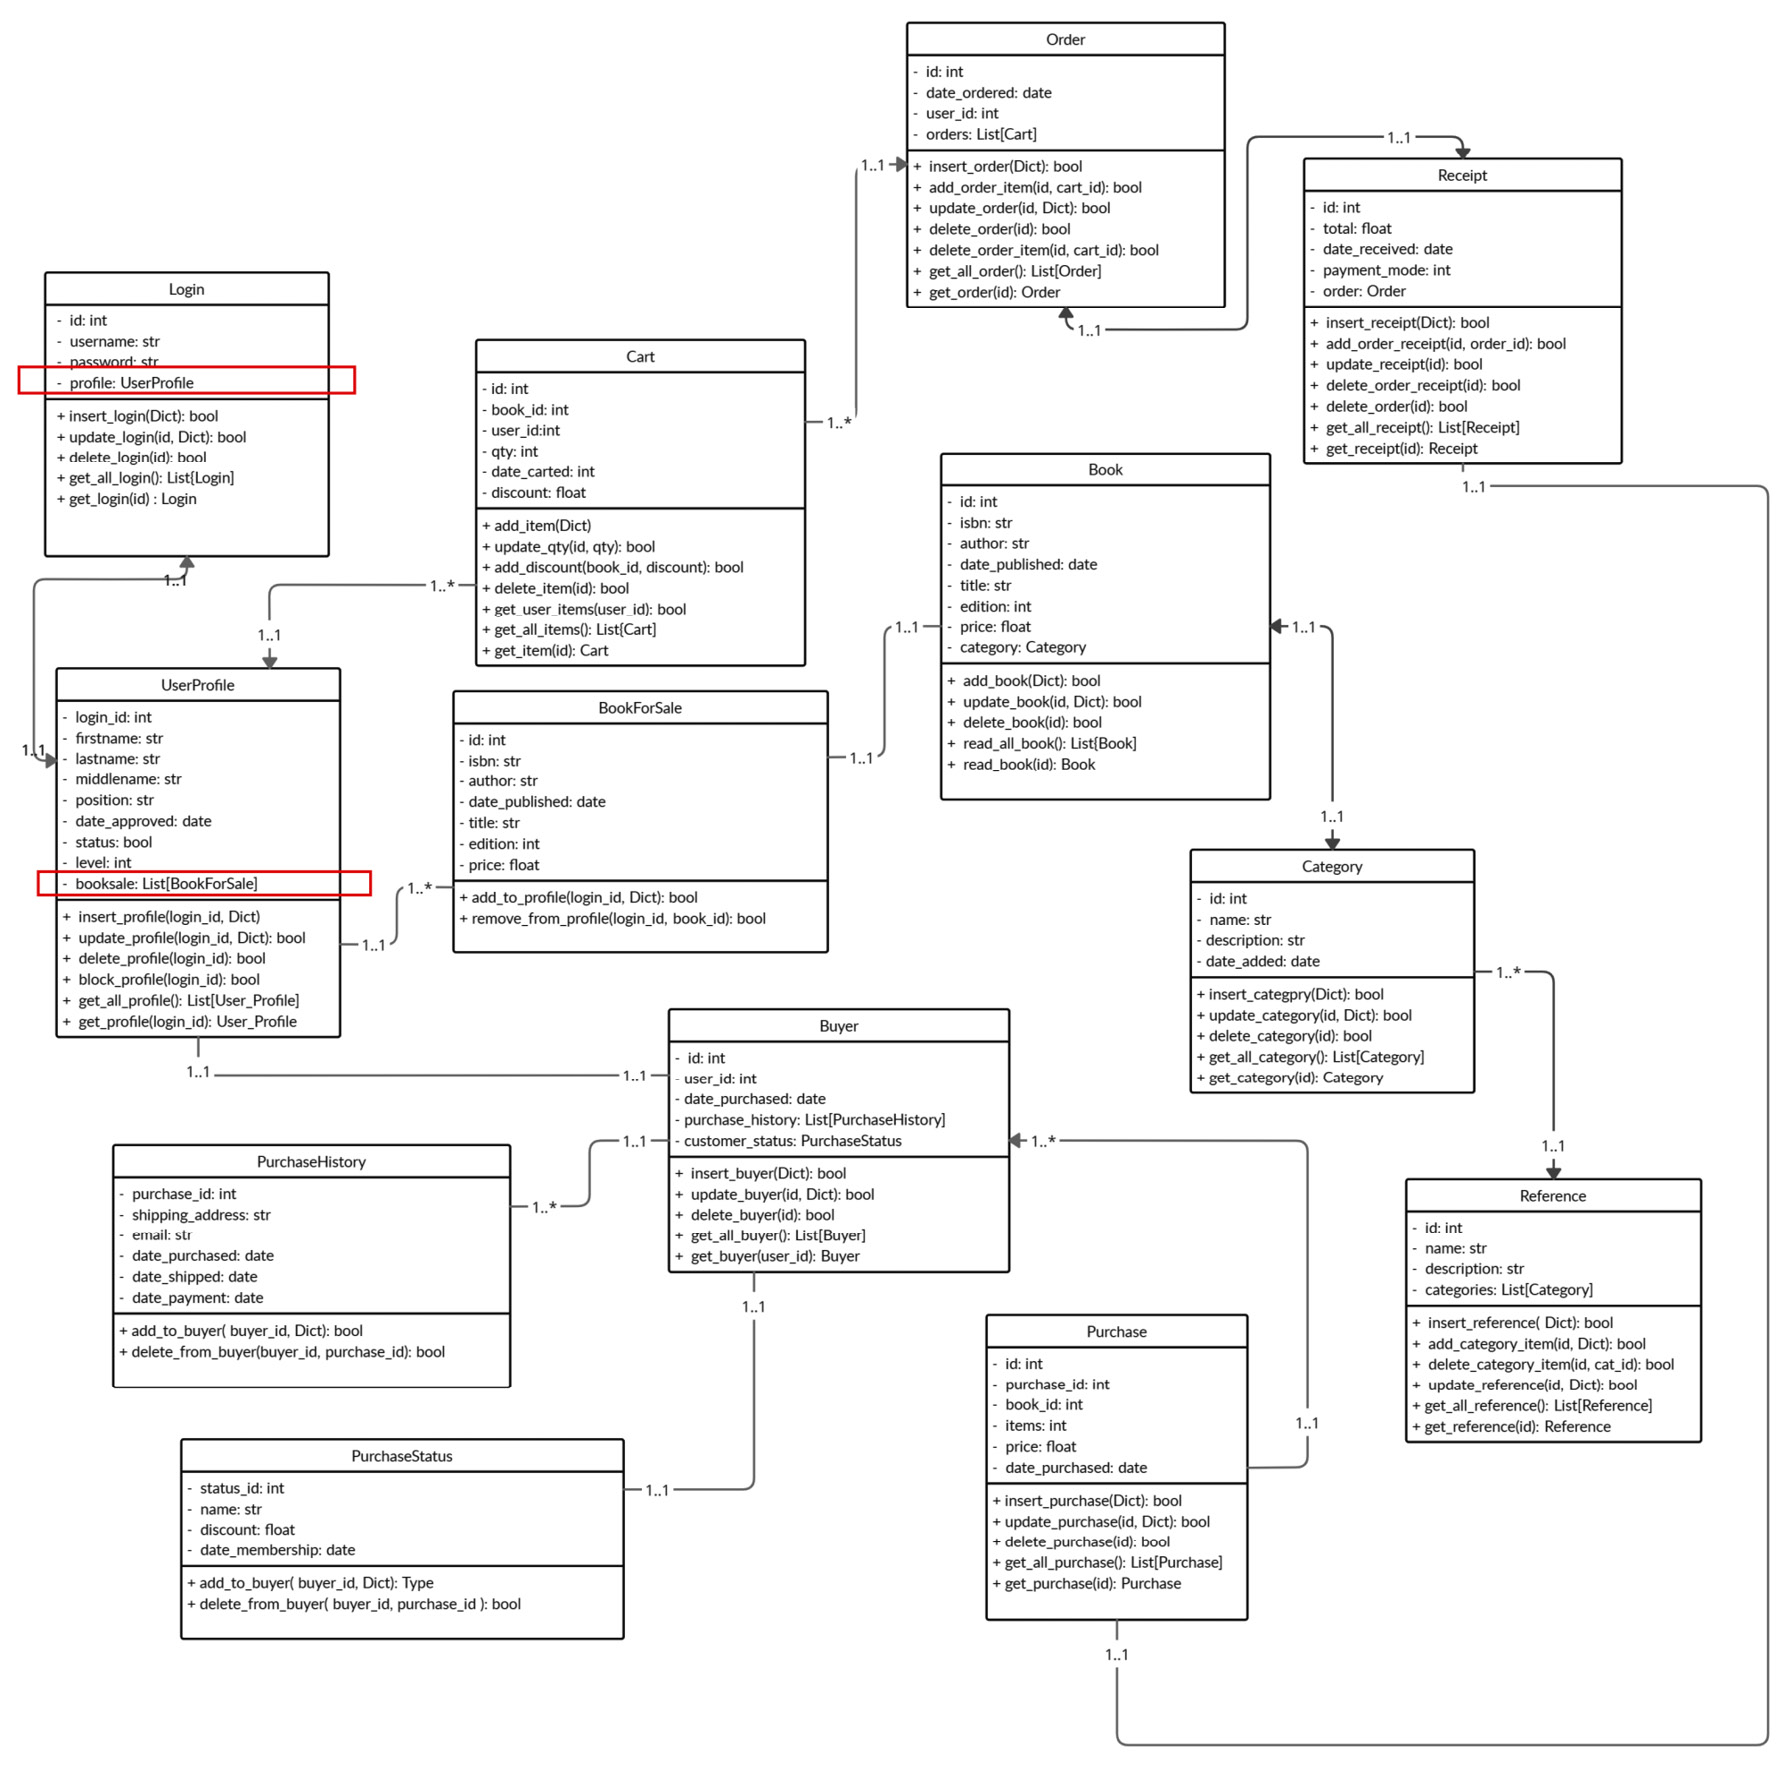
Figure 6.2 – The class diagram for the obrs database
Our application uses all the collections depicted in the preceding diagram to store all the information it captures from the client. Each context box represents one collection, with all the attributes and expected underlying transactions indicated inside the box. It also shows the associations that bind these collections, such as the one-to-one association between login and profile and the many-to-one association between BookForSale and UserProfile.
Now that the database server has been installed and designed, let us look at the different ways of establishing a connection from our FastAPI microservice application to its MongoDB database.
Applying the PyMongo driver for synchronous connections
We will start by learning how the FastAPI application connects to MongoDB using the PyMongo database driver. This driver is equivalent to psycopg2, which allows us to access PostgreSQL without using any ORM. Some popular ODMs, such as MongoEngine and Motor, use PyMongo as their core driver, which gives us the reason to explore PyMongo first before we touch on issues regarding popular ODMs. Studying the driver’s behavior can provide baseline transactions that will show how an ODM builds the database connectivity, models, and CRUD transactions. But before we proceed with the details, we need to install the pymongo extension using pip:
pip install pymongo
Setting up the database connectivity
PyMongo uses its MongoClient module class to connect to any MongoDB database. We instantiate it with the specified host and port to extract the client object, such as MongoClient("localhost", "27017"), or a database URI, such as MongoClient('mongodb://localhost:27017/'). Our application uses the latter to connect to its database. But if we instantiate without providing the parameters, it will use the default localhost and 27017 details.
After extracting the client object, we can use it to access the database through a dot (.) operator or attribute-style access if the database name follows the Python naming convention; for example, client.obrs. Otherwise, we can use the bracket symbols ([]) or dictionary-style access; for example, client["obrs_db"]. Once the database object has been retrieved, we can access the collections using the access rules. Note that a collection is equivalent to a table in a relational database, where the collated records, known as documents, are stored. The following code shows a generator function that’s used by the application to open database connectivity and access the necessary collections in preparation for the CRUD implementation:
from pymongo import MongoClient
def create_db_collections():
    client = MongoClient('mongodb://localhost:27017/')
    try:
        db = client.obrs
        buyers = db.buyer
        users = db.login
        print("connect")
        yield {"users": users, "buyers": buyers}
    finally:
        client.close()
A generator function such as create_db_collections() is preferred because the yield statement works perfectly when it comes to managing the database connection over the return statement. The yield statement suspends the function’s execution when it sends a value back to the caller but retains the state where the function can resume at the point where it left off. This feature is applied by the generator to close the database connection when it resumes the execution at the finally clause. The return statement, on the other hand, will not be applicable for this purpose because return will finish the whole transaction before it sends a value to the caller.
However, before we invoke the generator, let us scrutinize how PyMongo builds its model layer to pursue the necessary CRUD transactions.
Building the model layer
Documents in MongoDB are represented and collated as JSON-style structures, specifically BSON documents. A BSON document offers more data types than the JSON structure. We can use dictionaries to represent and persist these BSON documents in PyMongo. Once a dictionary has been persisted, the BSON-type document will look like this:
{
   _id:ObjectId("61e7a49c687c6fd4abfc81fa"),
   id:1,
   user_id:10,
   date_purchased:"2022-01-19T00:00:00.000000",
   purchase_history:
   [
       {
        purchase_id:100,
        shipping_address:"Makati City",
        email:"[email protected]",
        date_purchased:"2022-01-19T00:00:00.000000",
        date_shipped:"2022-01-19T00:00:00.000000",
        date_payment:"2022-01-19T00:00:00.000000"
      },
      {
        purchase_id:110,
        shipping_address:"Pasig City",
        email:"[email protected]",
        date_purchased:"2022-01-19T00:00:00.000000",
        date_shipped:"2022-01-19T00:00:00.000000",
        date_payment:"2022-01-19T00:00:00.000000"
      }
    ],
   customer_status:
   {
        status_id:90,
        name:"Sherwin John C. Tragura",
        discount:50,
        date_membership:"2022-01-19T00:00:00.000000"
   }
}
Common Python data types such as str, int, and float are supported by the BSON specification, but there are types such as ObjectId, Decimal128, RegEx, and Binary that are intrinsic only to the bson module. The specification only supports the timestamp and datetime temporal types. To install bson, use the following pip command:
pip install bson
Important note
BSON is short for Binary JSON, a serialized and binary encoding for JSON-like documents. The specification behind this is lightweight and flexible. The efficient encoding format is explained in more detail at https://bsonspec.org/spec.html.
ObjectId is an essential data type in a MongoDB document because it serves as a unique identifier for the main document structure. It is a 12-byte field that consists of a 4-byte UNIX embedded timestamp, the 3-byte machine ID of the MongoDB server, a 2-byte process ID, and a 3-byte arbitrary value for the ID’s increments. Conventionally, the declared field of the document, _id, always refers to the ObjectId value of the document structure. We can allow the MongoDB server to generate the _id object for the document or create an instance of the object type during persistence. When retrieved, ObjectId can be in 24 hexadecimal digit or string format. Note that the _id field is the key indicator that a dictionary is ready to be persisted as a valid BSON document. Now, BSON documents can also be linked with one another using some associations.
Establishing document associations
MongoDB has no concept of referential integrity constraints, but a relationship among documents is possible based on structures. There are two types of documents: main and embedded documents. A document has a one-to-one association with another if it is an embedded document of the other. Likewise, a document has a many-to-one association if a list in that document is linked to the main document structure.
The previous purchase BSON document shows a sample of the principal buyer document with a one-to-one association with the customer_status embedded document and a many-to-one association with the purchase_history documents. As depicted from this sample document, embedded documents have no separate collection because they have no respective _id field to make them stand as primary documents.
Using the BaseModel classes for transactions
Since PyMongo has no predefined model classes, the Pydantic models of FastAPI can be used to represent MongoDB documents with all the necessary validation rules and encoders. We can use the BaseModel classes to contain document details and pursue insert, update, and delete transactions since the Pydantic models are compatible with MongoDB documents. The following models are being used by our online book reselling application to store and retrieve the buyer, purchase_history, and customer_status document details:
 from pydantic import BaseModel, validator
from typing import List, Optional, Dict
from bson import ObjectId
from datetime import date
class PurchaseHistoryReq(BaseModel):
    purchase_id: int
    shipping_address: str
    email: str
    date_purchased: date
    date_shipped: date
    date_payment: date
    @validator('date_purchased')
    def date_purchased_datetime(cls, value):
        return datetime.strptime(value,
           "%Y-%m-%dT%H:%M:%S").date()

    @validator('date_shipped')
    def date_shipped_datetime(cls, value):
        return datetime.strptime(value,
           "%Y-%m-%dT%H:%M:%S").date()

    @validator('date_payment')
    def date_payment_datetime(cls, value):
        return datetime.strptime(value,
           "%Y-%m-%dT%H:%M:%S").date()

    class Config:
        arbitrary_types_allowed = True
        json_encoders = {
            ObjectId: str
        }

class PurchaseStatusReq(BaseModel):
    status_id: int
    name: str
    discount: float
    date_membership: date
    @validator('date_membership')
    def date_membership_datetime(cls, value):
        return datetime.strptime(value,
            "%Y-%m-%dT%H:%M:%S").date()

    class Config:
        arbitrary_types_allowed = True
        json_encoders = {
            ObjectId: str
        }

class BuyerReq(BaseModel):
    _id: ObjectId
    Buyer_id: int
    user_id: int
    date_purchased: date
    purchase_history: List[Dict] = list()
    customer_status: Optional[Dict]
    @validator('date_purchased')
    def date_purchased_datetime(cls, value):
        return datetime.strptime(value,
            "%Y-%m-%dT%H:%M:%S").date()

    class Config:
        arbitrary_types_allowed = True
        json_encoders = {
            ObjectId: str
        }
For these request models to recognize the BSON data types, we should make some modifications to the default behavior of these models. Just like earlier in this chapter, where we added the orm_mode option, there is also a need to add a nested Config class to the BaseModel blueprint with the arbitrary_types_allowed option set to True. This additional configuration will recognize the BSON data types used in the attribute declaration, including compliance with the necessary underlying validation rules for the corresponding BSON data types used. Moreover, the json_encoders option should also be part of the configuration to convert the ObjectId property of the document into a string during a query transaction.
Using Pydantic validation
However, some other types are too complex for json_encoders to process, such as the BSON datettime field being converted into a Python datetime.date. Since the ODM cannot automatically convert a MongoDB datetime into a Python date type, we need to create a custom validation and parse this BSON datetime through Pydantic’s @validation decorator. We must also use custom validators and parsers in the FastAPI services to convert all incoming Python date parameters into BSON datetime. This will be covered later.
@validator creates a class method that accepts class name as the first parameter, not the instance, of the field(s) to be validated and parsed. Its second parameter is an option that specifies the field name or class attribute that needs to be converted into another data type, such as date_purchased, date_shipped, or date_payment of the PurchaseRequestReq model. The pre attribute of @validator tells FastAPI to process the class methods before any built-in validation can be done in the API service implementation. These methods are executed right after APIRouter runs its custom and built-in FastAPI validation rules for the request models, if there are any.
Note that these request models have been placed in the /models/request/buyer.py module of the application.
Using the Pydantic @dataclass to query documents
Wrapping the queried BSON documents using the BaseModel model classes is still the best approach to implementing the query transaction. But since BSON has issues with the Python datetime.date fields, we cannot always utilize the request model classes that are used for the CRUD transaction by wrapping retrieved BSON documents. Sometimes, using the model yields an "invalid date format (type=value_error.date)" error because all the models have the Python datetime.date fields, whereas the incoming data has a BSON datetime or timestamp. Instead of adding more complexities to the request models, we should resort to another approach to extracting the documents – that is, utilizing the Pydantic @dataclass. The following data classes are defined for wrapping the extracted buyer documents:
from pydantic.dataclasses import dataclass
from dataclasses import field
from pydantic import validator
from datetime import date, datetime
from bson import ObjectId
from typing import List, Optional
class Config:
        arbitrary_types_allowed = True
@dataclass(config=Config)
class PurchaseHistory:
    purchase_id: Optional[int] = None
    shipping_address: Optional[str] = None
    email: Optional[str] = None
    date_purchased: Optional[date] = "1900-01-01T00:00:00"
    date_shipped: Optional[date] = "1900-01-01T00:00:00"
    date_payment: Optional[date] = "1900-01-01T00:00:00"

    @validator('date_purchased', pre=True)
    def date_purchased_datetime(cls, value):
        return datetime.strptime(value,
           "%Y-%m-%dT%H:%M:%S").date()

    @validator('date_shipped', pre=True)
    def date_shipped_datetime(cls, value):
        return datetime.strptime(value,
           "%Y-%m-%dT%H:%M:%S").date()

    @validator('date_payment', pre=True)
    def date_payment_datetime(cls, value):
        return datetime.strptime(value,
           "%Y-%m-%dT%H:%M:%S").date()
@dataclass(config=Config)
class PurchaseStatus:
    status_id: Optional[int] = None
    name: Optional[str] = None
    discount: Optional[float] = None
    date_membership: Optional[date] = "1900-01-01T00:00:00"

    @validator('date_membership', pre=True)
    def date_membership_datetime(cls, value):
        return datetime.strptime(value,
           "%Y-%m-%dT%H:%M:%S").date()

@dataclass(config=Config)
class Buyer:
    buyer_id: int
    user_id: int
    date_purchased: date
    purchase_history: List[PurchaseHistory] =
          field(default_factory=list )
    customer_status: Optional[PurchaseStatus] =
          field(default_factory=dict)
    _id: ObjectId = field(default=ObjectId())

    @validator('date_purchased', pre=True)
    def date_purchased_datetime(cls, value):
        print(type(value))
        return datetime.strptime(value,
             "%Y-%m-%dT%H:%M:%S").date()
@dataclass is a decorator function that adds an __init__() to a Python class to initialize its attributes and other special functions, such as __repr__(). The PurchasedHistory, PurchaseStatus, and Buyer custom classes shown in the preceding code are typical classes that can be converted into request model classes. FastAPI supports both BaseModel and data classes when creating model classes. Apart from being under the Pydantic module, using @dataclass is not a replacement for using BaseModel when creating model classes. This is because the two components are different in terms of their flexibility, features, and hooks. BaseModel is configuration-friendly and can be adapted to many validation rules and type hints, while @dataclass has problems recognizing some Config attributes such as extra, allow_population_by_field_name, and json_encoders. If a data class requires some additional details, a custom class is needed to define these configurations and set the config parameter of the decorator. For instance, the Config class in the preceding code, which sets arbitrary_types_allowed to True, has been added to the three model classes.
Besides config, the decorator has other parameters such as init, eq, and repr that accept bool values to generate their respective hook methods. The frozen parameter enables exception handling concerning field type mismatches when set to True.
When it comes to data parsing, transition, and conversion, @dataclass is always dependent on augmented validations, unlike BaseModel, which can process data type conversion simply by adding json_encoders. In the data classes shown previously, all the validators focus on BSON datetime to Python datetime.date conversion during the document retrieval process. These validations will occur before any custom or built-in validation in APIRouter because the pre parameter of the @validator decorator is set to True.
When dealing with default values, BaseModel classes can use typical type hints such as Optional or object instantiation such as dict() or list() to define the preconditional state of its complex attributes. With @dataclass, a ValueError exception is always thrown at compile time when type hints are applied to set default values of complex field types such as list, dict, and ObjectId. It requires the field() specifier from Python’s dataclasses module to set the default values of these fields, either by assigning an actual value through the specifier’s default parameter or invoking a function or lambda that returns a valid value through the default_factory parameter. The use of field() indicates that Pydantic’s @dataclass is an exact replacement of Python’s core data classes but with some additional features, such as the config parameter and the inclusion of the @validator components.
Note that it is advised that all @dataclass models have default values when using type hints or field(), especially for embedded documents and for models with the date or datetime types, to avoid some missing constructor parameter(s) errors. On the other hand, an @dataclass can also create embedded structures in the BaseModel classes, for example, by defining attributes with the class types. This is highlighted in the Buyer model.
All these model classes have been placed in the /models/data/pymongo.py script. Let us now apply these data models to create the repository layer.
Implementing the repository layer
PyMongo needs collection to build the repository layer of the application. Besides the collection object, the insert, delete, and update transactions will also need the BaseModel classes to contain all the details from the client and convert them into BSON documents after the transaction. Meanwhile, our query transactions will require the data classes to convert all BSON documents into JSON-able resources during the document retrieval process. Now, let us look at how a repository can be implemented using a PyMongo driver.
Building the CRUD transactions
The repository class in the following code block implements the CRUD transactions that aim to manage the buyer, purchase_history, and customer_status information based on basic specifications of the online book reselling system:
from typing import Dict, Any
class BuyerRepository:

    def __init__(self, buyers):
        self.buyers = buyers

    def insert_buyer(self, users,
          details:Dict[str, Any]) -> bool:
        try:
           user = users.find_one(
                {"_id": details["user_id"]})
           print(user)
           if user == None:
               return False
           else:
               self.buyers.insert_one(details)

        except Exception as e:
            return False
        return True
Let us examine insert_buyer(), which inserts details about a registered book buyer who had some previous transactions in the system as a login user. The PyMongo collection offers helper methods for processing CRUD transactions, such as insert_one(), which adds a single main document from its Dict parameter. It also has insert_many(), which accepts a valid list of dictionaries that can be persisted as multiple documents. These two methods can generate an ObjectId for the _id field of the BSON document during the insertion process. The buyer’s details are extracted from the BuyerReq Pydantic model.
Next, update_buyer() shows how to update a specific document in the buyer collection:
    def update_buyer(self, id:int,
              details:Dict[str, Any]) -> bool:
       try:
          self.buyers.update_one({"buyer_id": id},
                  {"$set":details})
       except:
           return False
       return True

    def delete_buyer(self, id:int) -> bool:
        try:
            self.buyers.delete_one({"buyer_id": id})
        except:
            return False
        return True
The collection has an update_one() method that requires two parameters: a unique and valid field/value dictionary pair that will serve as the search key of the record search, and another dictionary pair with the predefined $set key with the dictionary of updated details for replacement. It also has update_many(), which can update multiple documents, given that the primary dictionary field/value parameter is not unique.
delete_buyer() is the transaction that deletes a buyer document using a unique and valid field/value pair such as {"buyer_id": id}. If this parameter or search key is a common/non-unique data, the collection offers delete_many(), which can delete multiple documents. Now, the following script shows how to implement query transactions in PyMongo
from dataclasses import asdict
from models.data.pymongo import Buyer
from datetime import datetime
from bson.json_util import dumps
import json
    … … …
    … … …
    … … …
    def get_all_buyer(self):
        buyers = [asdict(Buyer(**json.loads(dumps(b))))
              for b in self.buyers.find()]
        return buyers

    def get_buyer(self, id:int):
        buyer = self.buyers.find_one({"buyer_id": id})
        return asdict(Buyer(**json.loads(dumps(buyer))))
When querying documents, PyMongo has a find() method, which retrieves all the documents in the collection, and find_one(), which can get a unique and single document. Both methods need two parameters: the conditional or logical query parameter in the form of a dictionary field/value pair and the set of fields that needs to appear in the record. get_buyer() in the previous code block shows how to retrieve a buyer document through the unique buyer_id field. The absence of its second parameter means the presence of all the fields in the result. Meanwhile, get_all_buyer() retrieves all the buyer documents without constraints. Constraints or filter expressions are formulated using BSON comparison operators, as shown in the following table:

For instance, retrieving buyer documents with user_id greater than 5 requires the buyers.find({"user_id": {"$gte": 5}}) query operation. If we need to build compound filters, we must apply the following logical operators:

Retrieving buyer documents with buyer_id less than 50 and buyer_id greater than 10 will require the find({'and': [{'buyer_id': {'$lt': 50}}, {'user_id':{'$gt':10}}]}) query.
Both methods return BSON documents that are not JSON-able components of the FastAPI framework. To convert the documents into JSON, the bson.json_util extension has a dumps() method that can convert a single document or list of documents into a JSON string. Both get_all_buyer() and get_buyer()convert every single document retrieved into JSON so that each can be mapped to the Buyer data class. The main objective of the mapping is to convert the datetime fields into Python datetime.date while utilizing the validators of the Buyer data class. The mapping will only be successful if the loads() method of the json extension is used to convert str into a dict data structure. After generating the list of Buyer data classes, the asdict() method of Python’s dataclasses module is needed to transform the list of Buyer data classes into a list of dictionaries to be consumed by APIRouter.
Managing document association
Technically, there are two ways to construct a document association in PyMongo. The first one is to use the DBRef class of the bison.dbref module to link the parent and child documents. The only prerequisite is for both documents to have an _id value of the ObjectId type and have their respective collection exist. For instance, if PurchaseHistoryReq is a core document, we can insert one purchase record into the list through the following query:
buyer["purchase_history"].append(new DBRef("purchase_history", "49a3e4e5f462204490f70911"))Here, the first parameter of the DBRef constructor pertains to the name of the collection where the child document is placed, while the second one is the ObjectId property of the child document in string format. However, some people use an ObjectId instance instead of the string version. On the other hand, to find a specific purchase_history document from the buyer collection using DBRef, we can write our query like this:
buyer.find({ "purchase_history ": DBRef("purchase_history",ObjectId("49a3e4e5f462204490f70911")) })The second way is to add the whole BSON document structure to the list field of buyer through the BuyerReq model. This solution applies to embedded documents that do not have _id and collection but are essential to the core document. add_purchase_history() in the following code shows how this approach is applied to create a many-to-one association between the purchase_history and buyer documents:
def add_purchase_history(self, id:int,
                details:Dict[str, Any]):
        try:
            buyer = self.buyers.find_one({"buyer_id": id})
            buyer["purchase_history"].append(details)
            self.buyers.update_one({"buyer_id": id},
           {"$set": {"purchase_history":
                     buyer["purchase_history"]}})
        except Exception as e:
           return False
        return True

    def add_customer_status(self, id:int,
                  details:Dict[str, Any]):
        try:
            buyer = self.buyers.find_one({"buyer_id": id})
            self.buyers.update_one({"buyer_id": id},
                {"$set":{"customer_status": details}})
        except Exception as e:
           return False
        return True
The add_customer_status() method shows how to implement the second approach in building a one-to-one association between the buyer and purchase_status documents. The first approach, which involves using DBRef, can also be applied if PurchaseStatusReq is an independent core document.
The complete repository class can be found in the /repository/pymongo/buyer.py script file. Now, let us apply these CRUD transactions to our API services.
Running the transactions
Before executing the BuyerRepository transactions, the create_db_collections() generator should be injected into the API services using Depends. Since PyMongo has difficulty processing Python types that are not BSON-supported, such as datettime.date, custom validations and serializers are sometimes required to pursue some transactions.
Important note
The implementation of @validator inside @dataclass and BaseModel converts outgoing BSON datetime parameters into Python date during query retrieval. Meanwhile, the JSON encoder validation in this API layer converts incoming Python date values into BSON datetime values during the transition from the application to MongoDB.
For instance, the add_buyer(), update_buyer(), and add_purchase_history() transaction methods in the following code require a custom serializer such as json_serialize_date() to transform the Python datetime.date value into the datettime.datetime type so that it complies with PyMongo’s BSON specification:
from fastapi import APIRouter, Depends
from fastapi.responses import JSONResponse
from models.request.buyer import BuyerReq,
      PurchaseHistoryReq, PurchaseStatusReq
from repository.pymongo.buyer import BuyerRepository
from db_config.pymongo_config import create_db_collections
from datetime import date, datetime
from json import dumps, loads
from bson import ObjectId
router = APIRouter()
def json_serialize_date(obj):
    if isinstance(obj, (date, datetime)):
        return obj.strftime('%Y-%m-%dT%H:%M:%S')
    raise TypeError ("The type %s not serializable." %
            type(obj))
def json_serialize_oid(obj):
    if isinstance(obj, ObjectId):
        return str(obj)
    elif isinstance(obj, date):
        return obj.isoformat()
    raise TypeError ("The type %s not serializable." %
            type(obj))
@router.post("/buyer/add")
def add_buyer(req: BuyerReq,
            db=Depends(create_db_collections)):
    buyer_dict = req.dict(exclude_unset=True)
    buyer_json = dumps(buyer_dict,
              default=json_serialize_date)
    repo:BuyerRepository = BuyerRepository(db["buyers"])
    result = repo.insert_buyer(db["users"],
            loads(buyer_json))

    if result == True:
        return JSONResponse(content={"message":
          "add buyer successful"}, status_code=201)
    else:
        return JSONResponse(content={"message":
          "add buyer unsuccessful"}, status_code=500)
@router.patch("/buyer/update")
def update_buyer(id:int, req:BuyerReq,
           db=Depends(create_db_collections)):
    buyer_dict = req.dict(exclude_unset=True)
    buyer_json = dumps(buyer_dict,
             default=json_serialize_date)
    repo:BuyerRepository = BuyerRepository(db["buyers"])
    result = repo.update_buyer(id, loads(buyer_json))

    if result == True:
        return JSONResponse(content={"message":
         "update buyer successful"}, status_code=201)
    else:
        return JSONResponse(content={"message":
         "update buyer unsuccessful"}, status_code=500)
@router.post("/buyer/history/add")
def add_purchase_history(id:int, req:PurchaseHistoryReq,
           db=Depends(create_db_collections)):
    history_dict = req.dict(exclude_unset=True)
    history_json = dumps(history_dict,
           default=json_serialize_date)
    repo:BuyerRepository = BuyerRepository(db["buyers"])
    result = repo.add_purchase_history(id,
           loads(history_json))
The json_serialize_date() function becomes part of the JSON serialization process of the dumps() method but only handles the temporal type conversion while transforming the buyer details into JSON objects. It is applied in the INSERT and UPDATE transactions of the repository class to extract the serialized JSON string equivalent of the BuyerReq, PurchaseHistoryReq, and PurchaseStatusReq models.
Now, another custom converter is applied in the data retrievals of the list_all_buyer() and get_buyer() methods:
@router.get("/buyer/list/all")
def list_all_buyer(db=Depends(create_db_collections)):
  repo:BuyerRepository = BuyerRepository(db["buyers"])
  buyers = repo.get_all_buyer()
  return loads(dumps(buyers, default=json_serialize_oid))
@router.get("/buyer/get/{id}")
def get_buyer(id:int, db=Depends(create_db_collections)):
  repo:BuyerRepository = BuyerRepository(db["buyers"])
  buyer = repo.get_buyer(id)
  return loads(dumps(buyer, default=json_serialize_oid))
The data models involved in our query transactions are data classes, so the results of the two preceding query methods have already been mapped and transformed into JSON format. However, unfortunately, they’re not JSON-able enough for the FastAPI framework. Aside from BSON datetime types, the PyMongo ODM cannot automatically convert ObjectId into a default type in Python, thus throwing ValueError during data retrieval from MongoDB. To fix this problem, dumps()needs a custom serializer, such as json_serialize_oid(), to convert all ObjectId parameters in MongoDB into FastAPI transitions. It also converts BSON datetime values into Python date values following the ISO-8601 format. The valid JSON string from dumps() will enable the loads() method to produce a JSON-able result for the FastAPI services. The complete API services can be found in the /api/buyer.py script file.
After complying with all the requirements, PyMongo can help store and manage all the information using the MongoDB server. However, the driver only works for synchronous CRUD transactions. If we opt for an asynchronous way of implementing CRUD, we must always resort to the Motor driver.
Creating async CRUD transactions using Motor
Motor is an asynchronous driver that relies on the AsyncIO environment of the FastAPI. It wraps PyMongo to produce non-blocking and coroutine-based classes and methods needed to create asynchronous repository layers. It is almost like PyMongo when it comes to most of the requirements except for the database connectivity and repository implementation.
But before we proceed, we need to install the motor extension using the following pip command:
pip install motor
Setting up the database connectivity
Using the AsyncIO platform of the FastAPI, the Motor driver opens a connection to the MongoDB database through its AsyncIOMotorClient class. When instantiated, the default connection credential is always localhost at port 27017. Alternatively, we can specify the new details in str format through its constructor. The following script shows how to create a global AsyncIOMotorClient reference with the specified database credentials:
from motor.motor_asyncio import AsyncIOMotorClient
def create_async_db():
    global client
    client = AsyncIOMotorClient(str("localhost:27017"))
def create_db_collections():
    db = client.obrs
    buyers = db["buyer"]
    users = db["login"]
    return {"users": users, "buyers": buyers}
def close_async_db():
    client.close()
The format of the database URI is a string with a colon (:) in between the details. Now, the application needs the following Motor methods to start the database transactions:
- create_async_db(): A method for establishing the database connection and loading schema definitions
- close_async_db(): A method for closing the connection
APIRouter will require event handlers to manage these two core methods as application-level events. Later, we will register create_async_db() as a startup event and close_async_db() as a shutdown event. On the other hand, the create_db_collections() method creates some references to the login and buyer collections, which will be needed by the repository transactions later.
In general, creating the database connection and getting the reference to the document collections do not require the async/await expression since no I/O is involved in the process. These methods can be found in the /db_config/motor_config.py script file. It is time now to create Motor's repository layer.
Creating the model layer
PyMongo and Motor share the same approaches in creating both the request and data models. All base models, data classes, validators, and serializers used by PyMongo also apply to Motor connectivity.
Building the asynchronous repository layer
When it comes to the CRUD implementation, both PyMongo and Motor have some slight differences in the syntax but a considerable difference in the performance of each transaction. Their helper methods for inserting, updating, and deleting documents, including the necessary method parameters, are all the same, except that Motor has the non-blocking versions. Invoking the non-blocking Motor methods inside the repository requires an async/await expression. Here is an asynchronous version of PyMongo’s BuyerRepository:
class BuyerRepository:

    def __init__(self, buyers):
        self.buyers = buyers

    async def insert_buyer(self, users,
           details:Dict[str, Any]) -> bool:
        try:
           user = await users.find_one({"_id":
                details["user_id"]})
           … … … … …
           else:
               await self.buyers.insert_one(details)
           … … … … …
        return True

    async def add_purchase_history(self, id:int,
            details:Dict[str, Any]):
        try:
            … … … … …
            await self.buyers.update_one({"buyer_id": id},
                   {"$set":{"purchase_history":
                     buyer["purchase_history"]}})
            … … … … …
        return True
insert_buyer() in the preceding code block is defined as async because insert_one() is a non-blocking operation that requires an await invocation. The same goes for add_purchase_history(), which updates the purchase_history embedded documents using the non-blocking update_one():
    async def get_all_buyer(self):
        cursor = self.buyers.find()
        buyers = [asdict(Buyer(**json.loads(dumps(b))))
           for b in await cursor.to_list(length=None)]
        return buyers

    async def get_buyer(self, id:int):
        buyer = await self.buyers.find_one(
                    {"buyer_id": id})
        return asdict(Buyer(**json.loads(dumps(buyer))))
The delete_many() and find_one() operations are also invoked through an await expression. However, find() in Motor is not asynchronous and behaves differently than it does with PyMongo. The reason is that find() is not an I/O operation in Motor, and it returns an AsyncIOMotorCursor or asynchronous cursor, an iterable type that contains all the BSON documents. We apply async to the cursor when retrieving all its stored documents. The get_all_buyer() transaction in the preceding code shows how we call the find() operation and invoke the cursor to extract the necessary documents for JSON transformation. This repository class can be found in the /repository/motor/buyer.py script file. Let us now apply these CRUD transactions to our API services.
Running the CRUD transactions
For the repository to work with APIRouter, we need to create two event handlers to manage the database connection and document collection retrieval. The first event, which is the startup event that the Uvicorn server executes before the application runs, should trigger the create_async_db() method’s execution to instantiate AsyncIOMotorClient and make references to the collections. The second event, which is the shutdown event, runs when the Uvicorn server is shutting down and should trigger the close_async_db() execution to close the connection. APIRouter has an add_event_handler() method to create these two event handlers. The following is a portion of the APIRouter script that shows how to prepare the database connection for the BuyerRepository transactions:
… … … … … …
from db_config.motor_config import create_async_db,
  create_db_collections, close_async_db
… … … … … …
router = APIRouter()
router.add_event_handler("startup",
            create_async_db)
router.add_event_handler("shutdown",
            close_async_db)
The "startup" and "shutdown" values are pre-built configuration values and not just any arbitrary string values used to indicate the type of event handlers. We will discuss these event handlers in more detail in Chapter 8, Creating Coroutines, Events, and Message-Driven Transactions.
After setting these events handlers, the API services can now invoke the repository transactions asynchronously using an await/async expression. The validations and serialization utilities that are applied in PyMongo can also be utilized here in this version of BuyerRepository. The collections will be available to the API services upon injecting create_db_collections() into the API services. The add_buyer() API service showcases the implementation of an asynchronous REST transaction using the Motor driver:
@router.post("/buyer/async/add")
async def add_buyer(req: BuyerReq,
          db=Depends(create_db_collections)):
    buyer_dict = req.dict(exclude_unset=True)
    buyer_json = dumps(buyer_dict,
              default=json_serialize_date)
    repo:BuyerRepository = BuyerRepository(db["buyers"])

    result = await repo.insert_buyer(db["users"],
                  loads(buyer_json))
    if result == True:
        return JSONResponse(content={"message":
            "add buyer successful"}, status_code=201)
    else:
        return JSONResponse(content={"message":
            "add buyer unsuccessful"}, status_code=500)
Using PyMongo and Mongo drivers provides a minimal and exhaustive implementation of the MongoDB transactions. The core implementation of every CRUD transaction varies from one developer to another, and the approaches that are used to scrutinize and analyze the processes involved are managed in different ways. Also, there are no established standards for defining the document fields, such as data uniqueness, the length of the field value, the value range, and even the idea of adding a unique ID. To address these issues surrounding PyMongo and Motor, let us explore other ways of opening a connection to MongoDB to create CRUD transactions, such as using an ODM.
Implementing CRUD transactions using MongoEngine
MongoEngine is an ODM that uses PyMongo to create an easy-to-use framework that can assist in managing MongoDB documents. It offers API classes that can help generate model classes using its field types and attribute metadata. It provides a declarative way of creating and structuring the embedded documents.
Before we explore this ODM, we need to install it using the following pip command:
pip install mongoengine
Establishing database connection
MongoEngine has one of the most straightforward ways to establish a connection. Its mongoengine module has a connect() helper method that connects to the MongoDB database when it’s given the appropriate database connections. Our application must have a generator method to create a reference to the database connection and close this created connection after the transactions expire. The following script showcases the MongoEngine database connectivity:
from mongoengine import connect
def create_db():
    try:
        db = connect(db="obrs", host="localhost",
                 port=27017)
        yield db
    finally:
        db.close()
The connect() method has a mandatory first parameter, named db, which indicates the name of the database. The remaining parameters refer to the other remaining details of the database connection, such as host, port, username, and password. This configuration can be found in the /db_config/mongoengine_config.py script file. Let us now create data models for our MongoEngine repository.
Building the model layer
MongoEngine provides a convenient and declarative way of mapping BSON documents to the model classes through its Document API class. A model class must subclass Document to inherit the structure and properties of a qualified and valid MongoDB document. The following is a Login definition that’s been created using the Document API class:
from mongoengine import Document, StringField,
         SequenceField, EmbeddedDocumentField
import json
class Login(Document):
    id = SequenceField(required=True, primary_key=True)
    username = StringField(db_field="username",
         max_length=50, required=True, unique=True)
    password = StringField(db_field="password",
         max_length=50, required=True)
    profile = EmbeddedDocumentField(UserProfile,
         required=False)

    def to_json(self):
            return {
            "id": self.id,
            "username": self.username,
            "password": self.password,
            "profile": self.profile
        }

    @classmethod
    def from_json(cls, json_str):
        json_dict = json.loads(json_str)
        return cls(**json_dict)
Unlike PyMongo and the Motor drivers, MongoEngine can define class attributes using its Field classes and their properties. Some of its Field classes include StringField, IntField, FloatField, BooleanField, and DateField. These can declare the str, int, float, bool, and datetime.date class attributes, respectively.
Another convenient feature that this ODM has is that it can create SequenceField, which behaves the same as the auto_increment column field in a relational database or Sequence in an object-relational database. The id field of a model class should be declared as SequenceField so that it serves as the primary key of the document. Like in a typical sequence, this field has utilities to increment its value or reset it to zero, depending on what document record must be accessed.
Other than the field types, field classes can also provide field arguments to attributes such as choices, required, unique, min_value, max_value, max_length, and min_length to give constraints to the field values. The choices parameter, for instance, accepts an iterable of string values that will serve as an enumeration. The required parameter indicates whether the field always needs a field value, while the unique parameter means the field value has no duplicates in the collection. Violating the unique parameter will lead to the following error message:
Tried to save duplicate unique keys (E11000 duplicate key error collection: obrs.login index: username_...)
min_value and max_value, on the other hand, indicate the minimum and maximum values for the numeric fields, respectively. min_length specifies the minimum length of a string value, while max_length sets the maximum string length. The db_field parameter, on the other hand, can also be applied when specifying another document field name instead of the class attribute name. The given Login class also has username and password fields defined to hold string values, an id primary key defined as SequenceField, and an embedded document field to establish document association.
Creating document association
The profile field of Login creates a one-to-one association between the Login document and UserProfile. But before the association can work, we need to define the profile field as being of the EmbeddedDocumentField type and UserProfile as being of the EmbeddedDocument type. The following is the complete blueprint of UserProfile:
class UserProfile(EmbeddedDocument):
   firstname = StringField(db_field="firstname",
          max_length=50, required=True)
   lastname = StringField(db_field="lastname",
          max_length=50, required=True)
   middlename = StringField(db_field="middlename",
          max_length=50, required=True)
   position = StringField(db_field="position",
          max_length=50, required=True)
   date_approved = DateField(db_field="date_approved",
          required=True)
   status = BooleanField(db_field="status", required=True)
   level = IntField(db_field="level", required=True)
   login_id = IntField(db_field="login_id", required=True)
   booksale = EmbeddedDocumentListField(BookForSale,
           required=False)

   def to_json(self):
            return {
            "firstname": self.firstname,
            "lastname": self.lastname,
            "middlename": self.middlename,
            "position": self.position,
            "date_approved":
               self.date_approved.strftime("%m/%d/%Y"),
            "status": self.status,
            "level": self.level,
            "login_id": self.login_id,
            "books": self.books
        }

   @classmethod
   def from_json(cls, json_str):
        json_dict = json.loads(json_str)
        return cls(**json_dict)
The EmbeddedDocument API is a Document without an id and has no collection of its own. Subclasses of this API are model classes that have been created to be part of a core document structure, such as UserProfile being part of the Login details. Now, the field that refers to this document has a required property set to False since an embedded document can’t be present at all times.
On the other hand, a field declared as EmbeddedDocumentList is used to create a many-to-one association between documents. The preceding UserProfile class is strongly connected to a list of BookForSale embedded documents because of its declared booksale field. Again, the field type should always set its required property to False to avoid problems when dealing with empty values.
Applying custom serialization and deserialization
There are no built-in hooks for validation and serialization in this ODM. Every model class in the online book reselling application has implemented a from_json() class method that converts JSON details into a valid Document instance. When converting the BSON document into a JSON object, model classes must have the custom to_json() instance method, which builds the JSON structure and automatically transforms the BSON datetime into JSON-able date objects through formatting. Let us now create the repository layer using the model classes.
Implementing the CRUD transactions
MongoEngine provides the most convenient and straightforward approach to building the repository layer for the application. All its operations come from the Document model class and they are easy to use. LoginRepository uses the ODM to implement its CRUD transactions:
from typing import Dict, Any
from models.data.mongoengine import Login
class LoginRepository:

    def insert_login(self, details:Dict[str, Any]) -> bool:
        try:
            login = Login(**details)
            login.save()
        except Exception as e:
            print(e)
            return False
        return True

    def update_password(self, id:int, newpass:str) -> bool:
       try:
          login = Login.objects(id=id).get()
          login.update(password=newpass)
       except:
           return False
       return True

    def delete_login(self, id:int) -> bool:
        try:
            login = Login.objects(id=id).get()
            login.delete()
        except:
            return False
        return True
It only takes two lines for the insert_login() method to save the Login document. After creating the Login instance with the necessary document details, we simply call the save() method of the Document instance to pursue the insert transaction. When it comes to modifying some document values, the Document API class has an update() method that manages changes in state for every class attribute. But first, we need to find the document using the objects() utility method, which retrieves document structures from the collection. This objects() method can fetch a document by providing its parameter with an id field value or extracting a list of document records by supplying the method with a generic search expression. The instance of the retrieved document must invoke its update() method to pursue the modification of some, if not all, of its field values. The given update_password() method updates the password field of Login, which gives us a good template regarding how to pursue update operations on other field attributes.
On the other hand, delete_login() shows how to delete a Login document from its collection after it searches for the object using a simple call to the instance’s delete() method. The following script shows how to perform query transactions in MongoEngine:
    def get_all_login(self):
        login = Login.objects()
        login_list = [l.to_json() for l in login]
        return login_list

    def get_login(self, id:int):
        login = Login.objects(id=id).get()
        return login.to_json()
The only way to perform single- or multiple-document retrieval is to utilize the objects() method. There is no need to implement JSON converters for the query results because every Document model class has a to_json() method to provide the JSON-able equivalent of the instance. The given get_all_login() transaction uses list comprehension to create a list of JSON documents from the result of objects(), while the get_login() method invokes to_json() after extracting a single document.
Managing the embedded documents
It is easier to implement document associations with an ODM than the core PyMongo and Motor database drivers. Since the operations of MongoEngine are comfortable to use, it takes only a few lines to manage the embedded documents. In the following UserProfileRepository script, insert_profile() shows how adding a UserProfile detail to the Login document can be done by performing a simple object search and an update() call:
from typing import Dict, Any
from models.data.mongoengine import Login, UserProfile,
      BookForSale
class UserProfileRepository():

    def insert_profile(self, login_id:int,
             details:Dict[str, Any]) -> bool:
        try:
            profile = UserProfile(**details)
            login = Login.objects(id=login_id).get()
            login.update(profile=profile)
        except Exception as e:
            print(e)
            return False
        return True

    def add_book_sale(self, login_id:int,
             details:Dict[str, Any]):
        try:
            sale = BookForSale(**details)
            login = Login.objects(id=login_id).get()
            login.profile.booksale.append(sale)
            login.update(profile=login.profile)
        except Exception as e:
            print(e)
            return False
        return True
Likewise, the given add_book_sale() transaction creates a many-to-one association between BookForSale and UserProfile using the same approach applied in insert_profile() with an additional List's append() operation.
Querying the embedded documents is also feasible in MongoEngine. The ODM has a filter() method that uses field lookup syntax to refer to a specific document structure or list of embedded documents. This field lookup syntax consists of the field name of the embedded document, followed by a double underscore in place of the dot in the usual object attribute access syntax. Then, it has another double underscore to cater to some operators, such as lt, gt, eq, and exists. In the following code, get_all_profile()uses the profile__login_id__exists=True field lookup to filter all user_profile embedded documents that have valid login structures. However, the get_profile() transaction does not need to use filter() and field lookups because it can simply access the specific login document to fetch its profile details:
     def get_all_profile(self):
        profiles = Login.objects.filter(
               profile__login_id__exists=True)
        profiles_dict = list(
              map(lambda h: h.profile.to_json(),
                Login.objects().filter(
                    profile__login_id__exists=True)))
        return profiles_dict

    def get_profile(self, login_id:int):
        login = Login.objects(id=login_id).get()
        profile = login.profile.to_json()
        return profile
The preceding query transactions are just simple implementations compared to some other complex MongoEngine queries, which involve complicated embedded document structures that require complex field lookup syntax. Let us now apply the CRUD transactions to our API services.
Running the CRUD transactions
CRUD will not work without passing our create_db() method to the startup event and disconnect_db() to the shutdown event. The former will open the MongoDB connection during the Uvicorn startup, while the latter will close it during server shutdown.
The following script shows the application’s profile router with a create_profile() REST service that asks clients for a profile detail, given a specific login record, and pursues the insert transaction using UserProfileRepository:
from fastapi import APIRouter, Depends
from fastapi.responses import JSONResponse
from models.request.profile import UserProfileReq,
         BookForSaleReq
from repository.mongoengine.profile import
         UserProfileRepository
from db_config.mongoengine_config import create_db
router = APIRouter()
@router.post("/profile/login/add",
      dependencies=[Depends(create_db)])
def create_profile(login_id:int, req:UserProfileReq):
    profile_dict = req.dict(exclude_unset=True)
    repo:UserProfileRepository = UserProfileRepository()
    result = repo.insert_profile(login_id, profile_dict)
    if result == True:
        return req
    else:
        return JSONResponse(content={"message":
          "insert profile unsuccessful"}, status_code=500)
create_profile() is a standard API service that deals with MongoEngine’s synchronous insert_profile() transaction. When it comes to asynchronous REST services, it is not advisable to use MongoEngine because its platform only works with synchronous ones. In the next section, we will discuss an ODM that’s popular in building an asynchronous repository layer.
Implementing async transactions using Beanie
Beanie is a non-boilerplate mapper that utilizes the core features of Motor and Pydantic. This ODM offers a more straightforward approach to implementing asynchronous CRUD transactions than its precursor, the Motor driver.
To use Beanie, we need to install it using the following pip command:
pip install beanie
Important note
Installing Beanie may uninstall the current version of your Motor module because it sometimes requires lower version of Motor module. Pursuing this will produce errors in your existing Motor transactions.
Creating the database connection
Beanie uses the Motor driver to open a database connection to MongoDB. Instantiating the Motor’s AsyncIOMotorClient class with the database URL is the first step of configuring it. But what makes Beanie unique compared to other ODMs is how it pre-initializes and pre-recognizes the model classes that will be involved in a CRUD transaction. The ODM has an asynchronous init_beanie() helper method that initiates the model class initialization using the database name. Calling this method will also set up the collection-domain mapping, where all the model classes are registered in the document_models parameter of init_beanie(). The following script shows the database configuration that’s required to access our MongoDB database, obrs:
from motor.motor_asyncio import AsyncIOMotorClient
from beanie import init_beanie
from models.data.beanie import Cart, Order, Receipt
async def db_connect():
    global client
    client =
     AsyncIOMotorClient(f"mongodb://localhost:27017/obrs")
    await init_beanie(client.obrs,
         document_models=[Cart, Order, Receipt])

async def db_disconnect():
     client.close()
Here, db_connect() uses an async/await expression because its method invocation to init_beanie() is asynchronous. db_disconnect() will close the database connection by calling the close() method of the AsyncIOMotorClient instance. Both of these methods are executed as events, just like in MongoEngine. Their implementation can be found in the /db_config/beanie_config.py script file. Let us now create the model classes.
Defining the model classes
The Beanie ODM has a Document API class that’s responsible for defining its model classes, mapping them to MongoDB collections, and handling repository transactions, just like in MongoEngine. Although there is no Field directive for defining class attributes, the ODM supports Pydantic’s validation and parsing rules and typing extension for declaring models and their attributes. But it also has built-in validation and encoding features, which can be used together with Pydantic. The following script shows how to define Beanie model classes while it’s being configured:
from typing import Optional, List
from beanie import Document
from bson import datetime
class Cart(Document):
    id: int
    book_id: int
    user_id: int
    qty: int
    date_carted: datetime.datetime
    discount: float

    class Collection:
        name = "cart"
    … … … … … …

class Order(Document):
    id: int
    user_id: int
    date_ordered: datetime.datetime
    orders: List[Cart] = list()

    class Collection:
        name = "order"
    … … … … … …

class Receipt(Document):
    id: int
    date_receipt: datetime.datetime
    total: float
    payment_mode: int
    order: Optional[Order] = None

    class Collection:
        name = "receipt"
    class Settings:
        use_cache = True
        cache_expiration_time =
             datetime.timedelta(seconds=10)
        cache_capacity = 10
The id attribute of the given Document classes automatically translates into an _id value. This serves as the primary key of the document. Beanie allows you to replace the default ObjectId type of _id with another type, such as int, which is not possible in other ODMs. And with Motor, this ODM needs custom JSON serializers because it has difficulty converting BSON datetime types into Python datetime.date types during CRUD transactions.
A document in Beanie can be configured by adding the Collection and Settings nested classes. The Collection class can replace the default name of the collection where the model is supposed to be mapped. It can also provide indexes to document fields if needed. The Settings inner class, on the other hand, can override existing BSON encoders, apply caching, manage concurrent updates, and add validation when the document is being saved. These three model classes include the collection configuration in their definitions to replace the names of their respective collections with their class names.
Creating the document associations
Python syntax, Pydantic rules, and API classes are used to establish links between documents in this mapper. To create a one-to-one association between Order and Receipt, for instance, we only need to set an Order field attribute that will link to a single Receipt instance. For many-to-one associations, such as the relationship between Order and Cart, the Cart document should only need a list field that will contain all the Order embedded documents.
However, the ODM has a Link type, which can be used to define class fields to generate these associations. Its CRUD operations, such as save(), insert(), and update(), strongly support these Link types, so long as the link_rule parameter is provided in their parameters. For query transactions, the find() method can include the Link documents during document fetching, given that its fetch_links parameter is set to True. Now, let us implement the repository layer using the model classes.
Implementing the CRUD transactions
Implementing repositories with Beanie is similar to how it’s done with MongoEngine – that is, it uses short and direct CRUD syntax due to the convenient helper methods like create(), update(), and delete(), provided by the Document API class. However, the Beanie mapper creates an asynchronous repository layer because all the API methods that are inherited by the model classes are non-blocking. The following code for the CartRepository class shows a sample implementation of an asynchronous repository class using this Beanie ODM:
from typing import Dict, Any
from models.data.beanie import Cart
class CartRepository:

    async def add_item(self,
             details:Dict[str, Any]) -> bool:
        try:
            receipt = Cart(**details)
            await receipt.insert()
        except Exception as e:
            print(e)
            return False
        return True

    async def update_qty(self, id:int, qty:int) -> bool:
       try:
          cart = await Cart.get(id)
          await cart.set({Cart.qty:qty})
       except:
           return False
       return True

    async def delete_item(self, id:int) -> bool:
        try:
            cart = await Cart.get(id)
            await cart.delete()
        except:
            return False
        return True
The add_item() method showcases the use of the asynchronous insert()method to persist a newly created Cart instance. The Document API also has a create() method that works like insert(). Another option is to use the insert_one() class method instead of the instance methods. Moreover, adding multiple documents is allowed in this ODM because an insert_many() operation exists to pursue that kind of insert.
Updating a document can be initiated using two methods, namely set() and replace().update_qty() in the preceding script chooses the set() operation to update the current qty value of the items placed in a cart.
When it comes to document removal, the ODM only has the delete() method to pursue the transactions. This is present in the delete_item() transaction in the preceding code.
Retrieving a single document or a list of documents using this ODM is easy. No further serialization and cursor wrapping is needed during its query operations. When fetching a single document structure, the mapper provides the get() method if the fetching process only requires the _id field; it provides find_one() when the fetching process requires a conditional expression. Moreover, Beanie has a find_all() method that fetches all the documents without constraints and the find() method for retrieving data with conditions. The following code shows the query transaction for retrieving cart items from the database:
async def get_cart_items(self):
        return await Cart.find_all().to_list()

    async def get_items_user(self, user_id:int):
        return await Cart.find(
              Cart.user_id == user_id).to_list()

    async def get_item(self, id:int):
        return await Cart.get(id)
Both the find() and find_all() operations are used in the methods to return a FindMany object that has a to_list() utility that returns a list of JSON-able documents. Let us now apply our CRUD transactions to the API services.
Running the repository transactions
The CartRepository methods will only run successfully if db_connect() from the configuration file is injected into the router. Although injecting it into each API service is acceptable, our solution prefers injecting the component into APIRouter using Depends:
from repository.beanie.cart import CartRepository
from db_config.beanie_config import db_connect
router = APIRouter(dependencies=[Depends(db_connect)])
@router.post("/cart/add/item")
async def add_cart_item(req:CartReq):
    repo:CartRepository = CartRepository()
    result = await repo.add_item(loads(cart_json))
          "insert cart unsuccessful"}, status_code=500)
The asynchronous add_cart_item() service asynchronously inserts the cart account into the database using CartRepository.
Another asynchronous mapper that can integrate perfectly with FastAPI is ODMantic.
Building async repository for FastAPI using ODMantic
The dependencies of Beanie and ODMantic come from Motor and Pydantic. ODMantic also utilizes Motor’s AsyncIOMotorClient class to open a database connection. It also uses Pydantic features for class attribute validation, Python’s typing extension for type hinting, and other Python components for management. But its edge over Beanie is that it complies with ASGI frameworks such as FastAPI.
To pursue ODMantic, we need to install the extension using the following pip command:
pip install odmantic
Creating the database connection
Setting up the database connectivity in ODMantic is the same as what we do with the Beanie mapper, except that the setup includes creating an engine that will handle all its CRUD operations. This engine is AIOEngine from the odmantic module, which requires both the motor client object and the database name to be created successfully. The following is a complete implementation of the database connectivity needed by the ODMantic mapper:
from odmantic import AIOEngine
from motor.motor_asyncio import AsyncIOMotorClient
def create_db_connection():
   global client_od
   client_od =
     AsyncIOMotorClient(f"mongodb://localhost:27017/")
def create_db_engine():
   engine = AIOEngine(motor_client=client_od,
         database="obrs")
   return engine
def close_db_connection():
    client_od.close()
We need to create event handlers in APIRouter to run create_db_connection() and close_db_connection() for our repository transactions to work. Let us now implement the model layer of the ODM.
Creating the model layer
ODMantic has a Model API class that provides properties to model classes when subclassed. It relies on Python types and BSON specifications to define the class attributes. When transforming field types, such as converting a BSON datetime value into a Python datetime.date value, the mapper allows you to add custom @validator methods into the model classes to implement the appropriate object serializer. Generally, ODMantic relies on the pydantic module when it comes to data validation, unlike in the Beanie mapper. The following is a standard ODMantic model class definition:
from odmantic import Model
from bson import datetime
class Purchase(Model):
    purchase_id: int
    buyer_id: int
    book_id: int
    items: int
    price: float
    date_purchased: datetime.datetime

    class Config:
        collection = "purchase"
For advanced configurations, we can add a nested Config class to the model class to set these additional options, such as the collection option, which replaces the default name of the collection with a custom one. We can also configure some familiar options, such as json_encoders, to convert one field type into another supported one.
Establishing document association
When creating associations, the typical Python approach of declaring fields so that they refer to an embedded document(s) is still applicable in this ODM. However, this ODM mapper has an EmbeddedModel API class to create a model with no _id field; this can be linked to another document. The Model classes, on the other hand, can define a field attribute that will refer to an EmbeddedModel class to establish a one-to-one association or a list of EmbeddedModel instances for a many-to-one association.
Implementing the CRUD transactions
Creating the repository layer using ODMantic always requires the engine object that was created in the startup event. This is because all the CRUD operations that are needed will come from this engine. The following PurchaseRepository shows the operations from the AIOEngine object that we need to create CRUD transactions:
from typing import List, Dict, Any
from models.data.odmantic import Purchase
class PurchaseRepository:

    def __init__(self, engine):
        self.engine = engine

    async def insert_purchase(self,
              details:Dict[str, Any]) -> bool:
        try:
           purchase = Purchase(**details)
           await self.engine.save(purchase)

        except Exception as e:
            print(e)
            return False
        return True
This insert_purchase() method shows the standard way to insert a record into the database using ODMantic. Through the engine’s save() method, we can persist one document at a time using the model class. AIOEngine also provides the save_all() method for inserting a list of multiple documents into the associated MongoDB collection.
Now, there is no specific way to update transactions, but ODMantic allows you to fetch the record that needs to be updated. The following code can be used to update a record using ODMantic:
    async def update_purchase(self, id:int,
              details:Dict[str, Any]) -> bool:
       try:
          purchase = await self.engine.find_one(
                Purchase, Purchase.purchase_id == id)

          for key,value in details.items():
            setattr(purchase,key,value)

          await self.engine.save(purchase)
       except Exception as e:
           print(e)
           return False
       return True
After accessing and changing the field values, the fetched document object will be re-saved using the save() method to reflect the changes in physical storage. The complete process is implemented in the preceding update_purchase() transaction:
     async def delete_purchase(self, id:int) -> bool:
        try:
            purchase = await self.engine.find_one(
                Purchase, Purchase.purchase_id == id)
            await self.engine.delete(purchase)
        except:
            return False
        return True
When it comes to document removal, you must fetch the document to be deleted. We pass the fetched document object to the delete() method of the engine to pursue the removal process. This implementation is shown in the delete_purchase() method.
When fetching a single document so that it can be updated or deleted, AIOEngine has a find_one() method that requires two arguments: the model class name and the conditional expression, which involves either the id primary key or some non-unique fields. All the fields can be accessed like class variables. The following get_purchase() method retrieves a Purchase document with the specified id:
    async def get_all_purchase(self):
        purchases = await self.engine.find(Purchase)
        return purchases

    async def get_purchase(self, id:int):
        purchase = await self.engine.find_one(
            Purchase, Purchase.purchase_id == id)
        return purchase
The engine has a find() operation to retrieve all Purchase documents, for instance, from the database. It only needs an argument – the name of the model class. Let now apply our repository layer to the API services.
Running the CRUD transaction
For the repository classes to run, all the router services must be asynchronous. Then, we need to create the startup and shutdown event handlers for create_db_connection() and close_db_connection(), respectively, to open the connection for repository transactions. Lastly, for the repository class to work, create_db_engine() must be injected into each API service to derive the engine object:
from fastapi import APIRouter, Depends
from fastapi.responses import JSONResponse
from models.request.purchase import PurchaseReq
from repository.odmantic.purchase import PurchaseRepository
from db_config.odmantic_config import create_db_engine,
    create_db_connection, close_db_connection
from datetime import date, datetime
from json import dumps, loads
router = APIRouter()
router.add_event_handler("startup", create_db_connection)
router.add_event_handler("shutdown", close_db_connection)
@router.post("/purchase/add")
async def add_purchase(req: PurchaseReq,
          engine=Depends(create_db_engine)):
     purchase_dict = req.dict(exclude_unset=True)
     purchase_json = dumps(purchase_dict,
                default=json_serial)
     repo:PurchaseRepository = PurchaseRepository(engine)
     result = await
            repo.insert_purchase(loads(purchase_json))
     if result == True:
        return req
     else:
        return JSONResponse(content={"message":
          "insert purchase unsuccessful"}, status_code=500)
     return req
At this point, we should know how to compare these mappers and drivers when it comes to the setup and procedures needed to manage MongoDB documents. Each has its strengths and weaknesses based on the code they produce and the performance, popularity, support, and complexity of its solution. Some may work on other requirements, while others may not. The final ODM we will cover focuses on being the lightest and least obtrusive mapper. It aims to fit into an existing application without generating syntax and performance problems.
Creating CRUD transactions using MongoFrames
If you are tired of using complicated and heavy-loaded ODMs, then MongoFrames is ideal for your requirements. MongoFrames is one of the newest ODMs and is very convenient to use, especially when building a new repository layer for an already existing complex and legacy FastAPI microservice application. But this mapper can only create synchronous and standard types of CRUD transactions.
But before we proceed, let us install the extension module using pip:
pip install MongoFrames
Creating the database connection
The MongoFrames platform runs on top of PyMongo, which is why it cannot build an asynchronous repository layer. To create the database connection, it uses the MongoClient API class from the pymongo module, with the database URL in string format. Unlike in the other ODMs, where we create a client variable, in this mapper, we access the variable _client class from the Frame API class to refer to the client connection object. The following code shows create_db_client(), which will open the database connection for our app, and disconnect_db_client(), which will close this connection:
from pymongo import MongoClient
from mongoframes import Frame
def create_db_client():
    Frame._client =
        MongoClient('mongodb://localhost:27017/obrs')

def disconnect_db_client():
    Frame._client.close()
Just like in the previous ODMs, we need event handlers to execute these core methods to start building the model and repository layers.
Building the model layer
The process of creating model classes in MongoFrames is called framing because it uses the Frame API class to define the model classes. Once inherited, Frame does not require a model class to define its attributes. It uses the _fields property to contain all the necessary fields of the document without indicating any metadata. The following model classes are defined by the Frame API class:
from mongoframes import Frame, SubFrame
class Book(Frame):
    _fields = {
        'id ',
        'isbn',
        'author',
        'date_published',
        'title',
        'edition',
        'price',
        'category'
    }
    _collection = "book"


class Category(SubFrame):

    _fields = {
        'id',
        'name',
        'description',
        'date_added'
        }

    _collection = "category"
class Reference(Frame):
    _fields = {
        'id',
        'name',
        'description',
        'categories'
        }

    _collection = "reference"
A Frame model class can wrap a document in dictionary form or in a kwargs that contains the key-value details of the document’s structure. It can also provide attributes and helper methods that can help pursue CRUD transactions. All the fields of the model class can be accessed through dot (.) notation, just like typical class variables.
Creating the document association
We need to define the SubFrame model before creating associations among these documents. A SubFrame model class is mapped to an embedded document structure and has no collection table of its own. The MongoFrames mapper provides operations that allow you to append, update, remove, and query the SubFrame class of the Frame instance. These operations will determine the type of association among documents since the field references of Frame do not have specific field types. The Reference document, for instance, will have a list of categories linked to its categories field because our transaction will build that association as designed. A Book document, on the other hand, will refer to a Category child document through its category field because a transaction will build that association at runtime. So, MongoFrames is both restrained and non-strict when it comes to defining the type of association among these documents.
Creating the repository layer
The Frame API class provides the model classes and the necessary helper methods to implement the asynchronous repository transactions. The following code shows an implementation of a repository class that uses MongoFrames to create its CRUD transactions:
from mongoframes.factory.makers import Q
from models.data.mongoframe import Book, Category
from typing import List, Dict, Any
class BookRepository:
    def insert_book(self,
             details:Dict[str, Any]) -> bool:
        try:
           book = Book(**details)
           book.insert()

        except Exception as e:
            return False
        return True
The given insert_book() transaction inserts a book instance into its mapped collection. The Frame API provides an insert() method that saves the given model object into the database. It also has insert_many(), which inserts a list of multiple BSON documents or a list of model instances. The following script shows how to create an UPDATE transaction in MongoFrames:
    def update_book(self, id:int,
            details:Dict[str, Any]) -> bool:
       try:
        book = Book.one(Q.id == id)
        for key,value in details.items():
            setattr(book,key,value)
        book.update()
       except:
           return False
       return True
The given update_book() transaction shows that the Frame model class also has an update() method, which recognizes and saves the changes reflected in the field values of a document object right after fetching them from the collection. A similar process is applied to the delete_book() process, which calls the delete() operation of the document object right after fetching it from the collection:
    def delete_book(self, id:int) -> bool:
        try:
           book = Book.one(Q.id == id)
           book.delete()
        except:
            return False
        return True
When creating query transactions, the Frame API provides two class methods – the many() method, which extracts all BSON documents, and the one() method, which returns a single document object. Both operations can accept a query expression as an argument if there are any constraints. Moreover, MongoFrames has a Q query maker class that’s used to build conditionals in a query expression. The expression starts with Q, followed by dot (.) notation to define the field name or path – for example, Q.categories.fiction – followed by an operator (for example, ==, !=, >, >=, <, or <=) and finally a value. The following code shows examples of the query transactions being translated using the MongoFrames ODM syntax:
    def get_all_book(self):
        books = [b.to_json_type() for b in Book.many()]
        return books

    def get_book(self, id:int):
        book = Book.one(Q.id == id).to_json_type()
        return book
The get_book() method shows how to extract a single Book document with a Q expression that filters the correct id, while get_all_book() retrieves all Book documents without any constraints.
The many() operator returns a list of Frame objects, while the one() operator returns a single Frame instance. To convert the result into JSON-able components, we need to invoke the to_json_type() method in each Frame instance.
As explained earlier, adding embedded documents is determined by the operation and not by the model attributes. In the following add_category() transaction, it is clear that a Category object has been assigned to a category field of a Book instance, even if the field is not defined to refer to an embedded document of the Category type. Instead of throwing an exception, MongoFrame will update the Book document right after the update() call:
    def add_category(self, id:int,
               category:Category) -> bool:
       try:
        book = Book.one(Q.id == id)
        book.category = category
        book.update()
       except:
           return False
       return True
Now, it is time to apply these CRUD transactions to our API services.
Applying the repository layer
Our repository classes will not work if we do not inject the create_db_client() injectable into the router. The following solution injects the component into APIRouter, even if it is acceptable to inject it into each API service implementation:
from fastapi import APIRouter, Depends
from fastapi.responses import JSONResponse
from models.request.category import BookReq
from repository.mongoframe.book import BookRepository
from db_config.mongoframe_config import create_db_client
from datetime import date, datetime
from json import dumps, loads
router = APIRouter(
         dependencies=[Depends(create_db_client)])
@router.post("/book/create")
def create_book(req:BookReq):
    book_dict = req.dict(exclude_unset=True)
    book_json = dumps(book_dict, default=json_serial)
    repo:BookRepository = BookRepository()
    result = repo.insert_book(loads(book_json))
    if result == True:
        return req
    else:
        return JSONResponse(content={"message":
          "insert book unsuccessful"}, status_code=500)
The create_book() service uses BookRepository to insert book details into the MongoDB database. In general, MongoFrames has an easy setup because it requires fewer configuration details for creating the database connection, building the model layer, and implementing the repository transactions. Its platform can be adapted to the existing requirements of the application and can easily reflect changes if modifications need to be made to its mapping mechanisms.
Summary
In this chapter, we looked at various ways to manage data using MongoDB. We utilized MongoDB to store non-relational data for our online book reselling system since we expect the data to become large when information is exchanged between the book buyers and resellers. Additionally, the details involved in the transactions are mainly strings, floats, and integers, which are all order and purchase values that will be easier to mine and analyze if they’re stored in schema-less storage.
This chapter took the non-relational data management roadmap for utilizing the data in sales forecasting, regression analysis of book readers’ demands, and other descriptive data analysis forms.
First, you learned how the PyMongo and Motor drivers connect the FastAPI application to the MongoDB database. After understanding the nuts and bolts of creating CRUD transactions using these drivers, you learned that ODM is the better option for pursuing MongoDB connectivity. We explored the features of MongoEngine, Beanie, ODMantic, and MongoFrames and studied their strengths and weaknesses as ODM mappers. All these ODMs can be integrated well with the FastAPI platform and provide the application with a standardized way to back up data.
Now that we’ve spent two chapters covering data management, in the next chapter, we will learn how to secure our FastAPI microservice applications.