
7
Securing the REST APIs
Building microservices means exposing the entire application to the worldwide web. For every request-response transaction, the client accesses the endpoint of the API publicly, which poses potential risks to the application. Unlike web-based applications, API services have weak mechanisms to manage user access using login controls. Thus, this chapter will provide several ways to protect the API services created using the FastAPI framework.
There is no such thing as perfect security. The main goal is to establish policies and solutions related to the confidentiality, integrity, and availability of these services. The confidentiality policy requires tokens, encryption and decryption, and certificates as mechanisms to make some APIs private. On the other hand, the integrity policy involves maintaining the data exchange as authentic, accurate, and reliable by using a "state" and hashed codes during the authentication and authorization process. The availability policy means protecting the endpoint access from DoS attacks, phishing, and timing attacks using reliable tools and Python modules. Overall, these three aspects of the security model are the essential elements to consider when building security solutions for our microservices.
Although FastAPI has no built-in security framework, it supports different authentication modes such as Basic and Digest. It also has built-in modules that implement security specifications such as OAuth2, OpenID, and OpenAPI. The following main topics will be covered in this chapter to explain and illustrate the concepts and solutions for securing our FastAPI services:
- Implementing Basic and Digest authentication
- Implementing password-based authentication
- Applying JWTs
- Creating scope-based authorization
- Building the authorization code flow
- Applying the OpenID Connect specification
- Using built-in middleware for authentication
Technical requirements
The software prototype for this chapter is a secure online auction system designed to manage online bidding on various items auctioned by its registered users. The system can bid on any items based within a price range and even declare those who won the bidding. The system needs to secure some sensitive transactions to avoid data breaches and biased results. The prototype will be using SQLAlchemy as the ORM for managing data. There will be 10 versions of our prototype and each will showcase a different authentication scheme. All 10 of these projects (ch07a to ch07j) can be found here: https://github.com/PacktPublishing/Building-Python-Microservices-with-FastAPI.
Implementing Basic and Digest authentication
The Basic and Digest authentication schemes are the easiest authentication solutions that we can use to secure API endpoints. Both schemes are alternative authentication mechanisms that can be applied to small and low-risk applications without requiring complex configuration and coding. Let us now use these schemes to secure our prototype.
Using Basic authentication
The most straightforward way to secure the API endpoint is the Basic authentication approach. However, this authentication mechanism must not be applied to high-risk applications because the credentials, commonly a username and password, sent from the client to the security scheme provider are in the Base64-encoded format, which is vulnerable to many attacks such as brute force, timing attacks, and sniffing. Base64 is not an encryption algorithm but simply a way of representing the credentials in ciphertext format.
Applying HttpBasic and HttpBasicCredentials
The prototype, ch07a, uses the Basic authentication mode to secure its administration and bidding and auctioning transactions. Its implementation in the /security/secure.py module is shown in the following code:
from passlib.context import CryptContext
from fastapi.security import HTTPBasicCredentials
from fastapi.security import HTTPBasic
from secrets import compare_digest
from models.data.sqlalchemy_models import Login
crypt_context = CryptContext(schemes=["sha256_crypt",
                    "md5_crypt"])
http_basic = HTTPBasic()
The FastAPI framework supports different authentication modes and specifications through its fastapi.security module. To pursue the Basic authentication scheme, we need to instantiate the HTTPBasic class of the module and inject it into each API service to secure the endpoint access. The http_basic instance, once injected into the API services, causes the browser to pop up a login form, through which we type the username and password credentials. Logging in will trigger the browser to send a header with the credentials to the application. If the application encounters a problem with receiving it, the HTTPBasic scheme will throw an HTTP status code 401 with an "Unauthorized" message. If there are no errors in the form handling, the application must receive a WWW-Authenticate header with a Basic value and an optional realm parameter.
On the other hand, the /ch07/login service will call the authentication()method to verify whether the browser credentials are authentic and correct. We need to be very careful in accepting user credentials from browsers since they are prone to various attacks. First, we can require endpoint users to use an email address as their username and require long passwords with a combination of different characters, numbers, and symbols. All stored passwords must be encoded using the most reliable encryption tools, such as the CryptContext class from the passlib module. The passlib extension provides more secured hashing algorithms than any Python encryption module. Our application uses SHA256 and MD5 hashing algorithms instead of the recommended bcrypt, which is slower and prone to attacks.
Second, we can avoid storing the credentials in the source code and use database storage or a.env file instead. The authenticate() method checks the credentials against the Login database record provided by the API service for correctness.
Lastly, always use the compare_digest() from the secret module when comparing credentials from the browser with the Login credentials stored in the database. This function randomly compares two strings while guarding the operation against timing attacks. A timing attack is a kind of attack that compromises the crypto-algorithm execution, which happens when there is a linear comparison of strings in the system:
def verify_password(plain_password, hashed_password):
    return crypt_context.verify(plain_password,
        hashed_password)
def authenticate(credentials: HTTPBasicCredentials,
         account:Login):
    try:
        is_username = compare_digest(credentials.username,
             account.username)
        is_password = compare_digest(credentials.password,
             account.username)
        verified_password =
             verify_password(credentials.password,
                   account.passphrase)
        return (verified_password and is_username and
               is_password)
    except Exception as e:
        return False
Our authenticate() method has all the needed requirements to help reduce attacks from outside factors. But the ultimate solution to secure Basic authentication is to install and configure a Transport Layer Security (TLS) (or HTTPS, or SSL) connection for the application.
Now, we need to implement a /ch07/login endpoint to apply the Basic authentication scheme. The http_basic instance is injected into this API service to extract HTTPBasicCredentials, which is the object that contains the username and password details from the browser. This service is also the one that calls the authenticate() method to check the user credentials. If the method returns a False value, the service will raise an HTTP status code 400 with an "Incorrect credentials" message:
from fastapi import APIRouter, Depends, HTTPException
from fastapi.security import HTTPBasicCredentials
from security.secure import authenticate,
            get_password_hash, http_basic
router = APIRouter()
@router.get("/login")
def login(credentials: HTTPBasicCredentials =
     Depends(http_basic), sess:Session = Depends(sess_db)):

    loginrepo = LoginRepository(sess)
    account = loginrepo.get_all_login_username(
                     credentials.username)
    if authenticate(credentials, account) and
            not account == None:
        return account
    else:
        raise HTTPException(
            status_code=400,
               detail="Incorrect credentials")

@router.get("/login/users/list")
def list_all_login(credentials: HTTPBasicCredentials =
     Depends(http_basic), sess:Session = Depends(sess_db)):
    loginrepo = LoginRepository(sess)
    users = loginrepo.get_all_login()
    return jsonable_encoder(users)
Each endpoint of the online auction system must have the injected http_basic instance to secure it from public access. For instance, the cited list_all_login() service can only return a list of all users if the user is an authenticated one. By the way, there is no reliable procedure to log off using Basic authentication. If the WWW-Authenticate header has been issued and recognized by the browser, we will seldom see the login form of the browser pop up.
Executing the login transaction
We can use either the curl command or the browser to perform the /ch07/login transaction. But to highlight the support of FastAPI, we will be using its OpenAPI dashboard to run /ch07/login. After accessing http://localhost:8000/docs on the browser, locate the /ch07/login GET transaction and click the Try it out button. The browser’s login form, as shown in Figure 7.1, will pop up after clicking the button:
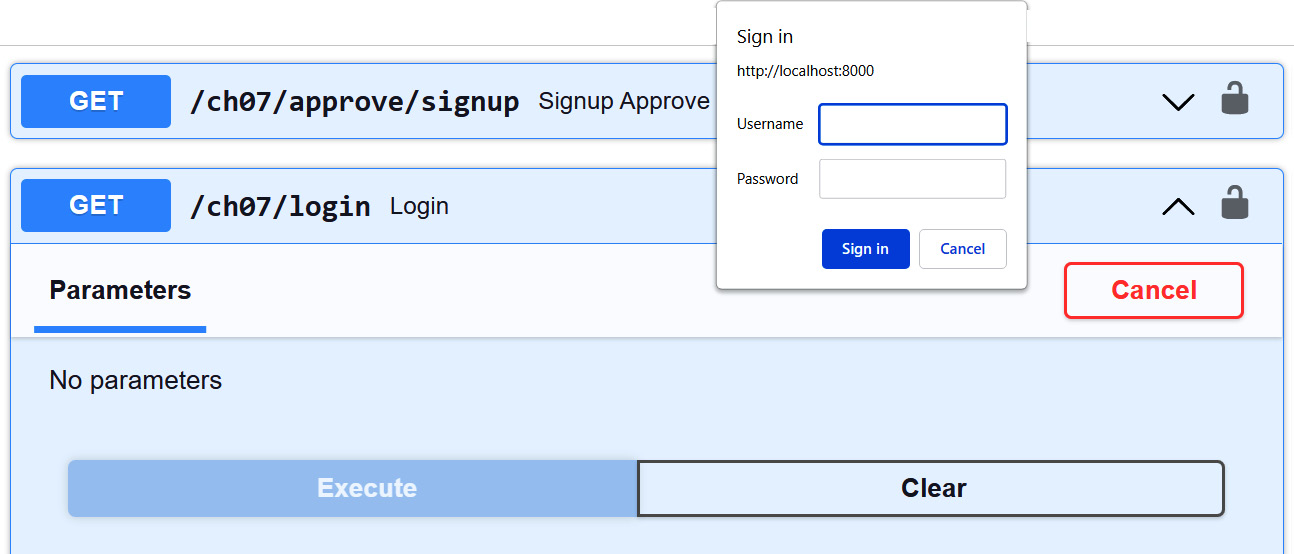
Figure 7.1 – The browser’s login form
After the Username and Password input, click the Sign in button on the login form to check whether the credentials are in the database. Otherwise, the app has /ch07/signup/add and /ch07/approve/signup to add the user credentials you want to test. Remember that all stored passwords are encrypted. Figure 7.2 shows how /ch07/login will output the user’s Login record after the authentication process finds that the user credentials are valid:

Figure 7.2 – The /login response
Now that the user is authenticated, run /ch07/login/users/list through the OpenAPI dashboard to retrieve the list of login details. The uvicorn server log will show the following log message:
INFO: 127.0.0.1:53150 - "GET /ch07/login/users/list HTTP/1.1" 200 OK
This means that the user is authorized to run the endpoint. Now, let us apply the Digest authentication scheme to our prototype.
Using Digest authentication
Digest authentication is more secure than the Basic scheme because the former needs to hash the user credentials first before sending the hashed version to the application. Digest authentication in FastAPI does not include an automatic encryption process of user credentials using the default MD5 encryption. It is an authentication scheme that stores credentials in a .env or .config property file and creates a hashed string value for these credentials before the authentication. The ch07b project applies the Digest authentication scheme to secure the bidding and auctioning transactions.
Generating the hashed credentials
So, before we start the implementation, we first need to create a custom utility script, generate_hash.py, that generates a digest in binary form using Base64 encoding. The script must have the following code:
The urlsafe_b64encode() function from the base64 module creates a digest in binary format from the username:password credential format. After running the script, we save the digest value anywhere safe, but not in the source code.
Passing the user credentials
Aside from the digest, we also need to save the user credentials for the Digest scheme provider later. Unlike the standard Digest authentication procedure, where the user negotiates with the browser, FastAPI requires storing the user credentials in a.env or .config file inside our application to be retrieved by the authentication process. In the ch07b project, we save the username and password inside the .config file, in this manner:
[CREDENTIALS]
USERNAME=sjctrags
PASSWORD=sjctrags
Then, we create a parser through the ConfigParser utility to extract the following details from the .config file and build a dict out of the serialized user details. The following build_map() is an example of the parser implementation:
import os
from configparser import ConfigParser
def build_map():
    env = os.getenv("ENV", ".config")
    if env == ".config":
        config = ConfigParser()
        config.read(".config")
        config = config["CREDENTIALS"]
    else:
        config = {
            "USERNAME": os.getenv("USERNAME", "guest"),
            "PASSWORD": os.getenv("PASSWORD", "guest"),
        }
    return config
Using HTTPDigest and HTTPAuthorizationCredentials
The FastAPI framework has an HTTPDigest from its fastapi.security module that implements a Digest authentication scheme with a different approach to managing user credentials and generating the digest. Unlike in Basic authentication, the HTTPDigest authentication process happens at the APIRouter level. We inject the following authenticate()dependable into the API services through the HTTP operator, including /login, where the authentication starts:
from fastapi import Security, HTTPException, status
from fastapi.security import HTTPAuthorizationCredentials
from fastapi.security import HTTPDigest
from secrets import compare_digest
from base64 import standard_b64encode
http_digest = HTTPDigest()
def authenticate(credentials:
    HTTPAuthorizationCredentials = Security(http_digest)):

    hashed_credentials = credentials.credentials
    config = build_map()
    expected_credentials = standard_b64encode(
        bytes(f"{config['USERNAME']}:{config['PASSWORD']}",
           encoding="UTF-8")
    )
    is_credentials = compare_digest(
          bytes(hashed_credentials, encoding="UTF-8"),
               expected_credentials)

    if not is_credentials:
        raise HTTPException(
            status_code=status.HTTP_401_UNAUTHORIZED,
            detail="Incorrect digest token",
            headers={"WWW-Authenticate": "Digest"},
        )
The authenticate() method is where the http_digest is injected to extract the HTTPAuthorizationCredentials that contains the digest byte value. After extraction, it checks whether the digest matches the credentials saved in the .config file. We also use compare_digest to compare hashed_credentials from the header and the Base64-encoded credentials from the .config file.
Executing the login transaction
After implementing the authenticate() method, we inject it into the API services, not in the method parameter, but in its HTTP operator. Notice that the http_digest object is not injected directly into the API services, unlike in the Basic authentication scheme. The following implementation shows how the authenticate() dependable is applied to secure all the crucial endpoints of the application:
from security.secure import authenticate
@router.get("/login", dependencies=[Depends(authenticate)])
def login(sess:Session = Depends(sess_db)):
    return {"success": "true"}

@router.get("/login/users/list",
      dependencies=[Depends(authenticate)])
def list_all_login(sess:Session = Depends(sess_db)):
    loginrepo = LoginRepository(sess)
    users = loginrepo.get_all_login()
    return jsonable_encoder(users)
Since the Digest authentication scheme behaves like the OpenID authentication, we will be using the curl command to run /ch07/login. The crucial part of the command is the issuance of the Authorization header with the value containing the Base64-encoded username:password digest generated by the generate_hash.py script we executed beforehand. The following curl command is the correct way of logging into our FastAPI application that uses the Digest authentication scheme:
curl --request GET --url http://localhost:8000/ch07/login --header "accept: application/json" --header "Authorization: Digest c2pjdHJhZ3M6c2pjdHJhZ3M=" --header "Content-Type: application/json"
We also use the same command to run the rest of the secured API services.
Most enterprise applications nowadays seldom use Basic and Digest authentication schemes because of their vulnerability to many attacks. More than that, both authentication schemes require sending credentials to the secured API services, which is also another risk. Moreover, at the time of writing, FastAPI does not yet fully support the standard Digest authentication, which is also a disadvantage to other applications that need the standard one. So, let us now explore the solution to secure API endpoints using the OAuth 2.0 specification.
Implementing password-based authentication
The OAuth 2.0 specification, or OAuth2, is the most preferred solution for authenticating API endpoint access. The OAuth2 authorization framework defines the four authorization flows, which are implicit, client credentials, authorization code, and resource password flows. The first three of these can be used with third-party authentication providers, which will authorize the access of the API endpoints. In the FastAPI platform, the resource password flow can be customized and implemented within the application to carry out the authentication procedure. Let us now explore how FastAPI supports the OAuth2 specification.
Installing the python-multipart module
Since OAuth2 authentication will not be possible without a form handling procedure, we need to install the python-multipart module before pursuing the implementation part. We can run the following command to install the extension:
pip install python-multipart
Using OAuth2PasswordBearer and OAuth2PasswordRequestForm
The FastAPI framework fully supports OAuth2, especially the password flow type of the OAuth2 specification. Its fastapi.security module has an OAuth2PasswordBearer that serves as the provider for password-based authentication. It also has OAuth2PasswordRequestForm, which can declare a form body with required parameters, username and password, and some optional ones such as scope, grant_type, client_id, and client_secret. This class is directly injected into the /ch07/login API endpoint to extract all the parameter values from the browser’s login form. But it is always an option to use Form(…) to capture all the individual parameters.
So, let us start the solution by creating the OAuth2PasswordBearer to be injected into a custom function dependency that will validate the user credentials. The following implementation shows that get_current_user() is the injectable function in our new application, ch07c, which utilizes the oath2_scheme injectable to extract a token:
from fastapi.security import OAuth2PasswordBearer
from sqlalchemy.orm import Session
from repository.login import LoginRepository
from db_config.sqlalchemy_connect import sess_db
oauth2_scheme =
    OAuth2PasswordBearer(tokenUrl="ch07/login/token")
def get_current_user(token: str = Depends(oauth2_scheme),
           sess:Session = Depends(sess_db) ):
    loginrepo = LoginRepository(sess)
    user = loginrepo.get_all_login_username(token)
    if user == None:
        raise HTTPException(
            status_code=status.HTTP_401_UNAUTHORIZED,
            detail="Invalid authentication credentials",
            headers={"WWW-Authenticate": "Bearer"},
        )
    return user
For the resource password flow, injecting oauth2_scheme will return a username as a token. get_current_user() will check whether that username belongs to a valid user account stored in the database.
Executing the login transaction
In this authentication scheme, /ch07/login/token is also the tokenUrl parameter of OAuth2PasswordBearer. The tokenUrl parameter is required for password-based OAuth2 authentication because this is the endpoint service that will capture the user credentials from the browser’s login form. OAuth2PasswordRequestForm is injected into /cho07/login/token to retrieve the username, password, and grant_type parameters of the unauthenticated user. These three parameters are the essential requirements to invoke /ch07/login/token for token generation. This dependency is shown in the following implementation of the login API service:
from sqlalchemy.orm import Session
from db_config.sqlalchemy_connect import sess_db
from repository.login import LoginRepository
from fastapi.security import OAuth2PasswordRequestForm
from security.secure import get_current_user, authenticate
@router.post("/login/token")
def login(form_data: OAuth2PasswordRequestForm = Depends(),
             sess:Session = Depends(sess_db)):
    username = form_data.username
    password = form_data.password
    loginrepo = LoginRepository(sess)
    account = loginrepo.get_all_login_username(username)
    if authenticate(username, password, account) and
              not account == None:
        return {"access_token": form_data.username,
                  "token_type": "bearer"}
    else:
        raise HTTPException(
            status_code=400,
               detail="Incorrect username or password")
Aside from verifying from the database, the login() service will also check whether the password value matches the encrypted passphrase from the queried account. If all the verification succeeds, /ch07/login/token must return a JSON object with the required properties, access_token and token_type. The access_token property must have the username value, and token_type the "bearer" value.
Instead of creating a custom frontend for the login form, we will be utilizing the OAuth2 form provided by OpenAPI in the framework. We just click the Authorize button on the upper-right-hand side of the OpenAPI dashboard, as shown in Figure 7.3:
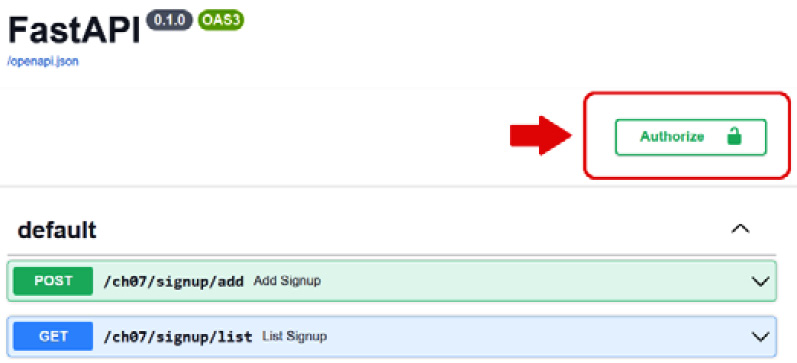
Figure 7.3 – The Authorize button
The button will trigger a built-in login form to pop up, shown in Figure 7.4, which we can use to test our solution:
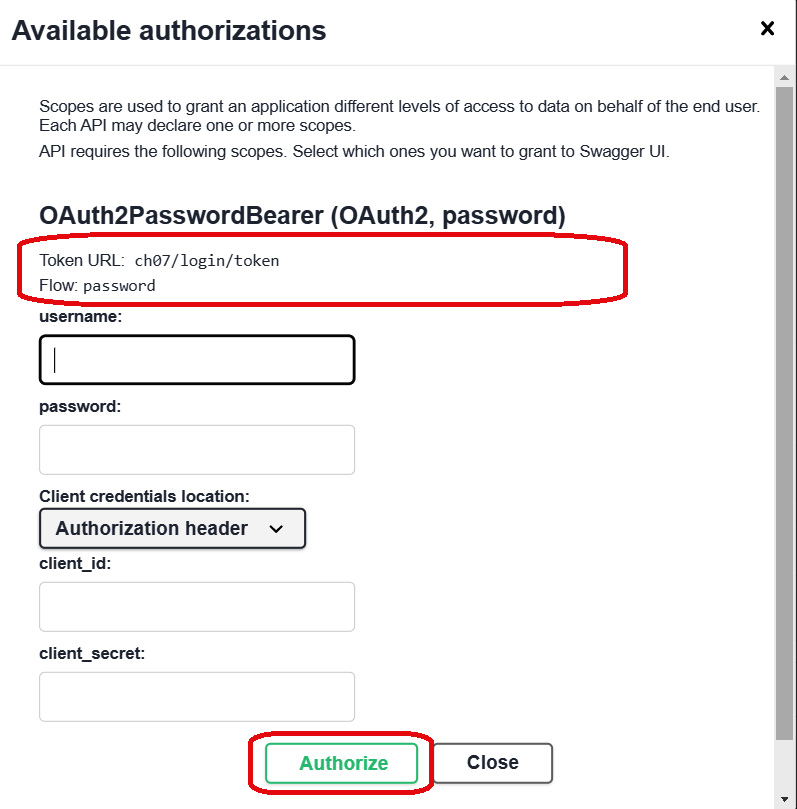
Figure 7.4 – The OAuth2 login form
Everything is fine if the OAuth2 login form detects the correct tokenURL specified in the OAuth2PasswordBearer instantiation. The OAuth2 flow or grant_type indicated in the login form must be "password". After logging the verified credential, the form’s Authorize button will redirect the user to an authorization form, shown in Figure 7.5, which will prompt the user to log out or proceed with the authenticated access:
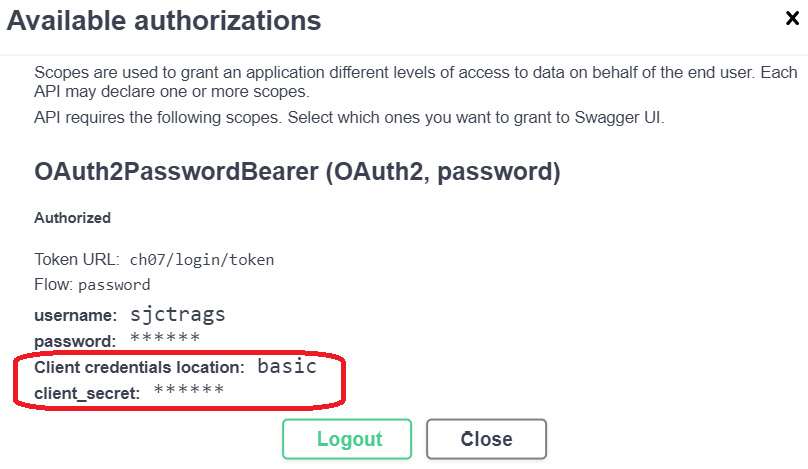
Figure 7.5 – The authorization form
Generally, the OAuth2 specification recognizes two client or application types: confidential and public clients. The confidential clients utilize authentication servers for security, such as in this online auction system that uses the FastAPI server through the OpenAPI platform. In its setup, it is not mandatory to provide the client_id and client_secret values to the login form since the server will generate these parameters during the authentication process. But unfortunately, these values are not revealed to the client, as shown in Figure 7.5. On the other hand, the public clients do not have any means to generate and use client secrets as in typical web-based and mobile applications. Therefore, these applications must include client_id, client_secret, and other required parameters during login.
Securing the endpoints
To secure the API endpoints, we need to inject the get_current_user() method into each API service method. The following is an implementation of a secured add_auction() service that utilizes the get_current_user() method:
@router.post("/auctions/add")
def add_auction(req: AuctionsReq,
      current_user: Login = Depends(get_current_user),
      sess:Session = Depends(sess_db)):
    auc_dict = req.dict(exclude_unset=True)
    repo:AuctionsRepository = AuctionsRepository(sess)
    auction = Auctions(**auc_dict)
    result = repo.insert_auction(auction)
    if result == True:
        return auction
    else:
        return JSONResponse(content=
         {'message':'create auction problem encountered'},
            status_code=500)
The get_current_user() injectable will return a valid Login account if the access is allowed. Moreover, you will notice that all padlock icons of the secured API endpoints that include /ch07/auctions/add, shown in Figure 7.6, are closed. This indicates that they are ready to be executed since the user is already an authenticated one:
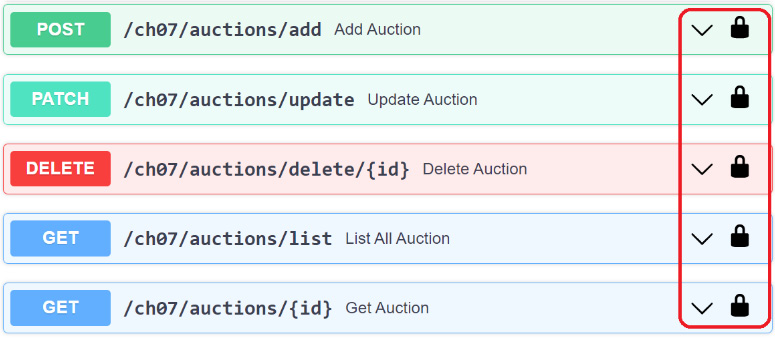
Figure 7.6 – An OpenAPI dashboard showing secured APIs
This solution is a problem for an open network setup, for instance, because the token used is a password. This setup allows attackers to easily forge or modify the token during its transmission from the issuer to the client. One way to protect the token is to use a JSON Web Token (JWT).
Applying JWTs
JWT is an open source standard used to define a solution for sending any information during the authentication and authorization between issuers and clients. Its goal is to generate access_token properties that are digitally signed, URL-safe, and always verifiable by the client. However, it is not perfectly safe because anyone can decode the token if needed. Thus, it is advisable not to include all the valuable and confidential information in the token string. A JWT is an effective way of providing OAuth2 and OpenID specifications with more reliable tokens than passwords.
Generating the secret key
But before we start building the authentication scheme, we first need to generate a secret key, which is an essential element in creating the signature. The JWT has a JSON Object Signing and Encryption (JOSE) header, which is the metadata that describes which algorithm to use for plain-text encoding, while the payload is the data we need to encode into the token. When the client requests to log in, the authorization server signs a JWT using a signature. But the signature will only be generated by the algorithm indicated in the header, which will take the header, payload, and secret key as inputs. This secret key is a Base64-encoded string manually created outside of the server and should be stored separately within the authorization server. ssh or openssl is the appropriate utility to generate this long and randomized key. Here, in ch07d, we run the following openssl command from a GIT tool or any SSL generator to create the key:
openssl rand -hex 32
Creating the access_token
In the ch07d project, we will store the secret key and algorithm type in some reference variables in its /security/secure.py module script. These variables are used by the JWT-encoding procedure to generate the token, as shown in the following code:
from jose import jwt, JWTError
from datetime import datetime, timedelta
SECRET_KEY = "tbWivbkVxfsuTxCP8A+Xg67LcmjXXl/sszHXwH+TX9w="
ALGORITHM = "HS256"
ACCESS_TOKEN_EXPIRE_MINUTES = 30
def create_access_token(data: dict,
           expires_after: timedelta):
    plain_text = data.copy()
    expire = datetime.utcnow() + expires_after
    plain_text.update({"exp": expire})
    encoded_jwt = jwt.encode(plain_text, SECRET_KEY,
            algorithm=ALGORITHM)
    return encoded_jwt
Within the JWT Python extension, we chose the python-jose module to generate the token because it is reliable and has additional cryptographic functions that can sign complex data content. Install this module first using the pip command before using it.
So now, the /ch07/login/token endpoint will invoke the create_access_token() method to request the JWT. The login service will provide the data, usually username, to comprise the payload portion of the token. Since the JWT must be short-lived, the process must update the expire portion of the payload to some datetime value in minutes or seconds suited to the application.
Creating the login transaction
The implementation of the login service is similar to the previous password-based OAuth2 authentication, except that this version has a create_access_token() call for the JWT generation to replace the password credential. The following script shows the /ch07/login/token service of the ch07d project:
@router.post("/login/token")
def login(form_data: OAuth2PasswordRequestForm = Depends(),
          sess:Session = Depends(sess_db)):
    username = form_data.username
    password = form_data.password
    loginrepo = LoginRepository(sess)
    account = loginrepo.get_all_login_username(username)
    if authenticate(username, password, account):
        access_token = create_access_token(
          data={"sub": username},
           expires_after=timedelta(
              minutes=ACCESS_TOKEN_EXPIRE_MINUTES))
        return {"access_token": access_token,
             "token_type": "bearer"}
    else:
        raise HTTPException(
            status_code=400,
            detail="Incorrect username or password")
The endpoint should still return access_token and token_type since this is still a password-based OAuth2 authentication, which retrieves the user credentials from OAuth2PasswordRequestForm.
Accessing the secured endpoints
As with the previous OAuth2 schemes, we need to inject get_current_user()into every API service to impose security and restrict access. The injected OAuthPasswordBearer instance will return the JWT for payload extraction using the JOSE decoders with the specified decoding algorithm. If the token is tampered with, modified, or expired, the method will throw an change to - exception. Otherwise, we need to continue the payload data extraction, retrieve the username, and store that in an @dataclass instance, such as TokenData. Then, the username will undergo further verification, such as checking the database for a Login account with that username. The following snippet shows this decoding process, found in the /security/secure.py module of the ch07d project:
from models.request.tokens import TokenData
from fastapi.security import OAuth2PasswordBearer
from jose import jwt, JWTError
from models.data.sqlalchemy_models import Login
from sqlalchemy.orm import Session
from db_config.sqlalchemy_connect import sess_db
from repository.login import LoginRepository
from datetime import datetime, timedelta
oauth2_scheme =
     OAuth2PasswordBearer(tokenUrl="ch07/login/token")
def get_current_user(token: str = Depends(oauth2_scheme),
    sess:Session = Depends(sess_db)):
    credentials_exception = HTTPException(
        status_code=status.HTTP_401_UNAUTHORIZED,
        detail="Could not validate credentials",
        headers={"WWW-Authenticate": "Bearer"}
    )
    try:
        payload = jwt.decode(token, SECRET_KEY,
           algorithms=[ALGORITHM])
        username: str = payload.get("sub")
        if username is None:
            raise credentials_exception
        token_data = TokenData(username=username)
    except JWTError:
        raise credentials_exception

    loginrepo = LoginRepository(sess)
    user =
      loginrepo.get_all_login_username(token_data.username)
    if user is None:
        raise credentials_exception
    return user
get_current_user() must be injected into each service implementation to restrict access from users. But this time, the method will not only verify the credentials but also perform JWT payload decoding. The next step is adding user authorization to the OAuth2 solution.
Creating scope-based authorization
FastAPI fully supports scope-based authentication, which uses the scopes parameter of the OAuth2 protocol to specify which endpoints are accessible to a group of users. A scopes parameter is a kind of permission placed in a token to provide additional fine-grained restrictions to users. In this version of the project, ch07e, we will be showcasing OAuth2 password-based authentication with user authorization.
Customizing the OAuth2 class
First, we need to create a custom class that inherits the properties of the OAuth2 API class from the fastapi.security module to include the scopes parameter or "role" options in the user credentials. The following is the OAuth2PasswordBearerScopes class, a custom OAuth2 class that will implement the authentication flow with authorization:
class OAuth2PasswordBearerScopes(OAuth2):
    def __init__(
        self,
        tokenUrl: str,
        scheme_name: str = None,
        scopes: dict = None,
        auto_error: bool = True,

    ):
    if not scopes:
         scopes = {}
    flows = OAuthFlowsModel(
       password={"tokenUrl": tokenUrl, "scopes": scopes})
    super().__init__(flows=flows,
       scheme_name=scheme_name, auto_error=auto_error)
    async def __call__(self, request: Request) ->
             Optional[str]:
        header_authorization: str =
              request.headers.get("Authorization")
        … … … … … …
        return param
This OAuth2PasswordBearerScopes class requires two constructor parameters, tokenUrl and scopes, to pursue an auth flow. OAuthFlowsModel defines the scopes parameter as part of the user credentials for authentication using the Authorization header.
Building the permission dictionary
Before we proceed with the auth implementation, we need to first build the scopes parameters that the OAuth2 scheme will be applying during authentication. This setup is part of the OAuth2PasswordBearerScopes instantiation, where we assign these parameters to its scopes parameter. The following script shows how all the custom-defined user scopes are saved in a dictionary, with the keys as the scope names and the values as their corresponding descriptions:
oauth2_scheme = OAuth2PasswordBearerScopes(
    tokenUrl="/ch07/login/token",
    scopes={"admin_read":
              "admin role that has read only role",
            "admin_write":
              "admin role that has write only role",
            "bidder_read":
              "customer role that has read only role",
            "bidder_write":
              "customer role that has write only role",
            "auction_read":
              "buyer role that has read only role",
            "auction_write":
              "buyer role that has write only role",
            "user":"valid user of the application",
            "guest":"visitor of the site"},
)
There is no feasible way to directly connect the OAuth2PasswordBearerScopes class to the database for the dynamic lookup of permission sets during the implementation of this project. The only solution is to statically store all these authorization "roles" directly into the constructor of OAuth2PasswordBearerScopes.
Implementing the login transaction
All the scopes will be added to the OAuth2 form login as an option and will be part of the user’s login credentials. The following implementation of /ch07/login/token in this new ch07e project shows how to retrieve the scope parameter(s) and the credentials from OAuth2PasswordRequestForm:
@router.post("/login/token")
def login(form_data: OAuth2PasswordRequestForm = Depends(),
         sess:Session = Depends(sess_db)):
    username = form_data.username
    password = form_data.password
    loginrepo = LoginRepository(sess)
    account = loginrepo.get_all_login_username(username)
    if authenticate(username, password, account):
        access_token = create_access_token(
            data={"sub": username, "scopes":
              form_data.scopes},
               expires_delta=timedelta(
               minutes=ACCESS_TOKEN_EXPIRE_MINUTES))
        return {"access_token": access_token,
                "token_type": "bearer"}
    else:
        raise HTTPException(
            status_code=400,
            detail="Incorrect username or password")
The selected scopes are stored in a list, such as ['user', 'admin_read', 'admin_write', 'bidder_write'], which means that a user has user, administrator (write), administrator (read), and bidder (write) permissions. create_access_token() will include this list of scopes or "roles" as part of the payload, which will be decoded and extracted by get_current_valid_user() through the get_current_user() injectable. By the way, get_current_valid_user() secures every API from the user access by applying the authentication scheme.
Applying the scopes to endpoints
The Security API from the fastapi module replaces the Depends class in injecting the get_current_valid_user() because of its capability to assign scopes to each API service, aside from its capability to perform DI. It has the scopes attribute, where a list of valid scope parameters is defined that restricts the user from access. For instance, the following update_profile() service is accessible only to users whose scopes contain the bidder_write and buyer_write roles:
from fastapi.security import SecurityScopes
@router.patch("/profile/update")
def update_profile(id:int, req: ProfileReq,
    current_user: Login = Security(get_current_valid_user,
        scopes=["bidder_write", "buyer_write"]),
    sess:Session = Depends(sess_db)):
    … … … … … …
    if result:
        return JSONResponse(content=
         {'message':'profile updated successfully'},
              status_code=201)
    else:
        return JSONResponse(content=
           {'message':'update profile error'},
               status_code=500)
Now, the following code snippet shows the implementation of the get_current_valid_user() injected into every API service by Security:
def get_current_valid_user(current_user:
   Login = Security(get_current_user, scopes=["user"])):
    if current_user == None:
        raise HTTPException(status_code=400,
           detail="Invalid user")
    return current_user
This method relies on get_current_user() when it comes to JWT payload decoding, credential validation, and user scope verification. The user must at least have the user scope for the authorization process to proceed. The Security class is responsible for injecting get_current_user() into get_current_valid_user() together with the default user scope. Here is the implementation of the get_current_user() method:
def get_current_user(security_scopes: SecurityScopes,
      token: str = Depends(oauth2_scheme),
           sess:Session = Depends(sess_db)):
    if security_scopes.scopes:
        authenticate_value =
          f'Bearer scope="{security_scopes.scope_str}"'
    else:
        authenticate_value = f"Bearer"
    … … … … … …
    try:
        payload = jwt.decode(token, SECRET_KEY,
                   algorithms=[ALGORITHM])
        username: str = payload.get("sub")
        if username is None:
            raise credentials_exception
        token_scopes = payload.get("scopes", [])
        token_data = TokenData(scopes=token_scopes,
               username=username)
    except JWTError:
        raise credentials_exception
    … … … … … …
    for scope in security_scopes.scopes:
        if scope not in token_data.scopes:
            raise HTTPException(
                status_code=status.HTTP_401_UNAUTHORIZED,
                detail="Not enough permissions",
                headers={"WWW-Authenticate":
                    authenticate_value},
            )
    return user
The SecurityScopes class of the given get_current_user() extracts the scopes assigned to the API service that the user is trying to access. It has a scope instance variable that contains all these scope parameters of the API. On the other hand, token_scopes carries all the scopes or "roles" of the user extracted from the decoded JWT payload. get_current_user() traverses the API scopes in SecurityScopes to check whether all of them appear in the token_scopes of the user. If True, get_current_user() authenticates and authorizes the user to access the API service. Otherwise, it throws an change to - exception. The purpose of TokenData is to manage the scope parameters from the token_scopes payload value and the username.
The next type of OAuth2 authentication scheme that FastAPI can support is the authorization code flow approach.
Building the authorization code flow
If the application is a public type and there is no authorization server to process the client_id parameter, the client_secret parameter, and other related parameters, this OAuth2 authorization code flow approach is appropriate to use. In this scheme, the client creates an authorization request for a short-lived authorization code from an authorizationUrl. The client will then ask for the token from tokenUrl in exchange for the generated code. In this discussion, we will be showcasing another version of our online auction system that will use the OAuth2 authorization code flow scheme.
Applying OAuth2AuthorizationCodeBearer
The OAuth2AuthorizationCodeBearer class is a class from the fastapi.security module that builds the authorization code flow. Its constructor requires authorizationUrl, tokenUrl, and the optional scopes before instantiation. The following code shows how this API class is created before its injection into the get_current_user() method:
from fastapi.security import OAuth2AuthorizationCodeBearer
oauth2_scheme = OAuth2AuthorizationCodeBearer(
    authorizationUrl='ch07/oauth2/authorize',
    tokenUrl="ch07/login/token",
    scopes={"admin_read": "admin … read only role",
            "admin_write":"admin … write only role",
            … … … … … …
            "guest":"visitor of the site"},
    )
The two endpoints, authorizationUrl and tokenUrl, are crucial parameters in the authentication and authorization process of this scheme. Unlike the previous solutions, we will not rely on the authorization server when generating access_token. Instead, we will be implementing an authorizationUrl endpoint that will capture essential parameters from the client that will comprise the authorization request for access_token generation. The client_secret parameter will always remain unexposed to the client.
Implementing the authorization request
In the previous schemes, the /ch07/login/ token or the tokenUrl endpoint is always the redirection point after a login transaction. But this time, the user will be forwarded to the custom /ch07/oauth2/authorize or the authorizationUrl endpoint for auth code generation. Query parameters such as response_type, client_id, redirect_uri, scope, and state are the essential inputs to the authorizationUrl service. The following code from the /security/secure.py module of the ch07f project will showcase the implementation of the authorizationUrl transaction:
@router.get("/oauth2/authorize")
def authorizationUrl(state:str, client_id: str,
       redirect_uri: str, scope: str, response_type: str,
       sess:Session = Depends(sess_db)):

    global state_server
    state_server = state

    loginrepo = LoginRepository(sess)
    account = loginrepo.get_all_login_username(client_id)
    auth_code = f"{account.username}:{account.password}
                    :{scope}"
    if authenticate(account.username,
              account.password, account):
        return RedirectResponse(url=redirect_uri
          + "?code=" + auth_code
          + "&grant_type=" + response_type
          + "&redirect_uri=" + redirect_uri
          + "&state=" + state)
    else:
        raise HTTPException(status_code=400,
               detail="Invalid account")
These are the query parameters needed by the authorizationUrl transaction:
- response_type: Custom-generated authorization code
- client_id: The public identifier of the app, such as username
- redirect_uri: The server default URI or a custom endpoint designed to redirect the user back to the application
- scope: A scope parameter(s) string, separated by spaces if at least two parameters are involved
- state: An arbitrary string value that determines the state of the request
The redirect_uri parameter is the destination point where the authentication and authorization processes will occur together with these query parameters.
The generation of auth_code is one of the crucial tasks of the authorizationUrl transaction, including the authentication process. The auth code indicates an ID for the authentication process and is usually unique from all other authentication. There are many ways to generate the code, but in our app, it is simply the combination of user credentials. Conventionally, auth_code needs to be encrypted because it comprises the user credentials, scope, and other request-related details.
If the user is valid, the authorizationUrl transaction will redirect the user to the redirect_uri parameter, back to the FastAPI layer, with the auth_code, grant_type, and state parameters, and the redirect_uri parameter itself. The grant_type and redirect_uri parameters are optional only if the application does not require them. This response will invoke the tokenUrl endpoint, which happens to be the redirectURL parameter, to pursue the continuation of the authentication process with scoped-based authorization.
Implementing the authorization code response
The /ch07/login/token service, or tokenUrl, must have the Form(…) parameter to capture the code, grant_type, and redirect_uri parameters from the authorizationUrl transaction instead of OAuth2PasswordRequestForm. The following code snippet shows its implementation:
@router.post("/login/token")
def access_token(code: str = Form(...),
  grant_type:str = Form(...), redirect_uri:str = Form(...),
  sess:Session = Depends(sess_db)):
    access_token_expires =
       timedelta(minutes=ACCESS_TOKEN_EXPIRE_MINUTES)

    code_data = code.split(':')
    scopes = code_data[2].split("+")
    password = code_data[1]
    username = code_data[0]

    loginrepo = LoginRepository(sess)
    account = loginrepo.get_all_login_username(username)
    if authenticate(username, password, account):
        access_token = create_access_token(
            data={"sub": username, "scopes": scopes},
            expires_delta=access_token_expires,
        )

        global state_server
        state = state_server
        return {
            "access_token": access_token,
            "expires_in": access_token_expires,
            "token_type": "Bearer",
            "userid": username,
            "state": state,
            "scope": "SCOPE"
        }
    else:
        raise HTTPException(
            status_code=400,
             detail="Incorrect credentials")
The only response data sent by authorizationUrl that is not accessible by tokenUrl is the state parameter. One workaround is to declare the state variable in authorizationURL as a global one to make it accessible anywhere. The state variable is part of the JSON response of the service, which the API authentication requires. Likewise, tokenUrl has no access to the user credentials but parsing auth_code is a possible way to derive the username, password, and scopes.
If the user is valid, tokenUrl must submit the JSON data containing access_token, expires_in, token_type, userid, and state to proceed with the authentication scheme.
This authorization code flow scheme provides the baseline protocol for the OpenID Connect authentication. Various identity and access management solutions, such as Okta, Auth0, and Keycloak, apply the authorization requests and responses involving response_type code. The next topic will highlight the FastAPI's support of the OpenID Connect specification.
Applying the OpenID Connect specification
There are three online auction projects created to impose the OAuth2 OpenID Connect authentication scheme. All these projects use third-party tools to perform authentication and authorization procedures. The ch07g project uses Auth0, ch07h uses Okta, and ch07i applies a Keycloak policy in authenticating client access to the API services. Let us first highlight Keycloak’s support for the OpenID Connect protocol.
Using HTTPBearer
The HTTPBearer class is a utility class from the fastapi.security module that provides an authorization scheme that relies directly on the authorization header with the Bearer tokens. Unlike the other OAuth2 schemes, this requires the generation of an access_token on the Keycloak side before running the authentication server. At this point, the framework has no straightforward way of accessing the credentials and the access_token from Keycloak’s identity provider. To utilize this class, we only need to instantiate it without any constructor parameters.
Installing and configuring the Keycloak environment
Keycloak is a Java-based application that we can download from the following link: https://www.keycloak.org/downloads. After downloading, we can unzip its content to any directory. But before running it, we need to install at least the Java 12 SDK on our development machine. Once you have completed the setup, run its binstandalone.bat or binstandalone.sh on the console and then open http://localhost:8080 on the browser. Afterward, create an administration account to set up the realm, clients, users, and scopes.
Setting the Keycloak realm and clients
A Keycloak realm is an object that encompasses all the clients together with their credentials, scopes, and roles. The first step before creating the user profiles is to build a realm, as shown in Figure 7.7:
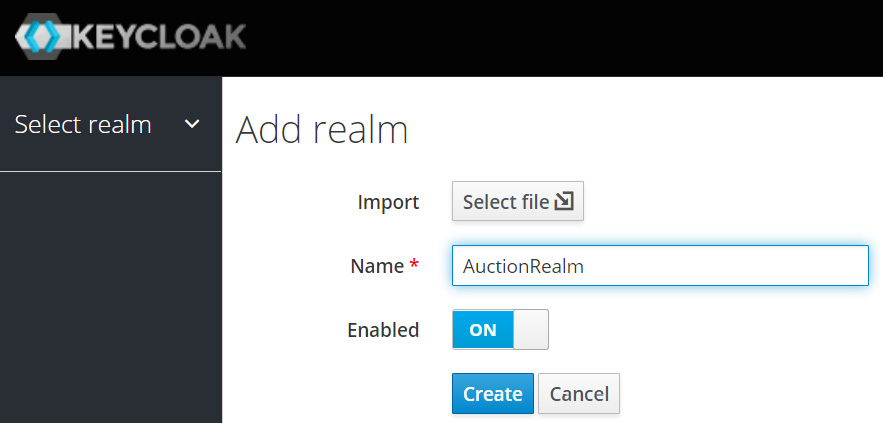
Figure 7.7 - Creating a Keycloak realm
After the realm, the Keycloak client, which manages the user profiles and credentials, is the next priority. It is created on the Configure | Clients panel, as shown:
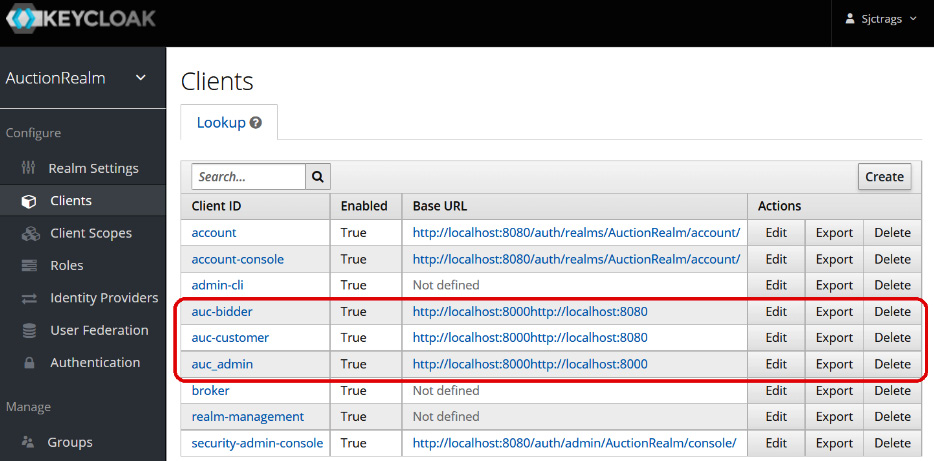
Figure 7.8 – Creating the Keycloak clients
After creating the clients, we need to edit each Client profile to input the following details:
- Its access type must be confidential
- Authorization Enabled is turned ON
- Provide values for Root URL, Base URL, and Admin URL, which all refer to the http://localhost:8000 of the API service application
- Specify a Valid Redirect URI endpoint, or we can just assign http://localhost:8080/* if we have no specific custom endpoint
- In Advanced Settings, set Access Token Lifespan (e.g., 15 minutes)
- Under Authentication Flow Overrides, set Browser Flow to browser and Direct Grant Flow to direct grant.
In the Credentials panel, we can find the client credentials, in which the auto-generated client_secret value is located. After the setup, we can now assign users to the clients.
Creating users and user roles
First, we create roles on the Configure | Roles panel, in preparation for user assignment later. Figure 7.9 shows three user roles that will handle the application’s administration, auctioning, and bidding tasks:
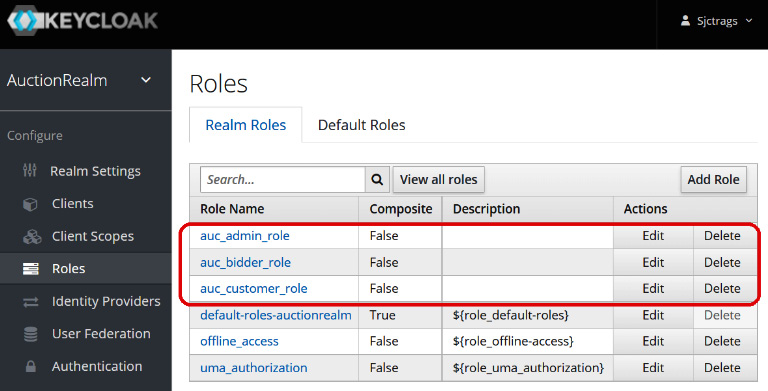
Figure 7.9 – Creating user roles
After creating the roles, we need to build the list of users on the Manage | Users panel. Figure 7.10 shows the three created users, each with the mapped roles:
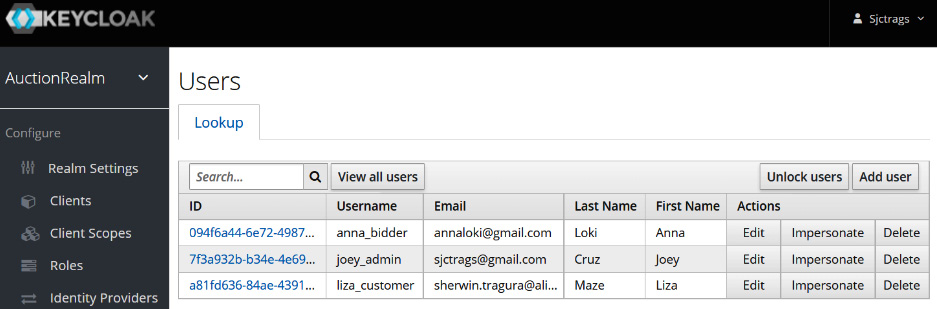
Figure 7.10 – Creating client users
To provide users with their roles, we need to click the Edit link for each user and assign the appropriate Realm Roles. Figure 7.11 shows that the user joey_admin has the auc_admin_role role, authorizing the user to do the administrative tasks for the app. By the way, do not forget to create a password for each user on the Credentials panel:
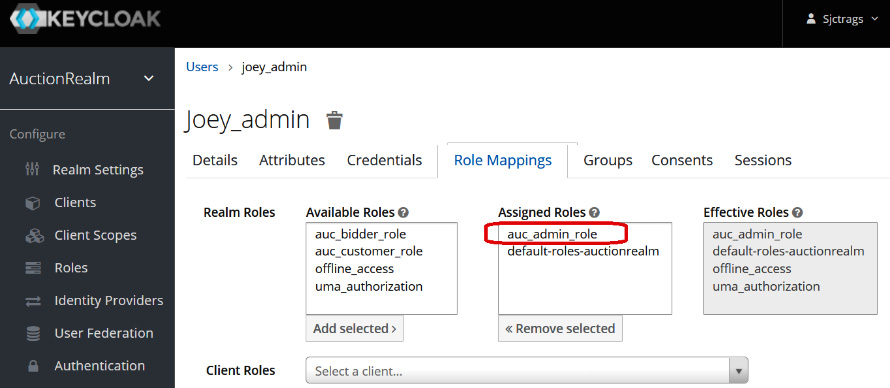
Figure 7.11 – Mapping user roles
Assigning roles to clients
Aside from user roles, clients can also have assigned roles. A client role defines the type of users a client must have under its coverage. It also provides the client’s boundary when accessing the API services. Figure 7.12 shows auc_admin with an admin role:
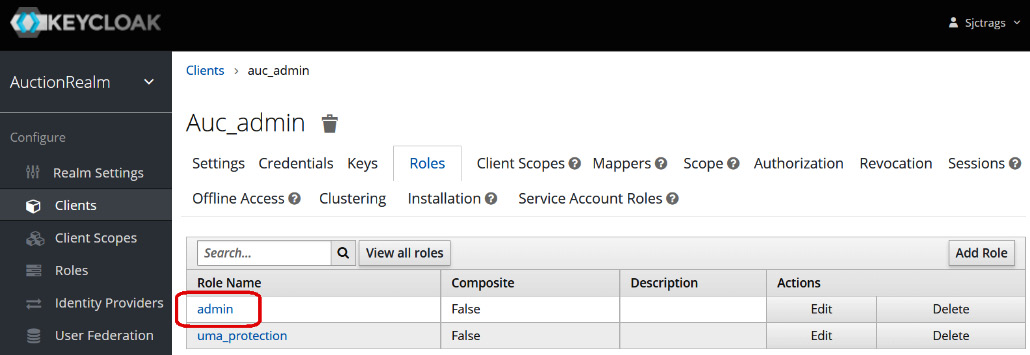
Figure 7.12 – Creating client roles
Then, we need to return to the Manage | Users panel and assign the user its role(s) through the client. For instance, Figure 7.13 shows that joey_admin has the admin role because the auc_admin role was added to its profile. All users with the auc_admin client added to their setup have admin access to the app, including joey_admin:
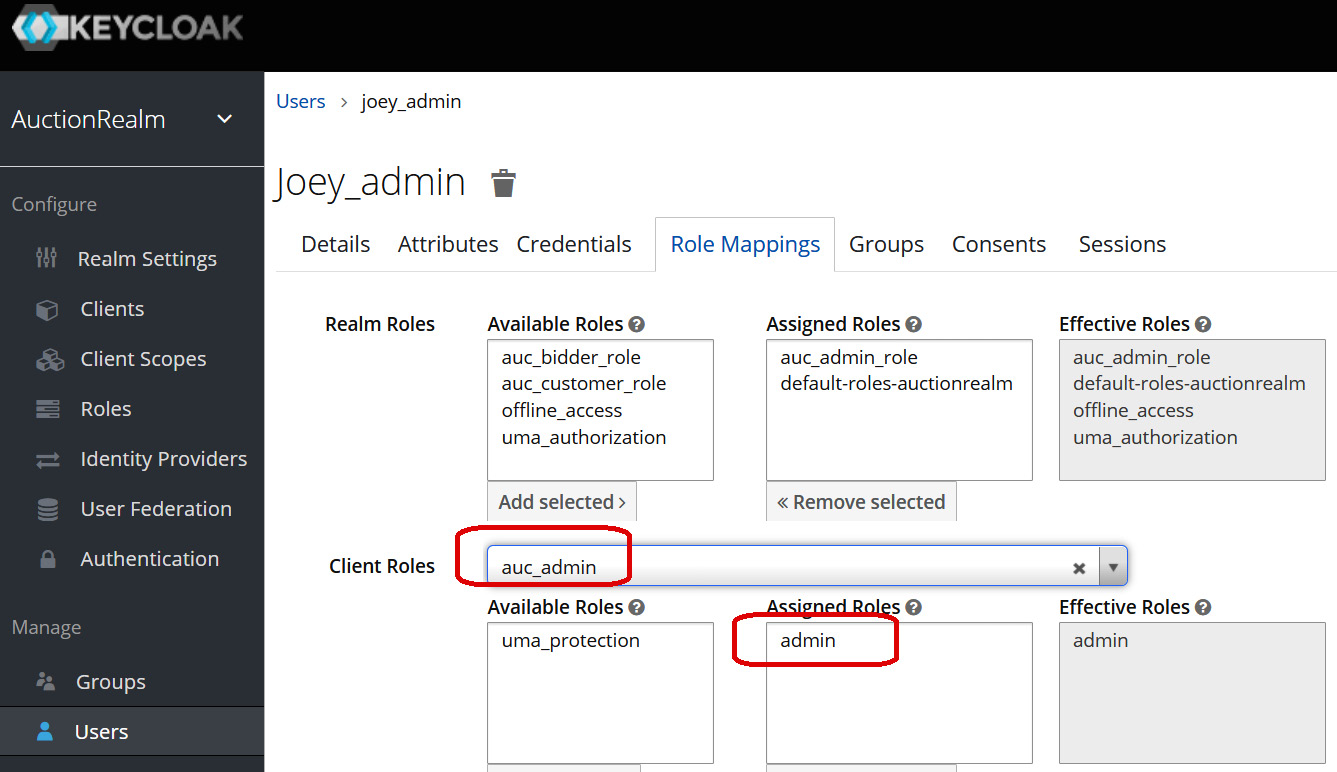
Figure 7.13 – Mapping client roles to users
Creating user permissions through scopes
To assign permission to each client, we need to create client scopes on the Configure | Client Scopes panel. Each client scope must have an Audience-type token mapper. Figure 7.14 shows the admin:read and admin:write scopes for the auc_admin client, auction:read and auction:write for auc_customer, and bidder:write and bidder:read for auc_bidder:
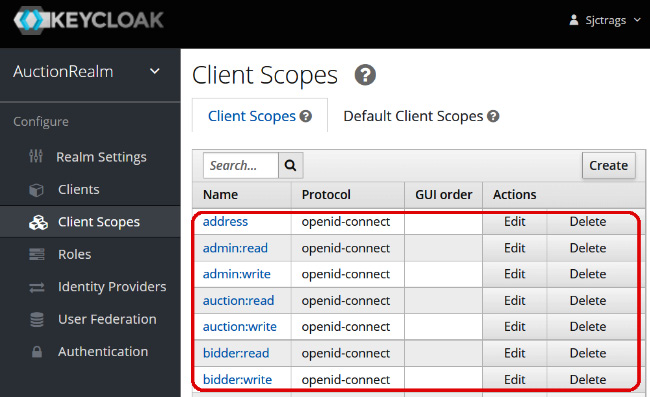
Figure 7.14 – Creating the client scopes
These client scopes are essential details within the Security injection for each API service if scope-based authorization is part of the scheme.
Integrating Keycloak with FastAPI
Since the FastAPI application cannot directly access the Keycloak client credentials for authentication, the application has a login_keycloak() service to redirect the user to the AuctionRealm URI, our custom authorizationUrl in Keycloak. The URI is /auth/realms/AuctionRealm/protocol/openid-connect/auth. First, access http://localhost:8080/auth/realms/AuctionRealm/account/ to log in using the authorized user credentials, such as joey_admin, before invoking the login_keycloak() service.
Now, the redirection must include client_id, as with the auc_admin client, and the custom callback handler called redirect_uri. All the Keycloak realm details must be in the .config property file. The following code shows the implementation of the login_keycloak() service:
import hashlib
import os
import urllib.parse as parse
@router.get("/auth/login")
def login_keycloak() -> RedirectResponse:
    config = set_up()
    state = hashlib.sha256(os.urandom(32)).hexdigest()

    AUTH_BASE_URL = f"{config['KEYCLOAK_BASE_URL']}
     /auth/realms/AuctionRealm/protocol/
         openid-connect/auth"
    AUTH_URL = AUTH_BASE_URL +
     '?{}'.format(parse.urlencode({
        'client_id': config["CLIENT_ID"],
        'redirect_uri': config["REDIRECT_URI"],
        'state': state,
        'response_type': 'code'
    }))
    response = RedirectResponse(AUTH_URL)
    response.set_cookie(key="AUTH_STATE", value=state)
    return response
A state is part of login_keycloak()’s response for the callback method to verify the authentication, a similar approach we had in utilizing OAuth2AuthorizationCodeBearer. The service used the hashlib module to generate a randomized hash string value for the state using the SHA256 encryption algorithm. On the other hand, Keycloak’s AuctionRealm URI must return a JSON result as follows:
{"access_token":"eyJhbGciOiJSUzI1NiIsInR5cCIgOiAiSldUIiwia2lkI iA6ICJJMFR3YVhiZnh0MVNQSnNzVTByQ09hMzVDaTdZNDkzUnJIeDJTM3paa0V VIn0.eyJleHAiOjE2NDU0MTgzNTAsImlhdCI6MTY0NTQxNzQ1MCwiYXV0aF90a W1lIjoxNjQ1NDE3NDM3LCJqdGkiOiI4YTQzMjBmYi0xMzg5LTQ2NzU……………………………2YTU2In0.UktwOX7H2ZdoyP1VZ5V2MXUX2Gj41D2cuusvwEZXBtVMvnoTDh KJgN8XWL7P3ozv4A1ZlBmy4NX1HHjPbSGsp2cvkAWwlyXmhyUzfQslf8Su00-4 e9FR4i4rOQtNQfqHM7cLhrzr3-od-uyj1m9KsrpbqdLvPEl3KZnmOfFbTwUXfE 9YclBFa8zwytEWb4qvLvKrA6nPv7maF2_MagMD_0Mh9t95N9_aY9dfquS9tcEV Whr3d9B3ZxyOtjO8WiQSJyjLCT7IW1hesa8RL3WsiG3QQQ4nUKVHhnciK8efRm XeaY6iZ_-8jm-mqMBxw00-jchJE8hMtLUPQTMIK0eopA","expires_in":900,"refresh_expires_in":1800,"refresh_token":"eyJhbGciOiJIUzI1NiIs InR5cCIgOiAiSldUIiwia2lkIiA6ICJhNmVmZGQ0OS0yZDIxLTQ0NjQtOGUyOC0 4ZWJkMjdiZjFmOTkifQ.eyJleHAiOjE2NDU0MTkyNTAsImlhdCI6MTY0NTQxNzQ 1MCwianRpIjoiMzRiZmMzMmYtYjAzYi00MDM3LTk5YzMt………………………zc2lvbl9z dGF0ZSI6ImM1NTE3ZDIwLTMzMTgtNDFlMi1hNTlkLWU2MGRiOWM1NmE1NiIsIn Njb3BlIjoiYWRtaW46d3JpdGUgYWRtaW46cmVhZCB1c2VyIiwic2lkIjoiYzU1 MTdkMjAtMzMxOC00MWUyLWE1OWQtZTYwZGI5YzU2YTU2In0.xYYQPr8dm7_o1G KplnS5cWmLbpJTCBDfm1WwZLBhM6k","token_type":"Bearer","not-before-policy":0,"session_state":"c5517d20-3318-41e2-a59d-e60d b9c56a56","scope":"admin:write admin:read user"}This contains the essential credentials, such as access_token, expires_in, session_state, and scope.
Implementing the token verification
The application’s HTTPBearer needs access_token to pursue the client-side authentication. On the OpenAPI dashboard, we click the Authorize button and paste the access_token value provided by Keycloak’s authorizationUrl. After the successful authentication, get_current_user() will verify the access to each API endpoint based on the credentials extracted from access_token. The following code highlights the get_current_user(), which builds the user credentials from Keycloak’s token using the PyJWT utility and algorithms such as RSAAlgorithm:
from jwt.algorithms import RSAAlgorithm
from urllib.request import urlopen
import jwt
def get_current_user(security_scopes: SecurityScopes,
        token: str = Depends(token_auth_scheme)):
    token = token.credentials
    config = set_up()
    jsonurl = urlopen(f'{config["KEYCLOAK_BASE_URL"]}
        /auth/realms/AuctionRealm/protocol
        /openid-connect/certs')
    jwks = json.loads(jsonurl.read())
    unverified_header = jwt.get_unverified_header(token)

    rsa_key = {}
    for key in jwks["keys"]:
        if key["kid"] == unverified_header["kid"]:
            rsa_key = {
                "kty": key["kty"],
                "kid": key["kid"],
                "use": key["use"],
                "n": key["n"],
                "e": key["e"]
            }

    if rsa_key:
        try:
                public_key = RSAAlgorithm.from_jwk(rsa_key)
                payload = jwt.decode(
                    token,
                    public_key,
                    algorithms=config["ALGORITHMS"],
                    options=dict(
                           verify_aud=False,
                           verify_sub=False,
                           verify_exp=False,
                     )
                )
    … … … … … …
    token_scopes = payload.get("scope", "").split()

    for scope in security_scopes.scopes:
        if scope not in token_scopes:
            raise AuthError(
               {
                 "code": "Unauthorized",
                 "description": Invalid Keycloak details,
               },403,
            )
    return payload
Install the PyJWT module first to utilize the needed encoders and decoder functions. The jwt module has RSAAlgorithm, which can help decode the rsa_key from the token with some options disabled, such as the verification of the client’s audience.
Integrating Auth0 with FastAPI
Auth0 can also be a third-party authentication provider that can authenticate and authorize access to the API endpoints of our app. But first, we need to sign up for an account at https://auth0.com/.
After signing up for an account, create an Auth0 application to derive Domain, Client ID, and Client Secret, and configure some URI- and token-related details. Figure 7.15 shows the dashboard that creates the Auth0 application:
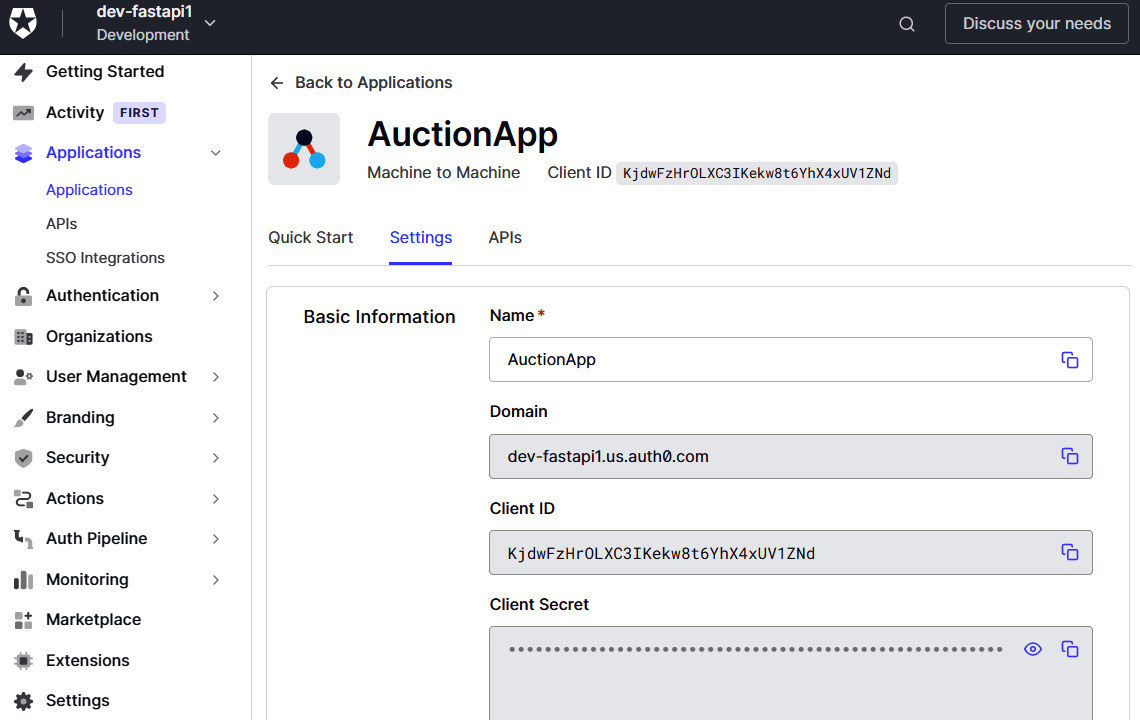
Figure 7.15 – Creating the Auth0 application
The Auth0 application also has the generated Audience API URI that the client-side authentication needs. On the other hand, part of the authentication parameters is the issuer, which we can derive from the Domain value of the Auth0 application. The issuer is a base URI to the /oauth/token service that generates the auth_token once requested, similar to the Keycloak’s realm. We place all these Auth0 details in the .config file, including the PyJWT algorithm for decoding auth_token.
ch07g has its own version of get_current_user() that processes the payload for API authentication and authorization from the Auth0 details in the .config file. But first, the HTTPBearer class needs the auth_token value and gets it by running the following tokenURL of our Auth0 application, AuctionApp:
curl --request POST --url https://dev-fastapi1.us.auth0.com/oauth/token --header
'content-type: application/json' --data "{"client_id":"KjdwFzHrOLXC3IKe kw8t6YhX4xUV1ZNd", "client_secret":"_KyPEUOB7DA5Z3mmRXpnqWA3EXfrjLw2R5SoUW7m1wLMj7 KoElMyDLiZU8SgMQYr","audience":"https://fastapi.auction.com/","grant_type":"client_credentials"}"
Integrating Okta with FastAPI
Some of the processes performed in Auth0 are also found in Okta’s procedures when extracting the Client ID, Client Secret, Domain, issuer, and Audience API information from the Okta account. The ch07h project has these details stored in the app.env file to be retrieved by its get_current_user() for the payload generation. But then again, the HTTPBearer class needs an auth_token from executing the following Okta’s tokenURL, based on the account’s issuer:
curl --location --request POST "https://dev-5180227.okta.com/oauth2/default/v1/token?grant_type=client_credentials&client_id=0oa3tvejee5UPt7QZ5d7&client_secret=LA4WP8lACWKu4Ke9fReol0fNSUvxsxTvGLZdDS5-" --header "Content-Type: application/x-www-form-urlencoded"
Aside from the Basic, Digest, OAuth2, and OpenID Connect authentication schemes, FastAPI can utilize some built-in middlewares to help secure API endpoints. Let us now determine whether these middlewares can provide a custom authentication process.
Using built-in middlewares for authentication
FastAPI can use Starlette middleware such as AuthenticationMiddleware to implement any custom authentication. It needs AuthenticationBackend to implement the scheme for our app’s security model. The following custom AuthenticationBackend checks whether the Authorization credential is a Bearer class and verifies whether the username token is equivalent to a fixed username credential provided by the middleware:
class UsernameAuthBackend(AuthenticationBackend):
    def __init__(self, username):
        self.username = username

    async def authenticate(self, request):
        if "Authorization" not in request.headers:
            return
        auth = request.headers["Authorization"]
        try:
            scheme, username = auth.split()
            if scheme.lower().strip() != 'bearer'.strip():
                return
        except:
            raise AuthenticationError(
             'Invalid basic auth credentials')
        if not username == self.username:
            return

        return AuthCredentials(["authenticated"]),
             SimpleUser(username)
Activating this UsernameAuthBackend means injecting it into the FastAPI constructor in main.py with AuthenticationMiddleware. It also needs the designated username for its authentication process to work. The following snippet shows how to activate the whole authentication scheme in the main.py file:
from security.secure import UsernameAuthBackend
from starlette.middleware import Middleware
from starlette.middleware.authentication import
    AuthenticationMiddleware
middleware = [Middleware(AuthenticationMiddleware,
    backend=UsernameAuthBackend("sjctrags"))]
app = FastAPI(middleware=middleware)
Injecting FastAPI’s Request is the first step in applying the authentication scheme. Then, we decorate each API with @requires("authenticated") after the @router decorator. We can extend the UsernameAuthBackend process further by adding JWT encoding and decoding, encryption, or custom roles-based authorization.
Summary
Securing any applications is always the main priority in producing quality software. We always choose frameworks that support reliable and credible security solutions, and that can at least prevent malicious attacks from the outside environment. Although we know for a fact that a perfect security model is a myth, we always develop security solutions that can cope with the threats we know.
FastAPI is one of the API frameworks that has built-in support for many popular authentication processes, from Basic to the OpenID Connect specification. It fully supports all effective OAuth2 authentication schemes and is even open to further customization of its security APIs.
Although it has no direct support for the OpenID Connect specification, it can still integrate seamlessly with different popular identities and user management systems, such as Auth0, Okta, and Keycloak. This framework may still surprise us with many security utilities and classes in the future that we can apply to build scalable microservice applications.
The next chapter will focus on topics regarding non-blocking API services, events, and message-driven transactions.