
4
Building the Microservice Application
Previously, we spent a lot of time building API services for various applications using the core features of FastAPI. We also started applying important design patterns such as Inversion of Control (IoC) and Dependency Injection (DI), which are essential for managing FastAPI container objects. External Python packages were installed and used to provide options on what containers to use in managing objects.
These design patterns can help not only with managed objects in container but also when building scalable, enterprise-grade, and unconventionally complex applications. Most of these design patterns help break down monolithic architecture into loosely coupled components that are known as microservices.
In this chapter, we will explore some architectural design patterns and principles that can provide strategies and ways to initiate the building of our microservices from a monolithic application. Our focus will be on breaking the huge application into business units, creating a sole gateway to bundle these business units, applying domain modeling to each of the microservices, and managing other concerns such as logging and application configuration.
Aside from expounding the benefits and disadvantages of each design pattern, another objective is to apply these architectural patterns to our software specimen to show its effectiveness and feasibility. And to support these goals, the following topics will be covered in this chapter:
- Applying the decomposition pattern
- Creating a common gateway
- Centralizing the logging mechanism
- Consuming the REST APIs
- Applying the domain modeling approach
- Managing a microservice’s configuration details
Technical requirements
This chapter uses a university ERP system prototype that focuses on the students, faculty, and library submodules, but more on student-library and faculty-library operations (for example, book borrowing and issuing). Each submodule has its administration, management, and transaction services, and they are independent of each other even though they are part of an ERP specification. Currently, this sample prototype does not use any database management system, so all the data is temporarily stored in Python containers. The code is all uploaded at https://github.com/PacktPublishing/Building-Python-Microservices-with-FastAPI under the ch04, ch04-student, ch04-faculty, and ch04-library projects.
Applying the decomposition pattern
If we apply the monolithic strategy used in building the prototypes presented in the previous chapters, building this ERP will not be cost-effective in terms of resources and effort. There will be features that might become too dependent on other functions, which will put the teams of developers in a difficult situation whenever transaction problems occur due to these tightly coupled features. The best way to implement our University ERP prototype is to decompose the whole specification into smaller modules before the implementation starts.
There are two appropriate ways in which to decompose our application prototype, namely decomposition by business units and decomposition by subdomains:
- Decomposition by business units is used when the breakdown of the monolithic application is based on organizational structures, architectural components, and structural units. Usually, its resulting modules have fixed and structured processes and functionality that are seldom enhanced or upgraded.
- Decomposition by subdomain uses domain models and their corresponding business processes as the basis of the breakdown. Unlike the former, this decomposition strategy deals with modules that continuously evolve and change to capture the exact structure of the modules.
Of the two options, decomposition by business units is the more practical decomposition strategy to use for our monolithic University ERP prototype. Since the information and business flow used by universities has been part of its foundation for years, we need to organize and breakdown its voluminous and compounded operations by colleges or departments. Figure 4.1 shows the derivation of these submodules:
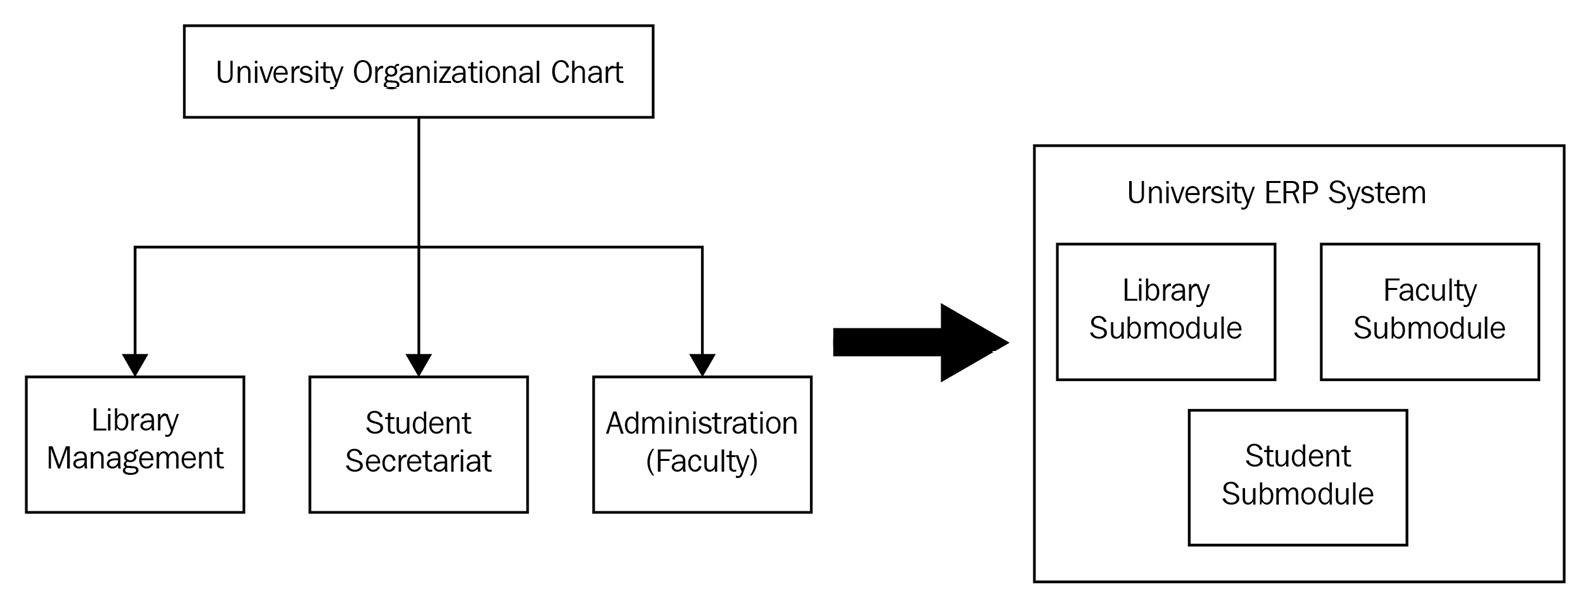
Figure 4.1 – Decomposition by business units
After determining the submodules, we can implement them as independent microservices using the FastAPI framework. We can call an implementation of a business unit or module a microservice if its services can collectively stand as one component. Also, it must be able to collaborate with other microservices through interconnection based on the URL address and port number. Figure 4.2 shows the project directories of the faculty, library, and student management modules implemented as FastAPI microservice applications. Chapter 1, Setting Up FastAPI for Starters, to Chapter 3, Investigating Dependency Injection, gave us the foundation to build a FastAPI microservice:
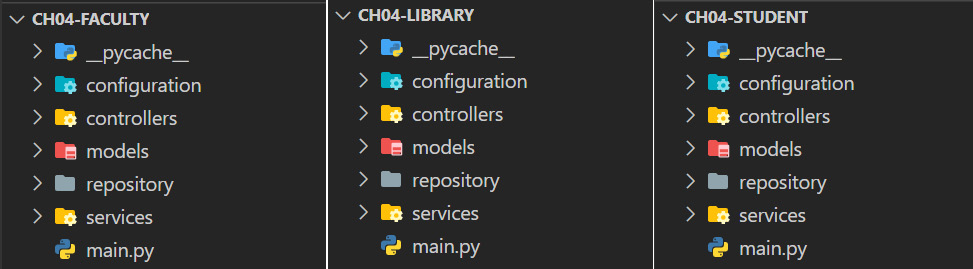
Figure 4.2 – The faculty, library, and student microservice applications
Each of these microservices is independent of the others in terms of its server instance and management. Starting and shutting down one of them will not affect the other two, as each can have a different context root and port. Each application can have a separate logging mechanism, dependency environment, container, configuration file, and any other aspect of a microservice, which will be discussed in the subsequent chapters.
But FastAPI has another way of designing microservices using a mount sub-application.
Creating the sub-applications
FastAPI allows you to build independent sub-applications inside the main application. Here, main.py serves as a gateway that provides a pathname to these mounted applications. It also creates the mounts specifying the context path mapped to the FastAPI instance of each sub-application. Figure 4.3 shows a new university ERP implementation that has been built using mounts:
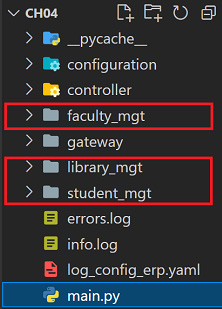
Figure 4.3 – The main project with the mounts
Here, faculty_mgt, library_mgt, and student_mgt are typical independent microservice applications mounted into the main.py component, the top-level application. Each sub-application has a main.py component, such as library_mgt, which has its FastAPI instance created in its library_main.py setup, as shown in the following code snippet:
from fastapi import FastAPI
library_app = FastAPI()
library_app.include_router(admin.router)
library_app.include_router(management.router)
The student sub-application has a student_main.py setup that creates its FastAPI instance, as shown in the following code:
from fastapi import FastAPI
student_app = FastAPI()
student_app.include_router(reservations.router)
student_app.include_router(admin.router)
student_app.include_router(assignments.router)
student_app.include_router(books.router)
Likewise, the faculty sub-application also has its faculty_main.py setup, as highlighted in the following code, for the same purpose, to build the microservice architecture:
from fastapi import FastAPI
faculty_app = FastAPI()
faculty_app.include_router(admin.router)
faculty_app.include_router(assignments.router)
faculty_app.include_router(books.router)
These sub-applications are typical FastAPI microservice applications containing all of the essential components such as routers, middleware exception handlers, and all the necessary packages to build REST API services. The only difference from the usual applications is that their context paths or URLs are defined and decided by the top-level application that handles them.
Important note
Optionally, we can run the library_mgt sub-application independently from main.py through the uvicorn main:library_app --port 8001 command, faculty_mgt through uvicorn main:faculty_app --port 8082, and student_mgt through uvicorn main:student_app --port 8003. The option of running them independently despite the mount explains why these mounted sub-applications are all microservices.
Mounting the submodules
All the FastAPI decorators of each sub-application must be mounted in the main.py component of the top-level application for them to be accessed at runtime. The mount() function is invoked by the FastAPI decorator object of the top-level application, which adds all FastAPI instances of the sub-applications into the gateway application (main.py) and maps each with its corresponding URL context. The following script shows how the mounting of the library, student, and faculty subsystems is implemented in the main.py component of the University ERP top-level system:
from fastapi import FastAPI
from student_mgt import student_main
from faculty_mgt import faculty_main
from library_mgt import library_main
app = FastAPI()
app.mount("/ch04/student", student_main.student_app)
app.mount("/ch04/faculty", faculty_main.faculty_app)
app.mount("/ch04/library", library_main.library_app)
With this setup, the mounted /ch04/student URL will be used to access all the API services of the student module app, /ch04/faculty will be used for all the services of the faculty module, and /ch04/library will be used for the library-related REST services. These mounted paths become valid once they are declared in mount() because FastAPI automatically handles all of these paths through the root_path specification.
Since all three sub-applications of our university ERP system are independent microservices, now let us apply another design strategy that can help manage the requests to these applications just by using the main URL of the ERP system. Let us utilize the main application as a gateway to our sub-applications.
Creating a common gateway
It will be easier if we use the URL of the main application to manage the requests and redirect users to any of the three sub-applications. The main application can stand as a pseudo-reverse proxy or an entry point for user requests, which will always redirect user requests to any of the desired sub-applications. This kind of approach is based on a design pattern called API Gateway. Now, let us explore how we can apply this design to manage independent microservices mounted onto the main application using a workaround.
Implementing the main endpoint
There are so many solutions when it comes to implementing this gateway endpoint, and among them is having a simple REST API service in the top-level application with an integer path parameter that will identify the ID parameter of the microservice. If the ID parameter is invalid, the endpoint will only return the {'message': 'University ERP Systems'} JSON string instead of an error. The following script is a straightforward implementation of this endpoint:
from fastapi import APIRouter
router = APIRouter()
@router.get("/university/{portal_id}")
def access_portal(portal_id:int):
    return {'message': 'University ERP Systems'}
The access_portal API endpoint is created as a GET path operation with portal_id as its path parameter. The portal_id parameter is essential to this process because it will determine which among the Student, Faculty, and Library microservices the user wants to access. Therefore, accessing the /ch04/university/1 URL should lead the user to the student application, /ch04/university/2 to the faculty microservice, and /ch04/university/3 to the library application.
Evaluating the microservice ID
The portal_id parameter will automatically be fetched and evaluated using a dependable function that is injected into the APIRouter instance where the API endpoint is implemented. As discussed in Chapter 3, Investigating Dependency Injection, a dependable function or object can serve as a filter or validator of all incoming requests of any services once injected into an APIRouter or FastAPI instance. The dependable function used in this ERP prototype, as shown in the following script, evaluates whether the portal_id parameter is 1, 2, or 3 only:
def call_api_gateway(request: Request):
    portal_id = request.path_params['portal_id']
    print(request.path_params)
    if portal_id == str(1):
        raise RedirectStudentPortalException()
    elif portal_id == str(2):
        raise RedirectFacultyPortalException()
    elif portal_id == str(3):
        raise RedirectLibraryPortalException()
class RedirectStudentPortalException(Exception):
    pass
class RedirectFacultyPortalException(Exception):
    pass
class RedirectLibraryPortalException(Exception):
    pass
The given solution is a feasible workaround to trigger a custom event since FastAPI has no built-in event handling except for the startup and shutdown event handlers, which are topics in Chapter 8, Creating Coroutines, Events, and Message-Driven Transactions. So, once call_api_gateway() finds portal_id to be a valid microservice ID, it will raise some custom exceptions. It will throw RedirectStudentPortalException if the user wants to access the Student microservice. On the other hand, the RedirectFacultyPortalException error will be raised if the user desires the Faculty microservice. Otherwise, the RedirectLibraryPortalException error will be triggered when the Library microservice is the one wanted by the user. But first, we need to inject call_api_gateway() into the APIRouter instance handling the gateway endpoint through the main.py component of the top-level ERP application. The following script shows you how it is injected into university.router using the concepts discussed earlier:
from fastapi import FastAPI, Depends, Request, Response
from gateway.api_router import call_api_gateway
from controller import university
app = FastAPI()
app.include_router (university.router,
           dependencies=[Depends(call_api_gateway)],
           prefix='/ch04')
All of these raised exceptions require an exception handler that will listen to the throws and execute some of the tasks required to pursue the microservices.
Applying the exception handlers
The exception handler does a redirection to the appropriate microservice. As you learned in Chapter 2, Exploring the Core Features, each thrown exception must have its corresponding exception handler to pursue the required response after the exception handling. Here are the exception handlers that will handle the custom exception thrown by call_api_gateway():
from fastapi.responses import RedirectResponse
from gateway.api_router import call_api_gateway,
     RedirectStudentPortalException,
     RedirectFacultyPortalException,
     RedirectLibraryPortalException
@app.exception_handler(RedirectStudentPortalException)
def exception_handler_student(request: Request,
   exc: RedirectStudentPortalException) -> Response:
    return RedirectResponse(
        url='http://localhost:8000/ch04/student/index')
@app.exception_handler(RedirectFacultyPortalException)
def exception_handler_faculty(request: Request,
   exc: RedirectFacultyPortalException) -> Response:
    return RedirectResponse(
       url='http://localhost:8000/ch04/faculty/index')
@app.exception_handler(RedirectLibraryPortalException)
def exception_handler_library(request: Request,
   exc: RedirectLibraryPortalException) -> Response:
    return RedirectResponse(
       url='http://localhost:8000/ch04/library/index')
Here, exception_handler_student() will redirect the user to the mount path of the Student microservice, while exception_handler_faculty() will redirect the user to the Faculty sub-application. Additionally, exception_handler_library() will let the user access the Library microservice. Exception handlers are the last component needed to complete the API Gateway architecture. The exceptions trigger the redirection to the independent microservices mounted on the FastAPI framework.
Although there are other, better solutions to achieve the gateway architecture, our approach is still procedural and pragmatic without having to resort to external modules and tools, just the core components of FastAPI. Chapter 11, Adding Other Microservices Features, will discuss establishing an effective API Gateway architecture using Docker and NGINX.
Now, let us explore how to set up a centralized logging mechanism for this kind of microservices setup.
Centralizing the logging mechanism
We have created an audit trail mechanism with middleware and Python file transactions in Chapter 2, Exploring the Core Features. We have found out that middleware, which can only be set up through the FastAPI decorator of the top-level application, can manage incoming Request and outgoing Response of any API services. This time, we will be using custom middleware to set up a centralized logging feature that will log all service transactions of the top-level application alongside its independent mounted microservices. Of the many approaches for integrating these logging concerns into the application without changing the API services, we will concentrate on the following pragmatic custom approach with the custom middleware and Loguru module.
Utilizing the Loguru module
An application log is essential to any enterprise-grade application. For monolithic applications deployed in a single server, logging means letting service transactions write their log messages to a single file. On the other hand, logging can be too complex and complicated to implement in an independent microservices setup, especially when these services are for deployment to different servers or Docker containers. Its logging mechanism could even cause runtime problems if the module used is not adaptable to asynchronous services.
For FastAPI instances that support both asynchronous and synchronous API services that run on an ASGI server, using Python’s logging module always generates the following error log:
2021-11-08 01:17:22,336 - uvicorn.error - ERROR - Exception in ASGI application
Traceback (most recent call last):
  File "c:alibatadevelopmentlanguagepython
  python38libsite-packagesuvicornprotocolshttp
  httptools_impl.py", line 371, in run_asgi
    result = await app(self.scope, self.receive, self.send)
  File "c:alibatadevelopmentlanguagepython
  python38libsite-packagesuvicornmiddleware
  proxy_headers.py", line 59, in __call__
    return await self.app(scope, receive, send)
Opting for another logging extension is the only solution to avoid the error generated by the logging module. The best option is one that can fully support the FastAPI framework, which is the loguru extension. But first, we need to install it using the pip command:
pip install loguru
Loguru is a straightforward and easy-to-use logging extension. We can immediately log using its default handler, the sys.stderr handler, even without adding much configurations. Since our application needs to place all messages in a log file, we need to add the following lines to the main.py component of the top-level application right after the instantiation of FastAPI:
from loguru import logger
from uuid import uuid4
app = FastAPI()
app.include_router (university.router,
         dependencies=[Depends(call_api_gateway)],
         prefix='/ch04')
logger.add("info.log",format="Log: [{extra[log_id]}:
   {time} - {level} - {message} ", level="INFO",
   enqueue = True)
Note that its logger instance has an add() method where we can register sinks. The first part of the sinks is the handler that decides whether to emit the logs in sys.stdout or the file. In our university ERP prototype, we need to have a global info.log file that contains all the log messages of the sub-applications.
A crucial part of the log sink is the level type, which indicates the granularity of log messages that need to be managed and logged. If we set the level parameter of add() to INFO, it tells the logger to consider only those messages under the INFO, SUCCESS, WARNING, ERROR, and CRITICAL weights. The logger will bypass log messages outside these levels.
Another part of the sinks is the format log, where we can create a custom log message layout to replace its default format. This format is just like a Python interpolated string without the "f" that contains placeholders such as {time}, {level}, {message}, and any custom placeholders that need to be replaced by logger at runtime.
In log.file, we want our logs to start with the Log keyword followed immediately by the custom-generated log_id parameter and then the time the logging happened, the level, and the message.
And to add support for asynchronous logging, the add() function has an enqueue parameter that we can enable anytime. In our case, this parameter is default to True just to prepare for any async/await execution.
There is a lot to explore with Loguru’s features and functionality. For instance, we can create additional handlers for loggers to emit where each of these handlers has different retention, rotation, and rendition types. Additionally, Loguru can allow us to add colors to our logs through some color markups such as <red>, <blue>, or <cyan>. It also has an @catch() decorator that can be applied to manage exceptions at runtime. All the logging features we need to set up our unified application log are in Loguru. Now that we have configured our Loguru in the top-level application, we need to let its logging mechanism work across the three sub-applications or microservices without modifying their code.
Building the logging middleware
The core component of this centralized application log is the custom middleware that we must implement in the main.py component where we set up Loguru. FastAPI’s mount allows us to centralize some cross-cutting concerns such as logging without adding anything to the sub-applications. One middleware implementation in the main.py component of the top-level application is good enough to pursue logging across the independent microservices. The following is the middleware implementation for our specimen application:
@app.middleware("http")
async def log_middleware(request:Request, call_next):
    log_id = str(uuid4())
    with logger.contextualize(log_id=log_id):
        logger.info('Request to access ' +
             request.url.path)
        try:
            response = await call_next(request)
        except Exception as ex:
            logger.error(f"Request to " +
              request.url.path + " failed: {ex}")
            response = JSONResponse(content=
               {"success": False}, status_code=500)
        finally:
            logger.info('Successfully accessed ' +
               request.url.path)
            return response
First, log_middleware() will generate a log_id parameter every time it intercepts any API services from the main app or the sub-applications. Then, the log_id parameter is injected into the dict of context information through Loguru’s contextualize() method since log_id is part of the log information, as indicated in our log format setup. Afterward, logging starts before the API service is executed and after its successful execution. When exceptions are encountered during the process, the logger will still generate a log message with the Exception message. So, whenever we access any API services anywhere from the ERP prototype, the following log messages will be written in info.log:
Log: [1e320914-d166-4f5e-a39b-09723e04400d: 2021-11-28T12:02:25.582056+0800 - INFO - Request to access /ch04/university/1
Log: [1e320914-d166-4f5e-a39b-09723e04400d: 2021-11-28T12:02:25.597036+0800 - INFO - Successfully accessed /ch04/university/1
Log: [fd3badeb-8d38-4aec-b2cb-017da853e3db: 2021-11-28T12:02:25.609162+0800 - INFO - Request to access /ch04/student/index
Log: [fd3badeb-8d38-4aec-b2cb-017da853e3db: 2021-11-28T12:02:25.617177+0800 - INFO - Successfully accessed /ch04/student/index
Log: [4cdb1a46-59c8-4762-8b4b-291041a95788: 2021-11-28T12:03:25.187495+0800 - INFO - Request to access /ch04/student/profile/add
Log: [4cdb1a46-59c8-4762-8b4b-291041a95788: 2021-11-28T12:03:25.203421+0800 -
INFO - Request to access /ch04/faculty/index
Log: [5cde7503-cb5e-4bda-aebe-4103b2894ffe: 2021-11-28T12:03:33.432919+0800 - INFO - Successfully accessed /ch04/faculty/index
Log: [7d237742-fdac-4f4f-9604-ce49d3c4c3a7: 2021-11-28T12:04:46.126516+0800 - INFO - Request to access /ch04/faculty/books/request/list
Log: [3a496d87-566c-477b-898c-8191ed6adc05: 2021-11-28T12:04:48.212197+0800 - INFO - Request to access /ch04/library/book/request/list
Log: [3a496d87-566c-477b-898c-8191ed6adc05: 2021-11-28T12:04:48.221832+0800 - INFO - Successfully accessed /ch04/library/book/request/list
Log: [7d237742-fdac-4f4f-9604-ce49d3c4c3a7: 2021-11-28T12:04:48.239817+0800 -
Log: [c72f4287-f269-4b21-a96e-f8891e0a4a51: 2021-11-28T12:05:28.987578+0800 - INFO - Request to access /ch04/library/book/add
Log: [c72f4287-f269-4b21-a96e-f8891e0a4a51: 2021-11-28T12:05:28.996538+0800 - INFO - Successfully accessed /ch04/library/book/add
The given snapshot of log messages proves that we have a centralized setup because the middleware filters all API service execution and performs the logging transaction. It shows that the logging started from accessing the gateway down to executing the API services from the faculty, student, and library sub-applications. Centralizing and managing cross-cutting concerns is one advantage that can be provided by using FastAPI’s mounting when building independent microservices.
But when it comes to the interactions among these independent sub-applications, can mounting also be an advantage? Now, let us explore how independent microservices in our architecture can communicate by utilizing each other’s API resources.
Consuming the REST API services
Just like in an unmounted microservices setup, mounted ones can also communicate by accessing each other’s API services. For instance, if a faculty member or student wants to borrow a book from the library, how can that setup be implemented seamlessly?
In Figure 4.4, we can see that interactions can be possible by establishing a client-server communication wherein one API service can serve as a resource provider, and the others are the clients:

Figure 4.4 – Interaction with the faculty, student, and library microservices
Consuming API resources in FastAPI can be straightforward using the httpx and requests external modules. The following discussions will focus on how these two modules can help our mounted services interact with each other.
Using the httpx module
The httpx external module is a Python extension that can consume both asynchronous and synchronous REST APIs and has HTTP/1.1 and HTTP/2 support. It is a fast and multi-purpose toolkit that is used to access API services running on WSGI-based platforms, as well as, on ASGI, like the FastAPI services. But first, we need to install it using pip:
pip install httpx
Then, we can use it directly without further configuration to make two microservices interact, for instance, our student module submitting assignments to the faculty module:
import httpx
@router.get('/assignments/list')
async def list_assignments():
   async with httpx.AsyncClient() as client:
    response = await client.get(
     "http://localhost:8000/ch04/faculty/assignments/list")
    return response.json()
@router.post('/assignment/submit')
def submit_assignment(assignment:AssignmentRequest ):
   with httpx.Client() as client:
      response = client.post("http://localhost:8000/
          ch04/faculty/assignments/student/submit",
           data=json.dumps(jsonable_encoder(assignment)))
      return response.content
The httpx module can process the GET, POST, PATCH, PUT, and DELETE path operations. It can allow the passing of different request parameters to the requested API without so much complexity. The post() client operation, for instance, can accept headers, cookies, params, json, files, and model data as parameter values. We use the with context manager to directly manage the streams created by its Client() or AsyncClient() instances, which are closeable components.
The preceding list_assignments service is a client that uses the AsyncClient() instance to pursue its GET request from an asynchronous /ch04/faculty/assignments/list API endpoint from the faculty module. AsyncClient accesses the WSGI-based platform to execute any asynchronous services, not the synchronous ones, or else it will throw Status Code 500. It might require additional configuration details in its constructor for some complex cases, where it needs to further manage resource access through ASGI.
On the other hand, the submit_assignment service is a synchronous client that accesses another synchronous endpoint, ch04/faculty/assignments/student/submit, which is a POST HTTP operation. In this case, the Client() instance is used to access the resource to submit an assignment to the Faculty module through a POST request. AssignmentRequest is a BaseModel object that needs to be filled up by the client for submission to the request endpoint. Unlike params and json, which are passed straightforwardly as dict, data is a model object that must be first converted into dict by jsonable_encoder() and json.dumps() to make the transport feasible across the HTTP. The new converted model becomes the argument value of the data parameter of the POST client operation.
When it comes to the response of the client services, we can allow the response to be treated as a piece of text using the module’s content or as a JSON result using json(). It now depends on the requirement of the client service as to what response type to use for the application.
Using the requests module
Another option to establish client-server communication among microservices is the requests module. Although httpx and requests are almost compatible, the latter offers other features such as auto-redirection and explicit session handling. The only problem with requests is its non-direct support to asynchronous APIs and its slow performance when accessing resources. Despite its drawbacks, the requests module is still the standard way of consuming REST APIs in Python microservice development. First, we need to install it before we can use it:
pip install requests
In our ERP prototype, the requests extension was used by the faculty microservice to borrow books from the library module. Let’s look at the Faculty client services that show us how the requests module is used to access the synchronous API of library:
@router.get('/books/request/list')
def list_all_request():
    with requests.Session() as sess:
        response = sess.get('http://localhost:8000/
           ch04/library/book/request/list')
        return response.json()
@router.post('/books/request/borrow')
def request_borrow_book(request:BookRequestReq):
    with requests.Session() as sess:
        response = sess.post('http://localhost:8000/
           ch04/library/book/request',
             data=dumps(jsonable_encoder(request)))
        return response.content
@router.get('/books/issuance/list')
def list_all_issuance():
    with requests.Session() as sess:
        response = sess.get('http://localhost:8000/
            ch04/library/book/issuance/list')
        return response.json()
@router.post('/books/returning')
def return_book(returning: BookReturnReq):
    with requests.Session() as sess:
        response = sess.post('http://localhost:8000/
            ch04/library/book/issuance/return',
              data=dumps(jsonable_encoder(returning)))
        return response.json()
The requests module has a Session() instance, which is equivalent to Client() in the httpx module. It provides all the necessary client operations that will consume the API endpoints from the FastAPI platform. Since Session is a closeable object, the context manager is, again, used here to handle the streams that will be utilized during the access of the resources and transport of some parameter values. Like in httpx, parameter details such as params, json, header, cookies, files, and data are also part of the requests module and are ready for transport through the client operation if needed by the API endpoints.
From the preceding code, we can see that sessions are created to implement the list_all_request and list_all_issuance GET client services. Here, request_borrow_book is a POST client service that requests a book in the form of BookRequestReq from the /ch04/library/book/request API endpoint. Similar to httpx, jsonable_encoder() and json.dumps() must be used to convert the BaseModel object into dict in order to be transported as a data parameter value. The same approach is also applied to the return_book POST client service, which returns the book borrowed by the faculty. The responses of these client services can also be content or json() just like what we have in the httpx extension.
Using the requests and httpx modules allows these mounted microservices to interact with each other based on some specification. Consuming exposed endpoints from other microservices minimizes tight coupling and strengthens the importance of the decomposition design pattern of building independent microservices.
The next technique gives you the option of managing components within a microservice using domain modeling.
Applying the domain modeling approach
Applications that are database-focused or built from core functionalities without collaborating with models are either not easy to manage when they scale up or not friendly when enhanced or bug-fixed. The reason behind this is the absence of the structure and flow of business logic to follow, study, and analyze. Understanding the behavior of an application and deriving the domain models with the business logic behind them encompasses the best approach when it comes to establishing and organizing a structure in an application. This principle is called the domain modeling approach, which we will now apply to our ERP specimen.
Creating the layers
Layering is one implementation that is inevitable when applying domain-driven development. There is a dependency between layers that, sometimes, might pose problems when fixing bugs during development. But what are important in layered architectures are the concepts, structures, categories, functionalities, and roles that layering can create, which helps in understanding the specification of the application. Figure 4.5 shows the models, repositories, services, and controllers of the sub-applications:
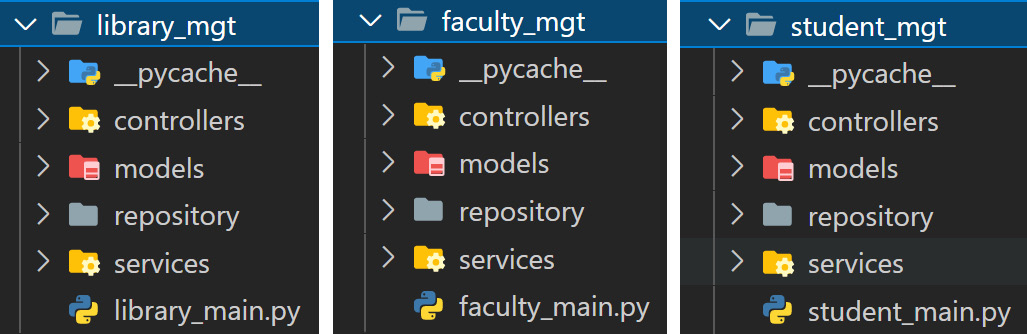
Figure 4.5 – Layered architecture
The most crucial layer is the models layer, which consists of the domain model classes that describe the domain and business processes involved in the application.
Identifying the domain models
The domain model layer is the initial artifact of the application because it provides the contextual framework of the application. Business processes and transactions can be easily classified and managed if domains are first determined during the initial phase of the development. The code organization created by domain layering can provide code traceability, which can ease source code updates and debugging.
In our ERP specimen, these models are categorized into two: the data and request models. The data models are those used to capture and store data in its temporary data stores, while the request models are the BaseModel objects used in the API services.
For instance, the faculty module has the following data models:
class Assignment:
    def __init__(self, assgn_id:int, title:str,
        date_due:datetime, course:str):
        self.assgn_id:int = assgn_id
        self.title:str = title
        self.date_completed:datetime = None
        self.date_due:datetime = date_due
        self.rating:float = 0.0
        self.course:str = course

    def __repr__(self):
      return ' '.join([str(self.assgn_id), self.title,
        self.date_completed.strftime("%m/%d/%Y, %H:%M:%S"),
        self.date_due.strftime("%m/%d/%Y, %H:%M:%S"),
        str(self.rating) ])
    def __expr__(self):
      return ' '.join([str(self.assgn_id), self.title,
       self.date_completed.strftime("%m/%d/%Y, %H:%M:%S"),
       self.date_due.strftime("%m/%d/%Y, %H:%M:%S"),
        str(self.rating) ])
class StudentBin:
    def __init__(self, bin_id:int, stud_id:int,
      faculty_id:int):
        self.bin_id:int = bin_id
        self.stud_id:int = stud_id
        self.faculty_id:int = faculty_id
        self.assignment:List[Assignment] = list()


    def __repr__(self):
        return ' '.join([str(self.bin_id),
         str(self.stud_id), str(self.faculty_id)])
    def __expr__(self):
        return ' '.join([str(self.bin_id),
         str(self.stud_id), str(self.faculty_id)])
These data model classes always have their constructors implemented if constructor injection is needed during instantiation. Moreover, the __repr__() and __str__() dunder methods are optionally there to provide efficiency for developers when accessing, reading, and logging these objects.
On the other hand, the request models are familiar because they were already discussed in the previous chapter. Additionally, the faculty module has the following request models:
class SignupReq(BaseModel):
    faculty_id:int
    username:str
    password:str
class FacultyReq(BaseModel):
    faculty_id:int
    fname:str
    lname:str
    mname:str
    age:int
    major:Major
    department:str
class FacultyDetails(BaseModel):
    fname:Optional[str] = None
    lname:Optional[str] = None
    mname:Optional[str] = None
    age:Optional[int] = None
    major:Optional[Major] = None
    department:Optional[str] = None
The request models listed in the preceding snippet are just simple BaseModel types. For further details on how to create BaseModel classes, Chapter 1, Setting Up FastAPI for Starters, provides guidelines for creating different kinds of BaseModel classes to capture different requests from clients.
Building the repository and service layers
The two most popular domain modeling patterns that are crucial in building the layers of this approach are the repository and service layer patterns. The repository aims to create strategies for managing data access. Some repository layers only provide data connectivity to the data store like in our specimen here, but oftentimes, repository's goal is to interact with the Object Relational Model (ORM) framework to optimize and manage data transactions. But aside from the access, this layer provides a high-level abstraction for the application so that the specific database technology or dialect used will not matter to the applications. It serves as an adapter to any database platform to pursue data transactions for the application, nothing else. The following is a repository class of the faculty module, which manages the domain for creating assignments for their students:
from fastapi.encoders import jsonable_encoder
from typing import List, Dict, Any
from faculty_mgt.models.data.facultydb import
     faculty_assignments_tbl
from faculty_mgt.models.data.faculty import Assignment
from collections import namedtuple
class AssignmentRepository:

    def insert_assignment(self,
           assignment:Assignment) -> bool:
        try:
            faculty_assignments_tbl[assignment.assgn_id] =
                assignment
        except:
            return False
        return True

    def update_assignment(self, assgn_id:int,
           details:Dict[str, Any]) -> bool:
       try:
           assignment = faculty_assignments_tbl[assgn_id]
           assignment_enc = jsonable_encoder(assignment)
           assignment_dict = dict(assignment_enc)
           assignment_dict.update(details)
           faculty_assignments_tbl[assgn_id] =   	 	 	           Assignment(**assignment_dict)
       except:
           return False
       return True

    def delete_assignment(self, assgn_id:int) -> bool:
        try:
            del faculty_assignments_tbl[assgn_id]
        except:
            return False
        return True

    def get_all_assignment(self):
        return faculty_assignments_tbl
Here, AssignmentRepository manages the Assignment domain object using its four repository transactions. Additionally, insert_assignment() creates a new Assignment entry in the faculty_assignment_tbl dictionary, and update_assignment() accepts new details or the corrected information of an existing assignment and updates it. On the other hand, delete_assignment() deletes an existing Assignment entry from the data store using its assign_id parameter. To retrieve all the created assignments, the repository class has get_all_assignment(), which returns all the entries of faculty_assignments_tbl.
The service layer pattern defines the algorithms, operations, and process flows of the applications. Oftentimes, it interacts with the repository to build the necessary business logic, management, and controls for the other components of the application, such as the API services or controllers. Usually, one service caters to one repository class or more depending on the specification of the project. The following code snippet is a service that interfaces a repository to provide additional tasks such as UUID generation for a student workbin:
from typing import List, Dict , Any
from faculty_mgt.repository.assignments import
            AssignmentSubmissionRepository
from faculty_mgt.models.data.faculty import Assignment
from uuid import uuid4
class AssignmentSubmissionService:

    def __init__(self):
        self.repo:AssignmentSubmissionRepository =
            AssignmentSubmissionRepository()

    def create_workbin(self, stud_id:int, faculty_id:int):
        bin_id = uuid4().int
        result = self.repo.create_bin(stud_id, bin_id,
                     faculty_id )
        return (result, bin_id)

    def add_assigment(self, bin_id:int,
                   assignment: Assignment):
        result = self.repo.insert_submission(bin_id,
                     assignment )
        return result

    def remove_assignment(self, bin_id:int,
                   assignment: Assignment):
        result = self.repo.insert_submission(bin_id,
                      assignment )
        return result
    def list_assignments(self, bin_id:int):
        return self.repo.get_submissions(bin_id)
The AssignmentSubmissionService cited in the preceding code has methods that utilize the AssignmentSubmissionRepository transactions. It provides them with parameters and returns the bool results for evaluation by other components. Other services might look more complicated than this sample because algorithms and tasks are usually added to pursue the requirements of the layers.
The successful wiring of a repository class to the service happens in the latter’s constructor. Usually, the repository class is instantiated just like in the preceding sample. Another fantastic option is to use DI, as discussed in Chapter 3.
Using the factory method pattern
The factory method design pattern is always a good approach for managing injectable classes and functions using the Depends() component. Chapter 3 showcased factory methods as mediums to inject the repository components into the service instead of instantiating them directly within the service. The design pattern provides loose coupling between components or layers. This approach is highly applicable to large applications wherein some modules and sub-components are reused and inherited.
Now, let us look at how the top-level application can manage the different configuration details of these mounted and independent microservice applications.
Managing a microservice’s configuration details
So far, this chapter has provided us with some popular design patterns and strategies that can give us a kickstart on how to provide our FastAPI microservices with the best structures and architecture. This time, let us explore how the FastAPI framework supports storing, assigning, and reading configuration details to mounted microservice applications such as database credentials, networking configuration data, application server information, and deployment details. First, we need to install python-dotenv using pip:
pip install python-dotenv
All of these settings are values that are external to the implementation of the microservice applications. Instead of hardcoding them into the code as variable data, usually, we store them in the env, property, or INI files. However, challenges arise when assigning these settings to different microservices.
Frameworks that support the externalized configuration design pattern have an internal processing feature that fetches environment variables or settings without requiring additional parsing or decoding techniques. For instance, the FastAPI framework has built-in support for externalized settings through pydantic’s BaseSettings class.
Storing settings as class attributes
In our architecture setup, it should be the top-level application that will manage the externalized values. One way is to store them in a BaseSettings class as attributes. The following are classes of the BaseSettings type with their respective application details:
from pydantic import BaseSettings
from datetime import date
class FacultySettings(BaseSettings):
    application:str = 'Faculty Management System'
    webmaster:str = '[email protected]'
    created:date = '2021-11-10'
class LibrarySettings(BaseSettings):
    application:str = 'Library Management System'
    webmaster:str = '[email protected]'
    created:date = '2021-11-10'
class StudentSettings(BaseSettings):
    application:str = 'Student Management System'
    webmaster:str = '[email protected]'
    created:date = '2021-11-10'
Here, FacultySettings will be assigned to the faculty module since it carries some information regarding the module. LibrarySettings is for the library module to utilize, while StudentSettings is for the student module.
To fetch the values, first, a component in a module must import the BaseSettings class from the main project’s /configuration/config.py module. Then, it needs an injectable function to instantiate it before injecting it into a component that needs to utilize the values. The following script is part of /student_mgt/student_main.py, where the settings need to be retrieved:
from configuration.config import StudentSettings
student_app = FastAPI()
student_app.include_router(reservations.router)
student_app.include_router(admin.router)
student_app.include_router(assignments.router)
student_app.include_router(books.router)
def build_config():
    return StudentSettings()
@student_app.get('/index')
def index_student(
   config:StudentSettings = Depends(build_config)):
    return {
        'project_name': config.application,
        'webmaster': config.webmaster,
        'created': config.created
      }
Here, build_config() is an injectable function that injects the StudentSettings instance into the /index endpoint of the student microservice. After the DI, the application, webmaster, and created values will become accessible from the config wired object. These settings will appear on the browser right after calling the /ch04/university/1 gateway URL.
Storing settings in the properties file
Another option is to store all these settings inside a physical file with an extension of .env, .properties, or .ini. For instance, this project has the erp_settings.properties file found in the /configuration folder, and it contains the following application server details in key-value pair format:
production_server = prodserver100
prod_port = 9000
development_server = devserver200
dev_port = 10000
To fetch these details, the application needs another BaseSettings class implementation that declares the key of the key-value pair as attributes. The following class shows how production_server, prod_port, development_server, and dev_port are declared without any assigned values:
import os
class ServerSettings(BaseSettings):
    production_server:str
    prod_port:int
    development_server:str
    dev_port:int

    class Config:
        env_file = os.getcwd() +
           '/configuration/erp_settings.properties'
Aside from the class variable declaration, BaseSetting requires an implementation of an inner class, called Config, with a predefined env_file assigned to the current location of the properties file.
The same processes are involved when it comes to accessing the property details from the file. After importing ServerSettings, it needs an injectable function to inject its instance to the components that need the details. The following script is an updated version of /student_mgt/student_main.py, which includes access to the development_server and development_port settings:
from fastapi import FastAPI, Depends
from configuration.config import StudentSettings,
      ServerSettings
student_app = FastAPI()
student_app.include_router(reservations.router)
student_app.include_router(admin.router)
student_app.include_router(assignments.router)
student_app.include_router(books.router)
def build_config():
    return StudentSettings()
def fetch_config():
    return ServerSettings()
@student_app.get('/index')
def index_student(
     config:StudentSettings = Depends(build_config),
     fconfig:ServerSettings = Depends(fetch_config)):
    return {
        'project_name': config.application,
        'webmaster': config.webmaster,
        'created': config.created,
        'development_server' : fconfig.development_server,
        'dev_port': fconfig.dev_port
      }
Based on this enhanced script, running the /ch04/university/1 URL will redirect the browser to a screen showing additional server details from the properties file. Managing configuration details in FastAPI is easy, as we either save them inside a class or inside a file. No external module is necessary, and no special coding effort is required to fetch all these settings, just the creation of the BaseSettings classes. This easy setup contributes to building flexible and adaptable microservice applications that can run on varying configuration details.
Summary
The chapter started with the decomposition pattern, which is useful for breaking down a monolithic application into granularized, independent, and scalable modules. The FastAPI application that implemented these modules exhibited some principles included in the 12-Factor Application principles of a microservice, such as having independence, configuration files, logging systems, code bases, port binding, concurrency, and easy deployment.
Alongside decomposition, this chapter also showcased the mounting of different independent sub-applications onto the FastAPI platform. Only FastAPI can group independent microservices using mounts and bind them into one port with their corresponding context roots. From this feature, we created a pseudo-API Gateway pattern that serves as a façade to the independent sub-applications.
Despite the possible drawbacks, the chapter also highlighted domain modeling as an option for organizing components in a FastAPI microservice. The domain, repository, and service layers help manage the information flow and task distribution based on the project specification. Tracing, testing, and debugging are easy when domain layers are in place.
In the next chapter, we will focus on integrating our microservice applications with a relational database platform. The focus is to establish database connectivity and utilize our data models to implement CRUD transactions within the repository layer.