Overview
By the end of this chapter, you will be able to use the Model-View-Controller (MVC) pattern to create your first Rails application; explain how Action Controller and Action View work together; implement routes, Rails models, and Active Record in a Rails application; save data, set up databases, and create migrations to alter a database schema, create views for web applications quickly with Rails helper methods and use the Rails console and perform Create, Read, Update, Delete (CRUD) operations for a web application.
This chapter aims to equip you with knowledge about Ruby on Rails and the underlying fundamentals that power Rails and make it one of the most popular web application frameworks.
Introduction
In the previous chapter, we learned about advanced topics in Ruby, such as metaprogramming, how to open existing classes and add new methods to them, and how to monkey patch to create dynamic methods on the fly. We also learned about how to interact with external servers by making RESTful calls to them.
In this chapter, we will learn about Ruby on Rails, also known as Rails or ROR. It is a server-side web application framework distributed as a Ruby gem, written in Ruby and first released in 2005. With Ruby on Rails, we can build real-world web applications quickly. Rails is one of the most popular application frameworks for building web applications quickly. It has best practices of web development built into its architecture to create secure, robust, and scalable web apps. Some popular web applications built using Ruby on Rails are Basecamp, GitHub, Shopify, Airbnb, Twitch, SoundCloud, Hulu, Zendesk, and Square – the list goes on.
Ruby on Rails was originally authored by David Heinemeier Hansson (popularly known as DHH) who sourced it from his project management tool Basecamp. DHH then opensourced it in July 2004 and allowed commit rights to the project only in February 2005. In 2007, Ruby on Rails reached a new milestone when Apple announced that it would ship Ruby on Rails along with macOS X. Ruby on Rails is published under the MIT license. It has a core team and a large number of contributors (over 5,000 across the world). In 2005, version 1.0 of Ruby on Rails was released, and the latest stable release is version 5.2, which was released in 2018.
Ruby on Rails is an MVC-based framework that comes with a standard structure for databases, templating engines, web pages, and interacting with databases. It encourages the use of standards such as JSON and XML for data transfer and the use of HTML/CSS/JavaScript for user interfaces. The following are two guiding principles of the Rails philosophy:
- Don't Repeat Yourself (DRY), which means avoiding repetition in code
- Convention over configuration, which means following best practices and following set conventions rather than using numerous configuration files
MVC
MVC is short for Model-View-Controller and is a design pattern that's used to develop web applications. It essentially divides an application in development into three distinct parts – a model, a view, and a controller. They are interconnected in a way that allows maximum reuse of code and effective parallel development, as shown in the following figure:

Figure 11.1: Basic architecture of the MVC pattern
In an MVC-based application, a user interacts with the view, which in turn raises an appropriate request with a URL, hitting a controller. The controller handles this request by either interacting with the appropriate model or rendering the required video.
Let's look at each of these components in detail.
Model
The model is the central component of this architecture. It is where we keep the business logic and the rules of the application, as well as being where we maintain the data. Model objects interact and store the model state in a database. The user never directly interacts with a model. Rather, this transaction is only performed through a controller. For example, the data that we see in any web application comes from the model. This could be any calculation or a query that is fetching data from a database.
View
The view is the representation component of the MVC pattern. It is responsible for creating the User Interface (UI). The view displays the data that comes from the model on the UI and also allows the end user to interact with this data. All of this happens via the controller. For example, in the case of web application, the website pages that can be seen form the view.
Controller
The controller accepts inputs and user requests, then converts them into commands to interact with the model or view. The controller is the glue between the model and view; it does much of the intermediary work between the two. For example, it is the controller that processes the HTTP request to generate a web page.
In a nutshell:
- The model is for maintaining data and business logic. It receives input from the controller.
- The view is for the UI, which involves the presentation of data from the model via the controller.
- The controller is a request handler between the view and the model. It also performs various other actions and interactions based on user input.
Note
It is always advised to have a fat model and a thin controller. The concept of a thin controller and a fat model means that we do more work in our model and keep our controller as thin as possible. For instance, we may validate data and simply pass it to the model, while in the model we may define business logic, coding operations, and database interactions. This coding style is very common in an MVC architecture and is a guiding light when developing applications.
In Rails, the MVC pattern is managed by Action Pack and Active Record. Active Record manages the interaction between the model and the database – it is the "M" in MVC, while Action Pack consists of Action View and Action Controller, which represent the "V" and "C" in MVC, respectively.
Action View, Action Controller, and Active Record are packed with helper methods to help speed up development. As we proceed in this chapter, we will use some of them.
Generating Our First Rails App
Now that you've been introduced to the theory concerning Ruby on Rails, it's time for us to create our first Rails application and learn about the anatomy of a Rails app.
Rails commands are built-in scripts that help to speed development by handling most of the everyday tasks encountered in day-to-day development. Some popular ones are listed here:
- rails new app_name
This generates a new Rails application with a file structure for the Rails application.
- rails server
This starts a web server named Puma to host a Rails application. This application, by default, is served on localhost port 3000. Puma is a web server that comes prepackaged with Rails. It's best suited for local development.
- rails console
This helps you interact with the Rails application using your Terminal. The Rails console is a nifty tool that uses IRB. It's a fast way to test your code for a Rails application.
- rails test
By default, Rails comes with a testing framework called minitest. This command helps to run all the tests.
- rails generate
This command provides boilerplate code for various Rails components. For example, rails generate controller controller_name action_name will set up a controller along with its test and corresponding views for actions. It does the same for generating models and migrations (we will learn more about this in the Models, Migrations, and Databases section).
- rails db:create
This creates a new database for a Rails application.
- rails db:migrate
This helps run migrations on a database.
- rails routes
This prints all the valid and available routes of the application to the controller and corresponding actions.
Let's now go through an exercise using these commands to build a more profound understanding of Rails.
Exercise 11.01: Generating a Simple Rails Application
In this exercise, we will create a simple Rails application for a travel-planning and advice application called citireview. We will serve this Rails application over a web server and access it via the browser.
Follow these steps to complete the exercise:
- Fire up your Terminal and install the Rails gem using the following command, if you haven't installed it with the bundler:
gem install rails
Note
If you have installed the gems using the bundler, you just have to enable the Rails extension from the Visual Studio Code editor interface. Go to Extensions, then search for Rails and install.
- Create the citireview Rails application using the following command:
$ rails new citireview
This command initiates the installation of various gems and their dependencies for the application, as listed in the following code snippet. The application is set up in the proper Rails structure, along with the installation of gems and the dependencies included with Rails:
chapter11 git:(master) ✗ rails new citireview
The following gems and dependencies will be installed after running the previous command:
create
create README.md
create Rakefile
create config.ru
create .gitignore
create Gemfile
run git init from "."
Initialized empty Git repository in /Users/akshatpaul/myapps/rubyFundamentals/packt-github/Ruby-Fundamentals/chapter11/citireview/.git/
create app
create app/assets/config/manifest.js
create app/assets/javascripts/application.js
- To test whether this application is working correctly, go to the citireview directory and run the rails server command from the Terminal. This will serve the generated Rails application on a web server called Puma:
$ cd citireview
$ rails server
The output should show up as follows on the Terminal:

Figure 11.2: Initiating the Rails server
This starts our Rails server and the Rails application is served on localhost port 3000.
- Test your sample application by visiting localhost:3000 on your browser, as shown in the following figure:

Figure 11.3: Output for the Rails application on localhost
This is the default home page when a Rails application is set up. You might find the Rails and Ruby versions to be different on your machine, but not to worry.
Note
For production applications that are served for your end users, it is advised to go for other web server options, such as Phusion Passenger and Unicorn.
Anatomy of a Rails application
Inside our citireview application directory reside the auto-generated files and folders that came when we created our application with the automatic scripts included in the Rails gem. The following are the different components that make up the anatomy of a Rails application, along with their descriptions:
- app/
This folder contains models, controllers, views, helpers, mailers, jobs, and assets for a Rails application. Most of the application-specific code files are placed in this directory.
- bin/
This folder contains various scripts that set up, update, and run the Rails application.
- config/
In this folder, we keep various configuration files related to routes, databases, environments, and initializers.
- config.ru
This file is used by a Rack-based server to start the application.
- db/
This folder contains all the files related to databases, such as migrations, schemas, and seed files.
- Gemfile, Gemfile.lock
With Gemfile, you can specify the gem and its respective version number. As the name suggests, Gemfile.lock locks the version number of a gem and its dependencies. This helps to keep the application stable across various environments and during the book of development/deployment.
- lib/
In this folder, we keep any other modules that are used for the application.
- log/
This folder contains application log files.
- package.json
Similar to Gemfile, this file contains any Node Package Manager (npm) dependencies used by the Rails application.
- public/
This folder contains compiled static files and assets for the application. It is a good place to keep any 404 pages, which appear when there are errors, as well as any other public assets or pages.
- Rakefile
This file contains tasks that are run from the command line. It's good practice to keep your custom task inside lib/tasks rather than modifying the default tasks.
- README.md
This file contains basic documentation about the application. You may add an introduction to your application or basic steps for how to set it up. This is a markdown file, which is very popular for its text-formatting syntax for documentation.
- test/
In this folder, we keep all unit tests for the controller, model, mailers, helpers, and other test files used for the application.
- tmp/
This folder contains files that are temporary in nature, such as cache content.
- vendor/
In this folder, we keep any third-party code, such as any custom gems.
- .gitignore
There are many files and folders that are auto-generated by your computer or IDE that you don't want to commit to your code. Such files should be added in this file so that they will be ignored during the commit to the repository.
- .ruby-version
In this file, we declare the Ruby version that is used.
The components will look as shown in the following figure in the application directory:

Figure 11.4: Components of a Rails application
Now that we have generated a Rails application with the default Rails page for when we start the server, what we have at the moment is essentially the home page of our citireview application.
In reality, the first thing we would want to do is add our own home page with a welcome message, and this is what we will try to achieve in the next exercise.
Exercise 11.02: Replacing the Default Page
In this exercise, we will be creating a new home page for the citireview application, essentially replacing the default home page of the application. Follow these steps to complete the exercise:
- To create this view, we will also require its corresponding controller. Once again, in Rails, we do have a generator for this. Type the following command to generate a controller with its corresponding views:
$ rails generate controller Home index
The output should show up as follows:
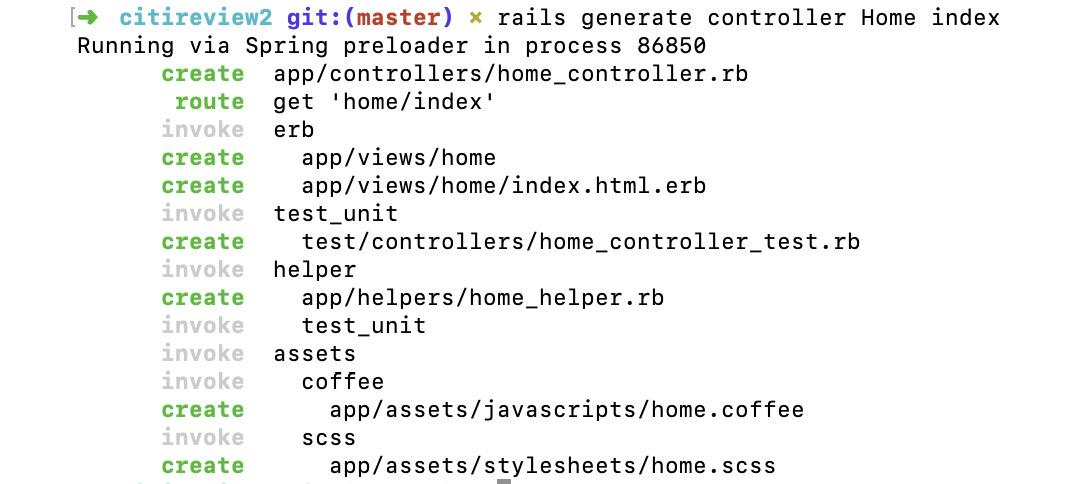
Figure 11.5: Generating a controller for the citireview application
As you can see in the preceding figure, we have created a controller and a route home folder in views with an index.html.erb file, along with tests and assets for styling.
- Open the view from app/views/home/index.html.erb and replace the generated code with the following:
app/views/home/index.html.erb
<h1>Welcome to Citireviews</h1>
<p>This will be the Index page of our app</p>
The preceding code is HTML code with h1 tags, which are header tags. This is usually the largest text on an HTML page to emphasize that it's the heading. Next, we have a p tag, which is a paragraph section for this page.
Note
erb, or eRuby (Embedded Ruby), is a template system that is used by default in Rails and allows Ruby code to be embedded with an HTML document.
- Now open the route file. Since we have to make this view the index page of our application, we would have to make it root_route. In a Rails web application, root_route is the home page. There is a specific convention to be used for this. Open the route file from config/routes.rb and replace it with the following code:
config/routes.rb
Rails.application.routes.draw do
root 'home#index'
end
The route file is where all the routes, basically all your application URLs, reside. A route is associated with a controller and an action in that controller. Since it's a home page for our application, we are using the Rails root keyword, which means you will serve the application on your home URL.
Note
Routes are written in a specific way, as controller_name#action_name. It is important to remember the principle of "convention over configuration," as this is a Rails convention.
root_route always routes only GET requests to the action controller.
- Now start the Rails server with the following command and see the changes on localhost:3000:
$rails server
The application will now appear as follows:

Figure 11.6: Home page of the citireview application
Note
You can also use alias commands such as rails g for Rails application generation and rails s for the Rails server.
If you open the controller folder, you will find home_controller.rb with an index method inside it. Any code related to this view, including its variables or any calculation or minimum logic, will reside in this index action.
Now that we have created our landing page for the application, it is time to add some customization to it. We will now display the heading with a variable value.
Exercise 11.03: Displaying a Page Heading from the Value Served from Its Action
In this exercise, we will add a variable in the index action with a string and display an H1 heading on the landing page of our citireview application. Follow these steps to complete the exercise:
- Open app/controllers/home_controller.rb and add the following code. We are creating an action for the controller to display the index values with a string that says "Welcome to our Site":
class HomeController < ApplicationController
def index
@welcome_message = "Welcome to our Site"
end
end
- Open /app/views/home/index.html.erb and add the following code, which defines the index value of the page to display the heading with the value defined with it:
<h1><%= @welcome_message %> </h1>
<p>This will be the Index page of our app</p>
- Start the Rails server from the root of this directory:
$ rails server
The output should show as follows in the Terminal:
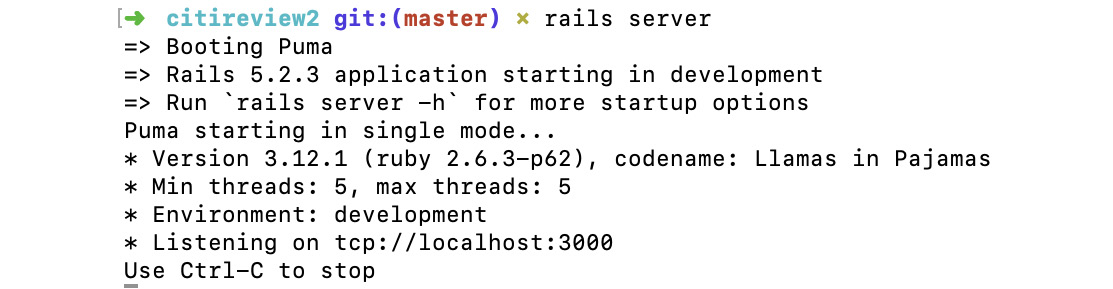
Figure 11.7: Rails server initialization
- Open a browser and go to localhost:3000 to see the output:

Figure 11.8: Output for the Rails application
We have successfully updated the heading on the landing page, which is coming from the variable we declared in the index action in the controller.
Extending Our View and Controller
Now that we have the basic Rails application set up, we can add the key features that should appear as part of any review web application. For instance, we will now add a feature to add reviews on the application.
We will create a Review resource for our citireview application. In Rails, the term "resource" is used to refer to a collection of similar things. For example, if there is a collection of grocery items or a collection of invoices, it is referred to as a resource. We can apply CRUD operations for an item of a resource. CRUD refers to Create, Read, Update, and Delete operations, which are the most fundamental operations applied on any item of a resource at any given time. We will be either creating a record, reading a record, updating a record, or destroying a record.
Rails comes with a resources method, which can be used in config/routes.rb to declare a standard REST resource. By "REST resource," we mean that all RESTful routes and their corresponding actions will be set up in our routes and we don't have to explicitly add them one by one.
Let's now add a resource to the citireview application.
Exercise 11.04: Adding a Resource to the Rails Application
In this exercise, we will be adding a Review resource to our application, which will allow the user to add their reviews for a city or specific locations. The following steps will help you complete the exercise:
- Open the config/routes.rb file and add the following code to it. We are essentially declaring the route of our application here:
Rails.application.routes.draw do
root 'home#index'
resources :reviews
end
- To see what's been set up, type the following command inside your project folder:
$ rails routes
The output should look like this:

Figure 11.9: File setup for the resources method
As you can see, we have all the RESTful routes defined for us by default. We need to define their respective actions; otherwise, we will get errors. Remember that these are just placeholder routes; their actions are to be created and defined by us.
Having our resources defined first helps us to implement our CRUD operations. We start with the controller.
- Generate a Reviews controller using the following command:
$ rails generate controller Reviews
The command output should be as follows:
Running via Spring preloader in process 41916
create app/controllers/reviews_controller.rb
invoke erb
create app/views/reviews
invoke test_unit
create test/controllers/reviews_controller_test.rb
invoke helper
create app/helpers/reviews_helper.rb
invoke test_unit
invoke assets
invoke coffee
create app/assets/javascripts/reviews.coffee
invoke scss
create app/assets/stylesheets/reviews.scss
Spring is a Rails application pre-loader. Its job is to allow an application to run in the background so that there is no need to restart the server every time a task, test, or migration executes. This saves time and results in faster development.
- Now we will add the required method for our CRUD operations in app/controllers/reviews_controller.rb, which, if you take a look now, will be empty. Since we want to create a new record, that is, a new review, we will first define a new action in our controller. Open app/controllers/reviews_controller.rb and add the following code in it:
class ReviewsController < ApplicationController
def new
end
end
Ruby provides many types of access modifiers, (including private, public, and protected) but all actions must be public. Since action methods are accessed by the view, there would otherwise be an error.
- Test accessing this action using the URL http://localhost:3000/reviews/new we saw with rails route using our browser. Start your server with the following command:
$ rails server
The error will show up in the output, as follows:

Figure 11.10: ActionController error
Now that is an informative error. The first line gives us a hint as to what is missing: the template. Basically, the application is able to access our new action, but there is no corresponding view for it to display. Rails first goes to reviews/new to load that template. It then goes to application/new to see whether there is a template, since our ReviewsController is inherited from ApplicationController. So, if you want to add some generic view for the entire application, you can create an application folder and add it there.
- In this step, we will create a view named new.html.erb inside the view/reviews folder. The functionality of this view will be to display a form to add a review for our Rails application. Create an app/views/reviews/new.html.erb file and add the following code in it, which is a heading with a form to submit a review:
<h1>Add new review</h1>
<%= form_with scope: :review, url: reviews_path, local: true do |form| %>
<p>
<%= form.label :name %><br>
<%= form.text_field :name %>
</p>
<p>
<%= form.label :description %><br>
<%= form.text_area :description %>
</p>
<p>
<%= form.submit %>
</p>
<% end %>
We have now created an html.erb page with HTML tags and have embedded the Ruby code within it. We have added the heading in the h1 tag and have generated a form with a submit button and an action to call.
To inject Ruby code in html.erb, use <%= %> or <% %>. The equals sign indicates that it's an expression and displays the content of the Ruby code. Without the equals sign, the syntax means that the code is a part of the script and the content of the Ruby code won't be displayed.
In order to create a form, we have used a Rails form builder. We used a helper method, form_with. This form_with helper method is passed with a scope, which is our resource name, review, which tells form_with what this form is. We have also added the URL, which is the form action where the form should pass the parameters mentioned for submission.
reviews_path is another helper method, and it tells Rails to pass the form parameters to a URI pattern associated with reviews. The fact that we're submitting a form is how we end up with a POST request instead of a GET request.
Finally, inside the form, we use the FormBuilder object, which uses the label, text_field, text_area, and form.submit objects to create this form. It is time to make the create action in ReviewsController, which will interact with a model and save this review in a database.
- If your Rails server is still up, you have to simply reload the page on your browser at http://localhost:3000/reviews/new.
It should look like this:

Figure 11.11: Review resource added to the application
We have successfully added a review functionality to our application.
You don't need to restart your server again and again after every change in Rails. In development mode, the Rails server automatically detects changes and gives you fresh results. This is one of the key features that powers faster development with Ruby on Rails. However, there are times when you have to restart your Rails server; the rule of thumb is that anything outside app/, config/routes.rb, or db/ requires a restart of the Rails server.
Next, try filling in and submitting the form:

Figure 11.12: Adding review
You will get the following error:

Figure 11.13: Unknown action error
As you can see, the application is trying to find a create action in the controller.
- Add the following code to app/controller/reviews_controller.rb:
class ReviewsController < ApplicationController
def new
end
def create
end
end
Though it is empty, it is sufficient for now. Go back, refresh, and click on submit again though you won't get any error or success on the browser, check the Terminal and you will see that the request is made. You will see the output as follows:

Figure 11.14: Output for review
We can see that a POST request is made. We can even see the parameters that have been filled in the form. We have received a 204 status code, which means that the request is successful but the client doesn't need to leave the current page.
Since we are not doing anything in the create action, the application will be stuck on the page.
Let's now look at building a model and adding a database to our application.
Models, Migrations, and Databases
Active Record is the power behind the model in Rails – the "M" in MVC – which manages data and business logic. Active Record helps in the creation of business objects whose data exists in a database. All this interaction is managed very easily since Active Record is an Object Relational Mapping (ORM) system.
Note
To know more about ORM, see https://packt.live/33BjMXZ.
Rails, by default, comes with SQLite support, which is a lightweight serverless database. However, with production applications, it's possible to end up overloading SQLite, so it is advised to use a more stable database, such as PostgreSQL or MySQL. For development, we will also use SQLite, but when we deploy our application for production, we will use PostgreSQL. The switch from SQLite to PostgreSQL is very simple.
To see your database settings, open config/database.yml:
# SQLite version 3.x
# gem install sqlite3
# Ensure the SQLite 3 gem is defined in your Gemfile
# gem 'sqlite3'
default: &default
adapter: sqlite3
pool: <%= ENV.fetch("RAILS_MAX_THREADS") { 5 } %>
timeout: 5000
development:
<<: *default
database: db/development.sqlite3
# Warning: The database defined as "test" will be erased and
# re-generated from your development database when you run "rake".
# Do not set this db to the same as development or production.
test:
<<: *default
database: db/test.sqlite3
production:
<<: *default
database: db/production.sqlite3
As you can see, we have three sections, for the development, test, and production environments, and we can set up different databases for different environments. Also, the switch between SQLite to PostgreSQL is super simple with database.yml.
Migrations are a neat way in Rails to create and alter your database schema over time in a simple and consistent way. It uses a Ruby Domain Specific Language (DSL) so that you don't have to write raw SQL code, allowing your database schema and its changes to be stable and independent. With the Ruby DSL, the complexities of raw SQL are hidden and we are able to interact with the database using a simple syntax.
Over time, we may have to create a new table, add columns to a table, or make any other alterations. For this, we can use migrations, which create new versions of a database. Migrations always run in order; if we need to roll back, we can simply reverse the order. This convention of migration makes database operation very predictable and stable. A database schema starts with nothing in it. As we proceed, our schema keeps on updating and ends up being a reflection of our actual metal database, which sits behind.
Let's now create a review model for the citireview application using a database.
Exercise 11.05: Creating a Review Model for citireview
In this exercise, we will create a review model to store review details in a database table, taking input from the user. Follow these steps to complete the exercise:
- Create a Review model with two attributes. Go to your Terminal and then to the root of your citireview directory and type following command. The generator will generate the required files and folders:
$ rails generate model Review name:string description:string
The output on the Terminal should be as follows:

Figure 11.15: Generating model for Review
Note
Just as we have a generate command, we also have a destroy command, which essentially destroys whatever has been generated by the generate command. The "destroy" equivalent of the generate command we used is rails destroy model Review.
As you can see, this generator has created a Review model along with its test files. To seed initial data, there is also a YAML file in fixtures. YAML is the short form of YAML Ain't Markup Language, which is a way to keep configurations in a human-readable format.
Note
To find out more about YAML, see https://packt.live/31l0WCB.
- We also have a migration that will be used to create our Reviews table in the database. Let's open the db/migrate/20190719200021_create_reviews.rb file and have a look.
Note that 20190719200021 is the timestamp of when the file was created, so it will be different for you:
class CreateReviews < ActiveRecord::Migration[5.1]
def change
create_table :reviews do |t|
t.string :name
t.string :description
t.timestamps
end
end
end
In the preceding code, we have our migration, which has the create_table helper method to create the reviews table in our database. In this method, we are specifying the data type for our two attributes as string. Besides this, we also have timestamp, which automatically adds a timestamp for the created_at and updated_at fields. These are present in all Rails tables by default.
In our migration file, you can see we have a timestamp, which is placed at the start of the name of the migration file. Inside the 20190719200021_create_reviews.rb migration file, we have a change method, which is used to create and drop the Review table with the two attributes, which are the two columns of this table.
Let's now run a command to run our migration.
- Go to your Terminal and to the root of your citireview directory, then type the following command:
$ rails db:migrate
The output should look like this:

Figure 11.16: Migrating a database
This has created our Reviews table in our database. You can check the current status of your database schema at db/schema.rb:
ActiveRecord::Schema.define(version: 20190719200021) do
create_table "reviews", force: :cascade do |t|
t.string "name"
t.string "description"
t.datetime "created_at", null: false
t.datetime "updated_at", null: false
end
end
schema.rb changes every time the state of our database changes. When we add or alter a table in a migration, we actually see the current state of our database.
- Let's now save the data that we have received from our form. Open the app/controllers/review_controller.rb file and update it with the following code:
class ReviewsController < ApplicationController
def new
end
def create
@review = Review.new(review_params)
@review.save
redirect_to @review
end
private
def review_params
params.require(:review).permit(:name, :description)
end
end
Here, we first added a create method, which has an instance variable called @review, which is creating a new object of the Review model by passing all the parameters in a review hash:

Figure 11.17: Passing parameters to the Review model
In the next line, @review.save will save the Review object that we created earlier. We have also added a redirect, which we can modify to the home page of any other view of our application.
We have created a private method where we mention the variables we will be using to save data in our model. Rails has many security features. You have to whitelist parameters that will be used with the model. This is called making strong parameters, parameters that will be allowed to be used in the controller's action.
Note
With strong parameters, the security feature parameters in the controller are forbidden to be used in the model for mass assignment unless they are whitelisted. As a rule of thumb, for mass assignment, always make your parameters strong parameters by defining them in a private method. Using a private method is a good practice as it encapsulates the permissible parameters, which can then be used between methods such as create and update.
- Let's now run our application to see the output. Run your Rails server and open the following URL: http://localhost:3000/reviews/new:
$rails server
The output should be as follows:

Figure 11.18: Adding a new review
The error output would show up as follows:

Figure 11.19: Unknown action error
When we entered our review and submitted it, we did not get any error related to saving the record; but we did get an error indicating where to go next. This is because we don't have a show action and its corresponding view where our app can be redirected.
We can, however, check whether our record has been created or not by using the Rails console.
The Rails Console
The Rails console helps you to interact with Rails applications using the command line. The Rails console uses IRB and allows you to make use of all Rails methods and interact with data. The Rails console is a very useful tool for experimenting with ideas without actually implementing any code.
Let's try this in our application. From the root of the citireview application, run the following command:
$rails console
The output should be as follows:

Figure 11.20: Rails console
Let's check the Review model by trying an Active Record query to get all the records from the reviews table. Type the following command from the Rails console:
Review.all
The Terminal will respond as follows:

Figure 11.21: Review model response
We can see clearly that our record, with the correct values for name and description, has been created. There are some additional columns in this table as well, which are id, created_at, and updated_ad. These columns were created by Rails when we created the migration for this table. The id column is autoincremented with an integer value, created_at adds a timestamp when a record is created, and updated_at adds the timestamp whenever there is a change to a record.
With Review.all, we are executing a SELECT SQL query to get all the records from the reviews table. There are numerous such Active Record methods that can be used to reduce the time spent writing raw queries.
When we submitted the reviews form, we got an error because there was an absence of a show action and a template. Let's display the review that we have created a view by creating a show action.
Add the following code to app/controller/review_controller.rb:
class ReviewsController < ApplicationController
…
def show
@review = Review.find(params[:id])
end
…
end
With a create action redirect, we will be redirected to a show action. In the parameters being passed, there will be the ID of our newly created record. Using that ID, we will be able to get the record and use its values to display on our view.
Note
The instance variable declared in an action is accessible to the view of this action and its data can be embedded or used with its respective html.erb file.
Let's also add a view for the show action. Create a new file called app/views/reviews/show.html.erb and add the following code in it:
<h1>Citireviews Review for </h1>
<p>
<strong>Name:</strong>
<%= @review.name %>
</p>
<p>
<strong>Description:</strong>
<%= @review.description %>
</p>
Here we have an H1 heading and are using the values in the @review instance variable embedded on our show view. Load http://localhost:3000/reviews/new and make another entry for a review, as depicted in the following figure:
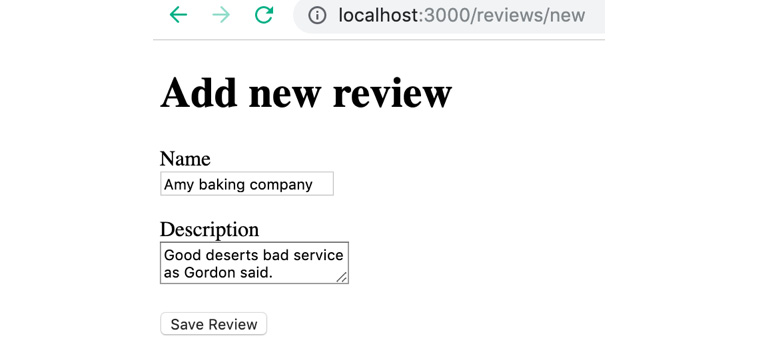
Figure 11.22: Adding a new review
Click Save Review to see the redirection:

Figure 11.23: Review a record on a model
We are able to see our saved review, and if we open this URL, with the specific ID of a review, we will be able to see the record in our show view.
Let's now add more features to our citireview application.
Exercise 11.06: Completing the Reviews Web Application
In this exercise, we aim to do the following with the application:
- Create a view and display a list of all the review titles for the citireview application. Also, add a detail button to show a detailed review description.
- Add two links to the home page of the application: one to show a list of all the reviews and another to take us to add a new review.
- Add a back button/URL to take us back to the home page from all reviews, and another button to take us to a new reviews page.
Let's build on the code that we've been dealing with so far:
- Open app/controllers/reviews_controller.rb and add the following code:
def index
@reviews = Review.all
end
Here, we have created an index action from which we are getting all the records from the Review model using an Active Record query and keeping the records in the @reviews instance variable. This @reviews variable will be used in the index view.
- Create a file called app/views/reviews/index.html.erb and add the following code:
<h1>All the Reviews</h1>
<table>
<tr>
<th>No</th>
<th>Name</th>
<th></th>
</tr>
<% @reviews.each_with_index do |review, index| %>
<tr>
<td><%= index+1 %></td>
<td><%= review.name %></td>
<td><%= link_to 'Details', review_path(review) %></td>
</tr>
<% end %>
</table>
Here, we have added an h1 tag with a heading for this view. After that, we have a table for listing all the review titles. Then, we are looping over the @reviews variable with a helper method, each_with_index, where the first attribute, review, will be used to show the name of the review, and index is the count to maintain, every time we iterate.
- Load http://localhost:3000/reviews on the browser to see the results:

Figure 11.24: List of reviews
The review would now look as follows:

Figure 11.25: Details of a review
- Let's now code for the next part of this exercise. Open app/views/home/index.html.erb and add the following code:
<h1>Welcome to Citireviews</h1>
<%= link_to 'All Reviews', controller: 'reviews' %> <br/><br/>
<%= link_to 'Add new review', new_review_path %>
Here we are using the link_to helper method, which creates a hyperlink. The first link_to method will take us to the index action of the review controller, which lists all the records from the Review model.
The second link_to method takes us to the new action, which is used to add/create a new record for the Review model.
- Reload the home page of the web application by visiting http://localhost:3000/ in your browser:

Figure 11.26: Adding options for reviews
- For both of these views, we don't have any way to go back to the home page. Let's add the following code snippet to the two views at app/views/reviews/index.html.erb and app/views/reviews/new.html.erb:
<%= link_to 'Back', root_path %>
The output should be as follows:

Figure 11.27: Redirecting to home page
The Back button will redirect the users to the index page, where the reviews are added, as shown in the following figure:

Figure 11.28: Redirection to the home page
In both of the preceding cases, we are redirected to the home page using a URL.
Let's now add some authentication to the application. We will be using the devise Ruby gem for authentication.
The devise Ruby Gem
Using devise, we can add authentication to our review application. The goal of the next activity is to implement authentication, and we can use devise for that.
The following are the key features of devise:
- Rack-based
- A complete MVC solution based on Rails engines
- Allows you to have multiple models signed in at the same time
- Modular – use only what you really need
Activity 11.01: Adding Authentication for the Review Application
In this activity, we will be creating an authentication sign-in page for our application using the devise gem.
Follow these steps:
- Add the devise gem in the Gemfile for our Rails application using the following command:
gem 'devise'
- Open a Terminal, go to the root of the application folder, and install the gem using the following command:
$ bundle install
- After the gem is installed, type the following command into your Terminal:
$ rails generate devise:install
- Generate a User model to manage user authentication.
- Update the database schema with every new migration.
- Add routes for your application.
- Access the login page and sign in to the application.
The login page should look as follows:

Figure 11.29: Login page for application
The signup page should be as follows:

Figure 11.30: SignUp page for the application
The index page for the blog should be as follows:

Figure 11.31: Index page
Note
The solution for the activity can be found on page 488.
Summary
In this chapter, we learned about the most popular Ruby framework-Ruby on Rails. We started with the fundamentals of Ruby on Rails and the MVC pattern it's based on. We then created our first Rails application and discussed the folder structure of an application that uses Rails. We then explored the interaction between a controller and a view using Rails Action Controller and Action View. We set up our model, database, and corresponding migrations, and we learned how easy it is to set up all this with Rails Active Record.
We also learned about routes in Rails and how to set up a root route for our application. Then, we learned how to create views quickly with helper methods and we created our first form. We used this form to save data to a database and create Active Record queries that could do so, too. Similarly, we also learned how to fetch data from the database using Active Record and display the fetched data on a view with Embedded Ruby (ERB). Furthermore, we explored a nifty tool provided with Rails called the Rails console, which can be used for experimenting with ideas without writing much code. Lastly, we secured our application with authentication while working on this chapter's activity.
In the next chapter, we will learn how to associate two tables in Rails with Active Record associations. We will also learn about the various types of validations available in Rails, including how we can trigger or skip them. We will implement validations at the model level. We will learn about Rails scaffolding and how it helps to speed up development time. Finally, we will also learn how to host our Rails application on platforms such as Heroku so that it's accessible to everyone on the web.