About
This section is included to assist the students to perform the activities present in the book. It includes detailed steps that are to be performed by the students to complete and achieve the objectives of the book.
Chapter 1: Writing and Running Ruby Programs
Activity 1.01: Generating Email Addresses Using Ruby
Solution
- Define and print the first name variable:
puts "Enter your first name: "
- Use the gets.chomp method to allow the user input to be stored in the variables:
first_name = gets.chomp
- Similarly, create a new variable for the last name of the user and print it. Also apply gets.chomp on the variable to store the input data:
puts "Enter your last name: "
last_name = gets.chomp
- Lastly, use string interpolation to combine the first and last name with the domain name to generate the email address:
puts "#{first_name}#{last_name}@rubyprogram.com"
#Output :
Enter your first name:
akshat
Enter your last name:
paul
Expected output:

Figure 1.49: Output for string interpolation
Activity 1.02: Calculating the Area and Perimeter for a Candy Manufacturing Plant
Solution
- Enter the IRB shell and print the radius variable of the candy:
print "Enter the radius for the circular candy: "
- Use the gets method to get the user input and define the radius variable:
radius = gets.to_f
- Define the formula for calculating the perimeter and area of the candy:
perimeter = 2 * 3.141592653 * radius
area = 3.141592653 * radius * radius
- Print the perimeter and area of the candy using string interpolation:
puts "The perimeter of the candy is #{perimeter}."
puts "The area of the candy is #{area}."
Expected output:

Figure 1.50: Output for area calculator
Chapter 2: Ruby Data Types and Operations
Activity 2.01: Dice Roller Program
Solution
- We begin by simulating the rolling of a dice. Ruby has an in-built rand method, which returns a random number. It takes an argument as an integer and returns a random number. Open irb and type the following:
rand 2
- Now, repeat that a few more times. You'll notice the numbers you get in response are either 0 or 1, never 2. This is what 0-indexing means: the first number is always zero.
- The problem here is that a die never starts with zero, it starts with one. So, let's create a method for that.
- Open up roller.rb and add the following method to it:
def roll
rand(6) + 1
end
puts roll
- Run that file a few times, and you'll see that we have successfully simulated rolling a dice.
- Next, roll a dice with any number of sides. Continue to expand on the previous program and add an argument to this method. Open roller.rb and add the following code:
def roll(sides)
rand(sides) + 1
end
puts roll(6)
- Now, our program can roll any number of dice, as long as we pass a number of sides to the roll method.
- Next, roll any number of sides. We will pass another argument along with the sides. For now, let's add the numbers together. Type the following in the roller.rb file:
def roll(sides, number=1)
roll_array = []
number.times do
roll_value = rand(sides) + 1
roll_array << roll_value
end
total = 0
roll_array.each do |roll|
new_total = total + roll
total = new_total
end
total
end
puts "Rolling a 5 sided die!"
puts roll(5)
puts "Rolling two 6 sided dice!"
puts roll(6, 2)
- Run the complete code. You should obtain an output as follows:

Figure 2.74: Output of dice roller
Let's now understand the preceding code. We added an argument, number, which has a default value of 1, so that in case we don't pass anything, the program continues to work. We then created an empty array to keep the die we are going to roll, called roll_array. The times method of the number variable will create a for loop for us, iterating over the body of the loop a number of times. By default, one iteration will happen. Every iteration will add a new value to our roll_array method based on the number of sides our die has. The last part of our function will return the sum of the rolled values with our dice, simple as that.
Chapter 3: Program Flow
Activity 3.01: Number-Guessing Game
Solution
- Create a Ruby source file called hilow.rb.
- Create the basic program architecture that allows a user to choose to play or exit:
play_choice = 'y'
while play_choice == 'y'
puts "Welcome to HiLow - Shall we play"
play_choice = gets.chomp.downcase
if play_choice == 'y'
play_game
end
end
puts "Thanks for playing!"
- Implement a single guess method that will employ various conditions for guessing a number. It will suggest that the player guesses lower/higher if the guess is incorrect:
def try_guess(magic_number, guess)
if guess == magic_number
puts "You guess correctly!"
return true
elsif guess < magic_number
puts "Guess higher"
return false
else
puts "Guess lower"
return false
end
end
- Put the whole program together with a play_game method:
Activity3.01.rb
1 def play_game
2 print "I'm going to pick a random number that you will have to guess. Please enter the maximum number for the guessing range."
3 range = gets.chomp.to_i
4 magic_number = rand(range)
5 until try_guess(magic_number) do
6 end
7 end
8
9 def try_guess(magic_number)
10 print "What's your guess? "
11 guess = gets.chomp.to_i
12 if guess == magic_number
The game will now look as shown in the following figure:

Figure 3.44: Output for the HiLow game
Chapter 4: Ruby Methods
Activity 4.01: Blackjack Card Game
Solution
- Write a method to generate a deck of cards:
def generate_deck
cards = (1..13)
suits = ["Diamonds", "Clubs", "Spades", "Hearts"]
deck = []
suits.each do |suit|
cards.each do |card|
deck << [card, suit]
end
end
return deck
end
- Write a method to shuffle the deck of cards:
def shuffle_deck(deck)
shuffled_deck = []
while(deck.length > 0) do
random_card_index = rand(deck.length)
shuffled_deck << deck.delete_at(random_card_index)
end
return shuffled_deck
end
- Write a method to identify the cards drawn in a hand:
def inspect_cards(cards, format: :short)
hand = cards.map{|c| card_label(c, format: format)}.join(",")
total = calculate_total(cards)
"#{hand} (#{total})"
end
- Write a method to label the cards based on their numbers and suits:
def card_label(card, format: :short)
card_labels = {1 => "Ace", 11 => "Jack", 12 => "Queen", 13 => "King"}
card_suit_labels = {"Diamonds" => "♦", "Clubs" => "♣", "Spades" => "♠", "Hearts" => "♥"}
card_index, card_suit = card
label = card_labels[card_index] || card_index
icon = card_suit_labels[card_suit]
if format == :short
"#{label}#{icon}"
else
"#{label} of #{card_suit}"
end
end
- Write a method that defines the card value and displays a hand of cards with its total:
Activity4.01.rb
75 def card_value(cards, card)
76 case card
77 # face cards are 10
78 when 11..13
79 10
80 when 1 # Ace can be 1 or 11 depending on the rest of the cards
81 # simple algorithm for determining what Ace should count as
82 # get total value of all non-ace cards
83 non_ace_cards = cards.reject{|c| c[0] == 1}
84 non_ace_card_total = calculate_total(non_ace_cards)
85 # If the Ace as 11 busts us, count it as a 1
86 if (non_ace_card_total + 11) > 21
87 1
88 # If the Ace as an 11, gets us to 21, count it as an 11
89 elsif (non_ace_card_total + 11) == 21
90 11
- Write a method that governs the gameplay. You will need a way to ask the user whether they want to hit or stay. Hitting means adding another card to the player's hand. Staying means keeping the current hand.
A way for the dealer to determine whether it should hit or stay is for the dealer to follow a fixed set of rules. If the total of the current hand is less than 17, it must hit. If the dealer's hand totals 17 or higher, it must stay:
Activity4.01.rb
36 def play(deck)
37 player_hand = deal_cards(deck, 2)
38 dealer_hand = deal_cards(deck, 2)
39 puts "Player has: #{inspect_cards(player_hand)}"
40 puts "Dealer has: #{inspect_cards([dealer_hand[0]])}, <other card hidden>"
41 choice = nil
42 while choice != 'stay' && calculate_total(player_hand) <= 21 do
43 print "Do you want to hit or stay?"
44 choice = gets.chomp
45 if choice == 'hit'
46 player_hand += deal_cards(deck, 1)
47 end
48 print "Your cards are now: #{inspect_cards(player_hand)} "
49 end
50 while((dealer_total = calculate_total(dealer_hand)) <= 21 && (dealer_total < 17)) do
- Write a loop that allows a player to continue playing as long as there are enough cards in the deck. The minimum number of cards for a hand is 4 (2 for the player and 2 for the dealer):
shuffled_deck = shuffle_deck(generate_deck)
choice = 'y'
while(shuffled_deck.length > 4 && choice.downcase != 'n') do # need at least 4 cards to play
puts "Deck has: #{shuffled_deck.length} cards left"
print "Do you want to play a hand?[Yn]"
choice = gets.chomp
if choice.downcase == 'y'
play(shuffled_deck)
end
end
# Tests
# puts calculate_total([[12, "Hearts"]]) # 10
# puts calculate_total([[1,"Spades"],[12, "Hearts"]]) #21
# puts calculate_total([[13,"Hearts"],[6, "Hearts"]]) # 16
Here is the expected output:

Figure 4.34: Output for the Blackjack game
Chapter 5: Object-Oriented Programming with Ruby
Activity 5.01: Voting Application for Employee of the Month
Solution
- Open the Terminal and clone the Lightweight Terminal Framework from GitHub:
git clone https://github.com/PacktWorkshops/The-Ruby-Workshop/tree/master/Chapter05/Activity5.01/framework
- Implement the VotingMachine model class:
voting_machine.rb
1 class VotingMachine
2 attr_reader :month, :year, :results
3
4 class InvalidVote < Exception; end
5
6 def initialize(month, year)
7 @month = month
8 @year = year
9 @results = {}
10 end
11
12 def record_vote(voter, votee)
13 raise InvalidVote unless valid_vote?(voter, votee)
14 results[votee] ||= 0
15 results[votee] += 1
16 end
- Implement VoteController to receive votes for the employees:
class VoteController < Controller
attr_accessor :voter, :votee
def run
get_input :voter, "What's your name? "
get_input :votee, "Who do you want to vote for? "
self.voting_machine.record_vote(@voter, @votee)
log "Vote recorded!"
end
end
- Add a controller to MenuController.rb:
MENU_CHOICES = {
1 => {controller: :vote, label: "Place a vote for a colleague"},
2 => {controller: :exit, label: "Exit"}
}.freeze
- Add LeaderboardController to count the number of votes against every votee:
class LeaderboardController < Controller
def run
sorted_results = voting_machine.sorted_results
sorted_results.each do |person, count|
log "#{person}: #{count}"
end
end
end
- Add LeaderboardController to MenuController:
MENU_CHOICES = {
1 => {controller: :vote, label: "Place a vote for a colleague"},
2 => {controller: :leaderboard, label: "See current leaderboard"},
3 => {controller: :exit, label: "Exit"}
}.freeze
- Add tests to test_controller.rb:
test_controller.rb
51 def test_menu_controller
52 stubbed_input_method = Proc.new do |variable_symbol, question|
53 instance_variable_set("@choice", $TEST_VARS[:choice])
54 end
55
56 stub_controller with: stubbed_input_method do
57 menu_controller = MenuController.new(nil)
58
59 $TEST_VARS = {choice: 1, display: ""}
60 assert_equal :vote, menu_controller.run
61 assert_match /Please enter your choice/, $TEST_VARS[:display]
62
63 $TEST_VARS = {choice: 2, display: ""}
64 assert_equal :leaderboard, menu_controller.run
65 assert_match /Please enter your choice/, $TEST_VARS[:display]
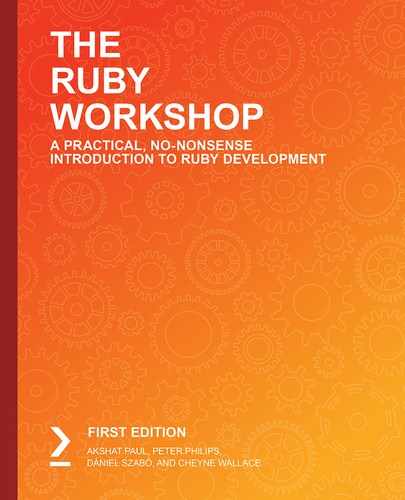
- Run the test code from test.rb:
ruby test.rb
The output will be as follows:
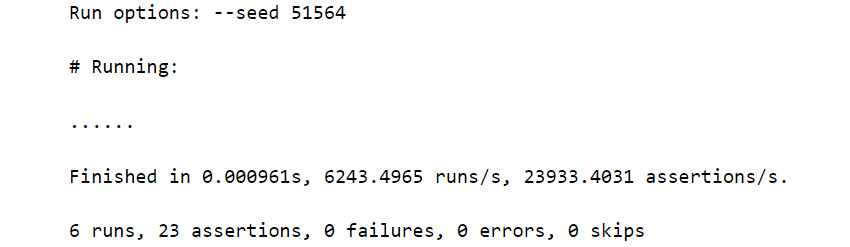
Figure 5.44: Output for the test data
- Run the application.rb file. The code in this file will essentially bring together the models and classes we have defined through the activity within a master class. The main program workflow for the application is defined here:
application.rb
1 #!/usr/bin/env ruby
2
3 # require all files in models and controllers directory
4 require './model'
5 require './controller'
6 require 'byebug'
7
8 class InvalidChoiceException < Exception;end
9
10 # Create master class called Application
11 # which will be the core class that manages the loop
12 # around the voting machine
13 class Application
14 attr_reader :voting_machine
15
Expected Output:

Figure 5.45: Output for voting application
Chapter 6: Modules and Mixins
Activity 6.01: Implementing Categories on the Voting Application Program
Solution
- We'll begin by first using the code from the previous chapter and writing some tests.
- Write a new test for VotingMachine to add a category:
require "minitest/autorun"
require 'minitest/stub_any_instance'
require_relative "../models/voting_machine"
class TestVotingMachine < Minitest::Test
def test_add_category
machine = VotingMachine.new(1, 1)
machine.add_category("TestCategory")
assert_equal machine.categories, ["TestCategory"]
machine.add_category("TestCategory2")
assert_equal machine.categories, ["TestCategory", "TestCategory2"]
machine.add_category("TestCategory")
assert_equal machine.categories, ["TestCategory", "TestCategory2"]
assert_equal machine.send(:valid_category?, "Invalid"), false
end
end
- Then, implement the add_category method on the voting machine. Run tests when complete:
class VotingMachine
attr_reader :month, :year, :results, :categories
class InvalidCategory < Exception; end
class InvalidVote < Exception; end
def add_category(category)
@categories << category
@categories.uniq! # make sure no duplicates
end
private
def valid_category?(category)
categories.include?(category) ? true : false
end
end
The output would be as follows:

Figure 6.30: Category addition
- Write a test for record_vote that adds the category argument:
def test_add_vote
machine = VotingMachine.new(1, 1)
category1 = "TestCategory1"
category2 = "TestCategory2"
machine.add_category(category1)
machine.add_category(category2)
machine.record_vote(category1, "Bob", "Mary")
machine.record_vote(category1, "Suzie", "Mary")
machine.record_vote(category1, "Sam", "Bob")
machine.record_vote(category2, "Jackie", "Sam")
assert_equal machine.results.class, Hash
assert_equal machine.results.keys, [category1, category2]
assert_raises VotingMachine::InvalidCategory do
machine.record_vote("Invalid category", "Sue", "John")
end
end
- Amend the record_vote implementation to include category:
class VotingMachine
attr_reader :month, :year, :results, :categories
class InvalidCategory < Exception; end
def record_vote(category, voter, votee)
raise InvalidCategory unless valid_category?(category)
raise InvalidVote unless valid_vote?(voter, votee)
results[category] ||= {}
results[category][votee] ||= 0
results[category][votee] += 1
end
end
- Amend the test_run_vote_controller test to include category:
def test_run_vote_controller
$TEST_VARS = {voter: "bob", votee: "mary", category: "TestCategory"}
stubbed_input_method = Proc.new do |variable_symbol, question|
instance_variable_set("@category", $TEST_VARS[:category])
instance_variable_set("@voter", $TEST_VARS[:voter])
instance_variable_set("@votee", $TEST_VARS[:votee])
end
# We have to stub the get_input method since this method grabs
# input from the terminal
stub_controller with: stubbed_input_method do
t = Time.now
machine = VotingMachine.new(t.month, t.year)
machine.add_category($TEST_VARS[:category])
Controller.run_controller(:vote, machine)
end
end
- Implement category choosing in VoteController:
class VoteController < Controller
attr_accessor :voter, :votee, :category
def run
get_input :category, "Which category are you voting for: #{self.voting_machine.categories.join(", ")}"
get_input :voter, "What's your name? "
get_input :votee, "Who do you want to vote for? "
self.voting_machine.record_vote(@category, @voter, @votee)
log "Vote recorded!"
end
end
- Implement the ControllerLogging module:
controller_logger.rb
1 module ControllerLogger
2 # If you aren't using a framework that gives you logging
3 # out of the box, its usually a good idea to implement a
4 # centralized logging method at the base class so you get
5 # consistent logging and do things like avoid logging output
6 # during tests
7
8 def self.prepended(parent_class)
9 parent_class.instance_eval do
10 def self.inherited(klass)
11 klass.send(:prepend, ControllerLogger)
12 end
13 end
14 end
15
- Now run the application using the ruby application.rb command.
The application would now be as follows:
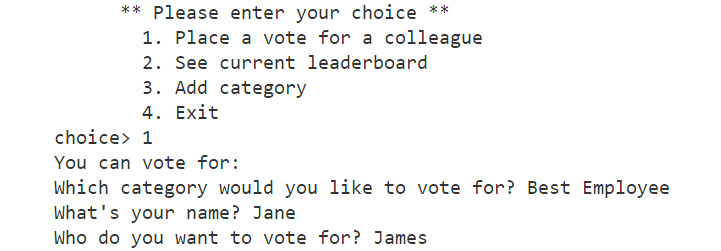
Figure 6.31: Voting application with categories
Chapter 7: Introduction to Ruby Gems
Activity 7.01: Presenting Voting Data in CSV Format Using Ruby Gems
Solution
- Download the votes.csv file from https://packt.live/2OzNN6a. Place this under test/fixtures. The CSV file will contain the following data:
category,votee,count
VoteCategoryA,Chris Jones,23
VoteCategoryA,Susie Bennet,29
VoteCategoryB,Allan Green,33
VoteCategoryB,Tony Bennet,23
- We'll start with our VoteImporter service object. Test whether it imports data from the CSV and perform a few basic checks to ensure that the content is what we're expecting. Create the test_vote_importer.rb file in the tests folder with the following code:
require "minitest/autorun"
require 'minitest/stub_any_instance'
require_relative "../services/vote_importer"
class TestVoteImporter < Minitest::Test
def test_perform
# Import vote data from our tests/fixtures/votes.csv file
filepath = 'tests/fixtures/votes.csv'
results = VoteImporter.perform(filepath)
assert_equal results.length, 2
assert_equal results.map{|k,v| k}.include?("VoteCategoryA"), true
assert_equal results.map{|k,v| k}.include?("VoteCategoryB"), true
end
end
- Next, we'll write a few tests for our VoteTable service object, which will simply check that we're returning a collection of Terminal::Table objects and perform some basic checks to ensure that the content is what we're expecting. We'll manually create the results object so we're not dependent on any other services. Create a test_vote_table.rb file under the tests folder with the following code:
require "minitest/autorun"
require 'minitest/stub_any_instance'
require_relative "../services/vote_table"
class TestVoteTable < Minitest::Test
def test_perform
# Import votes data from our tests/fixtures/votes.csv file
filepath = 'tests/fixtures/votes.csv'
results = {"VoteCategoryA"=>[["Susie Bennet", 29]]},{"VoteCategoryB"=>[["Allan Green", 33]]}
tables = VoteTable.perform(results)
assert_equal tables.length, 2
tables.each do |table|
assert_equal table.class, Terminal::Table
assert_equal table.title.include?("VoteCategory"), true
end
end
end
- Define the service object. Create vote_importer.rb under services with the following code. This code will define the file path of the CSV file from where the count of votes is to be imported. Also, it defines the headers of the CSV file:
require 'csv'
class VoteImporter
def initialize(filepath)
@filepath = filepath
end
def perform
results = {}
CSV.read(@filepath, headers: true).each do |row|
results[row["category"]] ||= {}
results[row["category"]][row["votee"]] = row["count"].to_i
end
results
end
def self.perform(*args)
new(*args).perform
end
end
- Also, create services/vote_table.rb with the following code:
require 'terminal-table'
class VoteTable
def initialize(sorted_votes)
@sorted_votes = sorted_votes
end
def perform
headings = ['Votee', 'Count']
tables = []
@sorted_votes.each do |votes|
tables << Terminal::Table.new(rows: votes.values[0], title: votes.keys[0], headings: headings)
end
tables
end
def self.perform(*args)
new(*args).perform
end
end
Now we just need to wire them up in our application.
- In menu_controller.rb, add an option to Import Votes.
MENU_CHOICES = {
1 => {controller: :vote, label: "Place a vote for a colleague"},
2 => {controller: :leaderboard, label: "See current leaderboard"},
3 => {controller: :category, label: "Add category"},
4 => {controller: :import, label: "Import Votes"},
5 => {controller: :exit, label: "Exit"}
}
- Add an import_votes method that will import and place the number of votes to the voting_machine.rb model:
def import_votes(filepath)
@results = VoteImporter.perform(filepath)
end
- Add a new import_controller.rb controller to the controllers folder to import votes from the CSV file:
class ImportController < Controller
attr_accessor :filepath
def run
log "Import votes from an external CSV"
get_input :filepath, "Enter the filepath of the CSV file? "
self.voting_machine.import_votes(filepath)
log "Votes imported!"
end
end
- Update the leaderboard_controller.rb file to now log out tables instead of the raw objects:
sorted_results = voting_machine.sorted_results
tables = VoteTable.perform(sorted_results)
tables.each do |table|
log table
end
- Create some test CSV data as votes.csv, which we can import in the root application directory using the following code:
require "csv"
votes = [
["Category", "Votee", "Count"],
["Employee Of The Month", "Chris Jones", 23],
["Employee Of The Month", "Susie Bennet", 29],
["Employee Of The Month", "Bob Wing", 65],
["Employee Of The Month", "James King", 31],
["Best Christmas Sweater", "Allan Green", 33],
["Best Christmas Sweater", "Tony Bennet", 23],
["Best Christmas Sweater", "Bob Wing", 45],
["Best Christmas Sweater", "Jane Smith", 39],
]
CSV.open("votes.csv", "w") do |csv|
votes.each do |vote|
csv.puts [vote[0], vote[1], vote[2]]
end
end
votes.csv will now hold the following data:
category,votee,count
Employee Of The Month,Chris Jones,23
Employee Of The Month,Susie Bennet,29
Employee Of The Month,Bob Wing,65
Employee Of The Month,James King,31
Best Christmas Sweater,Allan Green,33
Best Christmas Sweater,Tony Bennet,23
Best Christmas Sweater,Bob Wing,45
Best Christmas Sweater,Jane Smith,39
If everything goes well, you should see an option in the menu to import votes:

Figure 7.13: Importing votes
- Print the leaderboard by selecting the second option:

Figure 7.14: The voting application dashboard
Chapter 8: Debugging with Ruby
Activity 8.01: Perform Debugging on a Voting Application
Solution
- First up, let's write a simple test to ensure that our Controller class does indeed have access to the instantiated Logger class defined in the LoggerController initializer:
tests/test_controller.rb
def test_controller_logger
t = Time.now
machine = VotingMachine.new(t.month, t.year)
controller = Controller.new(machine)
assert_instance_of(Logger, controller.instance_variable_get('@logger'))
end
- Next, let's extend our ControllerLogger module. We'll need to add an initializer first so that our parent Controller class can instantiate the Logger class. We'll call super at the end of the method, which will call initialize on the parent class passing through the same parameters (which is the default when super is called with no parameters):
controller_logger.rb
def initialize(voting_machine)
@logger = Logger.new('log.txt')
@logger.formatter = proc do |severity, datetime, progname, msg|
"#{severity} | #{datetime} | #{msg} "
end
super
end
- Now let's define the log_to_file method on ControllerLogger. This is what we'll use to write to the filesystem via the Logger class. We'll want the ability to override the log level. We can use the send method to evaluate the level string into a method name:
controller_logger.rb
def log_to_file(msg, level = 'debug')
@logger.send(level, msg) unless ENV['TEST']
end
- Add a call to log_to_file in the existing log method so we capture a timestamped copy of the message in our log file:
controller_logger.rb
def log(msg)
puts msg unless ENV['TEST']
log_to_file(msg)
end
- For some additional logging, let's log out the votes made by users, including some additional information. We'll tag this one as an INFO log, so we can filter it out of the logs if we need to:
controllers/vote_controller.rb
log_to_file("Vote recorded - Voter: #{@voter} Votee: #{@votee} Category: #{@category}", "info")
- Run the program and create categories, place votes, and so on. Inspect the log.txt file.
You should see output like the following:
Figure 8.34: Output for the voting application
Chapter 9: Ruby Beyond the Basics I
Activity 9.01: Invoice Generator
Solution
- Create a new Ruby file.
- Define the invoice_generator method and the p1 and p2 variables to be used in the program using &block and block_given?. We call the invoice_generator method and pass the product prices along with a block of code:
def invoice_generator(p1,p2, &block)
yield calc_discount(p1,p2) if block_given?
end
The invoice_generator method has a yield keyword, which will only execute the block of code and pass the product prices if the first block of code is passed.
First, calc_discount is called and then a block code is executed, which, in turn, passes the customer details to the details method.
- Next, we will define the discount calculator method, calc_discount, which will calculate the discount on the products, add it to the product, and print the final price of the product. calc_discount is the method where we calculate the sum of the product prices and give a flat discount of 20% on the sum:
def calc_discount(p1,p2)
sum_of_products = p1.to_i+p2.to_i
final_amount = sum_of_products.to_i*0.80
puts "Price of Product 1: #{p1}"
puts "Price of Product 2: #{p2}"
puts "Final amount after 20% discount #{final_amount}"
end
- Next, we build a method to retrieve the customer details and final product prices with discounts. With the details method, we print the customer details, such as name and id:
def details(name, id)
puts "Customer name is #{name}"
puts "Customer id is #{id}"
end
- Finally, we bring all the elements together to print an invoice. We take inputs from, say, a store executive to enter their customer name, customer ID, and product prices and save them in the respective variables:
puts "Enter your Customer Name"
cust_name = gets.chomp
puts "Enter your Customer ID"
cust_id = gets.chomp
puts "Enter Product 1 price"
product1 = gets.chomp
puts "Enter Product 2 price"
product2 = gets.chomp
invoice_generator(product1, product2) do
details(cust_name, cust_id)
end
- Let's invoke our script:
ruby activity.rb
The output should be as follows:

Figure 9.21: The invoice generator output
Chapter 10: Ruby Beyond the Basics II
Activity 10.01: Implementing GET and POST Data to an External Server
Solution:
- We first require the gem, and then need to assign our GET request API to a url variable. We then make a GET call using httparty and display the response using an in-built method, parsed_response, which properly parses the JSON response:
require 'httparty'
url = 'https://www.akshatpaul.com/ruby-fundamentals/list-all-buildings'
response = HTTParty.get(url)
puts response.parsed_response
- Run this code from the Terminal using the following command:
$ruby get_request.rb
The output should be as follows:

Figure 10.22: GET request output
You can implement the same code without a third-party gem dependency by using the in-built net/http library and the JSON library. To try this, refer to the code in the get_request_net.rb file:
require 'net/http'
require 'json'
url = 'https://www.akshatpaul.com/ruby-fundamentals/list-all-buildings'
uri = URI(url)
response = Net::HTTP.get(uri)
puts JSON.parse(response)
You will get the same result as we achieved with much leaner code.
- Next, let's make our POST request. Create a file, post_request.rb. Once again, we require the httparty gem, before assigning our POST API to the URL variable. We then make a POST request, along with the URL and a body with proper fields, as per the contract specified in the problem statement:
require 'httparty'
url = "https://www.akshatpaul.com/ruby-fundamentals/buildings"
response = HTTParty.post(url, body: { property: {name: "Mr. Ruby Noobie", address: "Tokyo" }})
puts response.code
- Run the following command from the Terminal:
$ ruby post_request.rb
The output should be as follows:

Figure 10.23: POST request output
- To check whether our record has been created, we can visit the following URL:
If successful, we receive a proper status code and can then verify whether our record exists on the second URL provided.
Chapter 11: Introduction to Ruby on Rails I
Activity 11.01: Adding Authentication for the Review Application
Solution:
- Add the following gem in your gemfile:
gem 'devise'
- Open a Terminal, go to the root of the application folder, and install the gem using the following command:
$ bundle install
- After the gem is installed, type the following command into your Terminal:
$ rails generate devise:install
The output should be as follows:

Figure 11.32: Setting up initial files for the devise gem
This generator sets up all initial files required for devise. There are also some instructions related to customization, which is outside the scope of this activity.
- Generate a User model to manage user authentication. Type the following command in a Terminal:
$ rails generate devise User
The output is as follows:
Running via Spring preloader in process 15790
invoke active_record
create db/migrate/20190720201553_devise_create_users.rb
create app/models/user.rb
invoke test_unit
create test/models/user_test.rb
create test/fixtures/users.yml
insert app/models/user.rb
route devise_for :users
This devise generator has created an appropriate User model, along with migrations and routes for our application.
- Every time we have a new migration, we must update our schema. This will create the required database tables. Type the following command in your Terminal:
rails db:migrate
The output is as follows:
== 20190720201553 DeviseCreateUsers: migrating ================================
-- create_table(:users)
-> 0.0031s
-- add_index(:users, :email, {:unique=>true})
-> 0.0010s
-- add_index(:users, :reset_password_token, {:unique=>true})
-> 0.0010s
== 20190720201553 DeviseCreateUsers: migrated (0.0052s) =======================
- Type the following command to see where we can access the login page and sign up for our application:
$ rails routes
The output is as follows:
Prefix Verb URI Pattern Controller#Action
new_user_session GET /users/sign_in(.:format) devise/sessions#new
user_session POST /users/sign_in(.:format) devise/sessions#create
destroy_user_session DELETE /users/sign_out(.:format) devise/sessions#destroy
new_user_password GET /users/password/new(.:format) devise/passwords#new
edit_user_password GET /users/password/edit(.:format) devise/passwords#edit
user_password PATCH /users/password(.:format) devise/passwords#update
PUT /users/password(.:format) devise/passwords#update
POST /users/password(.:format) devise/passwords#create
cancel_user_registration GET /users/cancel(.:format) devise/registrations#cancel
new_user_registration GET /users/sign_up(.:format) devise/registrations#new
edit_user_registration GET /users/edit(.:format) devise/registrations#edit
user_registration PATCH /users(.:format) devise/registrations#update
PUT /users(.:format) devise/registrations#update
DELETE /users(.:format) devise/registrations#destroy
POST /users(.:format) devise/registrations#create
root GET / home#index
reviews GET /reviews(.:format) reviews#index
POST /reviews(.:format) reviews#create
new_review GET /reviews/new(.:format) reviews#new
edit_review GET /reviews/:id/edit(.:format) reviews#edit
review GET /reviews/:id(.:format) reviews#show
PATCH /reviews/:id(.:format) reviews#update
PUT /reviews/:id(.:format) reviews#update
DELETE /reviews/:id(.:format) reviews#destroy
- So, the user login will use the path users/sign_in. Let's open this route in our browser by accessing http://localhost:3000/users/sign_in:

Figure 11.33: Sign-in page for the review application
This is an out-of-the-box view that comes with the devise gem. For a simple application such as ours, this is quite good, but for anything more complex, we can always customize these views.
Note
You won't find this view in your application code; it's coming straight from the gem. To access and customize these default views, you can use rails generate devise:views, which will create these views within your application folders, where you can then modify them.
- Sign up for the application, create your user, then try to log in. The Sign up page would look as follows:
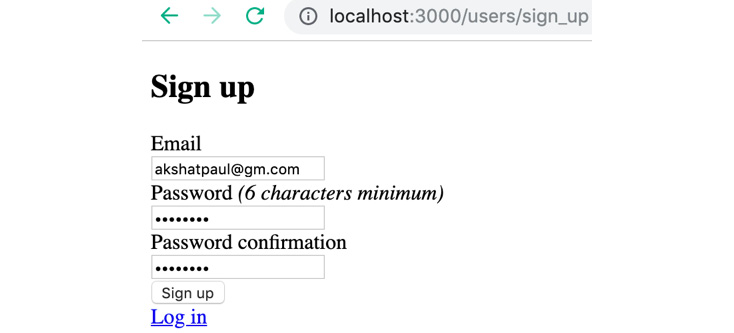
Figure 11.34: Signing up on the application
The Log in page would look as follows:

Figure 11.35: Signing into the application
The blog page would look as follows:
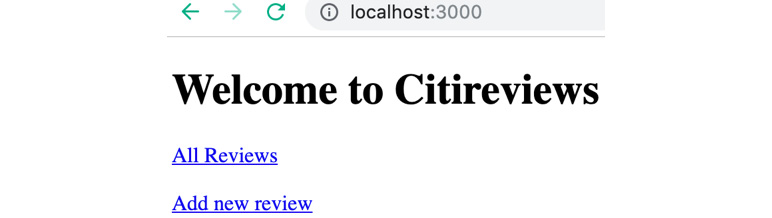
Figure 11.36: Login index page of the application
Signup and login have been successful. However, if we tried to directly access http://localhost:3000/reviews without signing in, we'd be able to, since our home and reviews pages are still not under any type of authentication.
- Add the following code snippet in app/controller/home_controller.rb and app/controller/review_controller.rb:
before_action :authenticate_user!
This one line will mean that access to any action in our controller needs to be authorized by devise. Here, authenticate_user! is a helper method that determines whether require is coming after authentication or not.
Note
before_action here is a helper method that is part of a filter. Filters in Rails are methods that are executed before or after a controller action. Filters are inherited from ApplicationController and will work with every controller of your application.
Now that we have covered both our Home and Reviews controllers, if you try to access any URL in our application, it will operate under an authentication system.
Chapter 12: Introduction to Ruby on Rails II
Activity 12.01: Create a Blog Application and Host It Live on a Cloud Platform
Solution
Part I – Create a blog application with the following features
- Create a new application and run the following command from Terminal:
$ rails new blog
The output should be as follows:

Figure 12.28: Initializing a new application
- Go into the blog directory and run the following scaffolding command from Terminal to generate MVC files and a folder structure for post:
$ cd blog
$ rails generate scaffold post title:string body:text
The output should be as follows:

Figure 12.29: Using scaffolding to create files and a folder structure
- The scaffold command creates a lot of files and folder structures, essentially creating all the files required for CRUD operations. It has a model, a controller, migration, and views all generated in one go. Scaffolding is very powerful syntactic sugar, doing a lot of repetitive tasks quickly and saving time.
- Inside the blog directory, run the following scaffolding command from Terminal to generate MVC files and a folder structure for comment:
$ rails generate scaffold comment post_id:integer body:text
The output should be as follows:

Figure 12.30: Generating MVC files using scaffolding
- From the root of the project, run the following command to execute migrations and generate tables:
$ rails db:migrate
The output should be as follows:

Figure 12.31: Executing migrations
- Open the config/routes.rb file and add the following code:
Rails.application.routes.draw do
resources :comments
resources :posts
root "posts#index"
end
Here, we have created a root route, which is the index page of the posts controller and will display a list of all blog posts.
- Test the application by starting the Rails server with the following command and visiting localhost:3000:
$ rails server
The output should be as follows:

Figure 12.32: Starting the Rails server
- Open the application by loading http://localhost:3000 in your browser window:

Figure 12.33: Application on localhost
- Click on New Post. The blog should now look as shown in the following figure:

Figure 12.34: New post feature
- Enter the data for Title and Body for the new post:

Figure 12.35: Entering data for a new post
- Click on Create Post to submit the form and it will be displayed as follows:

Figure 12.36: Post being displayed
- The post has been successfully created. Click on Back to see a list of all posts:

Figure 12.37: List of posts on the web page
- Let's add a comment for our first post by visiting the following URL in the browser window: http://localhost:3000/comments/new. It will look as shown in the following screenshot:

Figure 12.38: Post being displayed
- Click on Create Comment to submit the form. It should appear as shown in the following figure:

Figure 12.39: Post being displayed
- The comment has been successfully created. Click on Back to see a list of all comments and the post IDs they are associated with:

Figure 12.40: Post being displayed
Part II – Deploying your application to Heroku
Before you start deploying your application to Heroku, you need to first create a free account with the Heroku CLI set up locally:
- Create your free Heroku account by visiting https://signup.heroku.com/.
Fill in the simple form and create your free account:

Figure 12.41: Heroku signup page
Note
For our application, we won't require any paid add-ons. This application is available for access for anyone, free of cost.
- Download the Heroku CLI to set up Heroku locally. There are a number of ways to do that. The following are the ones we recommend but you can choose any of them:
With Homebrew:
brew tap heroku/brew && brew install heroku
With curl:
curl https://cli-assets.heroku.com/install.sh | sh
With npm (the least recommended):
npm install -g heroku
Check whether the installation is correct:
heroku --version
heroku/7.0.0 (darwin-x64) node-v8.0.0
Log into the Heroku CLI:
heroku login
heroku: Press any key to open up the browser to login or q to exit
' Warning: If browser does not open, visit
' https://cli-auth.heroku.com/auth/browser/***
heroku: Waiting for login...
Logging in... done
Logged in as [email protected]
- We have built our application using sqlite3 but Heroku does not support it so we will have to use postgres with our application. Add the following gem to your gemfile and remove the other gem. Open the gem file and enter the following command:
gem 'pg'
To remove sqlite3, use the following command:
gem 'sqlite3'
Run the following command from the Terminal window:
$ bundle Install
Note
To set up a PostgreSQL database, please refer to the docs: https://packt.live/2MBhC4F.
- Update the config/database.yml file with the following configurations:
default: &default
adapter: postgresql
encoding: unicode
# For details on connection pooling, see Rails configuration guide
# http://guides.rubyonrails.org/configuring.html#database-pooling
pool: <%= ENV.fetch("RAILS_MAX_THREADS") { 5 } %>
development:
<<: *default
database: myapp_development
test:
<<: *default
database: myapp_test
production:
<<: *default
database: myapp_production
username: myapp
password: <%= ENV['MYAPP_DATABASE_PASSWORD'] %>
Since the application was running previously, we have to update it with the proper postgres configuration.
- Create a database and run migrations to test that our database changes are successful and that there are no errors. Run the following command from Terminal:
$ rails db:create
Terminal will show the following:

Figure 12.42: Creating a database
This has created our database. Next, let's run migrations:
$ rails db:migrate
We have successfully migrated our application from sqlite to postgres.
Thanks to the Active Record ORM( Object Relational Mapping), switching between databases is made very simple. As we saw in this exercise, migrating from sqlite3 to postgres is fast and easy.
- Specify your Ruby version in your Gemfile. Add the following line at the top of your Gemfile:
ruby "2.6.0"
- Save your application in Git.
Git is required for deploying an application on Heroku. If you don't have Git on your machine, please set it up from https://git-scm.com/ (we won't be doing that since it's beyond the scope of this book).
Run the following command from the root of your application:
$ git add .
$ git commit -m "init"
- Deploy the application on Heroku. Run the following command from the Terminal window inside the root of the blog project:
$ heroku create

Figure 12.43: Creating an application on Heroku
This automatically creates a Heroku application on the Heroku server with a deployment pipeline. It also creates a URL for it as you can see at https://protected-tor-47977.herokuapp.com/. After deployment, we will be able to access our application from this URL.
Note
The Heroku application URL for the live site will be different for you than the one mentioned in this activity.
- Deploy the application on Heroku by executing the following command:
$ git push heroku master
The output will show up as follows:

Figure 12.44: Deployment on Heroku
The deployment runs for a few hundred lines and takes roughly 30-40 seconds.
- Set up a database on Heroku. Run the following command to run database migration and generate tables:
$ heroku run rails db:migrate
The output will show up as follows on Terminal:

Figure 12.45: Output for database migration
Visit the following URL in your browser to check that your application is live on the World Wide Web; however, when you push the application, this URL will be different – this is a randomly generated URL by Heroku: https://protected-tor-47977.herokuapp.com/
The blog post will now show up as follows:

Figure 12.46: Blog post landing page
We have successfully hosted our application for the world to play with.