Overview
By the end of this chapter, you will be able to describe associations and the various types of Active Record associations; implement associations in your application model; evaluate methods that trigger and skip validations; implement model-level validations; develop programs using Rails scaffolding and deploy your application to the World Wide Web using Heroku.
In this final chapter, we'll continue to build upon the previous chapter's application and learn about REST principles and other fundamental features/concepts of Ruby on Rails.
Introduction
In the previous chapter, we were introduced to the Ruby on Rails framework and how the MVC pattern helps us to create a modular web application. We also learned about the fundamentals of the Rails framework, the anatomy of a Rails application, how to save data in a database, how to interact with data using views, and how to test Ruby on Rails code using the Rails console.
In this chapter, we will dive deep into more advanced topics, such as creating associations between models using Active Record association. Like everything else, Rails has built-in helper methods to assist us. Associations are very commonly used in real-world applications. If we take the example of the citireview application from the previous chapter, we can easily see a relation between a review and its comments. These are joints that link one model to another with the use of primary and foreign keys. We will learn about six types of such associations provided by Rails.
Then, we will understand how validations work in Rails since validations are a critical feature of any application to avoid garbage data getting into the system, especially in the age of bots, when validations are essential for any real-world application. After that, we will make use of a unique Rails feature called scaffolding, for rapid development that will help generate a model, a view, a controller, and their supporting files all in one simple command. Lastly, we will learn how to host a Rails application on the internet using a popular hosting service called Heroku, because no application is complete unless it goes into production and sees the daylight of the World Wide Web.
Associations
In the previous chapter, we created a review web application where only authenticated users were allowed to write reviews. Ideally, every review would always allow other users to comment on it, and in this section, we will build that feature.
This means we will create a new model called Comment, which will be associated with the Review model since every review could have many comments, while every comment belongs to one review only. This is called a one-to-many relationship between the two models.
Associations are a set of methods for connecting objects of different models using foreign keys. Associations make it really simple to interact and perform various operations with records using Ruby code.
The following are six types of associations provided by Rails:
- belongs_to
- has_one
- has_many
- has_many :through
- has_one :through
- has_and_belongs_to_many
Let's discuss them one by one.
belongs_to
In the belongs_to association, the first model needs to have a one-to-one connection with the second model. This means that each record that the first model has belongs to an instance of the second model, thus creating an association. As can be seen in the following diagram, we have two models, Review and Author, where every record in the Review model belongs to only one author and in order to link Review with Author, the id primary key from the Author model acts as an author_id foreign key in the Review model:

Figure 12.1: belongs_to association
Consider the following code snippet:
class Review < ApplicationRecord
belongs_to :author
end
Rails provides helper methods for all associations. In the preceding example, we added the belongs_to helper method to the Review model. It is very important to use singular terms for belongs_to associations, based on the Rails philosophy of convention over configuration. You would get an uninitialized constant Review::Authors error if you used the plural form of an author association in the preceding example. The reason for this is that Rails automatically infers the class name from the association name. Hence, if the association name is in the plural form, then the inferred class will also be in the plural form, which is incorrect.
has_one
The has_one association also establishes one-to-one mapping with another model but in a different manner. This association suggests that one instance of a model will have only one occurrence in another model. For example, only one user profile can be created using a particular email address on any portal, as shown in the following diagram:

Figure 12.2: has_one association
Consider the following code snippet:
class Profile < ApplicationRecord
has_one :user
end
In this example, we have added a has_one association to the Profile model since every Profile can have only one user.
The distinction between belongs_to and has_one largely depends on where the foreign key is placed. Considering the preceding example, we can call the association belongs_to when one user creates user accounts on multiple platforms using the same email address. Here, the foreign key is the email address that is linked to multiple platforms.
has_many
This association generates a one-to-many connection with another model. This is exactly the opposite of a belongs_to association. It specifies that each instance of the model has zero or more occurrences in the other model. For example, on a publishing portal, one author may have more than one review, as depicted in the following example:

Figure 12.3: has_many association
Consider the following code snippet:
class Author < ApplicationRecord
has_many :reviews
end
When declaring a has_many association, the name of the other model must be in the plural form.
has_many :through
The has_many :through association is used to build multiple connections to another model. This association indicates that the model in which said association is declared can be associated with none or more than one occurrence of another model by progressing through a third model. For example, in a hospital, Doctors and Patients have interaction via a third model, Appointments, as shown in the following figure:

Figure 12.4: has_many: through association
Consider the following code snippet:
class Doctor < ApplicationRecord
has_many :appointments
has_many :patients, through: :appointments
end
class Appointment < ApplicationRecord
belongs_to :doctor
belongs_to :patient
end
class Patient < ApplicationRecord
has_many :appointments
has_many :doctors, through: :appointments
end
Here, we have three models where Doctor can have many patients and a patient can have many doctors. All of the models link with each other via the Appointment model such that Doctor can have many appointments and Patient can have many appointments, but an appointment belongs to a doctor and a patient. In short, the Patient model is associated with the Doctor model through the Appointment model.
has_one :through
This type of association is used to initiate a one-to-one connection with another model. It indicates that an association that is declared in a model can be linked with an occurrence of another model by using a third model. For example, every Contractor has one account on a certain portal, and every Account is linked with AccountHistory. The association should look like the following diagram:

Figure 12.5: has_one; through association
Consider the following code snippet:
class Contractor < ApplicationRecord
has_one :account
has_one :account_history, through: :account
end
class Account < ApplicationRecord
belongs_to :contractor
has_one :account_history
end
class AccountHistory < ApplicationRecord
belongs_to :account
end
Here, we have three models, Contractor, AccountHistory, and Account, where every contractor has one account and account history and every AccountHistory belongs to an account, while an Account has one account history but belongs to a contractor. In short, Contractor and AccountHistory have one-to-one mapping through the Account model.
has_and_belongs_to_many
This type of association builds direct multiple links with another model, without using a third model. For example, a discussion forum may have multiple users and groups within it. Each user may be part of numerous groups and every group may have numerous users who contribute to a discussion, as depicted in the following diagram:

Figure 12.6: has_and_belongs_to_many association
Consider the following code snippet:
class User < ApplicationRecord
has_and_belongs_to_many :groups
end
class Group < ApplicationRecord
has_and_belongs_to_many :users
end
In this example, unlike HABTM (Has And Belongs To Many) associations, we use the has_and_belongs_many helper method to build an association between the User and Group models via the user_groups model.
Exercise 12.01: Creating a Model to Enable Users to Comment on Reviews on the CitiReview Application
In Chapter 11, Introduction to Ruby on Rails I, we built a review application model and added an authentication sign-in page to the model. In this exercise, we will create a comment model and associate it with the Review model, and also run the migration. Remember, each review can have many comments but every comment belongs to only one review. We will add a form after a review for users to add comments.
The following steps will enable you to complete the exercise:
- Go to the root of the project and run the following command from Terminal to generate a model comment:
$ rails generate model Comment commenter:string body:text review:references
The output should be as shown in the following screenshot:

Figure 12.7: Generating a model comment
Here, we have generated a new model comment with commenter, body, and a foreign_key columns for the Review model. Let's open the migration file to understand this better. Open the db/migrate/20190801052630_create_comments.rb file:
class CreateComments < ActiveRecord::Migration[5.1]
def change
create_table :comments do |t|
t.string :commenter
t.text :body
t.references :review, foreign_key: true
t.timestamps
end
end
end
This migration will create a table, comments, with commenter, body, and review attributes.
The references keyword is a special datatype for models. The columns that will be created in the database will have their names appended with _id, which will hold an integer value of id from the review table.
- Run the following command from the root of the project to execute migrations:
$ rails db:migrate
The output should be as shown in the following screenshot:

Figure 12.8: Rails database migration
- Next, we need to create an association between two models where every record of the Comment model belongs to a review. Open the Comment model from app/models/comment.rb:
class Comment < ApplicationRecord
belongs_to :review
end
Here, we have created an association between the two models where every record of the Comment model belongs to a review.
- Now we need to create an associated behavior between the two models Review and ApplicationRecord. Open the Review model from app/models/review.rb and add the following code in it:
class Review < ApplicationRecord
has_many :comments
end
Once we have added the associations, associated behavior between the two models is enabled. For example, if we have 10 comments belonging to a review and we create a review object such as @review, we will get access to many methods that are already available for us to use, such as @review.comments, which will give associated comments for this review.
- Then, we create a controller for comments by running the following command from Terminal from the root of the project:
$ rails generate controller Comments
The output should be as shown in the following screenshot:

Figure 12.9: Generating the folder structure for the Comment model
This command has generated our required folder structure for the comment feature. Next, let's add a form to submit a comment.
- Create a form after a review to submit comments. Open the app/views/reviews/show.html.erb file and add the following code:
show.html.erb
1 <h1>Citireviews Review for </h1>
2 <p>
3 <strong>Name:</strong>
4 <%= @review.name %>
5 </p>
6
7 <p>
8 <strong>Description:</strong>
9 <%= @review.description %>
10 </p>
11 <h2>Write your comment:</h2>
12 <%= form_with(model: [ @review, @review.comments.build ], local: true) do 13 |form| %>
14 <p>
15 <%= form.label :commenter %><br>
Here, we have created a form that will allow the user to submit a comment for a review. On submission, the create action will be called in the controller. Before that, we should also add routes for the comments resource.
- Add routes for comments by adding the following code in config/routes.rb:
resources :reviews do
resources :comments
end
These are nested routes that create comments as a nested resource inside reviews.
- In CommentsController, add the create action to persist the comment value. Open the app/controller/comments_controller.rb file and add the following code:
class CommentsController < ApplicationController
def create
@review = Review.find(params[:review_id])
@comment = @review.comments.create(comment_params)
redirect_to review_path(@review)
end
private
def comment_params
params.require(:comment).permit(:commenter, :body)
end
end
Here, before we persist the comment, we first find the review that is associated with this comment and create a Review object and assign it to the @review instance variable. We then make use of the methods available with Active Record associations in order to insert the record into our database. Of course, as implemented in the previous chapter, we allow strong parameters by declaring them in the comment_params method.
- Run the Rails server to test whether the comment has been saved. Run the following command from Terminal from the root of the project:
$ rails server
Open the browser and access http://localhost:3000/reviews/3 to find any review. It should look as shown in the following figure:

Figure 12.10: Landing page to add comments
Once the comment is added, the Create Comment button should be highlighted as shown in the following figure:

Figure 12.11: Create Comment button
Write the review and submit it with Create Comment.
We did not get an error, but we cannot see whether our comment was saved or not. Try creating more comments, but to check whether the comments are saved refer to the Terminal window to see a SQL query being executed as shown in the following figure:

Figure 12.12: SQL query
In the next step, we will display these comments associated with a review and add a few more comments so that you can see them all.
- Open the app/views/reviews/show.html.erb file and add the following code to display the comments associated with a review:
show.html.erb
29 <h1>Citireviews Review for </h1>
30 <p>
31 <strong>Name:</strong>
32 <%= @review.name %>
33 </p>
34
35 <p>
36 <strong>Description:</strong>
37 <%= @review.description %>
38 </p>
39 <br/>
40 <strong><i>Comments for this review:</i></strong>
41 <% @review.comments.each do |comment| %>
42 <p>
43 <strong>Commenter:</strong>
Here, we have added a section to display all the comments associated with this review. Run rails server to check it on the browser. It should display as shown in the following figure:

Figure 12.13: Comments displayed
Now, if you submit a fresh comment, it will be displayed immediately in the list of comments associated with this review.
Thus, we have successfully created a Review model for the application.
Validations
Validations are added to an application so that only valid data is saved to your database – in other words, only keeping the signal and avoiding noise. For example, a user does not add their name in the age section, but uses a proper email ID format, and adds a proper cell phone number to validate the data on a portal, which is the basic requirement of the portal.
There are various ways and junctures at which we can set these validations in an application before the data gets persisted to the database. Mainly, there are four types of such validations:
- Database validations
- Controller-level validations
- Client-side validations:
- Model-level validations:
Let's look at each of these types one by one.
Database Validations
With database validations, we use database constraints or store procedures to check whether valid data is being stored. This is difficult to maintain since at the database level, changes are difficult to implement and there is more resistance against future changes. However, at the database level, validations such as uniqueness validations absolutely belong to the models as well.
Controller-Level Validations
Validations can be implemented in a controller, but this is against the philosophy of thin controllers, hence it's better to keep them at the model level only. Also, models could be interacted with by different controllers. Data validation is a concern at the data level, which is the model's concern.
Client-Side Validations
These are the first alerts when it comes to a validation example adding constraints right in the form that adds data. However, they are unreliable if they are the only ones to be used since they can be easily bypassed. But in combination with other validations, they are very useful.
Model-Level Validations
This is the best place for adding any validations before your data gets saved in the database. Also, these are database-agnostic validations so, irrespective of which database is used now or is changed later, validations will work. Rails makes it really easy to add validations with lots of helper methods that augment our own custom code.
Methods that Trigger Validations
With Active Record, there are certain methods that trigger validations before saving data in the database. The following is a list of such methods:
- create
- create!
- save
- save!
- update
- update!
Methods that Skip Validations
With Active Record, there are certain methods that skip validations before saving data in the database. The following is a list of such methods:
- decrement!
- decrement_counter
- increment!
- increment_counter
- toggle!
- touch
- update_all
- update_attribute
- update_column
- update_columns
- update_counters
While the save method triggers validation, there is a way to bypass this by adding a flag along with it, as in save(validate: false).
Checking Validations
Rails runs a validation before saving an Active Record object. If the validation criteria are not met, the object is rejected. To test these validations, there are helper methods available: valid? and invalid?. You can try them on your model in the Rails console.
Consider the following example:
class User < ApplicationRecord
validates :name, presence: true
end
The output in the Rails console would be as follows:
User.create(name: "Steve Carell").valid? # => true
User.create(name: nil).valid? # => false
User.create(name: nil).invalid? # => true
Here, we have created a User model, which could have many fields, such as name, age, location, and so on, with validation on the name parameter. At the time of creating a record, this record validation triggers, and using the valid? and invalid? helper methods, we can check whether the result would be true or false.
Exercise 12.02: Adding Validation for the Citireview Application
In this exercise, we will add validation for the citireview application such that every review must have a name and a comment body should not exceed more than 50 characters:
- Open the Review model from app/models/review.rb and add the following code:
class Review < ApplicationRecord
has_many :comments
validates :name, presence: true
end
With the presence of validations, if the name field is empty, data won't be saved in the database.
- Start rails server from Terminal and open http://localhost:3000/reviews/new in your browser to test whether you can still submit the review without a name:
$ rails server
The output would be as follows:

Figure 12.14: Saving a review
Redirection to the home page will look as follows:

Figure 12.15: Redirection to the home page
Check the Rails server in the Terminal window to see the redirection operation as shown in the following figure:

Figure 12.16: Redirection operation as seen on the Terminal window
As you can see, the reason why we did not see the review listed is because the record was never created in our database and the transaction was rolled back.
- Open the Comment model from app/models/comment.rb and add the following code in it:
class Comment < ApplicationRecord
belongs_to :review
validates :body, length: { maximum: 50 }
end
Similar to the previous step, we have added a validation where we check that the text added in the body field is not more than 50 characters.
- Refresh and open a review and add a comment of over 50 characters:

Figure 12.17: Comment over 50 characters
Submit it to see whether it gets saved and displayed instantly:
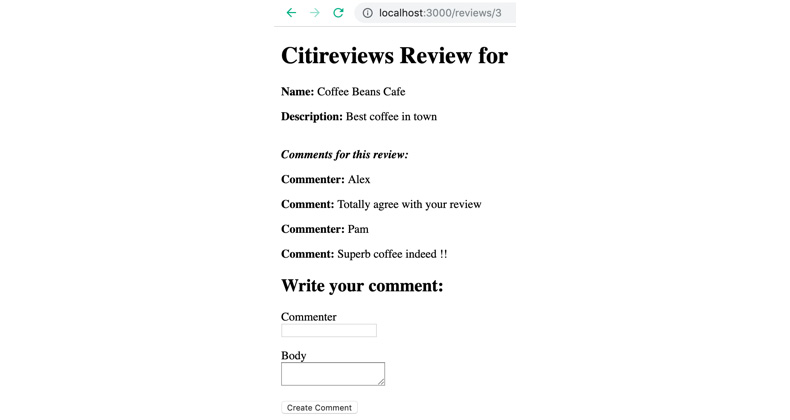
Figure 12.18: Failure to save a comment of over 50 characters
The comment failed to save since it was over 50 characters.
Scaffolding
Rails scaffolding is a feature in Rails that helps to autogenerate code. In Ruby on Rails, this refers to the autogeneration of Model, View, and Controller along with CRUD operations, usually for a single database table. This saves a lot of time and is yet another feature of Rails for speedy development.
The following is the scaffold command:
$ rails generate scaffold ScaffoldName [attributes]
This one-line command will set up the model, controller, views, migrations, and test suite – all in one go.
Exercise 12.03: Using Rails Scaffolding to Create a Rails Application for a Store with a List of Products
In this exercise, we will create a Rails application for a store allowing a user to enter a list of products with two fields, name and price:
- Create a new Rails application using the following command:
$rails new scaffold_app
The output should be as follows:

Figure 12.19: Using scaffolding to create a new Rails application
This will generate our new Rails application. Create a Store model to save the name and description of a product using the following scaffold command:
$rails generate scaffold Store name:string description:string
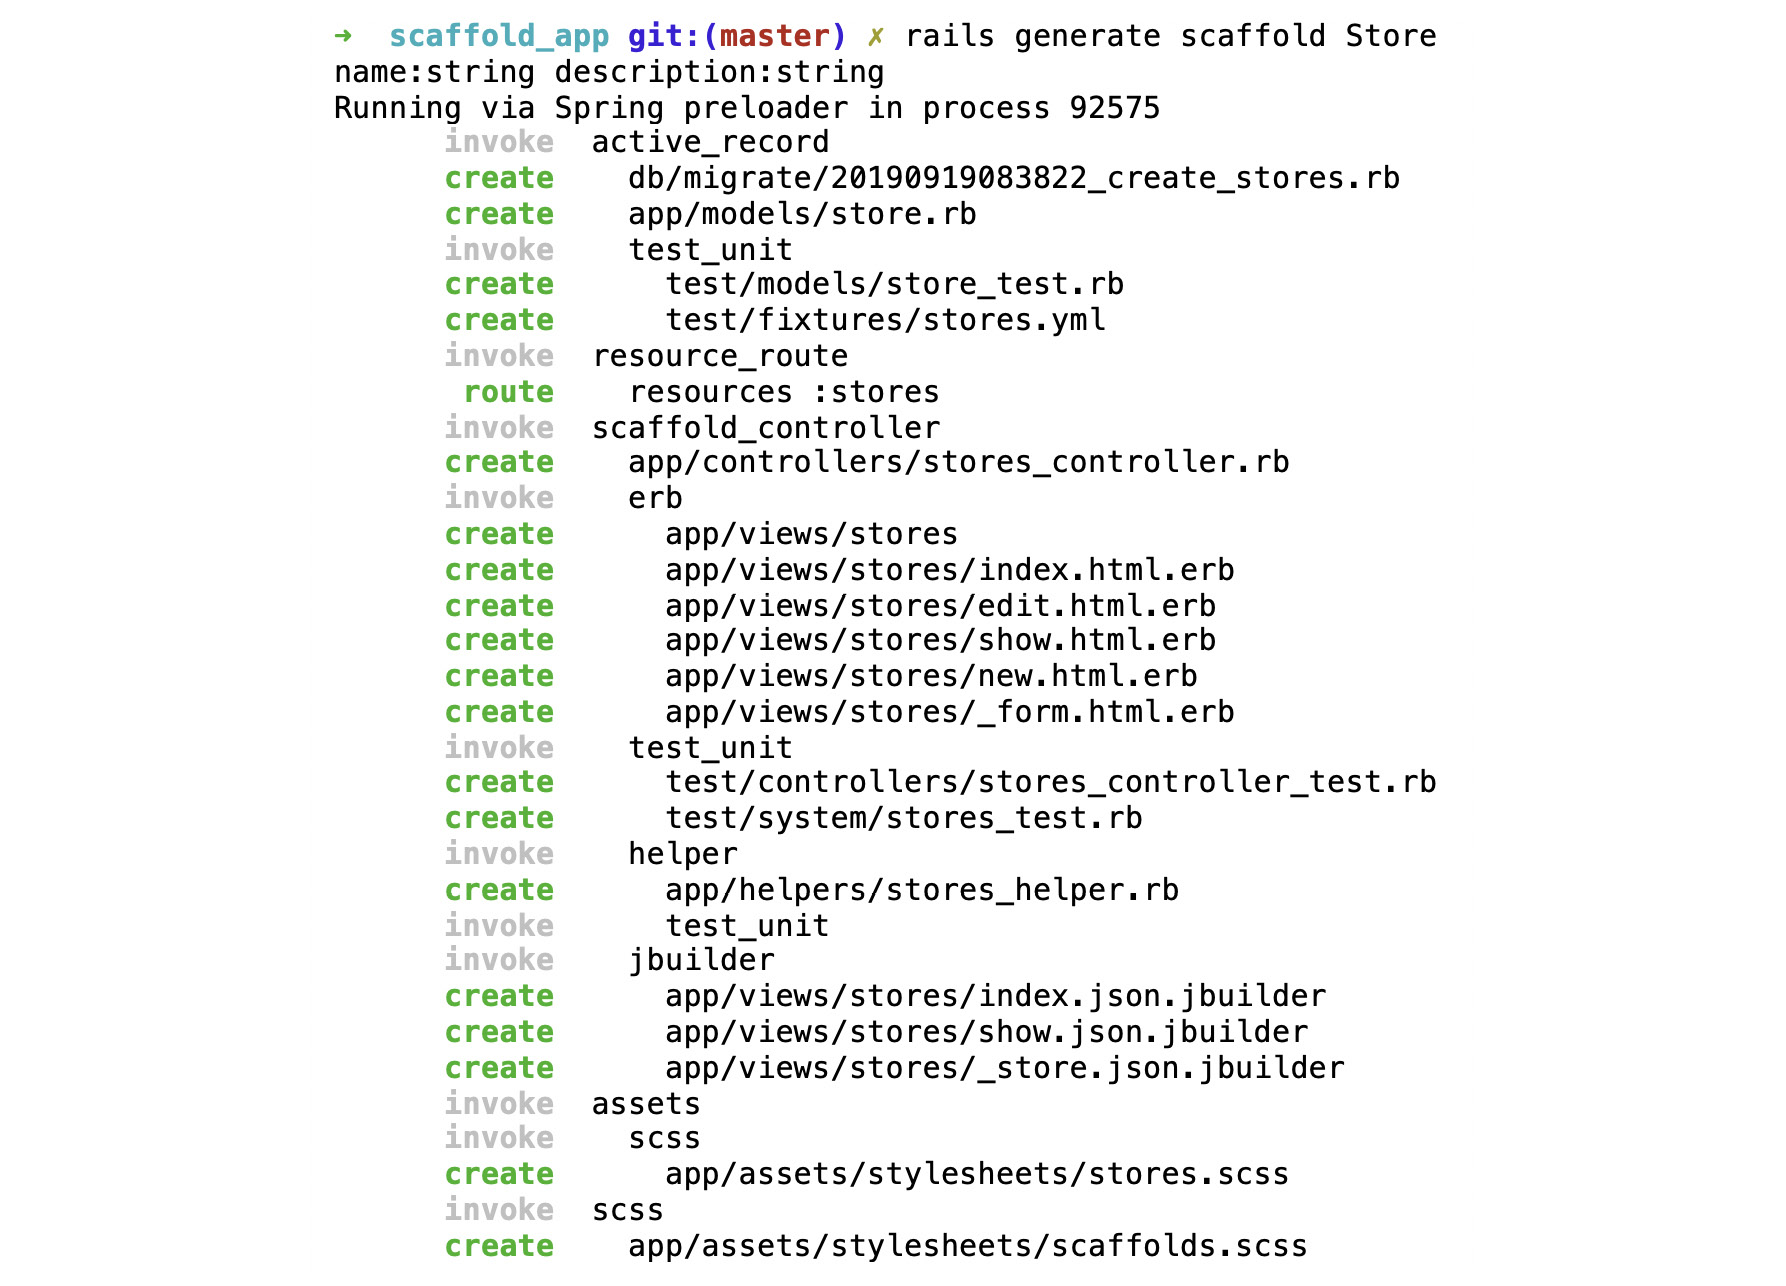
Figure 12.20: Using the scaffold command to create a model
As you can see, we have a model, controller, views, migrations, and assets all set up in just one command. Earlier, we saw that we had to generate every part using different Rails generators; scaffolding, therefore, saves a lot of time.
- Run the following command to execute the migrations created in the last step:
$rails db:migrate
The output should be as follows:

Figure 12.21: Executing migrations
As you can see, our Stores table is created with this migration, which was generated in step 2.
- Run the following command to serve the application over a web server:
$rails server
The output should be as follows:

Figure 12.22: Serving the applications on a web server
- Open the application in your browser – http://localhost:3000/stores/ (since we have created one resource only, which was Stores):
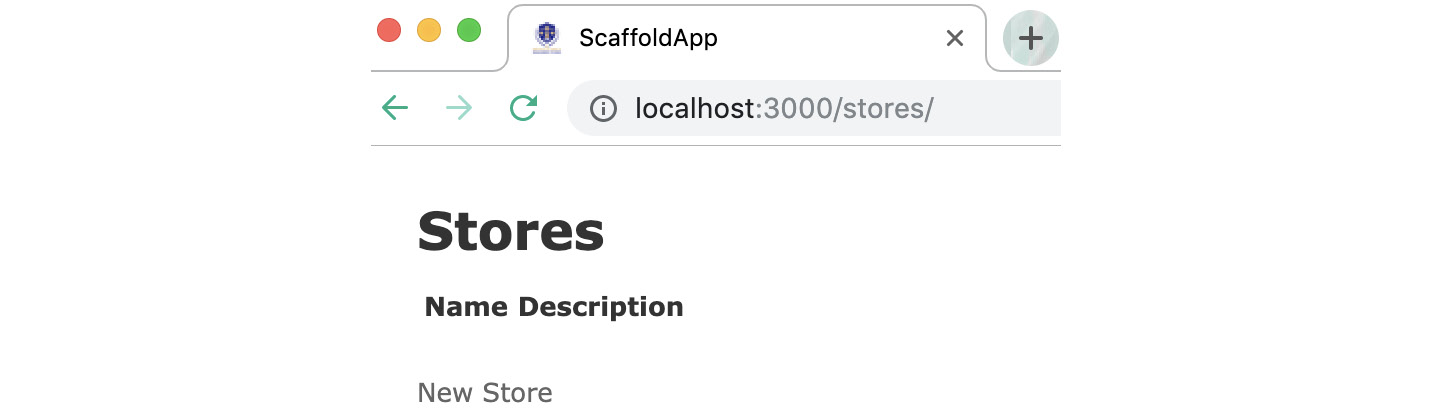
Figure 12.23: Landing page for the Stores application
At present, there is no data in this application. Click on New Store to add data.

Figure 12.24: New Store option in the application
- After filling in the form, submit it by clicking Create Store as shown in the following figure:

Figure 12.25: Creating a record
Our record has been successfully created.
- Click the back arrow to see whether the list of data appears as shown in the following screenshot:

Figure 12.26: List of data on the Stores application
So, on the index page of this resource, we can now see a list of data from this model.
As you have seen, with scaffolding, generating repetitive CRUD operation code is quick and easy.
Activity 12.01: Create a Blog Application and Host It Live on a Cloud Platform
In this activity, we will create an application model for a blogging platform. The activity has to be performed in the following parts:
Part I – Create a blog application with the following features:
- It should allow the creation of a blog post with a title and content.
- It should have a comment section to save a comment based on a blog post ID.
Part II – Host the application on a cloud platform such as Heroku so that it is publicly available.
Use the Rails scaffolding feature to build the application rapidly.
The following steps will help you with the solution:
Part I – Create a blog application with the following features
- Create a new blog model.
- Use scaffolding to generate an MVC file and a folder structure for posts.
- Execute migrations and generate tables for posts.
- Add a root route for adding the index page to display a list of posts.
- Test your application on the localhost URL, http://localhost:3000.
Part II – Host the application on a cloud platform such as Heroku so that it is publicly available
- Create a free account on Heroku and download the CLI (Command Line Interface) to set it up locally.
- Configure postgres using the Ruby pg gemfile and uninstall the SQLite3 gem.
- Make sure to update the configuration files with postgres specifications.
- Create a database and run migrations to check for changes.
- Next, save the application on Git and deploy it on Heroku using the following commands:
$ heroku create
$ git push heroku master
- Next, create a database on Heroku and run the following command to check the migrations and generate tables:
$ heroku run rails db:migrate
- Lastly, use https://protected-tor-47977.herokuapp.com to run the application.
Expected Output:

Figure 12.27: Blog post landing page
Note
The solution to the activity can be found on page 495.
Summary
In this chapter, we deep-dived into the Rails framework and learned about features such as Active Record associations, which are essential for any real-world application, and with six associations provided by Rails, working with models and databases becomes easier and more organized. We then learned about validations and the various options Rails provides. After that, we learned about scaffolding in Rails, which is a very powerful tool for rapid application development. Lastly, we learned about how to host our application on the World Wide Web with a popular hosting service called Heroku.
We have learned a lot in the last 12 chapters and we are confident that you will be excited to work with one of the most beautiful and powerful programming languages, Ruby (with the equally powerful Rails framework) – for your next software assignment.