Overview
By the end of this chapter, you will be able to perform operations on arrays and hashes; use Ruby methods on arrays and hashes; create your own Ruby method and write a Ruby program for rolling dice.
Introduction
In the previous chapter, we studied variables, constants, strings, and various data types. We performed various operations on strings and numbers. We were also introduced to the Interactive Ruby Shell (IRB), which makes coding in Ruby easier.
This chapter is dedicated to bringing you up to speed with arrays, hashes, and methods in Ruby. You could say that these are among the most fundamental topics. We will take a closer look at the different ways of creating arrays and hashes, as there are a wide variety of options. We'll also look at methods, which is another essential concept in Ruby and study certain rules about arguments that you should be aware of while creating methods. After that, you have the fundamentals to become a fine Ruby developer.
Arrays
An array is a data structure that contains a list of values called elements. Arrays can be an ordered, integer-indexed collection of any object. Ruby arrays can have objects such as Integer, String, Symbol, Fixnum, and Hash, or even other arrays, as elements. In many languages, arrays are rigid in terms of their size. In Ruby, however, an array increases its size as elements are added.
When we say ordered, we mean that the array will keep track of how the elements are inserted or removed from it. While fetching the data from an array, we can retrieve the values directly based on the position of the element. This will become clearer as we dive into the depths of data extraction and manipulation using arrays.
Integer-indexed means that each element in the array is linked to an index. In Ruby, we can fetch the data from an array based on the index irrespective of the value at that location. Like most other languages, array indexes in Ruby start from zero.
Ruby is very flexible and provides us with many ways in which to create arrays. Let's now look at a few examples in relation to arrays.
Note
We will be using Interactive Ruby Shell (IRB) extensively in this chapter for all examples, exercises, and activities.
Beginning with arrays, here is the code for creating an empty array:
my_array = []
The output will appear as follows:

Figure 2.1: Output for an empty array
To create an array with predefined values, we need to include the values in the parentheses [], as shown in the following code snippet:
my_array = [1,2,3]
The output will appear as follows:
Figure 2.2: Output for an array with predefined values
To create an array with default values using a different method that involves the .new function in the Array class with arguments, consider the following command:
my_array = Array.new([1,2,3])
my_array = Array.new(3, "ruby")
The output on IRB would appear as follows:

Figure 2.3: Output with Array.new
The .new function is a constructor for the Array class, which can take different arguments based on your current requirements.
If we want to create an array with the first few values as empty and start from a particular index in certain scenarios, we could do so as follows:
my_array = []
my_array[4] = "ruby"
my_array
The output will be as shown in the following code block:

Figure 2.4: Output for an array with the first four values empty
Unlike languages such as Java/C, an array in Ruby can contain more than one type of element, as depicted in the following code:
my_array = ["ruby", 1, "is", 2, "awesome", 3]
The output will appear as follows :
Figure 2.5: Output for arrays with different types of elements
Iterating Through an Array
Iterating through an array can either be done with or without the index. The code for both scenarios is presented as follows:
- Code for iterating without an index:
my_array = [1,2,3,4,5]
my_array.each do |element|
puts element
end
The output will be as follows:

Figure 2.6: Iterating without an index
- Code for iterating with an index:
my_array = ["a","b","c","d","e"]
my_array.each_with_index do |element, index|
puts "#{element} => #{index}"
end
The output will be as follows:

Figure 2.7: Iterating with an index
As mentioned previously, the index starts from 0. However, note that the index is just a variable and we can play around with it just like any other variable and it will not affect how we iterate over an array. By way of a demonstration, we can create a loop over the each_with_index function of an array and show the index+10 value for the array item. The each_with_index function will iterate over each element and create a temporary variable that shows the actual index of the element in the array, before returning a pair of elements (element, index) for each iteration.
In the first iteration, this will be ('a',10). It prints out "index + 10 => element", meaning it will print "10 => a" in the first iteration. As depicted in the following code:
my_array = ["a","b","c","d","e"]
my_array.each_with_index do |element, index|
puts "#{element} => #{index + 10}"
end
The output will appear as follows:

Figure 2.8: Output for the each_with_index function
Note
Changing the value of the index variable is only valid during its current iteration and does not affect subsequent iterations of the loop.
Ruby is purely an object-oriented language. This means that arrays are objects themselves. The full Object Oriented Programming (OOP) paradigm is valid for Ruby constructs throughout the application. We can use inheritance, polymorphism, and encapsulation in our application.
Now, let's check the base class for our Array. The base class is a class from which the specific properties of a data type and methods are inherited in a new instance as a way of reusing code and maintaining functionality.
Use the following code to check the class of the array:
my_array.class
The output on IRB would appear as follows:
Figure 2.9: Output for the array class
Ruby provides us with inbuilt methods related to a specific data type that allow us to discover the inherited methods, as well as the methods of our instance. This can be achieved using the .methods function as follows:
my_array.methods
The output will be as follows:

Figure 2.10: Methods for an array
As can be seen from the preceding output, .methods will return all the method names the object can be called upon. The preceding screenshot shows 169 methods, but we'll dig deep into just a few of the most common and important methods.
Ruby allows us to check whether a method is implemented in the instance we created, and thus inherited from its base class. This can be checked on an array using the .respond_to function. Consider the following example:
my_array = ["I", "love", "ruby"]
my_array.respond_to?("length")
my_array.respond_to?("garbage")
The output will appear as follows:

Figure 2.11: Output using the .respond_to? function on an array
In the preceding example, we define a set of variables in an array and check how the array responds to the methods called on the array. If you see the output, Ruby returns true when the length method is called on the array and false when a non-existent garbage method is called on the array. This clearly means that the array will only respond to the defined methods and return false for anything other than that.
Let's now move on to implementing some operations on arrays.
Operations on Arrays
Arrays are the Swiss army knife of every programming language. They are usually used to store values or different types, to calculate intermediate or final results, and even to send data to other functions or classes. This section shows you how we can harness the power of arrays for this purpose.
In this section, we are going to study how to perform various operations on arrays.
Merging Two Arrays
Different values held in arrays can be merged, as shown in the following code:
my_array_first_half = [1,2,3]
my_array_second_half = [4, 5, 6]
my_array_first_half + my_array_second_half
The output will appear as follows:

Figure 2.12: Merging two arrays
From the preceding code, you can clearly discern that the two arrays have been merged together using the + operator.
Note that even different values, belonging to different data types, that are held in arrays can be merged.
Removing Occurrences of Similar Elements from an Array
Values that have multiple instances in the array can be removed, as shown in the following code:
my_array_with_duplicates = [1, 1, 4, 5, 6]
my_array_to_be_removed = [1,2,3]
my_array_with_duplicates - my_array_to_be_removed
The output will be as shown in the following code block:

Figure 2.13: Removing similar elements from the array
In the preceding code, we defined two arrays with a few variables. Using the – operator, all the occurrences of the second array were removed from the resulting array.
If you notice, all the occurrences of 1 are removed from the result.
Inserting Elements into an Array at the End
There are many ways in which you can insert elements in an array. The following code shows how to insert elements using the push method. This will extend the current array with the new elements specified as arguments to the push function. They can be of any type; it is not necessary to have the same type of elements as the values already in the array:
my_array = [1,2,3]
my_array.push(4)
The output will be as shown in the following code block:

Figure 2.14: Inserting elements into an array using the push method
Here, we have defined an array and pushed the variable 4 into the array using the .push method.
Another way to add elements to an array is by means of the << operator. There are operators in Ruby that are aliases to functions or methods, and they are used to achieve the same result, but with shortcuts:
my_array = [1,2,3]
my_array << 4
The output will be as shown in the following code block:

Figure 2.15: Inserting elements into an array using the << operator
As you can see, the variable 4 is added to the array using the << operator.
Finding the Last Element of an Array without Modifying It
You can find the last element of the array as shown in the following code:
my_array = [1,2,3]
my_array.last
my_array
The output will be as shown in the following code block:

Figure 2.16: Finding the last element of the array
As shown in the preceding diagram, the .last method displays the last element of the array.
Finding the Last Element of an Array and Removing it
You can find the last element of the array and eliminate it, as shown in the following code:
my_array = [1,2,3]
my_array.pop
my_array
The output will be as shown in the following code block:

Figure 2.17: Eliminating the last element from an array
The .pop method has picked up the last element and removed it from the array.
Let's now solve an exercise to deepen our understanding of operations performed on arrays.
Exercise 2.01: Performing Simple Operations on Arrays
In this exercise, we are going to execute the following operations on an array:
- Merge arrays.
- Remove the repeated occurrences of elements in two arrays.
- Insert new elements into an array.
- Find the last element of the array without modifying it.
- Find the last element of the array and remove it.
We will define two arrays, colors_1 and colors_2, in which we will store colors of the visible light spectrum as elements, and then perform the aforementioned operations on these arrays.
The following steps will help you to complete the exercise:
- Go to the Terminal and enter irb for Interactive Ruby Shell.
- Define the two arrays that you wish to merge and merge them into one array, to be termed as colors_3:
colors_1 = ['violet', 'indigo', 'blue', 'green']
colors_2 = ['yellow', 'violet', 'orange', 'red', 'violet']
colors_3 = colors_1 + colors_2
The output of the colors_3 array would be as follows:

Figure 2.18: Output of the colors_3 array
As can be seen in the output, the new array includes elements from both the colors_1 and colors_2 arrays. However, as you might notice, some colors are repeated. We will eliminate the duplicates in the next step.
- Next, use the - operator to remove the repeated occurrences of the elements in the two arrays:
colors_repeated = ['violet']
colors_new = colors_3 - colors_repeated
The output of the colors_new array would be as follows:

Figure 2.19: Output of the colors_new array
You can see that the array only has unique elements. Now, let's try inserting new elements into our arrays.
- Then, insert new elements into the array:
colors_1.push('yellow')
colors_1.push('red')
colors_2.push('green')
colors_2.push('blue')
The new colors_1 and colors_2 arrays will be as follows:

Figure 2.20: Output of the colors_1 and colors_2 arrays
You can now see how the yellow, red elements have been added to the colors_1 array, and how the green, blue elements have been added to the colors_2 array.
- Now, we will trace the last element of the array without modifying the array:
colors_1 = ['violet', 'indigo', 'blue', 'green']
colors_1.last
The output will be as follows:

Figure 2.21: Last element of the array
As you can see from the output, the .last method has picked up the last element of the array.
- Next, we will find the last element in the array and remove it:
colors_1 = ['violet', 'indigo', 'blue', 'green']
colors_1.pop
colors_1
The output should be as follows:

Figure 2.22: Output of the colors_2 array without the last element
As you can see from the output, the .pop method has removed the last element from the array.
Thus, we have successfully performed basic operations on arrays.
Until now, we have only performed basic operations on arrays. However, there are many more operations, such as "freezing" an array, finding unique elements, and sorting elements.
Let's now look at each of these in more detail.
Creating an Array That Cannot Be Modified
This can come in handy when we want to limit the size of an array or prevent further modification. The freeze function can be used on objects other than arrays with the same result:
my_array = [1,2,3]
my_array.freeze
my_array << 4
The output will be as shown in the following code block:

Figure 2.23: FrozenError
As we can see, the error in the output clearly implies that a frozen array cannot be modified.
Finding All the Unique Elements in an Array
uniq means we want to have every occurrence of an element only once in our array. We can retrieve a different object with the results or just modify our original list in place.
Consider the following example:
my_array = [1,2,3, 4,3,2]
unique_array = my_array.uniq
my_array
The output will be as shown in the following code block:

Figure 2.24: Output of the uniq function
Note that in the preceding case, we do not modify the existing array, rather a new array is returned by the uniq method. If we want to modify the existing array, we can use ! as follows:
my_array = [1,2,3, 4,3,2]
my_array.uniq!
my_array
The output will be as shown in the following code block:

Figure 2.25: Output for the uniq! function
As you can see, uniq! has modified the array, keeping only one instance of each element.
Sorting the Elements of an Array
Remember that if we have to modify the existing array, we need to use !, as in sort!. We can also reverse sort an array. Sorting comes in handy when we do not have any control over the order in which the array elements arrive, but we want to process them in some kind of order. .reverse will give us the reverse order of the elements after sorting them, so it's two steps behind the scenes:
my_array = [3,6,23, 1]
my_array.sort
my_array.sort.reverse
The output will be as shown in the following code block:

Figure 2.26: Sorting elements
As you see in the preceding output, the array has been arranged in ascending order and also reversed using .reverse.
Finding the Number of Elements in an Array
The .length and .size methods do exactly the same thing and we can use either of them. Consider the following example:
my_array = [1,2,3]
my_array.length
my_array.size
The output will be as shown in the following code block:

Figure 2.27: Output for the length and size methods
As you can see, the .length and .size methods have returned the size and length of the array.
Note
In Ruby convention, any method that ends with ? implies that it will return a Boolean value. While writing our own methods, we should observe the same practice.
Establishing Whether an Element Exists in an Array (Case-Sensitive)
include? is used to find the occurrences of an element in an array. It is case-sensitive and is an extremely useful method when it comes to large arrays.
Consider the following example where we will call the include? method on two variables with different cases:
my_array = ["I", "love", "ruby"]
my_array.include?("ruby")
my_array.include?("Ruby")
The output will be as shown in the following code block:

Figure 2.28: Output of the include? method
As you can see, include? has identified the element mentioned in the array and stated the output accordingly as per the element that is being searched for. The array contains ruby and, hence, the method has returned true for ruby, and false for Ruby.
Converting Elements of an Array into a String
The purpose of join here is to combine each element of the array with the string that is passed as a parameter to the join method.
Consider the following example:
my_array = ["I", "love", "ruby"]
my_array.join(",")
my_array.join(" ")
The output will be as shown in the following code block:

Figure 2.29: Output of the join method
As we can see, the element , has been added to the variables in the array in the first case, and a whitespace has been added, in the second case. join has successfully combined the elements with a string passed as a parameter.
Exercise 2.02: Performing Complex Operations on Arrays
In this exercise, we will implement all the array operations discussed in the preceding section. We will define an array having numbers as elements for this purpose and then proceed to perform the various array operations.
The following steps will help you to complete the exercise:
- Go to the Terminal and enter irb for Interactive Ruby Shell.
- Define the array and use .freeze to make it unchangeable. Make sure you use a different notation for the new array so that you can use the original array in subsequent steps:
my_array = [1,2,3,4,5,6,6,4,3,2,1]
my_array.freeze
The output will appear as shown in the following code block:

Figure 2.30: Output of the frozen array
Now that we have frozen the array, it is not possible to make any changes to this array or perform any operations on it.
- You may have observed that there are a few values that are repeated in our array. Now, let's write the code to list the unique elements in the array using .uniq:
my_uniq_arry = my_array.uniq
The array should now be as shown in the following code block:

Figure 2.31: Output for .uniq
You can see that the new array has eliminated the repeat occurrences of the variables and returned only the unique elements of the array.
- Next, we use .sort to arrange the elements in alphabetical order:
my_sorted_array = my_array.sort
The output for the .sort method will be as follows:

Figure 2.32: Output for the .sort method
As can be seen in the preceding figure, the array has now sorted the elements in ascending order.
- Now, we find the total number of elements in the array using .length and .size:
my_array.size
my_array.length
The array size and length are as shown in the following code block:

Figure 2.33: Output for the size and length of the array
With .length and .size, we have derived the actual length and size of the array.
- Next, we shall use .include to establish whether a particular element exists in the array:
my_array.include?(1)
my_array.include?(11)
The output will be as shown in the following code block:

Figure 2.34: Output for the .include method
As you can see, the .include? method returns true when checked for the element 1, and false for the element 11.
- Lastly, we shall be converting the elements of the array into a string:
my_array.inspect
The output will be as shown in the following code block:

Figure 2.35: Output for .inspect
With the completion this exercise, we have successfully implemented all the aforementioned methods on an array and established a basic understanding of arrays in Ruby.
Hashes
Hashes are collections that save data as key-value pairs. This means that a key will identify every value that we want to save. This also means that keys within a hash have to be unique, otherwise we will overwrite the old values.
In terms of performance, hashes have a lookup time of O(1), which means that finding a value in a hash by its key will not be dependent on the size of the hash, nor on the order in which the hash was created. O(1) means a constant lookup time for the operation performed on a hash, irrespective of the data size. This differs from arrays, where finding a value in an O(n) operation means that the time taken to find an element in an array will be dependent on the length of an array. This means that we are looking for an element and we are going to find it on the nth location; the n does not denote the size of the array, but the location of the element.
An empty hash can be created as follows:
my_hash = {}
my_hash = Hash.new
The output will be as follows:

Figure 2.36: Output for the Hash.new method
We can also create hashes that have a default value, as shown in the following code snippet:
my_hash = Hash.new("No Value")
my_hash["Non existent key"]
my_hash = Hash.new("test")
my_hash["No such key"]
The output with default values would be as follows:
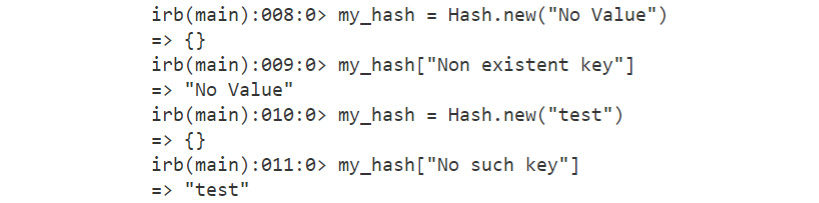
Figure 2.37: Output for default values in hashes
We can also initialize hashes when creating them as well, as you will see in the following code:
my_hash = {"jan" => 1, "feb" => 2, "mar" => 3}
The initialized hash would now appear as follows:

Figure 2.38: Output for initialized hashes
We can also add values to the hash. When adding values to the hash, we can use two syntaxes. When the keys are symbols, values can be assigned to the hash as follows:
my_hash = {}
my_hash[:jan] = 1
my_hash[:feb] = 2
my_hash[:mar] = 3
my_hash
:jan is called a symbol, and it's very similar to a string; however, strings are used to store data, while symbols are used as identifiers in Ruby.
The updated hash will now appear as follows:

Figure 2.39: Output for the hash with assigned values
Note
Keys are preceded with a : and not with double quotes.
When the keys are strings, values are assigned to the hash as follows:
my_hash = {}
my_hash["jan"] = 1
my_hash["feb"] = 2
my_hash["mar"] = 3
my_hash
The output, when keys are strings, would be as follows:

Figure 2.40: Output for the hash when keys are strings
As you can see, we have used both symbols and strings as keys in the hash. While we can use symbols and strings in a single hash, it is not advisable as the person reading our code would not be able to guess what we are using, and this would always be a source of confusion when retrieving values.
The value in the key-value pair inside a hash can be any data type, such as an array of our custom object, or even an array of our custom class objects.
We can use whichever method we want, but while using the hash, we must stick to just one. If the key is a symbol and we try to retrieve it as a string, the hash will return nil. The following code will show you the same:
my_hash = {}
my_hash[:jan] = 1
my_hash[:feb] = 2
my_hash[:mar] = 3
my_hash[:mar]
my_hash[:mar.to_s]
my_hash[:jan.to_s]
The output will now appear as follows:

Figure 2.41: Output for the hash when the symbol is retrieved as a string
Note how referring to :mar gives us the correct value. However, when we convert the keys to the :mar.to_s string, it fails to find the appropriate value.
The most common way to iterate through a hash is to use the .each iterator, which gives access to both keys and values of a hash while iterating.
Consider the following example:
my_hash = {}
my_hash[:jan] = 1
my_hash[:feb] = 2
my_hash[:mar] = 3
my_hash.each do |key, value|
puts "#{key} => #{value}"
end
The output will be as follows:

Figure 2.42: Output using the .each iterator
In the preceding code, we have created a hash and defined the keys – :jan, :feb, and :mar, with values. We have used the .each iterator to iterate through the key-value pairs.
As you can see, the .each iterator has pulled up both the keys and values of the hash through the iteration.
Ruby is purely an object-oriented language, which means that basic data types such as hashes are also objects in Ruby. This can be realized by the following code snippet:
my_hash = {}
my_hash.class
The object type of hash is displayed as follows:

Figure 2.43: Object type of hash
As you can see, the hash belongs to the Hash class. This also means that we can figure out which methods the Hash class responds to as well, as shown in the following code:
my_hash = {}
my_hash.methods
The output will be as follows:

Figure 2.44: Output for methods on hashes
In Ruby, .methods will return all the method names on which the object can be called. The preceding figure has 147 methods, so we'll just dig deep into a few of the most common and important methods.
Soon, when we familiarize ourselves with functions and methods in Ruby that can be called on objects, we need to learn respond_to?, which will tell us what functionality is implemented or inherited in our instance of a specific class. In this case, we inspect the my_hash variable, whose functionality is supported as shown in the following code:
my_hash = {}
my_hash.respond_to?("length")
my_hash.respond_to?("garbage")
respond_to? will provide the following output:

Figure 2.45: Output for respond_to?
Just as for arrays, the respond_to? method will return the values for methods that are defined for hashes. As you can see in the preceding diagram, respond_to? returns true for the length method and false for the garbage method.
Operations on Hashes
In this section, we will perform various operations on hashes, just like we did for arrays, as mentioned in the following list:
- Getting values based on keys
- Setting values for keys
- Sorting
- Merging
- Deleting values of a key
- Removing or rejecting keys
- Searching for values or keys
Let's have a look at each of these in detail.
Getting Values from the Hash
It's the key that fetches the value from the hash. If the key does not exist, a nil value will be returned:
my_hash = {:jan => 1, :feb => 2}
my_hash[:feb]
my_hash[:march]
The output will be as follows:

Figure 2.46: Retrieving values from the hash
As you can see, the hash returns the value 2 for the :feb key, but false for the :march key as the latter is not a part of the hash.
Sorting a Hash
Sorting a hash is not as simple as it is in an array. You can sort a hash by value by using .sort_by. The result of .sort_by is an array, with each key-value pair as an array element in a sorted manner. The .sort_by function operates differently based on which object is called.
The following code will show you how you can iterate over the |key,value| pairs of a hash, and then sort based on the second argument, which will be age, which is the value for the given hash key:
my_hash = {:bill => 34, :steve => 66, :eric => 6}
my_hash.sort_by { |name, age| age }
my_hash.sort_by { |name, age| age }.reverse
The output will be as follows:

Figure 2.47: Output for sorting and reversing arrays
As can be seen from the output, you can infer that the keys have been sorted and arranged as defined by the key-value pair by using the .sort_by method. The same hash is now reversed using the .reverse method.
Sorting can even be done on a more complex hash. It can be sorted by what we provide as a parameter in the .sort_by method.
Our next hash is a nested hash, where each key holds a small hash. We will sort the hash based on the :age of the hashes located inside the keys:
my_hash = {:bill => {:name => "Bill", :age => 55}, :steve => {:name => "Steve", :age => 60}, :eric => {:name =>"Eric", :age => 50}}
my_hash.sort_by {|key, value| value[:age]}
The output will be as follows:

Figure 2.48: Sorting keys in a hash
Merging Hashes
Hashes can be merged together just like arrays, but there is something you need to be mindful of the order in which the keys are passed within the hash. To understand this, let's look at the following example:
my_hash_1 = {:a => 10, :b => 20}
my_hash_2 = {:c => 30, :d => 40}
my_hash_1.merge(my_hash_2)
The output will be as follows:

Figure 2.49: Output for merging hashes
In the preceding example, we merged two hashes with unique keys. However, when merging hashes with common keys, the latter will override the former.
As shown in the following example, the value in the resulting hash would be my_hash_2 instead of my_hash_1. We are going to overwrite the value in the first hash with the value in the second hash as follows:
my_hash_1 = {:a => 10, :b => 20}
my_hash_2 = {:c => 30, :d => 40, :a => 33}
my_hash_1.merge(my_hash_2)
The output will be as follows:

Figure 2.50: Output depicting the overriding of hashes
Retrieving Keys or Values from a Hash
We can also get all the keys or values from a hash using .keys and .values, as shown in the following code:
my_hash= {:a => 10, :b => 20}
my_hash.keys
my_hash.values
The keys and values of the hash will be as follows:

Figure 2.51: Keys and values of a hash
Deleting a Value from a Hash by Key
If the key is found, it will return the value. If the key is not found, nil would be returned. Look at the following example:
my_hash= {:a => 10, :b => 20}
my_hash.delete(:b)
my_hash
my_hash.delete(:c)
The output will be as follows:

Figure 2.52: Deleting a value from a hash
You can see how the value for :b is deleted and also nil is returned when :c is called.
Removing or Rejecting Elements from a Hash
Based on a logical condition, if the value of a specific key is below a threshold, .reject returns a new copy with the elements omitted, while reject! actually removes them from the hash. Consider the following example:
my_hash= {:a => 10, :b => 20, :c => 23, :d => 2}
my_hash.reject { |key, value| value < 20 }
The output will be as follows:

Figure 2.53: Using reject on a hash
As you can see in the preceding code, the values below 20 were removed from the hash.
Establishing whether a Hash Contains a Particular Value
This operation will compare the value to the predefined value and display the result accordingly:
Consider the following example:
my_hash= {:a => 10, :b => 20}
my_hash.has_value?(10)
my_hash.has_value?(100)
The output will be as follows:

Figure 2.54: Finding values within the hash
The preceding output shows that the .has_value? method has returned true for the key 10, as it is a part of the hash. It has subsequently returned false for the key 100.
Let's now solve an exercise that will strengthen our understanding of hashes.
Exercise 2.03: Converting a Time String to a Hash
In this exercise, we will write a program to standardize the input time to hh:mm:ss.s format. The following steps will help with the solution:
- Go to the Terminal and use irb to enter the Interactive Ruby Shell.
- Define a string, which may be the following format – hh:mm:ss.s.
my_string_time = "00:05:23.323"
my_hash_time = {}
- Split the string into appropriate keys and update the hash:
my_hash_time["hh"] = my_string_time.split(":")[0]
my_hash_time["mm"] = my_string_time.split(":")[1]
my_hash_time["ss"] = my_string_time.split(":")[2].split(".")[0]
my_hash_time["s"] = my_string_time.split(":")[2].split(".")[1]
The output will be as follows:

Figure 2.55: Splitting the string
- Inspect the hash to see the standardized input:
my_hash_time.inspect
The output will now appear as follows:

Figure 2.56: Output for the inspect method
Make sure you follow the original time format, as the program would fail if you changed it. But this exercise shows you how to convert the time string to a hash, and then refer to each part of the string as you would like to, as shown in the following code:
my_hash_time["hh"]
my_hash_time["mm"]
my_hash_time["ss"]
my_hash_time["s"]
The output will now look like the following code block:

Figure 2.57: Separating strings from a hash
Ruby Methods
A method in Ruby is a set of expressions that return a value. These are similar to functions in other programming languages. Methods are defined using the def keyword, followed by the method name and then by optional parameters. The method body is enclosed between the preceding definition and the end keyword at the bottom:
def my_method
##method body
end
By convention, method names should begin with a lowercase letter, otherwise Ruby might consider it to be a constant while parsing. Also, names that have multiple words should be separated by an underscore. As in the preceding examples, the method name – my_method, has an underscore between two words.
Passing Arguments to a Method
We can pass arguments to the method on which a method has to operate. There is no limit in terms of the number of parameters that we can pass to a method. The following is a simple example of how we can create our own methods in Ruby:
def add_two_numbers a, b
puts "Sum of the number is #{a+b}"
end
add_two_numbers(10, 20)
The output will appear as follows:
Figure 2.58: Output for adding two numbers
As we can see from the preceding example, a method, add_two_numbers, is defined with the variables a and b. The method body comprises the display message, suggesting what method is used. The use of the parentheses ( and ) is optional. As a good practice, we should choose one approach in a project and follow it throughout.
Ruby Methods with Default Values
We can also define default values as parameters in the methods. In case the caller wants to use the default values, they may choose not to pass any parameter to the optional one. In case the caller wants to override it, they can always do that by passing that extra parameter.
Let's take this up with an example where we almost always want to calculate 50% of a particular value. In only 5% of the cases, this value goes to 70%:
def percent_of_value a, b=50
puts "Percent value is #{(a*b)/100}"
end
percent_of_value 10
percent_of_value 10, 70
The output will be as follows:
Figure 2.59: Output for percentage values
As we can see in the preceding example, in the first call, we do not provide the value of b. Since b is an optional value, the default value is taken, and the answer turns out to be 5. However, in the second call, we are explicitly passing the value of b. This value overrides the default value and, hence, the output is evaluated to 7.
However, these default values should always be the last parameter. Currently, there is no way where a value on the left can be a default and, when we pass just one parameter, as in the preceding case, it takes that value as a mandatory field. So, we have a default value that is stated by a=50 and a mandatory argument, which is the b.
Now, let's make our problem a little more difficult. Reverse the optional and required values and see the output:
def print_values a = 50, b
puts "value of a is #{a}"
puts "value of b is #{b}"
end
print_values 1
The output will be as follows:

Figure 2.60: Output after reversing the optional and required values
As we can see from the preceding example, the Ruby program was smart enough to decide which value should be given to which parameter. But actually, it shows the internal logic of Ruby; if we have an argument with a default value, it is skipped from being assigned an argument value until there are arguments without default values that can be mapped to actual arguments passed. Let's now make our problem more complex, and throw in another optional parameter:
def print_values a = 50, b = 100, c
puts "value of a is #{a}"
puts "value of b is #{b}"
puts "value of c is #{c}"
end
print_values 1, 2
The output will be printed as follows:

Figure 2.61: Output with three parameters
The preceding example is very interesting since our Ruby program skipped the assigning of the middle parameter. We can first deduce from the preceding example the value of the non-optional element that is committed (from right to left), and then the optional parameters from left to right.
However, we cannot mix and match the way in which we use optional and required parameters.
Let's now add one more parameter to the code and see what output is generated:
def print_values a = 50, b = 100, c, d=100
puts "value of a is #{a}"
puts "value of b is #{b}"
puts "value of c is #{c}"
end
print_values 1, 2
The output will be as follows:
Figure 2.62: Syntax error
Along similar lines, if we try to pass an incorrect number of arguments, we'll get the ArgumentError exception. Consider the following example:
def no_parameters
puts "I do not take any parameters"
end
no_parameters "Hello"
The output will be as follows:
Figure 2.63: The ArgumentError exception with no parameters
Look at another example with two parameters:
def add_two_numbers a, b
puts "The sum is #{a + b}"
end
add_two_numbers 10
The output will be as follows:
Figure 2.64: The ArgumentError exception with two parameters
Ruby also allows us to send an unknown number of parameters to the method. This is done with the help of a splat argument represented by an asterisk, *. Splatting means that whatever we pass as an argument is going to be treated as an array. Each value or argument passed will be stored in an array called my_params. Let's look at how this works in the following example:
def any_parameters(*my_params)
puts my_params.inspect
end
any_parameters "any", "number", "of", "parameters"
The output will be as follows:
Figure 2.65: Using a splat operator
The .inspect function is a little helper that converts the input object to a string temporarily, enabling us to print all the arguments that were passed.
If we look at the output, we can see that it is an array. So, what Ruby does internally is convert all the parameters that we are passing to a method and converting the parameters into an array. Once this is done, the method can access this array and take decisions based on accordingly.
This splat operator is very handy in many situations. Let's take a look at the following examples:
first_element, *rest_of_them = ["a", "b", "c", "d"]
puts first_element
puts rest_of_them
The output will be as follows:

Figure 2.66: Output using a splat operator
There are two things to note here. The first is that the first_element variable gets the first element and it is not an array. The second is that the rest_of_them variable is an array because of the splat operator. We can also use this splat operator to force variables into an array. Consider the following example:
a = "Hi".to_a
The output will show up an error as follows:
Figure 2.67: Undefined method error
Now, we use a splat operator as shown in the following code:
a = *"Hello"
The output will be as follows:
Figure 2.68: Using a splat operator
This is how the splat operator will force elements into an array.
Return Value(s) from Methods
Methods return the output of the last statement that is executed. Look at the following example:
def welcome_to_city
city = "New York"
"Welcome to " + city
end
puts welcome_to_city
The output will be as follows:
Figure 2.69: Output for the return statement
If we want to compare this with other languages where the return statement is required, the program would look like this:
def welcome_to_city
city = "New York"
result = "Welcome to " + city
return result
end
puts welcome_to_city
The output will be as follows:
Figure 2.70: Output for the return statement
The preceding code is valid Ruby code as well. As with everything in Ruby, it is developer-friendly and minimizes the typing effort required.
An explicit return statement before the end of the function definition can also be used to return from the function. This is useful to terminate from a loop or return from a function if a condition is satisfied. Consider the following example:
def welcome_to_city city
return city if city == "Garbage"
"Welcome to " + city
end
puts welcome_to_city "Garbage"
puts welcome_to_city "New York"
The output will now be as follows:

Figure 2.71: Using the explicit return statement
The next obvious question that comes to mind is how we can return more than one value from a method. The answer to that question is that we can trick the system by returning an object, which can contain multiple values.
The most common and obvious way to do this is to return an array containing all the values that we need. The following example shows how to return an array with all the requisite values:
def return_multiple_values a, b
result_array = []
result_array << a + b
result_array << b - a
end
puts return_multiple_values 10, 20
The output will be as follows:

Figure 2.72: Returning multiple required values in an array
Let's take a look at this example and try to understand what is happening. When the last statement of the method is executed, it is returning result_array, which happens to contain two values. We can have multiple values in that array and then return that object. Instead of an array, we can use hash or even a custom object that we want to return and have values associated with it.
Naming Conventions for Methods
Methods that act as queries and return a Boolean value should be named with a trailing ?. This convention is followed within Ruby as well. For example, look at the include? method. When we are using this method, we do not have to worry about the return type as we know it's going to be of the Boolean type.
The following is an example of how we use this. Note that this is not a strict rule and the program will not fail if we do not use ? at the end of the method that returns a Boolean value. It is a convention that makes our code more readable and helps our fellow developers:
def check_presence?
["New York", "Abu Dhabi"].include? "New Delhi"
end
puts check_presence?
#false
Another convention is the bang(!) method. What this means is that if a method ends with (!), it will modify the object on which it is working. The following is an example to reflect this:
def find_unique! test_array
test_array.uniq!
end
test_array = [1, 2, 3, 1, 2, 3]
puts find_unique! test_array
#[1,2,3]
Since our method is changing the value of the test_array array, it should end with (!).
Activity 2.01: Dice Roller Program
In this activity, we will simulate a dice roller program that has three objectives:
- Roll a die
- Roll a die with any number of sides
- Roll any number of dice
This activity will test you in terms of performing operations on arrays and using the .each iterator. Here are some steps that will help you to complete this activity:
- First, create a roller.rb file.
- Use the rand method to return a random number. Ruby has a built-in rand method, which returns a random number. It takes an argument as an integer and returns a random number.
- Type rand 2 and you'll notice that the numbers you get in response are either 0 or 1, never 2. This is what 0-indexing means.
- Create a method roll to simulate the rolling of a die.
- Next, add an argument to the roll to enable the die to roll.
- Then, add another argument along with the dice to roll any number of dice.
Upon successful completion of the activity, you should obtain a random number printed on the screen for two scenarios: rolling a five-sided die and rolling two six-sided dice.
The output should be similar to the following:

Figure 2.73: Output for dice roller
Note
The solution to this activity can be found on page 460.
Summary
In this chapter, we took a journey into data types and some very common operations that can be performed on them. We started out with array operations and took a closer look at adding, removing, and iterating over this data type. Then, we moved on to the hash data type and discovered the hidden magic that powers most of the web and desktop applications written in Ruby. Hashes are a very common way to store and manipulate data inside web applications. We added, removed, and iterated over hashes, and then performed some symbol-based sorting with nested hashes. Our final destination in this chapter was the methods and functions that allow us to create either functional or procedural applications in Ruby. Functions and methods in themselves are not of much use, so we imbued them with arguments. We also took a closer look at how optional and default arguments are handled in case multiple arguments are passed. This constituted a very important chapter, namely, how the extra arguments are mapped to the predefined arguments. In the next chapter, we will be studying methods in detail and how they define the program workflows.