Chapter 16: Building Playable Levels and Collision Detection
This chapter will probably be one of the most satisfying chapters of this project. The reason for this is that, by the end of it, we will have a playable game. Although there will still be features to implement (sound, particle effects, the HUD, and shader effects), Bob and Thomas will be able to run, jump, and explore the world. Furthermore, you will be able to create your very own level designs of any size or complexity by simply making platforms and obstacles in a text file.
We will achieve all this by covering the following topics:
- Exploring how to design levels in a text file
- Building a LevelManager class that will load levels from a text file, convert them into data that our game can use, and keep track of the level details such as spawn position, current level, and allowed time limit
- Updating the game engine to use LevelManager
- Coding a polymorphic function to handle collision detection for both Bob and Thomas
Designing some levels
Remember the sprite-sheet that we introduced in Chapter 14, Abstraction and Code Management – Making Better Use of OOP? Here it is again, annotated with numbers that represent each tile that we will build all our levels from:
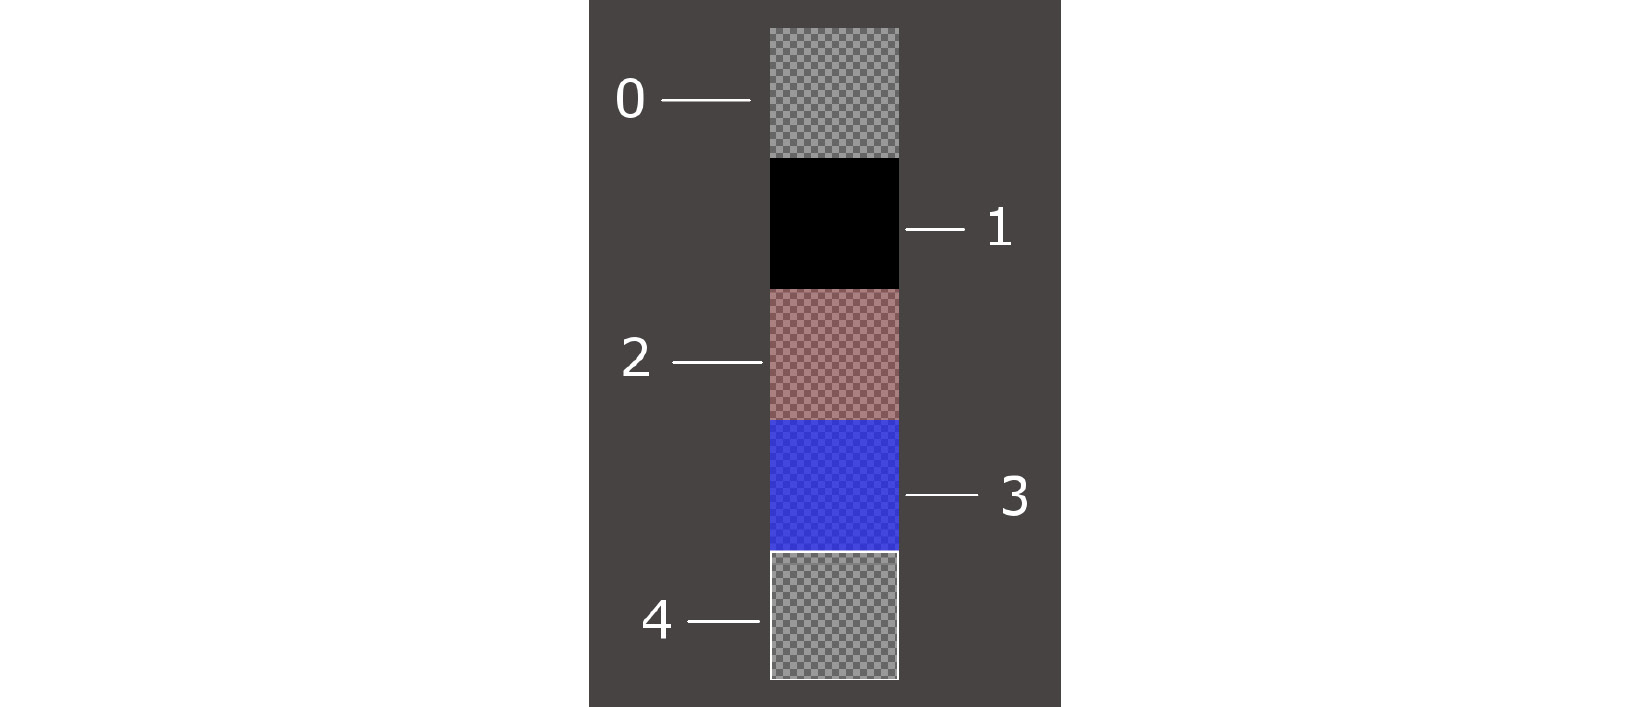
The image has been placed on a grey background so that we can see the different details of the sprite-sheet better. The chequered background represents the level of transparency. So, all the tiles except for number 1 will reveal at least a little of the background behind them. Let's go over them now:
- Tile 0 is completely transparent and will be used to fill in the gaps where there aren't any other tiles.
- Tile 1 is for the platforms that Thomas and Bob will walk on.
- Tile 2 is for fire tiles and 3 is for water tiles.
- In terms of tile 4, you might need to look quite closely to see it. It has a white square outline. This is the goal of the level and is where Thomas and Bob must get to together.
Keep this image in mind as we discuss designing the levels.
We will enter combinations of these tile numbers into text files to design the layouts. An example will help:
0000000000000000000000000000000000000000000000
0000000000000000000000000000000000000000000000
0000000000000000000000000000000000000000000000
0000000000000000000000000000000000000000000000
0000000000000000000000000000000000000000000000
0000000000000000000000000000000000000000000000
1111111111000111111222222221111133111111111411
0000000000000000001222222221000133100000001110
0000000000000000001222222221000133100000000000
0000000000000000001222222221000133100000000000
0000000000000000001111111111000111100000000000
The previous code translates into the following level layout:

Note that, to get the previous screenshot, I had to zoom out of the View and that the image has been cropped. The actual start of the level would look as follows:

These screenshots demonstrate two things. First, you can see how you can quickly construct level designs using a simple and free text editor such as Windows Notepad or Notepad ++. Just make sure you use a monospace font so that all the numbers are the same size. This makes designing the levels much easier.
Secondly, these screenshots demonstrate the gameplay aspects of the design. From left to right in the level, Thomas and Bob need to jump over a small hole or they will fall to their death (respawn). Then, they have a large expanse of fire to traverse. It is impossible for Bob to jump that many tiles. The players will need to work together to find the solution. The only way that Bob will clear the fire tiles is by standing on Thomas's head and jumping from there, as shown in the following screenshot:

It is then quite simple to get to the goal and move on to the next level.
Tip
I strongly encourage you to complete this chapter and then spend some time designing your own levels.
I have included a few level designs to get us started. They are in the levels folder that we added to the project back in Chapter 14, Abstraction and Code Management – Making Better Use of OOP.
There are some zoomed-out views of the game there, along with a screenshot of the code of the level design. The screenshot of the code is probably more useful than reproducing the textual content. If the code has to be checked, just open the files in the levels folder.
This is what the code looks like:

This is the level layout that the previous code will produce:

This level is the "leap of faith" level I referred to in Chapter 14, Abstraction and Code Management – Making Better Use of OOP:

The code for the in-game platforms has been highlighted, as they are not very clear in the zoomed-out screenshot that follows:

The provided designs are simple. The game engine will be able to handle very large designs, but we have the freedom to use our imagination and build some long and challenging levels.
Of course, these designs won't do anything until we learn how to load them and convert the text into a playable level. Additionally, it won't be possible to stand on any platforms until we have implemented the collision detection.
First, let's handle loading the level designs.
Building the LevelManager class
It will take several phases of coding to make our level designs work.
The first thing we will do is code the LevelManager header file. This will allow us to look at and discuss the member variables and functions that will be in the LevelManager class.
Next, we will code the LevelManager.cpp file, which will have all the function definitions in it. Since this is a long file, we will break it up into several sections to code and discuss them.
Once the LevelManager class is complete, we will add an instance of it to the game engine (Engine class). We will also add a new function to the Engine class, loadLevel, which we can call from the update function whenever a new level is required. The loadLevel function will not only use the LevelManager instance to load the appropriate level – it will also take care of aspects such as spawning the player characters and preparing the clock.
Now, let's get an overview of LevelManager by coding the LevelManager.h file.
Coding LevelManager.h
Right-click Header Files in the Solution Explorer and select Add | New Item.... In the Add New Item window, highlight (by left-clicking) Header File (.h) and then, in the Name field, type LevelManager.h. Finally, click the Add button. We are now ready to code the header file for the LevelManager class.
Add the following include directives and private variables and then we will discuss them:
#pragma once
#include <SFML/Graphics.hpp>
using namespace sf;
using namespace std;
class LevelManager
{
private:
Vector2i m_LevelSize;
Vector2f m_StartPosition;
float m_TimeModifier = 1;
float m_BaseTimeLimit = 0;
int m_CurrentLevel = 0;
const int NUM_LEVELS = 4;
// public declarations go here
The preceding code declares a Vector2i, m_LevelSize to hold two integer values that will hold the horizontal and vertical number of tiles that the current map contains. The Vector2f, m_StartPosition contains the coordinates in the world where Bob and Thomas should be spawned. Note that this is not a tile position relatable to m_LevelSize units but a horizontal and vertical pixel position in the level.
The m_TimeModifier member variable is a float type variable that will be used to multiply the time that's available in the current level. The reason we want to do this is so that we can change (decrease) this value so that we can shorten the time that's available each time the player attempts the same level. As an example, if the player gets 60 seconds for the first time they attempt level 1, then 60 multiplied by 1 is, of course, 60. When the player completes all the levels and comes back to level 1 for the second time, m_TimeModifier will have been reduced by 10 percent. Then, when the time available is multiplied by 0.9, the amount of time that's available to the player will be 54 seconds. This is 10 percent less. The game will get steadily harder.
The m_BaseTimeLimit float variable holds the original, unmodified time limit we have just discussed.
We can probably guess that m_CurrentLevel will hold the current level number that is being played.
The int, NUM_LEVELS constant will be used to flag when it is appropriate to go back to level 1 again and reduce the value of m_TimeModifier.
Now, add the following public variables and function declarations after the previous code we added:
public:
const int TILE_SIZE = 50;
const int VERTS_IN_QUAD = 4;
float getTimeLimit();
Vector2f getStartPosition();
int** nextLevel(VertexArray& rVaLevel);
Vector2i getLevelSize();
int getCurrentLevel();
};
In the previous code, there are two constant int members. TILE_SIZE is a useful constant to remind us that each tile in the sprite-sheet is fifty pixels wide and fifty pixels high. VERTS_IN_QUAD is a useful constant to make our manipulation of a VertexArray less error-prone. There are, in fact, four vertices in a quad. Now, we can't forget this.
The getTimeLimit, getStartPosition, getLevelSize, and getCurrentLevel functions are simple getter functions which return the current value of the private member variables we declared in the previous block of code.
The function that deserves to be talked about more is nextLevel. This function receives a VertexArray reference, just like we used in the Zombie Arena game. The function can then work on the VertexArray reference and all the changes will be present in the VertexArray reference from the calling code.
The nextLevel function returns a pointer to a pointer, which means we can return an address of the first element of a two-dimensional array of int values. We will be building a two-dimensional array of int values that will represent the layout of each level. Of course, these int values will be read from the level design text files.
Coding the LevelManager.cpp file
Right-click Source Files in the Solution Explorer and select Add | New Item.... In the Add New Item window, highlight (by left-clicking) C++ File (.cpp) and then, in the Name field, type LevelManager.cpp. Finally, click the Add button. We are now ready to code the .cpp file for the LevelManager class.
As this is quite a long class, we will break it up to discuss it in six chunks. The first five will cover the nextLevel function, while the sixth will cover the rest of the functions.
Add the following include directives and the first (of five) part of the nextLevel function:
#include <SFML/Graphics.hpp>
#include <SFML/Audio.hpp>
#include "TextureHolder.h"
#include <sstream>
#include <fstream>
#include "LevelManager.h"
using namespace sf;
using namespace std;
int** LevelManager::nextLevel(VertexArray& rVaLevel)
{
m_LevelSize.x = 0;
m_LevelSize.y = 0;
// Get the next level
m_CurrentLevel++;
if (m_CurrentLevel > NUM_LEVELS)
{
m_CurrentLevel = 1;
m_TimeModifier -= .1f;
}
// Load the appropriate level from a text file
string levelToLoad;
switch (m_CurrentLevel)
{
case 1:
levelToLoad = "levels/level1.txt";
m_StartPosition.x = 100;
m_StartPosition.y = 100;
m_BaseTimeLimit = 30.0f;
break;
case 2:
levelToLoad = "levels/level2.txt";
m_StartPosition.x = 100;
m_StartPosition.y = 3600;
m_BaseTimeLimit = 100.0f;
break;
case 3:
levelToLoad = "levels/level3.txt";
m_StartPosition.x = 1250;
m_StartPosition.y = 0;
m_BaseTimeLimit = 30.0f;
break;
case 4:
levelToLoad = "levels/level4.txt";
m_StartPosition.x = 50;
m_StartPosition.y = 200;
m_BaseTimeLimit = 50.0f;
break;
}// End switch
After the include directives, the code initializes the m_LevelSize.x and m_LevelSize.y variables to zero.
Next, m_CurrentLevel is incremented. The if statement that follows checks whether m_CurrentLevel is greater than NUM_LEVELS. If it is, then m_CurrentLevel is set back to 1 and m_TimeModifier is reduced by 0.1 in order to shorten the allowed time for all levels.
The code then switches based on the value held by m_CurrentLevel. Each case statement initializes the name of the text file that holds the level design, the starting position for Thomas and Bob, as well as m_BaseTimeLimit, which is the unmodified time limit for the level in question.
Tip
If you design your own levels, add a case statement and the appropriate values for it here. Also, edit the NUM_LEVELS constant in the LevelManager.h file.
Now, add the second part of the nextLevel function, as follows. Add this code immediately after the previous code. Study the code as we add it so we can discuss it:
ifstream inputFile(levelToLoad);
string s;
// Count the number of rows in the file
while (getline(inputFile, s))
{
++m_LevelSize.y;
}
// Store the length of the rows
m_LevelSize.x = s.length();
In the preceding (second part) code, we declare an ifstream object called inputFile which opens a stream to the file name contained in levelToLoad.
The code loops through each line of the file using getLine, but doesn't record any of its content. All it does is count the number of lines by incrementing m_LevelSize.y. After the for loop, the width of the level is saved in m_LevelSize.x using the s.length function. This implies that the length of all the lines must be the same or we would run into trouble.
At this point, we know and have saved the length and width of the current level in m_LevelSize.
Now, add the third part of the nextLevel function, as shown in the following code. Add the code immediately underneath the previous code. Study the code as we add it so we can discuss it:
// Go back to the start of the file
inputFile.clear();
inputFile.seekg(0, ios::beg);
// Prepare the 2D array to hold the int values from the file
int** arrayLevel = new int*[m_LevelSize.y];
for (int i = 0; i < m_LevelSize.y; ++i)
{
// Add a new array into each array element
arrayLevel[i] = new int[m_LevelSize.x];
}
First, we clear inputFile using its clear function. The seekg function, which is called with the 0, ios::beg parameters, moves the file cursor's position (where characters will be read from next) to the beginning of the file.
Next, we declare a pointer to a pointer called arrayLevel. Note that this is done on the free store/heap using the new keyword. Once we have initialized this two-dimensional array, we will be able to return its address to the calling code and it will persist until we either delete it or the game is closed.
The for loop loops from 0 to m_LevelSize.y -1. In each pass of the loop, it adds a new array of int values, on the heap, to match the value of m_LevelSize.x. We now have a perfectly configured (for the current level) two-dimensional array. The only problem is that there is nothing in it yet.
Now, add the fourth part of the nextLevel function, as shown in the following code. Add this code immediately after the previous code. Study the code as we add it so we can discuss it:
// Loop through the file and store all
// the values in the 2d array
string row;
int y = 0;
while (inputFile >> row)
{
for (int x = 0; x < row.length(); x++) {
const char val = row[x];
arrayLevel[y][x] = atoi(&val);
}
y++;
}
// Close the file
inputFile.close();
First, the code initializes a string called row that will hold only one row of the level design at a time. We also declare and initialize an int called y that will help us count the rows.
The while loop executes repeatedly until inputFile gets past the last row. Inside the while loop, there is a for loop which goes through each character of the current row and stores it in the two-dimensional array, arrayLevel. Notice that we access the right element of the two-dimensional array with arrayLevel[y][x]=. The atoi function converts the char val into an int. This is required because we have a two-dimensional array for int, and not for char.
Now, let's add the fifth part of the nextLevel function, as shown here. Add this code immediately after the previous code. Study the code as we add it, so we can discuss it:
// What type of primitive are we using?
rVaLevel.setPrimitiveType(Quads);
// Set the size of the vertex array
rVaLevel.resize(m_LevelSize.x *
m_LevelSize.y * VERTS_IN_QUAD);
// Start at the beginning of the vertex array
int currentVertex = 0;
for (int x = 0; x < m_LevelSize.x; x++)
{
for (int y = 0; y < m_LevelSize.y; y++)
{
// Position each vertex in the current quad
rVaLevel[currentVertex + 0].position =
Vector2f(x * TILE_SIZE,
y * TILE_SIZE);
rVaLevel[currentVertex + 1].position =
Vector2f((x * TILE_SIZE) + TILE_SIZE,
y * TILE_SIZE);
rVaLevel[currentVertex + 2].position =
Vector2f((x * TILE_SIZE) + TILE_SIZE,
(y * TILE_SIZE) + TILE_SIZE);
rVaLevel[currentVertex + 3].position =
Vector2f((x * TILE_SIZE),
(y * TILE_SIZE) + TILE_SIZE);
// Which tile from the sprite sheet should we use
int verticalOffset = arrayLevel[y][x] * TILE_SIZE;
rVaLevel[currentVertex + 0].texCoords =
Vector2f(0, 0 + verticalOffset);
rVaLevel[currentVertex + 1].texCoords =
Vector2f(TILE_SIZE, 0 + verticalOffset);
rVaLevel[currentVertex + 2].texCoords =
Vector2f(TILE_SIZE, TILE_SIZE + verticalOffset);
rVaLevel[currentVertex + 3].texCoords =
Vector2f(0, TILE_SIZE + verticalOffset);
// Position ready for the next four vertices
currentVertex = currentVertex + VERTS_IN_QUAD;
}
}
return arrayLevel;
} // End of nextLevel function
Although this is the longest section of code from the five sections (we divided nextLevel in two), it is also the most straightforward. This is because we have seen very similar code in the Zombie Arena project.
The process for the precedingcode is that the nested for loops loop from zero through to the width and height of the level. For each position in the array, four vertices are put into the VertexArray and four texture coordinates are assigned from the sprite-sheet. The positions of the vertices and texture coordinates are calculated using the currentVertex variable, TILE SIZE, and the VERTS_IN_QUAD constants. At the end of each loop of the inner for loop, currentVertex is increased by VERTS_IN_QUAD, moving nicely on to the next tile.
Important note
The important thing to remember about VertexArray is that it was passed in to nextLevel by reference. Therefore, VertexArray will be available in the calling code. We will call nextLevel from the code in the Engine class.
Once this function has been called, the Engine class will have a VertexArray to represent the level graphically and a two-dimensional array of int values as a numerical representation of all the platforms and obstacles in the level.
The rest of the LevelManager functions are all simple getter functions but do take the time to familiarize yourself with which private value is returned by which function. Add the remaining functions from the LevelManager class, as follows:
Vector2i LevelManager::getLevelSize()
{
return m_LevelSize;
}
int LevelManager::getCurrentLevel()
{
return m_CurrentLevel;
}
float LevelManager::getTimeLimit()
{
return m_BaseTimeLimit * m_TimeModifier;
}
Vector2f LevelManager::getStartPosition()
{
return m_StartPosition;
}
Now that the LevelManager class is complete, we can move on to using it. We will code another function in the Engine class to do so.
Coding the loadLevel function
To be clear, this function is part of the Engine class, although it will delegate much of its work to other functions, including those of the LevelManager class that we just built.
First, let's add the declaration for the new function, along with some other new pieces of code, to the Engine.h file. Open the Engine.h file and add the highlighted lines of code shown in the abbreviated snapshot of the Engine.h file, as follows:
#pragma once
#include <SFML/Graphics.hpp>
#include "TextureHolder.h"
#include "Thomas.h"
#include "Bob.h"
#include "LevelManager.h"
using namespace sf;
class Engine
{
private:
// The texture holder
TextureHolder th;
// Thomas and his friend, Bob
Thomas m_Thomas;
Bob m_Bob;
// A class to manage all the levels
LevelManager m_LM;
const int TILE_SIZE = 50;
const int VERTS_IN_QUAD = 4;
// The force pushing the characters down
const int GRAVITY = 300;
// A regular RenderWindow
RenderWindow m_Window;
// The main Views
View m_MainView;
View m_LeftView;
View m_RightView;
// Three views for the background
View m_BGMainView;
View m_BGLeftView;
View m_BGRightView;
View m_HudView;
// Declare a sprite and a Texture for the background
Sprite m_BackgroundSprite;
Texture m_BackgroundTexture;
// Is the game currently playing?
bool m_Playing = false;
// Is character 1 or 2 the current focus?
bool m_Character1 = true;
// Start in full screen mode
bool m_SplitScreen = false;
// How much time is left in the current level
float m_TimeRemaining = 10;
Time m_GameTimeTotal;
// Is it time for a new/first level?
bool m_NewLevelRequired = true;
// The vertex array for the level tiles
VertexArray m_VALevel;
// The 2d array with the map for the level
// A pointer to a pointer
int** m_ArrayLevel = NULL;
// Texture for the level tiles
Texture m_TextureTiles;
// Private functions for internal use only
void input();
void update(float dtAsSeconds);
void draw();
// Load a new level
void loadLevel();
public:
// The Engine constructor
Engine();
...
...
...
This is what we can see in the previous code:
- We included the LevelManager.h file.
- We added an instance of LevelManager called m_LM.
- We added a VertexArray called m_VALevel.
- We added a pointer to a pointer to int that will hold the two-dimensional array that is returned from nextLevel.
- We added a new Texture object for the sprite-sheet.
- We added the declaration for the loadLevel function that we will write now.
Right-click Source Files in the Solution Explorer and select Add | New Item.... In the Add New Item window, highlight (by left-clicking) C++ File (.cpp) and then, in the Name field, type LoadLevel.cpp. Finally, click the Add button. We are now ready to code the loadLevel function.
Add the code for the loadLevel function to the LoadLevel.cpp file. Then, we can discuss it:
#include "Engine.h"
void Engine::loadLevel()
{
m_Playing = false;
// Delete the previously allocated memory
for (int i = 0; i < m_LM.getLevelSize().y; ++i)
{
delete[] m_ArrayLevel[i];
}
delete[] m_ArrayLevel;
// Load the next 2d array with the map for the level
// And repopulate the vertex array as well
m_ArrayLevel = m_LM.nextLevel(m_VALevel);
// How long is this new time limit
m_TimeRemaining = m_LM.getTimeLimit();
// Spawn Thomas and Bob
m_Thomas.spawn(m_LM.getStartPosition(), GRAVITY);
m_Bob.spawn(m_LM.getStartPosition(), GRAVITY);
// Make sure this code isn't run again
m_NewLevelRequired = false;
}
First, we set m_Playing to false to stop parts of the update function from executing. Next, we loop through all the horizontal arrays within m_ArrayLevel and delete them. After the for loop, we delete m_ArrayLevel itself.
m_ArrayLevel = m_LM.nextLevel(m_VALevel) calls nextLevel and prepares the VertexArray m_VALevel, as well as the two-dimensional array known as m_ArrayLevel. The level is set up and ready to go.
m_TimeRemaining is initialized by calling getTimeLimit and Thomas and Bob are spawned using the spawn function, along with the value returned from getStartPosition.
Finally, m_NewLevelRequired is set to false. As we will see in a few pages time, m_NewLevelRequired being set to true causes loadLevel to be called. We only want to run this function once.
Updating the engine
Open the Engine.cpp file and add the following highlighted code to load the sprite-sheet texture at the end of the Engine constructor:
Engine::Engine()
{
// Get the screen resolution and create an SFML window and View
Vector2f resolution;
resolution.x = VideoMode::getDesktopMode().width;
resolution.y = VideoMode::getDesktopMode().height;
m_Window.create(VideoMode(resolution.x, resolution.y),
"Thomas was late",
Style::Fullscreen);
// Initialize the full screen view
m_MainView.setSize(resolution);
m_HudView.reset(
FloatRect(0, 0, resolution.x, resolution.y));
// Initialize the split-screen Views
m_LeftView.setViewport(
FloatRect(0.001f, 0.001f, 0.498f, 0.998f));
m_RightView.setViewport(
FloatRect(0.5f, 0.001f, 0.499f, 0.998f));
m_BGLeftView.setViewport(
FloatRect(0.001f, 0.001f, 0.498f, 0.998f));
m_BGRightView.setViewport(
FloatRect(0.5f, 0.001f, 0.499f, 0.998f));
// Can this graphics card use shaders?
if (!sf::Shader::isAvailable())
{
// Time to get a new PC
m_Window.close();
}
m_BackgroundTexture = TextureHolder::GetTexture(
"graphics/background.png");
// Associate the sprite with the texture
m_BackgroundSprite.setTexture(m_BackgroundTexture);
// Load the texture for the background vertex array
m_TextureTiles = TextureHolder::GetTexture(
"graphics/tiles_sheet.png");
}
All we do in the previous code is load the sprite-sheet into m_TextureTiles.
Open the Update.cpp file and make the following highlighted changes and additions:
void Engine::update(float dtAsSeconds)
{
if (m_NewLevelRequired)
{
// These calls to spawn will be moved to a new
// loadLevel function soon
// Spawn Thomas and Bob
//m_Thomas.spawn(Vector2f(0,0), GRAVITY);
//m_Bob.spawn(Vector2f(100, 0), GRAVITY);
// Make sure spawn is called only once
//m_TimeRemaining = 10;
//m_NewLevelRequired = false;
// Load a level
loadLevel();
}
Actually, we should delete, rather than comment out, the lines we are no longer using. I have just shown it in this way so that the changes are clear. All there should be in the previous if statement is the call to loadLevel.
Finally, before we can see the results of the work we've done so far in this chapter, open the Draw.cpp file and make the following highlighted additions to draw the vertex array that represents a level:
void Engine::draw()
{
// Rub out the last frame
m_Window.clear(Color::White);
if (!m_SplitScreen)
{
// Switch to background view
m_Window.setView(m_BGMainView);
// Draw the background
m_Window.draw(m_BackgroundSprite);
// Switch to m_MainView
m_Window.setView(m_MainView);
// Draw the Level
m_Window.draw(m_VALevel, &m_TextureTiles);
// Draw thomas
m_Window.draw(m_Thomas.getSprite());
// Draw bob
m_Window.draw(m_Bob.getSprite());
}
else
{
// Split-screen view is active
// First draw Thomas' side of the screen
// Switch to background view
m_Window.setView(m_BGLeftView);
// Draw the background
m_Window.draw(m_BackgroundSprite);
// Switch to m_LeftView
m_Window.setView(m_LeftView);
// Draw the Level
m_Window.draw(m_VALevel, &m_TextureTiles);
// Draw bob
m_Window.draw(m_Bob.getSprite());
// Draw thomas
m_Window.draw(m_Thomas.getSprite());
// Now draw Bob's side of the screen
// Switch to background view
m_Window.setView(m_BGRightView);
// Draw the background
m_Window.draw(m_BackgroundSprite);
// Switch to m_RightView
m_Window.setView(m_RightView);
// Draw the Level
m_Window.draw(m_VALevel, &m_TextureTiles);
// Draw thomas
m_Window.draw(m_Thomas.getSprite());
// Draw bob
m_Window.draw(m_Bob.getSprite());
}
// Draw the HUD
// Switch to m_HudView
m_Window.setView(m_HudView);
// Show everything we have just drawn
m_Window.display();
}
Note that we need to draw the VertexArray for all the screen options (full, left, and right).
Now, you can run the game. Unfortunately, however, Thomas and Bob fall straight through all our lovingly designed platforms. Due to this, we can't try and progress through the levels and beat the clock.
Collision detection
We will handle collision detection using rectangle intersection and the SFML intersects function. What will be different in this project is that we will abstract the collision detection code into its own function. Thomas and Bob, as we have already seen, have multiple rectangles (m_Head, m_Feet, m_Left, and m_Right) that we need to check for collisions.
Coding the detectCollisions function
To be clear, this function is part of the Engine class. Open the Engine.h file and add a declaration for a function called detectCollisions. This is highlighted in the following code snippet:
// Private functions for internal use only
void input();
void update(float dtAsSeconds);
void draw();
// Load a new level
void loadLevel();
bool detectCollisions(PlayableCharacter& character);
public:
// The Engine constructor
Engine();
Notice from the signature that the detectCollision function takes a polymorphic argument as a PlayerCharacter object. As we know, PlayerCharacter is abstract and can never be instantiated. We do, however, inherit from it with the Thomas and Bob classes. We will be able to pass either m_Thomas or m_Bob to detectCollisions.
Right-click Source Files in the Solution Explorer and select Add | New Item.... In the Add New Item window, highlight (by left-clicking) C++ File (.cpp) and then, in the Name field, type DetectCollisions.cpp. Finally, click the Add button. We are now ready to code the detectCollisions function.
Add the following code to DetectCollisions.cpp. Note that this is just the first part of this function:
#include "Engine.h"
bool Engine::detectCollisions(PlayableCharacter& character)
{
bool reachedGoal = false;
// Make a rect for all his parts
FloatRect detectionZone = character.getPosition();
// Make a FloatRect to test each block
FloatRect block;
block.width = TILE_SIZE;
block.height = TILE_SIZE;
// Build a zone around thomas to detect collisions
int startX = (int)(detectionZone.left / TILE_SIZE) - 1;
int startY = (int)(detectionZone.top / TILE_SIZE) - 1;
int endX = (int)(detectionZone.left / TILE_SIZE) + 2;
// Thomas is quite tall so check a few tiles vertically
int endY = (int)(detectionZone.top / TILE_SIZE) + 3;
// Make sure we don't test positions lower than zero
// Or higher than the end of the array
if (startX < 0)startX = 0;
if (startY < 0)startY = 0;
if (endX >= m_LM.getLevelSize().x)
endX = m_LM.getLevelSize().x;
if (endY >= m_LM.getLevelSize().y)
endY = m_LM.getLevelSize().y;
The first thing that we do is declare a Boolean called reachedGoal. This is the value that the detectCollisions function returns to the calling code. It is initialized to false.
Next, we declare a FloatRect object called detectionZone and initialize it with the same rectangle that represents the entire rectangle of the character sprite. Note that we will not actually do intersection tests with this rectangle. After, we declare another FloatRect called block. We initialize block as a 50 by 50 game unit rectangle. We will see block in use shortly.
Next, we will look at how we will use detectionZone. We initialize four int variables, startX, startY, endX, and endY, by expanding the area around detectionZone by a few blocks. In the four if statements that follow, we check that it is not possible to try and do collision detection on a tile that does not exist. We will achieve this by making sure we never check positions less than zero or greater than the value returned by getLevelSize().x or .y.
What all this previous code has done is create an area that is used to do collision detection. There is no point doing collision detection on a block that is hundreds or thousands of pixels away from the character. In addition, if we try and do collision detection where an array position doesn't exist (less than zero or greater than getLevelSize()...), the game will crash.
Next, add the following code, which handles the player falling out of the level:
// Has the character fallen out of the map?
FloatRect level(0, 0,
m_LM.getLevelSize().x * TILE_SIZE,
m_LM.getLevelSize().y * TILE_SIZE);
if (!character.getPosition().intersects(level))
{
// respawn the character
character.spawn(m_LM.getStartPosition(), GRAVITY);
}
For a character to stop falling, it must collide with a platform. Therefore, if the player moves out of the map (where there are no platforms), they will continuously fall. The previous code checks whether the character does not intersect with the FloatRect, level. If it does not, then it has fallen out of the level and the spawn function sends it back to the start.
Add the following, quite long. code block and then we will go through what it does:
// Loop through all the local blocks
for (int x = startX; x < endX; x++)
{
for (int y = startY; y < endY; y++)
{
// Initialize the starting position of the current block
block.left = x * TILE_SIZE;
block.top = y * TILE_SIZE;
// Has character been burnt or drowned?
// Use head as this allows him to sink a bit
if (m_ArrayLevel[y][x] == 2 || m_ArrayLevel[y][x] == 3)
{
if (character.getHead().intersects(block))
{
character.spawn(m_LM.getStartPosition(), GRAVITY);
// Which sound should be played?
if (m_ArrayLevel[y][x] == 2)// Fire, ouch!
{
// Play a sound
}
else // Water
{
// Play a sound
}
}
}
// Is character colliding with a regular block
if (m_ArrayLevel[y][x] == 1)
{
if (character.getRight().intersects(block))
{
character.stopRight(block.left);
}
else if (character.getLeft().intersects(block))
{
character.stopLeft(block.left);
}
if (character.getFeet().intersects(block))
{
character.stopFalling(block.top);
}
else if (character.getHead().intersects(block))
{
character.stopJump();
}
}
// More collision detection here once we have
// learned about particle effects
// Has the character reached the goal?
if (m_ArrayLevel[y][x] == 4)
{
// Character has reached the goal
reachedGoal = true;
}
}
}
The previous code does three things using the same techniques. It loops through all the values contained between startX, endX, and startY, endY. For each pass, it checks and does the following:
- Has the character been burned or drowned? if (m_ArrayLevel[y][x] == 2 || m_ArrayLevel[y][x] == 3) determines whether the current position being checked is a fire or a water tile. If the character's head intersects with one of these tiles, the player is respawned. We also code an empty if/else block in preparation to add sound in the next chapter.
- Has the character touched a regular tile? code if (m_ArrayLevel[y][x] == 1) determines whether the current position being checked holds a regular tile. If it intersects with any of the rectangles that represent the various body parts of the character, then the related function is called (stopRight, stopLeft, stopFalling, or stopJump). The value that is passed to each of these functions and how the function uses that value to reposition the character is quite nuanced. While it is not necessary to closely examine these values to understand the code, we might like to look at the values that are passed in and then refer to the appropriate function of the PlayableCharacter class in the previous chapter. This will help you appreciate exactly what is going on.
- Has the character touched the goal tile? This is determined with if (m_ArrayLevel[y][x] == 4). All we need to do is set reachedGoal to true. The update function of the Engine class will keep track of whether both characters (Thomas and Bob) have reached the goal simultaneously. We will write this code in the update function in just a minute.
Add the following line of code to the detectCollisions function:
// All done, return, whether or
// not a new level might be required
return reachedGoal;
}
The previous line of code returns the reachedGoal Boolean value so that the calling code can keep track and respond appropriately if both characters simultaneously reach the goal.
All we need to do now is call the detectCollision function once per character, per frame. Add the following highlighted code in the Update.cpp file within the if(m_Playing) block of code:
if (m_Playing)
{
// Update Thomas
m_Thomas.update(dtAsSeconds);
// Update Bob
m_Bob.update(dtAsSeconds);
// Detect collisions and see if characters
// have reached the goal tile
// The second part of the if condition is only executed
// when thomas is touching the home tile
if (detectCollisions(m_Thomas) && detectCollisions(m_Bob))
{
// New level required
m_NewLevelRequired = true;
// Play the reach goal sound
}
else
{
// Run bobs collision detection
detectCollisions(m_Bob);
}
// Count down the time the player has left
m_TimeRemaining -= dtAsSeconds;
// Have Thomas and Bob run out of time?
if (m_TimeRemaining <= 0)
{
m_NewLevelRequired = true;
}
}// End if playing
The previous code calls the detectCollision function and checks if both Bob and Thomas have simultaneously reached the goal. If they have, then the next level is prepared by setting m_NewLevelRequired to true.
You can run the game and walk on the platforms. You can reach the goal and start a new level. Also, for the first time, the jump button (W or Up arrow) will work.
If you reach the goal, then the next level will load. If you reach the goal of the last level, then the first level will load with a 10% reduced time limit. Of course, there is no visual feedback for the time or the current level because we haven't built a HUD yet. We will do so in the next chapter.
Many of the levels, however, require Thomas and Bob to work as a team. More specifically, Thomas and Bob need to be able to climb on each other's heads.
More collision detection
Add the following code just after you added the previous code in the Update.cpp file, within the if (m_Playing) section:
if (m_Playing)
{
// Update Thomas
m_Thomas.update(dtAsSeconds);
// Update Bob
m_Bob.update(dtAsSeconds);
// Detect collisions and see if characters
// have reached the goal tile
// The second part of the if condition is only executed
// when thomas is touching the home tile
if (detectCollisions(m_Thomas) && detectCollisions(m_Bob))
{
// New level required
m_NewLevelRequired = true;
// Play the reach goal sound
}
else
{
// Run bobs collision detection
detectCollisions(m_Bob);
}
// Let bob and thomas jump on each others heads
if (m_Bob.getFeet().intersects(m_Thomas.getHead()))
{
m_Bob.stopFalling(m_Thomas.getHead().top);
}
else if (m_Thomas.getFeet().intersects(m_Bob.getHead()))
{
m_Thomas.stopFalling(m_Bob.getHead().top);
}
// Count down the time the player has left
m_TimeRemaining -= dtAsSeconds;
// Have Thomas and Bob run out of time?
if (m_TimeRemaining <= 0)
{
m_NewLevelRequired = true;
}
}// End if playing
You can run the game again and stand on the heads of Thomas and Bob to get to the hard-to-reach places that were previously not possible to get to:

Summary
There was quite a lot of code in this chapter. We learned how to read from a file and convert strings of text into char values and then into int values. Once we had a two-dimensional array of int values, we were able to populate a VertexArray instance to show the level on the screen. We then used the same two-dimensional array of int values to implement collision detection. We used rectangle intersection, just like we did in the Zombie Arena project, although this time, for more precision, we gave each character four collision zones – one each to represent their head, feet, left, and right-hand sides.
Now that the game is totally playable, we need to represent the state of the game (score and time) on the screen. In the next chapter, we will implement the HUD, along with some much more advanced sound effects than we have used so far.