Chapter 8: Pod Placement Controls
This chapter describes the various ways of controlling Pod placement in Kubernetes, as well as explaining why it may be a good idea to implement these controls in the first place. Pod placement means controlling which node a Pod is scheduled to in Kubernetes. We start with simple controls like node selectors, and then move on to more complex tools like taints and tolerations, and finish with two beta features, node affinity and inter-Pod affinity/anti-affinity.
In past chapters, we've learned how best to run application Pods on Kubernetes – from coordinating and scaling them using deployments, injecting configuration with ConfigMaps and Secrets, to adding storage with persistent volumes.
Throughout all of this, however, we have always relied on the Kubernetes scheduler to put Pods on the optimal node without giving the scheduler much information about the Pods in question. So far, we've added resource limits and requests to our Pods (resource.requests and resource.limits in the Pod spec). Resource requests specify a minimum level of free resources on a node that the Pod needs in order to be scheduled, while resource limits specify the maximum amount of resources a Pod is allowed to use. However, we have not put any specific requirements on which nodes or set of nodes a Pod must be run.
For many applications and clusters, this is fine. However, as we'll see in the first section, there are many cases where using more granular Pod placement controls is a useful strategy.
In this chapter, we will cover the following topics:
- Identifying use cases for Pod placement
- Using node selectors
- Implementing taints and tolerations
- Controlling Pods with node affinity
- Using inter-Pod affinity and anti-affinity
Technical requirements
In order to run the commands detailed in this chapter, you will need a computer that supports the kubectl command-line tool along with a working Kubernetes cluster. See Chapter 1, Communicating with Kubernetes, for several methods for getting up and running with Kubernetes quickly, and for instructions on how to install the kubectl tool.
The code used in this chapter can be found in the book's GitHub repository at https://github.com/PacktPublishing/Cloud-Native-with-Kubernetes/tree/master/Chapter8.
Identifying use cases for Pod placement
Pod placement controls are tools that Kubernetes gives us to decide which node to schedule a Pod on, or when to completely prevent Pod scheduling due to a lack of the nodes we want. This can be used in several different patterns, but we'll review a few major ones. To start with, Kubernetes itself implements Pod placement controls completely by default – let's see how.
Kubernetes node health placement controls
Kubernetes uses a few default placement controls to specify which nodes are unhealthy in some way. These are generally defined using taints and tolerations, which we will review in detail later in this chapter.
Some default taints (which we'll discuss in the next section) that Kubernetes uses are as follows:
- memory-pressure
- disk-pressure
- unreachable
- not-ready
- out-of-disk
- network-unavailable
- unschedulable
- uninitialized (only for cloud-provider-created nodes)
These conditions can mark nodes as unable to receive new Pods, though there is some flexibility in how these taints are handled by the scheduler, as we will see later. The purpose of these system-created placement controls is to prevent unhealthy nodes from receiving workloads that may not function properly.
In addition to system-created placement controls for node health, there are several use cases where you, as a user, may want to implement fine-tuned scheduling, as we will see in the next section.
Applications requiring different node types
In a heterogeneous Kubernetes cluster, every node is not created equal. You may have some more powerful VMs (or bare metal) and some less – or have different specialized sets of nodes.
For instance, in a cluster that runs data science pipelines, you may have nodes with GPU acceleration capabilities to run deep learning algorithms, regular compute nodes to serve applications, nodes with high amounts of memory to do inference based on completed models, and more.
Using Pod placement controls, you can ensure that the various pieces of your platform run on the hardware best suited for the task at hand.
Applications requiring specific data compliance
Similar to the previous example, where application requirements may dictate the need for different types of compute, certain data compliance needs may require specific types of nodes.
For instance, cloud providers such as AWS and Azure often allow you to purchase VMs with dedicated tenancy – which means that no other applications run on the underlying hardware and hypervisor. This is different from other typical cloud-provider VMs, where multiple customers may share a single physical machine.
For certain data regulations, this level of dedicated tenancy is required to maintain compliance. To fulfill this need, you could use Pod placement controls to ensure that the relevant applications only run on nodes with dedicated tenancy, while reducing costs by running the control plane on more typical VMs without it.
Multi-tenant clusters
If you are running a cluster with multiple tenants (separated by namespaces, for instance), you could use Pod placement controls to reserve certain nodes or groups of nodes for a tenant, to physically or otherwise separate them from other tenants in the cluster. This is similar to the concept of dedicated hardware in AWS or Azure.
Multiple failure domains
Though Kubernetes already provides high availability by allowing you to schedule workloads that run on multiple nodes, it is also possible to extend this pattern. We can create our own Pod scheduling strategies that account for failure domains that stretch across multiple nodes. A great way to handle this is via the Pod or node affinity or anti-affinity features, which we will discuss later in this chapter.
For now, let's conceptualize a case where we have our cluster on bare metal with 20 nodes per physical rack. If each rack has its own dedicated power connection and backup, it can be thought of as a failure domain. When the power connections fail, all the machines on the rack fail. Thus, we may want to encourage Kubernetes to run two instances or Pods on separate racks/failure domains. The following figure shows how an application could run across failure domains:
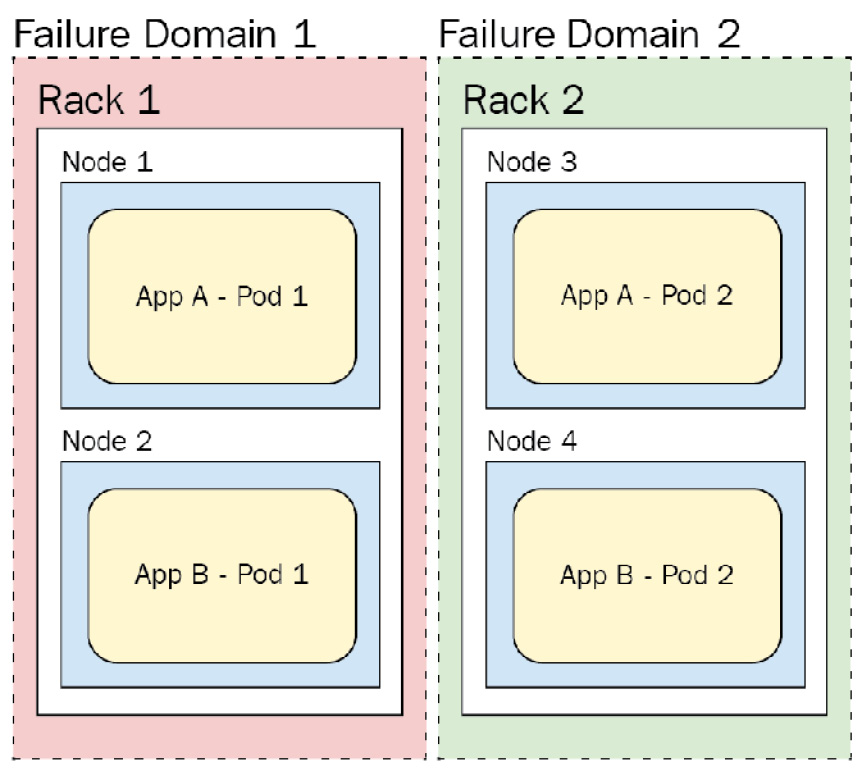
Figure 8.1 – Failure domains
As you can see in the figure, as the application pods are spread across multiple failure domains, not just multiple nodes in the same failure domain, we can maintain uptime even if Failure Domain 1 goes down. App A - Pod 1 and App B - Pod 1 are in the same (red) failure domain. However, if that failure domain (Rack 1) goes down, we will still have a replica of each application on Rack 2.
We use the word "encourage" here because it is possible to configure some of this functionality as either a hard requirement or on a best effort basis in the Kubernetes scheduler.
These examples should give you a solid understanding of some potential use cases for advanced placement controls.
Let's discuss the actual implementation now, taking each placement toolset one by one. We'll start with the simplest, node selectors.
Using node selectors and node name
Node selectors are a very simple type of placement control in Kubernetes. Each Kubernetes node can be labeled with one or more labels in the metadata block, and Pods can specify a node selector.
To label an existing node, you can use the kubectl label command:
> kubectl label nodes node1 cpu_speed=fast
In this example, we're labeling our node1 node with the label cpu_speed and the value fast.
Now, let's assume that we have an application that really needs fast CPU cycles to perform effectively. We can add a nodeSelector to our workload to ensure that it is only scheduled on nodes with our fast CPU speed label, as shown in the following code snippet:
pod-with-node-selector.yaml
apiVersion: v1
kind: Pod
metadata:
name: speedy-app
spec:
containers:
- name: speedy-app
image: speedy-app:latest
imagePullPolicy: IfNotPresent
nodeSelector:
cpu_speed: fast
When deployed, as part of a Deployment or by itself, our speedy-app Pod will only be scheduled on nodes with the cpu_speed label.
Keep in mind that unlike some other more advanced Pod placement options that we will review shortly, there is no leeway in node selectors. If there are no nodes that have the required label, the application will not be scheduled at all.
For an even simpler (but far more brittle) selector, you can use nodeName, which specifies the exact node that the Pod should be scheduled on. You can use it like this:
pod-with-node-name.yaml
apiVersion: v1
kind: Pod
metadata:
name: speedy-app
spec:
containers:
- name: speedy-app
image: speedy-app:latest
imagePullPolicy: IfNotPresent
nodeName: node1
As you can see, this selector will only allow the Pod to be scheduled on node1, so if it isn't currently accepting Pods for any reason, the Pod will not be scheduled.
For slightly more nuanced placement control, let's move on to taints and tolerations.
Implementing taints and tolerations
Taints and tolerations in Kubernetes work like reverse node selectors. Rather than nodes attracting Pods due to having the proper labels, which are then consumed by a selector, we taint nodes, which repels all Pods from being scheduled on the node, and then mark our Pods with tolerations, which allow them to be scheduled on the tainted nodes.
As mentioned at the beginning of the chapter, Kubernetes uses system-created taints to mark nodes as unhealthy and prevent new workloads from being scheduled on them. For instance, the out-of-disk taint will prevent any new pods from being scheduled to a node with that taint.
Let's take the same example use case that we had with node selectors and apply it using taints and tolerations. Since this is basically the reverse of our previous setup, let's first give our node a taint using the kubectl taint command:
> kubectl taint nodes node2 cpu_speed=slow:NoSchedule
Let's pick apart this command. We are giving node2 a taint called cpu_speed and a value, slow. We also mark this taint with an effect – in this case, NoSchedule.
Once we're done with our example (don't do this quite yet if you're following along with the commands), we can remove the taint using the minus operator:
> kubectl taint nodes node2 cpu_speed=slow:NoSchedule-
The taint effect lets us add in some granularity into how the scheduler handles the taints. There are three possible effect values:
- NoSchedule
- NoExecute
- PreferNoSchedule
The first two effects, NoSchedule and NoExecute, provide hard effects – which is to say that, like node selectors, there are only two possibilities, either the toleration exists on the Pod (as we'll see momentarily) or the Pod is not scheduled. NoExecute adds to this base functionality by evicting all Pods on the node that do have the toleration, while NoSchedule lets existing pods stay put, while preventing any new Pods without the toleration from joining.
PreferNoSchedule, on the other hand, provides the Kubernetes scheduler with some leeway. It tells the scheduler to attempt to find a node for a Pod that doesn't have an untolerated taint, but if none exist, to go ahead and schedule it anyway. It implements a soft effect.
In our case, we have chosen NoSchedule, so no new Pods will be assigned to the node – unless, of course, we provide a toleration. Let's do this now. Assume that we have a second application that doesn't care about CPU clock speeds. It is happy to live on our slower node. This is the Pod manifest:
pod-without-speed-requirement.yaml
apiVersion: v1
kind: Pod
metadata:
name: slow-app
spec:
containers:
- name: slow-app
image: slow-app:latest
Right now, our slow-app Pod will not run on any node with a taint. We need to provide a toleration for this Pod in order for it to be scheduled on a node with a taint – which we can do like this:
pod-with-toleration.yaml
apiVersion: v1
kind: Pod
metadata:
name: slow-app
spec:
containers:
- name: slow-app
image: slow-app:latest
tolerations:
- key: "cpu_speed"
operator: "Equal"
value: "slow"
effect: "NoSchedule"
Let's pick apart our tolerations entry, which is an array of values. Each value has a key – which is the same as our taint name. Then there is an operator value. This operator can be either Equal or Exists. For Equal, you can use the value key as in the preceding code to configure a value that the taint must equal in order to be tolerated by the Pod. For Exists, the taint name must be on the node, but it does not matter what the value is, as in this Pod spec:
pod-with-toleration2.yaml
apiVersion: v1
kind: Pod
metadata:
name: slow-app
spec:
containers:
- name: slow-app
image: slow-app:latest
tolerations:
- key: "cpu_speed"
operator: "Exists"
effect: "NoSchedule"
As you can see, we have used the Exists operator value to allow our Pod to tolerate any cpu_speed taint.
Finally, we have our effect, which works the same way as the effect on the taint itself. It can contain the exact same values as the taint effect – NoSchedule, NoExecute, and PreferNoSchedule.
A Pod with a NoExecute toleration will tolerate the taint associated with it indefinitely. However, you can add a field called tolerationSeconds in order to have the Pod leave the tainted node after a prescribed time has elapsed. This allows you to specify tolerations that take effect after a period of time. Let's look at an example:
pod-with-toleration3.yaml
apiVersion: v1
kind: Pod
metadata:
name: slow-app
spec:
containers:
- name: slow-app
image: slow-app:latest
tolerations:
- key: "cpu_speed"
operator: "Equal"
Value: "slow"
effect: "NoExecute"
tolerationSeconds: 60
In this case, the Pod already running on a node with the taint slow when the taint and toleration are executed will remain on the node for 60 seconds before being rescheduled to a different node.
Multiple taints and tolerations
When there are multiple taints or tolerations on a Pod and node, the scheduler will check all of them. There is no OR logic operator here – if any of the taints on the node do not have a matching toleration on the Pod, it will not be scheduled on the node (with the exception of PreferNoSchedule, in which case, as before, the scheduler will try to not schedule on the node if possible). Even if out of six taints on the node, the Pod tolerates five of them, it will still not be scheduled for a NoSchedule taint, and it will still be evicted for a NoExecute taint.
For a tool that gives us a much more subtle way of controlling placement, let's look at node affinity.
Controlling Pods with node affinity
As you can probably tell, taints and tolerations – while much more flexible than node selectors – still leave some use cases unaddressed and in general only allow a filter pattern where you can match on a specific taint using Exists or Equals. There may be more advanced use cases where you want more flexible methods of selecting nodes – and affinities are a feature of Kubernetes that addresses this.
There are two types of affinity:
- Node affinity
- Inter-Pod affinity
Node affinity is a similar concept to node selectors except that it allows for a much more robust set of selection characteristics. Let's look at some example YAML and then pick apart the various pieces:
pod-with-node-affinity.yaml
apiVersion: v1
kind: Pod
metadata:
name: affinity-test
spec:
affinity:
nodeAffinity:
requiredDuringSchedulingIgnoredDuringExecution:
nodeSelectorTerms:
- matchExpressions:
- key: cpu_speed
operator: In
values:
- fast
- medium_fast
containers:
- name: speedy-app
image: speedy-app:latest
As you can see, our Pod spec has an affinity key, and we've specified a nodeAffinity setting. There are two possible node affinity types:
- requiredDuringSchedulingIgnoredDuringExecution
- preferredDuringSchedulingIgnoredDuringExecution
The functionality of these two types maps directly to how NoSchedule and PreferNoSchedule work, respectively.
Using requiredDuringSchedulingIgnoredDuringExecution node affinities
For requiredDuringSchedulingIgnoredDuringExecution, Kubernetes will never schedule a Pod without a term matching to a node.
For preferredDuringSchedulingIgnoredDuringExecution, it will attempt to fulfill the soft requirement but if it cannot, it will still schedule the Pod.
The real capability of node affinity over node selectors and taints and tolerations comes in the actual expressions and logic that you can implement when it comes to the selector.
The functionalities of the requiredDuringSchedulingIgnoredDuringExecution and preferredDuringSchedulingIgnoredDuringExecution affinities are quite different, so we will review each separately.
For our required affinity, we have the ability to specify nodeSelectorTerms – which can be one or more blocks containing matchExpressions. For each block of matchExpressions, there can be multiple expressions.
In the code block we saw in the previous section, we have one single node selector term, a matchExpressions block – which itself has only a single expression. This expression looks for key, which, just like with node selectors, represents a node label. Next, it has an operator, which gives us some flexibility on how we want to identify a match. Here are the possible values for the operator:
- In
- NotIn
- Exists
- DoesNotExist
- Gt (Note: greater than)
- Lt (Note: less than)
In our case, we are using the In operator, which will check to see if the value is one of several that we specify. Finally, in our values section, we can list one or more values that must match, based on the operator, before the expression is true.
As you can see, this gives us significantly greater granularity in specifying our selector. Let's look at our example of cpu_speed using a different operator:
pod-with-node-affinity2.yaml
apiVersion: v1
kind: Pod
metadata:
name: affinity-test
spec:
affinity:
nodeAffinity:
requiredDuringSchedulingIgnoredDuringExecution:
nodeSelectorTerms:
- matchExpressions:
- key: cpu_speed
operator: Gt
values:
- "5"
containers:
- name: speedy-app
image: speedy-app:latest
As you can see, we are using a very granular matchExpressions selector. This ability to use more advanced operator matching now allows us to ensure that our speedy-app is only scheduled on nodes that have a high enough clock speed (in this case, 5 GHz). Instead of classifying our nodes into broad groups like slow and fast, we can be much more granular in our specifications.
Next, let's look at the other node affinity type –preferredDuringSchedulingIgnoredDuringExecution.
Using preferredDuringSchedulingIgnoredDuringExecution node affinities
The syntax for this is slightly different and gives us even more granularity to affect this soft requirement. Let's look at a Pod spec YAML that implements this:
pod-with-node-affinity3.yaml
apiVersion: v1
kind: Pod
metadata:
name: slow-app-affinity
spec:
affinity:
nodeAffinity:
preferredDuringSchedulingIgnoredDuringExecution:
- weight: 1
preference:
matchExpressions:
- key: cpu_speed
operator: Lt
values:
- "3"
containers:
- name: slow-app
image: slow-app:latest
This looks a bit different from our required syntax.
For preferredDuringSchedulingIgnoredDuringExecution, we have the ability to assign a weight to each entry, with an associated preference, which can again be a matchExpressions block with multiple inner expressions that use the same key-operator-values syntax.
The weight value is the key difference here. Since preferredDuringSchedulingIgnoredDuringExecution is a soft requirement, we can list a few different preferences with associated weights, and let the scheduler try its best to satisfy them. The way this works under the hood is that the scheduler will go through all the preferences and compute a score for the node based on the weight of each preference and whether it was satisfied. Assuming all hard requirements are satisfied, the scheduler will select the node with the highest computed score. In the preceding case, we have a single preference with a weight of 1, but weight can be anywhere from 1 to 100 – so let's look at a more complex setup for our speedy-app use case:
pod-with-node-affinity4.yaml
apiVersion: v1
kind: Pod
metadata:
name: speedy-app-prefers-affinity
spec:
affinity:
nodeAffinity:
preferredDuringSchedulingIgnoredDuringExecution:
- weight: 90
preference:
matchExpressions:
- key: cpu_speed
operator: Gt
values:
- "3"
- weight: 10
preference:
matchExpressions:
- key: memory_speed
operator: Gt
values:
- "4"
containers:
- name: speedy-app
image: speedy-app:latest
In our journey to ensure that our speedy-app runs on the best possible node, we have here decided to only implement soft requirements. If no fast nodes exist, we still want our app to be scheduled and run. To that end, we've specified two preferences – a node with a cpu_speed of over 3 (3 GHz) and a memory speed of over 4 (4 GHz).
Since our app is far more CPU-bound than memory-bound, we've decided to weight our preferences appropriately. In this case, cpu_speed carries a weight of 90, while memory_speed carries a weight of 10.
Thus, any node that satisfies our cpu_speed requirement will have a much higher computed score than one that only satisfies the memory_speed requirement – but still less than one that satisfies both. When we're trying to schedule 10 or 100 new Pods for this app, you can see how this calculation could be valuable.
Multiple node affinities
When we're dealing with multiple node affinities, there are a few key pieces of logic to keep in mind. First off, even with a single node affinity, if it is combined with a node selector on the same Pod spec (which is indeed possible), the node selector must be satisfied before any of the node affinity logic will come into play. This is because node selectors only implement hard requirements, and there is no OR logical operator between the two. An OR logical operator would check both requirements and ensure that at least one of them is true – but node selectors do not let us do this.
Secondly, for a requiredDuringSchedulingIgnoredDuringExecution node affinity, multiple entries under nodeSelectorTerms are handled in an OR logical operator. If one, but not all, is satisfied – the Pod will still be scheduled.
Finally, for any nodeSelectorTerm with multiple entries under matchExpressions, all must be satisfied – this is an AND logical operator. Let's look at an example YAML of this:
pod-with-node-affinity5.yaml
apiVersion: v1
kind: Pod
metadata:
name: affinity-test
spec:
affinity:
nodeAffinity:
requiredDuringSchedulingIgnoredDuringExecution:
nodeSelectorTerms:
- matchExpressions:
- key: cpu_speed
operator: Gt
values:
- "5"
- key: memory_speed
operator: Gt
values:
- "4"
containers:
- name: speedy-app
image: speedy-app:latest
In this case, if a node has a CPU speed of 5 but does not meet the memory speed requirement (or vice versa), the Pod will not be scheduled.
One final thing to note about node affinity is that, as you've probably already noticed, neither of the two affinity types allows the same NoExecute functionality that was available to us in our taints and tolerations settings.
One additional node affinity type – requiredDuringSchedulingRequiredDuring execution – will add this functionality in a future version. As of Kubernetes 1.19, this does not yet exist.
Next, we will look at inter-pod affinity and anti-affinity, which provides affinity definitions between Pods, rather than defining rules for nodes.
Using inter-Pod affinity and anti-affinity
Inter-Pod affinity and anti-affinity let you dictate how Pods should run based on which other Pods already exist on a node. Since the number of Pods in a cluster is typically much larger than the number of nodes, and some Pod affinity and anti-affinity rules can be somewhat complex, this feature can put quite a load on your cluster control plane if you are running many pods on many nodes. For this reason, the Kubernetes documentation does not recommend using these features with a large number of nodes in your cluster.
Pod affinities and anti-affinities work fairly differently – let's look at each by itself before discussing how they can be combined.
Pod affinities
As with node affinities, let's dive into the YAML in order to discuss the constituent parts of a Pod affinity spec:
pod-with-pod-affinity.yaml
apiVersion: v1
kind: Pod
metadata:
name: not-hungry-app-affinity
spec:
affinity:
podAffinity:
requiredDuringSchedulingIgnoredDuringExecution:
- labelSelector:
matchExpressions:
- key: hunger
operator: In
values:
- "1"
- "2"
topologyKey: rack
containers:
- name: not-hungry-app
image: not-hungry-app:latest
Just like with node affinity, Pod affinity lets us choose between two types:
- preferredDuringSchedulingIgnoredDuringExecution
- requiredDuringSchedulingIgnoredDuringExecution
Again, similar to node affinity, we can have one or more selectors – which are called labelSelector since we are selecting Pods, not nodes. The matchExpressions functionality is the same as with node affinity, but Pod affinity adds a brand-new key called topologyKey.
topologyKey is in essence a selector that limits the scope of where the scheduler should look to see whether other Pods of the same selector are running. That means that Pod affinity doesn't only need to mean other Pods of the same type (selector) on the same node; it can mean groups of multiple nodes.
Let's go back to our failure domain example at the beginning of the chapter. In that example, each rack was its own failure domain with multiple nodes per rack. To extend this concept to topologyKey, we could label each node on a rack with rack=1 or rack=2. Then we can use the topologyKey rack, as we have in our YAML, to designate that the scheduler should check all of the Pods running on nodes with the same topologyKey (which in this case means all of the Pods on Node 1 and Node 2 in the same rack) in order to apply Pod affinity or anti-affinity rules.
So, adding this all up, what our example YAML tells the scheduler is this:
- This Pod MUST be scheduled on a node with the label rack, where the value of the label rack separates nodes into groups.
- The Pod will then be scheduled in a group where there already exists a Pod running with the label hunger and a value of 1 or 2.
Essentially, we are splitting our cluster into topology domains – in this case, racks – and prescribing to the scheduler to only schedule similar pods together on nodes that share the same topology domain. This is the opposite of our first failure domain example, where we wouldn't want pods to share the same domain if possible – but there are also reasons that you may want to keep like pods on the same domain. For example, in a multitenant setting where tenants want dedicated hardware tenancy over a domain, you could ensure that every Pod that belongs to a certain tenant is scheduled to the exact same topology domain.
You can use preferredDuringSchedulingIgnoredDuringExecution in the same way. Before we get to anti-affinities, here's an example with Pod affinities and the preferred type:
pod-with-pod-affinity2.yaml
apiVersion: v1
kind: Pod
metadata:
name: not-hungry-app-affinity
spec:
affinity:
podAffinity:
preferredDuringSchedulingIgnoredDuringExecution:
- weight: 50
podAffinityTerm:
labelSelector:
matchExpressions:
- key: hunger
operator: Lt
values:
- "3"
topologyKey: rack
containers:
- name: not-hungry-app
image: not-hungry-app:latest
As before, in this code block, we have our weight – in this case, 50 – and our expression match – in this case, using a less than (Lt) operator. This affinity will induce the scheduler to try its best to schedule the Pod on a node where it is or with another node on the same rack that has a Pod running with a hunger of less than 3. The weight is used by the scheduler to compare nodes – as discussed in the section on node affinities – Controlling Pods with Node Affinity (see pod-with-node-affinity4.yaml). In this scenario specifically, the weight of 50 doesn't make any difference because there is only one entry in the affinity list.
Pod anti-affinities extend this paradigm using the same selectors and topologies – let's take a look at them in detail.
Pod anti-affinities
Pod anti-affinities allow you to prevent Pods from running on the same topology domain as pods that match a selector. They implement the opposite logic to Pod affinities. Let's dive into some YAML and explain how this works:
pod-with-pod-anti-affinity.yaml
apiVersion: v1
kind: Pod
metadata:
name: hungry-app
spec:
affinity:
podAntiAffinity:
preferredDuringSchedulingIgnoredDuringExecution:
- weight: 100
podAffinityTerm:
labelSelector:
matchExpressions:
- key: hunger
operator: In
values:
- "4"
- "5"
topologyKey: rack
containers:
- name: hungry-app
image: hungry-app
Similar to Pod affinity, we use the affinity key as the location to specify our anti-affinity under podAntiAffinity. Also, as with Pod affinity, we have the ability to use either preferredDuringSchedulingIgnoredDuringExecution or requireDuringSchedulingIgnoredDuringExecution. We even use all the same syntax for the selector as with Pod affinities.
The only actual difference in syntax is the use of podAntiAffinity under the affinity key.
So, what does this YAML do? In this case, we are recommending to the scheduler (a soft requirement) that it should attempt to schedule this Pod on a node where it or any other node with the same value for the rack label does not have any Pods running with hunger label values of 4 or 5. We're telling the scheduler try not to colocate this Pod in a domain with any extra hungry Pods.
This feature gives us a great way to separate pods by failure domain – we can specify each rack as a domain and give it an anti-affinity with a selector of its own kind. This will make the scheduler schedule clones of the Pod (or try to, in a preferred affinity) to nodes that are not in the same failure domain, giving the application greater availability in case of a domain failure.
We even have the option to combine Pod affinities and anti-affinities. Let's look at how this could work.
Combined affinity and anti-affinity
This is one of those situations where you can really put undue load on your cluster control plane. Combining Pod affinities with anti-affinities can allow incredibly nuanced rules that can be passed to the Kubernetes scheduler, which has the Herculean task of working to fulfill them.
Let's look at some YAML for a Deployment spec that combines these two concepts. Remember, affinity and anti-affinity are concepts that are applied to Pods – but we normally do not specify Pods without a controller like a Deployment or a ReplicaSet. Therefore, these rules are applied at the Pod spec level in the Deployment YAML. We are only showing the Pod spec part of this deployment for conciseness, but you can find the full file on the GitHub repository:
pod-with-both-antiaffinity-and-affinity.yaml
apiVersion: apps/v1
kind: Deployment
metadata:
name: hungry-app-deployment
# SECTION REMOVED FOR CONCISENESS
spec:
affinity:
podAntiAffinity:
preferredDuringSchedulingIgnoredDuringExecution:
- labelSelector:
matchExpressions:
- key: app
operator: In
values:
- other-hungry-app
topologyKey: "rack"
podAffinity:
requiredDuringSchedulingIgnoredDuringExecution:
- labelSelector:
matchExpressions:
- key: app
operator: In
values:
- hungry-app-cache
topologyKey: "rack"
containers:
- name: hungry-app
image: hungry-app:latest
In this code block, we are telling the scheduler to treat the Pods in our Deployment as such: the Pod must be scheduled onto a node with a rack label such that it or any other node with a rack label and the same value has a Pod with app=hungry-label-cache.
Secondly, the scheduler must attempt to schedule the Pod, if possible, to a node with the rack label such that it or any other node with the rack label and the same value does not have a Pod with the app=other-hungry-app label running.
To boil this down, we want our Pods for hungry-app to run in the same topology as the hungry-app-cache, and we do not want them to be in the same topology as the other-hungry-app if at all possible.
Since with great power comes great responsibility, and our tools for Pod affinity and anti-affinity are equal parts powerful and performance-reducing, Kubernetes ensures that some limits are set on the possible ways you can use both of them in order to prevent strange behavior or significant performance issues.
Pod affinity and anti-affinity limitations
The biggest restriction on affinity and anti-affinity is that you are not allowed to use a blank topologyKey. Without restricting what the scheduler treats as a single topology type, some very unintended behavior can happen.
The second limitation is that, by default, if you're using the hard version of anti-affinity – requiredOnSchedulingIgnoredDuringExecution, you cannot just use any label as a topologyKey.
Kubernetes will only let you use the kubernetes.io/hostname label, which essentially means that you can only have one topology per node if you're using required anti-affinity. This limitation does not exist for either the prefer anti-affinity or either of the affinities, even the required one. It is possible to change this functionality, but it requires writing a custom admission controller – which we will discuss in Chapter 12, Kubernetes Security and Compliance, and Chapter 13, Extending Kubernetes with CRDs.
So far, our work with placement controls has not discussed namespaces. However, with Pod affinities and anti-affinities, they do hold relevance.
Pod affinity and anti-affinity namespaces
Since Pod affinities and anti-affinities cause changes in behavior based on the location of other Pods, namespaces are a relevant piece to decide which Pods count for or against an affinity or anti-affinity.
By default, the scheduler will only look to the namespace in which the Pod with the affinity or anti-affinity was created. For all our previous examples, we haven't specified a namespace so the default namespace will be used.
If you want to add one or more namespaces in which Pods will affect the affinity or anti-affinity, you can do so using the following YAML:
pod-with-anti-affinity-namespace.yaml
apiVersion: v1
kind: Pod
metadata:
name: hungry-app
spec:
affinity:
podAntiAffinity:
preferredDuringSchedulingIgnoredDuringExecution:
- weight: 100
podAffinityTerm:
labelSelector:
matchExpressions:
- key: hunger
operator: In
values:
- "4"
- "5"
topologyKey: rack
namespaces: ["frontend", "backend", "logging"]
containers:
- name: hungry-app
image: hungry-app
In this code block, the scheduler will look to the frontend, backend, and logging namespaces when trying to match the anti-affinity (as you can see on the namespaces key in the podAffinityTerm block). This allows us to constrain which namespaces the scheduler operates on when validating its rules.
Summary
In this chapter, we learned about a few different controls that Kubernetes provides in order to enforce certain Pod placement rules via the scheduler. We learned that there are both "hard" requirements and "soft" rules, the latter of which are given the scheduler's best effort but do not necessarily prevent Pods that break the rules from being placed. We also learned a few reasons why you may want to implement scheduling controls – such as real-life failure domains and multitenancy.
We learned that there are simple ways to influence Pod placement, such as node selectors and node names – in addition to more advanced methods like taints and tolerations, which Kubernetes itself also uses by default. Finally, we discovered that there are some advanced tools that Kubernetes provides for node and Pod affinities and anti-affinities, which allow us to create complex rulesets for the scheduler to follow.
In the next chapter, we will discuss observability on Kubernetes. We'll learn how to view application logs and we'll also use some great tools to get a view of what is happening in our cluster in real time.
Questions
- What is the difference between node selectors and the Node name field?
- How does Kubernetes use system-provided taints and tolerations? For what reasons?
- Why should you be careful when using multiple types of Pod affinities or anti-affinities?
- How could you balance availability across multiple failure zones with colocation for performance reasons for a three-tier web application? Give an example using node or Pod affinities and anti-affinities.
Further reading
- For a more in-depth explanation of the default system taints and tolerations, head to https://kubernetes.io/docs/concepts/scheduling-eviction/taint-and-toleration/#taint-based-evictions.