Chapter 4: Scaling and Deploying Your Application
In this chapter, we will learn about the higher-level Kubernetes resources that are used to run applications and control Pods. First, we'll cover the drawbacks of the Pod, before moving on to the simplest Pod controller, ReplicaSets. From there we will move on to Deployments, the most popular method for deploying applications to Kubernetes. Then we'll cover special resources to help you deploy specific types of applications – Horizontal Pod Autoscalers, DaemonSets, StatefulSets, and Jobs. Finally, we'll put it all together with a full example of how to run a complex application on Kubernetes.
In this chapter, we will cover the following topics:
- Understanding Pod drawbacks and their solutions
- Using ReplicaSets
- Controlling Deployments
- Harnessing the Horizontal Pod Autoscaler
- Implementing DaemonSets
- Reviewing StatefulSets and Jobs
- Putting it all together
Technical requirements
In order to run the commands detailed in this chapter, you will need a computer that supports the kubectl command-line tool along with a working Kubernetes cluster. See Chapter 1, Communicating with Kubernetes, for several methods to get up and running with Kubernetes quickly, and for instructions on how to install the kubectl tool.
The code used in this chapter can be found in the book's GitHub repository at https://github.com/PacktPublishing/Cloud-Native-with-Kubernetes/tree/master/Chapter4.
Understanding Pod drawbacks and their solutions
As we reviewed in the previous chapter, Chapter 3, Running Application Containers on Kubernetes, a Pod in Kubernetes is an instance of one or more application containers that run on a node. Creating just one Pod is enough to run an application the same way you would in any other container.
That being said, using a single Pod to run an application ignores many of the benefits of running containers in the first place. Containers allow us to treat each instance of our application as a stateless item that can be scaled up or down to meet demand by spinning up new instances of the application.
This has the benefits of both allowing us to scale our application easily and making our application more available by providing multiple instances of our application at a given time. If one of our instances crashes, the application will still continue to function, and will automatically scale to pre-crash levels. The way we do this on Kubernetes is by using a Pod controller resource.
Pod controllers
Kubernetes provides several choices for Pod controllers out of the box. The simplest option is to use a ReplicaSet, which maintains a given number of Pod instances for a particular Pod. If one instance fails, the ReplicaSet will spin up a new instance to replace it.
Secondly, there are Deployments, which themselves control a ReplicaSet. Deployments are the most popular controller when it comes to running an application on Kubernetes, and they make it easy to upgrade applications using a rolling update across a ReplicaSet.
Horizontal Pod Autoscalers take Deployments to the next level by allowing applications to autoscale to different numbers of instances based on performance metrics.
Finally, there are a few specialty controllers that may be valuable in certain situations:
- DaemonSets, which run an instance of the application on each node and maintain them
- StatefulSets, where the Pod identity is kept static to assist in running stateful workloads
- Jobs, which start, run to completion, and then shut down on a specified number of Pods
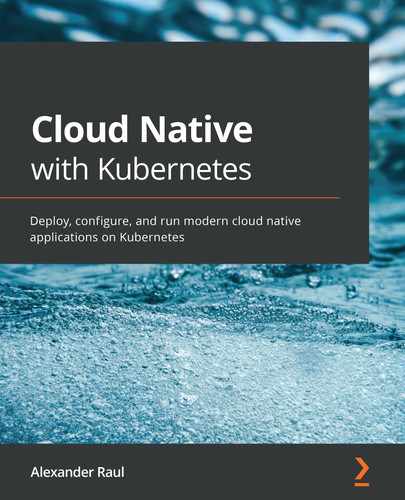
The actual behavior of a controller, be it a default Kubernetes controller like a ReplicaSet or a custom controller (for instance, the PostgreSQL Operator), should be easy to predict. A simplified view of the standard control loop looks something like the following diagram:
Figure 4.1 – A basic control loop for a Kubernetes controller
As you can see, the controller constantly checks the Intended cluster state (we want seven Pods of this app) against the Current cluster state (we have five Pods of this app running). When the intended state does not match the current state, the controller will take action via the API to correct the current state to match the intended state.
By now, you should understand why controllers are necessary on Kubernetes: the Pod itself is not a powerful enough primitive when it comes to delivering highly available applications. Let's move on to the simplest such controller: the ReplicaSet.
Using ReplicaSets
ReplicaSets are the simplest Kubernetes Pod controller resource. They replace the older ReplicationController resource.
The major difference between a ReplicaSet and a ReplicationController is that a ReplicationController uses a more basic type of selector – the filter that determines which Pods should be controlled.
While ReplicationControllers use simple equity-based (key=value) selectors, ReplicaSets use a selector with multiple possible formats, such as matchLabels and matchExpressions, which will be reviewed in this chapter.
Important note
There shouldn't be any reason to use a ReplicationController over a ReplicaSet – just stick with ReplicaSets unless you have a really good reason not to.
ReplicaSets allow us to inform Kubernetes to maintain a certain number of Pods for a particular Pod spec. The YAML for a ReplicaSet is very similar to that for a Pod. In fact, the entire Pod spec is nested in the ReplicaSet YAML, under the template key.
There are also a few other key differences, which can be observed in the following code block:
replica-set.yaml
apiVersion: apps/v1
kind: ReplicaSet
metadata:
name: myapp-group
labels:
app: myapp
spec:
replicas: 3
selector:
matchLabels:
app: myapp
template:
metadata:
labels:
app: myapp
spec:
containers:
- name: myapp-container
image: busybox
As you can see, in addition to the template section, which is essentially a Pod definition, we have a selector key and a replicas key in our ReplicaSet spec. Let's start with replicas.
Replicas
The replicas key specifies a replica count, which our ReplicaSet will ensure is always running at a given time. If a Pod dies or stops working, our ReplicaSet will create a new Pod to take its place. This makes the ReplicaSet a self-healing resource.
How does a ReplicaSet controller decide when a Pod stops working? It looks at the Pod's status. If the Pod's current status isn't "Running" or "ContainerCreating", the ReplicaSet will attempt to start a new Pod.
As we discussed in Chapter 3, Running Application Containers on Kubernetes, the Pod's status after container creation is driven by the liveness, readiness, and startup probes, which can be configured specifically for a Pod. This means that you can set up application-specific ways to know whether a Pod is broken in some way, and your ReplicaSet can jump in and start a new one in its place.
Selector
The selector key is important because of the way a ReplicaSet works – it is a controller that is implemented with the selector at its core. The ReplicaSet's job is to ensure that the number of running Pods that match its selector is correct.
Let's say, for instance, that you have an existing Pod running your application, MyApp. This Pod is labeled with a selector key as App=MyApp.
Now let's say you want to create a ReplicaSet with the same app, which will add an additional three instances of your application. You create a ReplicaSet with the same selector, and specify three replicas, with the intent of running four instances in total, since you already have one running.
What will happen once you start the ReplicaSet? You'll find that the total number of Pods running that application will be three, not four. This is because a ReplicaSet has the ability to adopt orphaned Pods and bring them under its reign.
When the ReplicaSet starts up, it sees that there is already an existing Pod matching its selector key. Depending on the number of replicas required, a ReplicaSet will shut down existing Pods or start new Pods that match the selector in order to create the correct number.
Template
The template section contains the Pod and supports all the same fields as Pod YAMLs do, including the metadata section and the spec itself. Most other controllers follow this pattern – they allow you to define the Pod spec within the larger overall controller YAML.
You should now understand the various parts of the ReplicaSet spec and what they do. Let's move on to actually running applications using our ReplicaSet.
Testing a ReplicaSet
Now, let's deploy our ReplicaSet.
Copy the replica-set.yaml file listed previously and run it on your cluster using the following command in the same folder as your YAML file:
kubectl apply -f replica-set.yaml
To check that the ReplicaSet has been created properly, run kubectl get pods to fetch the Pods in the default namespace.
Since we haven't specified a namespace for our ReplicaSet, it will be created by default. The kubectl get pods command should give you the following:
NAME READY STATUS RESTARTS AGE
myapp-group-192941298-k705b 1/1 Running 0 1m
myapp-group-192941298-o9sh8 1/1 Running 0 1m
myapp-group-192941298-n8gh2 1/1 Running 0 1m
Now, try deleting one of the ReplicaSet Pods by using the following command:
kubectl delete pod myapp-group-192941298-k705b
A ReplicaSet will always try to keep the specified number of replicas online.
Let's use our kubectl get command to see our running pods again:
NAME READY STATUS RESTARTS AGE
myapp-group-192941298-u42s0 1/1 ContainerCreating 0 1m
myapp-group-192941298-o9sh8 1/1 Running 0 2m
myapp-group-192941298-n8gh2 1/1 Running 0 2m
As you can see, our ReplicaSet controller is starting a new pod to keep our number of replicas at three.
Finally, let's delete our ReplicaSet using the following command:
kubectl delete replicaset myapp-group
With our cluster a bit cleaner, let's move on to a more complex controller – Deployments.
Controlling Deployments
Though ReplicaSets contain much of the functionality you would want to run a high availability application, most of the time you will want to use Deployments to run applications on Kubernetes.
Deployments have a few advantages over ReplicaSets, and they actually work by owning and controlling a ReplicaSet.
The main advantage of a Deployment is that it allows you to specify a rollout procedure – that is, how an application upgrade is deployed to the various pods in the Deployment. This lets you easily configure controls to stop bad upgrades in their tracks.
Before we review how to do this, let's look at the entire spec for a Deployment:
deployment.yaml
apiVersion: apps/v1
kind: Deployment
metadata:
name: myapp-deployment
labels:
app: myapp
spec:
replicas: 3
strategy:
type: RollingUpdate
rollingUpdate:
maxSurge: 25%
maxUnavailable: 25%
selector:
matchLabels:
app: myapp
template:
metadata:
labels:
app: myapp
spec:
containers:
- name: myapp-container
image: busybox
As you can see, this is very similar to the spec for a ReplicaSet. The difference we see here is a new key in the spec: strategy.
Using the strategy setting, we can tell our Deployment which way to upgrade our application, either via a RollingUpdate, or Recreate.
Recreate is a very basic deployment method: all Pods in the Deployment will be deleted at the same time, and new Pods will be created with the new version. Recreate doesn't give us much control against a bad Deployment – if the new Pods don't start for some reason, we're stuck with a completely non-functioning application.
With RollingUpdate on the other hand, Deployments are slower but far more controlled. Firstly, the new application will be rolled out bit by bit, Pod by Pod. We can specify values for maxSurge and maxUnavailable to tune the strategy.
A rolling update works like this – when the Deployment spec is updated with a new version of the Pod container, the Deployment will take down one Pod at a time, create a new Pod with the new application version, wait for the new Pod to register Ready as determined by the readiness check, and then move on to the next Pod.
The maxSurge and maxUnavailable parameters allow you to speed up or slow down this process. maxUnavailable allows you to tune the maximum number of unavailable Pods during the rollout process. This can be either a percentage or a fixed number. maxSurge allows you to tune the maximum number of Pods over the Deployment replica number that can be created at any given time. Like with maxUnavailable, this can be a percentage or a fixed number.
The following diagram shows the RollingUpdate procedure:

Figure 4.2 – RollingUpdate process for a Deployment
As you can see, the RollingUpdate procedure follows several key steps. The Deployment attempts to update Pods, one by one. Only after a Pod is successfully updated does the update proceed to the next Pod.
Controlling Deployments with imperative commands
As we've discussed, we can change our Deployment by simply updating its YAML using declarative methods. However, Kubernetes also gives us some special commands in kubectl for controlling several aspects of Deployments.
First off, Kubernetes lets us manually scale a Deployment – that is, we can edit the amount of replicas that should be running.
To scale our myapp-deployment up to five replicas, we can run the following:
kubectl scale deployment myapp-deployment --replicas=5
Similarly, we can roll back our myapp-deployment to an older version if required. To demonstrate this, first let's manually edit our Deployment to use a new version of our container:
Kubectl set image deployment myapp-deployment myapp-container=busybox:1.2 –record=true
This command tells Kubernetes to change the version of our container in our Deployment to 1.2. Then, our Deployment will go through the steps in the preceding figure to roll out our change.
Now, let's say that we want to go back to our previous version before we updated the container image version. We can easily do this using the rollout undo command:
Kubectl rollout undo deployment myapp-deployment
In our previous case, we only had two versions, the initial one and our version with the updated container, but if we had others, we could specify them in the undo command like this:
Kubectl rollout undo deployment myapp-deployment –to-revision=10
This should give you a glimpse into why Deployments are so valuable – they give us fine-tuned control over rollout for new versions of our application. Next, we'll discuss a smart scaler for Kubernetes that works in concert with Deployments and ReplicaSets.
Harnessing the Horizontal Pod Autoscaler
As we've seen, Deployments and ReplicaSets allow you to specify a total number of replicas that should be available at a certain time. However, neither of these structures allow automatic scaling – they must be scaled manually.
Horizontal Pod Autoscalers (HPA) provide this functionality by existing as a higher-level controller that can change the replica count of a Deployment or ReplicaSet based on metrics such as CPU and memory usage.
By default, an HPA can autoscale based on CPU utilization, but by using custom metrics this functionality can be extended.
The YAML file for an HPA looks like this:
hpa.yaml
apiVersion: autoscaling/v1
kind: HorizontalPodAutoscaler
metadata:
name: myapp-hpa
spec:
maxReplicas: 5
minReplicas: 2
scaleTargetRef:
apiVersion: apps/v1
kind: Deployment
name: myapp-deployment
targetCPUUtilizationPercentage: 70
In the preceding spec, we have the scaleTargetRef, which specifies what should be autoscaled by the HPA, and the tuning parameters.
The definition of scaleTargetRef can be a Deployment, ReplicaSet, or ReplicationController. In this case, we've defined the HPA to scale our previously created Deployment, myapp-deployment.
For tuning parameters, we're using the default CPU utilization-based scaling, so we can use targetCPUUtilizationPercentage to define the intended CPU utilization of each Pod running our application. If the average CPU usage of our Pods increases past 70%, our HPA will scale the Deployment spec up, and if it drops below for long enough, it will scale the Deployment down.
A typical scaling event looks like this:
- The average CPU usage of a Deployment exceeds 70% on three replicas.
- The HPA control loop notices this increase in CPU utilization.
- The HPA edits the Deployment spec with a new replica count. This count is calculated based on CPU utilization, with the intent of a steady state per-node CPU usage under 70%.
- The Deployment controller spins up a new replica.
- This process repeats itself to scale the Deployment up or down.
In summary, the HPA keeps track of CPU and memory utilization and initiates a scaling event when boundaries are exceeded. Next, we will review DaemonSets, which provide a very specific type of Pod controller.
Implementing DaemonSets
From now until the end of the chapter, we will be reviewing more niche options when it comes to running applications with specific requirements.
We'll start with DaemonSets, which are similar to ReplicaSets except that the number of replicas is fixed at one replica per node. This means that each node in the cluster will keep one replica of the application active at any time.
Important note
It's important to keep in mind that this functionality will only create one replica per node in the absence of additional Pod placement controls, such as Taints or Node Selectors, which we will cover in greater detail in Chapter 8, Pod Placement Controls.
This ends up looking like the following diagram for a typical DaemonSet:
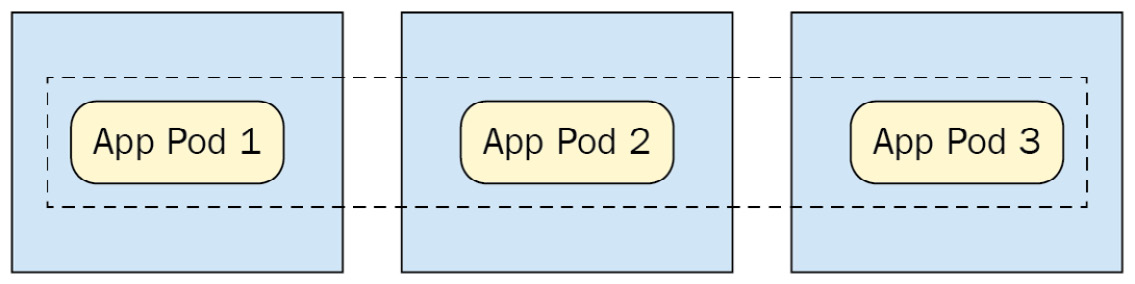
Figure 4.3 – DaemonSet spread across three nodes
As you can see in the preceding figure, each node (represented by a box) contains one Pod of the application, as controlled by the DaemonSet.
This makes DaemonSets great for running applications that collect metrics at the node level or provide networking processes on a per-node basis. A DaemonSet spec looks like this:
daemonset-1.yaml
apiVersion: apps/v1
kind: DaemonSet
metadata:
name: log-collector
spec:
selector:
matchLabels:
name: log-collector
template:
metadata:
labels:
name: log-collector
spec:
containers:
- name: fluentd
image: fluentd
As you can see, this is very similar to your typical ReplicaSet spec, except that we do not specify the number of replicas. This is because a DaemonSet will try to run a Pod on each node in your cluster.
If you want to specify a subset of nodes to run your application, you can do this using a node selector as shown in the following file:
daemonset-2.yaml
apiVersion: apps/v1
kind: DaemonSet
metadata:
name: log-collector
spec:
selector:
matchLabels:
name: log-collector
template:
metadata:
labels:
name: log-collector
spec:
nodeSelector:
type: bigger-node
containers:
- name: fluentd
image: fluentd
This YAML will restrict our DaemonSet to nodes that match the type=bigger-node selector in their labels. We will learn much more about Node Selectors in Chapter 8, Pod Placement Controls. For now, let's discuss a type of controller well suited to running stateful applications such as databases – the StatefulSet.
Understanding StatefulSets
StatefulSets are very similar to ReplicaSets and Deployments, but with one key difference that makes them better for stateful workloads. StatefulSets maintain the order and identity of each Pod, even if the Pods are rescheduled onto new nodes.
For instance, in a StatefulSet of 3 replicas, there will always be Pod 1, Pod 2, and Pod 3, and those Pods will maintain their identity in Kubernetes and storage (which we'll get to in Chapter 7, Storage on Kubernetes), regardless of any rescheduling that happens.
Let's take a look at a simple StatefulSet configuration:
statefulset.yaml
apiVersion: apps/v1
kind: StatefulSet
metadata:
name: stateful
spec:
selector:
matchLabels:
app: stateful-app
replicas: 5
template:
metadata:
labels:
app: stateful-app
spec:
containers:
- name: app
image: busybox
This YAML will create a StatefulSet with five replicas of our app.
Let's see how the StatefulSet maintains Pod identity differently than a typical Deployment or ReplicaSet. Let's fetch all Pods using the command:
kubectl get pods
The output should look like the following:
NAME READY STATUS RESTARTS AGE
stateful-app-0 1/1 Running 0 55s
stateful-app-1 1/1 Running 0 48s
stateful-app-2 1/1 Running 0 26s
stateful-app-3 1/1 Running 0 18s
stateful-app-4 0/1 Pending 0 3s
As you can see, in this example, we have our five StatefulSet Pods, each with a numeric indicator of their identity. This property is extremely useful for stateful applications such as a database cluster. In the case of running a database cluster on Kubernetes, the identity of the master versus replica Pods is important, and we can use StatefulSet identities to easily manage that.
Another point of interest is that you can see the final Pod is still starting up, and that the Pod ages increase as numeric identity increases. This is because StatefulSet Pods are created one at a time, in order.
StatefulSets are valuable in concert with persistent Kubernetes storage in order to run stateful applications. We'll learn more about this in Chapter 7, Storage On Kubernetes, but for now, let's discuss another controller with a very specific use: Jobs.
Using Jobs
The purpose of the Job resource in Kubernetes is to run tasks that can complete, which makes them not ideal for long-running applications, but great for batch jobs or similar tasks that can benefit from parallelism.
Here's what a Job spec YAML looks like:
job-1.yaml
apiVersion: batch/v1
kind: Job
metadata:
name: runner
spec:
template:
spec:
containers:
- name: run-job
image: node:lts-jessie
command: ["node", "job.js"]
restartPolicy: Never
backoffLimit: 4
This Job will start a single Pod, and run a command, node job.js, until it completes, at which point the Pod will shut down. In this and the future examples, we assume that the container image used has a file, job.js, that runs the job logic. The node:lts-jessie container image will not have this by default. This is an example of a Job that runs without parallelism. As you are likely aware from Docker usage, multiple command arguments must be passed as an array of strings.
In order to create a Job that can run with parallelism (that is to say, multiple replicas running the Job at the same time), you need to develop your application code in a way that it can tell that the Job is completed before ending the process. In order to do this, each instance of the Job needs to contain code that ensures it does the right part of the greater batch task and prevents duplicate work from occurring.
There are several application patterns that can enable this, including a mutex lock and a Work Queue. In addition, the code needs to check the status of the entire batch task, which could again be handled by updating a value in a database. Once the Job code sees that the greater task is complete, it should exit.
Once you've done that, you can add parallelism to your job code using the parallelism key. The following code block shows this:
job-2.yaml
apiVersion: batch/v1
kind: Job
metadata:
name: runner
spec:
parallelism: 3
template:
spec:
containers:
- name: run-job
image: node:lts-jessie
command: ["node", "job.js"]
restartPolicy: Never
backoffLimit: 4
As you can see, we add the parallelism key with three replicas. Further, you can swap pure job parallelism for a specified number of completions, in which case Kubernetes can keep track of how many times the Job has been completed. You can still set parallelism for this case, but if you don't set it, it will default to 1.
This next spec will run a Job 4 times to completion, with 2 iterations running at any given time:
job-3.yaml
apiVersion: batch/v1
kind: Job
metadata:
name: runner
spec:
parallelism: 2
completions: 4
template:
spec:
containers:
- name: run-job
image: node:lts-jessie
command: ["node", "job.js"]
restartPolicy: Never
backoffLimit: 4
Jobs on Kubernetes provide a great way to abstract one-time processes, and many third-party applications link them into workflows. As you can see, they are very easy to use.
Next, let's look at a very similar resource, the CronJob.
CronJobs
CronJobs are a Kubernetes resource for scheduled job execution. This works very similarly to CronJob implementations you may find in your favorite programming language or application framework, with one key difference. Kubernetes CronJobs trigger Kubernetes Jobs, which provide an additional layer of abstraction that can be used, for instance, to trigger batch Jobs at night, every night.
CronJobs in Kubernetes are configured using a very typical cron notation. Let's take a look at the full spec:
cronjob-1.yaml
apiVersion: batch/v1beta1
kind: CronJob
metadata:
name: hello
spec:
schedule: "0 1 * * *"
jobTemplate:
spec:
template:
spec:
containers:
- name: run-job
image: node:lts-jessie
command: ["node", "job.js"]
restartPolicy: OnFailure
This CronJob will, at 1 a.m. every day, create a Job that is identical to our previous Job spec. For a quick review of cron time notation, which will explain the syntax of our 1 a.m. job, read on. For a comprehensive review of cron notation, check http://man7.org/linux/man-pages/man5/crontab.5.html.
Cron notation consists of five values, separated by spaces. Each value can be a numeric integer, character, or combination. Each of the five values represents a time value with the following format, from left to right:
- Minute
- Hour
- Day of the month (such as 25)
- Month
- Day of the week (where, for example, 3 = Wednesday)
The previous YAML assumes a non-parallel CronJob. If we wanted to increase the batch capacity of our CronJob, we could add parallelism as we did with our previous Job specs. The following code block shows this:
cronjob-2.yaml
apiVersion: batch/v1beta1
kind: CronJob
metadata:
name: hello
spec:
schedule: "0 1 * * *"
jobTemplate:
spec:
parallelism: 3
template:
spec:
containers:
- name: run-job
image: node:lts-jessie
command: ["node", "job.js"]
restartPolicy: OnFailure
Note that for this to work, the code in your CronJob container needs to gracefully handle parallelism, which could be implemented using a work queue or other such pattern.
We've now reviewed all the basic controllers that Kubernetes provides by default. Let's use our knowledge to run a more complex application example on Kubernetes in the next section.
Putting it all together
We now have a toolset for running applications on Kubernetes. Let's look at a real-world example to see how this could all be combined to run an application with multiple tiers and functionality spread across Kubernetes resources:

Figure 4.4 – Multi-tier application diagram
As you can see, our diagrammed application contains a web tier running a .NET Framework application, a mid-tier or service tier running Java, a database tier running Postgres, and finally a logging/monitoring tier.
Our controller choices for each of these tiers are dependent on the applications we plan to run on each tier. For both the web tier and the mid-tier, we're running stateless applications and services, so we can effectively use Deployments to handle rolling out updates, blue/green deploys, and more.
For the database tier, we need our database cluster to know which Pod is a replica and which is a master – so we use a StatefulSet. And finally, our log collector needs to run on every node, so we use a DaemonSet to run it.
Now, let's go through example YAML specs for each of our tiers.
Let's start with our JavaScript-based web app. By hosting this application on Kubernetes, we can do canary tests and blue/green Deployments. As a note, some of the examples in this section use container image names that aren't publicly available in DockerHub. To use this pattern, adapt the examples to your own application containers, or just use busybox if you want to run it without actual application logic.
The YAML file for the web tier could look like this:
example-deployment-web.yaml
apiVersion: apps/v1
kind: Deployment
metadata:
name: webtier-deployment
labels:
tier: web
spec:
replicas: 10
strategy:
type: RollingUpdate
rollingUpdate:
maxSurge: 50%
maxUnavailable: 25%
selector:
matchLabels:
tier: web
template:
metadata:
labels:
tier: web
spec:
containers:
- name: reactapp-container
image: myreactapp
In the preceding YAML, we're labeling our applications using the tier label and using that as our matchLabels selector.
Next up is the mid-tier service layer. Let's take a look at the relevant YAML:
example-deployment-mid.yaml
apiVersion: apps/v1
kind: Deployment
metadata:
name: midtier-deployment
labels:
tier: mid
spec:
replicas: 8
strategy:
type: RollingUpdate
rollingUpdate:
maxSurge: 25%
maxUnavailable: 25%
selector:
matchLabels:
tier: mid
template:
metadata:
labels:
tier: mid
spec:
containers:
- name: myjavaapp-container
image: myjavaapp
As you can see in the preceding code, our mid-tier application is pretty similar to the web tier setup, and we're using another Deployment.
Now comes the interesting part – let's look at the spec for our Postgres StatefulSet. We have truncated this code block somewhat in order to fit on the page, but you should be able to see the most important parts:
example-statefulset.yaml
apiVersion: apps/v1
kind: StatefulSet
metadata:
name: postgres-db
labels:
tier: db
spec:
serviceName: "postgres"
replicas: 2
selector:
matchLabels:
tier: db
template:
metadata:
labels:
tier: db
spec:
containers:
- name: postgres
image: postgres:latest
envFrom:
- configMapRef:
name: postgres-conf
volumeMounts:
- name: pgdata
mountPath: /var/lib/postgresql/data
subPath: postgres
In the preceding YAML file, we can see some new concepts that we haven't reviewed yet – ConfigMaps and volumes. We'll get a much closer look at how these work in Chapters 6, Kubernetes Application Configuration, and Chapter 7, Storage on Kubernetes, respectively, but for now let's focus on the rest of the spec. We have our postgres container as well as a port set up on the default Postgres port of 5432.
Finally, let's take a look at our DaemonSet for our logging app. Here's a portion of the YAML file, which we've again truncated for length:
example-daemonset.yaml
apiVersion: apps/v1
kind: DaemonSet
metadata:
name: fluentd
namespace: kube-system
labels:
tier: logging
spec:
updateStrategy:
type: RollingUpdate
template:
metadata:
labels:
tier: logging
spec:
tolerations:
- key: node-role.kubernetes.io/master
effect: NoSchedule
containers:
- name: fluentd
image: fluent/fluentd-kubernetes-daemonset:v1-debian-papertrail
env:
- name: FLUENT_PAPERTRAIL_HOST
value: "mycompany.papertrailapp.com"
- name: FLUENT_PAPERTRAIL_PORT
value: "61231"
- name: FLUENT_HOSTNAME
value: "DEV_CLUSTER"
In this DaemonSet, we're setting up FluentD (a popular open source log collector) to forward logs to Papertrail, a cloud-based log collector and search tool. Again, in this YAML file, we have some things we haven't reviewed before. For instance, the tolerations section for node-role.kubernetes.io/master will actually allow our DaemonSet to place Pods on master nodes, not just worker nodes. We'll review how this works in Chapter 8, Pod Placement Controls.
We're also specifying environment variables directly in the Pod spec, which is fine for relatively basic configurations, but could be improved by using Secrets or ConfigMaps (which we'll review in Chapter 6, Kubernetes Application Configuration) to keep it out of our YAML code.
Summary
In this chapter, we reviewed some methods of running applications on Kubernetes. To start, we reviewed why Pods themselves are not enough to guarantee application availability and introduced controllers. We then reviewed some simple controllers, including ReplicaSets and Deployments, before moving on to controllers with more specific uses such as HPAs, Jobs, CronJobs, StatefulSets, and DaemonSets. Finally, we took all our learning and used it to implement a complex application running on Kubernetes.
In the next chapter, we'll learn how to expose our applications (which are now running properly with high availability) to the world using Services and Ingress.
Questions
- What is the difference between a ReplicaSet and a ReplicationController?
- What's the advantage of a Deployment over a ReplicaSet?
- What is a good use case for a Job?
- Why are StatefulSets better for stateful workloads?
- How might we support a canary release flow using Deployments?
Further reading
- The official Kubernetes documentation: https://kubernetes.io/docs/home/
- Documentation on the Kubernetes Job resource: https://kubernetes.io/docs/concepts/workloads/controllers/job/
- Docs for FluentD DaemonSet installation: https://github.com/fluent/fluentd-kubernetes-daemonset
- Kubernetes The Hard Way: https://github.com/kelseyhightower/kubernetes-the-hard-way