Chapter 4: Integrating Threat Intelligence
This chapter will explore the options available for adding Threat Intelligence (TI) feeds into Azure Sentinelt to enable the security team to have a greater understanding of the potential threats against their environment. We will explore the available TI feeds from Microsoft and other trusted industry sources, then learn how to choose the most appropriate feeds for your organization based on geography, industry, and other risk factors.
This chapter will also introduce several new topics you may not be familiar with, but we encourage you to further research to add to your SOC capabilities, including the collaborative efforts of STIX and TAXII, a TI framework and set of standards that will help organizations to contribute and benefit from the knowledge of others.
By the end of this chapter, you will know how to implement several TI feeds.
This chapter will cover the following topics:
- Introduction to TI
- Understanding STIX and TAXII
- Choosing the right intel feeds for your needs
- Implementing TI connectors
Introduction to TI
Due to the complex nature of cybersecurity and the sophistication of modern attacks, it is difficult for any organization to keep track of the vulnerabilities and multiple ways that an attacker may compromise a system, especially if cybersecurity is not the focus of the organization. Understanding what to look for and deciding what to do when you see a system anomaly or an other potential threat is complex and time-consuming. This is where TI comes in useful.
TI is critical in fighting against adversaries and is now integrated with most security products; it provides the ability to set a list of indicators for detection and blocking malicious activities. You can subscribe to TI feeds to gain knowledge from other security professionals in the industry and create your own indicators that are specific to the environment you are operating.
If you are new to this topic, there are some new keywords and abbreviations to learn:
- Threat Indicators: This is a list of suspicious or known malicious entities, such as IP addresses, URLs, and files. They are used to alert when usage is discovered in your environment.
- Indicators of Compromise (IoC): This indicates uniquely known behaviors and activities that show signs of potential malicious intent or an actual breach. These are available as open source and some paid-for services.
- Alert definitions: By combining multiple TIs and IoCs, you can build an alert definition that only trigger in the right context. This will reduce alert fatigue from overloading the SOC with too many false-positives.
- Malware Information Sharing Project (MISP): This is an open source Threat Intelligence Platform (TIP) and a set of open standards for threat information sharing. MISP covers malware indicators, fraud, and vulnerability information. Read more here: https://www.misp-project.org/.
- Adversarial Tactics, Techniques and Common Knowledge (ATT&CK): This is a knowledge base providing a list of the known adversary tactics and techniques, collated from real-world observations. Microsoft has integrated this framework into the Azure Sentinel platform. Read more here: https://attack.mitre.org/.
- Structured Threat Information eXpression (STIX): STIX is a standardized XML-based language, developed for the purpose of conveying cybersecurity threat data in a standard format.
- Trusted Automated eXchange of Indicator Information (TAXII): TAXII is an application layer protocol for the communication of cybersecurity threat intelligence over HTTP.
- MineMeld threat intelligence sharing: MineMeld is an open source TI processing tool that extracts indicators from various sources and compiles them into compatible formats for ingestion into Azure Sentinel.
- ThreatConnect: This is a third-party solution that has built an integration with Microsoft Graph Security threat indicators. This is one example of a TIP that can provide a comprehensive offering, for an additional cost.
Note
ATT&CK™, TAXII™, and STIX™ are trademarks of The MITRE Corporation. MineMeld™ is a trademark of Palo Alto Networks.
Microsoft provides access to its own TI feeds via the tiIndicators API, and has built connectors for integration with feeds from Palo Alto Networks (MineMeld), ThreatConnect, MISP, and TAXII. You can also build your own integration to submit custom threat indicators to Azure Sentinel and Microsoft Defender ATP. For further details, review this information: https://github.com/microsoftgraph/security-api-solutions/tree/master/QuickStarts.
Once your TI sources are connected, you can create rules to generate alerts and incidents when events match threat indicators or use built-in analytics, enriched with TI. You can also correlate TI with event data via hunting queries to add contextual insights to investigations.
In the next section, we will look at the specifics of one of these recommended approaches: STIX and TAXII, which is important to understand and consider implementing within your SOC as part of designing Azure Sentinel.
Understanding STIX and TAXII
The MITRE Corporation is a not-for-profit company that provides guidance in the form of frameworks and standards to assist with the development of stronger cybersecurity controls; the STIX language and TAXII protocol are some examples of this development effort.
These two standards were developed by an open community effort, sponsored by the U.S. Department of Homeland Security (DHS), in partnership with the MITRE Corporation. These are not software products, but the standards that products can use to enable automation and compatibility when sharing TI information with your security community and business partners.
As per the description provided by MITRE: STIX is a collaborative community-driven effort to define and develop a standardized language to represent structured cyber threat information. The STIX language was developed to ensure threat information can be shared, stored, and used in a consistent manner to facilitate automation and human-assisted analysis. You can read more about the STIX standard here: https://stixproject.github.io/.
The TAXII protocol was developed to provide support for TI feeds from Open Source Intelligence (OSINT) and TIP supporting this standard protocol and STIX data format. You can read more details about the TAXII protocol here: https://www.mitre.org/sites/default/files/publications/taxii.pdf.
Microsoft has developed a connector to enable integration with services using the TAXII protocol, enabling the ingestion of STIX 2.0 Threat Indicators for use in Azure Sentinel.
Public previews
Due to the nature of agile development and an ever-green cloud environment, Microsoft makes new features available first through private previews to a select few reviewers, and then releases the feature to public preview to allow wider audience participation for feedback. Your organization needs to determine whether it is acceptable to use preview features in your production tenants or restrict access to only a development/testing environment. At the time of writing, the TAXII data connector is in public preview with an expected release date of April 2020. You can check the list of available Data Connectors in your Azure Sentinel tenant to see whether it is currently available.
In the next chapter, we will review the options for intel feeds and choose which ones are right for your organization's needs.
Choosing the right intel feeds for your needs
With Azure Sentinel, you can import TIs from multiple sources to enhance the security analysts’ ability to detect and prioritize known threats and IOCs. When configured, several optional features become available within the following Azure Sentinel tools:
- Analytics: It includes a set of scheduled rule templates you can enable to generate alerts and incidents based on matches of log events.
- Workbooks: It provides summarized information about the TI imported into Azure Sentinel and any alerts generated from analytics rules that match your threat indicators.
- Hunting: Hunting queries allow security investigators to use threat indicators within the context of common hunting scenarios.
- Notebooks: Notebooks can use threat indicators to assist with the investigation of anomalies and to hunt for malicious behaviors.
There are several options available to gain access to TI feeds and you may choose to generate your own indicators based on specific information gathered through internal IT investigations; this allows you to develop a unique list of indicators that are known to be specific to your organization. Depending on your industry and region, you may choose to share these with partner organizations and communities to gain specific information related to healthcare, government, energy, and so on.
You can choose to leverage direct integration with the Microsoft Graph Security tiIndicators API, which contains Microsoft’s own TI, gathered across their vast internet services landscape (such as Azure, Office 365, Xbox, and Outlook). This feature also allows you to upload your own threat indicators and to send to other Microsoft security tools for the actions of allowing, blocking, or alerting on activities, based on the signals received from the intel.
It is recommended that you also obtain TI feeds from open source platforms, such as the following:
- MISP Open Source TIP
- MineMeld by Palo Alto Networks
- Any that are based on the MITRE STIX/TAXII standards
Optionally, you can also choose to purchase additional TI feeds from solution providers. Azure Sentinel currently offers the capability to integrate with the ThreatConnect Platform, which is a TIP you can purchase separately. Other platforms are expected to be integrated in the near future; review the data connector for TIPs for any updates.
Implementing TI connectors
Azure Sentinel provides a data connector specifically for the integration with TIP solutions (both commercial and open source). This section will provide walk-through guidance for the steps required to ingest TI data into Azure Sentinel, using MineMeld as an example:
- Enabling the data connector for TIPs
- Registering app permission in Azure AD
- Configuring the TI feed (MineMeld)
- Confirming that the TI feed data is visible
Note
At the time of writing, this feature is still in public preview. You can enable this solution in your Azure Sentinel workspace to gain access to these features; however, you should expect it to change as it is developed.
Let’s discuss each of these steps in detail in the following sections.
Enabling the data connector
Use the following steps to enable the data connector for TIPs within the Azure Sentinel:
- Navigate to the Azure Sentinel portal and go to the Data connectors page, as shown in the following screenshot:
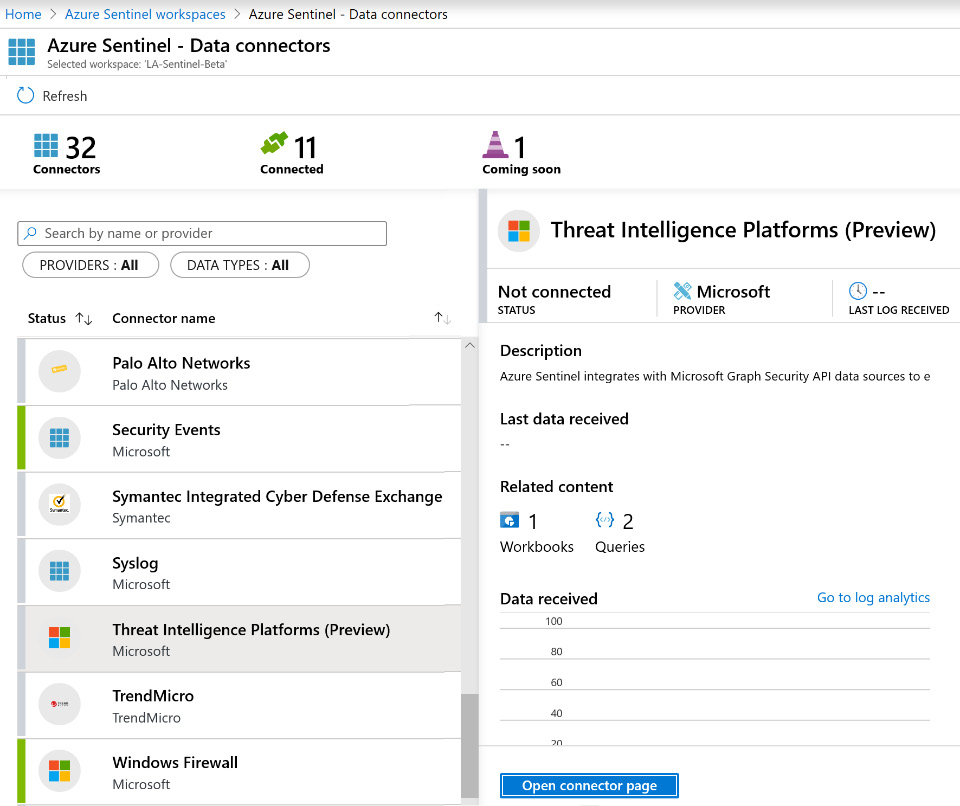
Figure 4.1 – Data connector for Threat Intelligence Platforms (Preview)
- Select the data connector for Threat Intelligence Platforms (Preview).
- Click on the Open connector page button.
- At the top of the page, you will see the Prerequisites for the data connector. Review these to ensure you have properly configured the workspace and tenant permissions, as shown in the following screenshot:
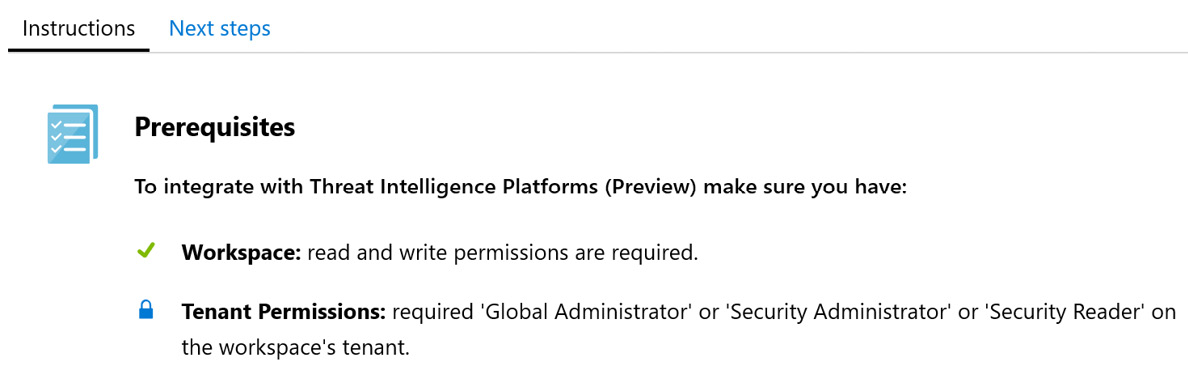
Figure 4.2 – Data connector prerequisites
- Next, you will see the configuration steps required to ensure the data connector will function correctly (which is what we did in the previous step). Click on the Connect button at the bottom of the page.
You should now have a working connector waiting for the TI feed data to flow in. Next, we will configure the app registration in Azure AD, which is necessary to then set up the MineMeld server.
Registering an app in Azure AD
In this section, we will create an app registration in Azure AD. This will be used by the TI server/service to run and send information to Azure Sentinel.
Note
You will need to repeat this process for each TI server/service you intend to integrate with Azure Sentinel.
Use the following steps to create an app registration in Azure AD:
- In the Azure portal, navigate to Azure AD and select App registrations, as shown in the following screenshot:
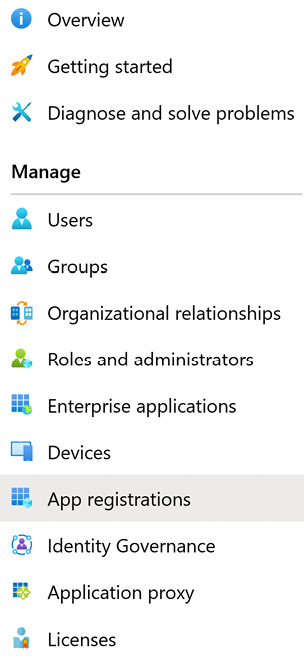
Figure 4.3 – Azure AD app registrations
- In the toolbar, select + New registration, as shown in the following screenshot:

Figure 4.4 – Create a new app registration
- On the next screen, provide a unique name for the specific TI connector. In this example, we are creating one for the MineMeld server, so we’ll name it as shown in the following screenshot. Choose the default option for Who can use this application or access this API?, then select Register, as shown in the following screenshot:
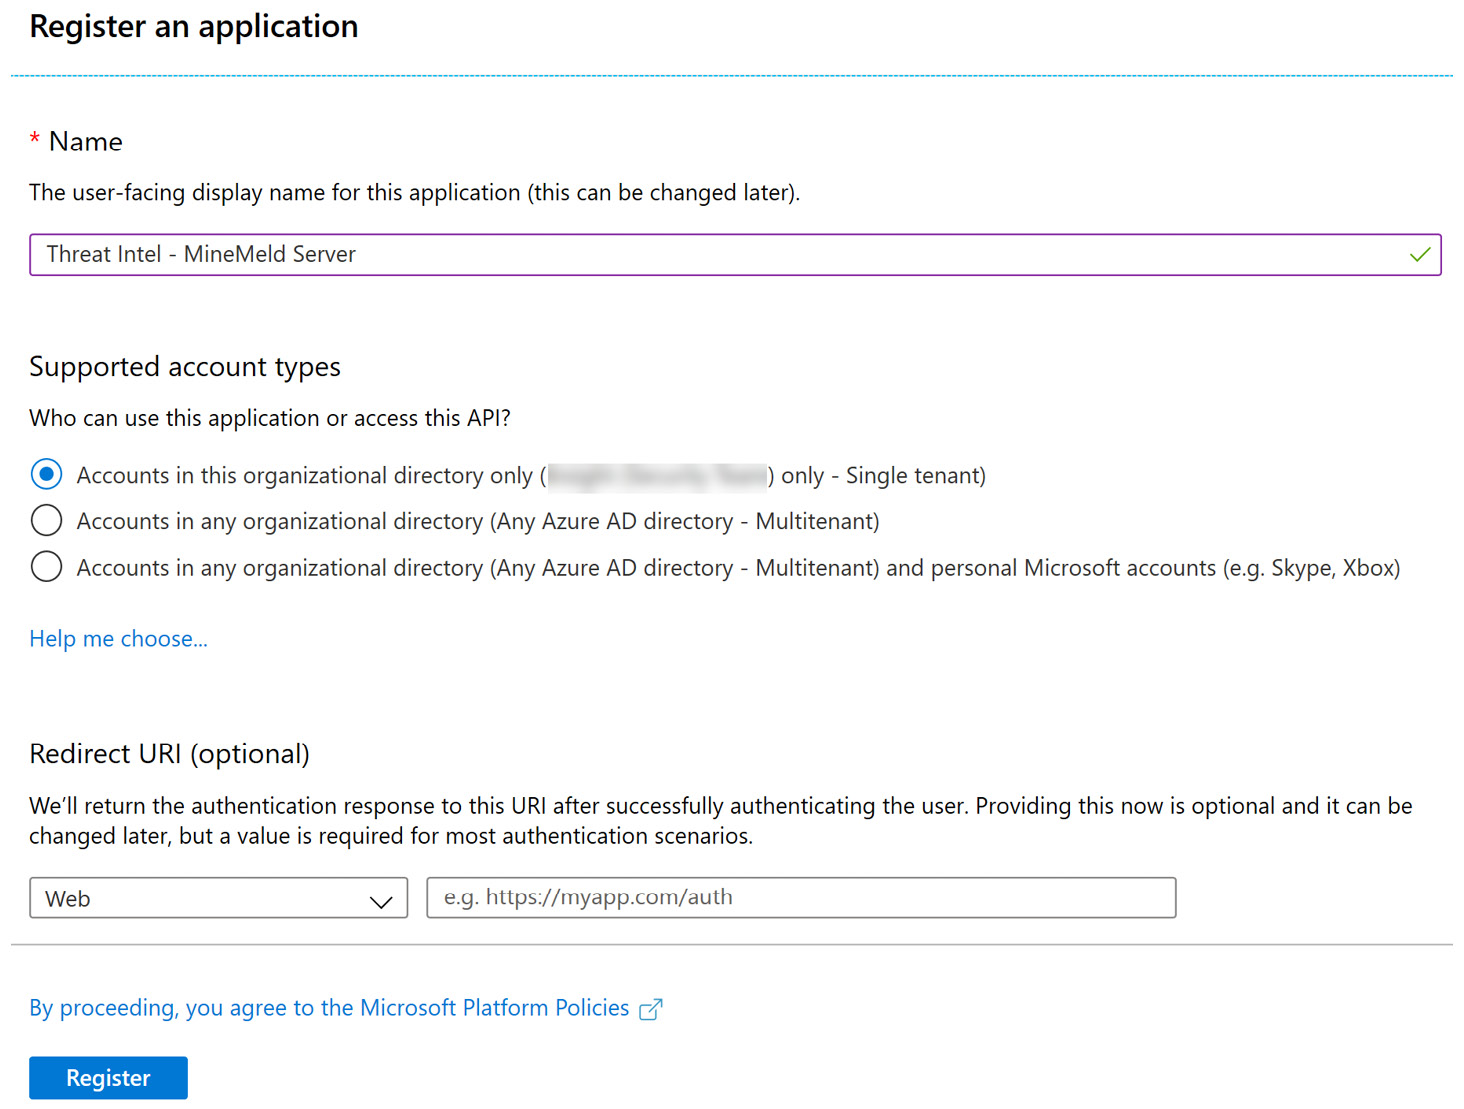
Figure 4.5 – Creating a new app registration
- When registration is complete, you will be presented with the Overview page, as shown in the following screenshot:
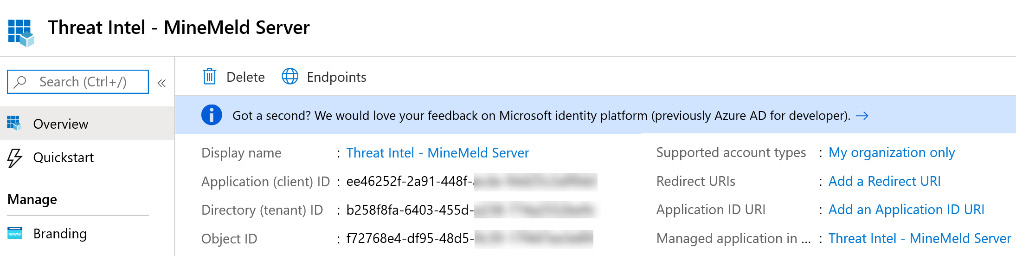
Figure 4.6 – New app registration details
- You will need to refer to these ID values when you configure your integrated TIP product or an app that uses direct integration with the Microsoft Graph Security API.
- Next, we will configure API permissions for the registered application. To do this, go to the menu on the left and select API Permissions, as shown in the following screenshot:
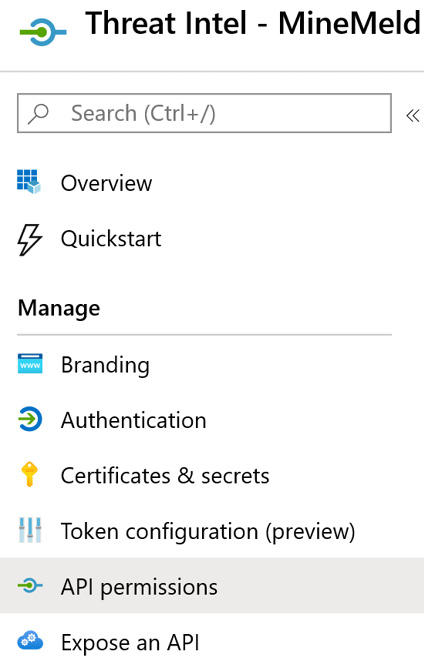
Figure 4.7 – API permissions menu option
- When first created, there will be a default permission of User.Read. Select + Add a permission.
- On the next screen, select the Microsoft Graph API, as shown in the following screenshot:
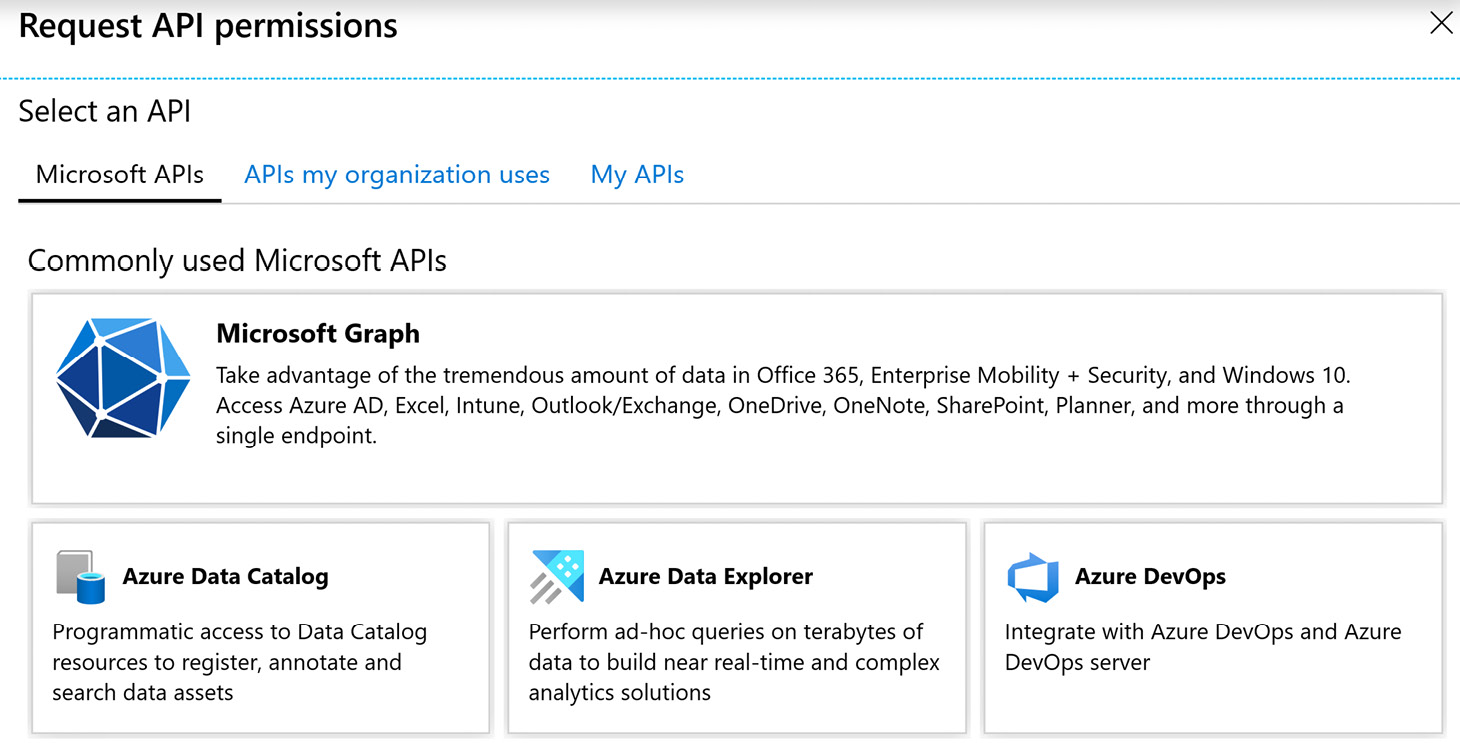
Figure 4.8 – Selecting an API
- Then, select Application permissions, as shown in the following screenshot:

Figure 4.9 – Application permissions
- In the search bar, enter ThreatIndicators, then select the ThreatIndicators.ReadWrite.OwnedBy option, as shown in the following screenshot:
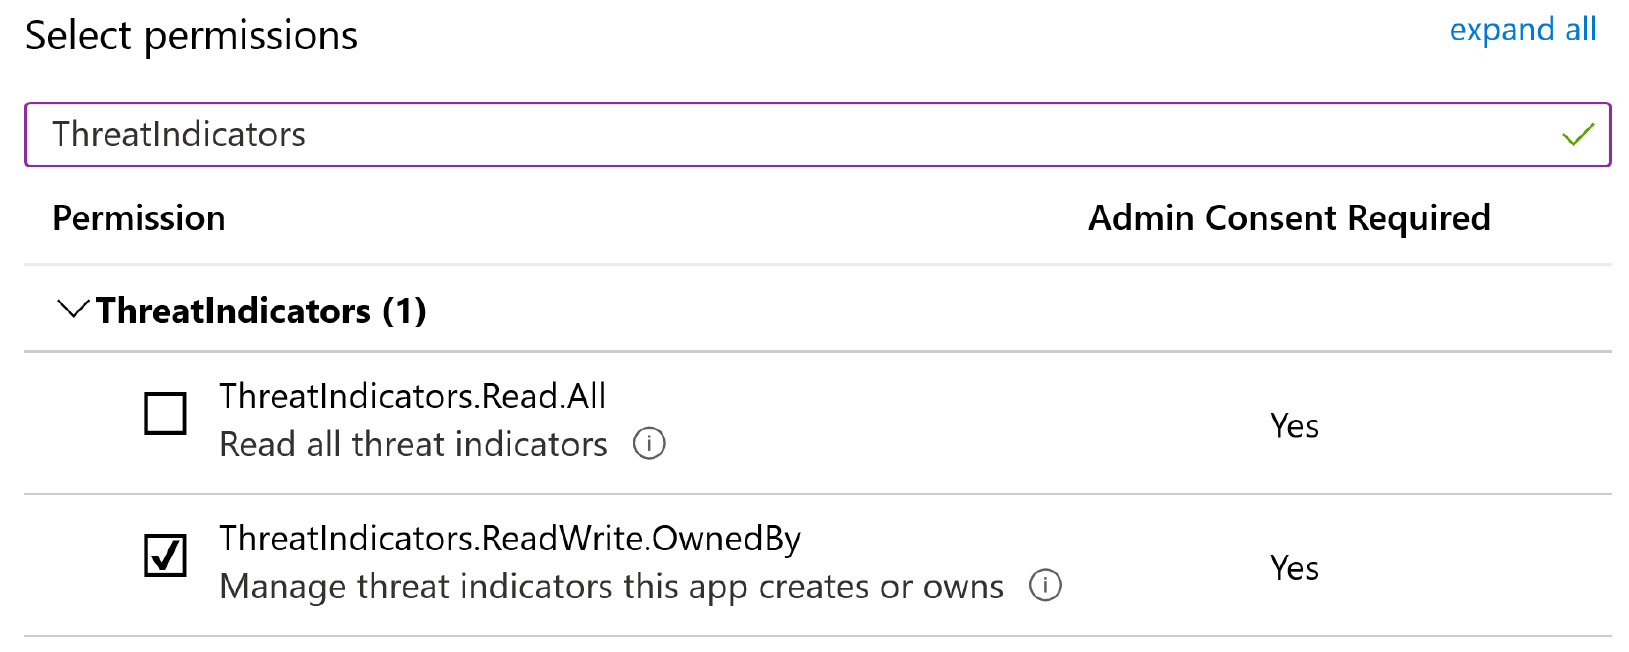
Figure 4.10 – Searching for permissions
- Click on Add permissions. On the next screen, select the Grant admin consent for <tenant name> button.
Note
You can also get to this screen from the Azure portal: navigate to Azure Active Directory | App registrations | <app name> | View API Permissions | Grant admin consent for <tenant name>.
- You will be prompted with a screen requesting permissions consent, on which you will need to click the Accept button.
- You will now be able to confirm the permissions are successfully granted by viewing the permissions and looking for the green checkmark, similar to the following screenshot:

Figure 4.11 – Confirming permissions have been granted
Now the app is registered in Azure AD, we can start to configure the MineMeld server, which involves setting up a new virtual machine (VM) to collect and forward the TI feeds.
Configuring the MineMeld threat intelligence feed
With the previous steps complete, you are ready to configure the services that will send TI data to Azure Sentinel. This section will walk you through the configuration of the MineMeld threat intelligence sharing solution.
Note
If this service is not already running in your environment, you will need to configure the TIP product; this guidance is only for the Azure Sentinel connectors.
There are three steps to this process:
- Building the VM and installing MineMeld
- Installing the Microsoft Graph Security API extension in MineMeld
- Configuring the extension to connect to the Microsoft Graph via the Security API
To carry out this procedure, you will need administrative access to the Azure Tenant and the MineMeld service.
Building the VM and installing MineMeld
Ideally you will already have the MineMeld VM configured and running in your environment; however, if you do not, you can find configuration instructions online via the official Palo Alto Networks website: https://live.paloaltonetworks.com/t5/MineMeld-Articles/Manually-Install-MineMeld-on-Ubuntu-16-04/ta-p/253336.
Note
Ensure you use Ubuntu version 16.04 only; other versions may not be compatible.
Installing the Microsoft Graph Security API extension in MineMeld
The following are the steps to install the API extension:
- Log in to the MineMeld web portal and go to SYSTEM then EXTENTIONS.
- Click on the Git icon, and enter the following address: https://github.com/PaloAltoNetworks/minemeld-msgraph-secapi.git.
- Click RETRIEVE then choose master from the drop-down list and click INSTALL, as shown in the following screenshot:
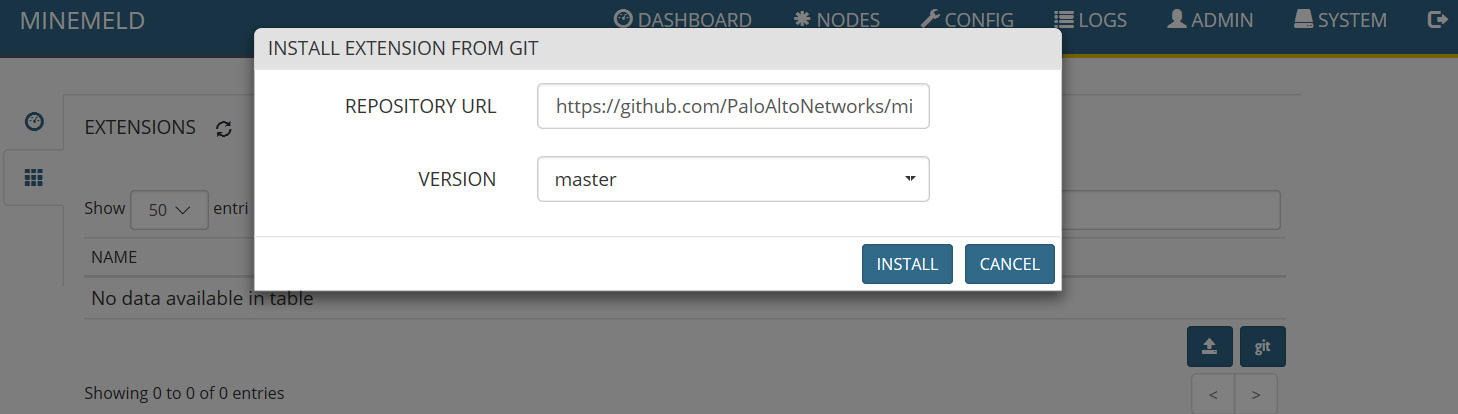
Figure 4.12 – Install the extension from Git
- Confirm the installation has completed, then select the Activate button beside the cross. To confirm activation, the API extension should show a white background instead of the gray-hashed background, as shown in the following screenshot:
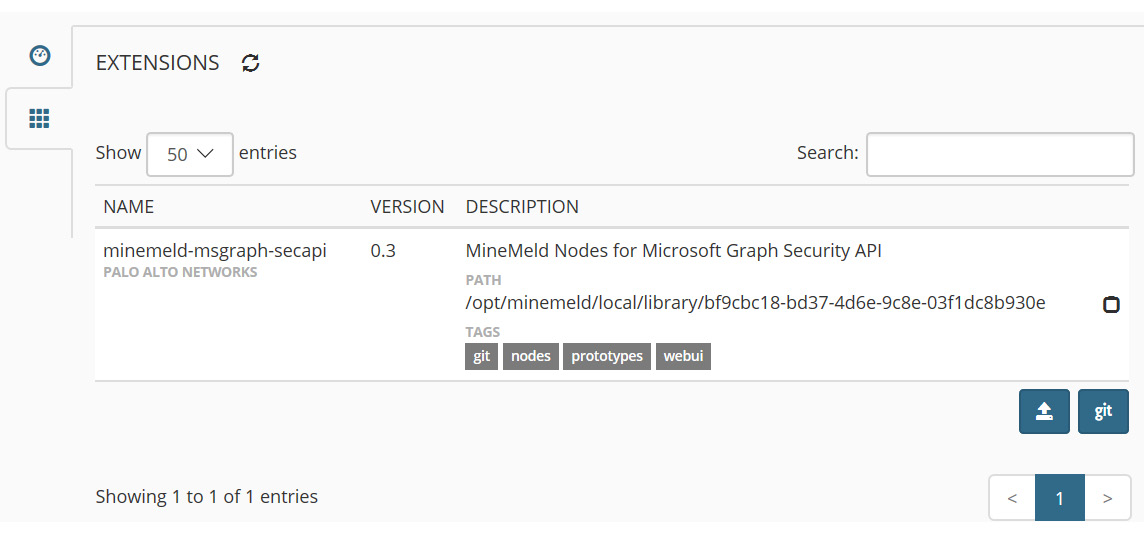
Figure 4.13 – Confirming installation of the API extension
Now that the Microsoft Graph Security API extension has been set up on the MineMeld server, we can configure the Azure Sentinel connector.
Configuring the Azure Sentinel connector
The following are the steps to configure the API extension:
- Log in to the MineMeld web portal. Go to CONFIG, then select the prototypes icon at the bottom of the page with three horizontal lines, as shown in the following screenshot:
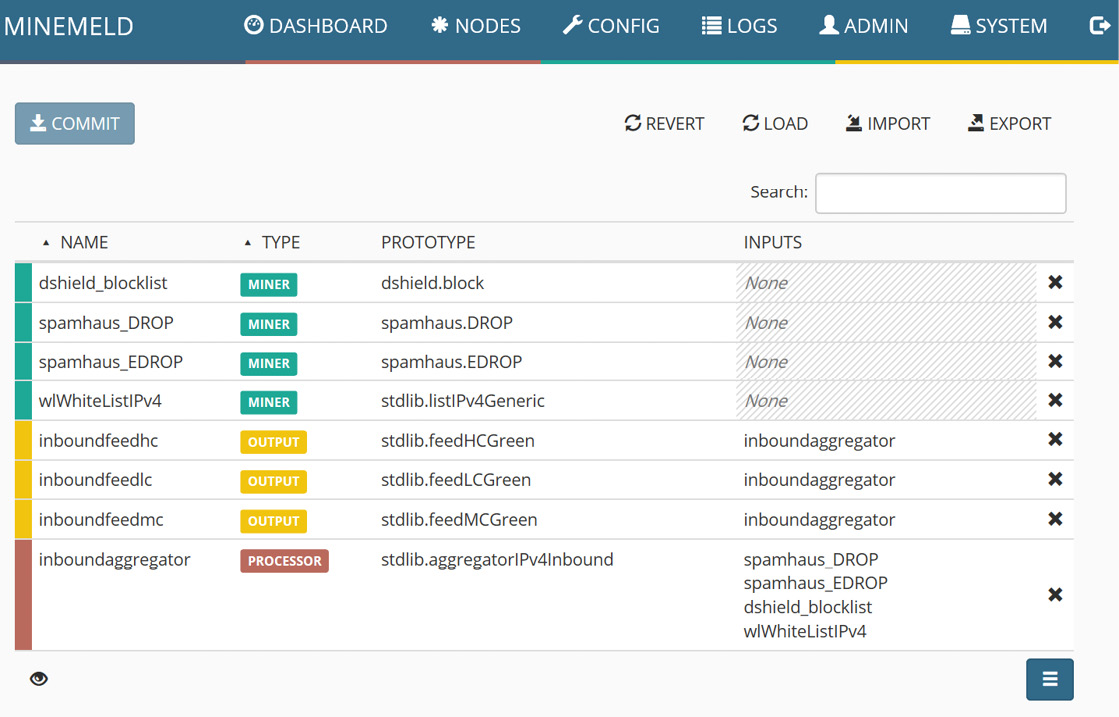
Figure 4.14 – MineMeld config page
- As you will see, there are many options to choose from. Review the list for additional TI feeds you may want to implement, then search for Microsoft and review the results. Select the prototype named microsoft_graph_secapi_output:
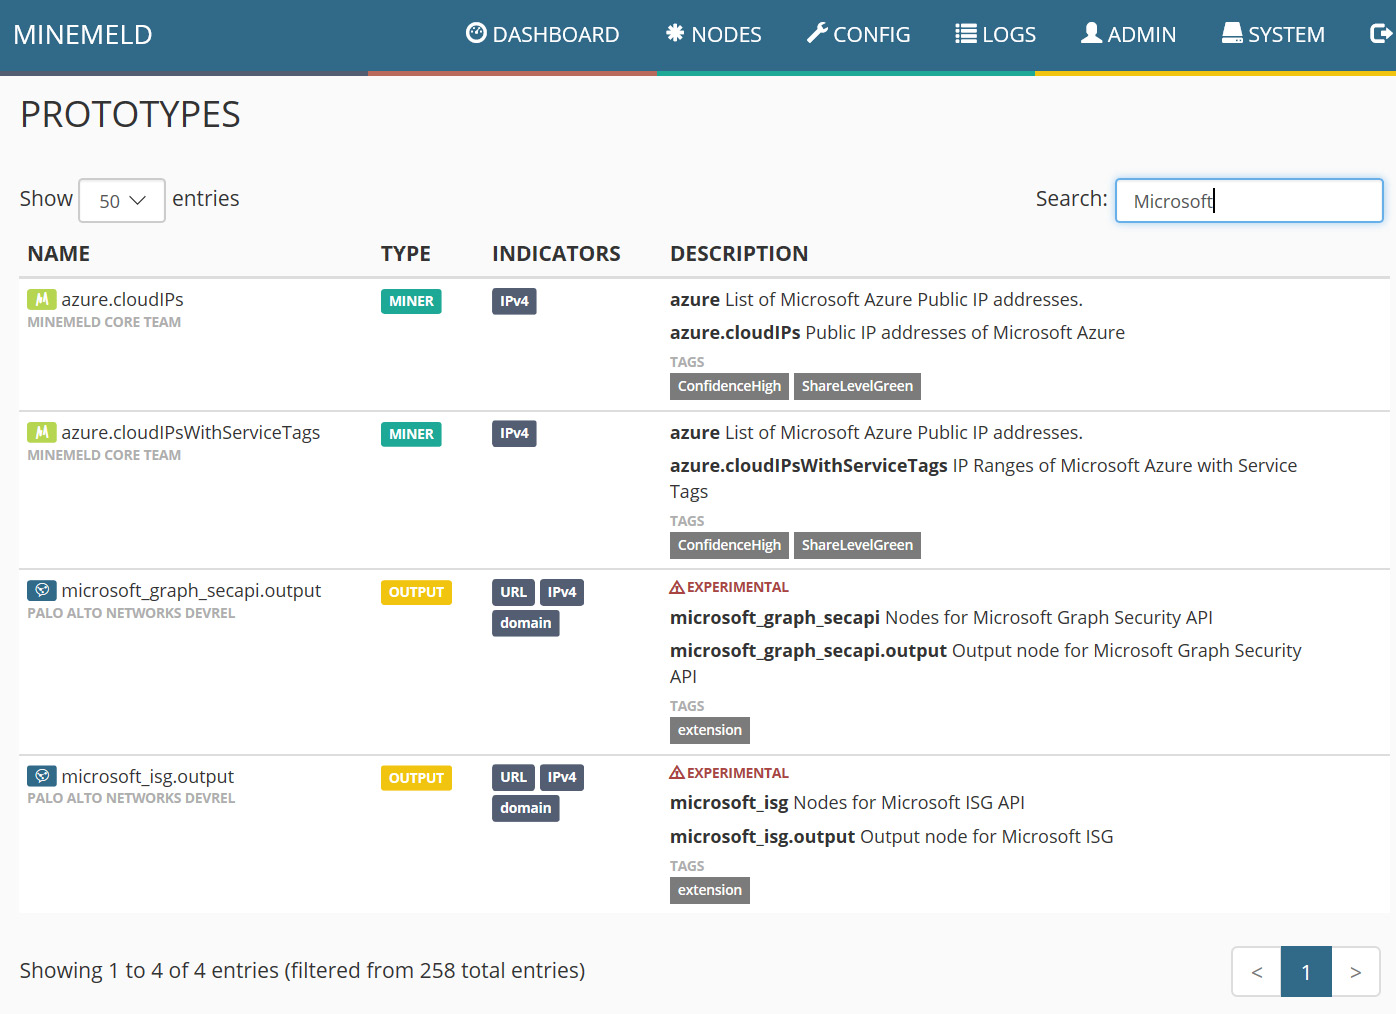
Figure 4.15 – Microsoft prototypes
- On the next page, select CLONE in the top-right corner:

Figure 4.16 – Creating a new node from a prototype
- On the next page, provide a name for the node, then select inboundaggregator for the INPUTS field:
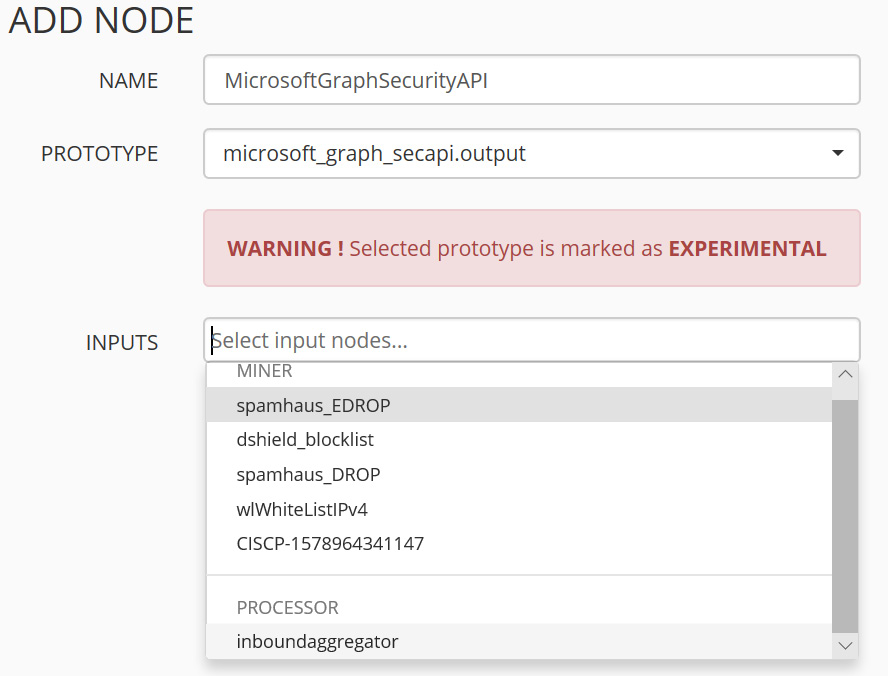
Figure 4.17 – Configuring a new node
- Confirm the new node is active by viewing the list of nodes as shown in the following screenshot. Select the COMMIT button at the top of the page. This will save the changes and restart the process to enable the new functionality:
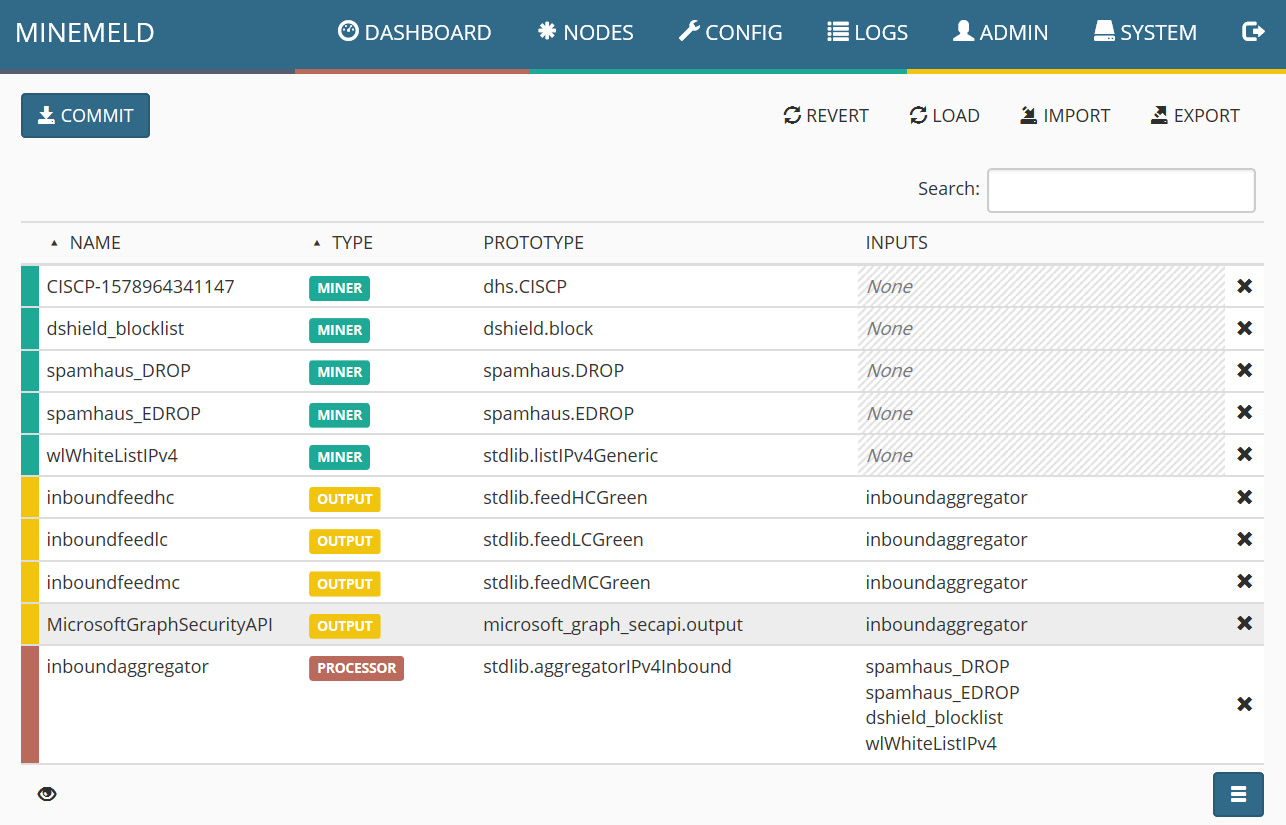
Figure 4.18 – Confirming the new node is added
- Now go to the NODES tab and select the new API extension, then enter the relevant details from the previously registered app in Azure AD (see figure 4.6):
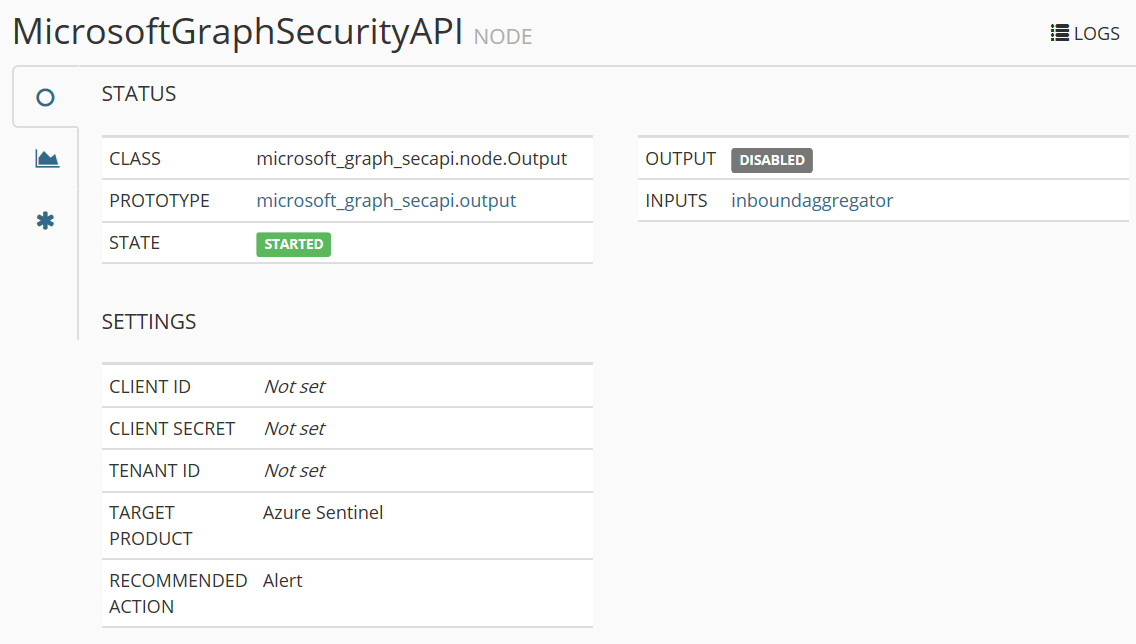
Figure 4.19 – Configuring the API extension for Azure Sentinel
- For the CLIENT SECRET field, you need to generate a new secret in the Azure AD App: Go to the Azure AD App created earlier and select Certificates & secrets, then select + New client secret and follow the steps that will appear to create a new secret:
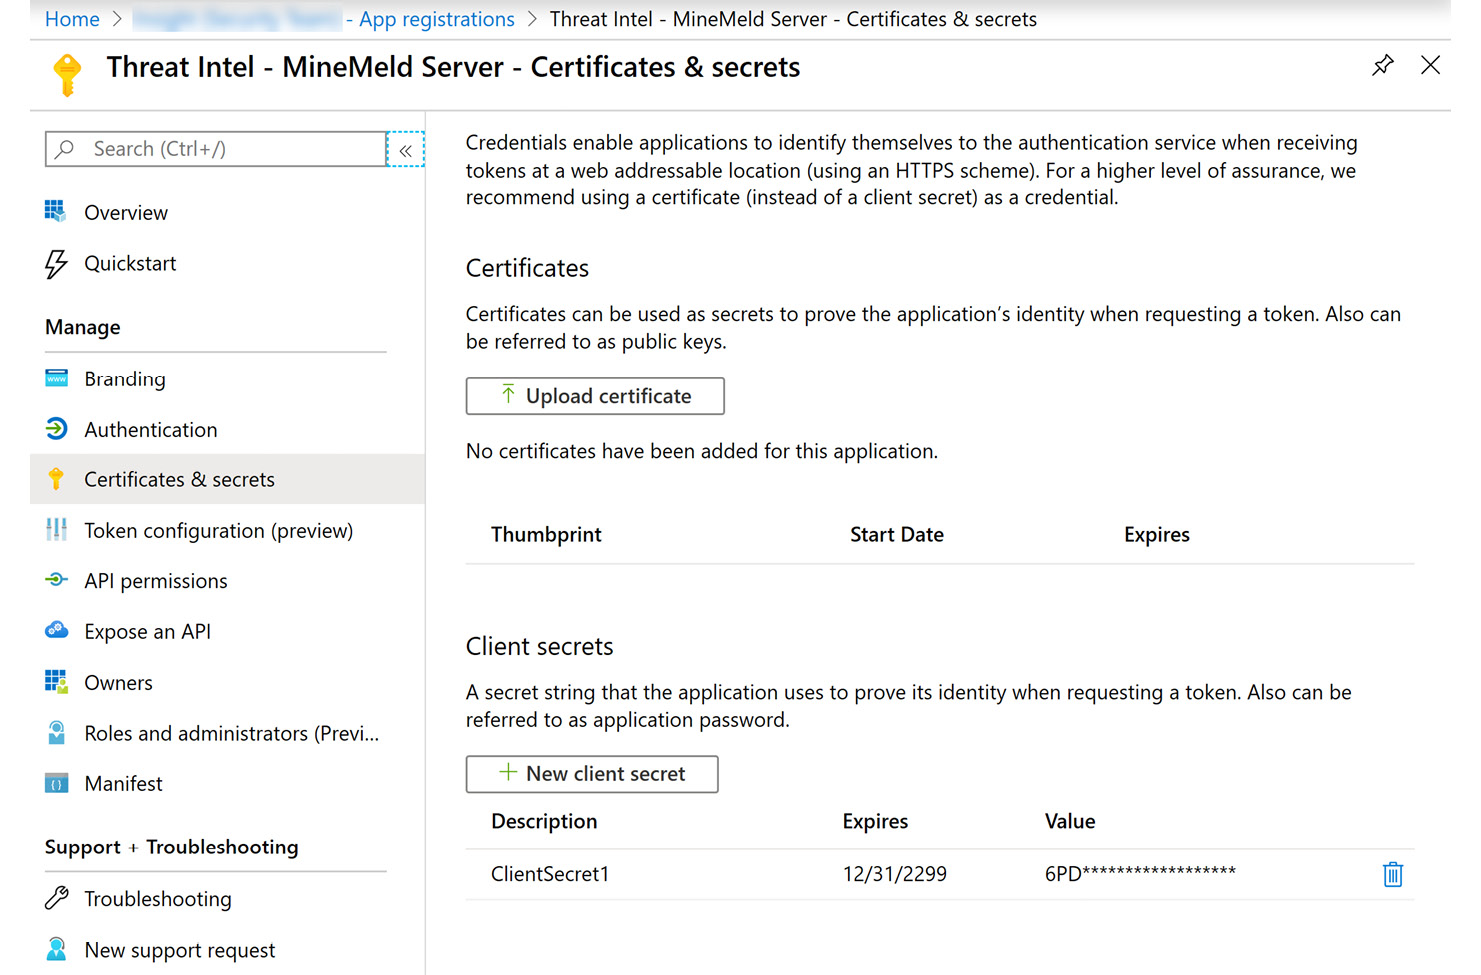
Figure 4.20 – Create a new client secret
- With this new secret added to the settings, you should see the following completed screen:
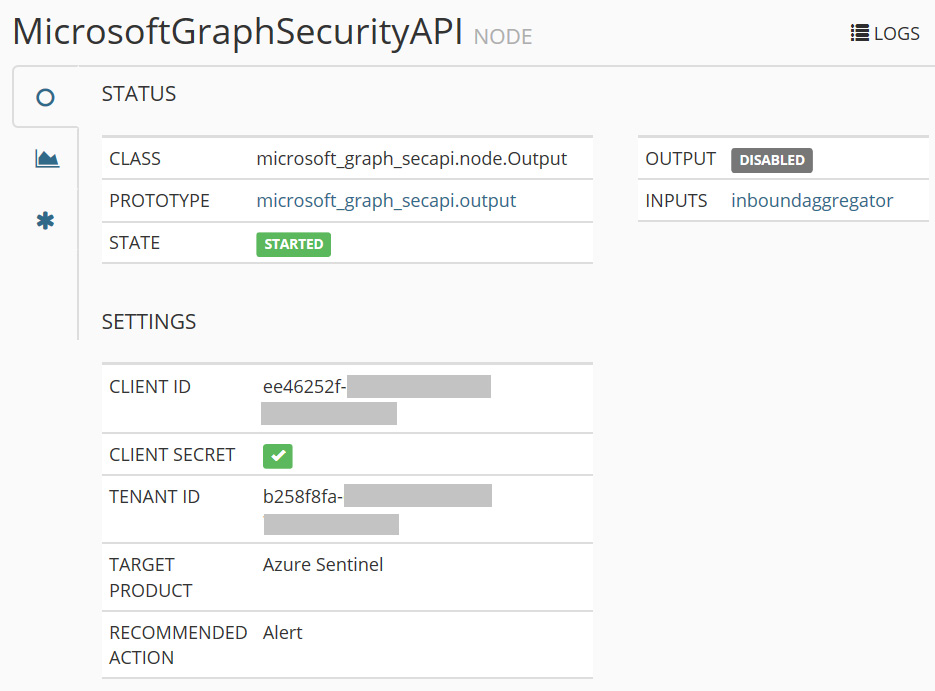
Figure 4.21 – Completed configuration
This concludes the configuration requirements for the MineMeld service. TI feeds should now be sent to your Azure Sentinel instance.
Confirming the data is being ingested for use by Azure Sentinel
To confirm the data is being sent to Azure Sentinel, follow these steps:
- Go to the Azure portal, then Azure Sentinel.
- Select Logs, then expand SecurityInsights.
- Type the following command into the command window and select Run:
ThreatIntelligenceIndicator
| take 100
- You should see the following screen with the results:
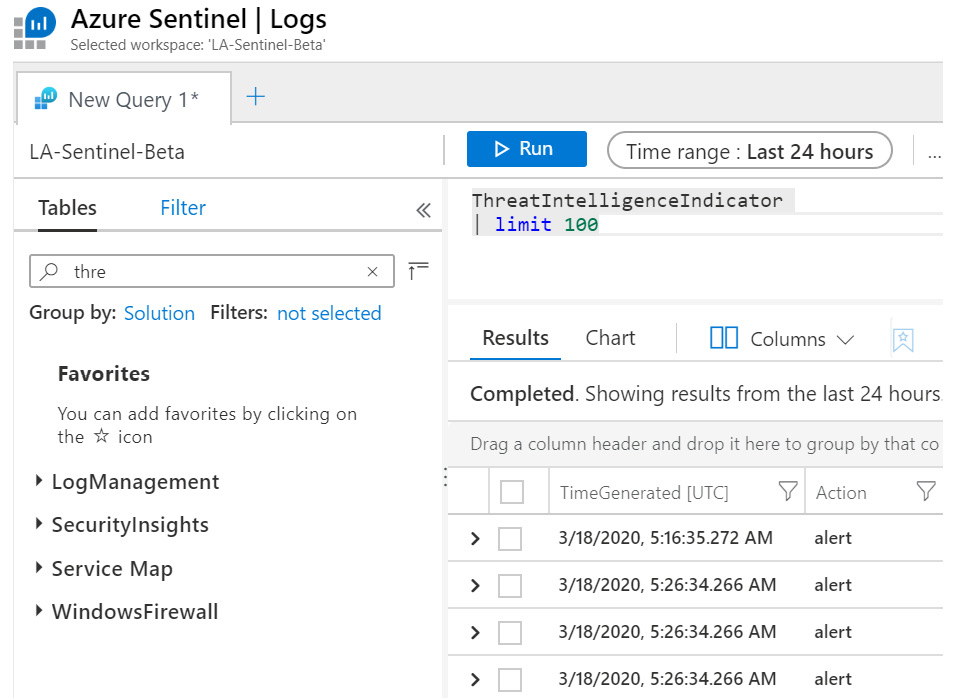
Figure 4.22 – Checking for TI feed activity
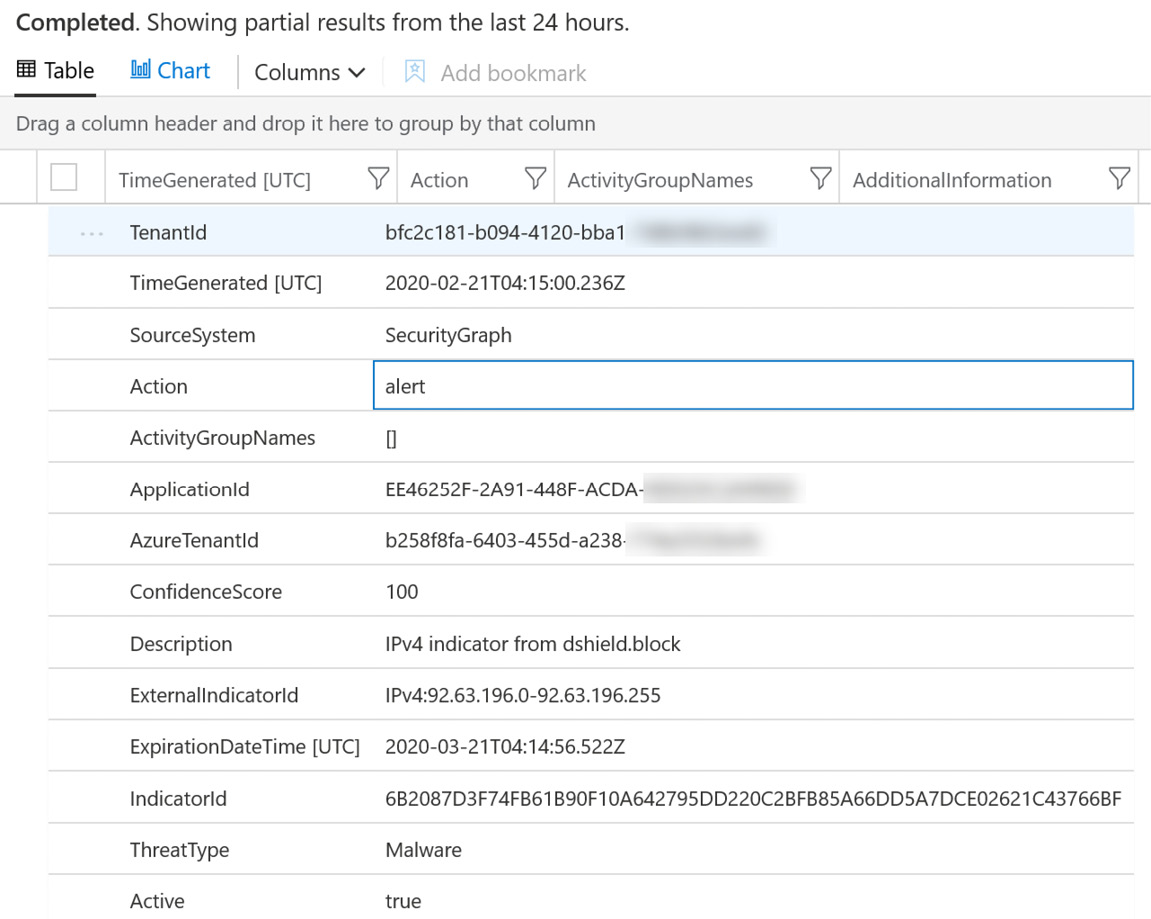
- The following screenshot shows an example of the details for one of the events:
- The following command can be used to show which TIs are enabled and delivering. Type the following command into the command window and select Run:
ThreatIntelligenceIndicator
| distinct SourceSystem
You have now configured and connected the MineMeld server to your Azure Sentinel workspace and can see the TI data feeds appearing in the logs. You can now use this information to help to create new analytics and hunting queries, notebooks, and workbooks in Azure Sentinel.
We recommended regular reviews to ensure this information is both relevant and updated frequently. New TI feeds become available regularly and you don’t want to miss out on that useful information if it can help you to find new and advanced threats.
Summary
In this chapter, we explored the concept of TI, new terminology and solutions options available, and the concept of creating and sharing TI feeds as a community effort.
There are several options available for adding TI feeds into Azure Sentinel, and we know Microsoft is working to develop this even further. TI feeds will assist with the analysis and detection of unwanted behavior and potentially malicious activities. With many options to choose from, selecting the right feeds for your organization is an important part of configuring Azure Sentinel.
The next chapter introduces the Kusto Query Language (KQL), which is the powerful means to search all data collected for Azure Sentinel, including the TI data we just added.
Questions
- Name three examples of threat indicator types.
- Name three examples of threat indicator types.
- What is the full name of the ATT&CK framework?
- Which Azure Sentinel components can utilize threat intelligence feeds?
- Who developed the STIX language and the TAXII protocol?
Further reading
The following resources can be used to further explore some of the topics covered in this chapter:
- Malware Information Sharing Project: https://www.misp-project.org/
- Mitre ATT&CK framework: https://attack.mitre.org/
- Microsoft Security Graph API: https://github.com/microsoftgraph/security-api-solutions/tree/master/QuickStarts
- STIX standard: https://stixproject.github.io/
- TAXII protocol: https://www.mitre.org/sites/default/files/publications/taxii.pdf
- Build a MineMeld server: https://live.paloaltonetworks.com/t5/MineMeld-Articles/Manually-Install-MineMeld-on-Ubuntu-16-04/ta-p/253336
- The Microsoft Graph Security API extension in MineMeld: https://github.com/PaloAltoNetworks/minemeld-msgraph-secapi.git