
The last step is to configure the data sources that the application is going to use at WebLogic, and create links to these databases at Eclipse. This kind of connection is a data source (DS) inside WebLogic Server.
Tip
In earlier versions of WebLogic Server, you were supposed to configure both a connection pool and a data source. Now, both concepts are contained within a data source, which is a logical move—sharing a pool of connections but not the link to it (the data source) may lead to problems, since no application could predict if others were using the underlying pool, and worst yet, how.
As we just finished enabling the domain at Eclipse, we can start the server from there:
- In the Servers tab, right-click on the domain name and then Start from the context menu, or if you prefer to start it manually, OEPE will synchronize to show that the server is up and running.
- The focus will switch to the Console tab. After 15 to 30 seconds, a message stating that the server is running is going to show up (<BEA-000360><The server started in RUNNING mode.>) and the focus will get back to the Servers tab.
- Right-click again on the server name, select Go To, and then Admin Console to open a browser window pointing to the administration console.
- Enter your administrator's credentials (the username and password you set when creating the domain) and click on Login. The initial page shows you a list of basically every resource you can configure. Find the link Data Sources inside the Services group and click on it.
- On the new page, click on New, then click on Generic Data Source and then on Next.
- Fill the fields as follows and click on Next:
- Name:
Store DS - JNDI Name:
jdbc/tickets/store - Database Type:
MySQL
- Name:
- Leave the default value for the driver, MySQL's Driver (Type 4) Versions: using com.mysql.jdbc.Driver, and click on Next.
- Select the Logging Last Resource option and go to the next page.
Note
As we're using a driver that doesn't support global (distributed) transactions—transactions that coordinate several resources as a single unit—we will emulate its behavior by enabling the Emulate Two-Phase Commit option.
The Logging Last Resource option is an alternative to this emulation that brings performance and reliability improvements. For detailed advantages and considerations about it, check the Web resources section at the end of the chapter.
- Enter the following values and click on Next:
- Database Name:
store_db - Host Name:
localhost - Port:
3306(this is the default value) - Database User Name:
store_user - Password and Confirmation:
store
- Database Name:
- There's no need to change any values here. Click on the Test Configuration button at the top of the page and a message Connection test succeeded must show up right above the test button. Click on Next.
- Finally, select the server on which the resource is to be made available—AdminServer is the only one on our domain—and click on Finish to commit the changes.
- Now, create another data source following the same steps, but changing these fields:
- Name:
Theater DS - JNDI Name:
jdbc/tickets/theater - Database Name:
theater_db - Database User Name:
theater_user - Password and Confirmation:
theater
- Name:
You must have a list of data sources like the following one by now:

Now we're going to inform Eclipse/OEPE about the databases, so we can use its wizards later. Go back to Eclipse and execute the following steps:
- Find or open the Data Source Explorer view (In the menu, navigate to Window | Show View | Other | Data Source Explorer).
- Right-click on Database Connections and select New... in the context menu.
- Select MySQL, type
MySQL – Storeas Name then click on Next. - Click on the New Driver Definition button beside the Drivers dropdown.
- Select MySQL JDBC Driver version "5.1" and go to the Jar List tab.
- Select the entry mysql-connector-java-5.1.0-bin.jar and click on Remove JAR/Zip, then click on Add JAR/Zip.
- On the pop-up window, navigate to
$MW_HOMEand continue to the subdirectory./oracle_common/modules/mysql-connector-java-commercial-5.1.22/. - Select the file
mysql-connector-java-commercial-5.1.22-bin.jarand click on OK. - The New Connection Profile window is going to pop up, change the following fields:
- Database:
store_db - URL:
jdbc:mysql://localhost:3306/store_db - User name:
store_user - Password:
store - Check Save password
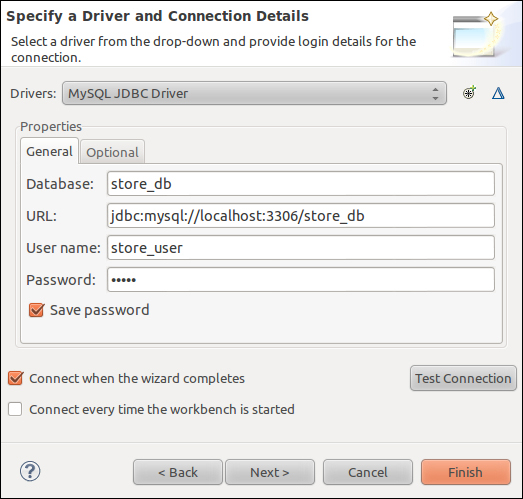
- Database:
- Click on Test Connection, and you should see a Ping succeeded! message.
- Click on Finish.
Now we need to execute the same steps mentioned earlier, but this time pointing to the Theater database. Here are the fields you need to change:
- Connection name:
MySQL – Theater - Database:
theater_db - URL:
jdbc:mysql://localhost:3306/theater_db - User name:
theater_user - Password:
theater
The last step is to create and configure an OpenLDAP server, which will be accessed by WebLogic's instance when we discuss security features.