
To implement even the most basic business functionality, the domain entities must exist and be available. So, let's create the project StoreBO (BO means Business Objects) that is going to hold the store's entities.
Note
As we're going to use the Java Persistence API (JPA), it's good to know that the default JPA implementation shipped with Oracle WebLogic Server 12c is Oracle TopLink, which is heavily based on EclipseLink. Up until the previous release (11g), the default implementation was Kodo, which Oracle bought along with other BEA products.
The Oracle Enterprise Pack for Eclipse gives us a couple of handy features to create a JPA Project. By selecting this project type, we basically instructed Eclipse to add the JPA facet to the project, enabling features such as a tool to map relational tables to classes.
Fire up your OEPE and perform the following steps:
- Navigate to File | New | Project….
- Type
JPAin the textbox, select JPA Project and click on Next. - On the New JPA Project screen:
- Enter
StoreBOin Project name. - Target Runtime: select Oracle WebLogic Server 12c (12.1.2).
- Click on the Modify… button next to the Configuration dropdown menu and make sure that the Java facet is set to Version 1.7, changing it if necessary, then click on Finish.
- Enter
- Click on Next.
- We don't need to change the default values for source folders, so just click on Next.
- On the JPA Facet screen:
- Select EclipseLink 2.4.x/2.5.x as Platform.
- Under JPA implementation, select Disable Library Configuration.
- In the Persistent class management group, select Annotated classes must be listed in persistence.xml.
- Click on Finish.
- Click Yes to open the JPA Perspective.
Let's take a closer look at the options presented by the JPA Facet screen:
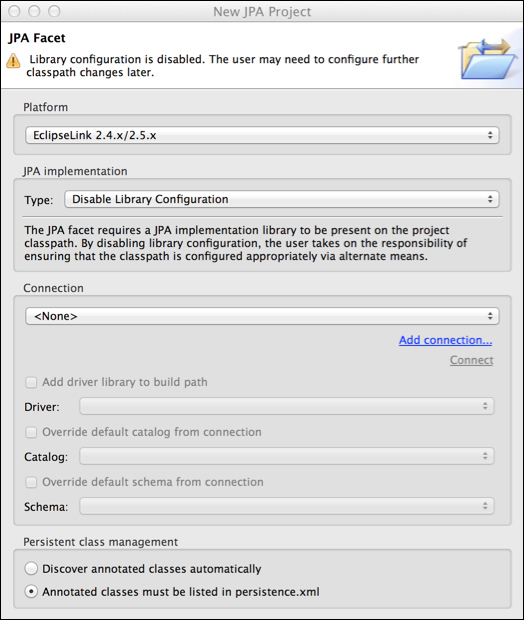
The default value for Platform is Generic 2.0, which means Eclipse/OEPE will give you the most basic configuration options when you open the persistence.xml file to edit. The other options are for specific versions of EclipseLink—an Object-Relation Mapping framework—giving you more graphical resources to edit the file.
Oracle WebLogic Server 12.1.2 ships with Oracle TopLink Version 12.1.2, which is the base for this book and is built upon EclipseLink 2.4.2. So, we selected the EclipseLink 2.4.x option to enable the features related to this version.
We disabled the configuration related to the JPA Implementation because OEPE doesn't give us a direct option to use the libraries provided by WebLogic. We could have selected User Library instead and installed one of the EclipseLink versions shown, but that defeats the idea of using WebLogic modules.
After walking through the other options of this screen, we're going to add the necessary module reference.
The Connection drop-down menu gives us the option to select one of the connections listed in the Data Source Explorer. If you are not running your application inside a Java EE container, you can set the transaction-type attribute as RESOURCE_LOCAL, which means that the entity managers or data sources used by the application are not capable of providing JTA services. Changing this property under the connection tab will populate the related entries in the persistence.xml. A good use case for this transaction type is unit testing.
According to the JPA 2.0 specification (JSR 317), the default value for this attribute in the Java EE environment is JTA and the default value for the Java SE environment is RESOURCE_LOCAL. Since we're going to use the WebLogic Server's Data Source to access data, we can leave it as JTA or empty.
Finally, the Persistent class management option configures the persistence.xml file to instruct the container to discover annotated beans by scanning the packages that compose the deployment/project. This is controlled by the exclude-unlisted-classes entry and the default behavior is to scan the packages. By setting the screen option to Annotated classes must be listed in persistence.xml, we are telling the container to stick to the classes listed in the file.
The last step to configure the project is to reference WebLogic's persistence library, so we can compile the generated classes:
- Right-click on the project name and click on the last entry, Properties.
- Click on Java Build Path in the tree.
- Click on the Libraries tab and then the Add Library… button.
- Select WebLogic System Libraries and click on Next.
- Select the javax.persistence library and click on Finish.
- Click on OK to close the Properties window.
With the project properly configured, we can use the database tables as a starting point to create the entities.
Note
Make sure the tables from the store_db database are loaded and Eclipse's connection to MySQL is properly configured. These procedures are explained in the Configuring MySQL databases section in Chapter 2, Setting Up the Environment.
To generate the classes:
- Right-click on the project name and select JPA Tools, then select Generate Entities from Tables… from the submenu.
- Select the MySQL - Store connection. If the connection is not yet active, the button just below the Connection drop-down menu will be enabled. If this is the case, click on it.
- Select the store_db entry from the Schema drop-down menu, then select all the business tables—customer, movie, theater, and ticket entries—and click on Next:

- On the Table Associations screen, click on the New Association button and do the following:
- Select Simple association as Association kind.
- Click on the button at the right side of Table 1 and select ticket.
- Click on the button at the right side of Table 2 and select theater.
- Click on Next.
- On the Join Columns screen, click on the Add button, change the value of the column
tickettotheaterRefand the columntheatertoid, then click on Next. - The Association Cardinality asks you the type of relationship between the tables. The default Many to one is the one we need, Each theater has many ticket. Click on Finish.
- We must execute the same preceding steps to create the second and last relationship:
- Click on New Association.
- Select Simple association as Association kind.
- Click on the button at the right side of Table 1 and select ticket, click on the button at the right side of Table 2 and select customer, then click on Next.
- On the Join Columns screen, click on the Add button, change the value of the column
tickettocustomerRefand columncustomertoid, then click on Finish (the cardinality is already set up, Each customer has many ticket). The list of associations should look like this: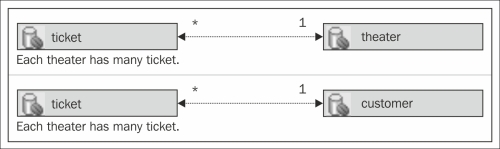
- Click on Next.
- Select table for Key generator, and enter
com.packt.domain.storein the Package field. - Click on Finish.
We now have the base code to execute a query against the database. Let's check the relevant pieces of code of one of the classes, Theater:
@Entity
@Table(name="theater")
public class Theater implements Serializable {
This is how you create a JPA entity—you just need to annotate your POJO class with javax.persistence.Entity and javax.persistence.Table, and it's done.
A few more details about the generated entity class that are implicit to the code we just saw:
- The class must be public and top-level (can't be an inner class)
- The class can't be final
- The class must implement the
Serializableinterface—most likely, it will be transferred between applications, network, or business layers, so as a best practice, always implement this interface - The class must have a no-argument constructor
Then we have the declaration of the primary key, which is also pretty straightforward:
@Id
@GeneratedValue(strategy=GenerationType.TABLE)
private int id;
The Id annotation states that the field is a primary key, and @GeneratedValue indicates the strategy and parameters the persistence provider must use to generate unique identifiers when inserting a record. This is the same as declaring a generated-value tag inside the orm.xml descriptor file. Use this file if you don't want to annotate your classes or if you want to change a definition without having to edit source code and repacking the binaries.
Note
The possible strategies for @GeneratedValue and their meanings are as follows:
AUTO (default): The persistence provider chooses the best strategy considering the target database.
TABLE: A table is used to generate unique values. You can use another annotation, TableGenerator, to override the default values for table name, schema, and so on.
SEQUENCE: A database sequence is used to create the primary keys. You can fine tune its behavior by using the SequenceGenerator annotation.
IDENTITY: You must use this when the provider is not supposed to generate a value, but instead read it back from the database after inserting the record. Usually, the table field is declared using a native mechanism; for example, AUTO_INCREMENT or SERIAL on MySQL, or IDENTITY on the Microsoft SQL Server.
Do you remember that we left out a couple of tables at the JPA Generate Entities wizard? One of them, the SEQUENCE table, is the default table used by EclipseLink when you select AUTO or TABLE as the strategy. This table must have a record prior to issuing an insert command, depending on the strategy selected, with specific values:
|
Strategy |
Content of SEQ_NAME Column |
|---|---|
|
|
|
|
|
|
Note
You can let the persistence provider worry about these details by inserting the property eclipselink.ddl-generation with value create-tables in persistence.xml. If any of the referenced objects are missing, TopLink/EclipseLink will try to create them.
This is okay to use when starting the development phase, but for other environments such as quality assurance or production, it is not a recommended practice.
The last snippet of code worth mentioning is the one that declares the relationship between the Theater and Room entities:
//bi-directional many-to-one association to Ticket
@OneToMany(mappedBy="theater")
private List<Ticket> tickets;
The JPA wizard's default behavior when creating relationships is to make them bi-directional. So, if you check the Ticket.java file, you will find the reference back to Theater:
@ManyToOne
@JoinColumn(name="theaterRef")
private Theater theater;
Tip
To make the relationship uni-directional, in the JPA Generate Entities wizard, once the association is created, select it from the list of Table associations and uncheck the proper checkbox. For the first relationship Ticket to Theater, the text next to it is Generate a reference to a collection of ticket in theater.
The basic entities and their mappings are ready. The usage of MySQL's auto_increment and foreign keys were left out on purpose to show how relationships and identities are manually created. In the next chapter, we're going to see how they are taken into account when generating classes.
A named query is also called a static query, in the sense that its declaration is attached to the entity either by using the named query annotation or by named-query tags inside a JPA mapping file that maps the entity.
To keep things simple, let's see how we declare a query using annotations:
@Entity
@NamedQuery(name=Movie.findAll, query="SELECT M FROM Movie M")
public class Movie implements Serializable {
   public final static String findAll = "Movie.FindAll";
...
This code snippet returns all the Movie instances available. This is a very basic query that we're going to use to check if all the persistence components are correctly configured. There are several possibilities to explore when creating a query—inner joins, aggregation functions, inheritance, subqueries, and so on—and we will use some of them as we evolve our sample applications.
When we ask the persistence provider to execute a named query, we need to inform the name of the desired query. You can have more than one NamedQuery annotation inside a class, provided you group them using the @NamedQueries decoration:
@Entity
@NamedQueries({
   @NamedQuery(name=Movie.findAll, query="SELECT M FROM Movie M")
   @NamedQuery(name=Movie.findPremiere, query="SELECT M FROM ...")
})There is a similar query declared inside the Theater class to retrieve all Theater instances available:
@NamedQueries({
   @NamedQuery(name=Theater.findAll, query="SELECT T FROM TheaterT")
})
public class Theater implements Serializable {
   public final static String findAll = "Theater.FindAll";
...The last piece of configuration we have to tweak is the persistence.xml file used by the persistence provider to identify which connections must be used to access each entity and fine-tune its behavior.
Here are the file contents after creating the entities using the wizard:
<persistence version="2.0">
   <persistence-unit name="StoreBO">
      <provider>org.eclipse.persistence.jpa.PersistenceProvider</provider>
      <class>com.packt.domain.store.Customer</class>
      <class>com.packt.domain.store.Movie</class>
      <class>com.packt.domain.store.Theater</class>
      <class>com.packt.domain.store.Ticket</class>
   </persistence-unit>
</persistence>
The persistence unit's name is the same as the project StoreBO; no need to change it. But, do you remember that we didn't select a connection when creating the project? As the JPA Project wizard does not allow us to choose a WebLogic data source, we now have to configure it:
- Open the
persistence.xmlfile inside the JPA Content project's tree node. - Click on the Connection tab.
- Select JTA as Transaction type.
- Enter
jdbc/tickets/storein the JTA data source field.
As the entities were explicitly declared by the JPA wizard, we can disable package scanning. To do so, perform the following steps:
- Go to the first tab, General.
- Expand the Managed Classes group.
- Click on the Exclude unlisted classes checkbox.
Now we just have to pack the project and deploy it to the WebLogic Server as an optional package.
To make the library adherent to the standard, create the MANIFEST.MF file inside the src/META-INF folder and add these lines:
Manifest-Version: 1.0
Extension-Name: storeBO
Specification-Version: 1.0
Implementation-Version: 1.0.0
This is the same configuration we made when creating PrimeFaces' shared library in the previous chapter, and it's the only requirement to make a plain JAR file an optional package.
You may use the JAR Export wizard provided by Eclipse to generate the package or create it using an Ant script as the example in the next info box, or a compression application, such as WinZip or 7Zip. Either way, make sure the packaged MANIFEST.MF file has exactly the same content (and sequence of lines) as we just showed. Without the specific tags we added in that specific order, the deployment will complete successfully but WebLogic will not be able to resolve the dependency when deploying a project that references the optional package.
Note
Here's a simple Ant script that can be used to create the package:
<?xml version="1.0" encoding="UTF-8"?>
<project>
   <property name="jarName" value="StoreBO.jar"/>
   <target name="clean">
      <delete dir="build"/>
   </target>
   <target name="compile">
      <mkdir dir="build/classes"/>
      <javac srcdir="src" destdir="build/classes"/>
   </target>
   <target name="jar">
      <mkdir dir="build/jar"/>
      <jar manifest="src/META-INF/MANIFEST.MF"destfile="build/jar/${jarName}"basedir="build/classes" />
   </target>
</project>
The final package must have the structure depicted in the following figure:
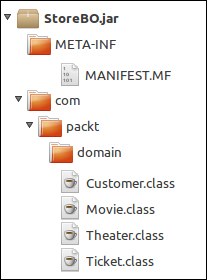
Notice that we didn't add the persistence.xml file to the JAR package—the file must be present in the EJB project using the entities, not here.
Note
According to JPA 2.0 specifications, the JAR package or directory holding the persistence.xml file is called the root of the persistence unit, and it cannot be a JAR file external to the application—or, more specifically, a referenced library. That's why we have to add the persistence.xml file to the project that uses the entities.
Based on the rule above, here are some of the places you can place the persistence.xml file:
- The classes directory inside the
WEB-INF/classesfolder, when used by a Web Project (WAR) - A JAR file placed in
WEB-INF/libof a Web Project - A JAR file inside
APP-INF/libof an Enterprise Project (EAR)
If you're going to pack a persistence.xml file into a JAR, make sure it is inside the META-INF folder, and that this folder is at the root of the package. Anywhere else, the container will not find it.
The last step to complete the enablement of an optional package is to register it in the WebLogic Server. To do so, access the WebLogic Administration Console and perform the following steps:
- Click on Deployments in Domain Structure.
- Click on the Install button at the top of the Deployments list.
- Click on the link upload your file(s) inside the Note phrase.
- Click on the first Choose File button next to Deployment Archive.
- Navigate to the folder where you saved the
StoreBO.jarfile, select it, click on Open and Next on the main page. - The Path field shows the complete path to our JAR file. Click on Next.
- This page shows the options to change the deployment strategy. But as the default settings are just fine, we don't need to change any of them, so go ahead and click on Next.
- Click the No, I will review the configuration later option and then click on Finish. The wizard automatically targets the deployment to the single instance available, AdminServer.
Note
Remember that a resource always has to be targeted to one or more WebLogic instances in order to be visible and active. Automatic targeting is not a feature present for every resource creation sequence, though - Data Sources, for instance, must be explicitly targeted, or else they will not be available for use.
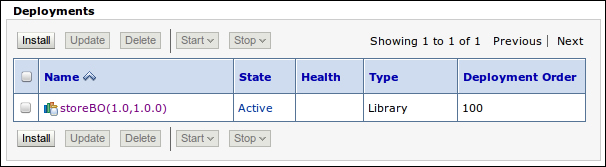
After the deployment is completed, the Deployments screen is reloaded and you should see the new module and its State as Active as shown in the following screenshot:
If you followed the installation procedures in Chapter 2, Setting Up the Environment, you may be thinking that if an optional package is basically the same as a shared library, why didn't we create it the same way we did earlier using Eclipse/OEPE?
Well, the two main reasons:
- The way we reference a shared library from a project isn't the same way we reference an optional package. We're going to see how it is done in the next section.
- To show you how to deploy an optional package using WebLogic's Administration Console, since there is no automatic deployment of an optional package from Eclipse/OEPE.
Now that we have our entities available, let's create the main project and the basic code to test the environment.