
We are now going to create the web application that will stay in the movie theater, so the Store application, our central module, will interact with all the movie theaters through this application. Essentially, it will be responsible to validate and consume tickets, showing available movie exhibitions and seats.
A RESTful Web Service, as defined by JSR-311, will provide this interaction. The Java API that implements Representational State Transfer (REST) Web Services is JAX-RS. Oracle WebLogic 12c comes with Jersey 1.9, which is the JAX-RS reference implementation and also includes JSON APIs for processing and streaming data.
There is no official definition of what is a RESTful Web Service, unlike SOAP, which is completely specified by W3C and other organizations such as OASIS or WS-I. But a slight difference is that REST is an architectural style, while SOAP is a protocol. Also, even though RESTful Web Services are not completely specified, the technologies involved are—HTTP, URI, XML, or JSON.
The important concepts that define what a RESTful Web Service looks like are:
Here are the steps to create the Theater application:
- Click on the File menu, then navigate to New | Dynamic Web Project.
- On the Dynamic Web Project screen, enter
Theateras the Project name. - The Target runtime should be Oracle WebLogic Server 12c (12.1.2) already. If not, select it.
- Select JavaServer Faces v2.1 Project from the Configuration drop-down menu.
- Click on Next.
- Click on Next again—no need to change folder settings.
- Change Context root to
theaterand click on Next. - On the JSF Capabilities screen, make sure you have the Type set to "Disable Library Configuration" and that the URL mapping patterns has *.jsf listed.
- Click on Finish.
Now, add a reference to the PrimeFaces shared library by modifying the weblogic.xml descriptor inside the folder WebContent/WEB-INF and by including it on the build path of the project, just like we've done in Chapter 3, Java EE Basics – Persistence, Query, and Presentation
. Your file should look like this:
<?xml version="1.0" encoding="UTF-8"?><wls:weblogic-web-appxmlns:wls="http://xmlns.oracle.com/weblogic/weblogic-web-app"xmlns:xsi="http://www.w3.org/2001/XMLSchema-instance"xsi:schemaLocation="http://java.sun.com/xml/ns/javaeehttp://java.sun.com/xml/ns/javaee/web-app_2_5.xsdhttp://xmlns.oracle.com/weblogic/weblogic-web-apphttp://xmlns.oracle.com/weblogic/weblogic-web-app/1.5/weblogic-web-app.xsd">
   <wls:weblogic-version>12.1.2</wls:weblogic-version>
   <wls:context-root>theater</wls:context-root>
   <wls:library-ref>
      <wls:library-name>primefaces</wls:library-name>
      <wls:specification-version>3.5</wls:specification-version>
      <wls:exact-match>true</wls:exact-match>
   </wls:library-ref>
</wls:weblogic-web-app>
We also need to add a reference to optional package TheaterBO by editing the MANIFEST.MF file inside WebContent/META-INF and setting it as follows:
Manifest-Version: 1.0
Extension-List: theaterBO
theaterBO-Extension-Name: theaterBO
theaterBO-Specification-Version: 1.0
theaterBO-Implementation-Version: 1.0.0
The next step is to make the entities visible to OEPE's compiler:
- Right-click on the Theater project, select Properties, then select Java Build Path entry from the tree, and click on the Projects tab.
- Click on the Add… button.
- Check the TheaterBO project and click on OK.
- Click on OK again to close the Properties screen.
The last step is the configuration of the project's persistence layer:
In order to enable JAX-RS in our web project:
- Open the project's Properties window and go to the Java Build Path section.
- Click on the Libraries tab and click on Add External JARs….
- Browse to the WebLogic 12c installation directory and go to the modules folder—
/$MW_HOME/oracle_common/modules. - Select
jersey.core-1.17.1.jarandjersey.json-1.17.1.jar files: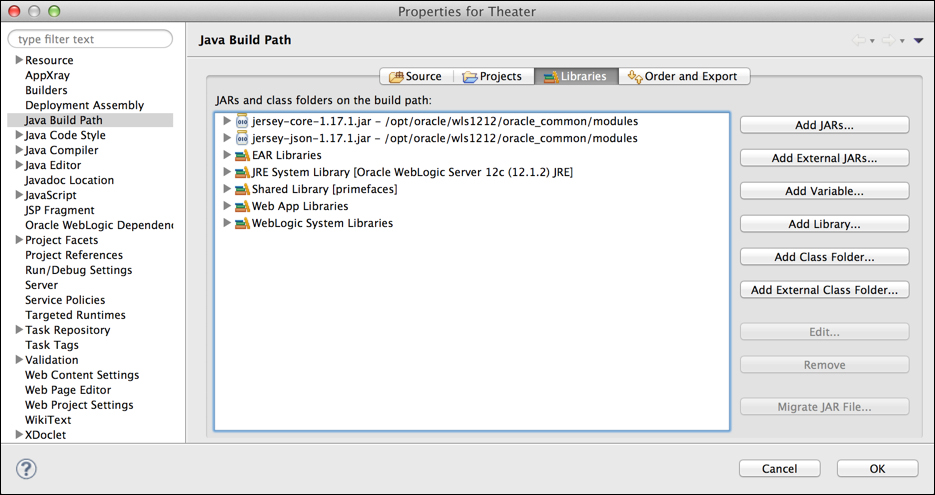
- Click on OK to close the Properties window.
Note
Note that these files will not be included in the package when you generate or deploy the project. Just like JavaServer Faces (JSF), JAX-RS is part of WebLogic container and you don't need to configure or deploy any extra library on the server to enable JAX-RS support. We only need to add this setting during the development time in order to compile the project.
- Open the
web.xmlfile and add the following entries as the last ones inside theweb-apptag:<servlet> <servlet-name>JAX-RS Application</servlet-name> <servlet-class>com.sun.jersey.spi.container.servlet.ServletContainer</servlet-class> <load-on-startup>1</load-on-startup> </servlet> <servlet-mapping> <servlet-name>JAX-RS Application</servlet-name> <url-pattern>/api/*</url-pattern> </servlet-mapping>
These entries load the Jersey Servlet Container class and create the URL mapping that will host all RESTful services on the application, /api/*.
The Theater application is now completely set and ready for development.