
This new kind of bean helps developers create components that implement the pattern that gives its name—no need to declare class methods and attributes to create them anymore.
Its behavior is a crossover between stateless and stateful beans, as it holds its state between calls but isn't expected to keep the state consistent in case of a server shutdown. As just one instance of such a bean is available at any given time, the client state must not be kept by it for obvious reasons.
The application container guarantees that one bean instance is loaded per JVM. This means that each Managed Server—an instance of WebLogic Server—will load and keep only one instance of the class in memory. If your WebLogic domain has just one instance, the bean is truly singleton in the sense that only one instance will receive every single request. But, the most common scenario is to have a cluster of managed servers so you end up with several instances in memory, each receiving the requests generated by the JVM running it:
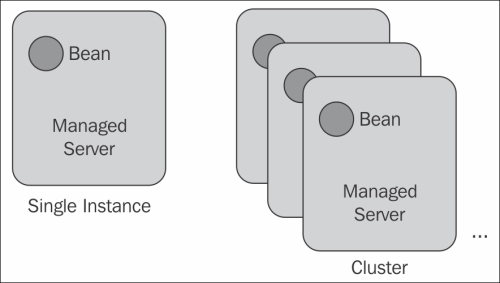
One strategy to ensure that just one bean instance is loaded onto the entire cluster is to target the application containing it to just one managed server.
But pinning an application to just one server raises a reliability-related issue. We now have a Single Point of Failure (SPOF); if this WebLogic instance goes down for some reason, for example, system overload due to request saturation (also known as denial-of-service attacks), the singleton will no longer be available. Request saturation occurs when a massive amount of requests are targeted to a server on a scale that it can't handle, and eventually the server goes down.
Let's see how to use a singleton session bean to implement a business rule that must have controlled access.
Tip
The scenario described here doesn't consider shared singleton session beans. If you have such a component packaged as a shared library referenced by multiple projects, each one will have an instance of the bean on its classloader. For such usage, a singleton service is a better approach as we're going to see in Chapter 10, Scaling Up the Application.
We're going to create a class that will generate control identifiers to attach to a ticket, so when a customer presents the ticket at the theater counter, there's a way to check its validity.
The most basic way to expose a class as a singleton is to decorate it with javax.ejb.Singleton. So, create a new class named ReservationCodeBean inside the package com.packt.util of the project Store, and mark it as a singleton.
To generate the identifier, we're going to use a simple structure where we concatenate the current date and time with a sequential number owned by the bean. For this, we need a numeric variable named counter and a method named generate that will create and return the identifier:
package com.packt.util;

import java.text.SimpleDateFormat;
import java.util.Date;
import javax.ejb.Singleton;

@Singleton
public class ReservationCodeBean {
  private int counter = 0;
  private SimpleDateFormat now =
                 new SimpleDateFormat("yyyyMMdd-hhmmss");

  public String generate() {
    String control = String.format("%1$s-%2$06d",
                 now.format(new Date()), ++counter);

     return control;
  }
}
A call to this method will return a string like 20130615-091654-000001.
For now, that's all we have to do in this class. We will get back to it later in this chapter, while finishing up the reservation process.
The next section details how the startup and shutdown sequences of singleton session beans can be defined.
A class annotation you can use with singleton beans is javax.ejb.Startup, which tells the container to call the method marked with @PostConstruct upon activation of the application—notice that this doesn't mean the application is deployed in the sense that it is already available to receive and process requests. To understand this, let's take a look at the graph showing the relevant states of an application inside the WebLogic Server:
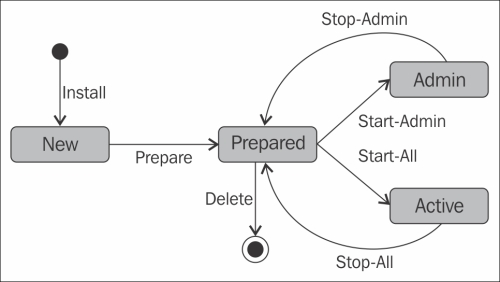
When you ask WebLogic to deploy a package, it is received by the deployer module and enters the New state. The Prepared state is reached when the application is distributed to all the servers that are going to host it, and all the servers accepted it, checked the package, and confirmed it as valid.
At this point, we can instruct the deployer to execute a full start, which is the commonly desired final state, or to serve only administrative requests; these are calls to the components using specific credentials so we can check whether everything is okay before releasing the application for general use.
This transition from Prepared to Admin or Active state is the point where the @PostConstruct methods of a class decorated with @Startup are called. Conversely, when a command to stop the application is issued, the @PreDestroy methods are called before the transition to the Prepared state.
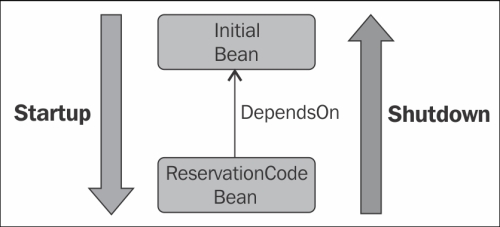
You can attach singleton beans decorated with @Startup to another bean using the javax.ejb.DependsOn annotation, effectively creating a bean load sequence:
@Singleton
@DependsOn({"InitialBean" })
public class ReservationCodeBean {
…
When executing the shutdown procedure, the server calls the @PreDestroy methods following the reverse sequence so the dependencies are still available:
This works fine if your bean depends on just one other bean, as described earlier. If you declare more than one bean, the container doesn't guarantee that the declaration sequence will be followed. Consider this dependency list:
@Singleton
@DependsOn({"InitialBean", "LoggingBean", "AuditBean" })
The beans will be loaded in no specific order; the only commitment made by the container is that it will load all the dependencies before the topmost bean, and that's it. If a predefined sequence is really needed, you must chain the dependencies; something similar to the following:
@Singleton
@DependsOn({ "InitialBean" })
public class ReservationCodeBean { … }

@Singleton
@DependsOn({ "LoggingBean", "AuditBean" })
public class InitialBean { ... }
This is the only way to guarantee specific load and destroy sequences.
The default behavior of a singleton session bean, which has synchronized access to all of its methods, is the consequence of default values set up by the container, and it may not fit every business need.
To understand what can be changed, here's how the code we just created would look like with explicit declaration of all concurrency-related tags that represent the default behavior:
@Singleton
@ConcurrencyManagement(ConcurrencyManagementType.CONTAINER)
@AccessTimeout(1000) // Default unit: milliseconds
public class ReservationCodeBean {
  …
   @Lock(LockType.WRITE)
    public String getNextId() {
    …
By setting the ConcurrencyManagement annotation to CONTAINER, the responsibility of the synchronization demarcation is transferred to the container. Also, the Lock annotation attached to each method is set to LockType.WRITE, which is the most restrictive strategy of locking—every call to the method is supposed to change its state, so all access must be serialized.
The most common scenario is to have a couple of methods that need a more restrictive lock. These are the ones that actually alter the bean's state; others that don't are methods that just read some data. If this is the case, decorate access methods with @Lock and the value, LockType.READ:
@Lock(LockType.WRITE)
public void updateData(String key, String value) {
  ...
}

@Lock(LockType.READ)
public String getData(String key) {
  return value;
}
By doing this, concurrent accesses to the read methods are allowed, improving the overall response time.
The last related annotation is AccessTimeout, which controls how long a request must wait for the lock to release. If time is exceeded, the container raises a ConcurrentAccessTimeoutException exception.
On the other end of the spectrum, if you set @ConcurrencyManagement as BEAN, the container leaves all of the responsibility of synchronization to the developer, who must resort to Java features in order to accomplish this—mark blocks with synchronized or volatile keywords, for instance, or use classes such as ConcurrentHashMap or ConcurrentLinkedQueue if the scenario allows it (as concurrent collections aren't always a viable alternative to synchronized blocks).
If you set the concurrency management to BEAN, none of the @Lock or @AccessTimeout declarations will be used by the container, and you won't get any errors when compiling or deploying it. So you may think that the annotations are effective but they are not, and you get no warnings about it, so be careful.
If you need to limit the consumption of a web service, one easy way to accomplish this is to annotate it with @Singleton; automatically, just one thread of each managed server will be allocated to process it.
Keep in mind that this is a rather radical solution. When you enable it, all consumers will have to wait for their turn to execute its target operation, so in practice, you're creating a queue. If the business process takes some time to finish and the queue is long, timeouts can happen, leading to undesired effects.