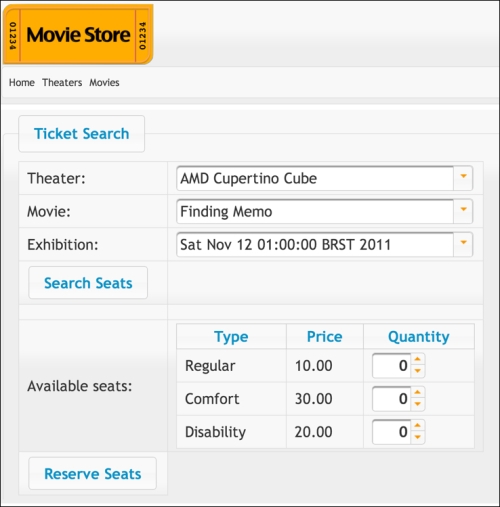
Before we get into the SOAP web service implementation, we need to complement the applications to execute a seat query using the existing REST web service and display the results on the query page. Once this is done, we can pick up from there and develop our SOAP service. So, to get this done, follow these steps:
- Open
ExhibitionBeanof the Theater project, add a method that will receive the exhibition ID chosen by the user, and return a list of seat types that are linked to that specific exhibition:@GET @Path("{id}/seats") @Produces({ MediaType.APPLICATION_XML, MediaType.APPLICATION_JSON }) public List<Seat> getSeatsByExhibition( @PathParam("id") int id) { String jpql = "SELECT s FROM Seat s, Exhibition e " + "WHERE (s.room.id = e.room.id) " + "AND (e.id = ?1)"; if (id != 0) { Query query = em.createQuery(jpql); query.setParameter(1, id); @SuppressWarnings("unchecked") List<Seat> result = query.getResultList(); if (result.size() > 0) return result; else throw new WebApplicationException( Response.Status.NOT_FOUND); } throw new WebApplicationException( Response.Status.NO_CONTENT); } - Go to the Store project, and add a consumer for this new method in the
TheaterClientclass:public List<Seat> getSeatsByExhibition(int exhibitionId) { final List<Seat> seats = (List<Seat>) getClient() .path("exhibition") .path(String.valueOf(exhibitionId)) .path("seats") .accept(MediaType.APPLICATION_XML) .get(ClientResponse.class) .getEntity(new GenericType<List<Seat>>() {}); return seats; }Note
In Chapter 4, Remote Access – Creating RESTful Services with JAX-RS, we added annotations
XMLRootElementandXMLTransientto theSeatclass. As explained there, this must be done to avoid cyclic references when JAX-RS is creating the query response.
Again, this new method follows the same structure of the other method already in the class, getExhibitionsByMovie, so it's basically a copy and paste operation with a few tweaks to the code.
- Now that we have both the service's provider and consumer, let's adjust the component connected to the JSF page,
SearchManager, to expose this information to the page by adding the following code snippets:// Variable to hold the list of seats private List<Seat> seats; // current quantity of seats private String[] quantities; // Getter and setters public void setSeats(List<Seat> seats) { this.seats = seats; } public List<Seat> getSeats() { return seats; } public String[] getQuantities() { return quantities; } public void setQuantities(String[] quantities) { this.quantities = quantities; } // The method that will call the reservation service public void reserve() { } // Helper method to translate the seat type private String getSeatDescription(int type) { switch (type) { case 1: return "Regular"; case 2: return "Comfort"; case 3: return "Disability"; default: return "Unknown"; } } - Also, in
SearchManager, replace the contents of the methodquerywith this single line that executes the call and sets the variable with the result:public void query() { if (exhibition != 0) { seats = theaterClient.getSeatsByExhibition(exhibition); /* * Set the variable that holds the selection * done by the user to zero */ quantities = new String[seats.size()]; for (int i = 0; i < seats.size(); i++) { quantities[i] = "0"; } } else { seats = null; } } - The last step is to change our query page—that would be the
search.xhtml(previouslyindex.xhtml) file of the Store project—to show the information retrieved. We're going to add this block of code just below thequerybutton:<br/> <p:spacer width="100" height="10" rendered="#{!empty search.seats}" /> <p:spacer width="100" height="10" rendered="#{!empty search.seats}" /> <h:outputLabel for="seats" value="Available seats:" rendered="#{!empty search.seats}" /> <p:dataTable id="seats" var="seat" value="#{search.seats}" rowIndexVar="index" rendered="#{!empty search.seats}"> <p:column headerText="Type"> <h:outputText value="#{search.getSeatDescription(seat.type)}" /> </p:column> <p:column headerText="Price"> <h:outputText value="#{seat.price}"> <f:convertNumber type="currency" currencySymbol="" /> </h:outputText> </p:column> <p:column headerText="Quantity"> <p:spinner id="spinnerBasic" value="#{search.quantities[index]}" min="0" max="99" maxlength="2" size="3" /> </p:column> </p:dataTable> <p:commandButton id="reserve" update="queryForm" value="Reserve Seats" action="#{ search.reserve}" rendered="#{!empty search.seats}" /> - Save all the files, publish both Store and Theater projects and navigate to the search page,
http://localhost:7001/store/search.jsf. Select the entries from the three dropdowns and click on Search Seats. A new table showing the types of seats available should appear after it:
Now that we have the seat query up and running, we can proceed to the next section where we're going to expose and consume a SOAP web service.
