
To find SPNEGO Identity Assertion, go to the Admin Console and select Security Realms | myrealm | Providers.
Click on the Lock & Edit button to lock and edit your domain, proceed to the New button (naming your provider with a personal reference), and select the Negotiate Identity Assertion provider from the list and click on Ok. Reorder the provider sequence on top after LDAP is configured (see Chapter 2, WebLogic Security Realm). After all these modifications, restart all the nodes of your WebLogic Server, along with the Admin Console, to make your changes effective.
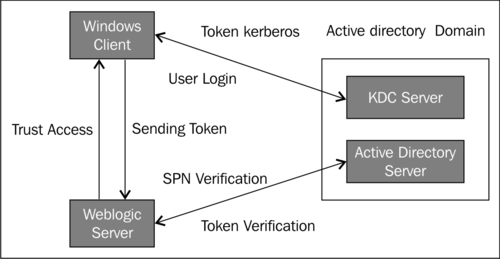
Now your WebLogic Server is able to accept Kerberos tokens in an HTTP connection, and it can establish a trusted relationship with your client when a Service Principal Name is called and the security is enabled in your Java application (refer to Chapter 3, Java EE Security With WebLogic, of this book to secure your path).
In the following diagram you can see an authentication schematic datasheet about the interaction actors:
If you receive any error message in the WebLogic log or if you just receive a Basic authentication form when you are trying to access a protected application resource, you probably have a configuration issue.
In the first instance, you can preserve your production configuration without touching it and try to do a client-side analysis with a network sniffer, for example, Wireshark. You will need to check if your Kerberos token is sent. Filter your network traffic for KRB5 protocols and by using the TCP port 88 (default TCP port to communicate with the Kerberos domain controller), you will be looking for some
Ticket Granting Server (TGS) transactions. If you can't find any trace of these kinds of packages you need to move your debug on the server side or follow our previous configuration again, step-by-step.
To debug your server configuration, you need to increase your log verbosity using some debug switches in your WebLogic Server node's parameter using the console path. We can do this by first going to the Servers (your server name) option and then selecting Debug | WebLogic | Security and then choosing the atn (authentication) and the atz (authorization) options.
Check these options, click Enable, and then apply your changes.
Now we need to change some parameters to activate the maximum verbosity for the security layer, as explained in the following steps:
- Edit your
krb5Login.conffile and switch the following parameter totrue:debug=true
- Under the WebLogic Admin Console, on every server node that you want to debug, in the startup arguments you need to change your
debugparameters totrue, as follows:-Dsun.security.krb5.debug=true -DDebugSecurityAdjudicator=true
- After this reconfiguration, you need to restart your WebLogic server nodes and analyze your server logs.