
Although ReSharper comes in a couple of versions and supports various versions of Visual Studio, there is only one main installation package. The version used depends on the license key used during activation.
Installing ReSharper is quite straightforward. Perform the following steps:
- Download the main installation package from the Download ReSharper page at http://www.jetbrains.com/resharper/download/index.html.
- After opening the downloaded installation package, you should see the following screenshot:
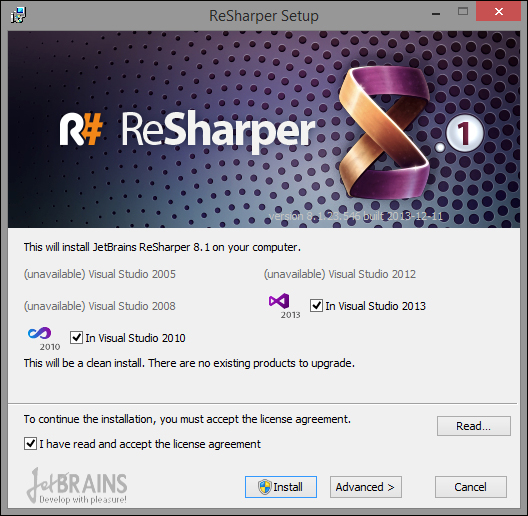
In this step, you can select the versions of Visual Studio in which you would like to use ReSharper (in case you have more than one already installed).
From this screen, you can just click on Install to run the installation process, or click on Advanced to configure more settings.
- If you have chosen Advanced settings, in the later steps you can choose what to do if you have a previous version of ReSharper already installed and how to change the installation location.
ReSharper is fully configurable. To access the ReSharper settings, you need to navigate to RESHARPER | Options from the Visual Studio toolbar.
ReSharper configuration is divided into four areas, which are listed as follows:
- Environment: This allows you to change the general ReSharper settings such as UI and Visual Studio integration
- Code Inspection: This allows you to change the settings related to code analysis
- Code Editing: This allows you to change the formatting, naming, and code cleanup rules
- Tools: This allows you to change the ReSharper tool's settings, such as Unit Test frameworks, patterns used for to-do items, and navigation to external sources
We will not go through all the available options in detail but present only those parts that, in our opinion, are the most useful.
Let's take a look at the tabs available under the Environment section.
In this tab, you can change settings that are related to user interface. We suggest that you check the Show managed memory usage in status bar and Show tips on startup options. The first one will show you, on the bottom status bar, how much memory is used by ReSharper and the second one will try to teach you something new every time you open Visual Studio.
This tab allows you to set how ReSharper integrates with Visual Studio. We propose that you check Hide overridden Visual Studio menu items and select Visual Studio as ReSharper keyboard scheme. The first one hides those options from the Visual Studio menu that are overridden by ReSharper; for example, the Refactor option in the context menu in the editor. This will indicate that you are using ReSharper features. The Visual Studio scheme adds shortcuts in order to avoid conflicts with the existing Visual Studio shortcuts.
Note
In this book, we will present many shortcuts and all will be related to the Visual Studio scheme. For shortcuts from the ReSharper 2.x/Intellij IDEA scheme, please check the ReSharper Documentation site at http://www.jetbrains.com/resharper/documentation/.
Now, let's look at the tabs that are available under the Code Inspection section.
This tab contains general settings for code analysis. Our suggestion is to check all the options available below the Enable code analysis checkbox:
- Color identifiers
- Highlight color usages
- Analyze errors in whole solution
- Show code inspection options in action list
- Show the "Import namespace" action using popup
This tab contains the most important settings related to code analysis. Settings are divided by language. It is highly recommended that you review these options to make sure that ReSharper will prompt suggestions that are consistent with your coding standards.
Next, we'll see the tabs under the Code Editing section.
ReSharper v8 allows you to store configuration on the following three levels:
- Computer: This contains settings that are applied to all your projects.
- Solution team-shared: This contains settings for a specific project. These settings are stored in the
sln.DotSettingsfile in your solution folder and override the settings specified at computer level. To share these settings with your team, you need to commit this file to your source control repository.Configuration on this level should be used to share common coding standards, such as naming conventions, code formatting, and code inspection rules, with your team.
- Solution personal: This contains your private settings. These settings are stored in the
sln.DotSettings.Userfile in your solution folder and override Solution team-shared configuration. This file should not be committed to your source control repository as it will override other users' settings.Usually, this level is used to change environment options such as preferred shortcuts, IntelliSense behaviors, and ReSharper UI settings.
To open the Manage Options… window, navigate to RESHARPER | Manage Options… from the Visual Studio toolbar. You can also open this window by clicking on the Manage… button in the Options window.