Now let's create your first plugin! In this example, we will use a plugin that is created automatically when you are creating a ReSharper plugin project. It simply allows you to reverse strings by adding a new context action and shows how you can add custom options to different menus in Visual Studio.
Assuming that you have installed SDK, we need to start with opening Visual Studio. It is important to run Visual Studio as an administrator.
Now let's create a new project. From the Visual Studio menu, navigate to FILE | New Project and from the New Project window, navigate to Installed | Templates | Visual C# | ReSharper | v8.1. This will display a list of the types of projects available to create the ReSharper plugin. Let's select ReSharper Plugin.
Note
It is very important for you to select the correct version of the .NET Framework. If you select Version 4.0 or higher, your plugin will be able to work only with Visual Studio 2010 or higher. If you would like to support older versions of Visual Studio, you need to select the .NET Framework 3.5.
Enter a name for your plugin, that is, AwesomeReSharperExtension, set a location, and click on OK.
Visual Studio will ask you to provide some information about your plugin such as the title, description, and author. Provide some descriptions in the correct fields and click on OK.
Now let's rebuild your solution to confirm that everything is working as it should. When building a plugin for the first time, ReSharper will ask you which build engine you would like to use, as shown in the following screenshot:
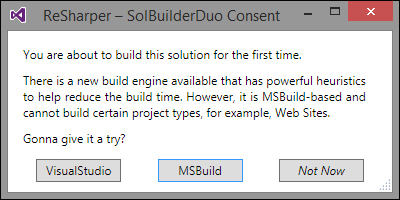
Click on VisualStudio. You can change this setting later on in the ReSharper Options window by navigating to the Tools | SolBuilderDuo screen.
As a project template comes with a reference to the ReSharper NuGet package, you do not need to add any references.
Your project now contains the following four important files:
AssemblyInfo.csin thePropertiesfolderAboutAction.csActions.xmlReverseStringAction.cs
Let's start with the first file, that is, AssemblyInfo.cs. It contains some metadata about your project. The plugin's related data contains information that you provided while creating a project and a file that contains a setting to add new actions to different menus:
[assembly: ActionsXml("AwesomeReSharperExtension.Actions.xml")]In this case, these actions are stored in the Actions.xml file in our project (AwesomeReSharperExtension).
Now let's open the
Actions.xml file. This XML file contains the definition to add new options for different menus.
It starts with the <action> node, which can contain sets of the <action> (for defining a new action) and <insert> (for inserting a new option in the menu, or creating a new action, or using the one created with the <action> attribute) elements.
Our sample file looks like what is shown in the following screenshot:
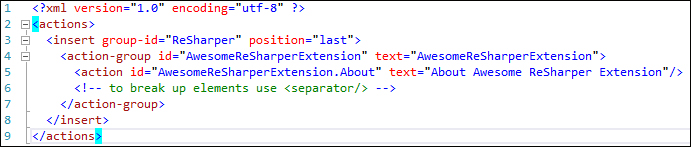
In the third line, we are referencing the ReSharper menu option, which is displayed in the Visual Studio menu. We are also setting the position of the new entry that we would like to add in the menu option—this will be the last position. Inside the <insert> attribute, we are creating a new menu option, AwesomeReSharperExtension, with the submenu About Awesome ReSharper Extension. We are also setting a handler for the action AwesomeReSharperExtension.About.
When you want to add new menu options, you can reference different options as follows:
- ReSharper.Navigate: This will add a new option to the Navigate menu in the RESHARPER tab
- VS#Solution: This will add a new option to the menu, which is available after right-clicking on your solution name
- VS#Project: This will add a new option to the menu, which is available after right-clicking on your project name
As we know that our action will be handled by the AwesomeReSharperExtension.About handler, let's open the AboutAction.cs file.
Do you remember the Ctrl + T shortcut? Let's use it!
The AboutAction class looks like what is shown in the following screenshot:

As you can see, this class starts with ActionHandler, which contains a name that we used in the Actions.xml file. Each action class needs to implement the IActionHandler interface. This interface comes with the following two methods:
Update(): This method returns a boolean value, which tells ReSharper if our action is disabled/enabledExecute(): This method runs when our action is executed
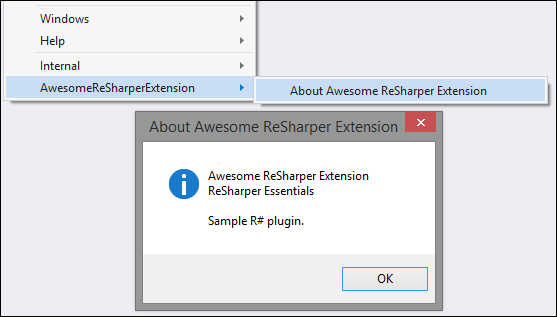
In our case, the Execute() method just displays a simple message box.
Finally, our action looks like what is shown in the following screenshot:
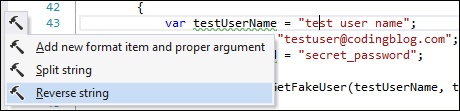
The most interesting feature of our plugin is the context action that can reverse strings.
Let's check the ReverseStringAction class. As you can see, it inherits from the ContextActionBase class and has the ContextAction attribute as shown in the following screenshot:
Values from the ContextAction attribute are used for displaying this context action in the ReSharper Options window.
Our class overrides the following two methods and one property:
IsAvailable()ExecutePsiTransaction()Text
The Text property returns the name that will be displayed on the list of available context actions.
The IsAvailable() method informs ReSharper if our action is available in a specific context. This method is run every time you move your cursor in the text editor.
In this method, the two most important lines are shown in the following screenshot:

The first line gets the element that is currently under the cursor. We are interested only in literal expressions (which are strings, numbers, and so on), so we are limiting the searched elements by the ILiteralExpression interface.
The second line checks if the element is a string value. This means that our context action will be available only if we place the cursor on a string (but not on the variable, which is a string type).
The second method, ExecutePsiTransaction(), is run when the user selects our action. It simply reverses the string (which we found in the IsAvailable() method) and replaces it in the code editor.
You can add more objects to your plugin. ReSharper SDK adds some item templates; for example, Context Action, Live Template Macro, and Quick Fix, which you can access by clicking on the right mouse button on your project, navigating to Add | New Item…, and filtering the available items to ReSharper items.
Each item contains some sample code that you can use in your plugin.
If you started developing a plugin using the ReSharper template, debugging it is quite easy—just press F5.
This is possible as the template contains proper debugging configuration, which you can see in the following screenshot:
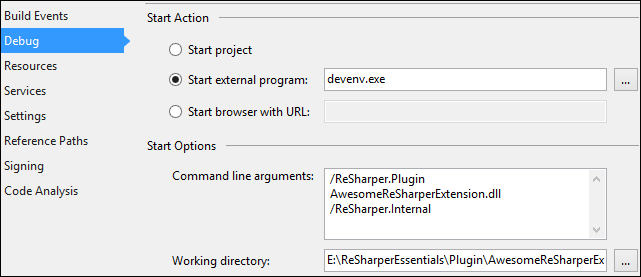
You can navigate to this screen from your project settings. The important part is setting devenv.exe (Visual Studio) as the start program and setting two command line arguments: /ReSharper.Plugin, which loads your plugin, and /ReSharper.Internal, which we have described earlier in this chapter. Finally, it is important to set Working directory, so we will need to specify only the filename and not the complete path to our plugin's .dll file.
Starting from ReSharper 8, plugins are provided as NuGet packages. To deploy a new plugin, you need to create a new NuGet package and upload it onto the ReSharper gallery at http://resharper-plugins.jetbrains.com.
Note
Creating NuGet packages is not in the scope of this book. For more information, you can check the NuGet documentation site at http://docs.nuget.org, or the ReSharper Plugin Development page at http://confluence.jetbrains.com/display/NETCOM/ReSharper+Plugin+Development.
You already know how to debug and deploy your plugin. Additionally, if you would like to run it locally, you can just copy your .dll file to the Bin/Plugins folder in the main ReSharper folder.
If you run Visual Studio with your plugin, you can access context action, as shown in the following screenshot: