
Chapter 8. Talk to the server with Ajax
This chapter covers
- A brief overview of Ajax
- Loading pre-formatted HTML from the server
- Making general GET and POST requests
- Making requests with fine-grained control
- Setting default Ajax properties
- A comprehensive example
It can be successfully argued that no one technology has transformed the landscape of the web more in recent years than the adoption of Ajax. The ability to make asynchronous requests back to the server without the need to reload pages has enabled a whole new set of user interaction paradigms and made Rich Internet Applications possible.
Ajax is a less recent addition to the web toolbox than many people may realize. In 1998, Microsoft introduced the ability to perform asynchronous requests under script control (discounting the use of <iframe> elements for such activity) as an ActiveX control to enable the creation of Outlook Web Access (OWA). Although OWA was a moderate success, few people seemed to take notice of the underlying technology.
A few years passed, and a handful of events launched Ajax into the collective consciousness of the web development community. The non-Microsoft browsers implemented a standardized version of the technology as the XMLHttpRequest (XHR) object; Google began using XHR; and, in 2005, Jesse James Garrett of Adaptive Path coined the term Ajax (for Asynchronous JavaScript and XML).
As if they were only waiting for the technology to be given a catchy name, the web development masses suddenly took note of Ajax in a big way, and it has become one of the primary tools by which we can enable Rich Internet Applications.
In this chapter, we’ll take a brief tour of Ajax (if you’re already an Ajax guru, you might want to skip ahead to section 8.2) and then look at how jQuery makes using Ajax a snap.
Let’s start off with a refresher on what Ajax technology is all about.
8.1. Brushing up on Ajax
Although we’ll take a quick look at Ajax in this section, please note that it’s not intended as a complete Ajax tutorial or an Ajax primer. If you’re completely unfamiliar with Ajax (or worse, still think that we’re talking about a dishwashing liquid or a mythological Greek hero), we encourage you to familiarize yourself with the technology through resources that are geared towards teaching you all about Ajax; the Manning books Ajax in Action and Ajax in Practice are both excellent examples.
Some people may argue that the term Ajax applies to any means to make server requests without the need to refresh the user-facing page (such as by submitting a request to a hidden <iframe> element), but most people associate the term with the use of XHR or the Microsoft XMLHTTP ActiveX control.
Let’s take a look at how those objects are used to generate requests to the server, beginning with creating one.
8.1.1. Creating an XHR instance
In a perfect world, code written for one browser would work in all commonly used browsers. We’ve already learned that we don’t live in that world; things don’t change with Ajax. There is a standard means to make asynchronous requests via the JavaScript XHR object, and an Internet Explorer proprietary means that uses an ActiveX control. With IE7, a wrapper that emulates the standard interface is available, but IE6 requires divergent code.
Once created (thankfully) the code to set up, initiate, and respond to the request is relatively browser-independent, and creating an instance of XHR is easy for any particular browser. The problem is that different browsers implement XHR in different ways, and we need to create the instance in the manner appropriate for the current browser.
But rather than relying on detecting which browser a user is running to determine which path to take, we’ll use the preferred technique known as object detection. In this technique, we try to figure out what the browser’s capabilities are, not which browser is being used. Object detection results in more robust code because it can work in any browser that supports the tested capability.
The code of listing 8.1 shows a typical idiom used to instantiate an instance of XHR using this technique.
Listing 8.1. Object detection resulting in code that can deal with many browsers

After creation, the XHR instance sports a conveniently consistent set of properties and methods across all supporting browser instances. These properties and methods are shown in table 8.1, and the most commonly used of these will be discussed in the sections that follow.
Table 8.1. XHR methods and properties
|
Description |
|
|---|---|
|
abort() |
Causes the currently executing request to be cancelled. |
|
getAllResponseHeaders() |
Returns a single string containing the names and values of all response headers. |
|
getResponseHeader(name) |
Returns the value of the named response header. |
|
open(method,url,async, |
Sets the method and destination URL of the request. Optionally, the request can be declared synchronous, and a username and password can be supplied for requests requiring container-based authentication. |
|
send(content) |
Initiates the request with the specified (optional) body content. |
|
setRequestHeader(name,value) |
Sets a request header using the specified name and value. |
|
Properties |
Description |
|
onreadystatechange |
Assigns the event handler used when the state of the request changes. |
|
readyState |
An integer value that indicates the state of the request as follows:
|
|
responseText |
The body content returned in the response. |
|
responseXML |
If the body content is XML, the XML DOM created from the body content. |
|
status |
Response status code returned from the server. For example: 200 for success or 404 for not found. See the HTTP Specification[1] for the full set of codes. |
|
statusText |
The status text message returned by the response. |
1http://www.w3.org/Protocols/rfc2616/rfc2616-sec10.html#sec10
With an instance created, let’s look at what it takes to set up and fire off the request to the server.
8.1.2. Initiating the request
Before we can send a request to the server, we need to do the following setup steps:
- Specify the HTTP method such as (POST or GET)
- Provide the URL of the server-side resource to be contacted
- Let the XHR instance know how it can inform us of its progress
- Provide any body content for POST requests
We set up the first two items by calling the open() method of XHR as follows:
xhr.open('GET','/some/resource/url'),
Note that this method does not cause the request to be sent to the server. It merely sets up the URL and HTTP method to be used. The open() method can also be passed a third Boolean parameter that specifies if the request is to be asynchronous (if true, which is the default) or synchronous (if false). There’s seldom a good reason not to make the request asynchronous (even if it means we don’t have to deal with callback functions); after all, the asynchronous nature of the request is usually the whole point of making a request in this fashion.
Third, we provide a means for the XHR instance to tap us on the shoulder to let us know what’s going on; we accomplish this by assigning a callback function to the onreadystatechange property of the XHR object. This function, known as the ready state handler, is invoked by the XHR instance at various stages of its processing. By looking at the settings of the various other properties of XHR, we can find out exactly what’s going on with the request. We’ll take a look at how a typical ready state handler operates in the next section.
The last steps to initiating the request are to provide any body content for POST requests and send it off to the server. Both of these are accomplished via the send() method. For GET requests, which typically have no body, no body content parameter is passed as follows:
xhr.send(null);
When request parameters are passed to POST requests, the string passed to the send() method must be in the proper format (which we might think of as query string format) in which the names and values must be properly URI-encoded. URI encoding is beyond the scope of this section (and as it turns out, jQuery is going to handle all of that for us), but if you’re curious, do a web search for the term encodeURIComponent, and you’ll be suitably rewarded.
An example of such a call is as follows:
xhr.send('a=1&b=2&c=3'),
Now let’s see what the ready handler is all about.
8.1.3. Keeping track of progress
An XHR instance informs us of its progress through the ready state handler. This handler is established by assigning a reference to the function to serve as the ready handler to the onreadystatechange property of the XHR instance.
Once the request is initiated via the send() method, this callback will be invoked numerous times as the request makes transitions through its various states. The current state of the request is available as a numeric code in the readyState property (see the description of this property in table 8.1).
That’s nice, but more times than not, we’re only interested in when the request completes and whether it was successful or not. So frequently, we’ll see ready handlers implemented using the pattern shown in listing 8.2.
Listing 8.2. Writing the ready state handler to ignore all but the completed state

This pattern ignores all but the completed state and, once complete, examines the value of the status property to determine if the request succeeded or not. The HTTP Specification defines all status codes in the 200 to 299 range as success and those with values of 300 or above as various types of failures.
We should note one thing about this ready handler; it referenced the XHR instance through a top-level variable. But shouldn’t we expect the instance to be passed to the handler as a parameter?
Well, we could have expected that, but that’s not what happens. The instance must be located by some other means, and that’s usually a top-level (global) variable. This could be a problem when we want to have more than one request firing simultaneously. Luckily, we shall see that the jQuery Ajax API handily solves this problem for us.
Let’s explore how to deal with the response from a completed request.
8.1.4. Getting the response
Once the ready handler has determined that the readyState is complete and that the request completed successfully, the body of the response can be retrieved from the XHR instance.
Despite the moniker Ajax (where the X stands for XML), the format of the response body can be any text format; it’s not limited to XML. In fact, most of the time, the response to Ajax requests is a format other than XML. It could be plain text or, perhaps, an HTML fragment; it could even be a text representation of a JavaScript object or array in JavaScript Object Notation (JSON) format.
Regardless of its format, the body of the response is available via the responseText property of the XHR instance (assuming that the request completes successfully). If the response indicates that the format of its body is XML by including a content-type header specifying a MIME type of text/xml (or any XML MIME type), the response body will be parsed as XML. The resulting DOM will be available in the responseXML property. JavaScript (and jQuery itself, using its selector API) can then be used to process the XML DOM.
Processing XML on the client isn’t rocket science, but—even with jQuery’s help—it can still be a pain. Although there are times when nothing but XML will do for returning complex hierarchical data, frequently page authors will use other formats when the full power (and corresponding headache) of XML isn’t absolutely necessary.
But some of those other formats aren’t without their own pain. When JSON is returned, it must be converted into its runtime equivalent. When HTML is returned, it must be loaded into the appropriate destination element. And what if the HTML markup returned contains <script> blocks that need evaluation? We’re not going to deal with these issues in this section because it isn’t meant to be a complete Ajax reference and, more importantly, because we’re going to find out that jQuery handles most of these issues on our behalf.
A diagram of this whole process is shown in figure 8.1.
Figure 8.1. The life cycle of an Ajax request as it makes its way from the client to the server and back again
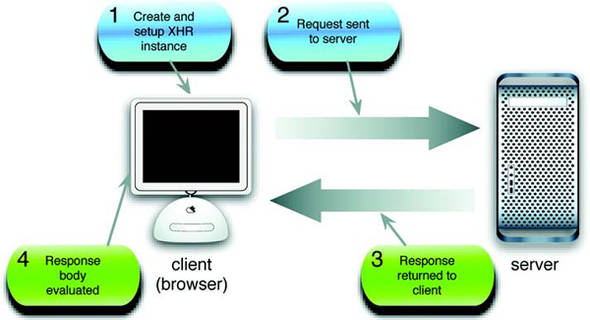
In this short overview of Ajax, we’ve identified the following pain points that page authors using Ajax need to deal with:
- Instantiating an XHR object requires browser-specific code.
- Ready handlers need to sift through a lot of uninteresting state changes.
- Ready handlers don’t automatically get a reference to invoking XHR instances.
- The response body needs to be dealt with in numerous ways depending upon its format.
The remainder of this chapter will describe how the jQuery Ajax commands and utility functions make Ajax a lot easier (and cleaner) to use on our pages. There are a lot of choices in the jQuery Ajax API, and we’ll start with some of the simplest and most often-used tools.
8.2. Loading content into elements
Perhaps one of the most common uses of Ajax is to grab a chunk of content from the server and stuff it into the DOM at some strategic location. The content could be an HTML fragment that’s to become the child content of a target container element, or it could be plain text that will become the content of the target element.
Let’s imagine that, on page load, we want to grab a chunk of HTML from the server using a resource named /serverResource and make it the content of a <div> element with an id of someContainer. For the final time in this chapter, let’s look at how we do this without jQuery assistance. Using the patterns we set out earlier in this chapter, the body of the onload handler is as shown in listing 8.3. The full HTML file for this example can be found in the file chapter8/listing.8.3.html.
Setting up for the examples
Unlike any of the example code that we’ve examined so far in this book, the code examples for this chapter require the services of a web server to receive the requests to server-side resources. Because it’s well beyond the scope of this book to discuss the operation of server-side mechanisms, we’re going to set up some minimal server-side resources that send data back to the client without worrying about doing it for real. We’ll treat the server as a black box; we don’t need or want to know how it’s doing its job.
To enable the serving of these smoke and mirrors resources, you’ll need to set up a web server of some type. For your convenience, the server-side resources have been set up in two formats: Java Server Pages (JSP) and some in PHP. The JSP resources can be used if you’re running (or wish to run) a servlet/JSP engine; if you want to enable PHP for your web server of choice, you can use the PHP resources.
If you want to use the JSP resources but aren’t already running a suitable server, instructions on setting up the free Tomcat web server are included with the sample code for this chapter. You’ll find these instructions in the file chapter8/tomcat.pdf. And don’t be concerned; it’s easier than you might think!
The examples found in the downloaded code are set up to use the JSP resources. If you want to switch the examples to use PHP, do a search-and-replace of all instances of the string .jsp with .php. Note that not all server-side resources have been translated from JSP to PHP, but the existing PHP resources should be enough to let the PHP-savvy fill in the rest of the resources.
Once you have the server of your choice set up, you can hit the URL http://localhost:8080/chapter8/test.jsp (to check your Tomcat installation) or http://localhost/chapter8/test.php (to check your PHP installation). The latter assumes that you have set up your web server (Apache or any other you have chosen) to use the example code root folder as a document base.
When you can successfully view the appropriate test page, you’ll be ready to run the examples in this chapter.
Listing 8.3. Using native XHR to include an HTML fragment
var xhr;

if (window.XMLHttpRequest) {
  xhr = new XMLHttpRequest();
}
else if (window.ActiveXObject) {
  xhr = new ActiveXObject("Msxml2.XMLHTTP");
}
else {
  throw new Error("Ajax is not supported by this browser");
}

xhr.onreadystatechange = function() {
  if (xhr.readyState == 4) {
    if (xhr.status >= 200 && xhr.status < 300) {
      document.getElementById('someContainer')
        .innerHTML = xhr.responseText;
    }
  }
}

xhr.open('GET','/serverResource'),
xhr.send();
Although there’s nothing tricky going on here, that’s a non-trivial amount of code; 19 lines or so—even accounting for blank lines that we added for readability and one line that we artificially broke in two so that it would fit on the page.
The equivalent code we’d write as the body of a ready handler using jQuery is as follows:
$('#someContainer').load('/serverResource'),
We’re betting that we know which code you’d rather write! Let’s look at the jQuery command that we used in this statement.
8.2.1. Loading content with jQuery
The simple jQuery statement from the previous section easily loads content from the server-side resource using one of the most basic, but useful, jQuery Ajax commands: load(). The full syntax description of this command is as follows:
Command syntax: load
Initiates an Ajax request to the specified URL with optional parameters. A callback function can be specified that’s invoked when the request completes. The response text replaces the content of all matched elements.
Parameters
url
(String) The URL of the server-side resource to which the request is sent.
parameters
(Object) An object whose properties are serialized into properly encoded parameters to be passed to the request. If specified, the request is made using the POST method. If omitted, the GET method is used.
callback
(Function) A callback function invoked after the response data has been loaded into the elements of the matched set. The parameters passed to this function are the response text, the status code, and the XHR instance.
Returns
The wrapped set.
Though simple to use, this command has some important nuances. For example, when the parameters parameter is used to supply the request parameters, the request is made using the POST HTTP method; otherwise, a GET request is initiated. If we want to make a GET request with parameters, we can include them as a query string on the URL. But be aware that when we do so, we’re responsible for ensuring that the query string is properly formatted and that the names and values of the request parameters are URI-encoded.
Most of the time, we’ll use the load() command to inject the complete response into whatever elements are contained within the wrapped set, but sometimes we may want to filter elements coming back as the response. If we want to filter response elements, jQuery allows us to specify a selector on the URL that will be used to limit which response elements are injected into the wrapped elements by suffixing the URL with a space and pound sign character (#) followed by the selector.
For example, to filter response elements so that only <div> instances are injected, we write
$('.injectMe').load('/someResource #div'),
If the request parameters come from form controls, a helpful command in building a query string is serialize(), whose syntax is as follows:
Command syntax: serialize
Creates a properly formatted and encoded query string from all successful form elements in the wrapped set
Parameters
- none
Returns
The formatted query string
The serialize() command is smart enough to only collect information from form control elements in the wrapped set, and only from those qualifying elements that are deemed successful. A successful control is one that would be included as part of a form submission according to the rules of the HTML Specification.[2] Controls such as unchecked check boxes and radio buttons, dropdowns with no selections, and any disabled controls are not considered successful and do not participate in the submission. They are also ignored by serialize().
If we’d rather get the form data in a JavaScript array (as opposed to a query string), jQuery provides the serializeArray() method.
Command syntax: serializeArray
serializeArray()
Collects the values of all successful form controls into an array of objects containing the names and values of the controls
Parameters
- none
Returns
The array of form data
The array returned by serializeArray() is composed of anonymous object instances, each of which contains a name property and a value property that contain the name and value of each successful form control.
With the load() command at our disposal, let’s put it to work solving a common real-world problem that many web developers encounter.
8.2.2. Loading dynamic inventory data
Often in business applications, particularly for retail web sites, we want to grab real-time data from the server to present our users with the most up-to-date information. After all, we wouldn’t want to mislead customers into thinking that they can buy something that’s not available, would we?
In this section, we’ll begin to develop a page that we’ll add onto throughout the course of the chapter. This page is part of a web site for a fictitious firm named The Boot Closet, an online retailer of overstock and closeout motorcycle boots. Unlike the fixed product catalogs of other online retailers, this inventory of overstock and closeouts is fluid, depending on what deals the proprietor was able to make that day and what’s already been sold from the inventory. So it will be important for us to always make sure that we’re displaying the latest info!
To begin our page (which will ignore site navigation and other boilerplate to concentrate on the lesson at hand), we want to present our customers with a dropdown containing the styles that are currently available and, on a selection, display detailed information regarding that style to the customer. On initial display, the page will look as shown in figure 8.2.
Figure 8.2. The initial display of our item information page
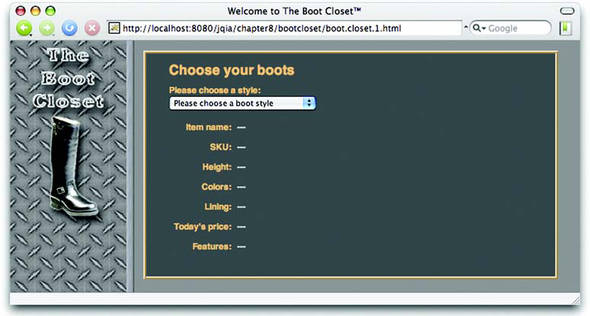
After the page first loads, a pre-loaded dropdown with the list of the styles currently available in the inventory and labeled fields to show the item data when a style is selected will be displayed. When no style is selected, we’ll display dashes as a placeholder for the data.
Let’s start by defining the HTML markup that will create this page structure as follows:
<body id="bootCloset1">
  <img id="banner" src="boot.closet.branding.png"/>
  <form action="" id="orderForm">
    <div id="detailFormContainer">
      <h1>Choose your boots</h1>
      <div>
        <label>Please choose a style:</label><br/>
        <select id="styleDropdown">
          <option value="">Please choose a boot style</option>
          <option value="7177382">Caterpillar Tradesman Work Boot</option>
          <option value="7269643">Caterpillar Logger Boot</option>
          <option value="7141832">Chippewa 17" Engineer Boot</option>
          <option value="7141833">Chippewa 17" Snakeproof Boot</option>
          <option value="7173656">Chippewa 11" Engineer Boot</option>
          <option value="7141922">Chippewa Harness Boot</option>
          <option value="7141730">Danner Foreman Pro Work Boot</option>
          <option value="7257914">Danner Grouse GTX Boot</option>
        </select>
      </div>
      <div id="detailsDisplay"></div>
    </div>
  </form>
</body>
Not much to it, is there?
We’ve defined all the visual rendition information in an external stylesheet, and we’ve included no behavioral aspects in the HTML markup in order to adhere to the precepts of Unobtrusive JavaScript.
The options for the styles dropdown have been pre-populated. In all the examples in this chapter, we assume that we’re using server-side resources to power our web application; communicating with these resources is, after all, the whole point of Ajax. So even though the example uses a simple HTML file, we assume that it was originally generated by some server-side templating resources such as a JSP or PHP page and that the product data was dynamically included from the inventory database (or wherever it’s stored).
Also, the <div> container defined (with an id of detailsDisplay) to hold the details display is completely empty! We’re going to rely on the server-side templating resource to provide the dynamic content, so we don’t want to specify it here and in the JSP (or PHP) page; having the structure defined in two places would necessitate keeping them in sync. Bad idea!
On page load, we grab the empty version of the content from the server so that the structure only needs to be defined in one place. Let’s look at our ready handler now.
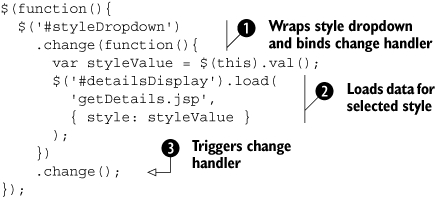
In this ready handler, we wrap the boot style dropdown and bind a change handler ![]() to it. In the callback for the change handler, which will be invoked whenever a customer changes the selection, we obtain
the current value of the selection by applying the val() command to this, which in the handler is the <select> element that triggered the event. We then apply the load() command
to it. In the callback for the change handler, which will be invoked whenever a customer changes the selection, we obtain
the current value of the selection by applying the val() command to this, which in the handler is the <select> element that triggered the event. We then apply the load() command ![]() to the detailsDisplay element to initiate an Ajax callback to a server-side resource, getDetails.jsp, passing the style value as a parameter named style.
to the detailsDisplay element to initiate an Ajax callback to a server-side resource, getDetails.jsp, passing the style value as a parameter named style.
As the final act of the ready handler, we call the change() command ![]() to invoke the change handler. This issues a request with the default style selection of “” (the empty string), causing the
server-side resource to return the construct that results in the display that was shown in figure 8.2.
to invoke the change handler. This issues a request with the default style selection of “” (the empty string), causing the
server-side resource to return the construct that results in the display that was shown in figure 8.2.
After the customer chooses an available boot style, the page will appear as shown in figure 8.3.
Figure 8.3. The server-side resource returns a pre-formatted fragment of HTML to display the boot information.

The most notable operation performed in the ready handler is the use of the load() command to quickly and easily fetch a snippet of HTML from the server and place it within the DOM as the child of an existing element. This command is extremely handy and well suited to web applications powered by servers capable of server-side templating such as JSP and PHP.
Listing 8.4 shows the complete code for our Boot Closet page, which can be found in the file chapter8/bootcloset/boot.closet.1.html. We’ll be revisiting this page to add further capabilities to it as we progress through this chapter.
Listing 8.4. The first phase of our Boot Closet retailer page
<html>
<head>
<title>Welcome to The Boot Closet™</title>
<link rel="stylesheet" type="text/css" href="boot.closet.css">
<script type="text/javascript"
src="../../scripts/jquery-1.2.1.js"></script>
<script type="text/javascript">
$(function(){
$('#styleDropdown')
.change(function(){
var styleValue = $(this).val();
$('#detailsDisplay').load(
'getDetails.jsp',
{ style: styleValue }
);
})
.change();
});
</script>
</head>
<body id="bootCloset1">
<img id="banner" src="boot.closet.branding.png"/>
<form action="" id="orderForm">
<div id="detailFormContainer">
<h1>Choose your boots</h1>
<div>
<label>Please choose a style:</label><br/>
<select id="styleDropdown">
<option value="">Please choose a boot style</option>
<option value="7177382">
Caterpillar Tradesman Work Boot</option>
<option value="7269643">Caterpillar Logger Boot</option>
<option value="7141832">Chippewa 17" Engineer Boot</option>
<option value="7141833">Chippewa 17" Snakeproof Boot</option>
<option value="7173656">Chippewa 11" Engineer Boot</option>
<option value="7141922">Chippewa Harness Boot</option>
<option value="7141730">Danner Foreman Pro Work Boot</option>
<option value="7257914">Danner Grouse GTX Boot</option>
</select>
</div>
<div id="detailsDisplay"></div>
</div>
</form>
</body>
</html>
The load() command is tremendously useful when we want to grab a fragment of HTML to stuff into the content of an element (or set of elements). But there may be times when we either want more control over how the Ajax request gets made, or we need to do something more esoteric with the returned data in the response body.
Let’s continue our investigation of what jQuery has to offer for these more complex situations.
8.3. Making GET and POST requests
The load() command makes either a GET or a POST request, depending on whether it’s called with request data, but sometimes we want to have a bit more control over which HTTP method gets used. Why should we care? Because, maybe, our servers care.
Web authors have traditionally played fast and loose with the GET and POST methods, using one or the other without heeding how the HTTP protocol intends for these methods to be used. The intentions for each method are as follows:
- GET requests—Intended to be idempotent; the state of the server and the model data for the application should be unaffected by a GET operation. The same GET operation, made again and again and again, should return exactly the same results (assuming no other force is at work changing the server state).
- POST requests—Can be non-idempotent; the data they send to the server can be used to change the model state of the application; for example, adding records to a database or removing information from the server.
A GET request should, therefore, be used for getting data (as its name implies). It may be required to send some data to the server for the GET; for example, to identify a style number to retrieve color information. But when data is being sent to the server in order to effect a change, POST should be used.
Warning
This is more than theoretical. Browsers make decisions about caching based upon the HTTP method used; GET requests are highly subject to caching. Using the proper HTTP method ensures that you don’t get cross-ways with the browser’s expectations regarding the intentions of the requests.
All that being said, jQuery gives us a few means to make GET requests, which unlike load(), aren’t implemented as jQuery commands for a wrapped set. Utility functions are provided to make various types of GET requests. As we pointed out in chapter 1, jQuery utility functions are top-level functions that are namespaced with the jQuery global name or its $ alias.
Let’s look at each of these functions.
8.3.1. Getting data with jQuery
When we want to fetch some data from the server and decide what to do with it ourselves (rather than letting the load() command set it as the content of an HTML element), we can use the $.get() utility function. Its syntax is as follows:
Command syntax: $.get
$.get(url,parameters,callback)
Initiates a GET request to the server using the specified URL with any passed parameters as the query string.
Parameters
url
(String) The URL of the server-side resource to contact via the GET method.
parameters
(Object|String) An object whose properties serve as the name/value pairs used to construct a query string to be appended to the URL, or a preformatted and encoded query string.
callback
(Function) A function invoked when the request completes. The response body is passed as the first parameter to this callback, and the status as the second.
Returns
The XHR instance.
Let’s look at a simple use of this function as shown in listing 8.5 (which can be found in the file chapter8/$.get.html).
Listing 8.5. Using $.get() utility function to fetch data from the server

In this simple page, we create a button and instrument it to initiate a call to $.get() ![]() once it’s clicked. The GET request is made to the server resource at reflectData.jsp (which returns a text snippet showing the values that were passed to it as request parameters), specifying values for request
parameters a, b, and c. The callback is passed the fetched data and can do whatever it wants with it. In this case, it merely issues an alert displaying
that data.
once it’s clicked. The GET request is made to the server resource at reflectData.jsp (which returns a text snippet showing the values that were passed to it as request parameters), specifying values for request
parameters a, b, and c. The callback is passed the fetched data and can do whatever it wants with it. In this case, it merely issues an alert displaying
that data.
When this HTML page is loaded into a browser and the button is clicked, we see the display of figure 8.4.
Figure 8.4. The $.get() utility function fetches data from the server that we can manipulate as we please, including only showing it in an alert.

If the response contains an XML document, the document will be parsed, and the data parameter passed to the callback will be the resulting DOM.
XML is great when we need its flexibility and our data is hierarchical in nature, but it can be painful to digest. Let’s see another jQuery utility function that’s quite useful when our data needs are more basic.
8.3.2. Getting JSON data
As stated in the previous section, when an XML document is returned from the server, the XML document is automatically parsed, and the resulting DOM is made available to the callback function. When XML is overkill or otherwise unsuitable as a data transfer mechanism, JSON is often used in its place; one reason is that JSON is easy to digest in client-side script. Well, jQuery makes it even easier.
For times when we know that the response will be JSON, the $.getJSON() utility function automatically parses the returned JSON string and makes the resulting JavaScript data item available to its callback. The syntax of this utility function is as follows:
Command syntax: $.getJSON
$.getJSON(url,parameters,callback)
Initiates a GET request to the server using the specified URL with any passed parameters as the query string. The response is interpreted as a JSON string, and the resulting data is passed to the callback function.
Parameters
url
(String) The URL of the server-side resource contacted via the GET method.
parameters
(Object|String) An object whose properties serve as the name/value pairs used to construct a query string to be appended to the URL, or a preformatted and encoded query string.
callback
(Function) A function invoked when the request completes. The data value resulting from digesting the response body as a JSON string is passed as the first parameter to this callback, and the status as the second.
Returns
The XHR instance.
This function is great for those times when we want to get data from the server without the overhead of dealing with XML. Let’s see an example that puts it to work for us.
Loading cascading dropdowns
When creating Rich Internet Applications, we often encounter the need to set the options in a dropdown control to values that are dependent on the setting of some other control, frequently another dropdown. A common example is choosing a state or province from one dropdown that causes a subsequent dropdown to be loaded with the list of cities in that state or province.
Such a set of controls has come to be known by the term dependent dropdowns—or, sometimes, cascading dropdowns—and has become a poster child for Ajax; it’s used as an example in almost every Ajax book in existence, as well as all over the Internet. In this section, we’ll look at how to solve this canonical problem and create a set of elements by leveraging the jQuery $.getJSON() utility function.
For this example, we’ll return to The Boot Closet page that we set up in section 8.2.2 and extend its capabilities. As originally written, the page allows our customers to find out which boots are available and the detailed information associated with the available boots, but they have no way to pick a pair for purchase. We like purchases, so our next step is to add controls that let them pick color and size.
Remember that we’re a closeout business—that means we don’t always have a full line of any one style available. Only certain colors are available from day to day, and only certain sizes are available in those colors. So we can’t hard-code lists of colors and sizes; we need to obtain these lists dynamically from our real-time inventory database.
To allow the customer to select colors and sizes, we’ll add two dropdowns to our form: one for color and one for size. The initial appearance of our enhanced form is shown in figure 8.5, and you can load the HTML page for this example from the file chapter8/bootcloset/boot.closet.2.html.
Figure 8.5. The initial state of the order form with the dependent dropdowns in an empty and disabled state

The dropdown element for choosing the boot style is enabled (and pre-filled with the available styles as we discussed earlier), but the color and size controls are disabled and empty. We can’t pre-fill these dropdowns because we don’t know what colors to display until a style is picked, and we don’t know what sizes to display until we know both the style and the color.
Given that, here are the things that we wish to accomplish for these controls:
- When a style is selected, the color dropdown should be enabled and filled with the colors available for the selected style.
- When both a style and a color are selected, the size dropdown should be enabled and display the sizes available for the combination of style and color.
- The dropdowns always need to be consistent with each other. We need to ensure that, regardless of the order in which the user goes about manipulating the controls, a combination that’s not available in inventory never be shown.
Let’s roll up our sleeves and get to work.
To begin, let’s lay out the additional HTML markup for the page body. Here’s the HTML for the new page with significant changes and additions to the code highlighted in bold:
<body id="bootCloset2">
  <img id="banner" src="boot.closet.branding.png"/>
  <form action="" id="orderForm">
    <div id="detailFormContainer">
      <h1>Choose your boots</h1>
      <div id="cascadingDropdowns">
        <div>
          <label>Please choose a style:</label><br/>
          <select id="styleDropdown">
            <option value="">Please choose a boot style</option>
            <option value="7177382">
             Caterpillar Tradesman Work Boot</option>
            <option value="7269643">Caterpillar Logger Boot</option>
            <option value="7141832">Chippewa 17" Engineer Boot</option>
            <option value="7141833">Chippewa 17" Snakeproof Boot</option>
            <option value="7173656">Chippewa 11" Engineer Boot</option>
            <option value="7141922">Chippewa Harness Boot</option>
            <option value="7141730">Danner Foreman Pro Work Boot</option>
            <option value="7257914">Danner Grouse GTX Boot</option>
          </select>
        </div>
<div>
<label>Color:</label><br/>
<select id="colorDropdown" disabled="disabled"></select>
</div>
<div>
<label>Size:</label><br/>
<select id="sizeDropdown" disabled="disabled"></select>
</div>
      </div>
      <div id="detailsDisplay"></div>
    </div>
  </form>
</body>
We’ve changed the id of the <body> tag (primarily so that we can use it as a switch within the CSS stylesheet used by multiple versions of the page) and added the two empty and disabled dropdowns.
To add the new behaviors associated with these controls to the page, we also need to enhance our ready handler. The new ready handler, once again with changes highlighted in bold, is as follows:

These changes are minor but significant. First, we make a call to a function named adjustColorDropdown() within the change listener for the styles dropdown ![]() . This will trigger any change required for the state and content based upon the value of the style selected.
. This will trigger any change required for the state and content based upon the value of the style selected.
We then add a listener to the new colors dropdown ![]() to adjust the state and content of the size dropdown when the color dropdown changes value. This listener is set to be a
function named adjustSizeDropdown().
to adjust the state and content of the size dropdown when the color dropdown changes value. This listener is set to be a
function named adjustSizeDropdown().
That’s all simple enough, but we still haven’t written the functions that effect the changes to the state and content of the dependent dropdowns. Let’s tackle the color dropdown first with the definition of the adjustColorDropdown() function.

After obtaining the value of the style dropdown and tucking it away in variable styleValue for later reference, we form a wrapped set consisting of the color dropdown and store it in variable dropdownSet. We’re going to reference this set repeatedly throughout the remainder of the function, and we don’t want to incur the overhead of re-creating it every time we need it.
The decision whether the color dropdown should be enabled or disabled is made next ![]() , depending on the value of the style dropdown—disabled if the value is empty, enabled if otherwise. If the color dropdown
is disabled, it’s also emptied through use of the emptySelect() command
, depending on the value of the style dropdown—disabled if the value is empty, enabled if otherwise. If the color dropdown
is disabled, it’s also emptied through use of the emptySelect() command ![]() .
.
Wait a minute! What emptySelect() command?
Before you start feverishly thumbing through the previous chapters searching for this command, don’t bother; it doesn’t exist—at least not yet. This command is one that we’ll create ourselves in the next section. For now, be aware that this command will cause all the options in the color dropdown to be removed.
After we disable and empty the color dropdown, we call the adjustSizeDropdown() function ![]() to make sure that any appropriate adjustments are made to its dependent size dropdown.
to make sure that any appropriate adjustments are made to its dependent size dropdown.
If the color dropdown is enabled, it needs to be filled with the values that are appropriate for the value that is selected
from the styles dropdown. To obtain those values, we use the services of the $.getJSON() function, ![]() specifying a server-side resource of getColors.jsp and passing it the selected style value via a request parameter named style.
specifying a server-side resource of getColors.jsp and passing it the selected style value via a request parameter named style.
When the callback function is invoked (after the Ajax request returns its response), the parameter passed to the callback is the JavaScript value resulting from the evaluation of the response as a JSON construct. A typical JSON construct returned from getColors.jsp is as follows:
[
  {value:'',caption:'choose color'},
  {value:'bk',caption:'Black Oil-tanned'},
  {value:'br',caption:'Black Polishable'}
]
This notation defines an array of objects, each with two properties: value and caption. These objects define the value and display text of the options to be added to the color dropdown. We populate the dropdown by passing the evaluated JSON value to the loadSelect() command applied to the dropdown. Yes, loadSelect() is another custom command that we’ll define ourselves.
Finally, whenever the value of the color dropdown changes, we need to make sure that the size dropdown reflects the new value;
we call the adjustSizeDropdown() function ![]() to apply a series of operations to the size dropdown similar to the routine for the color dropdown.
to apply a series of operations to the size dropdown similar to the routine for the color dropdown.
The definition of that adjustSizeDropdown() function is as follows:
function adjustSizeDropdown() {
  var styleValue = $('#styleDropdown').val();
  var colorValue = $('#colorDropdown').val();
  var dropdownSet = $('#sizeDropdown'),
  if ((styleValue.length == 0)||(colorValue.length == 0) ) {
    dropdownSet.attr("disabled",true);
    dropdownSet.emptySelect();
  }else {
    dropdownSet.attr("disabled",false);
    $.getJSON(
      'getSizes.jsp',
      {style:styleValue,color:colorValue},
      function(data){dropdownSet.loadSelect(data)}
    );
  }
}
It should be no surprise that the structure of this function is strikingly similar to that of the adjustColorDropdown() function. Aside from operating upon the size dropdown rather than the color dropdown, this function looks at both the values of the style and color dropdowns to decide whether the size dropdown is to be enabled or disabled. In this case, both the style and color values must not be empty for the size dropdown to become enabled.
If enabled, the size dropdown is loaded—once again using $.getJSON()—from a server-side resource named getSizes.jsp, which is passed both the style and color values.
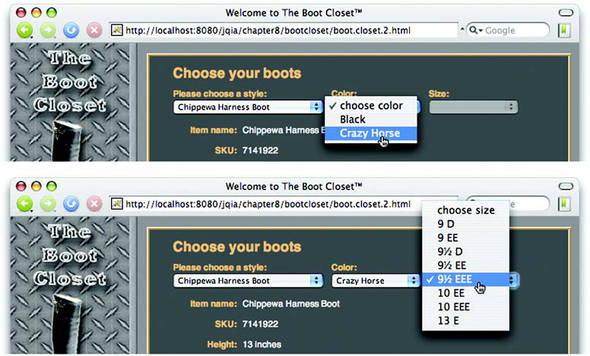
With these functions in place, our cascading dropdowns are now operational. Figure 8.5 showed us what the page looks like after its initial display, and figure 8.6 shows the relevant portion of the page after a style has been selected (top part of figure) and after a color has been selected (bottom part of figure).
Figure 8.6. Selecting a style enables the color dropdown (top), and selecting a color enables the size dropdown (bottom).
The full code for this page is shown in listing 8.6 and can be found in the file chapter8/bootcloset/boot.closet.2.html.
Listing 8.6. The Boot Closet page augmented with cascading dropdowns
<html>
<head>
<title>Welcome to The Boot Closet™</title>
<link rel="stylesheet" type="text/css" href="boot.closet.css">
<script type="text/javascript"
src="../../scripts/jquery-1.2.1.js"></script>
<script type="text/javascript"
src="jquery.jqia.selects.js"></script>
<script type="text/javascript">
$(function(){
$('#styleDropdown')
.change(function(){
var styleValue = $(this).val();
$('#detailsDisplay').load(
'getDetails.jsp',
{ style: styleValue }
);
adjustColorDropdown();
})
.change();
$('#colorDropdown')
.change(adjustSizeDropdown);
});
function adjustColorDropdown() {
var styleValue = $('#styleDropdown').val();
var dropdownSet = $('#colorDropdown'),
if (styleValue.length == 0) {
dropdownSet.attr("disabled",true);
dropdownSet.emptySelect();
adjustSizeDropdown();
} else {
dropdownSet.attr("disabled",false);
$.getJSON(
'getColors.jsp',
{style:styleValue},
function(data){
dropdownSet.loadSelect(data);
adjustSizeDropdown();
}
);
}
}
function adjustSizeDropdown() {
var styleValue = $('#styleDropdown').val();
var colorValue = $('#colorDropdown').val();
var dropdownSet = $('#sizeDropdown'),
if ((styleValue.length == 0)||(colorValue.length == 0) ) {
dropdownSet.attr("disabled",true);
dropdownSet.emptySelect();
}else {
dropdownSet.attr("disabled",false);
$.getJSON(
'getSizes.jsp',
{style:styleValue,color:colorValue},
function(data){dropdownSet.loadSelect(data)}
);
}
}
</script>
</head>
<body id="bootCloset2">
<img id="banner" src="boot.closet.branding.png"/>
<form action="" id="orderForm">
<div id="detailFormContainer">
<h1>Choose your boots</h1>
<div id="cascadingDropdowns">
<div>
<label>Please choose a style:</label><br/>
<select id="styleDropdown">
<option value="">Please choose a boot style</option>
<option value="7177382">
Caterpillar Tradesman Work Boot</option>
<option value="7269643">Caterpillar Logger Boot</option>
<option value="7141832">Chippewa 17" Engineer Boot</option>
<option value="7141833">Chippewa 17" Snakeproof Boot</option>
<option value="7173656">Chippewa 11" Engineer Boot</option>
<option value="7141922">Chippewa Harness Boot</option>
<option value="7141730">Danner Foreman Pro Work Boot</option>
<option value="7257914">Danner Grouse GTX Boot</option>
</select>
</div>
<div>
<label>Color:</label><br/>
<select id="colorDropdown" disabled="disabled"></select>
</div>
<div>
<label>Size:</label><br/>
<select id="sizeDropdown" disabled="disabled"></select>
</div>
</div>
<div id="detailsDisplay"></div>
</div>
</form>
</body>
</html>
Before we pat ourselves on the back too hard, we should know that we’re not done yet. We used custom commands in our functions that we haven’t written yet! Let’s get back to work...
Writing the custom commands
Our cascading dropdowns example needed to perform two operations on the select elements (dropdowns) on our page: removing all options from a dropdown and loading it with options defined within a JavaScript data construct.
We made the decision to implement these operations as jQuery commands for two major reasons:
- We knew that we’d need to perform these operations in multiple places throughout our page, so we should, at minimum, separate these operations out into individual functions rather than repeat them in inline code.
- These operations are general enough to be useful elsewhere on the site and even in other web applications. Defining and structuring them as jQuery commands makes a lot of sense.
Let’s tackle the emptySelect() command first.
$.fn.emptySelect = function() {
  return this.each(function(){
    if (this.tagName=='SELECT') this.options.length = 0;
  });
}
We learned how to add new jQuery commands in chapter 7, and we apply those techniques here to augment $.fn with a new function named emptySelect. Remember that, when such a function is invoked, the function context (this) is the matched set. By applying each() to the matched set, we iterate through all the elements in the set, calling the iterator function specified as the parameter to each().
Within that function, the function context is the individual element for the current round of the iteration. We check this element to ensure that it’s a <select> element, ignoring any other element type, and set the length of the options array for the element to 0. This is a supported, cross-browser way to remove all options from the dropdown.
Note that we return the wrapped set being operated on as the value of the function, ensuring that this command can participate in any jQuery command chain.
Easy enough! Now let’s tackle the loadSelect() command.
We add the following function to the $.fn namespace:
$.fn.loadSelect = function(optionsDataArray) {
return this.emptySelect().each(function(){
    if (this.tagName=='SELECT') {
      var selectElement = this;
      $.each(optionsDataArray,function(index,optionData){
        var option = new Option(optionData.caption,
                                optionData.value);
        if ($.browser.msie) {
          selectElement.add(option);
        }
        else {
          selectElement.add(option,null);
        }
      });
    }
  });
}
This command is slightly more involved.
As the lone parameter to this command, we expect a JavaScript construct as defined in the previous section—an array of objects, each of which possesses a value and a caption property that define the options to be added to the <select> element.
We’ll, once again, iterate through all the elements in the matched set; before we do that, we empty all <select> elements in the matched set by calling the emptySelect() command that we defined. This removes any options that might be in the element prior to our adding the new options.
Within the iterator function, we check the tag name of the elements and ignore all but <select> elements. For the elements that survive this test, we iterate through the data array passed to the command, creating a new Option instance for each array item and adding it to the <select>.
This addition is problematic because it must be performed in a browser-specific fashion. The W3C standard defines the add() method so that, in order to add an option to the end of the <select>, a null must be passed as the second parameter to add(). We’d think that this would be easily accomplished by omitting the second parameter as in
selectElement.add(option);
But life can’t be that simple. The Safari and Opera browsers work equally well whether the option is omitted or explicit, but Mozilla-based browsers throw a toofew-arguments exception when the second parameter is omitted. Adding an explicit null as the second parameter doesn’t help matters because doing so causes Internet Explorer to no longer add the new option.
Catch 22!
Because there is no single cross-browser way to perform the operation and no object to perform detection upon to use the preferred technique of object detection, we’re forced to resort to browser detection. Sigh. At least we have the $.browser utility flags to make the detection easy.
Once again, note that the wrapped set is returned as the function’s result.
The full implementation of these commands can be found in the file chapter8/bootcloset/jquery.jqia.selects.js and is shown in listing 8.7.
Listing 8.7. The implementation of our custom select commands
(function($) {
  $.fn.emptySelect = function() {
    return this.each(function(){
      if (this.tagName=='SELECT') this.options.length = 0;
    });
  }

  $.fn.loadSelect = function(optionsDataArray) {
    return this.emptySelect().each(function(){
      if (this.tagName=='SELECT') {
        var selectElement = this;
        $.each(optionsDataArray,function(index,optionData){
          var option = new option(optionData.caption,
                           optionData.value);
          if ($.browser.msie) {
            selectElement.add(option);
          }
          else {
            selectElement.add(option,null);
          }
        });
      }
    });
  }
})(jQuery);
Between $.get() and $.getJSON(), jQuery gives us some powerful tools when it comes to making GET requests, but man does not live by GETs alone!
8.3.3. Making POST requests
“Sometimes you feel like a nut, sometimes you don’t.” What’s true of choosing between an Almond Joy or a Mounds candy bar is also true of making requests to the server. Sometimes we want to make a GET, but at other times we want (or need) to make a POST request.
There are any number of reasons why we might choose a POST over a GET. First, the intention of the HTTP protocol is that POST will be used for any non-idempotent requests. Therefore, if our request has the potential to cause a change in the server-side state, it should be a POST (at least according to HTTP purists). Accepted practices and conventions aside, a POST operation must sometimes be used when the data to be passed to the server exceeds the small amount that can be passed by URL in a query string; that limit is a browser-dependent value. And sometimes, the server-side resource we contact may only support POST operations, or it might even perform different functions depending upon whether our request uses the GET or POST method.
For those occasions when a POST is desired or mandated, jQuery offers the $.post() utility function, which operates in the exact same fashion as $.get() except for the HTTP method used. Its syntax is as follows:
Command syntax: $.post
$.post(url,parameters,callback)
Initiates a POST request to the server using the specified URL with any parameters passed within the body of the request.
Parameters
url
(String) The URL of the server-side resource to contact via the POST method.
parameters
(Object|String) An object whose properties serve as the name/value pairs used to construct the body of the request, or a preformatted and encoded query string.
callback
(Function) A function invoked when the request completes. The response body is passed as the single parameter to this callback, and the status as the second.
Returns
The XHR instance.
Between the load() command and the various GET and POST jQuery Ajax functions, we can exert some measure of control over how our request is initiated and how we’re notified of its completion. But for those times when we need full control over an Ajax request, jQuery has a means for us to get as picky as we want.
8.4. Taking full control of an Ajax request
The functions and commands that we’ve seen so far are convenient for many cases, but there may be times when we want to take control of the nitty-gritty details into our own hands.
In this section, we’ll explore how jQuery lets us exert such dominion.
8.4.1. Making Ajax requests with all the trimmings
For those times when we want or need to exert a fine-grained level of control over how we make Ajax requests, jQuery provides a general utility function for making Ajax requests named $.ajax(). Under the covers, all other jQuery features that make Ajax requests eventually use this function to initiate the request. Its syntax is as follows:
Command syntax: $.ajax
$.ajax(options)
Initiates an Ajax request using the passed options to control how the request is made and callbacks notified.
Parameters
options
(Object) An object instance whose properties define the parameters to this operation. See table 8.2 for details.
Returns
The XHR instance.
Looks simple, doesn’t it? But don’t be deceived. The options parameter can specify a large range of values that can be used to tune the operation of this function. These options (in order of the likelihood of their use) are defined in table 8.2.
Table 8.2. Options for the $.ajax() utility function
|
Name |
Type |
Description |
|---|---|---|
|
url |
String |
The URL for the request. |
|
type |
String |
The HTTP method to use. Usually either POST or GET. If omitted, the default is GET. |
|
data |
Object |
An object whose properties serve as the query parameters to be passed to the request. If the request is a GET, this data is passed as the query string. If a POST, the data is passed as the request body. In either case, the encoding of the values is handled by the $.ajax() utility function. |
|
dataType |
String |
A keyword that identifies the type of data that’s expected to be returned by the response. This value determines what, if any, post-processing occurs upon the data before being passed to callback functions. The valid values are as follows:
|
|
The server resource is responsible for setting the appropriate content-type response header. If this property is omitted, the response text is passed to the callbacks without any processing or evaluation. |
||
|
timeout |
Number |
Sets a timeout for the Ajax request in milliseconds. If the request does not complete before the timeout expires, the request is aborted and the error callback (if defined) is called. |
|
global |
Boolean |
Enables (if true) or disables (if false) the triggering of so-called global functions. These are functions that can be attached to elements that trigger at various points or conditions during an Ajax call. We’ll be discussing them in detail in section 8.8. If omitted, the default is to enable the triggering of global functions. |
|
contentType |
String |
The content type to be specified on the request. If omitted, the default is application/x-www-form-urlencoded, the same type used as the default for form submissions. |
|
success |
Function |
A function invoked if the response to the request indicates a success status code. The response body is returned as the first parameter to this function and formatted according to the specification of the dataType property. The second parameter is a string containing a status value—in this case, always success. |
|
error |
Function |
A function invoked if the response to the request returns an error status code. Three arguments are passed to this function: the XHR instance, a status message string (in this case, always error), and an optional exception object returned from the XHR instance. |
|
complete |
Function |
A function called upon completion of the request. Two arguments are passed: the XHR instance and a status message string of either success or error. If either a success or error callback is also specified, this function is invoked after the callback is called. |
|
beforeSend |
Function |
A function invoked prior to initiating the request. This function is passed the XHR instance and can be used to set custom headers or to perform other pre-request operations. |
|
async |
Boolean |
If specified as false, the request is submitted as a synchronous request, By default, the request is asynchronous. |
|
processData |
Boolean |
If set to false, prevents the data passed from being processed into URL-encoded format. By default, the data is URL-encoded into a format suitable for use with requests of type application/x-www-form-urlencoded. |
|
ifModified |
Boolean |
If true, allows a request to succeed only if the response content has not changed since the last request according to the Last-Modified header. If omitted, no header check is performed. |
That’s a lot of options to keep track of, but it’s unlikely that more than a few of them will be used for any one request. Even so, wouldn’t it be convenient if we could set default values for these options for pages where we’re planning to make a large number of requests?
8.4.2. Setting request defaults
Obviously the last question in the previous section was a setup. As you might have suspected, jQuery provides a way for us to set up a default set of Ajax properties that will be used when we don’t override their values. This can make pages that initiate lots of similar Ajax calls much simpler.
The function to set up the list of Ajax defaults is $.ajaxSetup(), and its syntax is as follows:
Command syntax: $.ajaxSetup
$.ajaxSetup(properties)
Establishes the passed set of properties as the defaults for subsequent calls to $.ajax().
Parameters
properties
(Object) An object instance whose properties define the set of default Ajax properties. These are the same properties described for the $.ajax() function in table 8.2.
Returns
Undefined.
At any point in script processing, usually at page load (but can be at any point of the page authors’ choosing), this function can be used to set up defaults to be used for all subsequent calls to $.ajax().
Note
Defaults set with this function aren’t applied to the load() command. For utility functions such as $.get() and $.post(), the HTTP method can’t be overridden by use of these defaults. Setting a default type of GET won’t cause $.post() to use the GET HTTP method.
Let’s say that we are setting up a page where, for the majority of Ajax requests (made with the utility function rather than the load() command), we want to set up some defaults so that we don’t need to specify them on every call. We can, as the first statement in the header <script> element, write
$.ajaxSetup({
  type: 'POST',
  timeout: 5000,
  dataType: 'html',
  error: function(xhr) {
           $('#errorDisplay)
             .html('Error: ' + xhr.status + ' ' + xhr.statusText);
         }
})
This would ensure that every subsequent Ajax call (again, except via load()) would use these defaults, unless explicitly overridden in the properties passed to the Ajax utility function being used. Note the defaulting of an error callback. It’s quite common for error, complete, and even beforeSend callbacks that should be applied to all Ajax invocations to be specified in this way.
Now, what about those global functions that were controlled by the global property?
8.4.3. Global functions
In addition to the ability to specify default functions to be executed for all Ajax requests by establishing them as defaults with $.ajaxSetup(), jQuery also allows us to attach functions to specific DOM elements. These functions will be triggered during the various phases of Ajax request processing or when a request ultimately succeeds or fails.
For example, to attach a function to an element with an id of errorConsole whose purpose is to display error messages, we write
$('#errorConsole').ajaxError(reportError);
The function reportError will be called in the event that any Ajax request fails.
When this, or any other of these global functions, is invoked, the first parameter passed to the callback function consists of a JavaScript Object instance with the following two properties:
- type—A string that contains the type of global function invoked—ajaxError, for example.
- target—A reference to the DOM element to which the global function was attached. In the case of the previous example, it’s the element with the id of errorConsole.
We’ll call this construct the Global Callback Info object. Some global function types are passed additional parameters (as we’ll see shortly), but this common first parameter can be used to identify what global function type triggered the callback and to which element the function was attached.
The commands that can be used to attach these global functions are ajaxStart(), ajaxSend(), ajaxSuccess(), ajaxError(), ajaxComplete(), and ajaxStop(). As the syntax for the commands that attach each of these function types are identical, they are presented in the following single syntax description:
Command syntax: Ajax global functions
ajaxStart(callback)
ajaxSend(callback)
ajaxSuccess(callback)
ajaxError(callback)
ajaxComplete(callback)
ajaxStop(callback)
Attaches the passed function to all matched elements invoked when the specified point in the processing of an Ajax request takes place.
Parameters
callback
(Function) The callback function to be attached. See table 8.3 for information on when the callback is invoked and what parameters it will be passed.
Returns
The wrapped set.
Each of these global callbacks is invoked at a certain point during the processing of an Ajax request or conditionally depending upon the response status, assuming that global functions were enabled for the Ajax request. Table 8.3 describes when each global callback type is invoked and what parameters are passed to it.
Table 8.3. Global Ajax callbacks, listed in order of firing
|
Global callback type |
When invoked |
Parameters |
|---|---|---|
|
ajaxStart |
When a jQuery Ajax function or command is started, but before the XHR instance is created |
|
|
ajaxSend |
After the XHR instance has been created, but before it’s sent to the server |
|
|
ajaxSuccess |
After the request has returned from the server and the response contains a success status code |
|
|
ajaxError |
After the request has returned from the server and the response contains a failure status code |
|
|
ajaxComplete |
After the request has returned from the server and after any declared ajaxSuccess or ajaxError callbacks have been invoked |
|
|
ajaxStop |
After all other Ajax processing is complete and any other applicable global callbacks have been invoked |
|
Let’s put together a simple example of how some of these commands can easily be used to report the success or failure of an Ajax request. The layout of our test page (it’s too simple to be called a lab) is as shown in figure 8.7 and is available in the file chapter8/listing.8.6.html.
Figure 8.7. The initial layout of the page we’ll use to examine the use of the Ajax global callbacks

On this page we have defined three fieldsets: one that contains buttons that will initiate Ajax requests, one that contains an area for success messages, and one that contains an area for error messages. The HTML markup to set up this structure is suitably simple.
<body>
  <fieldset>
    <legend>Initiate Ajax Requests</legend>
    <div>
      <button type="button" id="goodButton">
        Initiate successful request
      </button>
      <button type="button" id="badButton">
        Initiate failed request
      </button>
    </div>
  </fieldset>

  <fieldset>
    <legend>Success display</legend>
    <div id="successDisplay"></div>
  </fieldset>

  <fieldset>
    <legend>Error display</legend>
    <div id="errorDisplay"></div>
  </fieldset>
</body>
The ready handler for the page has three tasks:
- Set up the click handlers for the buttons
- Establish a global function as a success listener attached to the success area
- Establish a global function as a failure listener attached to the error area
Setting up the click handlers for the buttons is straightforward.
$('#goodButton').click(function(){
  $.get('reflectData.jsp'),
});
$('#badButton').click(function(){
  $.get('returnError.jsp'),
});
The good button is set up to initiate an Ajax request to a resource that will return a success status, and the bad button initiates a request to a resource that always returns an error status.
Now we use the ajaxSuccess() command to establish a success listener attached to the <div> element with the id of successDisplay as follows:
$('#successDisplay').ajaxSuccess(function(info){
  $(info.target)
    .append('<div>Success at '+new Date()+'</div>'),
});
This establishes a function that will be called when an Ajax request completes successfully. This callback is passed a Global Callback Info instance whose target identifies the bound element—in this case, successDisplay. We use that reference to construct a success message and display it in the success display area.
The binding of the error callback is similar.
$('#errorDisplay').ajaxError(function(info,xhr){
  $(info.target)
    .append('<div>Failed at '+new Date()+'</div>')
    .append('<div>Status: ' + xhr.status + ' ' +
            xhr.statusText+'</div>'),
});
Using the ajaxError() command, we bind a callback function that will be invoked when an Ajax request fails. In this case, the XHR instance is passed to the function, and we use it to give the user information about the nature of the error.
Because each function is bound to only one global function type, the use of the type field of the Global Callback Info instance isn’t needed. But notice how the two functions perform some similar processing? How can we combine these functions into a single function instance that uses the type field to operate more efficiently?
With the page displayed in the browser, click each button a number of times (the messages have timestamps, so it’s easy to discern the order in which they are displayed). You might end up with a display such as shown in figure 8.8.
Figure 8.8. Clicking the buttons reveals how the callback functions get information and how they know which element they are attached to.

Before we move on to the next chapter, let’s put all this grand knowledge to use, shall we?
8.5. Putting it all together
It’s time for another comprehensive example. Let’s put a little of everything we’ve learned so far to work: selectors, DOM manipulation, advanced JavaScript, events, effects, and Ajax. And to top it all off, we’ll implement another jQuery command!
For this example, we’ll once again return to The Boot Closet page. To review, look back at figures 8.2, 8.3, 8.5, and 8.6 because we’re going to continue to enhance this page.
In the detailed information of the boots listed for sale (evident in figure 8.3), terms are used that our customers may not be familiar with—terms like Goodyear welt and stitch-down construction. We’d like to make it easy for customers to find out what these terms mean because an informed customer is usually a happy customer. And happy customers buy things!
We could be all 1998 about it and provide a glossary page that customers navigate to for reference, but that would move the focus away from where we want it—the pages where they can buy our stuff! We could be a little more modern about it and open a pop-up window to show the glossary or even the definition of the term in question. But even that’s being a tad old-fashioned.
If you’re thinking ahead, you might be wondering if we could use the title attribute of DOM elements to display a tooltip (sometimes called a flyout) containing the definition when customers hover over the term with the mouse cursor. Good thinking! That allows the definition to be shown in-place without the need for the customers to have to move their focus elsewhere.
But the title attribute approach presents some problems for us. First, the flyout only appears if the mouse cursor hovers over the element for a few seconds—and we’d like to be a bit more overt about it, displaying the information immediately after clicking a term—but, more importantly, some browsers will truncate the text of a title flyout to a length far too short for our purposes.
So we’ll build our own!
We’ll somehow identify terms that have definitions, change their appearance to allow the user to easily identify such terms, and instrument them so that a mouse click will display a flyout containing a description of the term. Subsequently clicking the flyout will remove it from the display.
Figure 8.9 displays a portion of our page showing the behavior we wish to add.
Figure 8.9. The before and after shots of the behavior that we’ll be adding to the page

In the top part of the figure we see the Features description of the item with the terms Full-grain and Cambrelle highlighted. Clicking Full-grain causes the flyout containing its definition to be displayed as shown in the bottom part of the figure.
We could hard-code everything to make this happen right on the page, but we’re smarter than that. As with our extensions to manipulate the select elements, we want to create a reusable component to use elsewhere on this, or any other, site. So once again, being jQuery-savvy, we’ll implement it as a jQuery command.
8.5.1. Implementing the flyout behavior
As we recall, adding a jQuery command is accomplished by use of the $.fn property. We’ll call our new plugin that looks up the definitions of terms The Termifier, and the command will be named termifier().
The termifier() command will be responsible for instrumenting each element in its matched set to achieve the following goals:
- Establish a click handler on each matched element that initiates the display of The Termifier flyout.
- Once clicked, the term defined by the current element will be looked up using a server-side resource.
- Once received, the definition of the term will be displayed in a flyout using a fade-in effect.
- The flyout will be instrumented to fade out once clicked within its boundaries.
- The URL of the server-side resource, as well as the CSS class assigned to the flyout element, can be assignable by the page author but will have reasonable defaults.
The code that creates a jQuery command that meets these goals is shown in listing 8.8 and can be found in the file chapter8/bootcloset/jquery.jqia.termifier.js.
Listing 8.8. The implementation of the termifier() command

Perhaps not as much code as expected, but there’s a lot going on in there! Let’s take it one step at a time.
First, we use the pattern that we learned in chapter 7 to establish the API for the termifier() command ![]() . The only parameter expected is an object whose properties serve as our options. To be friendly, we provide a default set
that we merge into the passed options using the services of the $.extend() utility function
. The only parameter expected is an object whose properties serve as our options. To be friendly, we provide a default set
that we merge into the passed options using the services of the $.extend() utility function ![]() . The defined options are as follows:
. The defined options are as follows:
- lookupResource—Specifies the URL of the server-side resource to be used
- flyoutClass—The CSS class name applied to newly created flyout elements
As a helpful tip to our customers, we add a title attribute to the target element so that if they hover the mouse cursor over the highlighted term, they will see a message letting them know that clicking the term will do something wonderful.
We establish a click handler on every element in the matched set ![]() . Remember that the function context (this) for a jQuery command is the matched set, so applying other jQuery commands to the matched set is as easy as calling the
commands on this.
. Remember that the function context (this) for a jQuery command is the matched set, so applying other jQuery commands to the matched set is as easy as calling the
commands on this.
In the listener for the click event, we initiate the Ajax call that will retrieve the term definition. For maximum control, we use the $.ajax() function ![]() and pass it an object that defines the following options:
and pass it an object that defines the following options:
- The URL specified by the command options (either the default or one provided by the page author)
- An HTTP method of GET (because the request is clearly idempotent)
- A request parameter named term that’s set to the content of the event target (the function context within the listener)
- Identification of the expected response data as HTML
- A success callback
 that uses the response data to create the flyout
A lot of the more interesting things happen in the success callback for the Ajax request. First, a new and empty <div> element is created, and then the following operations are performed on it (using the magic of jQuery chaining again):
- CSS styles are added to the <div> element that absolutely position it at the point of the mouse click event, change the mouse cursor to the hand shape, and hide the element from view.
- The response data, passed as the first parameter to the success callback and which we know contains the term definition, is inserted as the content of the <div> element.
- The CSS class identified by the flyoutClass option is added to the <div>.
- A click handler is established on the flyout <div>
 that will cause it to slowly fade when clicked and then to be removed from the DOM tree once the fade effect has concluded.
- The newly created flyout <div> is added to the DOM by appending it to the <body> element.
- And finally, the flyout <div> is displayed by fading it in using the default rate
 .
.
The implementation of the termifier() command makes sure to return the wrapped set as the result of the command (by returning the wrapped set as returned by the click() command) so that our new command can participate in any jQuery command chain.
Now, let’s see what it takes to apply this command to our Boot Closet page.
8.5.2. Using The Termifier
Because we rolled all the complex logic of creating and manipulating The Termifier flyout into the termifier() command, using this new jQuery command on the Boot Closet page is relatively simple. But first we have some interesting decisions to make.
We need to decide how to identify the terms on the page. Remember, we need to construct a wrapped set of elements whose content contains the term elements for the command to operate on. We could use a <span> element with a specific class name; perhaps something like
<span class="term">Goodyear welt</span>
Creating a wrapped set of these elements would be as easy as $('span.term').
But some might feel that the <span> markup is a bit wordy. Instead, we’ll leverage the little-used HTML tag <abbr>. The <abbr> tag was added to HTML 4 in order to help identify abbreviations in the document. Because the tag is intended purely for identifying document elements, none of the browsers do much with these tags either in the way of semantics or visual rendition, so it’s perfect for our use.
Note
HTML 4[3] defines a few more of these document-centric tags such as <cite>, <dfn>, and <acronym>. The HTML 5 Draft Specification[4]proposal adds even more of these document-centric tags whose purpose is to provide semantics rather than provide layout or visual rendition directives. Among such tags are <section>, <article>, and <aside>.
Therefore, the first thing that we need to do is modify the server-side resource that returns the item details to enclose terms that have glossary definitions in <abbr> tags. Well, as it turns out, the getDetails.jsp resource already does that. But because the browsers don’t do anything with the <abbr> tag, we might not have even noticed unless we’d already taken a look inside the JSP or PHP file. This resource returns JSON data such as the following for an example item:
{
  name: 'Chippewa Harness Boot',
  sku: '7141922',
  height: '13"',
  lining: 'leather',
  colors: 'Black, Crazy Horse',
  price: '$188.00',
  features: '<abbr>Full-grain</abbr> leather uppers. Leather lining. <abbr>Vibram</abbr> sole. <abbr>Goodyear welt</abbr>.'
}
Note how the terms Full-grain, Vibram and Goodyear welt are identified using the <abbr> tag.
Now, on to the page itself. Starting with the code of listing 8.6 as a starting point, let’s see what we need to add to the page in order to use The Termifier. We need to bring the new command into the page, so we add the following statement to the <head> section (after jQuery itself has loaded):
<script type="text/javascript"
        src="jquery.jqia.termifier.js"></script>
We need to apply the termifier() command to any <abbr> tags added to the page when item information is loaded, so we add a callback to the load() command that fetched the item information. That callback uses The Termifier to instrument all <abbr> elements. The augmented load() command (with changes in bold) is as follows:
$('#detailsDisplay').load(
  'getDetails.jsp',
  { style: styleValue },
function(){
$('abbr').termifier({
lookupResource: 'getTerm.jsp'
});
  }
);
The added callback creates a wrapped set of all <abbr> elements and applies the termifier() command to them, specifying a server-side resource of getTerm.jsp that overrides the command’s default.
And that’s it.
Because we wisely encapsulated all the heavy lifting in our reusable jQuery command, using it on the page is even easier than pie! And we can as easily use it on any other page or any other site. Now that’s what engineering is all about!
The only remaining task is to alter the appearance of the text elements so that users know which are clickable terms. To the CSS file, we add the following CSS properties for the <abbr> tag:
color: aqua;
cursor: pointer;
border-bottom: 1px aqua dotted;
These styles give the terms a link-ish appearance but with the subtle difference of using a dotted underline. This invites the users to click the terms, yet keeps them distinct from any true links on the remainder of the page.
The new page can be found in the file chapter8/bootcloset/boot.closet.3.html. Because the changes we made to the code of listing 8.6 are minimal (as we discussed), we’ll spare some paper and not include the entire page listing here.
The updated page with our new functionality in action is shown in figure 8.10.
Figure 8.10. Our customer learns what Stitch-down construction is all about.

Our new command is useful and powerful, but there’s always...
8.5.3. Room for improvement
Our brand-spankin’-new jQuery command is useful as is, but it does have some minor issues and the potential for some major improvements. To hone your skills, here’s a list of possible changes you could make to this command or to the Boot Closet page:
- The server-side resource is passed the term in a request parameter named term. Add an option to the command giving the page author the ability to specify the name of the query parameter. Our client-side command shouldn’t dictate how the server-side code is written.
- Add an option (or options) that allows the page author to control the fade durations or, perhaps, even to use alternate effects.
- The Termifier flyout stays around until the customer clicks it or until the page is unloaded. Add a timeout option to the command that automatically makes the flyout go away if it’s still displayed after the timeout has expired.
- Clicking the flyout to close it introduces a usability issue because the text of the flyout can’t be selected for cut-and-paste. Modify the code so that it closes the flyout if the user clicks anywhere on the page except on the flyout.
- It’s possible for multiple flyouts to be displayed if the user doesn’t dismiss one flyout before clicking another term, even when a new style is selected. Add code to remove any previous flyout before displaying a new flyout and when a new style is picked.
- We don’t do any error handling in our command. How would you enhance the command to gracefully deal with server-side errors?
- We achieved the appealing drop shadows in our images by using PNG files with partial transparencies. Although most browsers handle this file format well, IE6 does not and displays the PNG files with white backgrounds. To deal with this we could also supply GIF formats for the images without the drop shadows. How would you enhance the page to detect when IE6 is being used and to replace all the PNG references with their corresponding GIFs?
- While we’re talking about the images, we only have one photo per boot style, even when multiple colors are available. Assuming that we have photo images for each possible color, how would you enhance the page to show the appropriate image when the color is changed?
Can you think of other improvements to make to this page or the termifier() command? Share your ideas and solutions at this book’s discussion forum, which you can find at http://www.manning.com/bibeault.
8.6. Summary
Not surprisingly, this is one of the longest chapters in this book. Ajax is a key part of Rich Internet Applications, and jQuery is no slouch in providing a rich set of tools for us to work with.
For loading HTML content into DOM elements, the load() command provides an easy way to grab the content from the server and make it the content of any wrapped set of elements. Whether a GET or POST method is used is determined by whether data needs to be passed to the server or not.
When a GET is required, jQuery provides the utility functions $.get() and $.getJSON(); the latter is useful when JSON data is returned from the server. To force a POST, the $.post() utility function can be used.
When maximum flexibility is required, the $.ajax() utility function, with its ample assortment of options, lets us control most aspects of an Ajax request. All other Ajax features in jQuery use the services of this function to provide their functionality.
To make managing the bevy of options less of a chore, jQuery provides the $.ajaxSetup() utility function that allows us to set default values for any frequently used options to the $.ajax() function (and to all of the other Ajax functions that use the services of $.ajax()).
To round out the Ajax toolset, jQuery also allows us to monitor the progress of Ajax requests and associate these events with DOM elements via the ajaxStart(), ajaxSend(), ajaxSuccess(), ajaxError(), ajaxComplete(), and ajaxStop() commands.
With this impressive collection of Ajax tools under our belts, it’s easy to enable Rich Internet Application functionality in our web applications. And remember, if there’s something that jQuery doesn’t provide, we’ve seen that it’s easy to extend jQuery by leveraging its existing features. Or, perhaps, there’s already a plugin—official or otherwise—that adds exactly what you need!
Which is the subject of our next chapter...