| 11 | Getting Your Project Out of Final Cut Pro |
There are several different ways of getting your clips or edited sequences from FCP to your destination format. Once you’ve finished editing your video production, you’re ready to output the results to tape. You can ‘crash record’ straight from the sequence, Print to Tape, Edit to Tape, and export in any of a number of formats for DVD or CD/Web distribution. Getting your stuff out to the rest of the world is simply a matter of deciding what format to use and how much you want to automate that process.
Output to Video Tape
The first and simplest way to record your finished production out to tape is called crash recording. You put the tape in the deck, park the playhead at the beginning of the sequence, hit Record on the deck, and then hit the Spacebar to play in FCP. There is no real difference between this method, which you’ve been using all along to preview your edits on an NTSC or PAL video monitor, and the following method, Print To Video, aside from varying degrees of automation. This simpler method may prove best for editors using DV converter boxes or those who are using cameras and decks not yet supported or controlled by FCP.
If you intend to use the crash record method, it is highly recommended that you perform a Mixdown Audio from the menu, rendering the audio in your sequence. This will ensure that the tracks playback at the highest quality with no fluctuations in the data rate, regardless of how many tracks of audio you have included in the Timeline. This is particularly important if you have been using the Low or Medium setting for Audio Playback Quality in the Preferences, since playback on the Timeline uses that lower quality for resampling, whereas Print To Video always uses High settings!
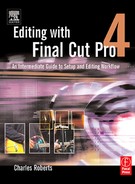
Don’t be confused about the render options for audio mixdowns (see Figure 11-1). Make sure you deselect all items in the sequence, then go Sequence > Render Only > Mixdown (keyboard shortcut, Command-Option-r). The subsequent render is very fast, and eliminates audio as a source of problems, from either quality or performance issues.
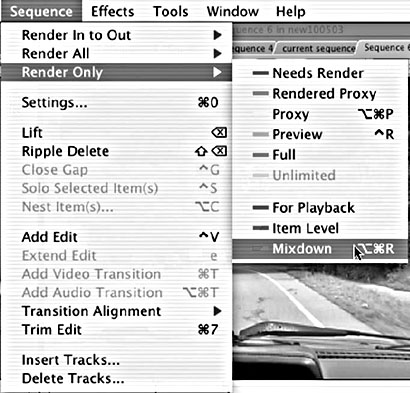
Figure 11-1 First deselect all items in the sequence, then go to Sequence > Render Only > Mixdown, to render your audio at the highest quality and assure no dropped frames or other hiccups.
Output to Tape: Print to Video
The second method is for customizing your master copy that will be recorded to tape and is called Print to Video. Print to Video is a very simple yet powerful tool that allows you to define what goes to tape. You can include leader material such as color bars and tone, slate information, special countdowns, and the amount of black that occurs prior to and after sequence playback. You can specify whether the entire sequence or just a portion of it is played back. You can have FCP play the sequence back as a defined number of loops, inserting black space between each loop. You can also add trailer black onto the end of the ecorded sequence so that your recorded product doesn’t end on blank video, resulting in a timecode break. And you can keep tabs on exactly how long the final recorded piece will be, based on the amount of extra time you’ve added on to include the features just described.
To start the process, make sure that your deck is connected to the video output on the Macintosh and powered on. Select a sequence in the project tab or the Timeline window. ou
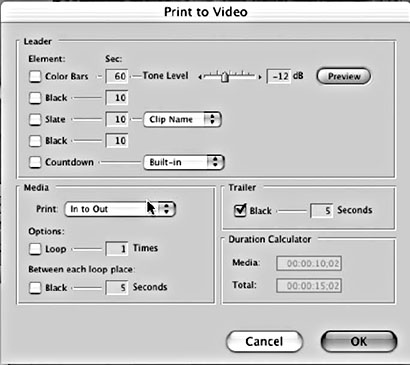
Figure 11-2 The Print to Video dialog box.
can also set In and Out points in your sequence to Print to Video only a section of the sequence. If necessary, perform any rendering and mixdowns on the sequence, since any unrendered material will have to be rendered before outputting. This includes mixing down any audio that you may have included that exceeds the number of realtime mixed audio tracks. Now go to the File drop-down menu and select Print to Video.
Customizing Your Print to Video
When you select Print to Video, a dialog box will appear named Print to Video (see Figure 11-2). This is the window that lets you customize the output. The top section of the box contains “Leader,” or any elements that you may want to include prior to playback of the actual video in your master tape. You enable or disable each element using checkboxes.
Color Bars and Audio Test Tone
The first Leader element is for Color Bars and Tone, essentially the same clip we used at the beginning of this book to explore the various windows of the application. Here, FCP will automatically output color bars and audio test tone to tape right before your project.
Most video monitors are not calibrated, or set to display colors exactly as yours does. Color bars contain each of the colors necessary for establishing the correct color balance of a video monitor. Color bars are not only useful for calibrating your own video monitors, they are necessary in the broadcast industry for making sure that your video fits within the broadcast specification for video. Such specifications are referred to as “broadcast legal.”
Without reference color bars on your tape, you are always at the mercy of having your video displayed incorrectly wherever it is played back. Including them is always a good idea, even if you think you may never need them. Most stations require a minimum of 60 seconds of color bars prior to slate information on the tape. FCP also includes a reference audio tone with the color bars. This standard tone lets the engineer check to make sure that what our tape thinks is 1 KHz agrees with what the station’s equipment thinks is 1 KHz. If the level of your reference audio tone is set at −12 dB, the engineer will know how to adjust our audio tracks when mixing them with other audio sources. It will be possible to boost or lower the signal with great precision so that your audio is reproduced faithfully.
This system of matching audio levels between the recording side and the playback side using a reference tone is referred to as gain staging. It has far more important benefits than those listed above, especially with respect to avoiding distortion and clipping when the audio is rerecorded through analog or digital systems later on down the road. Just remember that anything you record without reference color bars and audio tone leaves you operating in the dark about the state of your video and audio. You will have no way of gauging how the product looks or sounds when reproduced on another video monitor or when rerecorded later.
Below Bars and Tone is an option for Black. This option is offered between each leader option for the purposes of making your leader smoother, more predictable, and easy to use. ou can customize the amount of black in seconds here. Enable the Black checkbox and insert 10 seconds of black.
Slate
The third option is for a slate. Slates are simply text or graphic images that appear before our video piece plays back. They can give information about the format of the video and audio, the title of the piece, who produced it, what it is for, information about the reference bars and tone, and anything else you want to include. When you submit a piece of video to broadcast or production facilities, they often have specific policies about what they equire in the slates before your piece. Make sure you know what should and should not be there, as well as how long the slate should appear.
There are three options for the slate (see Figure 11-3). You can use the Clip Name, the default setting which includes just the name from your project being recorded. If you are ecording a sequence, the name of the sequence will appear in the slate. If you are out-putting only a single clip, its name will appear. Clip Name is the default setting because the other two choices, Text and File, require you to enter information or select a file, whereas Clip Name will just use the name of the object you are printing to video.
If you click the Slate drop-down bar and select Text, a small text box appears to the side of the bar. You can type all the relevant information here and it will appear as the slate during the Print to Video. This is the fastest way of getting information into the slate prior to

Figure 11-3 The Slate drop-down menu offers three options: Clip Name, Text, and File.
recording, since it requires no external file preparation and is capable of including far more information than the simple clip name. Be careful when using this, though. It’s easy to forget to change this text, and you will find yourself using slate information from a previous recording session if you do not change it, since the text remains the same until you disable or alter it.
Finally, the Slate drop-down bar gives you an option for File. If you choose this, a small folder icon appears next to the bar. Clicking on the icon allows users to navigate to the file they have created for a slate. This option is very useful if you wish to use a standardized company logo image or you have a specific design you want to use that cannot be achieved using the limited text box of the previous bar option. The File option allows for the use of standard PICT files, Photoshop images, or any of a number of QuickTime still image file types. Remember that the non-square pixel rules are still in effect here, as discussed earlier in the book, and that you need to prepare image files such that they are displayed correctly without appearing squeezed or stretched.
If you choose to include a slate in the playback, there will be a slight render delay before playback for recording. Clip Name and Text are very fast renders because they are using a standard black and white text format that processes and compresses very quickly. If you use the File option, the render may take longer as FCP converts, then processes and compresses the video. In either case, the render of still images in FCP is rather fast and is well worth the wait if you want the benefit of sharp-looking hand-made graphics that say more about your product than just what its name is.
Enable a slate, set it for 10 seconds, and then choose Text from the bar. In the text box, type in “This is the Print to Video text slate.” Below this is another optional Black. Enable the black checkbox and insert 10 seconds of black.
Countdown
The final Leader option is for Countdown (see Figure 11-4). This option also contains a drop-down bar for selecting the source of the countdown. There are two options: Built-in, which is a standard countdown file that comes pre-packaged with FCP; and File, which gives you the ability to create your own custom countdown movies. The Built-in countdown is precisely clocked for 10 seconds, in which each second is displayed with a clock wipe showing the passage of the second. When the countdown reaches second two, there is a “pop” (a ‘two-pop,’ as it is called). Countdowns are imperative for precise editing situations and broadcast facilities that must cue up tapes with a great degree of accuracy.

Figure 11-4 The Countdown menu offers both the built-in countdown and the ability to create and use your own custom countdown.
You could also select your own customized countdown QuickTime Movie file by changing the drop-down bar to File and then navigating to the new countdown file. You can use FCP itself to create your custom countdown file; just create and export a suitable movie file and save it in a safe place for use when you need it. But remember that using a custom-made countdown file does not guarantee that it is accurate to a 10-second countdown. You have to arrange that yourself when you create the file. The Print to Video settings box will not constrain your file to fit a 10-second countdown. It will simply play the file you select. Enable the countdown and select Built-in from the bar.
Media
In the bottom left corner of the Print to Video window, there is a box labeled Media. This box lets you customize what gets sent to tape. Although the practice of sending media through your video output is no different than simply playing from the Timeline, the Print to Video window allows us to automate the process and create seamless master tapes based on our individual needs. This can include looping the media, choosing to record only a specific portion of the sequence, or including pauses between the loop repetitions.
The first option is a drop-down bar named Print (see Figure 11-5). The two choices on the bar are In to Out and Entire Media. In to Out allows you to create a range in your sequence or clip defined by In and Out points on the sequence Timeline or Viewer window. Then choosing In to Out in the Print bar will restrict playback to those edit points.
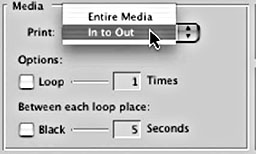
Figure 11-5 The Print drop-down menu lets you choose between a range of frames from the sequence or the entire thing.
This can be very useful if you are only backing up sections of your sequence to tape and are not yet mastering the entire sequence.
Choosing Entire Media, on the other hand, plays the whole clip or sequence from the first frame to the last frame of the last clip. The use of these two options is rather like the Voice Tool in the previous chapter. If you set an In point to Out point range in your sequence and choose In to Out, FCP will only Print to Video that range. If you choose Entire Media, Print to Video ignores any In and Out points and records the contents of the entire sequence from the first frame to the last.
Below the Print bar are two options. The first checkbox is for Loop, which is accompanied by a numerical field for establishing the number of looped repetitions. Beneath this is a checkbox for a black pause between repetitions and a field for determining the length of the pause. For the Media settings, select Entire Media from the bar, then disable Loop and Black between Loop checkboxes.
Of course, none of this is really ever out of your control. You can always stop the Print to Video by stopping the recording at the deck and/or hitting Escape on the keyboard. Print to Video does not involve Device Control; you are the one who tells the deck to actually begin recording. The only difference between Print to Video and simply playing from the Timeline and hitting the record button on your deck is that Print to Video allows you to add all this useful leader and trailer content. Print to Video will not start or stop the recording on your deck.
Actually, there is a way to add Device Control to Print to Video if you have device control through Firewire or serial deck control. Go to Final Cut Pro > Audio/Video Settings and click the Device Control preset tab (see Figure 11-6). Select the Device Control preset on the left that you have been using and hit the Duplicate button. When you do, the Edit Device Control Preset window opens. Look in the bottom right corner of the window for the Auto Record and PTV setting.
You can create a preset that allows FCP to automatically start recording after the predetermined delay you insert here. This is like automated crash recording. FCP doesn’t look at the timecode or content when you go to Print to Video. You have to be a little careful when you use this; it’s pretty easy to accidentally leave an important tape in the deck and then record over it!

Figure 11-6 In the Audio/Video Settings Device Control tab, you can set up a preset that does everything the default one does, but which also adds automatic recording.
Trailer
To the right of the Media box is the single option for Trailer. You may include black following the end of your recorded product, and you may define the length of this black trailer. Do not be fooled by the seeming unimportance of this one box. It is very important that you insert black trailer at the end of your recording. Always tack on at least 30 seconds of recorded black trailer at the end of your program.
A more important reason for including this black trailer is that if you do not add some sort of recorded material after your piece, the timecode on your tape may end up suffering from a Timecode break. Remember that when we captured video, we had to be very careful about capturing around timecode breaks. They could be just as bad or worse for you on our master tape. But if you always record 30 seconds of black at the end of your Print to Video, you will always have some video at the end of your piece to tag the next recording onto, therefore avoiding any possibility of timecode breaks. For the Trailer settings, enable Black and enter 30 seconds into the numerical field.
Duration Calculator
inally, the box underneath Trailer is the Duration Calculator. The two Timecode fields efer to Media (the length of the actual sequence or clip) and Total, which is the sum amount down to the frame of all the leader, media, and trailer footage, including any looping of the media. This is just a short idiot check to make sure that you have enough ecording space on the tape for the duration that you have prepared to Print to Tape.
Your Duration Calculator should show the length of your sequence in the Media field and that same amount plus 2 minutes and 20 seconds in the Total field, that being the sum total of the leader and trailer features you have tacked on to the piece.
Print to Tape
Once these settings are correct, hit the OK button to begin rendering the Slate and the Countdown. While the render process is completing, cue up a tape in the deck, or, if you are using an A/D converter box or other pass-through device, prepare whatever deck you are using to record.
When the render process is completed, you will be greeted by a message box reading, “Start the video recorder now and click OK to begin playback.” This is your cue to manually begin recording on the deck or camera. Let the tape record for at least eight seconds of pre-roll, then click OK. The video will start feeding the deck video and audio, showing you the leader, your product, and, finally, the trailer black footage. Near the end of the trailer black, press “Stop” on your deck, and you will have completed your first mastering-to-tape process. It should be noted that if you get repeated dropped frames interruptions in the rint to Video process, particularly on older Macs such as the G4 350 MHz models, you may need to disable Mirror to Desktop in the Audio/Video Settings tab, which can suck away just enough processor power to cause them (see Figure 11-7).
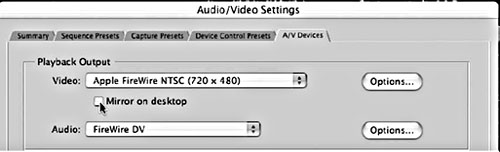
Figure 11-7 Turn off Mirror to Desktop on older Macs to avoid dropped frames interruptions on Print to Video.
Output to Tape: Edit to Tape
There is another type of output that is far more reliable and professional called Edit to Tape. Edit to Tape is exactly what it sounds like. The output from FCP edits to a precise timecode on the destination tape. This is not crash recording or simply printing to videotape as before. This is a true edit performed by FCP using what is on the sequence and the timecode from the destination tape. Depending on the type of deck control you are using, you can even perform true insert editing. If you don’t have deck control, you cannot take advantage of Edit to Tape.
Go to File > Edit to Tape (see Figure 11-8). When you do, a new window will open up. Very much like the Log and Capture window, this window has a direct in/out connection with your deck. If you have device control, you can control your deck from here. You will choose the edit points for your destination tape by controlling the deck here. You will use the same mastering controls you had in Print to Video to create header and trailer material.
There are three tabs in the Edit to Tape window. The first is the Video tab. The Video tab is very similar to the Log and Capture video window. There are controls for playback of the deck and the insertion of In and Out points. Once you have In and Out points, there is an edit overlay very much like the Insert/Overwrite overlays in the Canvas. The second tab is the Mastering Settings tab. This is essentially the same as the Header and Trailer window in the Print to Video window. Finally, the Settings tab is the same settings tab as in the Log and Capture, and lets you change the Device Control and Capture settings currently in force.
The Issues for Edit to Tape
Edit to Tape is not for everyone. There are basic limitations that depend on your specific hardware. Within the realm of DV editing in FCP, there are many different variations on getting your materials in and out. The main determinant is your deck control. If you are using Firewire DV for deck control, you will be limited to Assemble editing. Those with
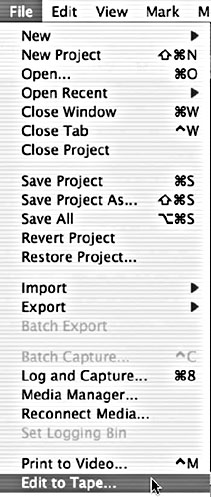
Figure 11-8 Access the Edit to Tape window from the File Menu.
serial deck control, such as RS-422 or RS-232 connector support, can take advantage of both Insert and Assemble edits to tape.
Insert and Assemble edits are different from the Insert edits you were working with in the Canvas. Insert and Assemble editing refer back to the good old days of tape editing. With an Insert edit, you give FCP the In and Out timecode numbers for the edit you want. FCP will then record the video into place on the tape, not recording over anything outside of those In and Out points.
This is often used in the industry when a program has already been laid out to tape, but something needs to be changed. Why record an entire hour long program out to tape again when you only need to correct one 15 second segment? Just set the In and Out points on the tape and in the sequence and Insert edit them. Also, Insert editing allows you to insert audio or video dubs to tape without recording over the existing tracks that you don’t want to change. For instance, if you already had the correct video recorded out to tape, but you needed to edit new audio tracks to the tape, you could insert edit them in without affecting the video already on the tape. Insert editing only records the tracks that you tell it to.
This differs from Assemble editing. Assemble edits do, in fact, use timecode and In points to begin editing your piece out to tape. But Assemble edits have two features that make them different. First, Assemble edits are what is called “clean in dirty out.” This means that FCP will lay in the edit precisely on the frame you chose for an In point, resulting in a “clean in.” However, assemble edits do not include Out points. Instead, they continue recording until the video source stops. This means that there is no frame-accurate guarantee that the end of the edit will be “clean out.” This usually results in a break in timecode and the recording of black frames, or “dirty out.”
Another feature of Assemble editing is that it must record all tracks of video and audio simultaneously. There can be no individual tracks recorded to tape, as with Insert editing. With Insert editing, the tape must be completely prestriped with timecode and video and audio, because Insert editing only records the individual tracks you indicate, but not timecode. Assemble editing, on the other hand, records video, audio, and timecode. With Assemble editing, you don’t need much timecode on the tape at all. All you need is a little timecode to tag onto at the beginning of the Assemble edit, after which the incoming assemble-edited sequence will write its own timecode on the tape.
The further implication of this is the hardware requirements. DV deck control only supports Assemble editing in the Edit to Tape window. Because Firewire deck control is not considered to be frame accurate, having DV set for the Device Control preset will yield a grayed out Insert overlay when the time comes to perform the edit. Assemble edit is the only available selection for Firewire DV deck control. As stated earlier, without deck control, Edit to Tape is impossible.
Performing the Edit to Tape
To perform the Edit to Tape, first go to the Capture Settings tab and make sure that you have the appropriate Device Control and Capture Preset enabled. It’s entirely possible that you may need to create a new Device Control preset for Edit to Tape. Many decks have specific offsets, or the number of frames late they will begin an edit, due to things like electronic latency. This is not a serious problem; all you have to do is go to the Apple website and search for “Final Cut Pro compatibility.” Find the compatibility chart for your deck or camera and look for frame offset information. If necessary, create a new preset for Device Control like we did in Chapter 2 in the Audio/Video Settings that includes the frame offset.
Next, visit the Mastering Settings tab. Use the same sensibility in creating header and trailer material on this tab if you are planning on recording your entire product to tape. If you are planning on performing an Insert edit, you probably will not want any of the header or trailer material. Furthermore, you will be choosing Edit mode, to be described next, which ignores the Mastering Settings tab.
Finally, switch back to the Video tab (see Figure 11-9). At the top and center of the window are two items to look at. The first is a pulldown menu that either lists Mastering or Editing. If it lists Mastering, then you are set to edit the entire range or sequence out to tape. Mastering also uses the Mastering Settings tab settings for any header and trailer material ou may want to include. Both Assemble and Insert Edits are available in Mastering mode.
If you switch it to Editing mode, you lose access to the Mastering Settings, because you are, strictly speaking, editing to the tape. This operation is exactly like doing an Overwrite
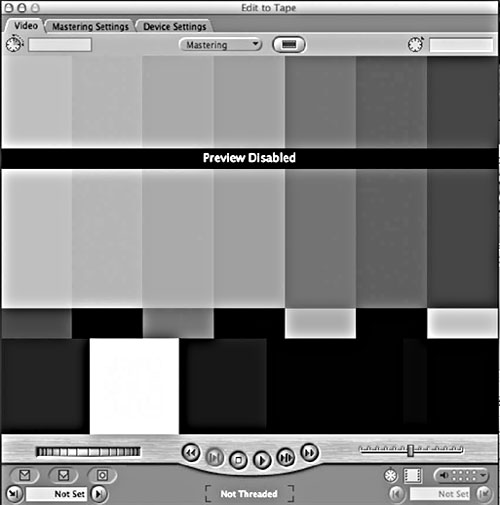
Figure 11-9 The Edit to Tape Video tab.
edit into a sequence in the Timeline, except that you are recording to tape. With Editing mode, you specify an edit In point (and quite possibly an Out point, depending on your hardware situation), and FCP edits the material into place. Why does an Out point depend on your hardware situation? Because, as specified earlier, DV Firewire controlled decks and cameras cannot perform Insert edits, while serial controlled decks can. Editing with both In and Out points requires an Insert edit, and, thus, the DV hardware in your system won’t be able to perform them.
Next to the Mastering/Editing pulldown is the Black and Code button (see Figure 11-10). As you will remember, both Edit to Tape Assemble and Insert edits require timecode to be already present on the tape. The only difference is how much is necessary. With Assemble, you only really need enough on the tape to pre-roll into and then tag onto for an In point. Assemble editing actually records a fresh timecode track as it records, so it doesn’t matter what’s on the tape beyond where it begins the edit. Insert, on the other hand, requires the entire section of tape that will be edited into to have timecode striped to it. This is because Insert edit gives you the option of recording or not recording any element of your production, specifying either video, audio, and timecode, or any mixture of them.
The Black and Code button is just an automated output to tape that records video black, 0 audio levels, and timecode for your entire tape, which is otherwise known as striping or blacking. Frankly, for DV editors, the easiest method of striping is not tying up your Mac for an hour recording video black. Just put the lens cap on the camera, hit record, and you’ll be doing the same thing. No matter how you do it, always do it. You should always work with tapes that have striped timecode.
Prestriping your tapes actually has another benefit for videographers. Running through the length of your tape once before using it to record is a very good idea if you require no surprises in your shooting. Called unpacking your tape, it basically relieves any uneven pressure on the tape cassette that may have occurred in the factory when the tape was being assembled. Uneven pressure can lead to uneven playback and record speeds, which can lead to drop outs and timecode breaks. It is rare, but it does happen. Prestriping your tapes eliminates this as a problem, since your tape is completely unwound and wound up again before you shoot with it.
After you have chosen Mastering or Editing mode, you are almost ready to perform the edit. First, you need to select the In point. Insert your tape in the deck, then use the familiar J-K-L controls to navigate the tape to select an In point, exactly as if this were a Log and

Figure 11-10 The Black and Code button.
Capture operation. Once you have chosen it, you could immediately perform the Assemble edit. Grab the sequence or clip that you want to edit in and drag it into the Edit to Tape window (see Figure 11-11). The Edit Overlay will appear. You would drop it on Assemble overlay and the edit will commence, delayed by any rendering of header or trailer material ou chose in the Mastering Settings.
Insert edits are a little more involved. You want to set an In point and Out point on our tape so that you limit the edit and don’t record over anything you don’t want to record over. Navigate as before, but this time get both an In and Out point from your tape. Next, in the bottom right hand of the window, you specify which tracks will be overwritten. Remember that Insert edits only record over the tracks you want them to. In the bottom right corner you will see enabler buttons and a pulldown for the video, timecode, and up to eight audio tracks if your hardware and audio output preset supports them.
After you have these set appropriately, drag the sequence or clip over to the Video window. But rather than immediately dropping it onto the Insert button, drop it onto the Preview button. Because you are overwriting individual tracks, edit controllers that do Insert edits have always had the ability to give a short preview of the edit to make sure that you dub over the tracks you want to. Both Assemble and Insert edits are destructive
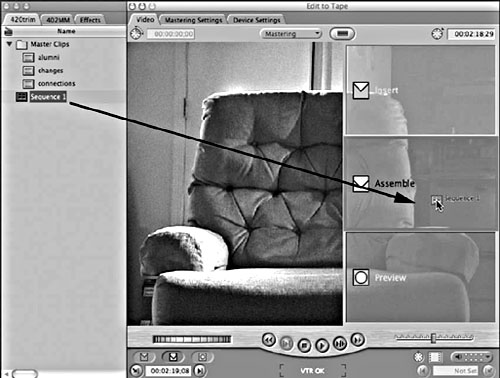
Figure 11-11 To perform an Assemble Edit to Tape, first set an In point on your tape, and then drag and drop the sequence or clip into the Assemble overlay.
edits; in other words, when you perform these edits, they destroy what was on the tape before.
Doing a preview is very important. After the Preview, drop the clip or sequence on the Insert overlay and the edit will be performed. Make sure you go back after performing such edits and check that the edit was performed correctly. If you do more Edits to Tape after this one, any change you need to make later to this section of tape is liable to affect the rest of the tape, so you want to get it right!
Exporting
You don’t have to restrict yourself to printing or editing to tape. Although DV is a fantastic way to make video for full-frame, full-screen viewing, you can also use the Export function to produce QuickTime movie files for use in Web, CD-ROM, and DVD. To explore all the possible variations of export is far beyond the scope of this book, but stepping through several of the more important options should get you through the initial stage and give you the tools for further experimentation.
There are two primary purposes for exporting media from FCP: (1) to create media files optimized for such specific purposes as the Web, CD-ROM, or DVD development, and (2) to create media files that are unchanged from the source for external manipulation in another digital application like iDVD, DVD SP, Compressor, Adobe After Effects, Pinnacle Commotion, or Discreet Combustion. Each of these two purposes requires a different strategy and, predictably, FCP has developed a convenient workflow for dealing with each option.
Export for Distribution: Optimizing the QuickTime Movie
The first option we will discuss is exporting to optimize a media file for use in specialized distribution. The most common use for this is to create multimedia files for use in Web and CD-ROM distribution or DVD authoring. In this instance, we are actually creating a new media file that contains the content of the media we are exporting from FCP but using different parameters to allow it to function elsewhere.
There is much you can change about a file while exporting it. Depending on the codec (Apple DV, MPEG-4, Animation, MPEG-2, etc.), the frame size, aspect ratio, and frame rate, you can change the media to suit your needs specifically. Which option you choose when exporting will determine how you can manipulate the media as you export it as a file. But to export the file as we want it, we need to first specify the file format, which will determine how the media will be exported into the new file.
Choosing the File Format
Select a clip in the project tab that you want to export and load it into the Viewer. For this exercise, we are exporting a single clip, although you could also set In and Out points on the sequence and export as a range. Next go to File > Export. You will be confronted by a huge list of export possibilities (see Figure 11-12). Even editors who have used FCP prior to version 4 are liable to be a little dismayed, because some of the names have changed, although none of the functionality has.
Many of the export options in this list are dedicated exports for use with “the four little dragons” that ship with FCP 4: Compressor, LiveType, Soundtrack, and Cinema Tools. Going into those applications is far beyond the scope of this book, and there are better resources out there that address the specific issues of each of these applications directly. We want to look at the two primary export types available to the FCP editor. They are the QuickTime Standalone and the QuickTime reference movie.
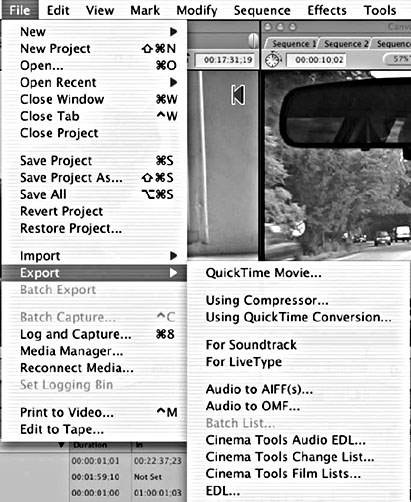
Figure 11-12 The many new and confusing possibilities in the Export menu.
QuickTime Standalones
For this first exercise, select Using QuickTime Conversion. This, in previous versions, was simply called QuickTime Movie. Using QuickTime Conversion creates what is referred to as a “QuickTime Standalone Movie.” A standalone movie is a movie file that contains the data for all the frames of the movie in the file itself. This is a true media file. The media files created when you captured clips earlier in the book, for instance, were standalone movie files.
QuickTime Conversion means that FCP will take the video and audio you want to export and leverage the QuickTime engine to convert the content to any QuickTime format you want. This could be low data rate movies for use in Web and CD-ROM, audio-only AIFF files, MPEG-2 files for use in DVD authoring applications, or any other format supported. The concept here is that you are creating a new version of the edited material for use elsewhere in a different format than what the material exists as in your project.
After you choose Using QuickTime Conversion, an Export dialog box will pop up asking you to specify the settings. There are many variations between the different types of QuickTime export possibilities. Underneath the File Location box and the Export As field, locate the Format pulldown menu (see Figure 11-13). The options on the list have their specific purposes, and independently purchased codecs, such as the professional Sorenson set, can add even more flexibility. The formats we want to work with in the first exercise are QuickTime Movie and MPEG-4 for use with low data rate Web and CD-ROM.
Underneath the Format bar is a Use bar with Export presets for the Format you’ve chosen, but it is rarely a good idea to settle for presets when you have the option of customizing the file manually to match your specific purpose.
Choosing and Setting the Compression
The main issue at stake for creating media files for Web and multimedia functions is to keep the data rate low. For the DV codec Firewire DV editors are using in FCP, the data rate is a steady 3.6 MB/second. For those editing with uncompressed media, the data rate may exceed 24 MB/second. Unfortunately, for users viewing QuickTime movies from CD-ROMs, the data rates shouldn’t exceed a maximum of 128 KB/second, and for most low-bandwidth Web surfers, the data rate should be even lower. We need to optimize the file as we export it, simultaneously dropping the data rate and creating a separate file for use elsewhere.
From the discussions in Appendix A about codecs, there are several issues involved in lowering the data rate of a media file. The initial issue is the codec we choose to utilize for the video. We know that the codec determines not only how much data is included about each frame of video, but other factors, such as the size of the frame and its aspect ratio.
For instance, the DV codec that Firewire DV uses requires the frame size to be exactly 720×480 pixels for NTSC and 720×576 pixels for PAL. It also requires that the frame rate be a standard 29.97 and 25 frames per second, respectively. This means that the data rate cannot dip below the 3.6 MB/second and still account for all those pixels.
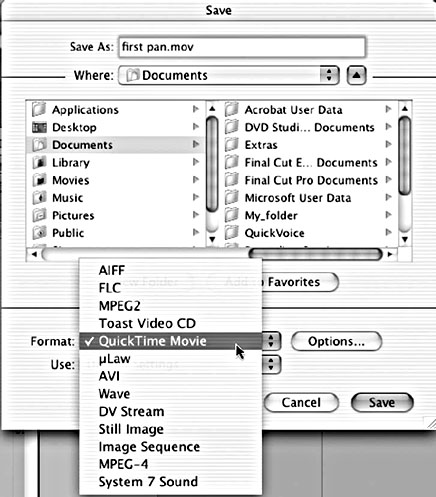
Figure 11-13 The Format Options in the QuickTime Conversion dialog box.
Other codecs are more flexible in this regard. Most software codecs will support different frame sizes and frame rates, and the data rates will adjust lower accordingly. There are a host of other factors for each individual codec as to how it trades off image quality and size for data rate, so there is always a particular codec that is best suited for the job of getting the data rate lower. In addition, it must be remembered that the same codec must live on the machine that exports the file and the machine expected to play the video file back. So, selecting the proper codec must involve a little soul-searching as to what the file needs to do and where it needs to go.
For this exercise, we will use two common multimedia codecs: Sorenson 3 and MPEG-4. These codecs are cross-platform, meaning that they are equally functional on both PC and Macintosh systems. Sorenson is fairly flexible at offering different frame sizes and frame rates, and delivers very small data rates, enabling widespread use in Web and multimedia applications (though it is not quite as good as MPEG-4 at getting great images for such low data rates). MPEG-4 is a new cross platform standard that is becoming popular but is not yet in widespread use. Its quality is staggering though, in view of how successful it is at delivering beautiful quality at very low data rates. We will use both to export a file suitable for multimedia distribution.
Select QuickTime Movie from the Format list, then look for the Options button in the dialog box. After hitting the Option button, you will be presented with a dialog box that lets you optimize each facet of the soon-to-be-exported Movie file (see Figure 11-14). At the top is the Video section. The default compressor, or codec, is Video. Beware! Video is the name of a codec in the list, not just a general title! And it’s not a particularly good one either! You need to change this. Since we want to use Sorenson 3, click the Settings button. You will be presented with the Compressor dialog box. Click on the Compressor drop-down bar and select Sorenson 3 Video from the list. When you do, the options for the codec will appear below the bar.
First, since we want to shrink the data rate enormously, enter 15 in the Frame Rate field or select 15 from the Frame Rate selection bar. Although this means the codec will throw away many frames from the video file, 15 frames per second is still enough to give a pretty
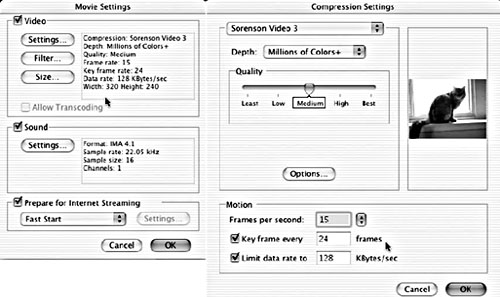
Figure 11-14 Choose QuickTime Movie from the Format list, and then hit the Options to correctly configure the subsequent settings for the export. For this exercise, choose Sorenson 3.
good illusion of the moving image, and it will shrink the size of the exported file radically, eliminating over half the visual data at one go.
The other two settings involve the way that the codec will operate on the video frames and determine which data is relevant and which can be thrown away. The two methods are referred to as spatial and temporal compression. Some codecs use one method, some use the other, and still others use both as a means of eliminating excess data from video frames.
Quality or Spatial Compression
The Quality slider represents the amount of spatial compression you are applying to the file. Spatial compression looks at each frame of video and throws out a certain amount of detail in order to achieve a specific amount of data reduction in the frame. The Quality slider does no comparisons between groups of frames for important or recurrent detail; it just evenly lowers the detail quality for each frame a certain amount based on how low you set the slider. Set the Quality slider at Medium, which will cut the data rate pretty radically without losing too much detail.
Keyframe Every or Temporal Compression
The next setting is called Keyframe Every, and represents the temporal compression technique. This keyframing is not to be confused with the keyframing we worked with in the sequence and Canvas window, although they do approach their separate tasks from the same universal idea of the amount of change between two frames. Temporal compression sets a keyframe at an interval established by the value you insert in the box. Each keyframe frame is compressed using only your setting for Quality or Spatial compression.
However, all the frames occurring between the two keyframes, called interframes, are compared to the initial keyframe. Any differences between the interframes and the keyframe are retained, whereas any similar pixels are discarded, thus further lowering the amount of data in the frame. If your video contains areas of the frame that do not change at all over time, such as static backgrounds around talking heads, much of that data can be thrown out without affecting the image quality of the interframe at all. The result is that the data rate shrinks dramatically because the amount of data in each interframe is lowered while the image quality isn’t affected very much.
Of course, this compression type is effective only if you do not have a lot of changing imagery in the video footage for the keyframes to keep track of. If you establish keyframes every 90 frames, this means that major changes in footage over roughly three seconds will not be tracked. If your keyframes are too far apart, a lot of important movement could be discarded as the interframes get further away from the keyframe. As the distance between keyframes increases, the image quality drops.
The option of entering a lower number in the Keyframe Every and decreasing the distance between the keyframes and making them closer together results in higher quality interframes. Unfortunately, it also defeats the purpose of the keyframing temporal compression, since the more keyframes you have, the fewer the frames that are processed as interframes and compressed.
The key, of course, is to shoot and select your video with an eye towards the compression issues you’ll encounter later. If you are going to compress video for the Web, make sure to get rock-steady tripod shots and don’t allow excessive camera or subject movement. Other codecs such as Cinepak offer different mathematical procedures for the compression, but the parameters for codecs are largely limited to spatial and temporal compression.
Leave the Keyframe Every setting at the default value of 24 frames. The final setting in the Compressor box is Limit Data Rate To. This lets you set a ceiling for the data rates, just in case your compression settings are not sufficient to bring the overall data rate down. Set the data rate ceiling at 128 KB/second, a data rate ceiling for slower CD-ROM drives and faster DSL/cable modem connections. Click OK and return to the Options box.
Other Factors: Frame Size, Audio, etc.
Having set the compression, the next setting is Filter, which would allow us to apply Effects Filters directly to the clip as it is exported. In most cases you will not want to apply such filters; it’s far better to apply such image manipulation in FCP as you edit, then export it directly. The next button, Size, will be necessary to visit, though. Because the video file is likely to be viewed on a computer screen, it is not necessary to stick religiously to the large 720×480 frame size our video currently uses. Cutting the size of the video frames will cut the data rate enormously, since fewer actual pixels will be included in each frame of video.
Click the Size button, and you will enter a dialog box labeled Export Size Settings. The two checkbox options below are for Use Current Size and Use Custom Size. Click the dot next to Use Custom Size and the Width and Height fields will appear. You can resize according to whim, which may result in a stretching of the video frame. To choose a new frame size, simply divide the starting dimension in halves or quarters or however small you wish to shrink the frame.
Don’t forget that the pixel shape, square or non-square, is determined by the codec in use. The DV codec your footage is originating from used non-square pixels, resulting from 720×480/720×486 or 720×576 frame size. But the codecs you are likely to use with Web and CD-ROM exports will be in square pixels. Therefore, the half-frame size for this export from DV to Sorenson would be from 720×480/720×486 to 320×240, which is half the frame size for the square pixel video file the Sorenson compressor generates. For the Size setting, select 320×240 pixels, then hit OK to return to the Options box.
The next section to set is Audio. We do want to include audio with the file, but we definitely need to change the settings from the default uncompressed version. Although audio data rates are smaller than video data rates, they can still be far higher than necessary for such uses as Web and CD-ROM, where every byte counts. Click the Settings button in the Sound section of the Options dialog box to enter the Audio Compressor dialog box.
For the Compressor bar, select the IMA 4:1. This is only one of a number of excellent audio compressors on the market, as well as the ones freely supplied with the QuickTime compression system. Each audio compressor has a specific targeted function, such as optimizing data rate for human voices, midrange music, and many other specific issues. Most audio compressors are expressly for use with Web and multimedia. Because audio data rates are generally so low compared to video, we never compress audio while editing. But for streaming video and other Web and multimedia work, compressing audio is just as integral a process as compressing video.
Setting the sample rate lower to 22.05 KHz will also contribute to a lower data rate. Although 22.05 KHz would be considered unacceptable for inclusion in the DV video we are editing, it is more than enough for low-bandwidth options. With the IMA 4:1 codec, the bit rate is fixed at 16, while you can choose between a Stereo or Mono file. Select Mono and hit OK to return to the Options box.
The last option in the box is for Fast Start. Fast Start refers to file coding that can be inserted in the exported QuickTime file to facilitate Internet streaming functionality. If our QuickTime Movies are to be sent to a server for streaming download, contact the administrator of the server and find out how the Fast Start settings need to be optimized for use. If you have no plans for streaming the video file, you can safely disable the feature.
Hit OK to return to the QuickTime Movie box, check your settings, then click OK again to return to the Export dialog box. Now all that remains is to navigate the Save location to a suitable place. This will depend on your Exported file. If the QuickTime file were of a high data rate and comparable in size and compression to the files you edit with in FCP, you’d want to save the file to a dedicated media drive just as if it were a captured clip. If, on the other hand, the file has a very low data rate for use on the Web, like the export we are working with here, saving it to the Desktop and playing from there will do no harm to our system. Since our exported QuickTime Movie will be heavily compressed with a very low data rate, save it to the Desktop.
Navigate the Save location to the Desktop by clicking on the Where tab and choosing Desktop. Name the file, using the “.mov” suffix in case any of your PC pals want to access it, and then click Save. FCP will begin rendering out your QuickTime file. Depending on the amount of processing and the codec you use, the render can be very short or very long. Once the render process is complete, you can double-click the exported file on the Desktop to view it in the QuickTime Movie Player application already installed in the Mac OS.
MPEG-4, MPEG-2, and You
Before moving on, it might be a good idea to address a couple of formats that are likely to be the new standard in compression of video for distribution on the Web, as well as for viewing on a television screen. These are a set of compression formats referred to as MPEG. There are various types of MPEG formats, each relating to a particular type of media and distribution format. MPEG generally offers such flexibility and quality at such low data rates that it is a shoe-in to be the most popular format for some time to come.
But the most amazing feature of MPEG is that it is a standard rather than a single proprietary child of one corporate parent. In other words, no company owns MPEG; rather, MPEG specifications (or what an MPEG must be able to do) are developed by a consortium of industry professionals, who then develop their own versions of MPEG products. This assures the consumer that Company A’s MPEG compressed files will playback on Company B’s player device. No one company can hold the standard hostage, since no one company “owns” MPEG.
Some of the MPEG formats are already in widespread use, though working in the background. The MP3 audio format is part of the MPEG system. Its name is somewhat misleading; it is not MPEG-3 but rather MPEG-1 Layer 3, hence, the short term MP3. Although it was developed as a complement to an MPEG video format, its audio compression quality was so excellent that it has come to be almost universal in the function of music compression and distribution.
Of course, the other widespread use of MPEG is MPEG-2, the video file format used in DVD authoring. This special format offers exceptional quality at incredibly low data rates. If you purchased your Macintosh with a Superdrive DVD-R burner, you are able to create DVDs playable in a desktop unit using either the iDVD application that comes free with the Superdrive burner and contains its own compressor, or with the much more flexible (and expensive) DVD Studio Pro application. FCP 4 actually installs a special codec option in the QuickTime Export format options to allow you to choose suitable compression settings for the MPEG-2s you will need to author in DVD Studio Pro or any other true DVD authoring application. iDVD, on the other hand, comes with its own automatic MPEG-2 encoder, so that you don’t have to work with compression settings. To use it, you will want to export your video as a reference movie, which will be covered in the next section.
Before moving on, though, we should visit an MPEG format that promises to be the most successful format in history in terms of quality, compatibility, and flexibility, MPEG-4. Although it is possible that MPEG-4 will always remain a format for online Web distribution where data rates must stay very low, its fantastic quality and universal acceptance by every platform and system makes it extremely attractive to deliverers of digital content.
It must be stated, though, that MPEG-4 is still in its infancy, and is just beginning to stake its claim in the world of video distribution. Currently, viewing MPEG-4 content using the Mac OS requires QuickTime 6 or later. Obviously, this will not be a problem on your FCP editing station, since QuickTime 6 or later is required for FCP to run. But you have to remember that not everyone out there is running the most current operating software on any platform. If you are going to encode content using a compression format, you want to take into account who will be accessing the content. If some of your viewers are using older systems and do not have access to MPEG-4-capable computers, you may need to offer the same content using older, more-compatible, and less impressive looking compression formats.
Exporting with MPEG-4
That said, let’s step through the process of exporting MPEG-4 QuickTimes. First, line up a clip for export using the same steps used earlier for the Sorenson-compressed export. When you get to the step of choosing the format in the QuickTime Export dialog box, click on the Format list and choose MPEG-4. Then hit the Options button to configure the export (see Figure 11-15).
The Options box offers a series of tabs that allow you to get pretty specific about what sort of trade-offs you are making to lower the data rate. On the General tab, set the Video Track to Improved and the Size to 320×240. MPEG-4 uses a series of “profiles” to give more flexibility with regard to quality, data rate, and streaming options when compressing, but not all MPEG-4 decoders can read all the profiles. In addition, if you select the largest frame sizes and higher frame rates, the computer that receives the file will also have to be able to decode them, and that might be a lot to ask from an older PC. With the free MPEG-4 that comes with QuickTime 6, the only audio options are Music and None. Obviously, we want audio here, so select Music. In the next couple of tabs we will optimize the settings for the best possible quality.
Click on the Video tab (see Figure 11-16). The default data rate for the Basic video setting is 64 kilobits. Beware, this is kb, or kilobits, not KB, or kilobytes! There are 8 bits to the byte, so divide 64 kilobits by 8 to get only 8 KB. The average DSL or Cable modem connection can get between 70 and 128 KB per second, so this gives us a lot more bandwidth and will allow us to get much better quality than the default setting. We’ll set the bit rate for worst case scenario DSL/Cable. Assuming the end user is getting a connection speed of 70 KB per second, this would give us a bit rate of around 560 kb/second.
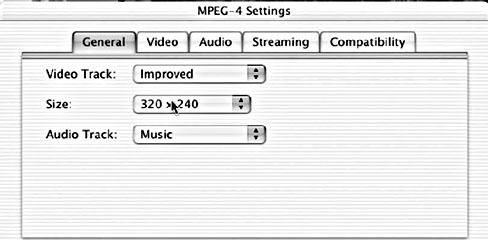
Figure 11-15 This time, choose MPEG-4 from the Format pulldown and again hit the Options button to get the MPEG-4 configuration dialog box.
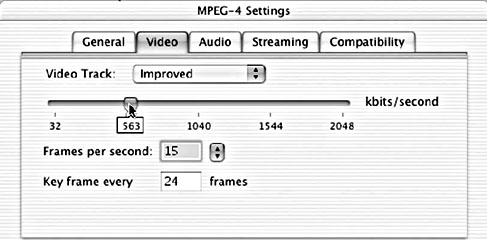
On the Video tab, drag the slider up to a value of around 560. The frame rate should be set at 15 frames per second, and we will set the temporal, or “Keyframe Every” 24 frames as well for a starter.
Unfortunately, if you had set the initial video track profile for Basic rather than Improved (and Basic providing the widest compatibility for streaming) you would have discovered from reading the information about your settings in the box below the settings controls that bit rates in excess of 64 kilobits per second do not fit into the Basic profile that guarantees the widest compatibility among MPEG-4 players. In addition, the frame size of 320×240 would also have been invalid. Although the widest compatibility is nice, it doesn’t give you much leeway to make good looking video.
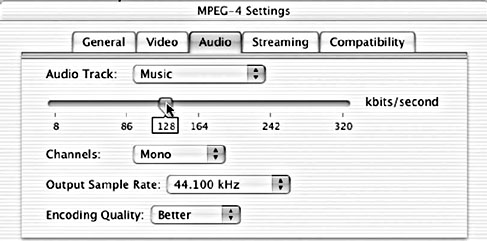
On the Audio tab (see Figure 11-17), leave the audio bitrate set for 128 kilobits and change the channels setting to mono. The only use for stereo would be if you had actually made interesting use of stereo in your project (like sounds that are only present in one channel or the other, or music from a CD). If not, the stereo file is basically just two mono channels, which means you are using twice the data rate that you really need! When you change the setting to mono, the lowest sample rate you will be able to achieve is 44.1 KHz. Lower sample rates will mean lower data rates, so select 44.1 KHz. Interestingly, if you choose stereo for channels, you can select 32 KHz, which is still an acceptable sample rate quality. Finally set the Quality for Medium, which is a decent tradeoff between Quality and Bitrate.
Streaming should be left alone until you can get to your network administrator. They will inform you of any settings necessary to prepare your content for streaming. It must be said that streaming technology is a rapidly evolving area. At this point, many content providers still prefer the older, reliable method of Progressive Download for the highest
quality and reliable playback, as opposed to Realtime Streaming. Seek more information about your server and what you need to do if you want to implement this option.
Finally, on the Compatibility tab (see Figure 11-18), leave the Compatibility Profile drop-down at None. If we had chosen Basic earlier for compatibility and still chosen our high data rates, we would have needed to set this to None to avoid an invalid combination of settings. Because we set our data rate and frame size too high for compliance with the
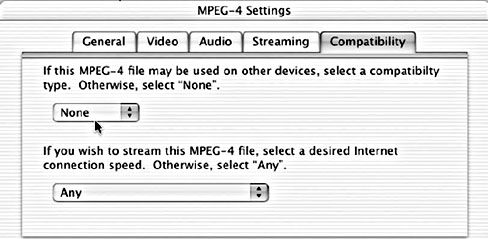
Figure 11-18 The Compatibility tab.
standards for ISMA streaming protocols, the MPEG-4 compressor Compability would have to be set for None.
Hit the OK button to return to the QuickTime Export box, then hit OK and begin the Export. Once it is complete, go to the Desktop and double-click on the “.mp4” file to start up QuickTime Player and watch your movie. Although the frame rate might be a little jumpy because you have reduced it to 15 frames per second, you should be pleasantly surprised by the quality, even in comparison to the Sorenson compressor we just used earlier.
Export for Loss-less Transfer: The QuickTime Reference Movie
Although the previously described Export is much more common, there is another export method that is specially designed for post-production purposes. The issue for post-production is definitely not reducing the data rate or quality of the editing materials. Quite the opposite; there is a necessity to retain the highest level of quality and fidelity to the film or video while editing and manipulating it.
It is often necessary to pass sections of a clip or sequence out to be manipulated by another application. There are numerous applications, such as Adobe After Effects and Pinnacle System’s Commotion Pro, which use specialized toolsets to further develop the same matting and keyframing techniques we worked with earlier in Chapter 9. Although FCP has a great set of compositing tools, professional post-production often requires styling that only specialized applications can deliver.
Also, many FCP editors will want to use the simple iDVD application to burn DVDs of their projects. Since iDVD uses an automatic encoder to produce the MPEG-2 files it needs to burn a DVD, you actually don’t export your video into the MPEG-2 format manually using QuickTime Conversion. And even when using DVD Studio Pro 2, you will want to use its automatic encoder or use Compressor (included with FCP 4) for much more effective compression and MPEG-2 encoding. So you need to bring your clips and sequences out of FCP at the highest quality, without passing through a codec and lowering data rate and image quality.
If we use the previously described QuickTime export process, our clip will end up having passed through two sets of compression. The first will be compression applied as the QuickTime file is saved using a codec. Then, it will likely be compressed a second time as it is rendered in the other application to which we exported the movie. Any time FCP creates media that does not already exist, it must render that media, and rendering with a codec requires compression.
There are two ways to overcome this compression. The first is fairly obvious; if you don’t want to involve compression in the export, use a lossless codec that doesn’t discard data! For instance, the Animation lossless codec would give us a media file that had not received any further compression. But this is not acceptable for our uses for another reason; it involves a waste of time and drive space.
The media we want to export without recompression already exists in our Scratch Disk folder. It is already digital, and it is already compressed. Why recompress digital media, when it is already sitting there on the media drive? Creating more copies of the same media on our media drives is a waste of space, particularly if the redundant copies are generated by a codec like the Animation codec that explodes the data rate tenfold. Beyond this, rendering takes time. When you render, FCP has to analyze and process each frame. Decompressing the DV codec source material, then applying the lossless Animation codec, and saving it to disk is a process that will have you looking at the progress bar far longer than you would if you could simply access the relevant parts of the media file already sitting in your Scratch Disk folder.
What if you could simply produce the equivalent of an FCP clip that can function outside of FCP? A clip in an FCP project is simply a reference to the original media file back in your Scratch Disk folder. When you work with it in the Viewer or Canvas, you are simply telling FCP how you want to work with the media file being referenced by the clip, rather than working with the media itself. This is what makes nonlinear editing possible and what sets digital video editing apart from old linear analog tape editing.
FCP includes an export feature that is sometimes referred to as a Reference Movie. A QuickTime Reference Movie is very similar to a QuickTime Movie; indeed, most applications will see it and treat it as such. But the QuickTime Reference Movie offers an option that a QuickTime Conversion export cannot: the choice between a Self-Contained and Referenced exported file.
A reference movie does not contain any frames of the video in the file, but instead references the frames of video from the FCP project from which it was exported. It references media from the Scratch Disk just like a clip in a FCP project does. It is treated like a normal QuickTime movie by any application that can access such files. And because the exported movie may be from a range of clips in a sequence, it even accesses any render files that might have been created if you rendered an effect on the sequence.
Since a self-contained movie file is not being created, no rendering is required, so a reference file export is nearly instantaneous. No more waiting on progress bars. And because the file is merely a reference to the media in the Scratch Disk folder, the reference movie file actually takes up very little drive space; in most circumstances, less than a single MB. Thus, this reference movie export function allows you to work with material that has not been recompressed with a codec, does not delay you with excessive render times, and takes up nearly zero drive space. This is clearly the best method to use if you want to take your media out to another application, particularly iDVD. You can even include chapter markers in our QuickTime reference for use in iDVD!
Special Limitations
That said, there are a few tweaks and special rules that apply. It’s important to follow the correct process in generating the reference movie to make sure that you are benefiting from all that the feature has to offer. To create the QuickTime reference movie, first create a range of frames that you want to export in a sequence using In and Out points.
Make sure that the range of frames does not require rendering. If it does, render it before attempting to export. If you export material as a reference movie that requires rendering, FCP will render the material prior to creating the reference movie and then embed the render files in the reference movie itself, resulting in a render process that takes time but does not actually apply to the sequence material you are exporting. In addition, the size of the reference movie itself grows, as the render files are included rather than really being referenced.
Also, you must be very careful not to orphan your reference movie by accidentally eliminating or moving media files referenced by the movie. This means that you need to keep the reference movie on the same workstation that the media files for the project are on. Unlike a sequence in a FCP project, the reference movie is not updated after it is exported, so if you change anything about its media, it will lose its links and become worthless. This applies particularly to render files in your FCP project. If you make a change to a sequence that has been rendered, the new render files will not work with any previously-created reference movie. This is not a step that can be undone, so proceed with caution when working with a project that you know has been used to create QuickTime reference movies.
The QuickTime Movie Dialog Box
In past versions of FCP, this export option was referred to as a Final Cut Pro Movie, but now is called QuickTime Movie. Select a sequence and the range of frames using In to Out points. Then go to File > Export > QuickTime Movie. When you do so, you will be presented with a QuickTime Movie Export dialog box (see Figure 11-19).
At the top of the dialog box, you will find the familiar Save location tools. Because the reference movie is not a true media file, it is less imperative that you save it to your media drive. Give yourself an export folder on the Desktop and store your reference movie there. After you navigate to the appropriate Save location, name the file, making sure to specify in the file name that it is a reference movie, i.e. “xxx.ref.mov.”
The setting “Include” bears a little discussion. A limitation of the reference movie is that only video files can be indexed; audio files are not indexed by a reference movie. If you leave the Include bar set at the default Video and Audio, the resulting reference movie will actually embed the audio tracks, just as it embeds render files that are not rendered prior to export. Selecting Video Only eliminates this problem, as only the video files will be included in the reference movie.
If you need to include audio in the reference movie; for instance, if you are using this as an export for use in iDVD, do not hesitate to Include Video and Audio. Remember that audio data rates are very low, and the inclusion of the audio data in the index file will not increase the file size radically. Just remember that you may want to store such reference
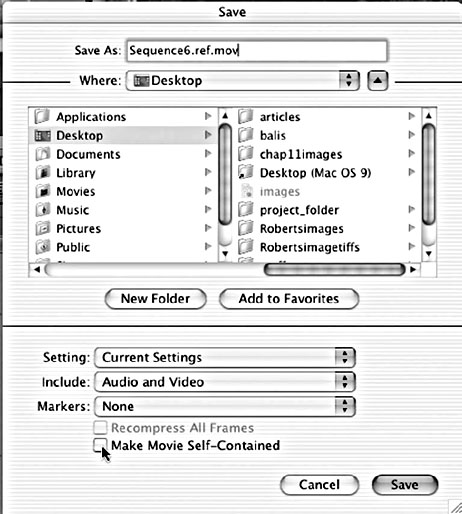
Figure 11-19 The QuickTime Movie Export dialog box.
movies that include audio on your media drive, since they contain audio files which have to be accessed at the requisite high speeds of a true media file. For our exercise, set the nclude bar at Video Only.
Underneath the Include bar is another drop-down tab named Markers, which by default is set for None. In most cases this is suitable. But we should look at it for the options it offers to those looking to work with iDVD. Because Apple knew that many FCP editors would be using the QuickTime Movie option to move sequences between FCP and iDVD (and DVD SP), they included the ability to insert Chapter Markers in the sequence, and then carry them out with the sequence straight to iDVD.
Where do the Chapter Markers come from? If you remember from the chapter on capturing clips, in the Log and Capture window we had the option of inserting Markers that would stay with the captured clip once it was brought into the project. Although this marker could not be seen on the video output, we could use any notes we included in the marker for reference purposes. Another use for markers is to carry chapter markers from the sequence to iDVD. In the sequence, you simply hit the M key twice (the first time creates the marker, then the second one opens up the Edit Marker dialog box so you can change its contents). One of the options in the Edit Marker dialog box is the Chapter Marker (see Figure 11-20). When you insert a chapter marker (which appears in the Edit Marker text field as “<Chapter>”), it will be included in QuickTime Movie export. Once the Movie is imported into iDVD, the chapter markers will be read and interpreted.
After this, there is a checkbox option that warrants special attention. This is the Make Movie Self-Contained box. The default setting for this box is enabled. If this box is enabled, FCP will create a stand-alone movie file for the export. If you want to create a reference movie, you need to disable this.
In some circumstances, you may actually want to create self-contained rather than reference movies. The difference between a self-contained QuickTime Movie and a QuickTime Conversion Movie previously described is that the QuickTime Conversion applies compression. Remember that you chose a codec with QuickTime Conversion (even if it was None or Animation, which are lossless codecs). A self-contained QuickTime Movie does
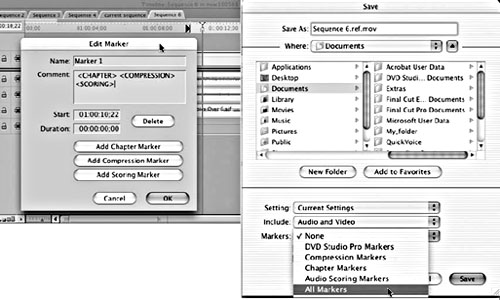
Figure 11-20 Chapter and other markers can be set into sequences in the Edit Marker box, and then exported from FCP through the QuickTime Movie option.
not have to compress your footage again; it can create a movie file by simply duplicating the frames from your media files from the sequence.
Unless you have chosen to include audio or are making a self-contained stand-alone QuickTime Movie, the process should be nearly instantaneous. Hide FCP (by Option-clicking the Desktop or hitting Command-h), and locate the exported FCP Reference Movie. If you select the reference movie and hit Command-i, you will see that it is indeed quite small in size compared to the same thing exported as a stand-alone QuickTime Movie of equal quality (see Figure 11-21).
The icon used for QuickTime Movies is a variation on the FCP icon. If you doubleclick on the FCP Movie icon, you will see that it opens the file up as a clip inside of FCP, instead of opening the QuickTime Movie Player application that the QuickTime movie file we exported earlier opened. This is because the file contains code establishing that it was created by FCP. This information is used by the Mac OS to decide which application to open when the file is double-clicked. Have no fear; applications that can use QuickTime movie files, such as QuickTime Player, iDVD, and Adobe After Effects, will recognize the eference movie and utilize it just like a QuickTime Movie.
Export for Metadata
There is another sort of export that is very useful for more advanced applications. This is called Metadata. Metadata means precisely what its name says, “data about data.” In fact, you’ve been working with metadata all along. The project you are working in is metadata. Metadata is essentially any saved and stored computer code that describes relationships and properties of media.
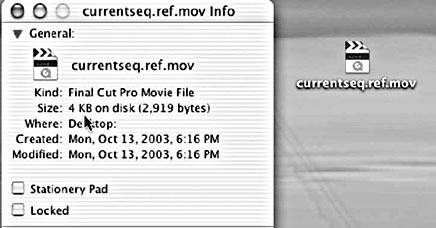
Figure 11-21 Select the reference movie on the Desktop and hit Command-i to see the file size.
Your project is basically a lot of computer code that tells the Mac OS where your media is on the drives, what order to play it in, and what, if anything, to do with it while playing it. That is metadata; data to describe and direct other data. But your project isn’t the only metadata out there. In fact, a large part of the professional functionality of FCP is its ability to generate and manipulate metadata.
What are other sorts of metadata? The two key types for FCP are the Edit Decision List and Batch Lists. Both are standard methods for getting project metadata out of FCP for use elsewhere, or even inside FCP again.
The Edit Decision List
The Edit Decision List is a great piece of functionality, even when used out of context from its origins in the linear tape editing world. The Edit Decision List, or EDL as it is referred to, is basically a “Rosetta Stone” or translator of edited sequences between video editing systems. It allows any system that can read EDLs to access the metadata from any other system. Thus, your FCP system can generate an EDL and pass it to an Avid or Media 100 nonlinear editing station. That station will be able to open the EDL and access the exact same sequence you were working with. This is only metadata from the sequence, so the media to make that sequence online is not present. EDLs are only meant to pass around the timecode information and types of edits in the sequence.
Where did this come from? The EDL was developed for use with online tape editing facilities. The editor was supposed to edit offline using lower quality dubs of their video materials. Once their edit of these offline dubs was in order, they generated a list with all the timecode values for all the edits in the piece. They did so using a standard format, based on spreadsheet formatting (called “tab-delimited”) that could be understood by an edit-controller (an automatic linear video editing station) (see Figure 11-22). Give the automatic editing station the EDL, the tapes the EDL refers to, and a destination tape to edit onto, and the editing station could assemble edit the entire program.
In fact, most online houses still use much more advanced versions of this same process when they online a production. A common professional workflow for high end broadcast is to shoot your material in whatever format you choose, from MiniDV up to Digi-Beta and HD, and then go to a dub facility. The dubbing facility will dub your source tape into two different formats: one offline format, such as DV, Betacam, or even 3/4″ tape; and an online master, which might be Digi-Beta or DVCPRO50. The most important part of this is that both the offline and master dubs will have precisely matching timecode values for all the footage.
You would go home, edit using the offline MiniDV tapes, then generate an EDL of the edited sequence. You would take this EDL back to the transfer facility and have them apply the same edits to the master dubs. Since the timecodes match, the higher quality, much more expensive formats can be used in the final assembly, while all the editing to generate the EDL was done on your $2,000 editing station at home. This process is called onlining.
There is another benefit to using EDLs. Because EDLs follow a standard spreadsheet format (necessary so that the automatic online editing station at the other end of the workflow
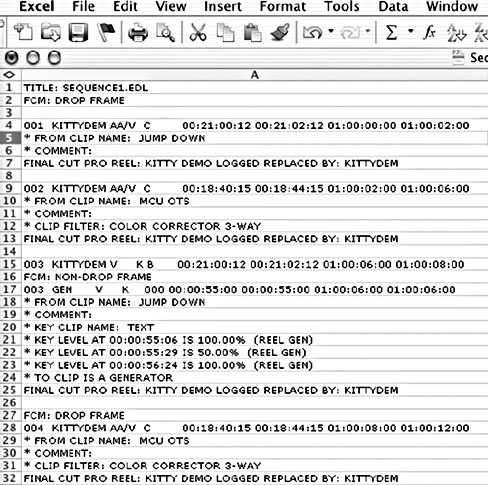
Figure 11-22 An EDL is simply a tab-delimited spreadsheet file containing timecode values and edits.
can understand it), this means that most programs that can generate EDLs can also read them! An application like Avid that can generate an EDL can send that information to FCP. FCP can use the EDL to create a sequence that matches all the metadata. You can then recapture all the media that goes along with it, just as if you had logged it all by hand and edited it into place. The reverse is also true. This means applications that have proprietary project files like Avid, FCP, Media 100, etc. can actually talk to each other.
Of course, there are limitations to that functionality. A lot of the great special stuff that FCP can do doesn’t translate into the simpler edit types that are used by online linear tape editors. The crazier and more interesting your effects get, the more unlikely that a linear tape editor can perform the operation. This is true for all nonlinear editors that generate EDLs but also are capable of creating effects. The key to working with EDLs successfully is to limit what is included in your sequences to what the limited EDL common languages can handle.
There are a few things that you can be sure won’t make it into an EDL from FCP. Because EDLs are limited to one edited video track (a second video track is only available for special keying techniques in the online edit session), you can’t really make use of those 98 other tracks available to you. This includes nested sequences, which, of course, have no timecode. Motion tabs don’t occur in other applications, and they won’t make it through your EDL either. This applies to filters as well, since FCP’s filter set is unique to the application.
Does this mean that EDLs must be cuts only, or consist of hard edits from clip to clip? Not at all. The rigid, simplified language does allow for some common transitions, as long as they meet the SMPTE specifications established to describe them. The common transitions are what you would expect: Dissolves, Wipes, and Iris. Straying beyond will likely yield unpredictable or no results at all.
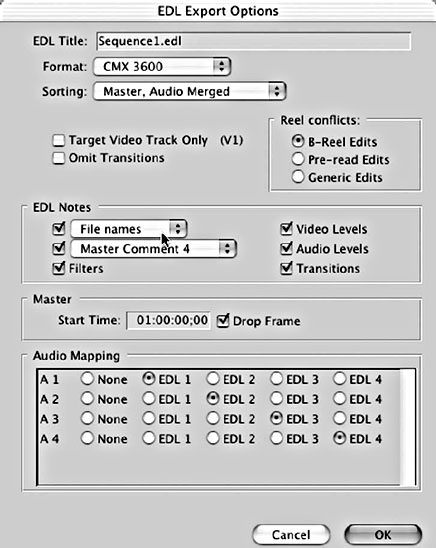
To export an EDL, select the sequence you want to export, and go File > Export > EDL. In the window that follows, you need to configure the EDL. First you have to make a decision about which type of EDL you want to produce (see Figure 11-23). The names of the EDL formats are related to the online editors they originated from: CMX, Sony, and Grass Valley Group. Although CMX 3600 is the most common EDL format passed around, you need to find out from your online facility which one they want before deciding this.
While we’re on the subject, the standard warning is that you want to communicate with your online facility (or whatever destination you are sending the EDL to) and find out what they want prior to generating it, even before you begin editing the sequence itself. EDLs are somewhat of a black art because there are so many possible variations among the EDL types and what you might potentially want to include in them. Sending the online facility a test EDL to check out the conversion is not such a bad idea, especially if your online house will do it cheaply or for free; many will, because it saves both parties time and money.
If you will be using a lot of EDLs in your workflow, make sure you read the relevant chapters in the Final Cut Pro manual. There is a great deal of detailed information there with regard to specific limitations and requirements for each EDL type and how video and audio tracks are handled inside them. This is important long before you deliver the EDL; even something as simple as naming your clips incorrectly can muck up the entire works!
The Batch List
The EDL is for sending out sequence metadata to recreate a sequence in another location. But what if you haven’t even started editing yet? The EDL only sends metadata about the clips in the sequence. Can you move logged clips to another machine, short of duplicating the project? The answer is yes, the Batch List. The Batch List is like an EDL for bins. When you export a Batch List for a bin, FCP generates a spreadsheet with all the information about the clips in that bin.
Go to the Browser, make sure it is in List view and open up the window wide so that you are looking at all the columns for your clips. You can customize the columns, as we saw in the editing chapter, by Control-clicking any column header to hide or show any given column. You can also save the column layout once you get it the way you like and even transport those settings to new machines when you move around to other editing stations (saved layouts are stored in your Preferences folder: go to Macintosh HD > Users > Your User > Library > Preferences > Final Cut Pro User Data > Custom Layouts).
If you need to access the data from your clips outside of FCP, all you have to do is File > Export > Batch List (see Figure 11-24). In the Save dialog box that follows, you can and should save this in the same location you save your project. It is very much like a project file, so it need not be saved on your media drives. At the bottom of the dialog box is the only possible variation: tabbed text or formatted text. Users of Microsoft Excel or Apple’s own Appleworks will see no difference between the two formats, since those applications can read the tabbed text that Batch Lists use. Any application that correctly displays spreadsheets should work fine, including software for handheld PDAs.
Batch Lists are useful not only for passing bins around between stations. You can use them for offline logging. If you start with a fresh project that currently holds no clips and export a Batch List, when you open it in the spreadsheet application you will get a worksheet with all the columns FCP uses (see Figure 11-25). Just fill in the fields in the columns for In and Out points and save. This is great for logging right on the set as you shoot or having an assistant sort through and log your tapes without tying up an expensive editing workstation.
When you are done building the Batch List, you can easily bring this into FCP by going to File > Import > Batch List. You need to remember to create a new bin before doing so; enter that bin by double-clicking it, and then doing the import process; otherwise importing Batch Lists will just dump the imported clips helter-skelter into the active bin or project tab. Then just recapture the clips and your clips go online.
This is not the limit to the Batch List functionality. Since it is a spreadsheet format, the Batch List can be used as a source tape database. B-Roll footage is worth its weight in gold, provided you can find it on your source tapes! As you shoot and edit projects, make a habit

Figure 11-24 The Export Batch List dialog box.

Figure 11-25 Exported Batch Lists can be opened in any application that can access spreadsheets.
of exporting your bins as Batch Lists when you are done. Merging your project databases allows you to build a huge, searchable database of logged clips that you can go browse through when you need a little extra B-Roll. If you’re old school and like to avoid the computer, you can print your Batch Lists out and keep them filed. Either way, being able to pull resources out in a pinch will speed you up and save you money and time.
Batch Lists can also be used to pass logged clips between FCP and Avid using a great freeware tool from Peter Reventlow’s Sebsky Tools (see Figure 11-26). Using the easy GUI interface and with one click, you can convert FCP Batch Lists into Avid ALE log files and back, among other useful functions. If you have both FCP and Avid in your workflow, the time will come when this simple tool will make your day.
Media Manager
The last subject of this chapter is more of a workflow than a file type. It is a tool called the Media Manager that is used to get complete control of your media. Media Manager can do a lot of things, but its usefulness comes mainly under three functionalities: Offline/Online Editing, Project Media Trimming, and Converting Media. Learning to use the offline/online process lets you make the most out of limited drive space, particularly for those cutting extremely longform projects or who are doing the bulk of their work on PowerBook laptops.
Figure 11-26 Peter Reventlow’s Sebsky Tools.
The Other Offline/Online Process
What is the offline/online process? Understanding offline editing is essential in getting the most out of your system, particularly if you are looking at upgrading your system from a Firewire DV editing station into an uncompressed high-end workstation. The biggest problem with digital video editing at the highest quality is always storage. It’s not just about how fast your drives are, as is emphasized in Chapter 3 and in the Appendices. Captured video takes up drive space, and the higher the resolution the video is that you are using, the more drive space it consumes per second of capture.
How much drive space? Well, the DV codec’s data rate runs at 3.6 MB per second, which ends up delivering about 5 minutes to the gig, or 12 gigs to the hour. This is not bad when contrasted with uncompressed video. Uncompressed 10-bit video, which is the highest quality when using standard definition video, can run up to 30 MB per second, or nearly 110 gigs per hour! When you start building in 10–20% drive space buffers (as you should), you really start to see your drive space evaporate.
The lion’s share of editing work is making choices about which footage occurs where in the sequence. It need not be the absolute highest quality video, so long as it is of acceptable quality to get the work done. Back in the days before our most recent video editing technology, editing digital video online (editing with the same quality as will be used in the final output) was unthinkable, simply because the quality of digital video technology at the time was terrible. You could see enough in the editing interface to make edits, but you didn’t want a customer to ever see the murky, pixellated, postage stamp-sized video you were using on the computer.
Instead, you edited your timeline using this offline video, then you used the timecode numbers generated by the timeline to re-assemble the edits from the original tapes using much higher quality decks to perform the edit, or to online it. Thus, offline editing is using a lower quality version of your materials with the same timecode as the original, which will later be onlined, also called up-rezzing (upping the resolution), using the original source tapes and higher quality editing machinery. This is the same process as we encountered earlier when looking at EDLs.
And though that process has improved with time, technology, and tools, the process is still in use in professional production everywhere today. But nowadays, it can be used by any FCP editor who is looking to maximize drive space and editing flexibility, rather than just being the province of people developing content for HDTV broadcasts. FCP contains a powerful offline codec called OfflineRT. This offline codec is based on the PhotoJPEG compression scheme. It uses a data rate of roughly 300 KB per second, less than one tenth of the DV data rate. This makes it possible to fit almost an hour into a gig. Although that number will shrink a little by the time you’ve included audio with the capture, you can still get nearly 45 minutes onto a gig of disk space. This is particularly useful for two groups of people: longform and documentary editors who need hours and hours of footage available to edit with all the time, and editors on the go who work on a PowerBook and can’t carry an external drive around holding tons of online footage.
There are two ways to implement this OfflineRT codec. First, you can capture your footage with this codec using the OfflineRT Capture and Sequence Presets available in the Audio/Video Settings (see Figure 11-27). When you capture, FCP converts the footage on the fly to the lower quality codec and stores it on your drive. Using the Sequence Preset for OfflineRT, you edit your footage. In fact, if your Macintosh has enough system resources, ou can even send this out to Firewire and video monitor using RT Extreme, although the quality is liable to be far too low for any usefulness in editing. When you finish the edit, you recapture the sequence, this time using the regular sequence preset for the best quality.
The other way is very useful for projects you begin working with online, but which you need to continue working with under either of the above scenarios. Media manager, as we will see, can convert the media
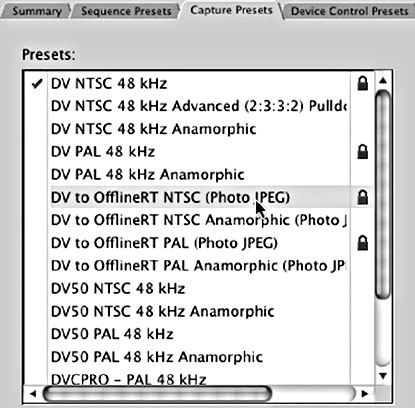
Figure 11-27 You can capture your footage using one of the OfflineRT capture presets from the Audio/Video Settings.
that already exists to another sequence preset, such as Offline RT. Once it is converted, the entire project and the new offline media can be transferred over to the PowerBook’s hard drive and the editing can resume there, using the same clips and sequences that you were working with online before.
How It Works
Media Manager is implemented by selecting sequences and clips in the Browser, then going File > Media Manager, or Control-clicking any of the selected clips and choosing Media Manager (see Figure 11-28). When you do this, FCP will open a dialog box that is where you tell Media Manager what to do with the selected items. At the top of the box you will likely see a couple of green bars. These bars are a visual indicator to demonstrate the reductions in media that occur as you change the settings below. They are accompanied by a short paragraph that details what is being left out or included in the Media Manager operation.
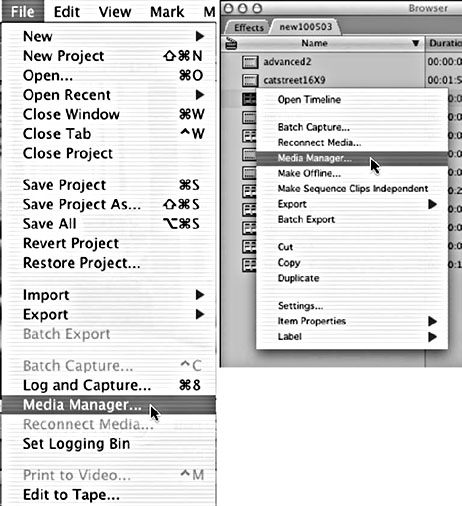
Figure 11-28 The Media Manager dialog box is reached either from the File menu or by selecting and Control-clicking specific clips and sequences in the project tab.
Below the green bars, there is a pulldown menu that directs the entire operation. Each choice on the bar initiates a radically different action (see Figure 11-29). The first option is Copy. Copy means that FCP will exactly duplicate your project’s clips, sequences, and media to a location you specify; it also leaves the original resources intact on the olume you are copying from. During the duplication, you have the option of trimming away any media resources that are not currently being used in the project. This option is useful when you need to clear off drive space, or transfer your project to another drive completely.
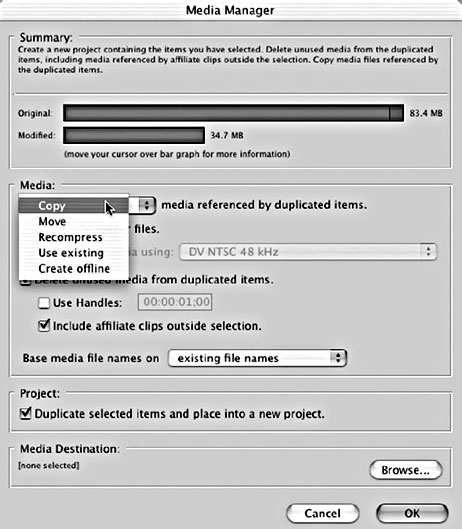
Figure 11-29 The Action pulldown in the Media Manager dialog box.
Change the pulldown menu to Move and you complete the same action as Copy, except that the media on the original volume is deleted after the operation. It might seem like this is a better option if you’re trying to free up drive space on your only capture drive, but there is a certain risk involved with Move. Copy is a safer method because after the operation you can test the copy you just created to make sure all the elements are there. If for whatever reason the duplication wasn’t perfect, your original project and its resources are still sitting there. This may not seem very important, but when you absolutely cannot afford any accidents, Copy is always the correct choice. Just make sure you keep your eye on your drive space so that you always have enough room to Copy and trim into. Once you have tested your Copy project you can then delete the media from the original.
The next choice is Recompress. Recompress performs the action described above wherein you are able to move an online project to a PowerBook. Recompress takes the sequence in question, as well as any related/selected clips and media, and makes a copy for use elsewhere. While doing so, it lets you compress the original media on your drive into the OfflineRT PhotoJPEG codec. Thus, you can take that project you’ve been working on for weeks on the road whenever you need to.
The next choice, Use Existing, is a mode meant strictly for trimming sequences. But where Copy and Move transfers the contents to another volume (trimmed or not), Use Existing merely trims the sequence contents, leaving only the used media on the capture drive. It is meant solely for freeing up drive space as you work, since you are not relocating the resources, only trimming away what is not in use in the sequence.
I am leery of Use Existing for the same reasons that I generally avoid Move. Since Use Existing is performing trimming operations on your existing media resources, there is little margin for error. All it takes is one mistake and you will have to go back to your tapes for ecapture. And, if for some reason you didn’t originally use timecode for capture, well, you’re not likely to enjoy the consequences.
Finally, the most useful option in the Media Manager is Create Offline. Create Offline generates an offline copy of your sequence and any selected items and places them in a new project. This offline does not refer to a lower quality of video, but is truly offline, meaning that no media is linked to the clips, as with the clips you logged in Chapter 4 before ou captured them. When you choose Create Offline, the next pulldown menu becomes available, asking which sequence preset you want to use to put the offline clips into (see Figure 11-30). This is because the main function of Create Offline is to create a sequence to be recaptured into a fully online sequence (both in terms of media being linked and online, or the highest quality).
While Media Manager can be useful for reclaiming drive space as described earlier, it is really the ability to work at different resolutions through offline/online editing that
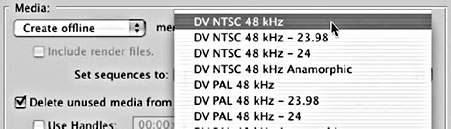
Figure 11-30 Choosing Create Offline enables the Sequence Preset menu. You must choose the type of sequence to put the offline clips you create in. Choosing the preset also assigns the clips’ “logged clip settings” so that they recapture correctly fully online.
makes Media Manager an essential tool in the professional editor’s toolkit. Editors working with uncompressed or low-compression video and capture cards will find that using offline/online techniques makes much higher quality video edits possible without breaking the bank on terabytes of drive space. Even editors only working with DV capture and output can make a 120 gigabyte drive stretch nearly to infinity by using OfflineRT editing. No other software-only editing package offers such flexibility.
The Offline/Online Process
Here’s the offline/online process you will use. When you start your project, you will do your initial Audio/Video Settings, choosing the offline codec appropriate to you. For instance, if you will be working with DV as your final online capture, you will want to start out with OfflineRT Capture and Sequence Presets. For those using 8- and 10-bit uncompressed cards, depending on the card you own, you might use an 8-bit uncompressed or a low compression JPEG format, depending on how much drive space you are willing to burn while working offline. Once you have captured and edited your sequence, select it and go File > Media Manager. On the Media pulldown menu, choose Create Offline.
When you do this, the lower green bar disappears from the top of the window (see Figure 11-31). This is because once you commit to generating an offline sequence, the lower green bar is irrelevant. Offline sequences do not have media for the green bar to measure. Instead, you want to monitor the duration of the media Media Manager is saying it will recapture when you go to recapture the sequence. You can see this by running the mouse over the “N/A” where you will see the current trimmed duration of the amount of media that will need to be recaptured. As you make adjustments to what is being trimmed from the offline sequence, this duration will change.
After setting the “Set sequences to:” pulldown menu for the online sequence preset you will want to recapture to, you need to make some decisions about how much you are going

Figure 11-31 Green duration bars at the top of the dialog box tell you how much media is really being trimmed by your current settings. Create Offline doesn’t show the lower green bar, rather “N/A,” because Offline, by definition, contains no media.
to trim away. In general, you won’t want to recapture extra media from your project that isn’t being used in the final sequence. Checking “Delete unused media from duplicate sequences” makes sure that the sequence you recapture contains only the edits in the sequence. The next option, Handles, should always be checked. In almost all situations where you will be capturing, you want to make sure that you add handles to your clips, and this is no exception. One second should be enough in most cases.
The next option bears a little discussion and involves a less than obvious step. “Include affiliate clips outside selection” would force FCP to include any affiliate clip material, even if it were not in use in the present sequence. This includes parts of the master clip that are marked with In and Out points as well as clips in use in other sequences that are derived from the same master clip. Since our purpose is almost always to limit the recapture to only what is used in the sequence (and of course, handles), you’ll want to uncheck this option.
Unfortunately, just unchecking this option is not enough. FCP 4’s new master and affiliate relationship throws a curve ball into the process. Even if you disable the Include affiliate … option, FCP still forces recapture of any frames of video in any master clip in the project tab that is between In and Out points. To illustrate this, run the mouse pointer over the N/A where the lower green bar would have been in any other Media Manager mode (see Figure 11-32). The trimmed duration will likely be much larger than you would expect, based on how much of your master clips you are using in the sequence that is being trimmed.
There is a way to deal with this. It is called Make Sequence Clips Independent. Control-click the sequence you are trimming in the project tab and you will see this option in the list (see Figure 11-33). When you select it, FCP strips the sequence clips of any affiliate relationship with master clips in the project. Once the master clips are no longer connected to the affiliates in the sequence, the Media Manager will report the correct duration, and subsequent recapture will only get the frames from the sequence. The problem with this is that Make Sequence Clips Independent is not only irreversible, it’s not undoable! If ou select the wrong sequence, or if you decide you want to continue your edit with the same master/affiliate relationship, you are now out of luck.
To get around that, simply duplicate the sequence (Control-click the sequence and choose Duplicate), rename it ‘indy sequence’ or somesuch, and then apply the Make equence Clips Independent to the duplicate sequence. That way, your original sequence is

Figure 11-32 Run the mouse pointer over the “N/A” and you will see that FCP still wants to capture far too much material.

Figure 11-33 Control-click the sequence and choose Make Sequence Clips Independent, which will divorce the sequence clips from the project tab master clips. This method is irreversible!
still connected to its master clips. After making the sequence clips independent, run your mouse pointer over the N/A and you will see that the duration is almost exactly the duration of all the clips in your sequence (see Figure 11-34).
Finally, address the last setting. Base Media file names on … tells FCP how to name the media files when you recapture the offline sequence you are creating. If you choose Source Media Files, FCP will use the same names for the capture of the offline clips’ media that the project currently uses. If you choose Clip Names, FCP will use the names of the clips in the offline sequence to name the media files it captures and places in the Scratch Disk in the onlining process.

Figure 11-34 Checking the N/A indicator now shows the correct duration.
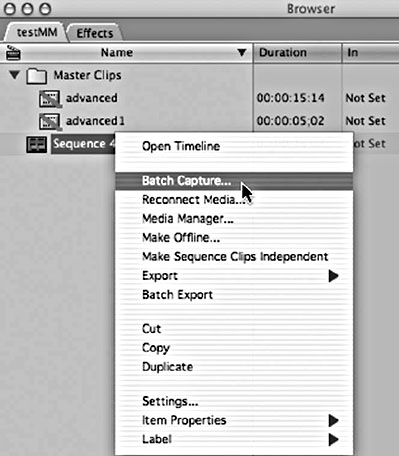
Figure 11-35 After the Offline Sequence has been generated in the new sequence, its new project is opened. All that remains is to recapture by Control-clicking it and choosing Batch Capture.
Hit the OK button to start the generation of the offline copy. FCP creates a brand new project to put the offline sequence and a bin for the master clips that will correspond to the sequence clips. Indeed, the next thing that will happen after you hit OK is that FCP will ask you to save that new project. Make sure you save this project in an appropriate place, such as the folder on the desktop where you saved your original project.
After naming and saving the project, FCP will open it, such that both your original and new offline project are available in the Browser (see Figure 11-35). All that’s left to do is Control-click the sequence in the project tab and choose Batch Capture to online it. It is ecommended that you leave the original OfflineRT sequence intact and online until you have recaptured the new sequence, so that if there are any errors or issues, you can easily Media Manage the original project to rectify the situation.