
CHAPTER 7. Installing, Configuring as a Workstation
Exam objectives in this chapter
■ Printing
■ X11
Introduction
Users of any system will want to undertake a number of basic tasks: interaction with applications on a monitor (for example, word processing, task scheduling) and printing. A standard setup for the user interface and the printers will make the users experience much more fulfilling; as well as reduce the support overhead. The section on printers will describe how Common UNIX Printing System (CUPS) is configured and used.
Most of the latest Linux distributions offer one or more graphical user interfaces (GUIs) to interact with the user. These are commonly run on top of the X Windows system, with the most common window managers being KDE and GNOME. X11, the latest incarnation of X Windows is a true client/server application, and how this is implemented is described, along with descriptions of the main configuration files that are needed.
Printing
The management of the devices and the setup can be confusing as the support for Linux print drivers varies between manufacturers, and not all have compatible Linux drivers. CUPS is a print service program that is commonly deployed in a modern Linux distribution.
CUPS Overview
The CUPS application will convert the page descriptions from an application into a format that the printer will understand and then manages the process for sending this to the actual printer. Manufactures of printers will develop different methods to print, even within their own line of printers. The CUPS application will perform this conversion, hopefully hidden from the end user.
Fast Facts
The CUPS application can be summarized as performing the following actions.
■ Create and manage a queue for each printer.
■ Users will send print requests to CUPS and CUPS puts the job into the appropriate queue.
■ Each job will have a job request associated with it.
■ Users can cancel or pause their own jobs.
■ CUPS assigns a program to each job to best convert it into a printable form.
■ Jobs are actioned in a first-in/first-out basis.
■ Completed jobs are removed from the queue by CUPS.
Enable and Disable Queues
Each printer will have its own queue which will be managed to ensure that the jobs are printed in an orderly fashion. These queues can be enabled or disabled, even if there are items in the queue. This is often necessary if a printer has a problem that needs to be fixed and the system administrator wants to disable the queue until the issue is corrected. A system administrator can also issue a comment to tell users why the printer is disabled.
# cupsdisable –r “Printer maintenance being performed” CANONMX
The printer queue can be enabled using the command:
# cupsenable CANONMX
Web Management Port (Port 631)
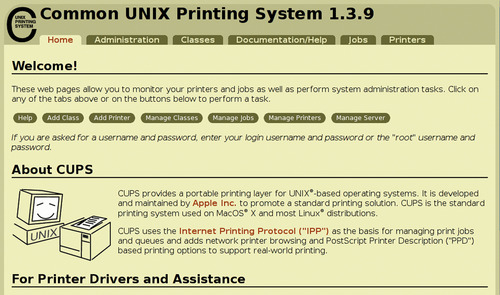
The interface to CUPS is via a Web interface that allows you to view print jobs and what printers are installed, and will also to manage of them. CUPS can be accessed via a Web interface on port 631, either locally or remotely. On the local machine, the interface can be accessed using the URL http://localhost:631. The interface is shown in Figure 7.1. In addition, there is a CUPS application program available, which does not use a browser, but the look and feel is identical.
There are some pages on the GUI that will require a user name and password to perform some actions on them, such as to add a printer. On most Linux distributions, only root can add, modify, or delete a printer or class of printers.
Crunch Time
You must remember the port numbers and names that are commonly used as references to the port name or number may be used. The Web interface port 631 is one of the required ports to remember.
Managing Printers, Jobs, and Queues
The CUPS management interface can be used to add and delete printers, and this is accessed under the Administration tab. Local printers can be added directly if you know the make and model or the system can find new printers that have been attached to it.
Printer jobs can be managed via two options: directly from the first page in the administration tab or by clicking on “manage printers” under the administration tab and managing the jobs from there.
Fast Facts
The management of printers section is very powerful and allows the user to
■ Print a test page
■ Stop/start a printer
■ Enable and disable a print queue
■ Move jobs from one print queue to another
■ Cancel all jobs
■ Set printer options
■ Allow specified users
■ Set as default printer
Later on in this chapter, in the Printing Commands section, we will look at the command line versions of some of these commands. The CUPS interface is very easy to understand and for the majority of users, it is easier to use than the command line. As the system administrator can prevent unauthorized users changing certain functions, it provides an easy, safe GUI to deploy to users.
CUPS Printer Classes
CUPS allows the user to group printers together and this collection of printers is called a class. This is particularly of interest in a company who has a number of printers and they can be grouped together in areas, such as finance, admin, and so forth. This allows printers to be taken offline for maintenance and the user will not notice any disruption or need to remember the names of different printers in their area. The adding and management of printer classes is undertaken in the Administration tab of the CUPS GUI.
Did You Know?
Although we have discussed CUPS in terms of Linux, it is a cross-platform software application.
■ CUPS can run on Microsoft Windows and Apple platforms as well.
■ The application can manage local and remote printers – even across the Internet.
■ The Web-based GUI allows remote administration.
■ The Web interface port is 631.
Printing Commands
Once a printer has been installed and properly configured, a user is able to print to it from any printer-capable graphical client. Text-based interface can also print via a simple command line interface. These basic commands are described in the following sections.
LPR
The lpr command submits print jobs to the specified printer, or the default printer if none is specified. The main options that a user will need are shown in Table 7.1.
This command is used with BSD systems.
LP
The lp command is very similar to the lpr command described earlier, but it works on System V systems. There are a number of differences in the syntax, such as the –o parameter with lp has a number of different options such as nobanner, cpi=pitch, and width=chars. Depending on which system you are working on, you should understand the syntax of each command.
LPQ
lpq is used to see the status of one or more print queues and this can be run once or displayed continuously at a specified interval until the queue is empty. The command on its own will display the queue of the default printer. The main options for the command are as follows:
-a to show the queue status of all printers
-P status of a specific printer
+interval will display the queue every interval seconds until empty
LPSTAT
The lpstat command can show the status of printers and queues like the lpq command; however, there are far more options, such as options to query the status of specific CUPS servers in the network. The options are shown in Table 7.2. This is useful for system administrators who can administer print servers and queues from a central location.
Cancel
Administrators can cancel jobs still in the queue of a specific printer. An individual job can be canceled or all jobs can be removed, if the user has the appropriate rights. The default printer queue will be checked if no specific printer is defined.
X11
X11 is the common name for the X Windows system, which is the GUI found on most Linux distributions today.
Starting and Stopping X11
There are a number of ways to start and stop the X Windows system. Normally, the display manager will be loaded automatically on boot, accomplished by setting up the /etc/inittab file to load the X windows system when multiuser mode is used (runlevel 5). The actual display manager that will be used is defined in the /etc/sysinit/displaymanager configuration file as shown below for the KDE environment:
DISPLAYMANAGER=“kdm4”
When Linux is booted into a multiuser mode without a graphical login using the display manager, such as runlevel 3 in the /etc/inittab file, you will have to start an X session from the command line. The X server and X session must be started, and this can be accomplished using startx, often without any parameters.
The startx command will use configuration settings found in the .xinitrc file which by default will be in /etc/X11/xinit directory; however, the user can customize the X session and launch default clients using a .xinitrc file located in their home directory. If you intend to use the display manager that was installed with your system, you do not need to use a customized .xinitrc file.
The startx command itself can be passed parameters which it passes to the X server before an X session is launched. One such parameter is the –depth option that will alter the number of colors used. This can be used during development or testing of X clients to ascertain how each will look on different hardware solutions. This may be useful if you are planning a large roll out of Linux across a variety of differing hardware. This will start an X session a depth of 16.7 million colors.
$ startx -- -depth 24
The startx command can also be used to launch multiple X sessions in a number of virtual consoles. The complexity of multiple X sessions means that it is not an everyday occurrence, and you may wish to be very familiar with X sessions before you try this. Each X session then to be closed separately or the system gets restarted in runlevel 3 as mentioned earlier.
Difference between X11 Clients and Server
The X Window System was developed using a client/server model, which means that the two components can be distributed on separate systems. On a typical Linux configuration, both these components are located on the same machine; however, they communicate via the standard processes. In a client/server application, the client software process will initiate a communication session, while the server waits for a request from one of its clients. Most people use client/server programs on a regular basis without realizing it. For instance, a Web browser is a client program that requests data from a Web server.
In X11, the X server communicates with various client programs. This server accepts requests for graphical output, that is, the normal display window on a screen and also accepts user input from the keyboard and mouse and sends these back to the client. The server can send out to a display on another system or may control the video output on the local system. Thus, the user's terminal is the server and the applications are the client, which is often the cause of confusion for new users as they typically think of a server from their perspective as an end-user. Their normal perception is that the client runs on the user's computer and the server is remote. In X Window terminology, the server provides display and I/O services to the applications. The applications that use these services are clients (such as a browser).
The Server and Client Communication Protocol runs with network transparency, that is, it is invisible to the applications that are using it. When Linux is designated as a server, the clients are often distributed across the network. This Communication Protocol can be tunneled over an encrypted tunnel. X can be bandwidth intensive, so a fast network is desired, particularly if there a lot of remote clients.
Window Managers
The X Window manager is the windowing system that runs on X, and the user can choose one of many. These windows manager will have certain requests between the client and server redirected through them, such as when a new window needs to be displayed. The types of window manager include tiling window managers (such as ion, dwm, and so forth), compositing window managers (GNOME and KDE are good common examples), and stacking window managers, such as IceWM.
In general, the window manager controls the appearance of the GUI to the user. It positions the windows, controls the fonts and colors, and handles the input and output (mouse-clicks and so forth). The window manager is just another client from the point of view of the X window server. The initial window that is displayed is defined as the root window, with top-level windows being children of this root window.
X Session Manager
The state of the desktop or session at a given time is managed by the X Session Manager. This allows, for instance, a user to log out and then log into a session and to have the same windows displayed. The session manager stores the state of all the windows on exit to restore them. Although the default session manager xsm can be used, specific session managers are often bundled with the display manager, such as ksmserver in KDE.
Display Manager
The X display manager runs as a program that allows the X server to start a session on a system, either local to the server or remotely. The display manager often prompts the user for a user name and a password with an initial login screen, although it may be bypassed depending on the set up of the system (usually via KDM's auto login feature). When it is run on a local system, it will start the X server before presenting the login screen. In a remote session, the display manager will act like a telnet server requesting a username and password and starting the remote session. The default display manager in X is the X Windows Display Manager (XDM). The most popular alternative display managers are explained later. Alternative display managers are often used, as the default XDM is often more complex to configure for the standard user.
KDM
The display manager bundled with KDE is the KDE Display Manager, KDM. It is very configurable from the KDE control center, allows configuring screen color, menu options, styles, and so on. KDM was originally based on XDM. The main configuration file for KDM is often found in /usr/share/kde4/config/kdm and is called kdmrc. KDM must be run before a user is logged in, so it is therefore not associated with any user and hence user-specific configuration files are not possible. Users can, however, change the appearance of their desktop once they are logged in.
The graphical login manager within KDM is The Greeting, which can show a company logo, current system time, or perhaps nothing. Some or all users may be allowed to shutdown the system from this initial screen.
GDM
GNOME was conceived slightly later than KDE and unlike KM, this was written entirely from scratch and does not contain any original XDM code. Upon startup, the GDM daemon reads its local configuration file, gdm.conf. When there is more than one local display, each of these forks an Xserver and slave process. The initial process will start the display and calls gdmlogin to prompt the user for a user name and a password. Remote displays are managed using the X Display Manager Protocol, XDMCP, typically running on port 177.
The configuration file can be found in the file /etc/gdm/gdm.conf and the syntax within the file follows the standard GNOME file syntax. The file contains a large number of options for the daemon configuration, security, and remote and local GUI. When the system is installed, most of these are set up automatically. The look and feel of GDM can be configured by a large number of themes that are available in the main package or downloadable from various sites.
Differences between KDM and GDM
At first glance, the differences between GDM and KDM are purely cosmetic (colors, whether there is a toolbar at the bottom of the screen or main menu, and so on). Overall, it is often said that a system installed with KDE is more Microsoft Windows like than one with GNOME.
GDM by default has two toolbars at the top and bottom, and it also divides its menu into three submenus: applications, places, and system. KDM has only one toolbar at the bottom and its menu is divided into favorites, applications, and computer. In terms of user input, the default for KDM is one click, and two in GDM. Also, the system configuration menus are usually more complicated in KDM as opposed to GDM.
You can install both window managers onto a system and switch between them (or have them display on different monitors at the same time, if you have enough memory and computing power). This is undertaken in many ways, with some common distributions like Fedora using the switchdesk command.
Multiple Desktops
Within the X Windows systems, there is an ability to have more than one desktop. Each desktop is known as a virtual desktop within the system, and each can operate independently to one another. This concept allows the user to create two or more separate environments where simultaneous tasks can be undertaken. This may involve a word processor in one desktop, email client open in another, and perhaps some scripts running in a terminal session in another. The use of virtual desktops allows an uncluttered view of the applications with the ability to change to another desktop at the click of a button.
KDE Virtual Desktop
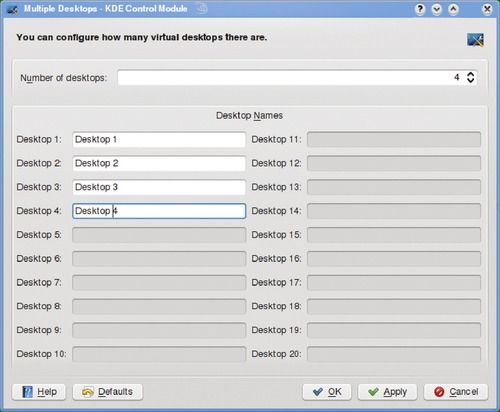
There are four virtual desktops installed with KDE as a default, with the option to install a total of 36. These are shown on the bottom toolbar, initially numbered 1 to 4.
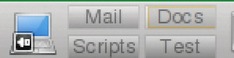
Moving between desktops is achieved just by clicking on the appropriate number. The standard desktop is initially installed on all desktops. To make it easier for navigation, these can be renamed using the multiple desktop control module as shown in Figure 7.2.
The toolbar will then appear as shown in Figure 7.3.
GNOME Workspaces
Within the GNOME system, these are called workspaces and there is a workspace switcher application that controls this. You can set different preferences including the number of workspaces you want (up to 36). The user can move to a different workspace using the applet or you can move to one by pressing Ctrl and scrolling the mouse to highlight the desired workspace. A part of a typical GNOME screen showing four numbered workspaces is shown in Figure 7.4. Rather than having names such as Desk 1, Desk 2, and so on, you can rename the workplaces to more meaningful names, perhaps mail, scripts, Internet, and so forth. Individual applications within one desktop can be moved to another desktop or made to be visible in all workspaces.

X Window System Directories
The current implementation of X controlled by the X.org foundation (www.x.org) is a distribution commonly called Xorg, typically more than 100 MB in size.
Fast Facts
The /usr directory and its subdirectories contain the majority of Xorg's software, with the most significant directories being:
■ /usr/bin: It contains the X server and the clients that are installed.
■ /usr/lib: It contains software libraries in support of the X server.
■ /usr/include: It has the include files needed if a new X client needs to be developed.
■ /usr/lib/x11: A symbolic link will be found to this directory in /usr/lib. It contains the font file, documentation, system, and client resources.
■ /usr/lib/modules: This will hold all the drivers for various graphics cards used by the X server.
■ /usr/X11/man: The man pages for X11.
When Linux is installed on a computer and the graphical desktop option installed, the main components required to run a local X session are loaded: X server, basic fonts, a terminal client, and a Window Manager. The main configuration file for the X Windows system is the xorg.conf file. The xorg.conf file is typically located in /etc/X11/xorg.conf, although this does vary across some Linux distributions.
The xorg.conf file will contain a number of different sections that will provide information on the input devices, monitor layout, file locations, and so on. The main sections are as follows:
■ Files: The location of the fonts and colors of the X server.
■ Module: It informs the X server on the dynamic modules to load.
■ InputDevice: It defines all the input devices such as the mouse and keyboard that are used in the system.
■ ServerLayout: It defines the display and defines the screen layouts.
■ Monitor: Attributes of the monitor(s) that are attached to the system.
■ Screen: Screen configuration.
■ Device: It defines all the graphics cards attached to the system.
The ServerLayout sections are at the highest level and can bind together the input and output devices to be used in a session. The output devices will comprise of a number of sections (for example the graphics board and a monitor). All the input and output devices are bound together in the Screen section and these are used in the ServerLayout section. Although most of the settings for the input and output sections are configured automatically, some users may wish to override these, for example to force the monitor to a lower resolution.
Exam Warning
The name and location of the main configuration files are important to know for the exam. In particular, make sure that you know the configuration files you need to change to configure individual users desktop.
Terminal Emulators
Within Linux, there are a number of built-in terminal emulators, often bundled with the X Windows display manager. The two common ones are gnome-terminal and kconsole in GNOME and KDE, respectively. These are feature rich and have a very user-friendly interface, although both have a relatively high memory foot print. For everyday tasks where memory is not an issue, these terminal emulators are very good and easy to use and are probably the preferred interface for a user. However, for systems that have a smaller amount of RAM, there is another emulator called xterm that has a very small memory footprint (usually under 1 MB), although the windows is smaller and the default font is hard to read. The standard xterm emulations are for DEC VTxxx and Tektronix 4014 terminals.
The VTxxx and Tektronix terminals can each have their own window so that a user can edit text in one and look at graphics in another. Only one of these windows will be considered active at any one time, and this one will accept keyboard input and terminal output. The number of options allowed for xterm is very large. That will allow the system to correctly emulate the terminal and application running in it.
Summary of Exam Objectives
In this chapter, you learned about how to configure a Linux system when it is used as a workstation. The two most common aspects of the user experience, namely printing and the GUI (X Windows interface), and how these can be configured for individual users were explained.
The CUPS interface was shown, and how to add local printers using the interface was explained. The management of printers and their queues was demonstrated using the CUPS interface and also how this could be achieved using the command line interface.
The user's main interface to the computer is through the GUI, and the number of different interfaces that can be used is very large. The standard, underlying interface is X Windows and is commonly known as X11. This can be used and enhanced with many different display managers; the two most common ones being GNOME and KDE. The main configuration files for X Windows and how to modify these for individual users were described. Specific configuration details were then outlined for the GNOME and KDE desktops. The use of multiple or virtual desktops and how these may be different from a user's experience of a single desktop were explained. The configuration of these multiple desktops was explained.
1. A user has problems with the startup of their system and the user wishes to start up their system in single-user mode and then to start X Windows. Which is the best method to achieve this?
A. Start the system in runlevel 1 and then run startx.
B. Start the system in runlevel 5 and then run startx.
C. Reboot the system and when the initial load screen appears, press Ctrl + S together.
D. Reboot the system and when the initial load screen appears, press Ctrl + 1 together.
2. You have just downloaded and installed the latest version of the GNOME desktop. This is a beta version and your system seems to freeze when you start it. Which option would be the best one to use?
A. Press the reset button and boot into single-user mode with command line input. Then remove the beta version.
B. Open a terminal window and type shutdown –now and then boot into single-user mode with command line input. Then remove the beta version.
C. Press Ctrl + Alt + F2 and use the root username and password when prompted. Look at the PID list and kill all the processes associated with X Terminal session. You can now uninstall the beta version.
D. Press Ctrl + Alt + F7 and use the root username and password when prompted. Type rollback X11 to revert to the previous version of X Windows.
3. You want to run the GNOME window manager if you boot your system into runlevel 5, and the Openbox window manager if you start the system in runlevel 4. How can this be best achieved?
A. You cannot start a different window manager based on runlevel.
B. Modify the .xinitrc in your home directory and include shell code to execute the commands exec gnome-session or exec openbox-session based on the current runlevel.
C. Boot the system directly into a terminal session and run a script to start X based on the appropriate runlevel.
D. Add the lines in the .xinitrc file in your home directory to switch window managers:
if runlevel=4 then
gnome-session else
openbox-session
end
4. You are a system administrator for a large company and a user wants to purchase a new color printer for his administrative assistant to produce sales literature. This printer is not the usual printer you purchase. What would be your best advice to the user to ensure that the new printer works with their Linux system?
A. Find out the make and models of the printers he is considering to purchase and check with the www.cups.org Web site to see if the printer's drivers can be downloaded.
B. Look at the printer manufacturer's Web site to see if the printers are listed as “Plug and Play” devices and hence will work seamlessly.
C. Tell the user that he can buy any printer which has the “CUPS Compatible” logo on the box.
D. Tell the user that he can buy any HP printer as they are all compatible with Linux via downloads on HP's Web site.
5. You have sent a job to your default printer and have seen that there are a lot of jobs before it. As you need the printout in a hurry, which is the best option?
A. Using the CUPS GUI finds out the use of an idle printer and moves your job to that printer.
B. Move your job to the top of the queue on your default printer using the CUPS GUI.
C. Login as superuser on the CUPS GUI. Pause all the jobs on the printer ahead of your job so your job will start next
D. Resend your job to the printer using the option –priority on the lpr command that will insert the job to the head of the queue.
Answers
1. Correct answer and explanation: A. Answer A is correct as this will start Linux in single-user mode on most Linux distributions and will then allow the user to start X Windows when the command prompt appears.
Incorrect answers and explanations: B, C, and D. Answer B is incorrect, as runlevel 5 normally starts X Windows at the end of the boot process. Answers C and D are incorrect, as these commands are not available.
2. Correct answer and explanation: C. Answer C is the correct. This will revert you to a terminal window where you can gracefully kill the rogue X Windows sessions and then remove the beta software.
Incorrect answers and explanations: A, B, and D. Answer A is incorrect, as this will result in the loss of files that have not been written to the disk, and possible disk corruption. It should only be used as a last resort. Answer B is also incorrect, as this will also shut the system down immediately with the same consequences as A. Answer D is incorrect, as there is no rollback command to revert the software back to a previous version.
3. Correct answer and explanation: B. Answer B is correct, as you can test for the appropriate runlevel in this shell script and call the appropriate window manager using the exec command.
Incorrect answers and explanations: A, C, and D. Answer A is incorrect, as you can start different window managers. Answer C could be made to work, but this is not the best way to achieve the result as it is not automatic. Answer D is incorrect, as the code is wrong and there is no exec command.
4. Correct answer and explanation: A. Answer A is correct, as you can download a large number of drivers from the CUPS Web site and easily check if the printer has a driver written for it.
Incorrect answers and explanations: B, C, and D. Answer B is incorrect, as “Plug and Play” printers refer to their compatibility with Microsoft Windows and not to Linux. Answer C is incorrect; as there is no “CUPS Compatible” logo defined. Answer D is incorrect, as a lot of HP printers have Linux drivers, but not all do.
5. Correct answer and explanation: A. Answer A is correct, as this will allow you to print your job without affecting anyone else.
Incorrect answers and explanations: B, C, and D. Answer B is incorrect, as there is no command to move your job to the top of the queue within CUPS. Answer C is incorrect, as like B, there is no pause command. Answer D is incorrect as you cannot force a job to the top of the queue using lpr.
..................Content has been hidden....................
You can't read the all page of ebook, please click here login for view all page.