Drawing on Location

I’m trained as an architect and have spent many years learning a very specific way of drawing freehand. My studies have only strengthened this practice. Design students are taught that a line should be made with confidence; it should have a specific beginning and end. With pencil, you can achieve a multitude of line weights and depths.
Everything starts with a line—that first mark you make when beginning a sketch or painting. To make the move from a blank sheet of paper to a finished painting requires you to put instrument to paper and begin.
The difference between drawing comfortably from a photograph in your studio and drawing outside is considerable. The most obvious difference is that you are drawing from life, rather than using a two-dimensional photograph as your reference. Without getting too bogged down with perspective drawing, imagine a photograph as a three-dimensional scene. Now reverse the process. Drawing from life requires you to flatten the world you see onto a two-dimensional sheet of paper. If you need help, simply take a photograph on your phone—now you have a two-dimensional reference, as well as the three-dimensional scene itself.

Crail Harbor, Scotland
TIP
If you worry that pencil will smudge, bring along a water bottle and a small travel brush. Once your drawing is complete, you can gently wash clear water over the drawing. This serves as a fairly good fixative, and you don’t have to worry about carrying aerosols. Remember: once you add water over graphite, you can no longer erase the drawing.
When working from a photograph, the limits of your reference are determined by the photograph itself. Yes, you can zoom in and crop a photo, but you have no information beyond its boundaries. In contrast, when working onsite, your field of vision is as far as you can turn your head. When you move your subject to paper, you need to decide what to convey to give your own unique sense of place. I don’t like to move my head around much; I simply glance up to see my subject and then back down to continue working.
Start with a simple composition that you feel comfortable drawing, and then move on to more advanced subjects. Getting overly detailed is easy; letting go of detail is the difficult part.
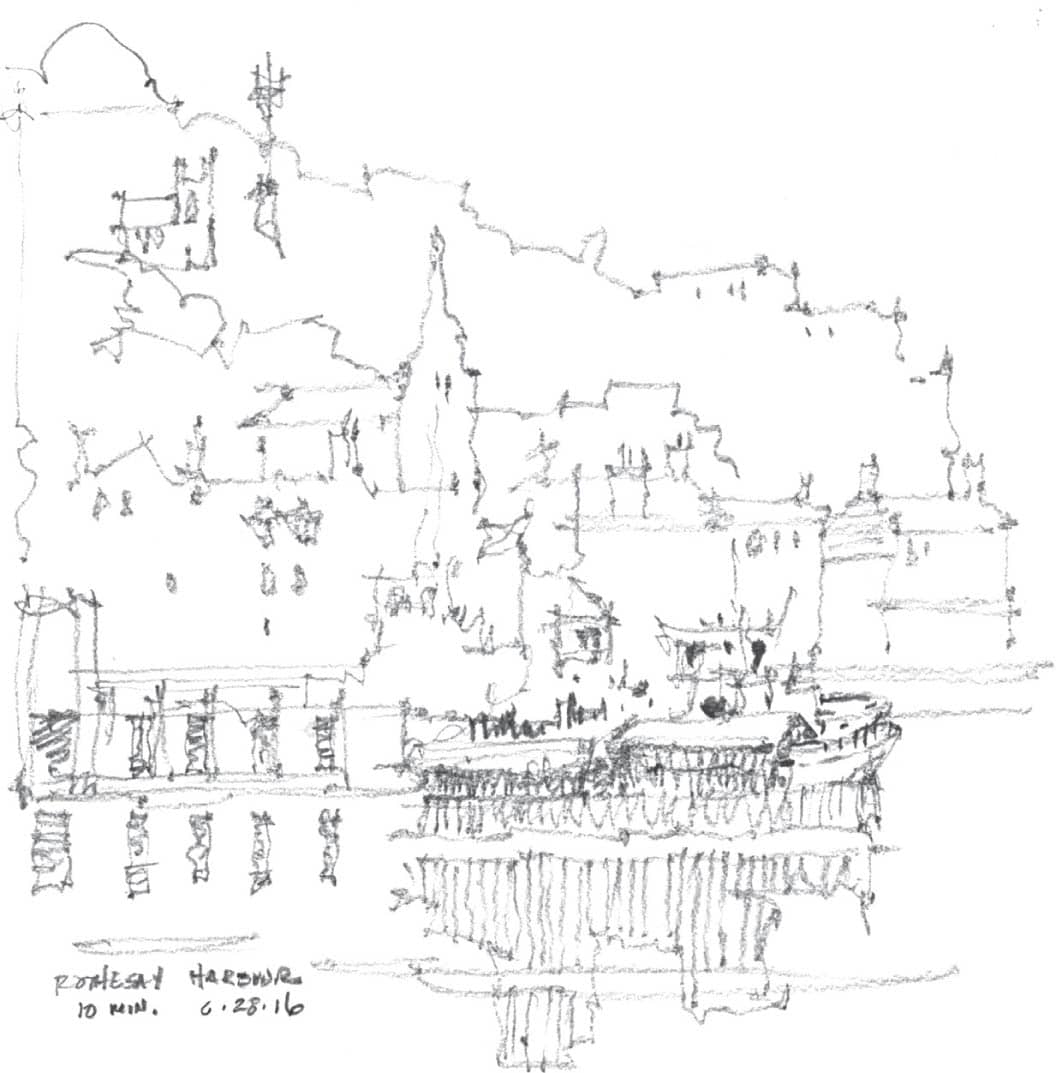
Rothesay Harbour, Scotland
I narrowed down this complex scene of the Duomo in Florence to its base geometry and then added detail in about 5 to 10 minutes. How do you easily reference your sense of place with as few marks as possible? Learning to see your subject in this manner is at the heart of painting en plein air.
One of the most common requests I get from students is how to draw loosely. There are many degrees of “loose”—suffice it to say that if you draw with too much detail, you will paint with the same precision. To begin letting go, you need to practice drawing with an understanding of what you see, not what you think you see.
One of the most effective ways is to practice timed drawings. Take your sketchbook outside and find a scene to draw. Study it for two minutes. Then give yourself three minutes to draw it. Start again and draw another sketch for two minutes. Finally draw another sketch for just one minute. Note how at each step, the drawing becomes more gestural and begins to address the subject with less detail and more intent.
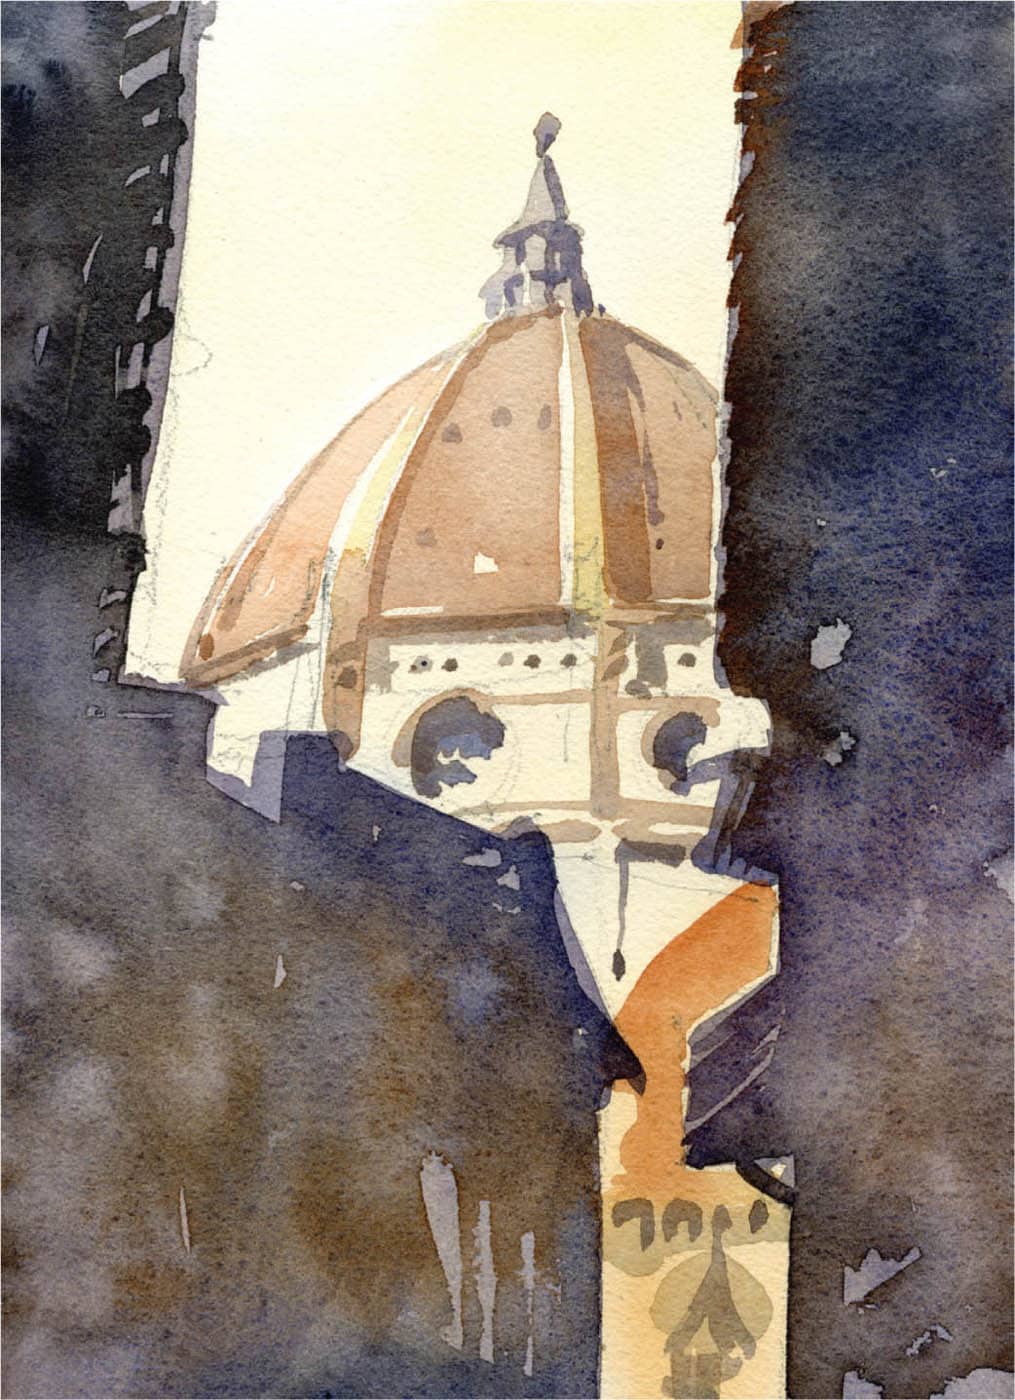
Duomo, Florence, Italy
It also becomes fairly clear that three minutes can be an eternity if you include just the most important forms in your drawing. In the example at left, look at how little information I need to convey “car” in this drawing.

Try to regularly set aside some part of your day for these exercises. Revealing your own style means letting go of how you would like to draw and embracing the practice itself. Eventually your style will emerge. A timed drawing is a perfect way to create the discipline to edit quickly, see the large shapes, and give your inner voice a way to break free.

Bistrot Mazarin, Paris
Look for the big shapes. Don’t think about the detail during the early stages of a drawing. Running out of space on your paper means you haven’t created an adequate preliminary sketch. Never begin working on detail until you are satisfied with the initial sketch. Once this is done, you can begin to judge your work and make changes to the composition where necessary.
Before starting the final drawing, think about placement and size of the elements in the scene. Using construction lines, lay out the major elements in your drawing, and then begin to break them down into manageable parts. This is one of the more intense parts of drawing that most beginners skip, but it’s important spend time on this stage. A rushed or poorly proportioned construction drawing will always lead to an unbalanced final drawing.
We have all seen what I call an accordion drawing— when the artist begins to run out of room on the paper and squeezes the subject to fit. A better solution is to crop the drawing at the edges of the paper. Better yet, learn to create a construction drawing that places all of the necessary elements in order of importance.
Never begin working on detail until you are satisfied with the initial sketch.
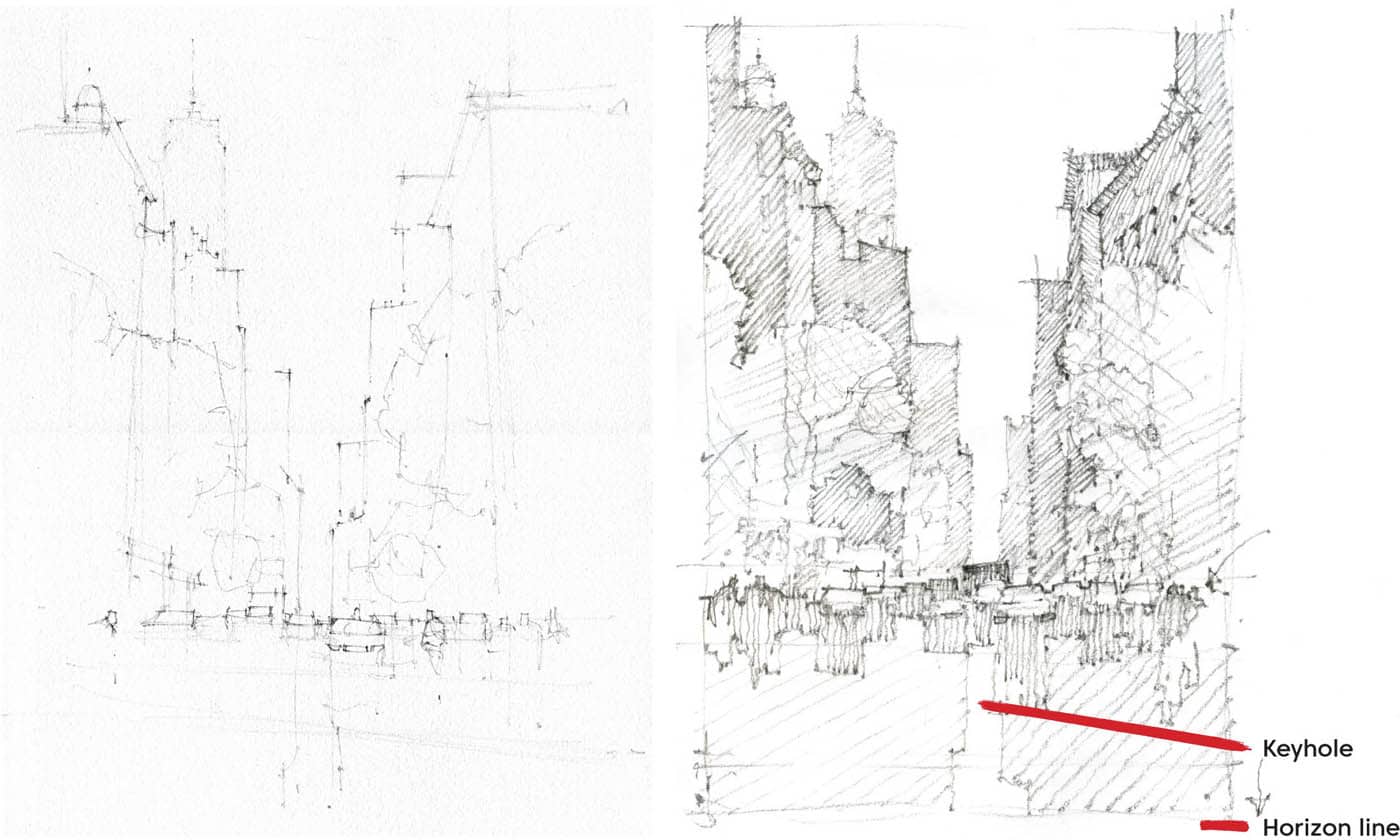
Look at these quick Florence studies above. Notice, I build a construction-line study of the buildings to warm up; then I create a value study of the same scene. Next, I begin looking at different elements, such as people and cars, to include or remove. I typically practice this way before attempting most field paintings.
Definition of Terms
All artists use similar terminology to explain how to break down a scene. The jargon may change, but the core ideas remain. I look for balance, tension, resolution, and most importantly, a sense of place in my work.

Action line
Here is a simple yet effective method for defining planes within a scene. For me, it is the discernible line between one plane and another, most obviously the line where the sky meets the land. In more subtle forms, it defines the planes as they move forward in the image, creating a sense of distance on a two- dimensional surface. In more technical terms, this is also called atmospheric perspective.

Action Lines—San Gimignano

These rules work for both interior and exterior spaces. Print out a few photographs and try to find the horizon and vanishing points yourself.
Note how the windows and other objects on the perpendicular plane seem close to a perfect horizontal. In one-point perspective, make it easy on yourself and draw them as such.
Horizon Line—I took this photograph from a higher vantage point facing forward. Your horizon will shift up or down depending on your vantage point.
Think about the vanishing point being the hand of a clock. All parallel lines radiate from this place on the horizon.
The vanishing point will always cross the horizon as long as you are looking forward. If you tilt your head up or down, the horizon will become skewed.
Construction drawing
This is a very light blocking of the major forms in your drawing. It allows you to place all of the elements in correct proportion to each other.
Horizon line (or eye level)
When looking straight ahead, this is the imaginary line that runs horizontally from your eye level that defines the upper and lower regions of the scene. Imagine standing on a beach and looking straight ahead. Where the sky meets the water is your horizon. If on flat ground, the horizon line can be used to place all elements of a city scene in proportion.
Keyhole
The void or negative space typically found in cityscapes where the sky forms a discernible “key shape” between buildings. If drawn with precision, it defines a form in perspective. It is a highly effective way of understanding “negative space.” Many scenes will have more than one keyhole, or the keyhole will enlarge to define the entire area where the sky meets the land.

Keyhole—The most prominent shape in an urban environment that defines the separation between land and sky.
Vanishing Point—The place at which all parallel lines seemingly converge, creating a definitive spot to aid you in drawing in perspective correctly. All parallel lines on a one-point perspective will be defined by this point.
Horizon Line—Note the flat ground the line will pass through at eye level.
Hook’s Three Rules
I recently talked to art instructor William Hook about perspective. He has the unique ability to communicate big ideas simply and clearly. He said, “one thing that I find helpful when talking about perspective for non-architects . . . is always go back to the basics.”
- Where is the eye level?
- Is something above or below eye level? Does it slope up or down toward eye level?
- Is it closer or farther away (closer is larger; farther away is smaller).
Practice this whenever you can. Eventually you will see perspective lines everywhere you look!
Line weight
Differing line widths and strengths are used to move attention or to solidify areas of your drawing. They are a good tool for defining planes within your drawing.
Measuring line
This is a vertical or horizontal line (or both) in your scene that can be used to judge proportions for the rest of the drawing. It can be established by using your drawing instrument as a measuring stick (of sorts).
Thumbnail study
A small sketch, not exceeding 4” x 5” (preferably smaller), that you can use to determine the largest shapes within your composition. Use it to try out different compositions of your subject.
Vanishing point
Think about standing between a set of train tracks on level ground. As you gaze into the distance, your view will distort, making them look as if they converge on the horizon. If you walk toward that point, they do not actually connect, but they always seem to converge at the same distance away from you. This vanishing point is always at the horizon or eye level; it is the basis for all perspective drawing.
How to see complex shapes in a simple way:
- Look for action lines.
- Find your keyhole, if one is available.
- Establish your horizon line.
- Define the boundaries of your composition.
- Simplify your geometry.
- Move or remove anything that distracts from the composition.
- Create thumbnail studies.
Practice, Practice, Practice
When onsite, I tend to wander until something catches my eye and I see a possible subject. It can be anything, but I lean toward how human hands have shaped the landscape. The subject doesn’t need to be overly spectacular or impressive. It can be a simple street corner or vista that defines a sense of place. My intention is to record how this particular place speaks to me. For now, use these steps as a road map to repeat and practice.
Step 1. Take the time to study your subject before beginning your drawing. Look for the big shapes, keyholes, and action lines, and remember to use your pencil as a measuring stick. Try out multiple compositions until you find one you like. If you feel an object is too difficult to draw, remove it. If a tree is planted in an unfortunate place, ignore it. Remember: Big shapes, less detail.
Step 2. Ideally, take a photograph of your exact view looking straight ahead. Try to keep your camera level.
Step 3. In your sketchbook, lightly begin the construction drawing using a medium lead. I usually use an F or HB. Be careful not to engrave the paper; make legible marks and shapes that will eventually be hidden in the next phase. If you press too hard, you’ll have to erase.
Step 4. Once you have the construction lines in place, step back and judge your composition. Try turning it on its side or upside down for a different perspective. It is easy to become too “close” to your drawing in the early stages, so be sure to view it objectively. This is a useful way to see patterns or passages that may need attention.
Step 5. If the construction drawing needs adjustment, lightly make the changes you need. There is rarely a need to erase at this stage if the lines are light enough. Once complete, begin to sketch in the large shapes.
Step 6. Moving to an HB lead, start to sketch the value study, being careful not to get overly detailed. You just need to test if the composition is going to work and have a plan for the values of the painting.
Step 7. Move to watercolor paper and repeat the stages of the thumbnail sketch. Look for the big shapes and lightly sketch them in, adjusting where needed but not getting too bogged down in the details.

Step 8. Only when you are satisfied with the placement and size of the elements in your drawing should you begin to add the final details. When onsite, it is especially important to get to the heart of the drawing without being too finicky. Remember, you have another chance to make adjustments during the painting phase. I always say there are two drawings in each painting: The first rarely seen pencil drawing, and the second visible drawing done with the brush.
