
Enabling LDAP for IBM FlashSystem A9000 and A9000R with Microsoft Active Directory
You can enable user authentication for IBM® FlashSystem A9000 and FlashSystem A9000R for use with Microsoft Windows Active Directory (AD). AD is Microsoft Windows implementation of the Lightweight Directory Access Protocol (LDAP).
This IBM Redpaper™ publication explores various benefits of this approach. Although the benefits from using AD are significant, you must also evaluate the substantial planning effort and added complexity of deploying an LDAP infrastructure if it is not already in place.
You can enable and use LDAP with FlashSystem A9000 or A9000R by using the XCLI or by using the IBM Hyper-Scale Manager GUI, as illustrated in Figure 1.
When first installed, the Hyper-Scale Manager uses by default, local user credentials, as noted in the selected radio button. However, to ensure maximum flexibility for various LDAP implementations, this same selection is also used, if LDAP- without a domain context, is configured and enabled.
The benefits of an LDAP-based centralized user management can be substantial when you consider the size and complexity of the overall IT environment. Maintaining local user credential repositories is straightforward and convenient when you work with only a few users and a few storage systems. However, as the number of users and interconnected systems grows, the complexity of user account management rapidly increases, and managing this environment is time-consuming.
If LDAP authentication is enabled, only then, will Hyper-Scale Manager access a specified LDAP directory, for example the Microsoft Windows Active Directory, to authenticate users, using the roles from LDAP for appropriate permissions.
Once LDAP authentication is activated, all user credentials are stored and maintained solely in the LDAP directory, such as Microsoft’s AD. Some FlashSystem A9000 family system predefined accounts, such as the admin user ID or the technician user ID used by IBM support, remain locally administered and authenticated.

Figure 1 Hyper-Scale Manager LDAP selection
As indicated by the dual arrows, both radio buttons are useful; they specify the domain attributes and the User Principle Name (UPN). This choice determines how Hyper-Scale Manager parses, and when enabled, will pass, user credentials to an LDAP/AD server.
We review and explain those options in “AD implementation” on page 7.
|
Important: The User Principle Name (UPN) and domain attributes are critical to integration. They are used to ensure that Hyper-Scale Manager parses the LDAP information correctly, depending on the environment.
|
Introduction to LDAP
LDAP is an open industry standard that defines a standard method for accessing and updating information in a directory.
A directory is a listing of information about objects that are arranged in an order that gives details about each object. Common examples are a city telephone directory and a library card catalog. In computer terms, a directory is a specialized database, which is also called a data repository, that stores typed and ordered information about objects. A particular directory might list information about users (the objects) that consists of typed information, such as user names, passwords, and email addresses. Users or applications use directories to find resources with the necessary characteristics for a particular task.
Directories in LDAP are accessed by using the client/server model. An application that wants to read or write information in a directory does not access the directory directly, but it uses a set of programs or application programming interfaces (APIs) that cause a message to be sent from the LDAP client to the LDAP server. An LDAP server retrieves the information that was requested on behalf of the client application and returns the requested information if the client has permission to see the information. LDAP defines a message protocol that is used between the LDAP clients and the LDAP directory servers. This protocol includes methods to search for information, read information, and update information based on permissions.
LDAP directory components
An LDAP directory is a collection of objects that are organized in a tree structure. The LDAP naming model defines how objects are identified and organized. Objects are organized in a tree-like structure that is called the Directory Information Tree (DIT). Objects are arranged within the DIT based on their Distinguished Name (DN). The DN defines the location of an object within the DIT. Each object is also referred to as an entry in a directory that belongs to an object class. An object class describes the content and purpose of the object. It also contains a list of attributes, such as a telephone number or surname, that can be defined in an object of that object class.
As shown in Figure 2 on page 3, the object with the DN cn=mbarlen, ou=Marketing, o=IBM belongs to object class objectClass=ePerson.
Object class ePerson contains the following attributes:
•cn (common name)
•mail
•sn (surname)
•givenName
•telephoneNumber
Each attribute has the following values assigned to it:
•cn=mbarlen
•sn=Barlen
•givenName=Marion
•telephoneNumber=112
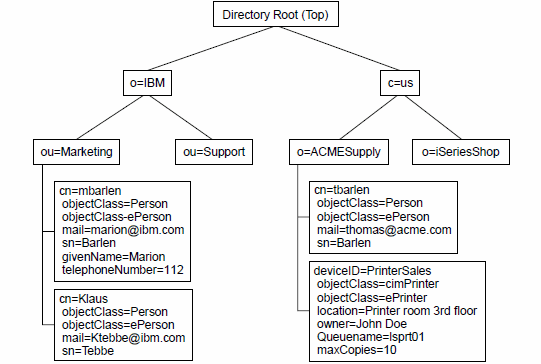
Figure 2 Example of a DIT
In this example, the object represents a single employee record. If a record for a new employee in organizational unit (ou), Marketing, of organization (o), IBM, needs to be created, the same location in DIT is the same, ou=Marketing, o=IBM. Additionally, the same set of attributes defined by objectClass ePerson are also used. The new object is defined using its own set of attribute values because the new employee will have a unique name, email address, phone number, and so on.
|
Attention: It is important to note which branch or branches are used for Hyper-Scale Manager and FlashSystem A9000 or A9000R users, as this information is critical for implementation.
|
For more information about the directory components, see Understanding LDAP - Design and Implementation, SG24-4986.
All the objects and attributes with their characteristics are defined in a schema. The schema specifies what can be stored in the directory.
AD and LDAP
The current skill set of your IT staff is always an important consideration when you choose a product for centralized user authentication. If you have skills in running a particular directory server, it might be a wise choice to standardize on this server because your skilled people will best be able to customize and tune the server. Your experts will be able to provide the most reliable and highly available implementation for the LDAP infrastructure.
AD is used in many enterprises with most of its infrastructure components deployed by using Microsoft Windows operating system.
For more information about AD and LDAP, see the following website:
|
Take note: AD is a database-based system that provides authentication, directory, policy, and other services in a Microsoft Windows environment.
LDAP is an application protocol for querying and modifying items in directory service providers, such as AD, which supports a form of LDAP.
In summary, AD is a directory services database, and LDAP is one of the protocols you can use to talk to it.
|
The current implementation of LDAP-based user authentication for IBM FlashSystem® A9000 and A9000R does not support connectivity to multiple LDAP servers of various types. However, you can configure Hyper-Scale Manager to use multiple LDAP servers of the same type to eliminate a single point of failure (SPOF). Hyper-Scale Manager supports communication with only one LDAP server at a time. The LDAP authentication configuration allows the specification of multiple LDAP servers that Hyper-Scale Manager can connect to if a specified LDAP server is inaccessible.
LDAP role mapping
Before any LDAP user can be granted access to FlashSystem A9000 or A9000R, the user must be a member of a single, and only one, appropriate LDAP group from the following list. Here are the predefined FlashSystem A9000 and A9000R role mappings:
storageadmin Defined as a single LDAP group
securityadmin Defined as a single LDAP group
readonly Defined as a single LDAP group
applicationadmin Defined as a single LDAP group for each FlashSystem user group
Each of the roles must be created in your LDAP implementation, even if they are not fully utilized by your users. The names can be modified inside the organizational LDAP to suit the business requirements.
|
Important: An LDAP authenticated user can be a member of only one of these LDAP groups to ensure a single Hyper-Scale Manager role mapping. LDAP authentication will fail if a user is added to more than one of the groups.
|
In native mode, a role is explicitly assigned to a user at the time of user account creation. In LDAP mode, the role of a specific user is determined at the time that the user logs in to Hyper-Scale Manager.
Planning considerations
When using AD authentication with FlashSystem A9000 and A9000R, it is important to understand that this method uses the organizationalPerson LDAP object class for the definition of user accounts inside AD for FlashSystem A9000 and A9000R authentication.
For a definition of the organizationalPerson LDAP object class and its list of attributes, see the Microsoft website:
In our illustration, we use the AD memberOf attribute.
Currently, the mapping can be performed only by using the XCLI commands. To set the appropriate value to the xiv_group_attrib configuration parameter, use the ldap_config_set XCLI command as follows:
A9000>>ldap_config_set xiv_group_attrib=memberOf
LDAP role mapping for the storageadmin and readonly roles
As previously indicated, the Hyper-Scale Manager administrator requires four LDAP group names to use for the roles and an additional service account to perform LDAP queries.
In the following example, the storage system administrator uses the A9000_Admins and A9000_Readonly LDAP group names for mapping to the storageadmin role and the readonly role. This mapping needs to be entered by using the full DN because this full DN is the value used for the memberOf attribute.
The storage system administrator sets the corresponding parameters in FlashSystem A9000 and A9000R using the ldap_config_set command:
A9000R>> ldap_config_set storage_admin_role=“CN=A9000_Admins,CN=Users,DC=itso,DC=storage,DC=ibm,DC=com”
A9000R>> ldap_config_set read_only_role=“CN=A9000_Readonly,CN=Users,DC=itso,DC=storage,DC=ibm,DC=com”
|
Case-sensitivity: The LDAP server does not use case-sensitive string matching for the memberOf attribute value. For example, A9000_Admins and a9000_admins are recognized as equal strings. However, to simplify administration, treat both the FlashSystem A9000 or A9000R configuration parameter and the LDAP attribute value as though they are case-sensitive and assign the A9000_Admins value to both.
|
The A9000_Admins and A9000_Readonly names are used because both strings can be easily associated with their corresponding IBM XIV® Storage System roles: storageadmin and readonly. It is not necessary to use the same names in your configuration.
However, if you change these parameters, consider the use of names that are self-descriptive and easy to remember to simplify the LDAP server administration tasks. Every time that the LDAP server administrator creates a new FlashSystem A9000 or A9000R account, one of the names must be entered as a description attribute value (except for the applicationadmin role, which we explain next in “LDAP role mapping for the applicationadmin role” on page 6. After these parameters are configured in both FlashSystem A9000 or A9000R and LDAP, changing these parameters, although possible, can potentially be time-consuming, because each existing LDAP account must be changed individually to reflect the new attribute value.
LDAP role mapping for the applicationadmin role
A quick reminder about the applicationadmin role is useful, as this role limits activities to the following items:
•Creating and deleting snapshots of specifically assigned volumes
•Mapping their own snapshot to a specifically assigned host
•Deleting their own snapshot
In addition, the storageadmin role has complete administrative functionality, and conversely, the readonly role has the bare functions to list and view system information.
The LDAP account can be assigned to an applicationadmin role, but the mechanism of creating role mapping in this case differs from the mechanism that is used for storageadmin and readonly role mapping.
Hyper-Scale Manager (or the XCLI command) assigns a user to the applicationadmin role if it can match the value of the MemberOf attribute with the ldap_role parameter of any user groups that are defined in Hyper-Scale Manager or AD configuration. If an account is assigned the applicationadmin role, it also becomes a member of the user group whose ldap_role parameter matches the value of the user’s MemberOf attribute.
AD implementation
For a smooth installation and implementation, review the following important considerations as they apply to your AD schema and logistics:
•The Hyper-Scale Manager monitoring account comes predefined on all FlashSystem A9000 or A9000R units. During setup, a new local password is set. You also need to define this monitoring account in the AD schema using the same credentials.
– Select the “Use Local Account / LDAP without domain” option when configuring the monitoring account in Hyper-Scale Manager ONLY IF you are using short names without domain context. (See the important note that follows.)
– If you select the “Use LDAP with domain” option, all users need to enter their username credential as LDAP’s “userPrinicipleName” (UPN), which is typically with the full domain name and using the At (@) sign, as noted in the example below; Example 1.
Example 1 Example of user with UPN format
storageuser@A9000-78:# ldap_user_list role=storageadmin
User Name Role
-------------------------------------------------------------------------------
[email protected] CN=StorageAdmin,OU=Secure,OU=XIVITSO,DC=org
•However, some care must be given to the above setting if using the CLI; The use of the At sign (@) in the user name is not allowed by encryption related CLI commands.
|
Important: A UPN consists of a UPN prefix (the user account name) and a UPN suffix (a DNS domain name). The prefix is joined with the suffix using the At sign (@). For example, [email protected]. A UPN must be unique among all security principal objects within a directory forest.
If user_name_attrib is set to sAMAccountName, only short name logins will work; UPN logins will not be allowed. This format is useful for certain AD environments.
|
Observe below the differences between short names and full UPN logins as shown in Figure 3:
|
User name: user1
Password: ******** connecting.. A9000R-SurfsUp>> Error: LOGIN_FAILURE_USER_NOT_FOUND_IN_LDAP_SERVERS
Details: User [email protected] was not found in LDAP servers. |
Figure 3 Short name versus full UPN Example
•Ensure that Hyper-Scale Manager monitoring user account is part of the storageadmin role.
•The Xiv_User account is a required, separate, read-only, account that is used by Hyper-Scale Manager for LDAP queries.
The Xiv_User account, the Manager_Server_User account, along with four security groups listed in “LDAP role mapping” on page 5 must all be manually created inside the organizational AD. as illustrated in Figure 8 on page 11. These four groups are predefined on the A9000 family, and all authenticated users will fall into one of the roles.
•FlashSystem A9000 or FlashSystem A9000R is limited to only one type of authentication at a given time. Thus, choosing LDAP authentication in Hyper-Scale Manager will not allow local authentication, except for the predefined local admin account.
|
Important: Depending on the userPrincipleName setting, using the admin account might not authenticate properly in Hyper-Scale Manager, as it will be verified using the AD directory instead of the local user registry in FlashSystem A9000 or A9000R.
|
•To ensure a successful implementation, it is critical that you use the local Admin {built-in} account, and not another Admin equivalent local account for the HSM as well as each array that will be monitored and controlled via LDAP. These local Admin account credentials must be the same.
|
Important: It is best practices that the local admin account password be changed from the default factory setting, when preparing for production usage. When additional IBM FlashSystem A9000 family array(s) are to be added to an existing environment, each of their local Admin built-in account(s) should be immediately updated to remain consistent with the production (user updated) password, and then if desired, configured to use LDAP.
Be sure to accept the default HSM and Array License(s); Both of which are documented in the standard installation and configuration documents. More information on those steps and related topics can be found at:
|
•Consider what your AD Search should contain in terms of OUs and other branches; the format is dependent on the specific AD Forest. This format is an important consideration for your Base_DN variable when specified for the AD. It instructs where the system will begin to look for user authentication in the entire AD schema. Refer to Figure 4.
|
Example 1: cn=users,dc=company,dc=com
Example 2: ou=A9000 users,dc=company,dc=com
|
Figure 4 Example of search base DN
•If you want to use Secure AD and LDAP, supply the certificate file over SSL. FlashSystem A9000 or A9000R expects to receive a certificate in .pem format. The name of the file has to be the LDAP server name.
AD exports certificate in a .cer format, and thus by using various methods, such as the open source OpenSSL utility, you can convert certificate formats as shown for example in Figure 5.
|
openssl x509 -inform DER -in yourdownloaded.crt -out outcert.pem -text
|
Figure 5 Example of OpenSSL utility to convert SSL certificates to .pem format
Alternatively, use the following procedure to save the certificate directly into .pem format, using Microsoft’s Certificate Manager:
a. On a Windows system, open Certificate Manager (certmgr.exe).
b. Right-click the certificate to export, and select All Tasks → Export.
c. Select options in the Certificate Export Wizard:
• Decide if you will export the private key with the certificate.
• Select Base-64 encoded X.509 (.cer) for the file export format. For the certificate to work with FlashSystem A9000 or A9000R, you must choose this option.
d. Provide a location to save the certificate and a file name.
e. Review the settings you selected, and click Finish.
The certificate file is saved to the location you indicated.
•Consider how many levels, downward, an LDAP query will need to search for the appropriate user; this is defined by the Set group_search_depth variable.
•For the storageadmin role, FlashSystem A9000 or A9000R allows stringing together multiple group names, separated by semicolon (;), in the Role field. Refer to Figure 6. Specifying multiple group names enables more flexibility.
|
storage_admin_role= CN=group1,CN=Users,DC=org,DC=net;CN=group2,CN=Users,DC=org,DC=net
|
Figure 6 Example of the storageadmin role with multiple AD groups defined
Configuring AD for authentication
This section shows how to configure AD.
Establish the A9000 Group Roles inside AD
As an AD administrator (level) user with appropriate permissions, create the storageadmin role within AD, as shown in Figure 7 on page 10.

Figure 7 Example of creating the storageadmin role inside AD
Repeat this process for the remaining, needed groups inside AD:
•read_only_role
•security_admin_role
•storage_integration_admin_role
|
Renaming roles: You can rename these roles according to the needs of the organizational AD structure and then map them properly with FlashSystem A9000 or A9000R using the XCLI. Specify each role with a name in the CLI as shown in Figure 11 on page 14 and then apply as shown in Figure 12 on page 14.
|
Establish FlashSystem A9000 and A9000R accounts in AD
Follow these steps:
1. Similar to earlier AD group creation, as an administrator user with appropriate permissions, create the Hyper-Scale Manager monitoring account inside AD, as shown in Figure 8 on page 11.
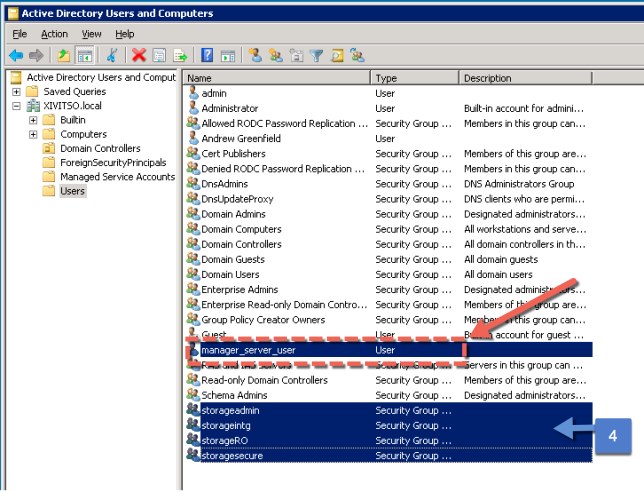
Figure 8 Example of Hyper-Scale Manager monitoring account; Note the four groups at bottom
2. Ensure this user is part of the storageadmin group created earlier, as shown in Figure 9 on page 12.
|
Naming accounts: You can name these accounts similarly according to the needs of the organizational AD structure and then configure them properly in FlashSystem A9000 or A9000R, using the Hyper-Scale Manager GUI or the XCLI.
|
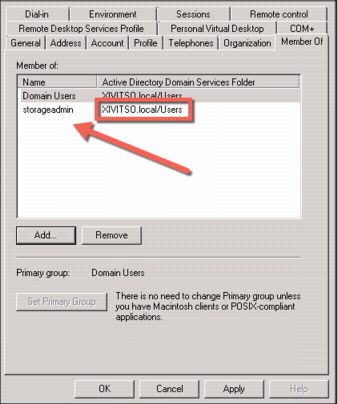
Figure 9 Example showing of storageadmin group membership
Configuring FlashSystem A9000 or A9000R for AD
With the AD properly set up, we now need to finish the integration by updating FlashSystem A9000 or A9000R and Hyper-Scale Manager to connect to AD for authentication. You use the XCLI, which is the only method available at this time.
Verify and update LDAP variables using XCLI
Follow these steps:
1. Log in to FlashSystem A9000 using the XCLI utility.
Log in as administrator using one of the IP address assigned to the FlashSystem A9000 or A9000R, and issue the ldap_config_get command, as shown in Figure 10 on page 13.
|
A9000 6003308 Jazz>>ldap_config_get
Name Value
current_server
version 3
xiv_group_attrib memberOf
storage_admin_role
read_only_role
security_admin_role
storage_integration_admin_role
session_cache_period 20
bind_time_limit 20
user_id_attrib sAMAccountName
first_expiration_event 30
second_expiration_event 14
third_expiration_event 7
use_ssl no
xiv_user
server_type Microsoft Active Directory
user_name_attrib userPrincipalName
group_search_depth 0
group_search_max_queries 39
group_search_stop_when_found yes
A9000 6003308 Jazz>>
|
Figure 10 Initial LDAP configuration on FlashSystem A9000 using XCLI
Many of the default variables listed previously will work fine with the majority of AD environments; however, note the following important defined variables.
|
Important: Pay particular attention to the following variables, as certain values are required for successful AD integration:
xiv_group_attrib Needs to be memberOf for AD.
user_id_attrib Needs to be sAMAccountName for AD.
use_ssl Completely dependent on AD setup. If you set to yes, you will need to import an SSL certificate for the A9000 to use.
xiv_user The primary account to use for AD queries. It must be able to traverse the AD tree to return LDAP queries.
server_type Needs to be Microsoft Active Directory for AD.
user_name_attrib Needs to be userPrincipalName for AD.
group_search_depth Critical value for AD lower branches and Organizational Unit (OU) searches. A value of 5 satisfies most large AD environments.
|
2. You can now update the various LDAP variables individually or on a single command line. Figure 11 shows a partial command structure with the minimum required variables to populate with your specific environment information.
|
ldap_config_set
[ storage_admin_role=LdapRole ]
[ read_only_role=LdapRole ]
[ security_admin_role=LdapRole ]
[ storage_integration_admin_role=LdapRole ]
[ use_ssl=<yes|no> ]
[ xiv_user=LdapAttrib ]
[ xiv_password=LdapAttrib ]
[ group_search_depth=Depth ] [ group_search_max_queries=Number ]
|
Figure 11 Using the CLI to set minimum required AD LDAP variables inside A9000
Figure 12 shows an example of this command being used to set values individually.
|
BLUEdorin>>ldap_config_set storage_admin_role=cn=storageadmin,cn=Users,dc=DC1,dc=XIVITSO,dc=local
BLUEdorin>>ldap_config_set read_only_role=cn=storagero,cn=Users,dc=DC1,dc=XIVITSO,dc=local
BLUEdorin>>ldap_config_set security_admin_role=cn=storagesecure,cn=Users,dc=DC1,dc=XIVITSO,dc=local
BLUEdorin>>ldap_config_set storage_integration_admin_role=cn=storageintg,cn=Users,dc=DC1,dc=XIVITSO,dc=local
BLUEdorin>>ldap_config_set group_search_depth=5
BLUEdorin>>ldap_config_set xiv_user=cn=AndrewG,cn=Users,dc=DC1,dc=XIVITSO,dc=local xiv_password=Passw0rd
|
Figure 12 Example of using CLI to set LDAP Roles, Server, and Account to use for AD
3. After entering all of the required variables, an important next step is to define the AD server, using its fully qualified domain name (FQDN), and base_dn as well as its IP address, using the ldap_add_server command, as shown in Figure 13.
|
XIV 6003310>>ldap_add_server
fqdn=dc1-itso.XIVITSO.local address=9.155.117.26 base_dn=cn=users,dc=XIVITSO,dc=local
Command executed successfully.
|
Figure 13 Adding AD Server definition to FlashSystem A9000 via CLI
4. The next step is to test this newly defined LDAP connection to ensure connectivity is working as expected, using the ldap_test command as shown in Figure 14.
|
XIV 6003310>>ldap_test user=user1 password=pass1
Command completed successfully
|
Figure 14 Test the LDAP connection before activation via the FlashSystem A9000 CLI
5. With a successful test, you can then enable the LDAP mode to use AD for authentication. Use the ldap_mode_set mode command as shown in Figure 15.
|
XIV 6003310>>ldap_mode_set mode=Active
Command completed successfully
|
Figure 15 Enable the LDAP Authentication via the FlashSystem A9000 CLI
6. It is important to then re-verify that the LDAP is working properly. Use the ldap_user_list command to ensure the storage system can query the AD, as shown in Figure 16.
|
XIV 1301004>>ldap_user_list role=storageadmin
User Name Role
[email protected] CN=storageadmin,CN=Users,DC=ad02,DC=xivlab,DC=net
[email protected] CN=storageadmin,CN=Users,DC=ad02,DC=xivlab,DC=net
[email protected] CN=storageadmin,CN=Users,DC=ad02,DC=xivlab,DC=net
[email protected] CN=storageadmin,CN=Users,DC=ad02,DC=xivlab,DC=net
[email protected] CN=storageadminsad2,CN=Users,DC=ad02,DC=xivlab,DC=net
|
Figure 16 Validating the list of AD storageadmins via CLI
7. Now, to ensure that the storage system itself can use the AD credentials, log off the CLI and then log in again, as shown in Figure 17.
|
Xcli –m a9000 –u [email protected] -p foobar
|
Figure 17 Testing AD credentials to log in to FlashSystem A9000 via CLI
|
Important: It is important that the local FlashSystem A9000 or A9000R and Hyper-Scale Manager credentials, along with the manually created AD manager_server_user variable, are in lockstep to ensure that in case AD authentication fails, Hyper-Scale Manager can still authenticate using local credentials.
Additionally, when adding more FlashSystem A9000 or A9000R systems, Hyper-Scale Manager must be able to authenticate using the local account before they are enabled for AD.
|
8. Now that you have verified that your FlashSystemA9000 or A900R can query and authenticate using the AD, it is time to update Hyper-Scale Manager itself.
Log in to the Hyper-Scale Manager again the built-in Admin user, and then either add the FlashSystem A9000 or A9000R to the configuration (if this is a new install) or simply re-authenticate to the existing FlashSystem A9000 or A9000R. See Figure 18 on page 16.

Figure 18 Update the Hyper-Scale Manager to use the LDAP AD credentials created earlier
|
Important: There are several excellent tools to help troubleshoot potential problems with AD integration.
Ensue that the AD query (user) account has appropriate permissions to browse the AD Users containers, and if using multiple branches and forests, ensure that account can also traverse, in similar fashion, as well as specifying the other Base DNs (if needed for complex environments) for the storageadmin role.
Additionally, there are several excellent open source tools, such as JXplorer, that can simulate AD and LDAP queries to further validate that the various accounts, CN, and OU definitions are accurate. Refer to:
Be sure to use both this tool as well as ldap_test commands to ensure connectivity before switching the authentication mode in Hyper-Scale Manager.
|
JXplorer troubleshooting and examples
Install the tool and log in to the AD as shown in Figure 19.
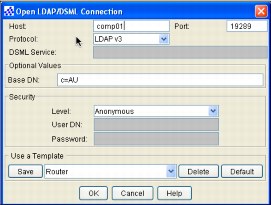
Figure 19 JXplorer log in to AD
After you are logged in, you see the AD tree based on you credentials, and you can then browse the tree, as shown in Figure 20.
Figure 20 JXplorer AD tree display
The tool allows you to then perform AD searches in the same method that the Hyper-Scale Manager and FlashSystem A9000 or A9000R attempts. It then returns those results as shown in Figure 21.

Figure 21 JXplorer AD Search results
HSM Text User Interface (TUI) Service Menu: Troubleshooting
When troubleshooting entries inside as well as from the HSM, sometimes it is useful to use the HSM Text User Interface [TUI] or Service menu. It can be invoked using SSH into the HSM server itself. Once logged in with appropriate credentials, navigate to the MSMS directory, which is usually in the ‘/home’ directory, as shown below in Figure 22 on page 19:
|
[JoshB@HyperScale]# pwd
/home/msms
[JoshB@HyperScale]# ls -alt
total of 2
lrwxrwxrwx 1 msms msmsgroup 40 Apr 27 13:19 management_menu.sh -> /home/msms/hyperscale/management_menu.sh
drwxr-xr-x. 9 msms msmsgroup 4096 Apr 27 13:18 hyperscale
[JoshB@HyperScale]# ./management_menu.sh
-------------------------------------------------------------------
----------------- IBM Hyper-Scale Manager v5.2 -------------
-------------------------------------------------------------------
User Menu
---------------
IBM Hyper-Scale Manager is running
1) IBM Hyper-Scale Manager Inventory Options
2) Show Audit Log
3) Gather IBM Hyper-Scale Manager Logs
4) Backup/Restore Options
5) Change Manager Access Code
6) Replace IBM Hyper-Scale Manager Certificate
7) Change Network Settings
8) SMTP Configuration
9) Start/Stop Hyper-Scale Manager Service
10) Exit
Your Selection>
|
Figure 22 SSH Example of HSM Service Menu
As you can see from the above menu, you can do many of the same functions as inside HSM GUI, with the additional options for various system level functions, including backup and restore options and the actual HSM service itself.
Of particular interest is Option 1 which yields the following, as show below in Figure 23 on page 20:
|
Your Selection> 1
Manager Inventory Options
-------------------------
IBM Hyper-Scale Manager is running.
1) System Inventory List
2) Add System
3) Modify System
4) Remove System
5) System Monitoring Suspend
6) System Monitoring Resume
7) Re-authenticate All Users
8) Change Monitoring Account
9) Manage System Certificates
10) Manage Capacity Planning Data
11) Back to previous menu
Your Selection>
|
Figure 23 HSM TUI Inventory Options
Under this sub menu, it is possible for you to update and verify the HSM Monitoring account, including domain variables (these are also available in the HSM GUI, shown previously in Figure 18 on page 16). The HSM TUI version is shown below in Figure 24 on page 20:
|
Your Selection> 8
Change Monitoring Account
-----------------------------
Current Monitoring Account is: MSMS
1) Modify User And Password
2) Configure domain name (for LDAP mode only)
3) Remove domain name
4) Back to previous menu
Your Selection>
|
Figure 24 HSM TUI Monitoring Account Options
In the above example, selecting Option(s) 1 or 2 would allow you to validate HSM settings via text instead of the GUI.
|
Attention: Option 3, in Figure 24 on page 20, should only be used for short name usage as it would remove the domain name and be essentially the same as using the default setting which is shown in Figure 1 on page 2.
|
Additionally, it is useful that for configuring secure SSL LDAP or enabling encryption, the following menu sequence; shown below, in Figure 25 on page 21:
|
-------------------------------------------------------------------
----------------- IBM Hyper-Scale Manager v5.2 -------------
-------------------------------------------------------------------
User Menu
---------------
IBM Hyper-Scale Manager is running
1) IBM Hyper-Scale Manager Inventory Options
2) Show Audit Log
3) Gather IBM Hyper-Scale Manager Logs
4) Backup/Restore Options
5) Change Manager Access Code
6) Replace IBM Hyper-Scale Manager Certificate
7) Change Network Settings
8) SMTP Configuration
9) Start/Stop Hyper-Scale Manager Service
10) Exit
Your Selection> 1
Manager Inventory Options
-------------------------
IBM Hyper-Scale Manager is running.
1) System Inventory List
2) Add System
3) Modify System
4) Remove System
5) System Monitoring Suspend
6) System Monitoring Resume
7) Re-authenticate All Users
8) Change Monitoring Account
9) Manage System Certificates
10) Manage Capacity Planning Data
11) Back to previous menu
Your Selection> 9
Manage Systems Certificates
---------------------------
1) Show Trusted Certificates
2) Import Certificate to Trust
3) Remove Trusted Certificate
4) Show All Systems with Certificate Problem
5) Trust System Certificate with Certificate Problem
6) Back to previous menu
Your Selection> 2
Please upload the certificate file (*.pem) in PEM format to the (/home/msms/hyperscale/files/upload) folder and press any key...
|
Figure 25 HSM TUI Encryption Certificates Sub-Menu
Authors
This paper was produced by the following author working with the International Technical Support Organization (ITSO):
Andrew Greenfield is an IBM Global Engineer based in Phoenix, Arizona. He holds numerous technical certifications from Cisco, Microsoft, and IBM. He is also responsible for many of the photos and videos that are featured in this paper and many more at http://www.IBM.com. Andrew brings over 24 years of data center experience inside the Fortune 100 to the IBM team. He graduated Honors, Magna cum Laude, from the University of Michigan, Ann Arbor. Andrew has also written earlier IBM FlashSystem A9000 and IBM XIV Gen3 Redbooks® publications.Joshua Blumert
Joshua Blumert is an IBM Storage Solutions Engineer based in the New York Metropolitan area. He is a open systems specialist with expertise in Linux, Windows, VMware and server automation. Josh has over 30 years of experience in server technologies, having been with IBM for the past 15 years and Silicon Graphics before that. He is a graduate of Rensselaer Polytechnic Institute with a degree in Physics and focus on Computer Science.
Now you can become a published author, too!
Here’s an opportunity to spotlight your skills, grow your career, and become a published author—all at the same time! Join an ITSO residency project and help write a book in your area of expertise, while honing your experience using leading-edge technologies. Your efforts will help to increase product acceptance and customer satisfaction, as you expand your network of technical contacts and relationships. Residencies run from two to six weeks in length, and you can participate either in person or as a remote resident working from your home base.
Find out more about the residency program, browse the residency index, and apply online at:
Stay connected to IBM Redbooks
•Find us on Facebook:
•Follow us on Twitter:
•Look for us on LinkedIn:
•Explore new Redbooks publications, residencies, and workshops with the IBM Redbooks weekly newsletter:
•Stay current on recent Redbooks publications with RSS Feeds:
..................Content has been hidden....................
You can't read the all page of ebook, please click here login for view all page.