
Chapter 15: Testing
The success of any application depends on how easy it is for users to use it. The longevity of any software product depends directly on the quality of the product.
Testing is an important aspect of the Software Development Life Cycle (SDLC) that ensures that a product meets the customers’ requirements and the quality requirements. Testing is also important as the cost of fixing bugs increases as we move toward the later stages of the SDLC.
In this chapter, we will learn about the different types of testing and the tools that Visual Studio provides for testing, as well as looking at third-party tools that we can use to ensure the quality of the products we build in .NET 5.
In this chapter, we will learn about the following:
- Types of testing
- Understanding unit testing
- Understanding functional testing
- Understanding the importance of load testing
By the end of this chapter, you will know everything you need to know about ensuring the quality of a product.
Technical requirements
You will need Visual Studio 2019 Enterprise Edition. This is a paid version only, and it can be downloaded from https://visualstudio.microsoft.com/.
You will also need a basic understanding of Microsoft .NET.
Introducing testing
Software testing is a way to check whether an application is performing according to expectations. These expectations could be to do with functionality, responsiveness, or the resources that the software consumes while running.
Software testing can be broadly categorized into the following two categories based on the way it is performed:
- Manual testing: In manual testing, testers execute test cases manually by using the application under test and validating the expected outcome. Manual testing requires more effort than the alternative.
- Automated testing: Automated testing is performed by special automated testing software. This automated software runs on the application under test in a specialized environment and validates the expected output. Automated testing saves a lot of time and manpower. In some cases, it might take a lot of effort to have 100% automation and maintain the automation with considerably less Return on Investment (ROI).
In terms of the information known about the internals of the application under test, such as the code flow, dependent modules integration, and so on, software testing can also be broadly categorized in the following ways:
- Black-box testing: In black-box testing, the individual responsible for testing does not have information about the internals of the system. The focus here is on the behavior of the system.
- White-box testing: In white-box testing, the tester has information about the internal structure, design, and implementation of the system. The focus of white-box testing is testing the alternate paths that exist in the implementation.
In software testing, we validate different aspects of an application.
Software testing also has the following variants, based on the aspect of an application that it validates and the tools or frameworks it uses:
- Unit testing: Unit testing focuses on the smallest unit of an application. Here we validate individual classes or functions. This is mostly done during the development phase.
- Functional testing: This is often termed integration testing. The main objective of this is to ensure that an application is performing as per the requirements.
- Regression testing: A regression test ensures that any recent changes have not adversely affected application performance and that the existing functionality is not affected by any changes. In regression testing, all or some of the functional test cases are executed, depending upon the change introduced in the application.
- Smoke test: A smoke test is done after every deployment to ensure that the application is stable and ready for rollout. This is also known as a Build Verification Test (BVT).
- Load test: A load test is used to determine the overall effectiveness of the system. During a load test, we simulate the projected load on an integrated system.
- Stress testing: In stress tests, we push the system beyond the intended capacity or load. This helps us identify the bottlenecks in the system and identify the points of failure. Performance testing is the umbrella term used for both stress and load testing.
- Security testing: Security testing is performed to ensure the flawless execution of the application. In security testing, we focus on evaluating various elements of security aspects such as integrity, confidentiality, and authenticity, among others.
- Accessibility testing: Accessibility testing is designed to determine whether differently-abled individuals will be able to use an application.
Now that we have seen the different types of testing, in the sections ahead we will be covering unit testing, functional testing, and load testing in detail, as they are critical to ensure the stability of an application.
Note
To explore more on security, try security testing with static code analysis tools: https://docs.microsoft.com/en-us/azure/security/develop/security-code-analysis-overview. More on accessibility can be found here: Accessibility testing: https://accessibilityinsights.io/.
Performance tests, accessibility tests, and security tests are the tests that we perform to assess the non-functional aspects of the application such as performance, usability, reliability, security, and accessibility.
Now let’s see how to perform unit testing for our e-commerce application.
Understanding unit testing
Unit testing is a way to test the smallest isolated unit of an application. It is an important step in software development that helps isolate a problem early.
Unit testing has a direct impact on the quality of the software we build. It is always recommended to write a unit test as soon as you write any method. If we follow the methodology of Test-Driven Development (TDD), we write the test case first and then proceed to implement the functionality.
In the next section, we will learn about creating unit tests and running them from Visual Studio.
Unit testing in Visual Studio
We chose to use Visual Studio as it has powerful tooling to create and manage test cases.
With Visual Studio, we can create, debug, and run unit test cases. We can also check the code coverage of the tests that are executed. Additionally, it has a Live Unit test feature, which runs unit test cases while we modify the code and shows the results in real time.
We will explore all these features in the subsequent sections.
Creating and running unit tests
Let’s go ahead and create a unit test project to perform unit testing on the Packt.ECommerce.Order project.
Perform the following steps to create unit test cases:
- Add a new project of the MSTest Test Project (.NET Core) type to the solution under the Tests folder and name the project Packt.ECommerce.Order.UnitTest:
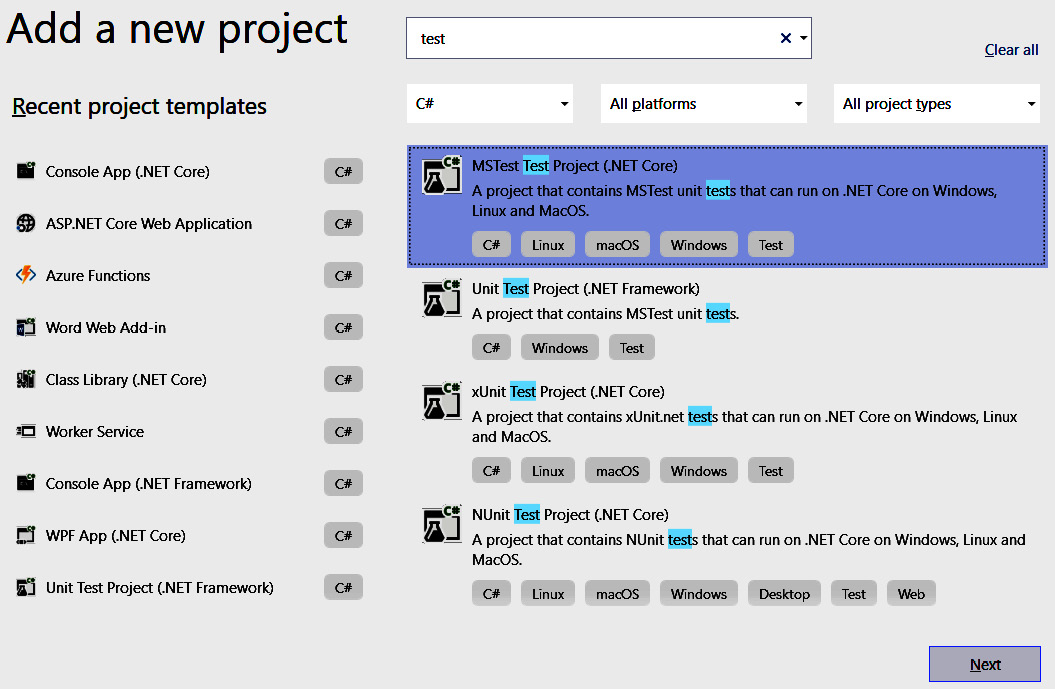
Figure 15.1 – Visual Studio MSTest test Project with .NET Core
- Once the project is added, the Solution structure will look like the following screenshot:

Figure 15.2 – Solution structure after the creation of the Test project
Add a project reference of Packt.ECommerce.Order to the newly created test project.
- Add a new class to the test project and name it OrdersControllerTest. We are going to add all the test cases related to OrderController in this class.
- For the Test framework to detect the test class, the class should be attributed with TestClass, as follows:
[TestClass]
public class OrdersControllerTest
{
}
Now let’s add a simple test to test the constructor of the OrderController controller. The test we will be performing is to assert the successful creation of the OrderController controller. Let’s now add the test as shown in the following code:
[TestMethod]
public async Task OrderController_Constructor()
{
OrdersController testObject = new OrdersController(null);
Assert.IsNotNull(testObject);
}
The OrderController_Constructor test method is attributed with TestMethod; this is required for the test framework to discover the test method. Here we are asserting by checking the null condition of the object created.
- Visual Studio provides Test Explorer to manage and run tests. Let’s open it by going to Test | Test Explorer, as shown in Figure 15.3.
- Build the solution to see the tests in Test Explorer.
- In Test Explorer, we can see all the tests that were present in the solution. We can see the OrderController_Constructor test we created here:

Figure 15.3 – Visual Studio Test Explorer window
- Next, run the test by right-clicking on the test case and selecting Run from the context menu:

Figure 15.4 – Test Run context menu from the Test Explorer window
- Once the test is executed, we can see the test result in the right pane. From the result, we can see that the test executed and runs successfully, as follows:
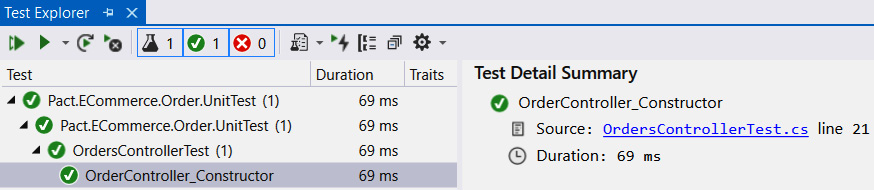
Figure 15.5 – Test results from Test Explorer
We have created and executed a simple test in Visual Studio. In the next section, we will learn how to mock the dependencies of OrdersController to validate the functionality.
Mocking dependencies with Moq
Often a method under test calls other external methods or services, which we call dependencies. In order to ensure the functionality of the method under test, we isolate the behavior of dependencies by creating mock objects for the dependencies.
In an application, classes may be dependent on other classes; for instance, our OrdersController is dependent on OrderService. While testing OrdersController, we should be isolating the behavior of OrderService.
To understand mocking, let’s create the unit test for the GetOrdersAsync action method of OrdersController.
Let’s have a look at the GetOrderById method for which we are writing the unit test case:
//This is the GetOrderById action method in OrdersController.cs
[HttpGet]
[Route(“{id}”)]
public async Task<IActionResult> GetOrderById(string id)
{
var order = await this.orderService.GetOrderByIdAsync(id).ConfigureAwait(false);
if (order != null)
{
return this.Ok(order);
}
else
{
return this.NotFound();
}
}
In this method, the call is made to GetOrderByIdAsync of orderService in order to fetch the orders based on the id instance passed in. The controller action will return the order id retrieved from OrderService; otherwise, the NotFound action is returned.
As we have seen, there are two paths for the code flow: one path is for when the order is present, and the other is for when the order is not. With a unit test, we should be able to cover both of these paths. So, now the question that arises is, how do we simulate these two cases?
What we want here is to mock the response of OrderService. To mock the response of OrderService, we can leverage the Moq library.
To leverage Moq, we need to add a NuGet reference to the Moq package to the Packt.ECommerce.Order.UnitTest test project.
Let’s add the test method in the OrdersControllerTest class, as shown in the following code, to test GetOrderById of OrdersController to validate the case where the order object is returned by OrderService:
[TestMethod]
public async Task When_GetOrdersAsync_with_ExistingOrder_receive_OkObjectResult()
{
var stub = new Mock<IOrderService>();
stub.Setup(x => x.GetOrderByIdAsync(It.IsAny<string>())).Returns(Task.FromResult(new OrderDetailsViewModel { Id = “1” }));
OrdersController testObject = new OrdersController(stub.Object);
var order = await testObject.GetOrderById(“1”).ConfigureAwait(false);
Assert.IsInstanceOfType(order, typeof(OkObjectResult));
}
From the code, we can observe the following:
- Since IOrderService is injected to OrderController via controller injection, we can inject a mocked OrderService to OrderController, which will help us to test all the code paths of OrderController by altering the mock object behavior.
- We leverage the Mock class to create a stub (also known as a mock) for IOrderService and overwrite the GetOrderByIdAsync behavior as shown in the preceding code.
- We create an instance of the Mock object for the IOrderService interface and set up the behavior for GetOrderByIdAync by calling the Setup method on the Mock object.
- The GetOrderByIdAsync method is mocked such that for any parameter value that it receives, the mock object will return the object of OrderDetailsViewModel with Id as 1.
- Since we injected the mocked object into OrderService via constructor injection, whenever there is a call to any method in IOrderService, the call will go to the mocked implementation of IOrderService.
- Finally, assert the test result by validating the type of result that is returned from OrderController to OkObjectResult.
Now let’s add a test case to validate the behavior where we receive the NotFound result if the order is not present, as shown in the following code:
[TestMethod]
public async Task When_GetOrdersAsync_with_No_ExistingOrder_receive_NotFoundResult()
{
var stub = new Mock<IOrderService>();
stub.Setup(x => x.GetOrderByIdAsync(It.IsAny<string>())).Returns(Task.FromResult<OrderDetailsViewModel>(null));
OrdersController testObject = new OrdersController(stub.Object);
var order = await testObject.GetOrderById(“1”).ConfigureAwait(false);
Assert.IsInstanceOfType(order, typeof(NotFoundResult));
}
In this test case, we simulated the behavior of the order not being present by returning a null value from the OrderService stub. This will make the GetOrderById action method of OrdersController return NotFoundResult, and this is validated in the test case.
Note
The OrderService class depends on IHttpClientFactory, IOptions, Mapper, and DistributedCacheService. So, to add a unit test for this, we should be mocking them all. You can take look at the When_GetOrderByIdAsync_with_ExistingOrder_receive_Order test method in the OrderServiceTest test class of the previous code for more details.
In this section, we have seen how to leverage the MSTest framework to create unit tests. There are a number of other test frameworks available to create unit tests in .NET Core. Two such frameworks worth mentioning here are xUnit and nUnit. Though there are a few differences in the way the tests are executed between xUnit and nUnit, both these frameworks are brilliant and provide features such as mocking and parallel execution.
In unit testing, our aim is to test a specific class by mocking the behavior of dependent classes. If we test these classes along with other dependent classes, we call that integration testing. We write integration tests at various levels: at the level of a specific module or assembly, at the microservice level, or at the entire application level.
Now that we have added unit test cases to our e-commerce solution, in the next section we will check the code coverage for these tests.
Code coverage
Code coverage is a measure to describe how much of the code is covered by our test cases. Visual Studio provides a tool to find the code coverage of unit tests. We can run Test | Analyze Code Coverage for all tests as shown here:

Figure 15.6 – The Analyze Code Coverage context option from Text Explorer
This can also be done from the Context menu in Test Explorer.
This will run all the test cases and identify any code blocks that are not tested. We can see the code coverage results in the following Code Coverage Results window:
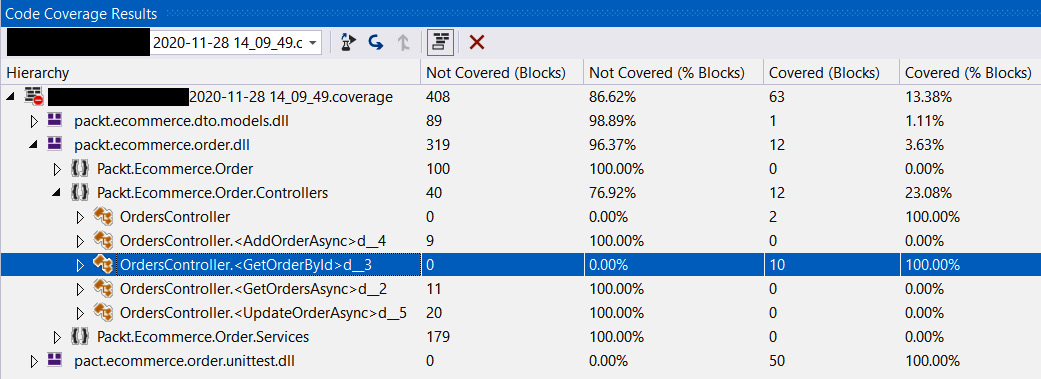
Figure 15.7 – Visual Studio Code coverage window
Code Coverage Results will show the percentage of covered blocks and the percentage of not-covered blocks. Since we covered all the blocks of GetOrderByIdAsync, the code coverage for that method is 100%. The coverage for GetOrdersAsync is 0.00%, as we did not have any test cases to test it. The code coverage gives us a good indication of how effective our unit testing is.
Note
MSTest provides a mock framework called Fakes that can be leveraged to create mocks, but the limitation of that is that we will not be able to get the code coverage in .NET Core. Microsoft is committed to adding this feature in future versions.
It is recommended to create unit test cases for all the classes in a solution. By adding unit tests to validate all the classes and functionality, a higher percentage of code will be covered by unit test cases. With higher code coverage, we will be able to catch more errors early in the development while making changes to a solution. We should ensure that all the test cases pass before we commit changes. In the next chapter, Chapter 16, Deploying the Application in Azure, we will learn how to integrate running test cases with Azure DevOps pipelines.
So far, we have tested individual modules or classes by mocking dependencies and writing unit test cases. It is also important to test functionality after integrating and deploying an entire solution. In the next section, we will learn about how to perform functional testing for our e-commerce application.
Tip
Visual Studio’s code metrics and code analysis tools are useful to ensure the maintainability and readability of the code that we write. You can find details on code metrics here: https://docs.microsoft.com/en-us/visualstudio/code-quality/code-metrics-values?view=vs-2019.
For code analysis, go here: https://docs.microsoft.com/en-us/dotnet/fundamentals/code-analysis/overview.
Understanding functional testing
In functional testing, we validate the application we have built against the functional requirements. Functional testing is performed by providing some input and asserting the response or output of the application. While performing functional testing, we consider the application as a whole; we are not validating individual internal components.
Functional testing can be split into three tasks: identifying the functionalities of the system to be tested, determining the input with the expected output, and then executing these tests to assess whether the system is responding according to expectations. The execution of functional tests can be done manually by performing the test steps on the application, or we can automate them using tools. The time to market for an application can be drastically reduced by automating functional tests.
In the next section, we will learn about automating functional test cases.
Automating functional test cases
Executing functional test cases manually is still relevant in application testing. However, given the fact of shorter deployment cycles and customers expecting new features quickly, manual testing can be prohibitively time-consuming and inefficient in terms of identifying bugs early. Using automation, we can gain new efficiencies, accelerate the testing process, and improve software quality. There are multiple tools and frameworks available to automate functional test cases.
In this section, we will learn about the most popular automation framework, Selenium. Let’s begin:
- To start with, let’s create an MSTest project and name it Packt.ECommerce.FunctionalTest.
- To this project, add the Selenium.WebDriver, Selenium.WebDriver.ChromeDriver, and WebDriverManager NuGet packages. These packages are required for us to run Selenium tests.
- Let’s start with a simple test that validates the title of our e-commerce application. To do this, create a HomePageTest test class and a When_Application_Launched_Title_Should_be_ECommerce_Packt test method, as we did in the Understanding unit testing section, as shown in the following code:
[TestClass]
public class HomePageTest
{
[TestMethod]
public void When_Application_Launched_Title_Should_be_ECommerce_Packt()
{
}
}
- To execute our functional tests, we should launch a browser and use that browser to navigate to the e-commerce application. The MSTest framework provides a special function to perform the initialization and cleanup operations required for our tests. We will be creating a Chrome web driver to perform a functional test.
Let’s go ahead and add the initialize and cleanup methods as shown in the following code:
[TestClass]
public class HomePageTest
{
ChromeDriver _webDriver = null;
[TestInitialize]
public void InitializeWebDriver()
{
var d = new DriverManager();
d.SetUpDriver(new ChromeConfig());
_webDriver = new ChromeDriver();
}
[TestMethod]
public void When_Application_Launched_Title_Should_be_ECommerce_Packt()
{
}
[TestCleanup]
public void WebDriverCleanup()
{
_webDriver.Quit();
}
}
In the preceding code, the InitializeDriver method is attributed with TestInitialize to notify the framework that this is the test initialization method. In test initialization, we are creating ChromeDriver and initializing the class variable. After the completion of the test case, we should close the browser instance; we do this in the WebDriverCleanup method by calling the Quit method. To notify the test framework that it is the cleanup method, it should be attributed as TestCleanup.
- Now let’s go and add the test case to navigate to the e-commerce application and validate the title as shown in the following code:
[TestMethod]
public void When_Application_Launched_Title_Should_be_ECommerce_Packt()
{
_webDriver.Navigate().GoToUrl(“https://localhost:44365/”);
Assert.AreEqual(“Ecommerce Packt”, _webDriver.Title);
}
Call GoToUrl on our Chrome web driver to navigate to the e-commerce application. Once navigated, we can validate the title of the page by asserting the Title property of the web driver.
- Go ahead and run the test case from Test Explorer by right-clicking on the When_Application_Launched_Title_Should_be_ECommerce_Pact test case and selecting Run. This will open the Chrome browser and navigate to the specified e-commerce URL, and then it will assert the title of the page. After the execution of the test case, the browser will be closed. We see the results in Test Explorer as shown in the following screenshot:

Figure 15.8 – Solution structure after the creation of the test project
Now we will extend the functional test to validate the search functionality. To test this functionality, we should enter text in the search box and click on the Search button. Then, check the results to see whether the returned test results are only of the searched product.
Let’s automate the test case by adding the When_Searched_For_Item test method as shown in the following code:
[TestMethod]
public void When_Searched_For_Item()
{
_webDriver.Navigate().GoToUrl(“https://localhost:44365/”);
var searchTextBox = _webDriver.FindElement(By.Name(“SearchString”));
searchTextBox.SendKeys(“Orange Shirt”);
_webDriver.FindElement(By.Name(“searchButton”)).Click();
var items = _webDriver.FindElements(By.ClassName(“product-description”));
var invaidProductCout = items.Where(e => e.Text != “Orange Shirt”).Count();
Assert.AreEqual(0, invaidProductCout);
}
In this test case, after navigating to the home page, enter the search text in the SearchString field and click on the Search button. Assert by validating the search results to see whether any product is not returned as the search string.
Selenium makes it so easy to write functional tests. We should try to automate all functional test cases, such as user management, adding products to the cart, and placing an order. With all the functional test cases automated, we will be in a better position to test and validate the functionality of new releases and maintain the quality of our application. There are other functional testing tools available, such as QTP and Visual Studio Coded UI Test.
We have looked at functional testing, which validates the functionality of an application. It is equally important to assess the responsiveness of an application to see how it responds to a particular load. In the next section, we will learn how we can perform performance testing on our e-commerce application. We can leverage automated functional test cases to perform BVT or regression testing.
Note
Refer to the documentation to explore more about Selenium testing: https://www.selenium.dev/documentation/en/.
Understanding load testing
Users expect an application to respond quickly to their actions. Any sluggishness in response will lead to user frustration, and ultimately, we will lose them. Even if an application works fine under a normal load, we should know how our application behaves when there is a sudden peak in demand and be prepared for it.
The main goal of load testing is not to find bugs but to eradicate the performance bottlenecks of the application. A load test is done to provide stakeholders with information about the speed, scalability, and stability of their application. In the next section, we will learn how to perform a load test using JMeter.
Load testing with JMeter
JMeter is an open source testing tool built by the Apache Software Foundation. It is one of the most popular tools available to perform load testing. JMeter can simulate a heavy load on an application by creating virtual concurrent users of a web server.
You can download and configure JMeter from here: https://jmeter.apache.org/download_jmeter.cgi.
Let’s go ahead and create a JMeter load test for our e-commerce application.
To learn how to use JMeter to do a load test, we will be creating a test with two home pages and product search pages. Try the following steps to create the load test:
- Launch Apache JMeter from the download location. We will see the window as follows:

Figure 15.9 – Apache JMeter
- Add a thread group by right-clicking on Test Plan in the left pane and selecting Add | Threads (Users) | Thread Group. The thread group defines the pool of users that will execute the test case against our application. With it, we can configure the number of users simulated, the time to start all the users, and the number of times to perform the test.
- Let’s name the thread group Load and Query Products and set the number of users to 30. Set Ramp-up period to 5 seconds as shown in the following screenshot:

Figure 15.10 – Adding a thread group in Apache JMeter
This will simulate a user load of 30 within 5 seconds. Using Thread Group, we can also control the number of times the test should run.
- To add the test request, right-click on Thread Group and select Add | Sampler | HTTP Request.
Let’s set Protocol as https, Server Name or IP as localhost, and Port Number as 44365 (the port number of the locally running e-commerce portal). Name this test Home Page, as shown in the following screenshot:

Figure 15.11 – Adding the Home Page HTTP request in JMeter
Let’s also add one more HTTP request sampler to get the details of a specific product. For this request, set the productId query parameter as Cloth.3 and productName as Orange%20Shirt, as shown in the following screenshot:
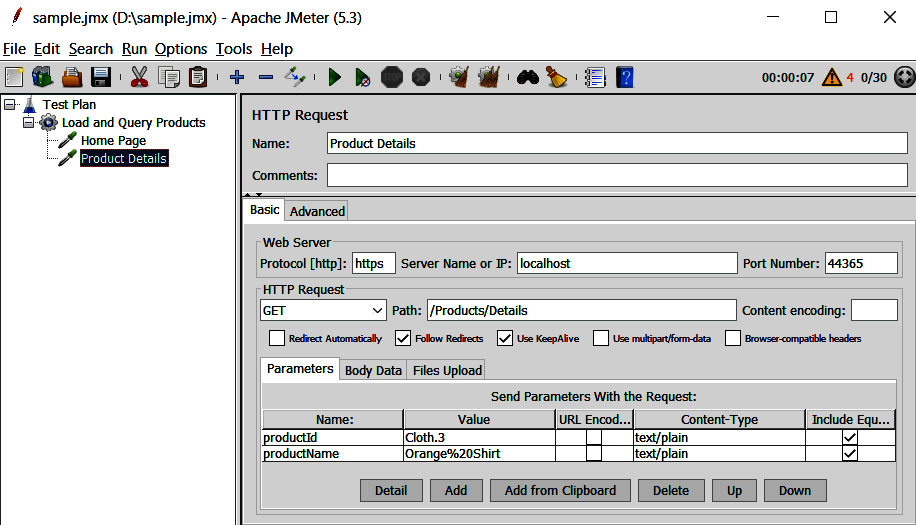
Figure 15.12 – Adding the Product Details page HTTP request in JMeter
- Save this test plan by clicking on the Save button and naming it ECommerce.
- To view the results, we should add a listener to this test. Right-click on the test group and select Add | Listener | View Results in Table.
- Once the listener is added, go ahead and run the test by selecting Run | Start.
- After the test run is complete, you will see the results as shown in the following screenshot. This will give us the response time for each request:
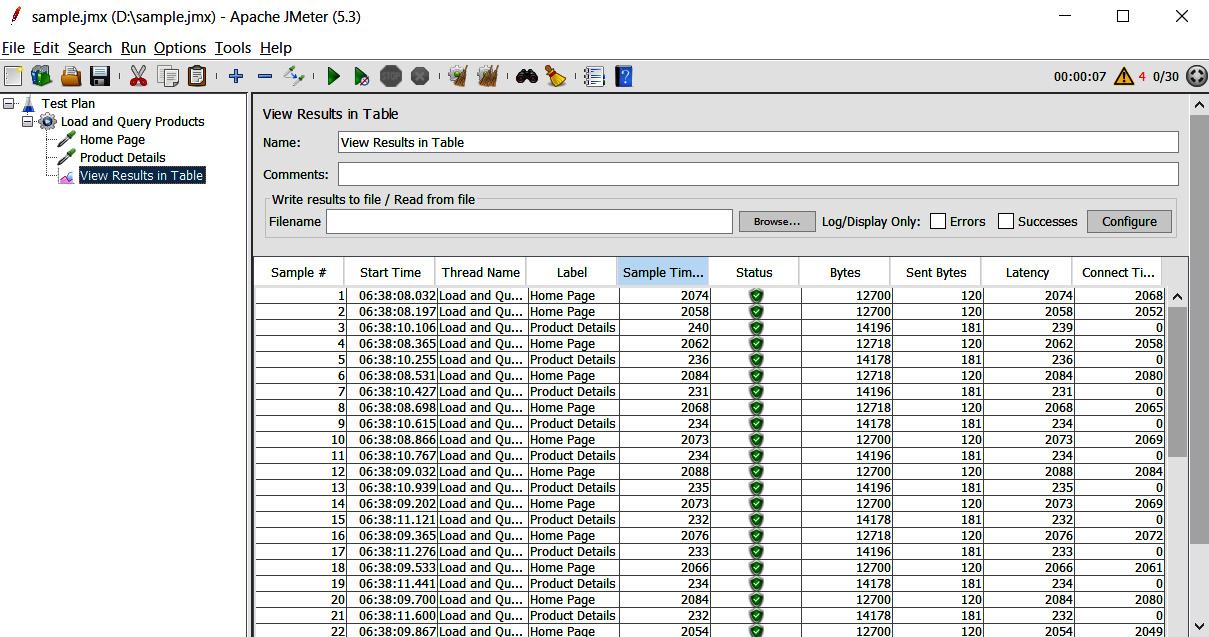
Figure 15.13 – Test results table in JMeter
There are multiple listeners available in JMeter to view the results, such as Summary report and Graph results, which will give another representation of the test results. We can configure different kinds of samplers easily with JMeter, as well as being able to configure requests with different HTTP methods and dynamic tests, where requests are dependent on another API’s response. Once a test plan is in JMeter, we can leverage the JMeter command-line utility to run it from multiple data centers to simulate a load across geographies and collate the results.
The flexibility that JMeter provides, along with its extensive documentation, makes it the most-used performance testing tool. JMeter can also be leveraged to perform functional testing.
It is recommended to run a load test with 1.5 to 2 times the anticipated load. After running the performance test, it is recommended to use Application Insights to analyze the server response time of requests, how dependent APIs are responding during the load conditions, and more importantly, any failures that occur while the test is in progress.
Tip
It is recommended to run automated tests using Azure DevOps pipelines. Use the documentation to see how to integrate tests with an Azure DevOps pipeline.
JMeter tests: https://github.com/Azure-Samples/jmeter-aci-terraform
Summary
In this chapter, we explored a very important aspect of software development: testing. We have learned about the different kinds of testing and the stages at which we should be using them in the SDLC.
We learned about the concepts of unit testing and how to focus our testing on specific calls by mocking dependencies using the Moq framework. We were also introduced to the creation of automated functional tests using Selenium to test the functionality of our e-commerce application before releasing it to production.
Toward the end, we learned about JMeter, which is the most-used tool for performing load testing. The next chapter will focus on deploying applications in Azure.
Questions
- True or False: We should only start to think about testing an application after the completion of its development?
a. True
b. False
- Which of the following is a kind of software testing?
a. Security testing
b. Functional testing
c. Accessibility testing
d. All of the above
- True or False: A higher code coverage percentage for unit tests is desirable to achieve a shorter time to market?
a. True
b. False