
8
SCANNING TARGETS
No thief, however skillful, can rob one of knowledge, and that is why knowledge is the best and safest treasure to acquire.
—L. Frank Baum, The Lost Princess of Oz

The more you know about a victim, the more effectively you can influence their behavior. For example, a victim is more likely to click a phishing email if it’s sent by someone they know. In this chapter, we’ll explore some of the tools and techniques hackers use to learn about their victims. These tools search and catalog relevant publicly available information from the internet. You’ll use these tools to identify devices on the public internet that contain vulnerabilities that you can exploit.
This process of collecting and cataloging information from public sources is called open source intelligence (OSINT). Let’s discuss how OSINT and social engineering techniques can identify and exploit vulnerable machines. I’ll begin by discussing an OSINT technique called link analysis.
Link Analysis
Link analysis identifies connections between related pieces of publicly available information. For example, you could look up a victim’s phone number in a phone book to link their number to their name. Or, to take a more extreme example, state actors like the NSA may have access to the telephone company’s private logs. This allows them to identify your recent contacts, often referred to as your first-degree connections.
The true power of this technique comes from its ability to identify who your contacts have themselves contacted, also known as your second-degree connections. Exploring second-degree connections allows hackers to discover hidden links between a person of interest and another person being investigated (see Figure 8-1).

Figure 8-1: Firstand second-degree connections
Hackers and security researchers don’t have access to the same private data sources as governments and must rely on public sources.
An example of such a public source is the whois database, which contains contact information for websites. This allows users to report any issues to the website’s administrators. The contact information often includes the system administrator’s email address and phone number.
To protect their information from being exposed, system administrators will often pay an extra fee to keep this information private. However, the law requires some domains to publish their contact information. For example, the National Telecommunications and Information Administration (NTIA) requires all .us domains to publish their contact information. This means that you can view the contact information for, say, zoom.us by running the following command in your Kali Linux terminal:
kali@kali:~$ whois zoom.us
The command should print out a lot of information, including an address, phone number, and contact email. Scroll up in the terminal so that you can see all of this. The following is a short snippet of the result (I’ve redacted the phone number and email address as a courtesy).
Admin Country: us
Admin Phone: +1.xxxxxxxx
Admin Phone Ext:
Admin Fax:
Admin Fax Ext:
Admin Email: [email protected]
An attacker could use this information to send a phishing email to the system administrator and attempt to steal their username and password. If this fails, the attacker might attempt to use link analysis to discover the system administrator’s username and password. Let’s explore how the Maltego link analysis tool makes this possible.
Maltego
Maltego allows hackers and security researchers to discover connections between pieces of publicly available information on the internet. These sources include forum posts, web pages, and records from the whois database.
Maltego refers to programs like whois as transforms. By applying a transform to a piece of data, a hacker can discover related information. Some of Maltego’s transforms identify related infrastructure such as DNS servers and web servers, whereas other transforms search public forums to find usernames or email addresses.
Let’s use Maltego to see what open source information we can find on the maltego.com domain. Start up your Kali Linux virtual machine and search for Maltego in the Applications menu. Maltego offers both free and paid versions. We’ll use the free version, so select Maltego CE free. Follow the instructions in the setup wizard and select the defaults.
During the setup process, you’ll be asked to provide an email address. Instead of using your personal email address, let’s create an account on Protonmail.com, an anonymous encrypted mail service, and use that address to register for Maltego. If Protonmail is banned in your country, download the Opera browser, enable its built-in VPN, and select a country other than your own. This will route your requests through an encrypted channel to another country. (We’ll discuss creating an anonymous infrastructure in more depth in Chapter 16.) After you have done this, you should be able to use Protonmail.
After you’ve completed the setup process, you should see an empty canvas in the Maltego interface. To get started, add pieces of data, which Maltego refers to as entities, to this canvas. Maltego supports several entities such as telephone numbers, email addresses, physical locations, company names, and web domains. Click New Entity Type, search for domain, and then add the Domain entity to the canvas, as shown in Figure 8-2.

Figure 8-2: Adding an entity to the canvas
Because we’re searching for information about Maltego itself, change the URL of the domain entity from paterva.com to maltego.com. Right-click the domain entity and run it through a whois transform by clicking the play button next to the Domain owner detail option (Figure 8-3).
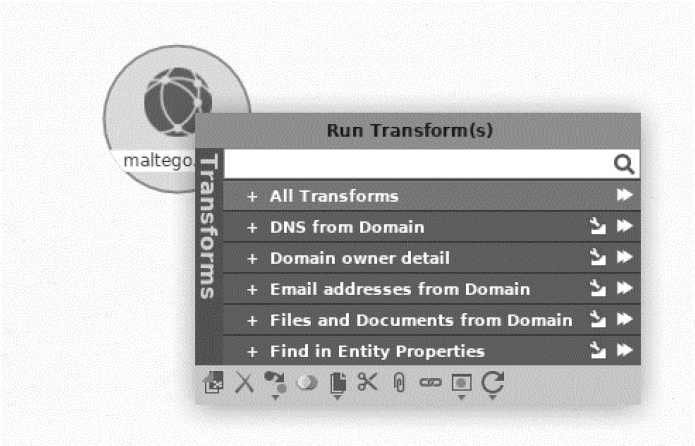
Figure 8-3: Example of running a Maltego transform
Running the transform will produce other entities related to the domain. Figure 8-4 shows the output of the transform. Notice that the output includes information you would find in a whois query.

Figure 8-4: Results of the Maltego transform
What could an attacker do with this information? Well, by applying consecutive transforms, they might discover information about a company’s users and infrastructure. You can install the additional transform by selecting Transforms ▶Transform Hub (Figure 8-5).

Figure 8-5: The Transform Hub’s list of transforms
One of the most useful pieces of information you can obtain is the system administrator’s username and password. Over the years, hackers have stolen databases containing login credentials from companies like LinkedIn, Adobe, and MasterCard. If you obtain a system administrator’s email address, you can search these leaked databases to find an associated password.
The website https://haveibeenpwned.com/ keeps track of these leaks and stores a list of email addresses associated with leaked passwords. Check the website directly to see if one of your passwords has been leaked, or search the database in Maltego by installing the haveibeenpwned transform and running it on the email address you discovered.
Leaked Credential Databases
You might notice that the transform will tell you whether the email address has been exposed in a leak, but it won’t show the password. How do hackers obtain the passwords associated with leaked email addresses? They’ll often turn to other databases containing plaintext usernames, email addresses, and passwords. One of the largest lists ever leaked contained approximately 1.4 billion email address (or username) and password pairs. You can find such a list available via the following Magnet link:
magnet:?xt=urn:btih:7ffbcd8cee06aba2ce6561688cf68ce2addca0a3&dn=
BreachCompilation&tr=udp%3A%2F%2Ftracker.openbittorrent.com%3A80&tr=udp%3
A%2F%2Ftracker.leechers-paradise.org%3A6969&tr=udp%3A%2F%2Ftracker.
coppersurfer.tk%3A6969&tr=udp%3A%2F%2Fglotorrents.pw%3A6969&tr=udp%3A%2F
%2Ftracker.opentrackr.org%3A133
NOTE
Possession of this password list may be illegal in your country, so check your local laws before downloading the database.
Magnet links are an improvement on torrent files. Instead of downloading a file from a single server, torrents allow you to download parts of the file from multiple machines called peers. A torrent file contains a link to a torrent tracker server, which keeps track of all the peers and facilitates connections between them. But this makes the torrent tracker server a single point of failure. With magnet links, each peer keeps track of other peers, instead, thus eliminating the need for a single tracker.
Because the plaintext database is very large (41GB), it won’t fit on your virtual machine as originally configured. You’ll need to increase the size of the virtual machine hard drive if you want to store this file. Do this by clicking File ▶Virtual Media Manager (Figure 8-6).

Figure 8-6: How to increase hard drive size
Select the Properties tab ➊ in VirtualBox and then click the virtual machine images that you would like to increase in size ➋. Next, move the slider ➌ to a new size. Be careful though, because moving the slider all the way to the right could fill your hard drive and make your primary operating system unusable. Check the available space on your hard drive before you do this step.
The rtorrent utility supports magnet links. You can install it by running the following command:
kali@kali:~$ sudo apt-get install rtorrent
Now you can use it to download the file:
kali@kali:~$ rtorrent <magnet link goes here>
The data in the database is organized alphabetically and contains search tools that allow you to find particular information in less than a second. The leak contains a README file with instructions on how to use the tools.
SIM Jacking
If you find a password in the list, you can attempt to log in to the victim’s accounts. But some systems require users to perform an additional verification step after they log in, a process commonly referred to as two-factor authentication. For instance, the system might send a text message to the user’s smartphone containing a unique code that the user must provide during authentication. Other systems will call a user and ask them to verify that they’re currently logging in. However, if you don’t have access to a victim’s phone, you won’t be able to access their account.
Although these authentication methods are creative, attackers have found ways of defeating two-factor authentication using a technique called SIM jacking. This attack is based on the fact that telecommunications companies can transfer your old phone number to a new phone when you purchase one. Attackers sometimes use social engineering techniques to trick those companies into transferring the victim’s phone number to the hacker’s phone. To do this, the attacker uses information collected from link analysis and leaked databases to answer the customer representative’s questions and impersonate the victim. Once the phone number has been transferred, all text messages and calls are forwarded to the hacker’s phone, allowing them to circumvent two-factor authentication.
In addition, certain SIM cards allow hackers to spoof phone numbers or change their voices in real time. We commonly refer to these as encrypted SIMs.
Google Dorking
Maltego isn’t the only way to collect data about a victim. Attackers can also use Google to obtain open source data. This technique is more lucrative than you might think, as Google attempts to find and index all web pages, some of which allow system administrators to control systems like IP cameras. A system administrator can explicitly tell Google not to crawl a specific resource by listing it in the robots.txt file on the web server. However, some web crawlers will ignore this file, so the best way to protect these web pages is to require user authentication.
By using carefully crafted Google searches, you can discover web pages that let you view or control systems. Let’s cover some of these queries to find sensitive pages.
NOTE
The Computer Fraud and Abuse Act (CFAA) prohibits unauthorized access to systems you do not own. Because you are operating outside of your own virtual environment, clicking any of the links you discover during this process could constitute unauthorized access.
Google allows you to use special filters to make your search more specific. For example, you can use the inurl filter to search for pages whose URLs contain certain patterns that can indicate the page’s functionality. For example, the following search will show you live cameras that have been intentionally made public:
inurl:"live/cam.html"
We assume that these cameras were intentionally made public because they’ve been assigned to a dedicated web page (cam.html). The following query attempts to discover IP cameras that were unintentionally exposed:
"Pop-up" + "Live Image" inurl:index.html
This query searches for index.html pages that contain the terms “live image” and “pop-up.” These words are typically associated with web pages that control cameras. You can make the search more specific by adding additional terms.
Other queries search exposed logs for plaintext usernames and passwords. For example, the following query uses the filetype, intext, and after filters to find log files discovered after 2019 that contain email addresses and passwords:
filetype:log intext:password after:2019 intext:@gmail.com | @yahoo.com
You can find a list of these Google queries by visiting https://exploit-db.com/google-hacking-database/.
Scanning the Entire Internet
Certain systems attempt to find and catalog every device on the internet and test them for vulnerabilities. They do this by performing a SYN scan on all 232, or 4,294,967,296, IPv4 addresses on the internet. In this section, we’ll look at two tools, Masscan and Shodan, which allow attackers to scan the internet. There are also great academic tools, like Zmap from the University of Michigan: https://zmap.io/.
Masscan
Masscan is an internet-scale scanner that scans for open TCP and UDP ports. Its creator, Robert Graham, has implemented his own custom TCP/IP stack, allowing the program to scan the entire IPv4 internet in less than 10 minutes. This is possible because Masscan is capable of transmitting up to 10 million packets per second. Unlike nmap, which synchronously sends SYN packets and waits for SYN-ACK responses, Masscan sends multiple SYN packets independently, or asynchronously, without waiting for a response to the previous packet.
Transmitting this many packets requires special hardware and software. The machine running Masscan must have a 10Gbps Ethernet adapter and the PF_RING ZC driver installed. Running Masscan on a virtual machine also limits the number of packets you can transmit. Masscan performs best when you run it directly on a Linux machine.
For our purposes, we’ll run it at a much more modest rate of only 100,000 packets per second. We’ll also scan only a single port. With this configuration, it will take about 10 hours to scan every IPv4 device on the internet. Still, this configuration lets us use our Kali Linux virtual machine without any special hardware or software.
Using an Exclusion List
One more thing: you don’t actually want to scan the entire internet. The administrators of certain government and military servers don’t take kindly to being scanned. For this reason, several groups have compiled lists of IP addresses that you should not scan, called exclusion lists. You can find such an exclusion list at https://github.com/robertdavidgraham/masscan/blob/master/data/exclude.conf. This list includes the IP addresses of machines at the NASA headquarters, the NASA Information and Electronic Systems Laboratory, and a US Navy computer and telecommunications station. Do NOT scan these.
Download this list and save it to a file called exclude.txt. It should look something like this:
## NASA Headquarters
#138.76.0.0
## NASA Information and Electronic Systems Laboratory
#138.115.0.0
## Navy Computers and Telecommunications Station
#138.136.0.0 - 138.136.255.255
You might say that this exclusion list could double as an attack list. But you are an ethical hacker and hacking these systems would be unethical. The list also contains several honey pots operated by the FBI and other agencies. A honey pot is a vulnerable machine intentionally placed in a network as bait for attackers. When a hacker compromises one of these machines, the owner can discover the hacker’s tools and techniques by monitoring the honey pot’s activity.
Here are some FBI honey pots included in the exclusion list (it’s important to update your exclusion list regularly because these might change):
## (FBI's honeypot)
#205.97.0.0
## (FBI's honeypot)
#205.98.0.0
Performing a Masscan Scan
Now let’s use Masscan to execute a quick scan of our virtual network. Open your preferred text editor and add the following:
➊ rate = 100000.00
output-format = xml
output-status = all
output-filename = scan.xml
➋ ports = 0-65535
➌ range = 192.168.1.0-192.168.1.255
➍ excludefile = exclude.txt
The rate represents the number of packets to transmit per second ➊. The next options determine the format of the output file, along with the type of information to include. We also specify the range of ports to scan ➋. Here, we’re scanning all possible ports, from 0 to 65,535. Next, we specify the range of IP addresses ➌ to scan. We’ll scan all the IP addresses in our virtual environment. Finally, we specify our execution list ➍. Though we don’t need it for our environment, you should include it when doing public internet scans.
Save the file as scan.conf. Although it’s possible to supply these parameters as command line arguments, creating a configuration file like this one makes it easier to repeat the scan.
Open a terminal on your Kali Linux virtual machine and run the scan by executing the following command:
kali@kali:~$ sudo masscan -c scan.conf
Your Kali Linux virtual machine should come with Masscan preinstalled. As the scan runs, you should see the following status screen:
Starting masscan (http://bit.ly/14GZzcT)
--forced options: -sS -Pn -n --randomize-hosts -v --send-eth
Initiating SYN Stealth Scan
Scanning 256 hosts [65536 ports/host]
rate: 13.39-kpps, 4.28% done, 0:20:56 remaining, found=0
After the scan completes, you can view the XML results by opening scan.xml in Mousepad or your preferred text editor. It will contain a list of machines and open ports:
<?xml version="1.0"?>
<!-masscan v1.0 scan -->
<?xml-stylesheet href="" type="text/xsl"?>
<nmaprun scanner="masscan" start="1606781854" version="1.0-BETA"
![]() xmloutputversion="1.03">
xmloutputversion="1.03">
<scaninfo type="syn" protocol="tcp" />
➊ <host endtime="1606781854"><address addr="192.168.1.101" addrtype="ipv4"/><
![]() ports><port protocol="tcp" portid="32228"><state state="closed" reason
ports><port protocol="tcp" portid="32228"><state state="closed" reason
![]() ="rst-ack" reason_ttl="64"/></port></ports></host>
="rst-ack" reason_ttl="64"/></port></ports></host>
<host endtime="1606781854"><address addr="192.168.1.101" addrtype="ipv4"/><
![]() ports><port protocol="tcp" portid="65128"><state state="closed" reason
ports><port protocol="tcp" portid="65128"><state state="closed" reason
![]() ="rst-ack" reason_ttl="64"/></port></ports></host>
="rst-ack" reason_ttl="64"/></port></ports></host>
...
The line that begins with host endtime= ➊ indicates that Masscan has detected an open TCP port (portid=) with the ID 32228 on a machine with the IP address (addr=) 192.168.1.101.
Reading Banner Information
Masscan can also open a TCP connection on a port and download banners information that normally includes details about the application running on that port. For example, the banner might include the application’s version. This is extremely useful because as soon as a company discloses a known vulnerability in some software, a powerful machine running Masscan can identify all internet-facing vulnerable machines in less than 10 minutes.
For example, servers running older versions of the OpenSSL library are vulnerable to an attack called Heartbleed. In Chapter 9, we’ll examine the details of Heartbleed, which can allow hackers to read a server’s memory. For now, let’s see how a hacker might use Masscan to detect all the machines on the internet that are vulnerable to the attack.
Earlier I mentioned that Masscan used its own custom TCP/IP implementation. Although this implementation works seamlessly for scanning, it conflicts with an operating system’s TCP/IP implementation when it attempts to establish a TCP connection and download a banner. You can circumvent this by using the --source-ip option to assign a unique network ID to the packets Masscan sends. Carefully select this IP address to ensure that it’s unique on the network (so that IP packets aren’t forwarded to another machine):
kali@kali:~$ sudo masscan 192.168.1.0/24 -p443 --banners --heartbleed --source-ip 192.168.1.200
Here we’ve specified the range of IP addresses to scan using CIDR notation (see Chapter 2 for an explanation of CIDR notation). Next, we select the port to check. In this case, we are checking port 443 (-p443), which is associated with the HTTPS protocol. We then need to inspect the banner (--banners) for the OpenSSL version numbers associated with the Heartbleed (--heartbleed) vulnerability. Simultaneously establishing multiple TCP connections can cause conflicts between Masscan’s TCP/IP stack and that of the operating system, so we label outgoing packets with a new source IP address (--source-ip) not used by other machines on the network to avoid conflicts.
Once the scan completes, we should see the following output:
Starting masscan (http://bit.ly/14GZzcT)
--forced options: -sS -Pn -n --randomize-hosts -v --send-eth
Initiating SYN Stealth Scan
Scanning 256 hosts [1 port/host]
Discovered open port 443/tcp on 192.168.1.1
Banner on port 443/tcp on 192.168.1.1: [ssl] TLS/1.1 cipher:0xc014, pfSense-5
![]() f57a7f8465ea, pfSense-5f57a7f8465ea
f57a7f8465ea, pfSense-5f57a7f8465ea
➊ Banner on port 443/tcp on 192.168.1.1: [vuln] SSL[heartbeat]
The scan detected that port 443 is open on one host ➊ and that the machine might be running a vulnerable version of OpenSSL.
You’ll need to follow extra steps if you decide to run this scan outside of your virtual test environment, especially if you’re running the scan over Wi-Fi. In particular, you’ll need to prevent your operating system from interfering by blocking the port that Masscan uses with a firewall. On Linux, the iptables program allows editing of firewall rules. Run the following command to create a new rule:
kali@kali:~$ iptables -A INPUT -p tcp --dport 3000 -j DROP
This rule drops (-j DROP) all incoming (-A INPUT) packets associated with the TCP protocol (-p tcp) on port 3000 (--dport3000). I discuss firewalls in more detail in Chapter 16. For additional nuances on Masscan, read the Masscan documentation at https://github.com/robertdavidgraham/masscan/.
Shodan
Like Google, Shodan is a search engine. But unlike Google, which searches for web pages, Shodan searches for active IP addresses. When it finds one, it collects as much information about that device as it can, including information on the device’s operating system, open ports, software versions, and location. Shodan catalogs this information and makes it searchable through a web page and Python API, so when hackers and security researchers discover a software vulnerability, they can use Shodan to find vulnerable devices.
For example, the following search query returns Apache version 2.4.46 web servers that support HTTPS:
apache 2.4.46 https
Figure 8-7 shows the redacted result of running the query on Shodan.

Figure 8-7: The redacted results of running a query on Shodan
Shodan also supports several filters for refining the search results. For example, the os filter limits the results to include only certain operating systems and the city filter limits results to machines in a specific city. The following search query returns Linux servers in Charlottesville, Virginia, that run Apache and support HTTPS:
os:linux city:Charlottesville apache 2.4.46 https
You can find a list of Shodan filters at https://github.com/JavierOlmedo/shodan-filters/. Shodan allows only registered users to run filtered queries, but you can always register with your Protonmail account.
However, there’s a downside to using Shodan: it logs your IP address every time you query Shodan. This is bad, because Shodan now knows your IP address and who you’re scanning. Thus, it might be better to set up your own scanning machine. In Chapter 16, I’ll show you how you can set up such an anonymous hacking environment. Now let’s discuss some limitations of current scanning methods.
IPv6 and NAT Limitations
Internet scanners are unable to scan private IP ranges behind routers that implement a system called network address translation (NAT). This means that, often, the only devices that show up on public scans are public devices like cable modems and the Wi-Fi routers. To understand NAT and how it affects scanning, we must first discuss the limitations of IPv4.
Internet Protocol Version 6 (IPv6)
So far, I’ve discussed scanning the approximately four billion possible addresses in IPv4. However, there are approximately eight billion people on Earth, some of whom have multiple devices like phones, laptops, video game consoles, and IoT devices. There are approximately 50 billion internet-connected devices. Four billion addresses is not enough.
Two solutions were proposed to deal with this problem. The first was to share a single IP address between multiple people using NAT and the second was to create a new version of IP called Internet Protocol (IPv6) that contains a larger number of possible addresses.
The designers of IPv6 proposed allocating more bits to each IP address. Instead of using 32-bit IPv4 addresses, IPv6 addresses are 128 bits long, which increases the number of possible IP addresses from four billion to 2128, or 340 undecillion (one trillion multiplied by itself three times).
Unlike IPv4 addresses, for which 8-bit segments are represented by decimal numbers between 0 and 255, IPv6 addresses are represented as hexadecimal numbers, each of which represents an 8-bit sequence. IPv6 addresses are commonly written as eight pairs of hexadecimal numbers separated by colons. Following is an example of an IPv6 address:
81d2:1e2f:426b:f4d1:6669:3f50:bf31:bc0e
Because the IPv6 search space is so large, tools like Masscan can’t scan every IPv6 address.
You might be wondering why some machines still use IPv4 if a new standard exists. Switching to IPv6 requires updating the NICs and routers in the network. So, until infrastructure is updated, several systems will need to maintain backward compatibility with IPv4.
NAT
Because we can’t instantaneously upgrade all the equipment in the network to IPv6, home Wi-Fi routers use NAT to allow all devices in the home to share a single IP address. For example, consider the small home network depicted in Figure 8-8, consisting of a laptop and mobile phone.

Figure 8-8: Example home network that uses NAT
The cable modem is assigned a single IP address by the ISP, and it shares that address with the Wi-Fi router (the cable modem and router are bundled into a single device in some home networks). The router then creates its own internal LAN that contains the IP addresses in private IP range like 192.168.0.0/16 or 10.0.0.0/8. These IP addresses are completely internal and will never be seen by an external network.
The Wi-Fi router must also map those internal IP addresses to a single external IP address. How is this possible? The router manages the mapping using port numbers. For example, the laptop may be mapped to the external IP address on port 1, whereas the mobile device may be mapped to the same external IP address on port 2.
But remember that network communication occurs between processes, and each device (like the laptop and phone) may be running multiple processes. Thus, the devices might each need multiple ports through which to make connections. We can solve this problem by assigning a unique port to each process. For example, the browser process running on port 562 of the laptop with IP address 192.168.1.101 might be assigned the external address (168.1.25.153) on port 8002, whereas the game running on port 452 of the laptop is assigned to port 5002 on the same external address. The table that keeps track of these assignments is called the NAT table.
You can see an example of this kind of mapping in Figure 8-9. When the packet leaves the internal network, the source IP is replaced with an entry in the NAT table, making it appear as though all the traffic is coming from a single IP address running multiple processes.

Figure 8-9: How the source IP address and port are replaced
If a packet arrives at the modem at 168.1.25.153 on port 8002, the modem will forward it to the router, which then will replace the destination address with the corresponding private address.
NAT also prevents scanning services like Masscan from directly connecting to devices connected to routers that implement NAT. This is why we designed the reverse shell in Chapter 4. It initiated the connection to the server, and not the other way around.
Vulnerability Databases
Vulnerability databases contain collections of known vulnerabilities. As I’ve discussed, once a hacker uses OSINT techniques to learn about a victim’s systems, they can search vulnerability databases for a way to access those systems.
One popular vulnerability database is Exploit Database (https://exploit-db.com/), which contains information on vulnerabilities and instructions on how to exploit them. Figure 8-10 shows its interface.

Figure 8-10: Exploit Database’s list of vulnerabilities
In addition, NIST maintains the National Vulnerability Database (NVD), which contains a collection of known vulnerabilities, at https://nvd.nist.gov/vuln/search. NIST also provides feeds that allow ethical hackers to get updates when new vulnerabilities are discovered. This database is synced with the Common Vulnerabilities and Exposures (CVE) database maintained by Mitre. Figure 8-11 shows a CVE database entry about an Apache vulnerability.

Figure 8-11: Entry for Apache Server CVE 2020-9491 vulnerability
CVE entries follow a particular naming structure: CVE-YYYY-NNNN, where YYYY represents the year the vulnerability was discovered, and NNNN is a unique number assigned to the vulnerability.
These tools can do damage in the wrong hands. For example, an attacker may receive an NVD update about a new CVE vulnerability and then search Shodan for devices running vulnerable software. This scenario isn’t just hypothetical. In October 2020, the NSA released the top CVE vulnerabilities exploited by one particular state actor. Researchers will continue to discover new vulnerabilities and new lists of preferred vulnerabilities will emerge, so the cycle will continue. This is why it’s so important to keep your systems updated and patched.
You can also search these databases from the Kali Linux command line by running the following:
searchsploit <keywords>
For example, the following search shows the results of running a searchsploit query on Apache 2.4:
kali@kali:~/Desktop$ searchsploit apache 2.4
-----------------------------------------------------------------------------------------
Exploit Title | Path
----------------------------------------------------------------------------------------
Apache + PHP < 5.3.12 / < 5.4.2 cgi-bin Remote Code Execution | php/remote/29290.c
Apache + PHP < 5.3.12 / < 5.4.2 Remote Code Execution + Scanner | php/remote/29316.py
Apache 2.2.4 413 Error HTTP Request Method Cross-Site Scripting | unix/remote/30835.sh
Apache 2.4.17 Denial of Service | windows/dos/39037.php
Apache 2.4.17 < 2.4.38 'apache2ctl graceful' 'logrotate'Local.. | linux/local/46676.php
Apache 2.4.23 mod_http2 Denial of Service | linux/dos/40909.py
Apache 2.4.7 + PHP 7.0.2 'openssl_seal()'Uninitialized Memory.. | php/remote/40142.php
Apache 2.4.7 mod_status Scoreboard Handling Race Condition | linux/dos/34133.txt
Apache < 2.2.34 / < 2.4.27 OPTIONS Memory Leak | linux/webapps/42745.py
Each entry contains the name of the vulnerability and a path to a script that a hacker can use to exploit it. You can view the exploitation script by using the -p flag followed by the unique number that identifies the exploit. Each exploit file is named using a unique number. For example, the second Remote Code Execution exploit is named 29316.py, so we can view information on the file that implements the exploit by using the following command:
kali@kali:~$ searchsploit -p 29316
Exploit: Apache + PHP < 5.3.12 / < 5.4.2 - Remote Code Execution + Scanner
URL: https://www.exploit-db.com/exploits/29316
➊ Path: /usr/share/exploitdb/exploits/php/remote/29316.py
File Type: Python script, ASCII text executable, with CRLF line terminators
You can view the exploit code by opening the file at the path shown ➊. I’ll discuss exploits in more detail in Chapter 9.
Vulnerability Scanners
Searching the vulnerability database for each system configuration is tedious. Luckily, vulnerability scanners can automatically scan systems and identify any vulnerabilities present. In this section, I’ll discuss a commercial solution called Nessus; however, there are also open source ones like the OpenVAS and Metasploit’s Nexpose scanning module.
The Nessus Home scanner is free, but it is limited to 16 IP addresses. We’ll use it to scan your virtual lab environment. Open the browser on your Kali Linux virtual machine and download the Nessus scanner for Debian from https://www.tenable.com/downloads/nessus/.
Next, open a terminal and go to the folder with the downloaded file:
kali@kali:~$ cd ~/Downloads
Use the Debian package management system to install the file by running the following command:
kali@kali:~/Downloads$ sudo dpkg -i Nessus-<version number>-debian6_amd64.deb
Remember to replace the Nessus version number with the version you downloaded. Next, run the following commands to start the Nessus service:
kali@kali:~/Downloads$ sudo systemctl enable nessusd
kali@kali:~/Downloads$ sudo systemctl start nessusd
You can access Nessus through your browser. Open Firefox on Kali Linux and enter the following URL to connect to the Nessus server that is running on your Kali Linux virtual machine:
https://127.0.0.1:8834/
You should see a security warning. This is because the server is using a self-signed certificate like the one we generated in Chapter 6, and your browser is unable to verify the certificate with the PKI. Not to worry: this certificate is safe, and you can add an exception. In the browser, click Advanced and select Accept the Risk and Continue (see Figure 8-12).

Figure 8-12: Accepting a certificate that isn’t validated by the PKI
Start all of the devices in your virtual lab environment and run the netdiscover tool that we discussed in Chapter 2 to get the IP addresses of all machines in your virtual lab environment.
Next, in Nessus, click the All Scans tab and then the New Scans button to create your first scan. Here, you can also see all of the scans you can perform with Nessus. Select a basic scan (Figure 8-13).

Figure 8-13: A list of available scans
Fill out the information for your scan. We’ll limit this to just the Metasploitable machine, so add its IP address to the list of hosts. (Remember, you can log in to the Metasploitable machine using the username msfadmin and password msfadmin and then run the ifconfig command to obtain the virtual machine’s IP address.) Figure 8-14 shows these settings.
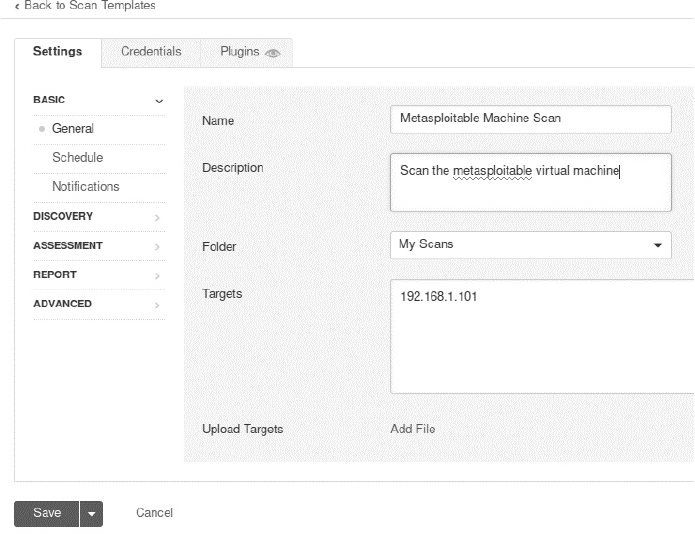
Figure 8-14: Create a new Nessus scan.
Launch the scan. When the scan completes, click the Vulnerabilities tab to see a list of vulnerabilities (Figure 8-15).

Figure 8-15: Vulnerabilities detected by the scan
Notice that the scan detected a backdoor. This is the same backdoor we exploited earlier. Once a hacker has identified this vulnerability, they could execute the attack discussed in Chapter 1 and gain root shell access to the machine.
Exercises
Explore other OSINT tools by attempting the following exercises. I’ve ordered the exercise by increasing difficulty. In the first exercise, you’ll use nmap to collect information about a server by performing different nmap scans. In the second exercise, you’ll use the Discover tool to run multiple OSINT tools and aggregate the result into a single report. In the third and final exercise, you will write your own OSINT tool that will retrieve an administrator’s email address from the whois database and check a leaked password list to see if it contains a plaintext password entry.
nmap Scans
I’ve listed some sample nmap scans in the code that follows. The first scan uses the http-enum script in nmap to enumerate the files and folders on a website. This is a great way to discover hidden files or directories:
kali@kali:~$ sudo nmap -sV -p 80 --script http-enum <IP address of victim
![]() machine>
machine>
The second nmap scan attempts to identify the server’s operating system and running servers while avoiding detection:
kali@kali:~$ sudo nmap -A -sV -D <decoy-IP-1,decoy-IP-2,MY-IP,decoy-IP-3...> <
![]() IP address of victim machine>
IP address of victim machine>
The -A option enables operating system detection, version detection, script scanning, and traceroute. The -D flag enables scanning with decoys, which attempt to avoid firewall detection by sending dummy packets with a fake source IP address along with the scanning machine’s real IP address. The third example uses nmap as a vulnerability scanner.
kali@kali:~$ sudo nmap -sV --script vulners <IP address of victim machine>
We supply the vulners script, which scans a machine and lists the CVE vulnerabilities it detects. You can find a complete list of all nmap scripts currently installed on your Kali Linux virtual machine by listing the contents of the script directory, as follows:
kali@kali:~$ ls /usr/share/nmap/scripts/
Lastly, try a scan of all common ports (-p-) using the default scripts (-sC), and output the results in normal format (-oN) to a file called scanResults.nmap:
kali@kali:~$ nmap -sV -sC -p- -oN scanResults.nmap <IP address of victim machine>
Discover
Discover is an open source tool that contains various scripts to automate the OSINT and vulnerability scanning process. After your scans have completed, Discover will generate a report with the information it has found, as shown in Figure 8-16.
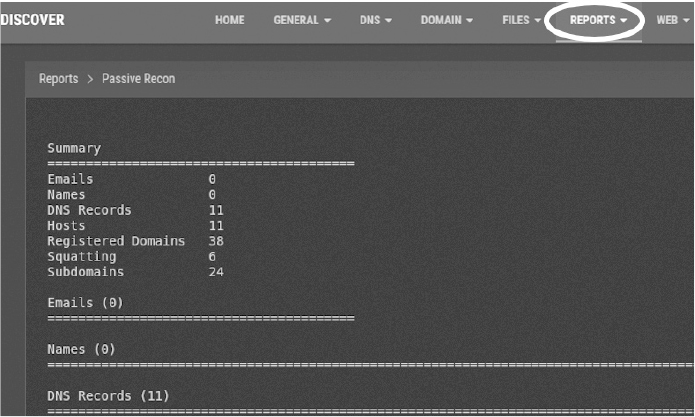
Figure 8-16: Results of running the Discover scan
Discover includes two OSINT scanning-tool categories: passive and active. The key difference between these is your likelihood of being detected. Passive scans query records held by third parties, so victims are unlikely to know they’re being scanned. Active scans probe the victim’s infrastructure and are more likely to trigger an alarm.
Begin by examining some of Discover’s passive scanning tools:
ARIN and Whois Identifies IP addresses. (The American Registry for Internet Numbers is the organization that administers IP addresses and hosts the whois database.)
dnsrecon Collects OSINT from DNS servers. (Also supports active scanning.)
goofile Searches a domain for specific file types.
theHarvester Searches public sources on the internet, such as Google and LinkedIn, for email addresses that are associated with a domain under investigation.
Metasploit scanning tool Performs scans with the Metasploit framework.
URLCrazy Checks for URL variations that could be used for squatting, like the facebeok.com example we considered in Chapter 7.
Recon-ng Contains a variety of tools specifically for web-based open source reconnaissance. (Also supports active scanning.)
The following are some active scanning tools:
traceroute Sends ICMP packets to discover routers along the path to a server.
Whatweb Probes a website to uncover the technologies used to build it.
You don’t have to run these tools individually. The Discover tool will execute them for you and generate a comprehensive report.
Run the following command to clone the Discover repository and place it in the opt directory on the Kali Linux virtual machine. This directory contains any Linux programs you install:
kali@kali:~$ sudo git clone https://github.com/leebaird/discover /opt/discover/
Navigate to the directory containing the repository and run the update.sh script. This will install Discover and all of its dependencies:
kali@kali:~$ cd /opt/discover/
kali@kali:~/opt/discover$ sudo./update.sh
During the installation process, you’ll be asked to enter information to create a certificate. Remember that you don’t need to use your private information. Just make something up like you did with your previous certificates.
The installation process takes some time. In the meantime, create a folder called Results on your Kali Linux desktop. You’ll save your reports there. When your installation is complete, run Discover using the following command:
kali@kali:~/opt/discover$ sudo./discover.sh
As practice, select the domain option from the Recon menu and run both a passive and active scan on a domain that you own or have acquired permission to scan. The scan can take more than an hour to complete.
Discover should output the results of the scan to the following folder: /root/data/. Move this to your Results folder for easy access by running the following command:
kali@kali:~$ mv /root/data/ ~/Desktop/Results
What information did you discover?
Writing Your Own OSINT Tool
How much of of the web can you PWN on your own? Write a scanner that does a whois lookup on any of the four billion IPv4 addresses. It’s okay to check all IP addresses given that you aren’t connecting to these IP addresses. Instead, you’re looking up the admin’s information in a public database.
In other words, you should be able to run
kali@kali:~$ whois 8.8.8.8
and extract any email addresses it finds. Then, use the haveibeenpwnded API available at https://haveibeenpwned.com/API/v2 to see if the administrator email address was associated with a password leak.
For testing purposes, you might want to limit your scan to only a couple of addresses, and then scale it up after your tool works.
Bonus
Check the leaked database containing the 1.4 billion email addresses and passwords you downloaded earlier. Does it contain a password entry for the email address returned by the whois command? Loop through a collection of IP addresses and output a CSV file in which each line contains an IP address, email address, and password.