Chapter 2
Implement management and security solutions
Organizations are still working out the details of getting to the cloud. With all the hardware and servers running in datacenters and co-location spaces, moving to the cloud still takes a bit of effort.
Architecting solutions in Azure is not just development or infrastructure management in the cloud. It’s much more than that, and you need to understand how the Azure resources an organization needs to operate will sometimes be centered in development and sometimes in infrastructure. It’s up to you to know enough about these topics.
This chapter helps you understand how you can bring your existing workloads to Azure by allowing the use of some familiar resources (IaaS Virtual Machines) and others that may be new (such as serverless computing) to your environment. In addition, the use of multifactor authentication (MFA) is covered here to ensure your cloud environment is as secure as possible. An Azure Solutions Architect might face all these situations in day-to-day work life and needs to be ready for each of them.
Skills covered in this chapter:
■ Skill 2.2: Implement disaster recovery using Azure Site Recovery
■ Skill 2.5: Implement application load balancing and network security
■ Skill 2.6: Integrate an Azure virtual network and an on-premises network
■ Skill 2.7: Implement and manage Azure governance solutions
Skill 2.1: Manage workloads in Azure
Because most organizations have been operating on infrastructure running in house, there is a significant opportunity to help them migrate these workloads to Azure, which might save some costs and provide efficiencies for these servers that their datacenters might not. Also, some organizations might want to explore getting out of the datacenter business. How can you help your organization or customer move out of a datacenter into the Azure cloud?
The recommended tool for this is Azure Migrate, which offers different options depending on the type of workload you’re migrating (physical or virtual). Azure Site Recovery has not gone away, though it is used primarily for disaster-recovery scenarios where Azure is the target for disaster recovery. See Skill 2-2, “Implement disaster recovery using Azure Site Recovery,” for more info.
This skill covers:
■ Migrate Virtual Machines to Azure
■ Migrate data to Azure
■ Migrate web applications
■ Configure the components needed to migrate databases to Azure SQL or an Azure SQL–managed instance
Configure the components of Azure Migrate
Azure Migrate uses migration projects to assess and manage any inbound migration of workloads to Azure. To create a migration project and get started, follow these steps:
Determine the workload type to migrate:
■ Servers. Virtual or physical servers
■ Databases. On-premises databases
■ VDI. Virtual Desktop Infrastructure
■ Web Apps. Web-based applications
■ Data Box. Offline data migration to Azure
Add the tools for the selected migration to create a Migrate Project
Perform a migration of the selected workloads to Azure
Azure Migrate Assessment Tools
Before executing the migration of any workload to Azure, with the exception of a Data Box migration, the assessment of the current status of on-premises resources will help determine the type of Azure resources needed, as well as the cost to migrate them to Azure.
There are two assessment tools for migrating servers to Azure:
■ Azure Migrate Server Assessment. This service has been the built-in assessment tool for some time and has roots in Site Recovery. It will discover and review VMware, Hyper-V, and physical servers to determine if they are ready and able to make the transition to Azure.
■ Movere. This assessment tool was a third-party company until late 2019, which was acquired by Microsoft to broaden the tools available for getting resources into Azure. With the assessments performed by Movere, an agent is loaded within the on-premises environment and scans are performed to determine the volume of servers in the environment. Additional information, including SQL Server instances, SharePoint instances, and other applications, are also reported by Movere.
In addition to server assessments, Azure Migrate has tools to review existing web applications with the Web App Migration Assistant and on-premises SQL Server databases with the Database Migration Service. The assessment for SQL Server will also review the fit of the databases discovered within the three Azure offerings for SQL Server: Azure SQL Database, Managed Instance SQL, and SQL Server running on VMs in Azure.
Note Azure SQL Additional Fixes may be Required
When migrating SQL databases, there might be additional steps identified by the assessment that need to be remedied based on the destination implementation of the chosen SQL. In our experience, Azure SQL Database will have the most items for review because it is the most different (and potentially feature-restricted) option.
Azure Migrate Server Assessment Tool
The Server Assessment Tool provides the following information to help your organization make the best decisions when preparing to move resources to Azure:
■ Azure Readiness. This tool determines if the servers discovered on-premises are good candidates for moving to Azure.
■ Azure Sizing. This tool estimates the size of a virtual machine once it has migrated to Azure, based on the existing specifications of the on-premises server.
■ Azure Cost Estimation. This server assessment tool will help to estimate the run rate for machines that are migrated to Azure.
No agents are required by the Server Assessment tool. Server assessment is configured as an appliance and runs on a dedicated VM or physical server in the environment being evaluated.
Once an environment has been scanned for assessment, administrators can review the findings of the tool and group servers for specific projects or lifecycles. (The grouping of servers is done after assessment.) Then, groups of servers can be evaluated for migration to Azure.
When reviewing server groups for migration, be sure to consider things like connectivity to Azure and any dependencies that applications or servers being moved may have.
To complete a server environment assessment, perform the following steps:
Locate Azure Migrate within the Azure Portal.
Create an Azure Migrate resource from the Azure portal by selecting Assess and Migrate Servers on the Overview blade, as shown in Figure 2-1.

FIGURE 2-1 Choosing Assess And Migrate Servers
Select Add Tool(s) to create a project and select assessment and migration tools, as shown in Figure 2-2.
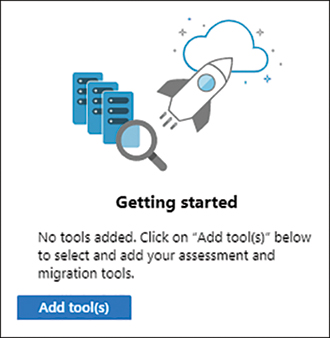
FIGURE 2-2 Assessment and migration tool selection
Enter the details required for the migration project for servers, as shown in Figure 2-3.
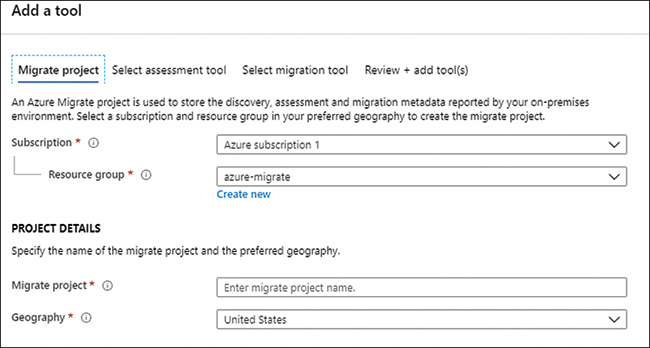
FIGURE 2-3 Details for configuration of server migration project
Select a Subscription.
Select a Resource Group.
Enter a name for the Azure Migrate project.
Select the Azure Migrate: Server Assessment tool and click Next, as shown in Figure 2-4.

FIGURE 2-4 Tools for server assessment to Azure
Select the Skip Adding A Migration Tool For Now check box and click Next, as shown in Figure 2-5.

FIGURE 2-5 Server migration tools
Review the assessment selections made and click Add Tool(s), as shown in Figure 2-6.
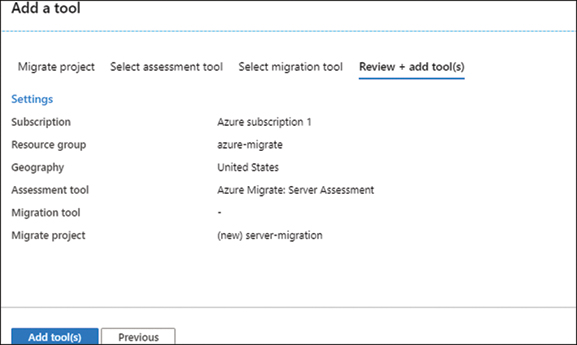
FIGURE 2-6 Review choices and continue
Once the assessment tool has been chosen in Azure, additional setup of the appliance is necessary.
Click Discover under Assessment Tools. The Azure Migrate: Server Assessment dialog box shown in Figure 2-7 below.
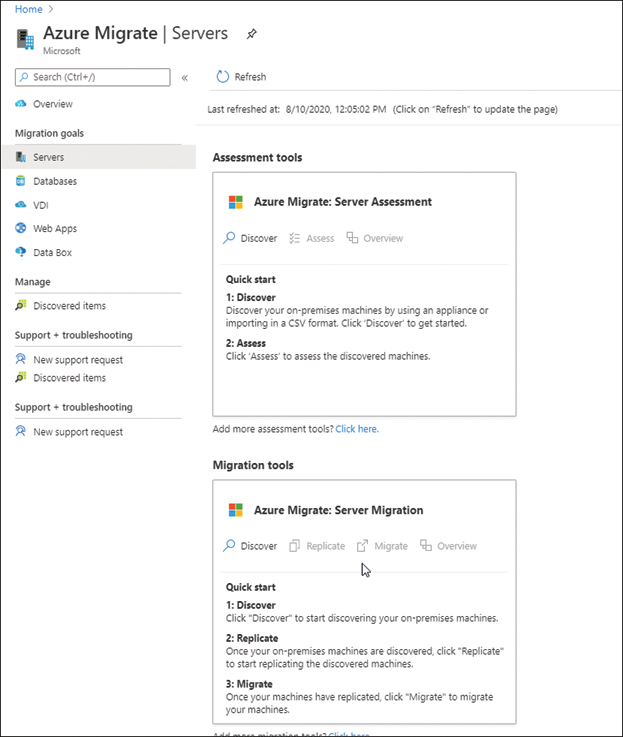
FIGURE 2-7 Discovering servers for migration to Azure
To use an appliance, select Discover Using Appliance, as shown in Figure 2-8.
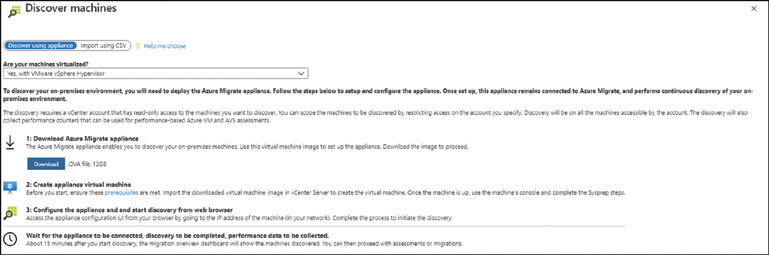
FIGURE 2-8 Discovering servers using a self-hosted appliance
Choose the hypervisor type used in the environment: Hyper-V, VMware, or Physical Servers.
Download the appliance and install it in the environment.
Using a browser, visit the IP address of the appliance, configure it to reach the Azure Migrate project, and then start discovery.
After about 15 minutes, machines that are discovered will begin to appear in the Azure Migrate Discovery Dashboard.
You can also complete a CSV template, which supplies the details of your environment, and then upload it to the Azure Migrate project if you would rather not use the discovery appliance. This is shown in Figure 2-9.
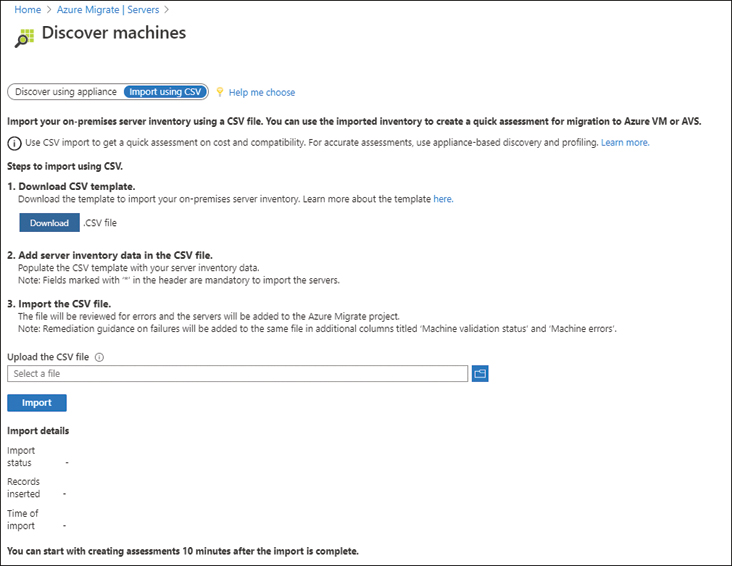
FIGURE 2-9 CSV template download to provide information about environment
Note Assessment and Migration – Better Together
Assessment and migration are discussed together here because the same tool is used for both operations.
To complete a web app assessment and migration, complete the following steps:
Inside the existing Azure Migrate project, select Web Apps from the Migration Goals section of the navigation bar.
Select Add Tool(s) and choose the Azure Migrate: Web App Assessment tool, as shown in Figure 2-10.
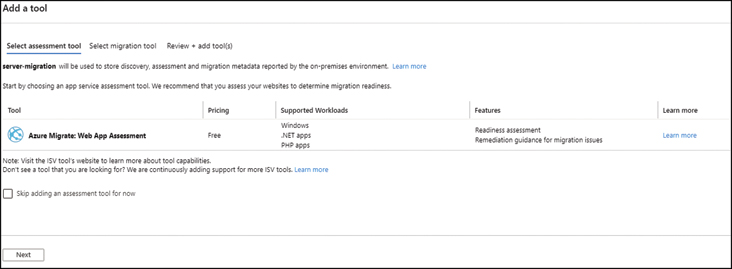
FIGURE 2-10 Adding Azure Migrate: Web App Assessment tool
Click Next.
Select the Skip Adding A Migration Tool check box and click Next.
After reviewing the configuration, click Add Tool(s).
Once the web app assessment tool has been added, download the Azure App Service Migration Assistant to assess internal web applications. If the application has a public URL, it can be scanned via the public Internet.
Install the assessment tool on any web servers containing applications for migration. IIS 7.5 and administrator access on the server(s) are the minimum requirements to complete an assessment. Currently, PHP and .NET apps are supported for migration, with more application types coming soon.
The migration tool will determine whether the selected websites are ready to migrate to Azure, as shown in Figure 2-11.
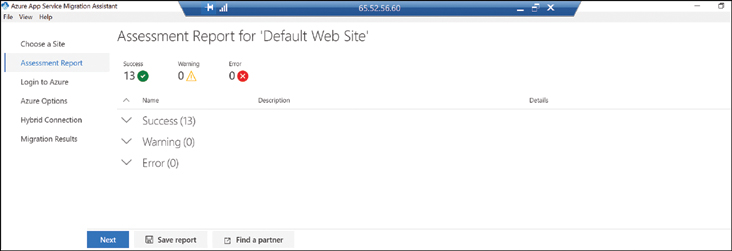
FIGURE 2-11 Website Assessment for migration to Azure App Services
Once the assessment tool has reviewed the chosen web applications, click Next to log in to Azure using the provided device code and link provided in the wizard, show in Figure 2-12.

FIGURE 2-12 Use the link provided to open a browser and log in to your Azure Migrate project
Click Azure Options in the left-side navigation pane and set the Subscription, Resource Group, Destination Site Name, App Service Plan, Region, Azure Migrate Project, and Databases options, as shown in Figure 2-13.

FIGURE 2-13 Options for Azure Migrate web app utility
If your application has a database back end, select the Set Up Hybrid Connection To Enable Database Connection option and enter the name of the on-premises database server and the port on which to connect in the On-Premises Database Server field shown when the option is selected.
Click Migrate to migrate the application as is or click the Export ARM Template button on the Azure Options screen to produce the JSON-based ARM template for the application for later deployment to Azure.
The migration progress is shown in Figure 2-14. You will also be able to see the resources once they are migrated in the Azure portal.
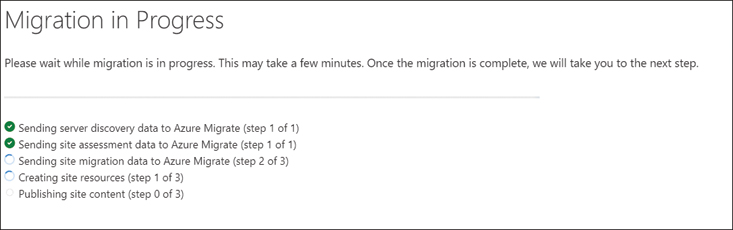
FIGURE 2-14 Migration in process
Complete a SQL database assessment and migration using the following steps:
Within the Azure Migrate project, select Databases > Add Tool(s).
Select the Azure Migrate: Database Assessment tool and click Next, as shown in Figure 2-15.

FIGURE 2-15 Database Assessment tool selection in Azure Migrate
To proceed with a migration if the assessment produces the expected outcome, select the Azure Migrate: Database Migration tool.
If you are assessing production workloads and/or extremely large databases, select the Skip Adding A Migration Tool For Now check box to allow further review of the assessment to correct any issues found.
Once the tools have been added to the migration project, as shown in Figure 2-16, click the Download link to download the Database Migration Assessment tool to start the assessment.

FIGURE 2-16 Database Assessment and Migration tools
Install and run the Data Migration Assistant Tool on the SQL server(s) to be migrated to Azure.
In the Data Migration Assistant tool, as shown in Figure 2-17, click New to add a new project.
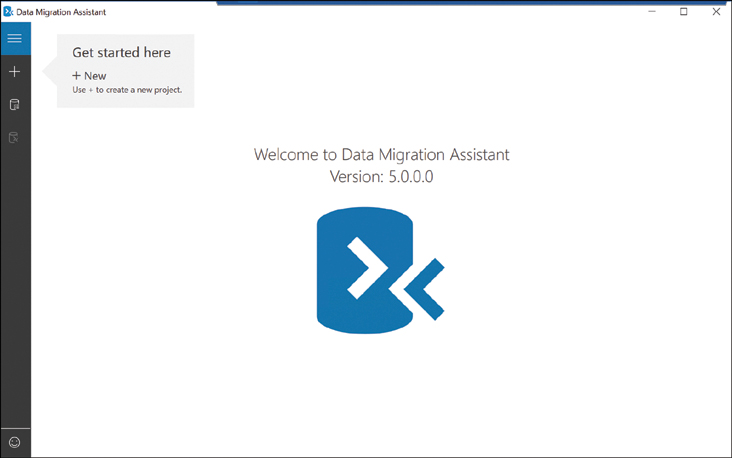
FIGURE 2-17 Azure Migration Assistant
Enter a name for the project and select the following for the SQL server data being migrated:
■ Assessment Type. Choose either database engine or integration services.
■ Source Server Type. Choose either SQL Server or AWS RDS For SQL Server.
■ Target Server Type. Choose from Azure SQL Database, Azure SQL Database Managed Instance, SQL Server On Azure Virtual Machines, or SQL Server.
On the Options screen within the created project, following are the selected (and default) options:
■ Check Database Compatibility. This will check an existing database for any issues that would prevent it from running in Azure SQL.
■ Check Feature Parity. This option looks for unsupported features in the source database.
Select the SQL server(s) and choose the appropriate authentication method(s) for the SQL server:
■ Windows Authentication. Use the currently logged-in Windows credentials to connect.
■ SQL Server Authentication. Use specific credentials stored in the SQL server to connect.
■ Active Directory Integrated Authentication. Use the logged-in Active Directory user for authentication.
■ Active Directory Password Authentication. Use a specific Active Directory user or service account to authenticate.
Select the properties for the connection:
■ Encrypt connection. Check this box if the SQL Server (and/or your organization’s information security team) requires connections to be encrypted.
■ Trust Server Certificate. If the SQL Server is using certificates, the Data Migration Assistant can trust these certificates to simplify future connections.
Click Connect.
From the list of databases found, select any that should be included in the assessment, as shown in Figure 2-18.
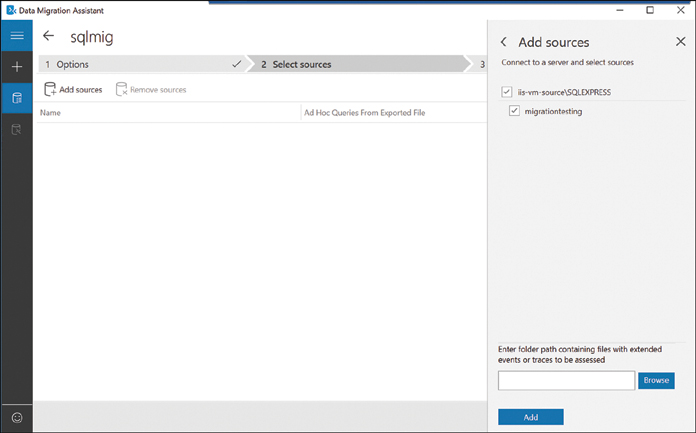
FIGURE 2-18 Include selected databases in Assessment
Click Add.
Once the databases are added to the assessment, if there are log files or extended events to include, click Browse to locate and include them, as shown in Figure 2-19.

FIGURE 2-19 Include log files or extended events
Review the assessment for both feature parity and compatibility and fix any issues found. If there are discrepancies, they will need to be resolved before the migration can proceed.
Note Some Items may Require Additional Work
The assessment will return items that are unsupported by Azure SQL but are in use within the source database(s). It will also find any compatibility issues within the data in the source database. These items will need to be remedied before migrating the data to Azure SQL.
Click Upload To Azure.
You will be prompted to sign in if you are not already signed in on the computer where the assessment is running.
Select the Subscription and Resource Group and then click Upload.
Migrating information is straightforward as well, though there must be an existing Azure SQL database in which to migrate the SQL data. You should create this Azure SQL database beforehand because the tools will not build Azure SQL or other types of SQL in Azure as part of the process.
To complete a migration after the assessment of SQL databases, complete the following steps:
In the Data Migration Assessment tool, select the Migrations option.
Specify the source SQL instance and log-in method.
Specify the target Azure SQL Server name and credentials, and then click Connect.
Note Access Required to Proceed
You will need to ensure the system where the migration is running has access to the Azure SQL DB by allowing access from the IP address of the client within the Azure SQL Server networking details.
Select the database to migrate and click Next, as shown in Figure 2-20.
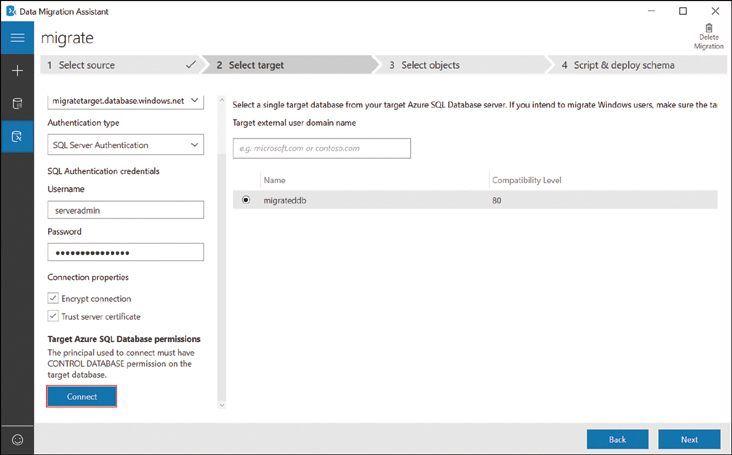
FIGURE 2-20 Connect to Azure to migrate source data to Azure SQL Database
Once the preparation completes and has been reviewed, click Generate SQL Script to create a script. A generated script is shown in Figure 2-21.
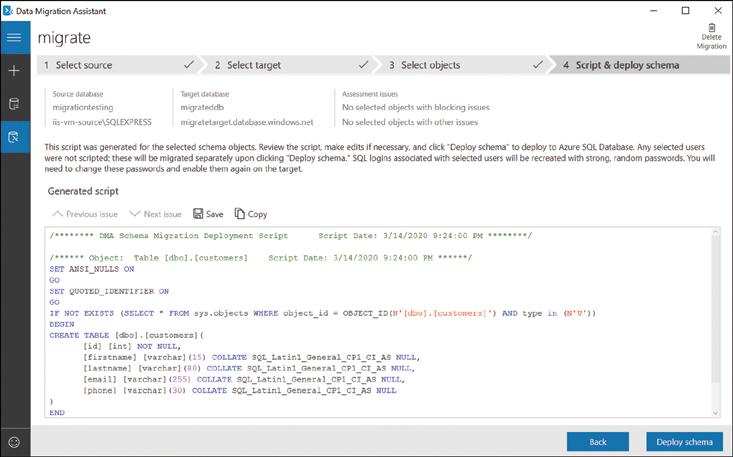
FIGURE 2-21 An SQL Script generated for migration work
To push this data to a specified instance of Azure SQL Database using the Data Migration Assistant, click Deploy Schema.
Migrate virtual desktop infrastructure to Azure
Azure Migrate also allows you to bring virtual desktop infrastructure (VDI) into Azure. The assessment of VDI requires the use of Lakeside: Systrack, a third-party tool, to complete the assessment of VDI environments. The migration process, however, follows the same path as a server migration, allowing workloads from VMware or Hyper-V to be migrated.
Azure Data Box allows offline migration of existing data to Azure. The Data Box itself is a ruggedized NAS that is capable of storing up to 100 TB of data with AES 256 encryption for transporting your data physically to the Azure datacenter(s) for ingestion.
To complete a Data Box offline migration of workloads to Azure, complete the following steps:
From within an Azure Migrate project, select Data Box as the Migration Goal.
Provide the following details about the data being ingested:
■ Subscription. Select the name of the Azure Subscription where the data will be transferred.
■ Resource Group. Select the resource group where the data will be transferred.
■ Transfer Type. Select the type of transfer being performed.
■ Source Country/Region. Select the country or region where the data lives today.
■ Destination Azure Region. Select the region in Azure where the data should reside after transfer.
Click Apply.
Select the appropriate Data Box option for your migration, as shown in Figure 2-22.

FIGURE 2-22 Select the appropriate Data Box size for your migration
Note that Data Box disks provided by Microsoft are only allowed with the following subscription offers:
■ EA. Enterprise Agreement
■ CSP. Cloud solution provider partnership
■ Microsoft Partner Network. Partner organizations
■ Sponsorship. A limited, invite-only Azure subscription offer provided by Microsoft
If you do not have an offer tied to your Azure subscription that meets the above requirements to use a provided Data Box, you can send in data on your own disks. If you provide your own disk, the following requirements apply:
■ Up to 10 disks per order
■ 1 TB per disk
■ Copying data to one storage account
■ $80 per disk import fee
These Data Box options are for offline transfers to Azure. Using the Data Box Gateway, a virtual appliance within your environment, will perform an online data migration to Azure.
Once you have selected a disk option, you will be able to configure the options for your environment (see Figure 2-22). You will choose the following options shown in figure 2-23:
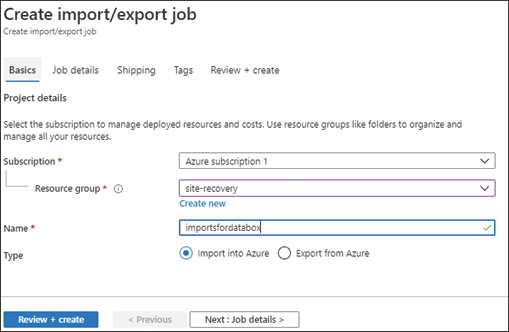
FIGURE 2-23 Configuration options for migration environment
■ Type. Import to or export from Azure.
■ Name. The name of the job to identify it to Azure.
■ Subscription. Select the subscription for the job.
■ Resource Group. Select an existing resource group or create a new one for the job.
After clicking Next: Job Details, you will supply the following information, shown in Figure 2-24:

FIGURE 2-24 Provide job details
■ Upload Journal Files. Specify the path to the journal file for each drive being used for import.
■ Import Destination. Specify a storage account to consume ingested data and the region the data will be stored in.
■ Provide Return Shipping Information. Specify the name and address details to allow your disk to be returned along with carrier information as shown in Figure 2-24.
Review and confirm your choices.
If you have shipped your own drives for this process, you will need to supply return information.
Note Only Option
Supplying your own drives is the only option available for some Azure subscription types.
As discussed above, if you are not using a EA,CSP, Partner, Sponsorship subscription in Azure, or one with a special offer designation, you might be required to use your own drive(s) with Data Box. If that is the case, return shipping information is required, as shown in Figure 2-25.

FIGURE 2-25 Return shipping information
There are other assessment and migration tools such as Movere or other third-party tools. These tools might require additional spend to assess your environment. Movere is free and can be used as part of this process because it was acquired by Microsoft, but this book focuses on the Azure tools for assessment and migration.
Implementing Azure Update Management
An organization that is seeking to move workloads to the cloud is probably (hopefully) already ensuring these servers are patched regularly and kept as close to truly up to date as their governance and infosec organizations will allow. Migrating a server to Azure does not necessarily remove this burden from server administration teams. The last thing to cover in this section on workload management and migration is managing updates in the cloud. As you might expect, Azure has a method for that, and here, we will look at the implementation of this feature set.
Note If it is Working, maybe it should Stay Working
Just because Azure brings an update management tool to the party does not mean it will be the best patch management strategy for your organization. In the event your organization has mostly Windows domain-joined systems or a well-oiled strategy for patching Linux, there might be no reason for you to change the way things are. Sure, you should evaluate the situation, but make sure the new tools fit the needs of your organization.
To configure Azure Update Management, complete the following steps:
Log in to the Azure portal and navigate to a running virtual machine.
In the Operations section of the left navigation menu for the VM, select Update Management.
Supply the following information:
■ Log Analytics Workspace Location. Select the region for the account.
■ Log Analytics Workspace. Choose (or create) a log analytics workspace.
■ Automation Account Subscription. Select the Azure subscription to house this resource.
■ Automation Account. Choose or create an automation account for Update Management.
Click Enable and wait for the deployment to complete (between 5 and 15 minutes).
Note Be Patient with Data Collection
Once the solution is enabled, the solution will need to collect data about your system(s) to help ensure the best update management plan. This can take several hours to complete. The Azure portal dialog box recommends allowing this to run overnight.
Once the solution has finished onboarding virtual machines, revisiting the Update Management blade for one or more VMs will display information as it becomes available.
Selecting the Update Agent readiness troubleshooter will help determine which items might interfere with the use of the Update Management solution (see Figure 2-26).
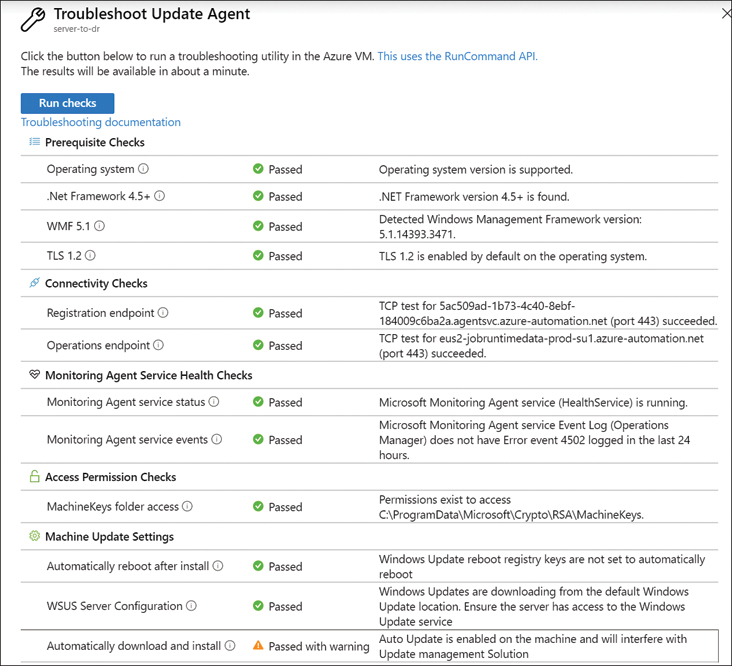
FIGURE 2-26 Update Agent Readiness configuration
If your VM is running Windows Auto Update, you will want to disable it before proceeding with Update Management in Azure.
Once the onboarding process has completed and after waiting for configuration to complete, visit the Update Management blade for a VM to see the Missing Updates for the system, which are broken out by Critical, Security, and Others, as shown in Figure 2-27.

FIGURE 2-27 Security fixes needed before migration can proceed
Selecting an update from the Missing Updates list will open Log Analytics and insert a query looking for that update; running the query will display the update as a result.
When a server has onboarded into Update Management, it can be patched by configuring a schedule for update deployment. To do that, complete the following steps:
From the Update Management blade, click Schedule Update Deployment.
Enter the following information about the schedule:
■ Name. A name for the deployment.
■ Update Classification. The update types to be included.
■ Include/Exclude Updates. Optionally, select the updates to include or exclude.
■ Schedule Settings. When the deployment should happen.
■ Pre/Post Scripts. Any scripts that should run before or after deployment.
■ Maintenance Window. Specify the length of the maintenance window for deploying updates.
■ Reboot Options. Choose the reboot options for the update(s).
Click Create on the update deployment schedule.
The deployment that has been scheduled will be listed on the Deployment Schedule tab. Also, any deployments will be defaulted to 30 minutes after the current time to allow the schedule to push to Azure.
After these items are configured, the updates will be applied as per the schedule that has been set up.
This section took a high-level overview covering the various types of migrations to Azure using built-in Azure tools. As this technology changes and Azure evolves, this will surely expand.
Need more Review? Azure Migrate
Check out these resources:
■ Azure Migrate Guidelinesfor Hyper-V. https://docs.microsoft.com/en-us/azure/migrate/migrate-support-matrix-Hyper-V#assessment-appliance-requirements
■ Azure Migrate Overview. https://docs.microsoft.com/en-us/azure/migrate/
■ Update Management Solution in Azure. https://docs.microsoft.com/en-us/azure/automation/update-management/overview
■ An Overview of Azure VM Backup. https://docs.microsoft.com/en-us/azure/backup/backup-azure-vms-introduction
Skill 2.2: Implement disaster recovery using Azure Site Recovery
With the growing number of organizations moving to Azure, one of the first things that comes to mind is leveraging the cloud as a target for disaster recovery. If an organization has an existing co-location for DR data, Azure can provide some or all the services needed to replace this secondary (or multiple secondary) datacenter(s). In this section, the use and configuration of Azure Site Recovery are covered.
Note Before there was Migrate, there was Site Recovery
Before Azure Migrate, Azure Site Recovery was the Microsoft solution for both disaster recovery and migration of servers to Azure.
This skill covers:
Configure Azure components of Site Recovery
Azure Site Recovery provides a way to leverage the scale of Azure while allowing Resources to be failed back to your on-premises datacenter should the need arise as part of a business continuity and disaster recovery (BCDR) scenario. Since the introduction of Azure Migrate and the additional workloads covered previously in this chapter, Site Recovery has become the primary disaster recovery tool for use with Azure.
Follow these steps to configure the Azure resources to use Site Recovery for DR to Azure:
Note Consider Creating the Azure Resources First
Creating the Azure resources first prepares the destination and ensures that nothing is missed. Because the process moves files into Azure, this can minimize issues when the transfer begins because the target resources will be identified up front.
Log in to your Azure subscription.
Create a resource group to hold your Azure Backup Vault.
Create a new resource and select Backup And Site Recovery from the Storage grouping in the Azure Marketplace, as shown in Figure 2-28.

FIGURE 2-28 Creating a Backup and Site Recovery vault
In the Recovery Services Vault Creation blade shown in Figure 2-29 complete the form:

FIGURE 2-29 Creating a Recovery Services vault
■ Subscription. Specify an active Azure subscription.
■ Resource Group. Create a new resource group or select an existing resource group for the Recovery Services vault.
■ Name. Choose a unique name for your Recovery Services vault.
■ Location. Select the region to use for the Recovery Services vault.
Click the Create button to build the resource, which may take a few moments to complete.
Note Feature Name Changes Happen at cloud Speed, too
Backup and Site Recovery is the new name for the Recovery Services vault resource. As of this writing, the names have not been updated throughout the portal.
Once the Recovery Services vault is ready, open the Overview page by clicking the resource within the resource group. This page provides some high-level information, including any new things related to Recovery Services vault.
Configure on-premises components of Site Recovery
Use the following steps to get started with a site recovery (migration in this case):
Click the Site Recovery link under Getting Started in the Settings pane, as shown in Figure 2-30.

FIGURE 2-30 Getting Started with Site Recovery
Select the Prepare Infrastructure link to begin readying on-premises machines.
Complete the Prepare Infrastructure steps (shown in Figure 2-31):

FIGURE 2-31 Configure protection goals
■ Where Are Your Machines Located? Choose On-Premises.
■ Where Do You Want To Replicate Your Machines To? Choose To Azure.
■ Are You Performing A Migration? Select Yes or No.
■ Are Your Machines Virtualized? Select the appropriate response:
■ Yes, With VMware.
■ Yes, With Hyper-V.
■ Other/Not virtualized.
Note About Physical Servers
Migrating Physical Servers using P2V, which is covered later in this chapter, uses the Physical/Other option of the Azure Site Recovery configuration mentioned here. Aside from this step, the Azure configuration is the same as discussed here.
Note About Hyper-V
If you select Hyper-V as the virtualization platform, you will also need to indicate if you are using System Center VMM to manage the virtual machines.
Click OK to complete the Protection Goal form.
Step 2 of infrastructure preparation is deployment planning, which helps to ensure that you have enough bandwidth to complete the transfer of virtualized workloads to Azure. The wizard will estimate the time needed to completely transfer the workloads to Azure based on the machines found in your environment.
Click the Download link for the deployment planner, located in the middle pane of the deployment planning step, to download a zip file to get started.
This zip file includes a template that will help in collecting information about the virtualized environment as well as a command-line tool to scan the virtualized environment to determine a baseline for the migration. The tool requires network access to the Hyper-V or VMware environment (or direct access to the VM hosts where the VMs are running). The command-line tool provides a report about throughput available to help determine the time it would take to move the scanned resources to Azure.
Note Ensure RDP is Enabled before Migration
Ensuring the local system is configured to allow remote desktop connections before migrating it to Azure is worth the prerequisite checks. There will be considerable work to do—including the configuration of a jumpbox that is local to the migrated VM’s virtual network—if these steps are not done before migration. It’s likely that this will be configured already, but it’s never a bad idea to double-check.
After the tool has been run, in the Azure portal, specify that the deployment planner has been completed and click OK.
Next, the virtualization environment will be provided to Azure by adding the Hyper-V site and server(s).
Note All Hypervisors Welcome
At the time of this writing, the lab used for the examples consists of Hyper-V infrastructure. The examples provided will use Hyper-V as the on-premises source, but ASR is compatible with VMware as well.
To add a Hyper-V server, download the Azure Site Recovery Provider and the vault registration key (see Figure 2-32), and install them on the Hyper-V server. The vault registration info is necessary because ASR needs to know which recovery vault the VMs belong to once they are ready to migrate to Azure.
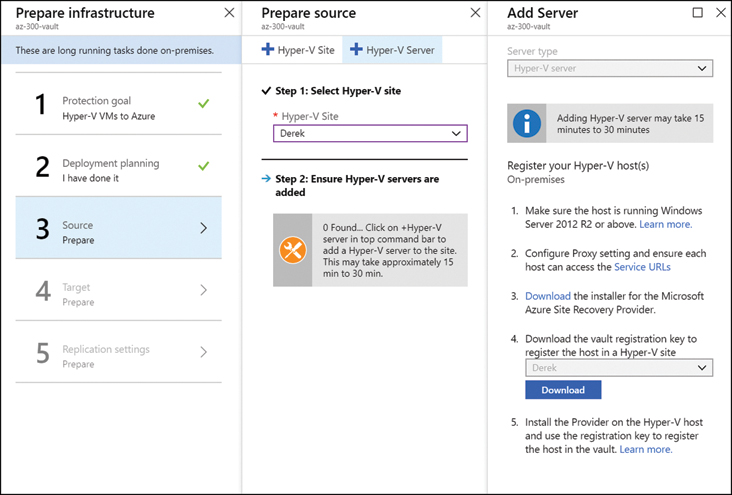
FIGURE 2-32 Preparing the source virtualization environment
If you’re using Hyper-V, install the Site Recovery Provider on the virtualization host, as shown in Figure 2-33.

FIGURE 2-33 Installation of Site Recovery Provider
After installation and registration, it might take some time for Azure to find the server that has been registered with Site Recovery vault.
Proceed with infrastructure prep by completing the Target section of the wizard, as shown in Figure 2-34.
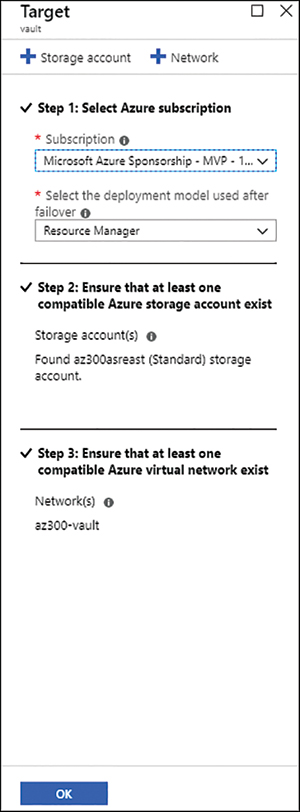
FIGURE 2-34 Preparing the Azure Target
Select the Subscription and the Deployment Model used. (Generally, the Deployment Model will be Resource Manager.)
Note Ensure that Storage and Networking are Available
A storage account and network are necessary within the specified subscription in the same Azure region as the Recovery Services vault. If this exists when you reach this step, you can select the resources. If the storage account and network don’t exist, you can create them at this step.
Click the Storage Account button at the top of the Target blade to add a storage account.
Provide the following storage account details:
■ Storage account name
■ Replication settings
■ Storage account type
When this storage account is created, it will be placed in the same region as the replication services vault.
If a network in the same region as the vault isn’t found, you can click the Add Network button at the top of the Target blade to create one. Much like storage, the network region will match the vault. Other settings, including Address Range and Name, will be available for configuration.
The last requirement for preparing infrastructure is to configure a replication policy. Complete the following steps to create a replication policy:
Click Create And Associate at the top of the Replication Policy blade. Enter the following information:
■ Name The name of the replication policy.
■ Source Type This should be prepopulated based on previous settings.
■ Target Type This should be prepopulated based on previous settings.
■ Copy Frequency Enter the replication frequency for subsequent copies to be captured.
■ Recovery Point Retention In Hours How much retention is needed for this server.
■ App Consistent Snapshot Frequency In Hours How often an app-consistent snapshot will be captured.
■ Initial Replication Start Time Enter a time for the initial replication to begin.
■ Associated Hyper-V Site Filled in based on previous settings.
Click OK to create the policy, and Azure builds and associates these settings with the specified on-premises environment.
Replicate data to Azure
After the completion of the on-premises settings, you return to the Site Recovery blade to continue configuration.
To enable replication, complete the following steps:
Select the source of the replication—On-Premises, in this case.
Select the Source location—the Hyper-V server configured within your environment.
Click OK to proceed to the target settings.
Select the Subscription to use with this replication.
Provide a post failover resource group, which is a resource group for the failed-over VM.
Choose the deployment model for the failed-over virtual machine.
Select or create the storage account to use for storing disks for the VMs being failed-over.
Select the option for when the Azure network should be configured: Now or Later.
If you selected Now, select or create the network for use post-failover.
Select the subnet for use by these VMs from the list of subnets available for the chosen network.
Click OK.
Select the virtual machines to failover as part of Azure Site Recovery.
Specify the following default properties and the properties for the selected virtual machines:
■ OS Type Whether the OS is Linux or Windows (available as default and per VM).
■ OS Disk Select the name of the OS Disk for the VM (available per VM).
■ Disks To Replicate Select the disks attached to the VM to replicate (available per VM).
Click OK.
Review the replication policy settings for this replication. They will match the replication policy settings configured in step 5 of the Prepare Infrastructure wizard, but you can select other policies if they exist.
Click OK.
Click Enable Replication.
With replication options configured, the last part of the configuration to complete is the recovery plan. To configure the recovery plan, use the following steps:
On the Site Recovery blade, select Step 2: Manage Recovery Plans and click the Add Recovery Plan button at the top of the screen.
Provide a name for the recovery plan and select the deployment model for the items to be recovered.
Select the items for a recovery plan. Here you will choose the VMs that will be included in recovery.
Click OK to finalize the recovery plan.
Once the items are protected and ready to failover to Azure, you can test the failover by selecting the Site Recovery vault resource and choosing Recovery Plans (Site Recovery) from the Manage section of the navigation pane.
Select the appropriate recovery plan for this failover. This overview screen shows the number of items in the recovery plan in both the source and target, as shown in Figure 2-35.

FIGURE 2-35 Site Recovery plan overview
To test the configuration, click the Test Failover button at the top of the Site Recovery Plan blade and complete the following steps:
Select the recovery point to use for the test.
Select the Azure Virtual Network for the replicated VM.
Click OK to start the test failover.
Once the failover completes, the VM should appear in the resource group that was specified for post-failover use, as shown in Figure 2-36.
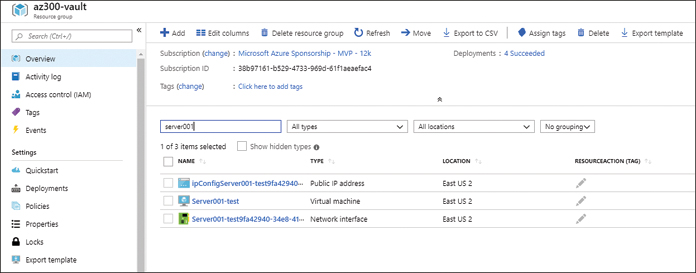
FIGURE 2-36 Resources after failover running in Azure
Migrate by using Azure Site Recovery
Once the test failover has completed, your VM is running in Azure, and you can see that things are as expected. When you’re happy with the result of the running VM, you can complete a cleanup of the test, which will delete any resources created as a part of the test failover. Select the item(s) in the Replicated Items list and choose the Cleanup Test Failover button shown previously at the top of the recovery plan blade (see Figure 2-35). When you are ready to migrate, use an actual failover by completing the following steps:
Select Replicated Items in the ASR Vault Protected Items section.
Choose the item to be replicated from the list.
Once the item has synchronized, click the Failover button to send the VM to Azure.
Following the failover of the VM to Azure, the on-premises environment is cleaned up as part of the completion of the migration to Azure. This ensures that the restore points for the migrated VM are cleaned up and that the source machine can be removed because it will be unprotected after these tasks have been completed.
You might need to tweak settings to optimize performance and ensure that remote management is configured once the system has landed (meaning it has been migrated to Azure), such as switching to managed disks—the disks used in a failover are standard disks.
There may might be some networking considerations after migrating the VM. External connectivity might require network security groups to ensure that RDP or SSH is active to allow connections. Remember that any firewall rules that were configured on-premises will not necessarily be completely configured post migration in Azure.
After verification that the migrated resource is operating as needed, the last step of the migration is to remove the on-premises resources. In terms of Azure, the resources are still in a failover state because the process was to fail them over with the intention of bringing them back to an on-premises location.
Although migrating to Azure using Site Recovery still works by using the cutover and cleanup process, Azure Migrate is a newer version of this tool that is used specifically for moving workloads (VMs, Databases, and so on) to Azure. Azure Migrate was covered earlier in this chapter.
Need more Review? Azure Disaster Recovery Resources
For additional material, see “Prepare Azure resources for disaster recovery of on-premises machines” at https://docs.microsoft.com/en-us/azure/site-recovery/tutorial-prepare-azure.
Skill 2.3: Implement application infrastructure
In the age of the cloud, even using servers is considered legacy technology in some instances because there are platform-based services that will run the provided code rather than deploying applications, functions, or other units of work to a server. The cloud provider—Azure, in this case—takes care of the workings under the hood, and the customer only needs to worry about the code to be executed.
There are more than a few resources in Azure that run without infrastructure—or serverless:
■ Azure Storage
■ Azure Functions
■ Azure Cosmos DB
■ Azure Active Directory
■ Azure Key Vault
These are just a few of the services that are available for serverless compute. Serverless resources are the managed services of Azure. They’re not quite Platform as a Service (PaaS), but they’re not all Software as a Service (SaaS), either. They’re somewhere in between.
Serverless objects are the serverless resources to be used in an architecture. These are the building blocks used in a solution, and there will be several types created, depending on the solution being presented.
Two of the most popular serverless technologies supported by Azure are logic apps and function apps. The details of configuring these are discussed in the text that follows.
A logic app is a serverless component that handles business logic and integrations between components—much like Microsoft Flow but with full customization and development available.
This skill covers:
Create a simple logic app
To build a simple logic app that watches for files in a OneDrive folder and sends an email when they’re found, complete the following steps:
Select Create A Resource from the Azure Navigation menu.
Type Logic Apps in the marketplace search and select the Logic App resource.
Click Create in the Logic App description.
Complete the Logic App Create form and click Create.
■ Name. Provide a name for the logic app.
■ Subscription. Choose the subscription where the resource should be created.
■ Resource Group. Select Create or Use Existing to choose the resource group where the logic app should be created. If you select Use Existing, choose the appropriate resource group from the drop-down menu.
■ Location. Select the region where the logic app should be created.
■ Log Analytics. Set Log Analytics to either On or Off for this resource.
Note Log Analytics Workspace is Required
To enable the log analytics feature for a logic app, ensure that the log analytics workspace that will collect the information exists beforehand.
Once a logic app resource exists, you can apply the code to get it to act on resources through predefined templates, custom templates, or using a blank app and adding code to perform actions for the application.
To add code to copy Azure storage blobs from one account to another, complete the following steps:
Open the resource group specified when you created the logic app resource.
Select the name of the logic app. The Logic App page opens so you can add templates, actions, and custom code to the logic app (see Figure 2-37).
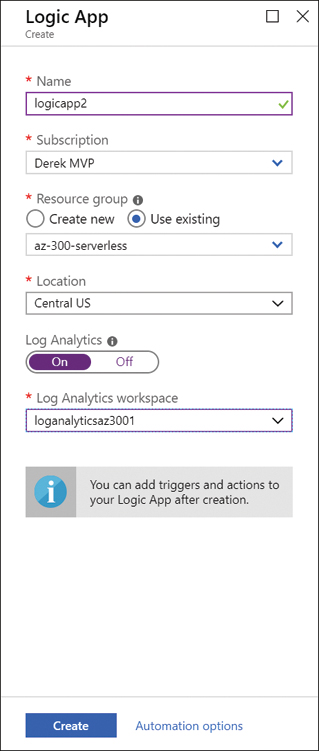
FIGURE 2-37 Creating a logic app resource
From the initial designer page, select the When A New File Is Created On OneDrive common trigger, as shown in Figure 2-38.
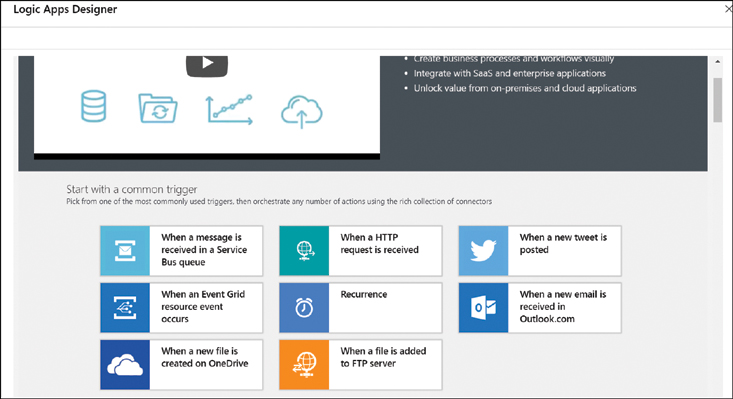
FIGURE 2-38 Logic Apps Designer with common templates
In this example, the logic app watches for new files in OneDrive and sends an email when a new file is landed. It is very simple, but it is designed to showcase the tools available to work with logic apps.
Note Connect to OneDrive
A connection to OneDrive will be needed to use this template; choosing to connect a OneDrive account will prompt you to log in to the account.
Specify the account credentials for OneDrive to be watched for files and click Continue.
Specify the folder to be watched and the interval for how often the folder should be checked by the logic app, as shown in Figure 2-39.

FIGURE 2-39 Specifying the OneDrive folder to be watched for new files
Choose a folder to monitor by clicking the folder icon at the end of the folder text box and choosing the root folder.
Set an Interval. The default is 3 minutes.
Click New Step to add an action to the logic app.
Select Office 365 Outlook Template.
Choose the Send An Email option.
Sign in to Office 365.
Specify the To, Subject, and Body of the email, as shown in Figure 2-40.
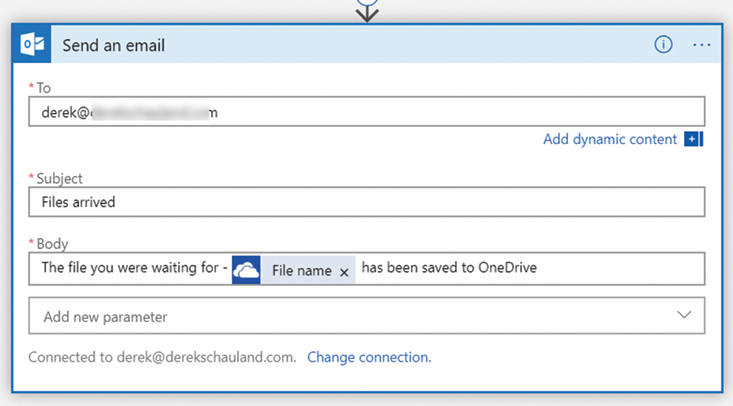
FIGURE 2-40 Configuring an action to send an email from a logic app
Click Save at the top of the Logic Apps Designer window to ensure the changes made to the logic app are not lost.
Click the Run button in Logic Apps Designer to make the app start watching for files.
Place a new file in the folder being watched by the logic app.
The Logic Apps Designer should show the progress of the app and that all steps for finding the file and sending the mail message have completed successfully.
Manage Azure Functions
Azure Functions allows the execution of code on demand, with no infrastructure to provision. Whereas logic apps provide integration between services, function apps run any piece of code on demand. How they’re triggered can be as versatile as the functions themselves.
As of this writing, Azure Functions support the following runtime environments:
■ .NET
■ JavaScript
■ Java
■ PowerShell (which is currently in preview)
To create a function app, complete the following steps:
Select the Create A Resource link in the Azure portal Navigation bar.
Type function apps in the marketplace search box and select Function Apps.
On the Function Apps overview hub, click the Create button.
Complete the Function App Create form shown in Figure 2-41:
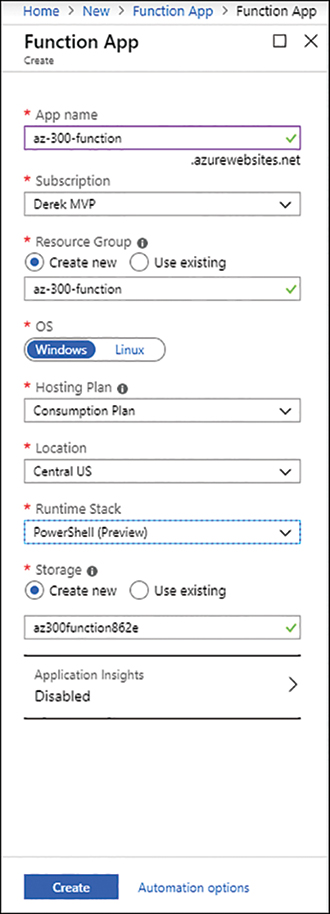
FIGURE 2-41 Creating a function
■ App Name. Enter the name of the function app.
■ Subscription. Enter the subscription that will house the resource.
■ Resource Group. Create or select the Resource Group that will contain this resource.
■ OS. Select the operating system that the function will use (Windows or Linux).
■ Hosting Plan. Select the pricing model used for the app: Consumption (pay as you go) or App Service (specifically sized app service).
Note New App Service Plan if Needed
If you select the App Service hosting plan, a prompt to select/create it will be added.
■ Location. Select the Azure region where the resource will be located.
■ Runtime Stack. Select the runtime environment for the function app.
■ Storage. Create or select the storage account that the function app will use.
■ Application Insights. Create or select an Application Insights resource for tracking usage and other statistics about this function app.
Click Create to build the function app.
In the Resource Group where you created the function app, select the function to view the settings and management options for it.
The Overview blade for the function app provides the URL, app service, and subscription information along with the status of the function (see Figure 2-42).
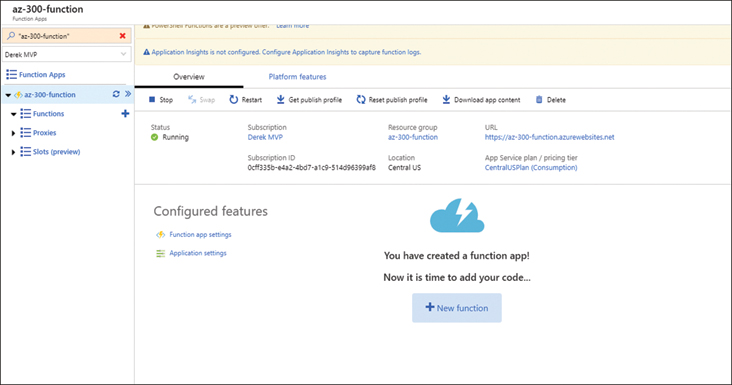
FIGURE 2-42 The Overview blade for an Azure function
Function apps are built to listen for events that kick off code execution. Some of the events that functions listen for are
■ HTTP Trigger
■ Timer Trigger
■ Azure Queue Storage
■ Azure Service Bus Queue trigger
■ Azure Service Bus Topic trigger
Important Multiple types of Authentication Possible
When configuring a function for the HTTP Trigger, you need to choose the Authorization level to determine whether an API key will be needed to allow execution. If another Azure service trigger is used, you might need an extension to allow the function to communicate with other Azure resources.
In addition to the Overview blade, there is a Platform Features blade, which shows the configuration items for the App Service plan and other parts of Azure’s serverless configuration for this function. Here, you configure things like networking, SSL, scaling, and custom domains, as shown in Figure 2-43.

FIGURE 2-43 The Platform Features blade for an Azure function app
Within the App Settings blade for function apps is the Kudu console, which is shown as Advanced Tools (Kudu). This console operates much like being logged into the system or app back end. Because this is a serverless application, there is no back end to be managed; this tool is used for troubleshooting a function app that isn’t performing as needed. Figure 2-44 shows the Kudu back end.

FIGURE 2-44 The Kudu troubleshooting console for a function app
Note Azure has a Custom Console for Troubleshooting
You can access the Kudu console by inserting .scm. into the URL of the Azure function. https://myfunction.azurewebsites.net would be https://myfunction.scm.azurewebsites.net.
Need more review? Azure Functions Creation and Troubleshooting
For additional information, see
■ “Using Kudu and deploying apps into Azure” at https://blogs.msdn.microsoft.com/uk_faculty_connection/2017/05/15/using-kudu-and-deploying-apps-into-azure/
■ “Azure Functions Documentation” at https://docs.microsoft.com/en-us/azure/azure-functions/
■ “Execute an Azure Function with triggers” at https://docs.microsoft.com/en-us/learn/modules/execute-azure-function-with-triggers
Manage Azure Event Grid
Event Grid is an event-consumption service that relies on publish/subscription (pub/sub) to pass information between services. Suppose I have an on-premises application that outputs log data and an Azure function that’s waiting to know what log data has been created by the on-premises application. The on-premises application would publish the log data to a topic in Azure Event Grid. The Azure function app would subscribe to the topic to be notified as the information lands in Event Grid.
The goal of Event Grid is to loosely couple services, allowing them to communicate, using an intermediate queue that can be checked for new data as necessary. The consumer app listens for the queue and is not connected to the publishing app directly.
To get started with Event Grid, complete the following steps:
Open the Subscriptions blade in the Azure portal.
Select Resource Providers under Settings.
Filter the list of providers by entering Event Grid in the Filter By Name box.
Click the Microsoft.EventGrid resource provider and then click Register at the top of the page.
Once the registration completes, you can begin using Event Grid by navigating to the Event Grid Topics services in the portal, as shown in Figure 2-45.
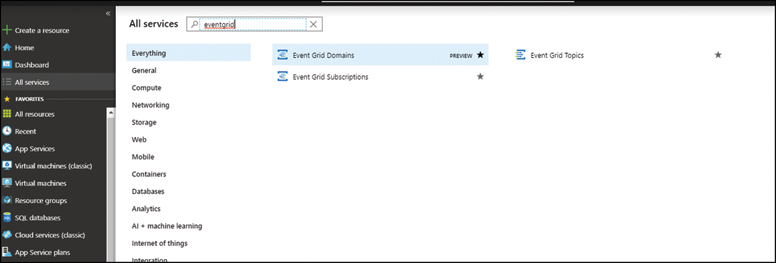
FIGURE 2-45 Event Grid topics
Once a subscription has topics created, each topic will have specific properties related to the subscription. Click the event grid subscription from the list. From the Topic Overview blade, the URL for the topic endpoint, the status, and the general subscription information are available. You can manage the following items from this point:
■ Access Control. The Azure IAM/Role-Based configuration for which Azure users can read, edit, and update the topic. Access Control is discussed later in this chapter.
■ Access Keys. Security keys used to authenticate applications publishing events to this topic.
Ensuring that the applications pushing information to this topic have a key to do so will ensure that the amount of noise sent to the topic is controlled. If the application sends an overly chatty amount of information, the noise might not be reduced.
Important Security Item
To ensure the access keys for a topic are secured and kept safe, consider placing them in a Key Vault as secrets. This way, the application that needs them can refer to the secret endpoint and avoid storing the application keys for the topic in any code. This prevents the keys from being visible in plain text and only makes them available to the application at runtime.
Once a topic has been created and is collecting information, consuming services that require this information need to subscribe to these events and an endpoint for the subscription. In this case, an endpoint is an app service with a URL that the subscriber services will access to interact with the topic.
Event subscriptions can collect any and all information sent to a topic, or they can be filtered in the following ways:
■ By Subject. Allows filtering by the subject of messages sent to the topic—for example, only messages with
.jpgimages in them■ Advanced Filter. A key-value pair one level deep
Note Advanced Filter Limitations
These are limited to five advanced filters per subscription.
In addition to filtering information to collect for a subscription, when you select the Additional Features tab when you’re creating an event subscription, additional configurable features are shown, including the following:
■ Max Event Delivery Attempts How many retries there will be.
■ Event Time To Live. The number of days, hours, minutes, and seconds the event will be retried.
■ Dead-Lettering. Select whether the messages that cannot be delivered should be placed in storage.
■ Event Subscription Expiration Time. When the subscription will automatically expire.
■ Labels. Any labels that might help identify the subscription.
Need more review? Working with Event Grid
Check out the articles at the following URLs for additional information:
■ “Concepts in Azure Event Grid” at https://docs.microsoft.com/en-us/azure/event-grid/concepts
■ “Understand event filtering for Event Grid subscriptions” at https://docs.microsoft.com/en-us/azure/event-grid/event-filtering
■ “Event sources in Azure Event Grid” at https://docs.microsoft.com/en-us/azure/event-grid/event-sources
Manage Azure Service Bus
Azure Service Bus is a multi-tenant asynchronous messaging service that can operate with first-in first-out (FIFO) queuing or publish/subscribe information exchange. Using queues, the message bus service will exchange messages with one partner service. If you are using the publish/subscribe (pub/sub) model, the sender can push information to any number of subscribed services.
A service bus namespace has several properties and options that can be managed for each instance:
■ Shared Access Policies. The keys and connection strings available for accessing the resource. The level of permissions, manage, send, and listen are configured here because they’re part of the connection string.
■ Scale. The service tier used by the messaging service: Basic or Standard.
Note A Note about SKU
A namespace can be configured with a premium SKU, which allows geo recovery in the event of a disaster in the region where the service bus exists. Selection of a premium SKU is available only at creation time.
■ Geo-Recovery. Disaster recovery settings that are available with a Premium namespace.
■ Export Template. An ARM automation template for the service bus resource.
■ Queues. The messaging queues used by the service bus.
Each configured queue displays the queue URL, max size, and current counts about the following message types:
■ Active Messages. Messages currently in the queue.
■ Scheduled Messages. These messages are sent to the queue by scheduled jobs or on a general schedule.
■ Dead-Letter Messages. Dead-letter messages are undeliverable to any receiver.
■ Transfer Messages. Messages that are pending transfer to another queue.
■ Transfer Dead-Letter Messages. Messages that failed to transfer to another queue.
In addition to viewing the number of messages in the queue, you can create shared access permissions for the queue. This will allow manage, send, and listen permissions to be assigned. Also, this provides a connection string leveraging the assigned permissions that the listener application will use as the endpoint when collecting information from the queue.
In the Overview blade of the selected message queue, the following settings can be updated:
■ Message Time to Live
■ Message Lock Duration
■ Duplicate Detection History
■ Max Delivery Count
■ Max Size
■ Dead Lettering
■ Forward Messages To
The settings for a message queue are similar to those discussed earlier in the “Manage Azure Event Grid” section because they serve a similar purpose for the configured queues.
Need more review? Service Bus Messaging
Check out the articles at the following URLs for additional information:
■ “What is Azure Service Bus?” at https://docs.microsoft.com/en-us/azure/service-bus-messaging/service-bus-messaging-overview
■ “Choose between Azure messaging services—Event Grid, Event Hubs, and Service Bus” at https://docs.microsoft.com/en-us/azure/event-grid/compare-messaging-services?toc=https%3A%2F%2Fdocs.microsoft.com%2Fen-us%2Fazure%2Fservice-bus-messaging%2FTOC.json&bc=https%3A%2F%2Fdocs.microsoft.com%2Fen-us%2Fazure%2Fbread%2Ftoc.json
■ “Choose a messaging model in Azure to loosely connect your services” at https://docs.microsoft.com/en-us/learn/modules/choose-a-messaging-model-in-azure-to-connect-your-services
Skill 2.4: Manage security for applications
Azure Active Directory is available for registering applications and users for access to services and applications. This section discusses how applications and other Azure resources are registered with Azure Active Directory and how confidential values are managed using a service called Azure Key Vault.
This skill covers:
Using Azure Key Vault to store and manage application secrets
Applications need access to resources outside of what is being developed. Placing credentials, API keys, or other potentially sensitive information in code is something that might get developers hauled into meetings with InfoSec—which could spell trouble. Azure has a service that can solve this issue—Key Vault.
Azure Key Vault is an encrypted storage service specifically created for storing the following items:
■ Keys
■ Secrets
■ Certificates
All these items are encrypted at rest and are only visible to the user accounts, service principals (registered applications), or managed identities that are granted access to use them.
Key Vault, like all other resources, can have access controlled by IAM, which in this case, means the user or group’s ability to see or access the Key Vault resource. This does not apply to the items contained within the Key Vault. For access to secrets, keys, and certificates, the user or application will need to be identified in an access policy specific to the particular Key Vault containing these items.
To create the Key Vault resource, follow these steps:
Log in to the Azure portal https://portal.azure.com.
Select the Create A Resource button from the home screen.
Search for Key Vault in the New Resources blade.
On the Key Vault marketplace blade, click Create.
Select the Subscription that will house the Key Vault resource.
Select a Resource Group (or create one) that will be used to manage the Key Vault resource.
Enter a Name for the Key Vault resource.
Select a Region for the Key Vault resource.
Choose a Pricing Tier:
■ Standard. Software-based only key-management solution
■ Premium. Software and Hardware Security Module (HSM)–backed key management solution
Note When to Choose Premium
Only choose premium Key Vault pricing if you require HSM-backed data. This is the only difference in the two tiers; all other pricing is the same. If you need the HSM features, the price does increase a bit.
Enable Soft Delete.
Determine the retention period if Soft Delete is enabled.
Enable Purge Protection.
Click Next to create an access policy.
Soft Delete marks a value or key vault for deletion after a configured number of days before removing the stored items permanently. The number of days is determined by the retention period chosen when the Key Vault is created.
Note One Time Only
When a retention value is set, it cannot be changed or removed from the Key Vault. The same goes for Purge Protection; once set to true, items kept in the Key Vault are held for 90 days before being permanently deleted.
An access policy manages the security for the items contained within a Key Vault. One Key Vault can have multiple access policies.
Create an access policy by completing the following steps while referring to Figures 2-46 and 2-47.
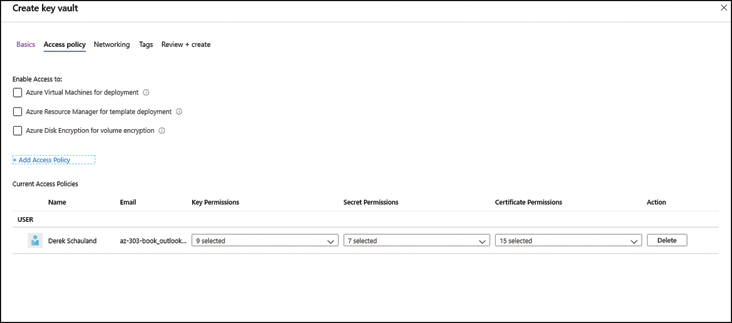
FIGURE 2-46 Create an Azure Key Vault access policy

FIGURE 2-47 Configure key, secret, and certificate settings with an Azure Key Vault access policy
From the Key Vault resource blade in the Azure portal, select Access Policy from the navigation list.
Specify whether this Key Vault can be used for VM deployment.
Specify whether this Key Vault can be used by deployment templates during deployment—think administrative credential storage.
Specify whether this Key Vault should be used for Azure Disk Encryption information.
Click the Add Access Policy link.
If desired, select a template for configuration of an access policy.
Select permissions for the key values stored in this key vault:
Key Management Operations
■ Get. Retrieve key values
■ List. List keys contained in Key Vault
■ Update. Modify existing key values
■ Create. Create new keys
■ Import. Import key values
■ Delete. Remove keys
■ Recover. Recover deleted keys
■ Backup. Backup keys
■ Restore. Restore key backups
Cryptographic Operations
■ Decrypt. Decrypt cryptographically stored data
■ Encrypt. Encrypt data to store
■ Unwrap Key. Decrypt symmetric key data
■ Wrap Key. Encrypt symmetric key data
■ Verify. Provides verification of key data stored in Key Vault
■ Sign. Uses key data stored to sign applications and resources
Privileged Key Operations
■ Purge. Permanently remove key data from Key Vault
Select permissions to secrets stored in this Key Vault:
■ Get. Allows access to secret values
■ List. Allows access to see what secrets are stored in Key Vault
■ Set. Write a secret and its value to Key Vault
■ Delete. Remove a secret from Key Vault
■ Recover. Bring a removed secret back to Key Vault
■ Backup. Capture an external copy of a secret stored in Key Vault
■ Restore. Import an external copy of a secret to Key Vault
■ Purge. Permanently remove a secret from Key Vault after the configured retention period
Select permissions for certificates stored in Key Vault:
■ Get. Allow access to certificate values
■ List. Allow access to see which certificates are stored in Key Vault
■ Update. Allow existing certificate values stored to be updated
■ Create. Add new certificates to Key Vault from the portal
■ Import. Import existing certificates to Key Vault
■ Delete. Remove a certificate from Key Vault
■ Recover. Bring a deleted certificate back into Key Vault
■ Backup. Create an external file backup of a certificate
■ Restore. Create a certificate value in Key Vault from an external backup
■ Manage Contacts. Add or edit contacts associated with a stored certificate
■ Manage Certificate Authorities. Add, edit, or remove certificate authorities for certificates stored in the Key Vault
■ Get Certificate Authorities. Review existing certificate authority information in Key Vault
■ List Certificate Authorities. List certificate authorities stored in Key Vault
■ Set Certificate Authorities. Update/create certificate authority data stored in Key Vault
■ Delete Certificate Authorities. Remove certificate authority data stored in Key Vault
■ Purge. Permanently remove certificate data stored in Key Vault per the retention days set for they Key Vault resource
Select the principal for the access policy—the user, group, or application to which this policy applies.
■ Search for the user or group needed and click Select.
Specify any authorized applications that can access this Key Vault via this access policy. (This option is usually locked and unavailable for selection.)
Click Add to create the policy.
Note Some Things are Better Together
When you are looking to assign read permissions, consider keeping get and list access together within an access policy. It is easier to select the correct secret endpoint when all secrets can be listed.
Note About Key Vaults
A Key Vault is a great way to store sensitive information, but it has a downside as well. When you configure an access policy, that access is assigned to the key vault. It is not specific to an individual record within the Key Vault. If you can see one secret, you can see them all—something to keep in mind when using a Key Vault.
Once the permissions are assigned via an access policy, do not forget to click the Save button inside the resource to write the policies to the Key Vault.
Accessing an endpoint
Once a value is stored within a Key Vault, it gets assigned an HTTPS endpoint to allow access. If the entity accessing the endpoint is listed on an access policy with permission to use the value, the value is used in place of the endpoint. A Key Vault is a great way to keep sensitive information only accessible to the applications or users that need it. It lives within Azure and does not require third-party services or subscriptions to manage this information for an organization.
Using Azure Active Directory Managed Identity
Azure Active Directory is a great way to authenticate user accounts and provide services like single sign-on for applications. Managed Identity extends these features to other Azure resources, including but not limited to
■ App services
■ Function apps
■ Virtual machines
The above examples are services that can have a managed identity assigned to them that allows interaction with other Azure services. Azure allows two types of managed identities: system-assigned and user-assigned:
■ System-assigned managed identity. This type of managed identity is enabled on a service instance in Azure, and the identity for the service is created in Azure Active Directory and is trusted by the subscription containing the instance of the service. The service instance credential lifecycle is directly tied to the lifecycle of the service instance with no additional management of the assigned credentials required.
■ User-assigned managed identity. This type of managed identity is created as an independent resource within Azure and assigned a service principal within Azure Active Directory. Once the service principal is created, it can be assigned to one or more applications or Azure instances. The lifecycle of a user-assigned identity is managed independently of the resource(s) to which it is assigned.
Unless your organization has specific requirements for managing these identities, system-assigned managed identities reduce the management overhead and provide the same level of security and access as user-assigned managed identities.
For example, a key vault can hold sensitive information and allow other resources to access that information. If, for example, my application needs to connect to a database, it will require a connection string to do so. The connection string likely contains a user ID and Password or key that provides the database a way to verify that the application requesting access should be allowed to connect. Because the connection string is a sensitive piece of information, storing it in Key Vault makes sense because it will be encrypted and will only be accessible to those who have access policies assigned.
As an administrator of the Key Vault, the user Derek would be able to add the connection string as a secret and view it once added. However, Derek is not the application, so if the application called an endpoint for the connection string, the connection would fail or return an error about an invalid identity.
Assigning a managed identity to the application provides a registration within Azure Active Directory and returns the following credentials for the application:
■ Client ID. This is an identifier within Azure Active Directory for the application and its service principal (managed identity).
■ Principal ID. This is the
objectIDof the application within Azure Active Directory for the application.■ Azure Instance Metadata Service. This is a rest endpoint accessible only from within Azure Resource Manager VM resources on a well-known and non-routable IP address (169.254.169.254).
Once a managed identity is assigned, the application can be assigned role-based access to resources in Azure, and just like the user account, Derek can be assigned these permissions. In addition, in the case of a Key Vault, the application can have an access policy assigned to it. This will grant permissions set in the access policy to all the items within the Key Vault.
With Managed Identity enabled for the application and with an access policy configured, the application code can reference the connection string for the needed database(s) simply by calling the secret endpoint.
To enable managed identity for an Azure App Service, follow these steps:
Log in to the Azure portal.
Browse to the app service resource to which the managed identity will be assigned.
In the navigation pane shown in Figure 2-48, select Identity from the Settings section.
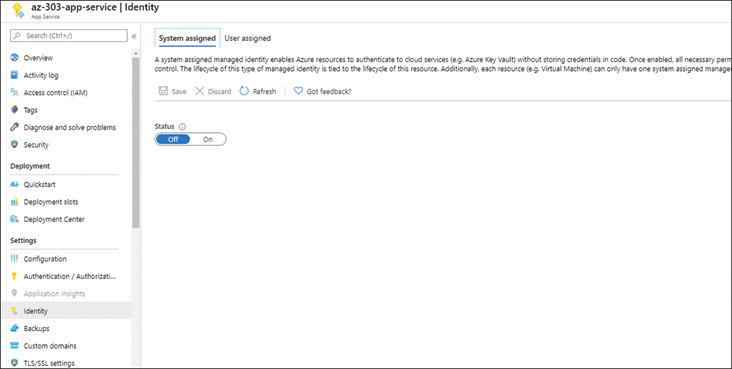
FIGURE 2-48 Managed Identity for App Service
On the System Assigned tab, toggle the Status to On and click Save to use a system-assigned identity.
To use a user-assigned identity, select the User Assigned tab and click Add.
Select the user-assigned managed identity you want to assign to this application.
Applications and Azure Manage Credentials
Once the managed identity is assigned, you do not need to know or manage the client secret (password). This password is completely managed by Azure and the application.
For services that support enabling the managed identity option, managed identity creates an application registration for the resource where the feature is enabled; at least in part, it does this by creating a service principal within Azure Active Directory. Application registrations are covered in detail in the next section, “Azure Active Directory application registration.”
Azure Active Directory application registration
Like Managed Identities, application registrations in Azure Active Directory are a method used to identify applications to allow access and roles to be assigned to them. An application or app registration can be created for applications that are created by your organization or for third-party applications that might be leveraging single sign-on capabilities provided by Azure Active Directory.
To create an application registration in Azure Active Directory using the Azure portal, complete the following steps and refer to Figure 2-49:
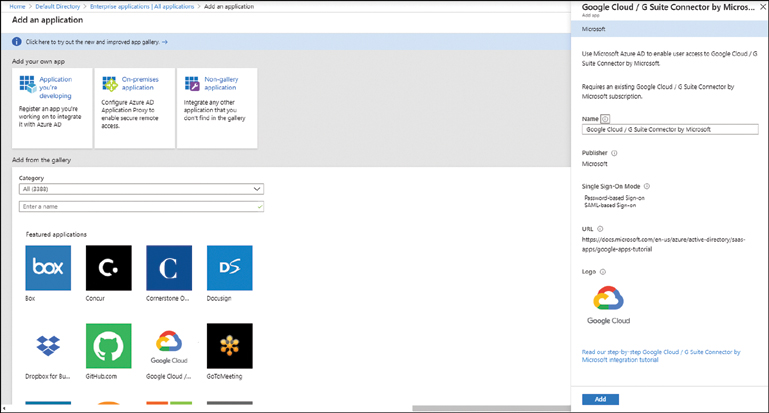
FIGURE 2-49 Registering an enterprise/gallery application
From the Azure portal navigation menu, select Azure Active Directory.
Ensure the appropriate tenant of Azure Active Directory is selected. Many organizations only have one tenant, but more than one Azure Active Directory tenant is allowed.
Select Enterprise Applications.
Select New Application.
Choose the application type to register:
■ An application you are developing.
■ An on-premises application via application proxy.
■ A non-gallery application, which is any other application not in the gallery.
■ A gallery (marketplace) application. As of this writing, there are 3,388 applications in the gallery.
For a gallery application, select or search for the application and click the gallery to be registered.
Enter a name and other details for the registration, if required, and click Add.
For an application, your organization is working on, complete the following steps and refer to Figure 2-50:

FIGURE 2-50 Registering an internally developed application
From the Azure Active Directory navigation menu, select App Registrations.
Click Register An Application.
Supply a Name for the application.
Select the context in which the application will be available:
■ Accounts In This Organizational Directory Only (Default Directory Only - Single Tenant)
■ Accounts In Any Organizational Directory (Any Azure AD Directory - Multitenant)
■ Accounts In Any Organizational Directory (Any Azure AD Directory - Multitenant And Personal Microsoft Accounts, such as Skype or Xbox)
Enter an optional Redirect URI.
Click Register.
The tenancy of the application determines
■ If only your organization can use the application registration.
■ If any other Azure Active Directory tenant can use the application registration.
■ If in addition to any Azure Active Directory tenant, any personal Microsoft account services (Xbox or Skype) can access the application.
The type of application being registered and/or company policy might dictate this selection.
The redirect URI is optional, and can be filled in as https://localhost if there is not a redirect URI required by the application. This URI determines where the authentication response will be sent.
To create an application registration in Azure Active Directory using PowerShell, execute the following code:
Connect-AzureAD -tenantid <your azure ad tenant id>
$applicationName = "my latest application"
$AppURI = "https://myapp.azurewebsites.net"

If(!($myapp = get-azureadapplication -filter "DisplayName -eq '$($applicationName)'"))
{
        $myapp = new-azureadapplication -displayname $applicationName -identifierUris
$appURI
}
You will need to have the Azure AD module installed to register an application via PowerShell.
This code specifies the name and application URL for the app and then checks Azure AD to ensure that the application being registered is not already registered in the tenant. If the application is not found, it is registered in Azure AD.
Creating application secrets for registered applications
Now that the next big application has been registered in Azure Active Directory, it has an Application (client) ID just like the previously mentioned Application ID for managed identities and can be found in Azure AD. It does not have a client secret configured yet because the manual process of application registration requires the admin to create the secret as well.
Note Two IDs one use
The Application ID and Client ID for registered applications are the same; however, Microsoft has as generally had two nomenclatures for this value.
To add a client secret for your app registration, complete the following steps:
Within Azure Active Directory, select App Registrations.
Search for and select your registered application.
In the navigation menu, select Certificates And Secrets.
Click New Client Secret to create a secret value for this application and set the expiration info.
Enter a description for the secret and select an expiration.
Click Add.
Note Secrets are Secret
When adding a new secret, the value is shown in the portal only while you are on the screen where the secret first displays. It should disappear if you navigate away from this screen and cannot be retrieved once dismissed. Make sure you copy the value somewhere for safe keeping before leaving the screen. A Key Vault is a great place to store these values.
If you are adding a client secret via PowerShell, you can choose any expiration date you like; for example, you could set this to 5 years. You can also collect the client secret from PowerShell for an existing application registration after the fact. To add a client secret in PowerShell, execute the following code:
$application = get-azureadapplication
$secretStartDate = get-date
$secretExpireDate = (get-date).addyears(5)
$aadClientSecret = new-azureadapplicationpasswordcredential -objectid $application.
objectid -customkeyidentifier "App Secret" -startdate $secretStartDate -enddate
$secretEndDate
Note Review Powershell before Copying it from the Internet
Make sure that you understand how this PowerShell works and have examined it. Also, the variable values listed here will not generally work unless you edit them to be used within your environment.
Need more review? More Information about Azure Application Security
Check out the articles at the following URLs for additional information:
■ “Azure Key Vault basic concepts” at https://docs.microsoft.com/en-us/azure/key-vault/basic-concepts
■ “What are managed identities for Azure resources?” at https://docs.microsoft.com/en-us/azure/active-directory/managed-identities-azure-resources/overview
■ “Registering your application in Azure AD” at https://docs.microsoft.com/en-us/skype-sdk/trusted-application-api/docs/registrationinazureactivedirectory
Skill 2.5: Implement load balancing and network security
Azure has a couple of different options for load balancing: the Azure load balancer that operates at the transport layer of the networking stack and the Application gateway that adds to the load balancer at layer 4 and adds layer 7 (HTTP) load balancing on top of this configuration using additional rules. With some recent additions to the security space, there are additional resources being added constantly to improve the security posture of customers using Azure services. The new services include
■ Azure Firewall
■ Azure Front Door
■ Azure Traffic Manager
■ Network and Application Security Groups
■ Azure Bastion
This skill covers how to:
Configure Application Gateway and load balancing rules
An Application Gateway has the following settings that you can configure to tune the resource to meet the needs of an organization:
■ Configuration. Settings for updating the tier, SKU, and instance count; indicate whether HTTP/2 is enabled.
■ Web Application Firewall. Allows adjustment of the firewall tier for the device (Standard or WAF) and whether the firewall settings for the gateway are enabled or disabled.
■ Enabling the WAF on a gateway defaults the resource itself to a Medium tier by default.
■ If Firewall Status is enabled, the gateway evaluates all traffic except the items excluded in a defined list (see Figure 2-51). The firewall/WAF settings allow the gateway to be configured for detection only (logging) or prevention.
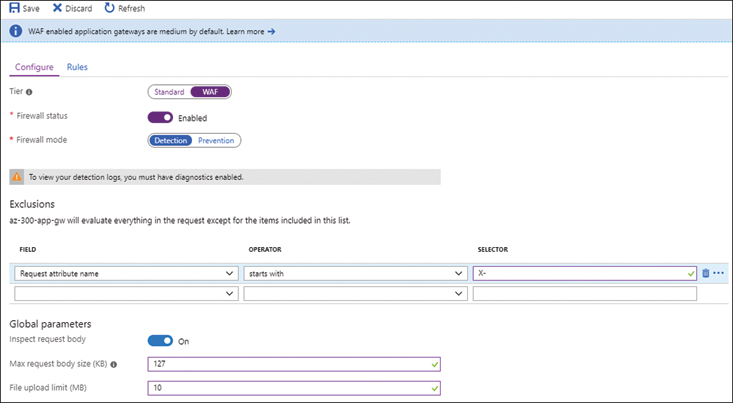
FIGURE 2-51 WAF settings in an application gateway
Note Auditing at the Firewall Requires Diagnostics
When using the Firewall Settings in WAF mode, enabling detection mode requires diagnostics to be enabled to review the logged settings.
■ Back-end Pools The nodes or applications to which the application gateway will send traffic.
Note Anything can be a Back-End Pool
The pools can be added by FQDN or IP address, Virtual Machine, VMSS, and App Services. For target nodes not hosted in Azure, the FQDN/IP Address method allows external back-end services.
■ HTTP Settings. These are the port settings for the back-end pools. If you configured the gateway with HTTPS and certificates during set up, this defaults to 443; otherwise, it starts with port 80. Other HTTP-related settings managed here are as follows:
■ Cookie-Based Affinity (sticky sessions)
■ Connection draining, which ensures sessions in flight at the time a back-end service is removed will be allowed to complete
■ Override paths for back-end services, which allow specified directories or services to be rerouted as they pass through the gateway
■ Listeners. These determine which IP addresses are used for the front-end services managed by this gateway. Traffic hits the front end of the gateway and is processed by configured rules as it moves through the application gateway. Listeners are configured for IP address and port parings.
■ Rules. The rules for the gateway connect listeners to back-end pools, allowing the gateway to route traffic landing on a specific listener to a back-end pool using the specified HTTP settings.
Even though each of these items is configured separately in the application gateway, rules bring these items together to ensure traffic is routed as expected for an app service.
Health Probes are used to ensure the services managed by the gateway are online. If there are issues with one of the configured back-end services, the application gateway removes the resource from the back end of the gateway. This ensures that the back-end service being used by the gateway will be less likely to display errored pages for resources that may be down.
Important At Least One Back-End Service is Needed
If all back-end services are unhealthy, the application gateway is unable to route around the issue.
The interval at which health probes are evaluated, the timeout period, and retry threshold can all be configured to suit the needs of the back-end applications, as shown in Figure 2-52.
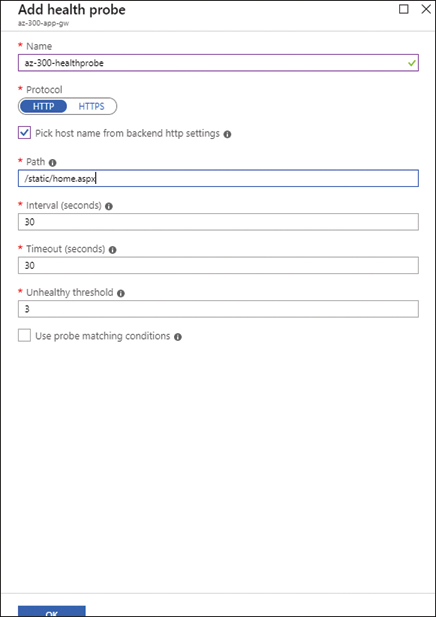
FIGURE 2-52 Configuring a new health probe
![]() Exam Tip Multiple Options Available for Load Balancing
Exam Tip Multiple Options Available for Load Balancing
Azure supports different types of load balancing services that can be used in concert with one another. Be sure to understand when to use an application gateway and when to use a network load balancer.
Implement front-end IP configurations
An application gateway defaults to a front-end configuration using a public IP address, but you can configure it to use a private IP address for the front end. This might be useful in a multitiered application configuration. Using one application gateway to direct traffic from the Internet to an “internal” gateway that has a private front-end configuration might be a useful configuration in some scenarios.
Configuring virtual IP addresses (VIPs) happens in the settings for the application gateway in the Front-End IP Configuration section, which is shown in Figure 2-53.

FIGURE 2-53 The front-end configuration for an application gateway
When you set the front-end configuration, the default public settings include a configured listener. Each configuration needs a listener to allow it to properly distribute traffic to back-end resources.
Setting up private front-end configurations requires a name and private IP address to be specified if the original header will be modified to a known IP value.
Note Update Time may be Required
When saving settings to some areas of the application gateway resource, the time to update may take longer than expected.
Manage application load balancing
The application gateway handles load balancing at layer 7 (the application layer) of the OSI model. This means it handles load balancing techniques using the following methods:
■ Cookie-Based Affinity. This will always route traffic during a session to the same back-end application where the session began. The cookie-based method works well if there is state-based information that needs to be maintained throughout a session. For client computers to leverage this load balancing type, the browser used needs to allow cookies.
Cookie-Based Affinity management happens in the HTTP Settings/Backend HTTP Settings blade of the resource (see Figure 2-54).
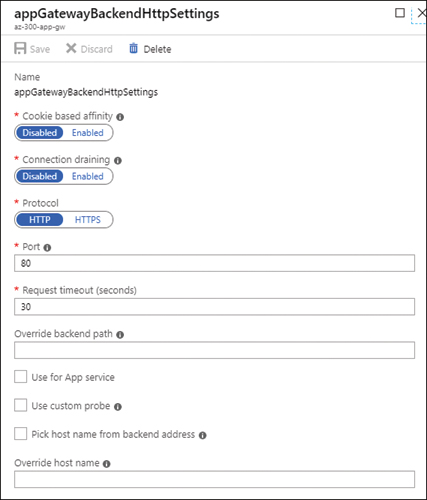
FIGURE 2-54 Configuring HTTP settings
■ Connection Draining. Enable this setting to ensure that any connections that are being routed to a resource will be completed before the resource is removed from a back-end pool. In addition, enter the number of seconds to wait for the connection to timeout.
■ Protocol. Set HTTP or HTTPS here. If you choose HTTPS, you need to upload a certificate to the application gateway.
URL Path-Based Routing
URL Path-Based Routing uses a configuration called a URL Path Map to control which inbound requests reaching the gateway are sent to which back-end resources. There are a few components within the Application Gateway needed to take advantage of URL Path-Based Routing:
■ URL Path Map. The mapping of requests to back-end resources
■ Backend Listener. Specifies the front-end IP configuration and port that the routing rules will be watching
■ Routing Rules. The rules associate the URL Path Map and the listener to ensure that specific requests are routed to the correct back-end pool.
PowerShell is necessary to add the configurations to an application gateway for the settings needed for URL Path-Based Routing.
![]() Exam Tip
Exam Tip
Leveraging the examples to help create a PowerShell script that works in your environment is advisable. When reviewing code supplied by others, be sure to look over it in an editor that supports the language—like Visual Studio Code—to help you understand what the code does before you run it in your environment.
A useable example of the following code is at https://docs.microsoft.com/en-us/azure/application-gateway/tutorial-url-route-powershell:
#Configure Images and Video backend pools
$gateway = Get-AzApplicationGateway '
  -ResourceGroupName Az-300-RG-Gateway'
  -Name AppGateway
Add-AzApplicationGatewayBackendAddressPool '
  -ApplicationGateway $gateway '
  -Name imagesPool
Add-AzApplicationGatewayBackendAddressPool '
  -ApplicationGateway $gateway '
  -Name videoPool

Add-AzApplicationGatewayFrontendPort '
  -ApplicationGateway $gateway '
  -Name InboundBEPort '
  -Port 8080
$backendPort = Get-AzApplicationGatewayFrontendPort '
  -ApplicationGateway $gateway '
  -Name bport
#configure a backend Listener
$fipconfig = Get-AzApplicationGatewayFrontendIPConfig '
  -ApplicationGateway $gateway

Add-AzApplicationGatewayHttpListener '
  -ApplicationGateway $gateway '
  -Name backendListener '
  -Protocol Http '
  -FrontendIPConfiguration $fipconfig '
  -FrontendPort $backendPort
#Configure the URL Mapping
$poolSettings = Get-AzApplicationGatewayBackendHttpSettings '
    -ApplicationGateway $gateway '
    -Name myPoolSettings

$imagePool = Get-AzApplicationGatewayBackendAddressPool '
    -ApplicationGateway $gateway '
    -Name imagesBackendPool

$videoPool = Get-AzApplicationGatewayBackendAddressPool '
    -ApplicationGateway $gateway '
    -Name videoBackendPool

$defaultPool = Get-AzApplicationGatewayBackendAddressPool '
    -ApplicationGateway $gateway
    -Name appGatewayBackendPool

$imagePathRule = New-AzApplicationGatewayPathRuleConfig '
    -Name imagePathRule '
    -Paths “/images/*” '
    -BackendAddressPool $imagePool '
    -BackendHttpSettings $poolSettings

$videoPathRule = New-AzApplicationGatewayPathRuleConfig '
    -Name videoPathRule '
    -Paths “/video/*” '
    -BackendAddressPool $videoPool '
    -BackendHttpSettings $poolSettings

Add-AzApplicationGatewayUrlPathMapConfig '
    -ApplicationGateway $gateway '
    -Name urlpathmap '
    -PathRules $imagePathRule, $videoPathRule '
    -DefaultBackendAddressPool $defaultPool '
    -DefaultBackendHttpSettings $poolSettings

#Add the Routing Rule(s)
$backendlistener = Get-AzApplicationGatewayHttpListener '
    -ApplicationGateway $gateway '
    -Name backendListener

$urlPathMap = Get-AzApplicationGatewayUrlPathMapConfig '
    -ApplicationGateway $gateway '
    -Name urlpathmap

Add-AzApplicationGatewayRequestRoutingRule '
    -ApplicationGateway $gateway '
    -Name rule2 '
    -RuleType PathBasedRouting '
    -HttpListener $backendlistener '
    -UrlPathMap $urlPathMap

#Update the Application gateway
Set-AzApplicationGateway -ApplicationGateway $gateway
Important Be Patient when Updating Application Gateway
An update to the application gateway can take up to 20 minutes.
![]() Exam Tip Spend some Time with the CLI
Exam Tip Spend some Time with the CLI
Remember to work with the Azure Command-Line Interface (CLI) to understand how the commands work and that they differ from PowerShell. Although PowerShell can handle the command-line work in Azure, there may be some significant Azure CLI items on the exam, and it’s good to know your way around.
Once the URL map is configured and applied to the gateway, traffic is routed to the example pools (images and videos) as it arrives. This is not traditional load balancing where traffic would be routed based on load of the device; a certain percentage of traffic goes to pool one and the rest to pool two. In this case, the content type is helping to drive the incoming traffic.
Implement Azure Load Balancer
Application Gateway includes layer 7 (HTTP or HTTPS) load-balancing capabilities to ensure increased performance of websites or web apps throughout an organization’s Azure environment(s). There will be times when requirements come up for a more traditional, layer 4 load balancing solution and Azure Load Balancer has this covered.
Note Layer 4 and Layer 7
The layers mentioned above call out positioning in the OSI networking model. Layer 7 is the top layer and works at the application and browser level. Layer 4 is a middle layer that deals with communication transport—the TCP area. A discussion of what these layers bring is beyond the scope of this text. More info can be found at https://osi-model.com.
The Azure Load Balancer works to handle TCP and other protocol-based communication and ensure requests are handled appropriately.
To configure Azure Load Balancer, complete the following steps (shown in Figure 2-55):

FIGURE 2-55 Creating an Azure Load Balancer
Log in to the Azure portal.
Click Create A Resource and search for Load Balancer to begin creating the load balancer.
Click Create.
Supply the following items to create a load balancer:
■ Subscription. Select the Azure subscription to use with this resource.
■ Resource Group. Select or create the resource group for the load balancer.
■ Name. Enter a name for the resource that meets organizational naming standards.
■ Region. Select the region for the load balancer.
■ Type. Select the type:
■ Internal. Used to provide connectivity for VMs within your virtual network to the front-end VMS as needed.
■ Public. Provides outbound connections for the virtual machines on a virtual network via address translation.
■ SKU. Select the pricing SKU for the load balancer:
■ Basic. Offered at no charge, but it is limited and has no SLA.
■ Standard. Used for large pools of targets or for additional functionality.
■ Public IP Address. Select an existing or create a new public IP.
■ Public IP Address Name. Name the public IP address resource.
■ Assignment. Select the assignment type for the public IP.
■ Dynamic. Assigned when the load balancer is online and released if the load balancer goes away.
■ Static. Assigned permanently for use within Azure.
■ Add a Public Address. Choose to enable IPv6 if needed.
Click Next to add tags.
Click Review + Create to review settings and build the load balancer.
![]() Exam Tip Tags and Organization
Exam Tip Tags and Organization
Using tags is a good way to ensure certain information is captured for resources being created. Azure keeps some information in the Activity Log, but this data gets purged regularly. If the information has been removed and you need to see who created a resource or the date the resource was added, you might be out of luck. This is where tags come in handy and can save much frustration with resources in Azure. There are other uses for them as well, but this one is a primary use we have found for tags.
Once the load balancer exists in Azure, it needs some configuration to get it working properly in your environment. Specifically, the following items need to be configured:
■ Frontend IP Configuration. The public IP address and external endpoint for the resource.
■ Health Probes. Method(s) to ensure the back end is healthy and online so the load balancer knows when to shift traffic.
■ Backend Pools. The resources being load balanced.
■ Rules. This expresses how traffic should be routed through the load balancer.
The front-end IP configuration is the easiest part of a simple load balancer. The IP was assigned during resource creation and requires no further changes to operate successfully. Additional IP addresses can be added to the load balancer if required by an organization.
Back-end pools are the resources targeted by users and the load balancer. This is where those needing access to things are headed. One note about back-end pools is that they are designed to be extremely similar. For example, placing three servers running your application behind a load balancer would be one backend pool. Requests coming in would then receive the same result no matter which resource they were directed toward.
To configure a back-end pool, complete the following steps:
From the Load Balancer Resource in Azure, select Backend Pools in the Settings section of the navigation pane.
Click Add.
Supply the Name of the pool.
Supply the Virtual Network that should be used for resources.
Select the IP Version. (Generally, IPv4 will be used.)
Select the association for the back-end pool:
■ Single Virtual Machine
■ Virtual Machine Scale Set
Select the virtual machine (or scale set) to associate with.
Select the IP address of the back-end resource to use.
Click Add to create the pool.
Note Be Mindful of Regions
When setting up a load balancer, it should exist in the same region as the virtual network that will be used for its backend pool. Accessing virtual networks across regions will not work natively.
With the front end configured and the back-end pool online, the next item in the order of operations is health probes. Before we start flooding the back-end pool with traffic, the resources should be healthy. To configure a health probe, complete the following steps:
Select health probes from the settings list in the navigation menu for the load balancer.
Click Add to create a health probe and supply the following:
■ Name. The name of the health probe.
■ Protocol. Select the protocol the probe should use.
■ Port. Specify the port to watch; make sure the port is open or listening on the VM.
■ Interval. The number of seconds between checks.
■ Unhealthy Threshold. The number of consecutive failures before the pool is deemed unhealthy.
Click OK.
With a healthy back-end pool ready to go, the last step is to set up the rule(s) needed to move traffic between the front end and the back end. Depending on the type of load balancing you will be doing, there are two rule types to be aware of:
■ Load balancing rules. These ensure traffic is being routed to healthy resources or pools.
■ Inbound NAT rules. Forwards traffic from a source port on the front end to a destination port on the back-end pool.
Complete the following steps to configure a load balancing rule:
Select the Load Balancing Rules blade from Settings and click Add.
Provide the following information for the rule:
■ Name. A name for the rule.
■ IP Version. Whether the rule should be used with IPv4 or IPv6.
■ Protocol. Select either TCP or UDP.
■ Port. Specify the port the rule should be leveraging.
■ Backend Pool. Choose a back-end pool.
■ Health Probe. Choose a health probe.
■ Session Persistence. This helps ensure that the server you connected to will maintain your session for its duration.
■ Idle Timeout. Specify the number of minutes to wait before timing out.
■ Floating IP (Direct Server Return). Select whether a floating IP should be used. Unless you are configuring SQL AlwaysOn or other sensitive resources, a floating IP is not necessary.
Click OK.
Complete the following steps to configure an inbound NAT rule:
From the Settings section of the navigation pane, select Inbound NAT Rules.
Click Add.
Supply the following information:
■ Name. A name for the NAT rule.
■ Frontend IP Address. Select the load balancer front end to use.
■ Service. The service that will be used with NAT.
■ Protocol. The protocol for the service (TCP or UDP).
■ Idle Timeout. The number of minutes the session should be allowed idle.
■ Network IP Configuration. Select the resource that will be used with NAT.
■ Port Mapping. Choose to use the default port or a custom port with NAT.
Click OK.
With the load balancer configured, accessing allowed resources using the IP address of the load balancer works the same way as using the IP address of the resource itself. This allows any directly attached public IP addresses to be removed from resources in a back-end pool. Before taking this step, be sure anything using those IP addresses has shifted to the load balancer IP.
Note Using Specific Ports
Using Inbound NAT rules can help ensure that well-known ports for certain workloads are not exposed to the Internet. For example, you could configure a front-end port of 2020 to send traffic to 3389 on your internal network to obfuscate where RDP is happening. Note that 2020 was just a random port number selected as an example.
The load balancer configured for this text was a basic load balancer. Visit the Azure pricing documentation for the Load Balancer resource to learn more about the SLAs and additional features provided by other load balancer SKUs. See https://azure.microsoft.com/en-us/pricing/details/load-balancer/.
Configure and manage Azure Firewall
Azure Firewall is a stateful next generation firewall service that can be configured on a virtual network. When Azure Firewall is enabled, the default mode is to deny traffic to resources on the same VNet. Only after rules are configured will access to resources be allowed. Keep this in mind if adding Azure Firewall to an existing VNet.
To get Azure Firewall running on a virtual network, complete the following steps:
Log in to the Azure portal and locate the VNet resource to which Azure Firewall will be added.
With the VNet selected, choose Firewall under Settings.
Click the Click Here To Add a New Firewall link to add a new firewall and supply the following information:
■ Subscription. This should be the same subscription that holds the previously selected VNet.
■ Resource Group. The resource group should default to the resource group for the VNet.
■ Name. The name of the Azure Firewall instance.
■ Region. The region for the Azure Firewall instance, which should match the region of the VNet as well.
■ Choose A Virtual Network. Create or select an existing Virtual Network.
■ Virtual Network Name. The name of a new VNet if you chose to create one.
■ Address Space. The address space of the new VNet.
■ Subnet. This will be filled in as
AzureFirewallSubnetand cannot be changed. If you choose an existing VNet, this subnet will need to exist before creating the instance of Azure firewall.■ Subnet Address Space. The IP address range for the
AzureFirewallSubnet.■ Firewall Public IP Address. The public IP address (required) for use with Azure Firewall.
■ Forced Tunneling (Preview). This feature will force all traffic to flow through the firewall; it is in preview at the time of this writing.
Click Review + create to review the selected settings.
Click Create to deploy Azure Firewall.
Note Forced Tunneling Additional Config
If you choose to enable forced tunneling, a management IP address (public) will be required to ensure the firewall can always be reached for configuration and to ensure that management traffic is handled separately from traffic passing through and affected by the firewall.
![]() Exam Tip Built-In Templates
Exam Tip Built-In Templates
As you work through building these resources, there will be templates built in the background for ARM-based deployment. Downloading the templates for review will help improve your understanding of the templates and prepare you for automation of resource deployment in Azure. In addition, you will not be building or attempting to build ARM templates from scratch.
Once the deployment has completed, additional configuration will be needed to ensure that resources behind the firewall are available. By default, anything behind the firewall will not be accessible until there are rules in place to allow it.
Configuring rules for Azure Firewall
To configure rules for Azure Firewall, complete the following steps:
On the Azure Firewall resource blade, select Rules under the Settings section of the navigation pane shown in Figure 2-56.

FIGURE 2-56 Configuring or adding rules to Azure Firewall
Select one of the following rule types to configure:
■ NAT Rule Collection. This is a collection of rules used to share a single inbound IP address with many internal resources, depending on the chosen port. Microsoft might refer to this as Destination Network Azure Translation (DNAT).
■ Network Rule Collection. This is a collection of outbound rules to allow connection to external resources based on IP address and/or port.
■ Application Rule Collection. This is a collection of outbound rules meant to target external FQDN resources, such as google.com, and allow or deny traffic out to the specified target(s) based on the port and FQDN.
![]() Exam Tip Rules have Processing Order
Exam Tip Rules have Processing Order
When used, network rules are processed in order of assigned priority. If no matches are found for the outbound request, application rules are checked for matches. Once a match is found, no further rule processing is attempted.
Click Add NAT Rule and provide the following information:
■ Name. The first name is for the rule collection; similar types of rules can be added to the same collection.
■ Priority. This is the priority of the collection; keep these adequately spaced if you are using more than one type of rule collection to allow room for rule expansion.
■ Name. This is the name of the individual rule being configured (for example, RDP).
■ Protocol. Select TCP or UDP (or both) for the rule.
■ Source Type. Select IP Address for a single source address or IP Address Group for a load-balanced group of source addresses.
■ Source. Enter the IP address (or * for any) if the source type is an IP address, or select the named IP address group if source type is an IP address group.
■ Destination Address. For a NAT rule, this should be the public IP address of the Azure Firewall Resource.
■ Destination Ports. The network ports expected on the outside of the firewall, if using obfuscation; this is where the custom port number should be used.
■ Translated Address. This is the internal IP address of the resource targeted by the rule; this address should be inside the VNet where the firewall is configured.
■ Translated port. This is the target port for the service used by the rule; for example, RDP uses port 3389.
Repeat this information to add additional rules to the collection.
Click Add.
Click the Network Rule Collection tab to create network rules.
Supply the following information for a network rule collection:
■ Name. The name of the rule collection.
■ Priority. The priority for evaluation.
■ Action. Choose Allow or Deny.
■ Name. The name of the rule.
■ Protocol. Select TCP, UDP, or both.
■ Source Type. An IP address or IP address group.
■ Source. Enter an IP address (* for any) or select an IP address group.
■ Destination Type. An IP address or IP address group.
■ Destination Address. Enter an IP address (* for any) or select an IP address group.
■ Destination Ports. Specify the port that should be matched for the rule to be applied.
Service tags can also be configured in network rule sets—these are used to denote designated Azure services as the destination for the network rule—they are configured as individual rules within a rule set.
Click Add to create the rules and rule set.
To create an application rule collection, provide the following information:
■ Name. The name for the application rule collection.
■ Priority. The priority for the rule collection.
■ Action. Choose Allow or Deny.
■ FQDN Tags. These allow outbound access to Azure-based services, such as Windows Update:
■ Name. The name of the FQDN tag rule.
■ Source Type. IP address or an IP address group.
■ Source. Enter the IP address (enter * for any) or select IP address groups.
■ FQDN Tags. Select the services that this rule should apply to.
■ Target FQDNs. External domain names that should be allowed (or denied) from this rule collection.
■ Name. The name of the rule.
■ Source Type. IP address or a IP address group.
■ Source. Enter the IP address (enter * for any) or select IP address groups.
■ Protocol:Port. Specify a well-known protocol or protocol and port number to allow outbound access on.
■ Target FQDNs. specify a comma-separated list of FQDNs to which to allow outbound access.
Click Add to create the firewall rules and collections.
With rules configured, traffic will begin flowing through the Azure Firewall (if allowed). Without any rules, the default action of Azure Firewall is to deny any requests.
Once a firewall has been configured, it might make sense to lock the resource so it cannot be deleted by accident. On the Overview blade for the firewall resource, click the Lock option to lock the resource. Once enabled, clicking the Unlock option will remove the lock from an Azure Firewall Instance.
Configuring threat intelligence
Microsoft is constantly fielding networking attacks and other threats across Azure and other properties it manages. This data is aggregated to allow customers to work with data collected and managed by Microsoft. Note that this does not mean your environment is exposed to any of these attacks or threats; instead, it means when configured, threat intelligence can prevent them.
Telemetry data from all this aggregation is made available inside Azure Firewall to allow items to be alerted on or for items to be alerted on and denied by an instance of Azure Firewall.
To configure threat intelligence, choose one of the following options from the Threat Intelligence Settings blade:
■ Off. Disable threat intelligence.
■ Alert Only (Default). Receive high-confidence alerts for traffic routed through an instance of Azure Firewall in your environment that is going to or from known malicious IP addresses or domains.
■ Alert And Deny. In addition to alerting on these events, traffic of this nature will be blocked.
Azure Firewall Manager (Preview)
Microsoft has introduced a policy-based firewall management service for Azure Firewall, which is in preview at the time of this writing. This service will allow rules and configurations to be shared across multiple instances of Azure Firewall. This feature is not covered in detail because it is in preview.
Configure and Manage Azure Front Door
Azure Front Door brings together monitoring, management, and routing of inbound HTTP and HTTPS traffic to an environment by allowing users to connect to points of presence (POPs) nearest their location to leverage Azure’s backplane and network configurations to provide the best experience and access to your organization’s applications.
Think of Front Door as the service that combines load balancing, Traffic Manager, and app gateway into a single offering for customers that wish to leverage it.
To get started with Azure Front Door, complete the following steps:
Log in to the Azure portal (https://portal.azure.com).
Select Create A Resource from the Azure navigation menu.
In the Search The Marketplace text box, enter Front Door to locate Azure Front Door.
Click Create.
Provide the following information for configuration:
■ Subscription. Select the subscription that will house your Azure Front Door implementation.
■ Resource Group. Create or select an existing resource group to house your Azure Front Door implementation.
Click Next: Configuration.
Complete the configuration wizard, as shown in Figure 2-57.

FIGURE 2-57 Azure Front Door configuration
■ Configure Frontends/Domains.
■ Enter the host name.
■ Select to enable or disable session affinity.
■ Select to enable or disable the web application firewall.
■ Click Add.
■ Configure Back-End Pools.
■ Enter a name for the back-end pool.
■ Click Add A Backend to configure a host within the backend pool.
■ Specify a path for the health probe for this back-end pool. Consider a static application or page to ensure the path does not change.
■ Specify the protocol: HTTP or HTTPS.
■ Specify the probe method for the health probe (Head or Get).
■ Define the interval in seconds for the frequency of polling.
■ Specify a load balancing sample size.
■ Specify successful samples required.
■ Specify latency sensitivity.
Click Add.
■ Define the Routing Rules to determine which traffic is distributed to which back-end pool.
■ Specify a name for the rule.
■ Select the protocol to be accepted.
■ Specify the front domains (configured previously).
■ Specify patterns to match. This will determine which traffic is routed by this rule.
■ Select a route type for the rule (Forward or Redirect).
■ Select the back-end pool to pass traffic to.
■ Select the forwarding protocol (HTTPS, HTTP, or Match Request).
■ Select to enable or disable URL Rewrite.
■ Select to enable or disable Caching.
Click Add.
■ Click Review + Create.
■ Click Create to deploy Azure Front Door.
Once Front Door is online and running, you can view the Front Door designer to add additional front ends, back ends, and routing rules. This will follow the same process outlined above.
In addition to these configuration options, you can enable and configure the Web Application Firewall options for Front Door separately.
Within the Azure Front Door resource, select Web Application Firewall and then select the configured front end you wish to assign a policy to. Policies are specific to front end configurations so that they can be different for each configured front end.
Web application firewall policies are separate entities from Front Door and must exist within the subscription where front door is deployed. In the search bar at the top of the Azure portal, search for Web Application Firewall to see Web Application Firewall policies (WAF), shown in Figure 2-58.

FIGURE 2-58 Adding Web Application Firewall Policy items
Note Why Create WAF Policies?
Front Door supports policies to allow the centralized management of configuration settings for an environment. These can be custom and created to follow an organization’s security policy (which should be created) and/or they can use pre-created Azure policies, which take into account things that have been detected and have occurred across the Azure cloud. Using items from both will allow you to fine-tune policies and reduce the amount of things that must be considered/included within custom policy.
To create a custom WAF policy, complete the following steps:
Provide project details about what this policy will cover.
Select where the policy will apply:
■ Global WAF (Azure Front Door)
■ Regional WAF (Application Gateway)
■ Azure CDN (preview at the time of this writing)
Select a subscription and resource group for the policy.
Supply an instance name for the policy and choose whether the policy is enabled or disabled.
Note Configuration Consideration
We would recommend starting out with policies disabled to ensure all the necessary options are configured and documented as your organization requires before enabling them. Enabling these settings could cause traffic to your environment to be denied.
Click Next: Policy Settings to define the following about the policy.
■ Mode. Select whether the policy will prevent (block) traffic or only detect (audit).
■ Redirect URL. This is the URL used to redirect requests if configured.
■ Block Response Status Code. This is the error code to return when a request is blocked.
■ Block Response Status Body. The message to return to the browser when a request is blocked.
Click Next: Managed Rules to configure the items managed by Azure.
■ Select the managed rule set to apply or choose None to skip managed rules.
Click Next: Custom Rules to add rules specific to an organization.
■ Click Add Custom Rule.
■ Supply the following information to configure a custom rule:
■ Rule Name. The name of the rule.
■ Status. Enabled or disabled.
■ Rule Type. Select Match to match specific patterns or Rate Limit to trigger the rule based on incoming requests.
■ Priority. Specify the priority of the rule, lower numbers process first.
Configure conditions for the rule:
■ Specify a match type and values to match against.
■ Specify the then condition. This specifies what to do when a match for conditions is found: Allow, Deny, Log, or Redirect.
■ When all the conditions needed for a rule have been added, click Add.
Click Next: Association to associate this policy with an environment.
■ Click Add A Front-End Host.
■ Select the Front Door instance, and then choose from the list of front-end hosts configured to associate the policy.
■ Click Review + Create to continue.
■ Click Create to build the configured policy and assign it.
Note Simple, Custom, and Azure Preconfigured
When defining policy, it is a good idea to set up a policy that contains only Azure pre-configured rules and another that contains only custom rules. This way, when you are managing them later, only one set of items must be managed at a time. This also means you won’t be wading through a mixture of custom rules and Azure provided rules.
■ Like any other firewall or rule configuration, keeping rules within a policy containing related items is a good idea for WAF policy. More policies can be created to bring out more rules, but keeping your rules for certain types of traffic together can make for easier troubleshooting.
■ Remember: Azure Front Door is a one-stop shop for applications and resources within an environment, and applying individual policies to the front-end configurations within Front Door removes the need to configure multiple instances of the Front Door service.
![]() Tip Periodical Policy Reviews
Tip Periodical Policy Reviews
When leveraging services like Azure Front Door, it is a good idea to periodically review the configuration of the service, specifically any policies and associated rules, to ensure they still apply to your organization and that they are still providing the intended result. If not, you should adjust them accordingly.
Implement Azure Traffic Manager
Azure Traffic Manager is a DNS load balancer that allows DNS-based traffic to be sent to configured hosts to ensure specific hosts are not overloaded. In a similar fashion to the way a traditional load balancer ensures traffic going to IP address 1.2.3.4 is evenly spread across a pool of resources, Traffic Manager does the same for DNS-based traffic. Balancing traffic across Azure regions is possible using Traffic Manager profiles as well, which can make it a key component of a service failover solution, which removes the need to update DNS records during a failover scenario.
To configure Azure Traffic Manager, complete the following steps:
Log in to the Azure portal (https://portal.azure.com).
From the navigation pane select Create A Resource.
Search for Traffic Manager Profile and click Create.
Provide the following information to configure a Traffic Manager profile:
■ Name. This is the resource name, which will get an Azure DNS name of
<name>.trafficmanager.net.■ Routing Method. Choose the method for routing traffic:
■ Performance. Use this routing when resources are geographically dispersed, and you want to send the user to the closest endpoint to their location.
■ Weighted. Use this to distribute traffic across nodes evenly or by a weight you specify.
■ Priority. Use this to select one endpoint as the primary and specify additional resources as backups.
■ Geographic. Use this routing to send specific users to a defined geographic location based on where the DNS query originates.
■ MultiValue. Use this for profiles where only IPv4 or IPv6 addresses can be endpoints. When queried, all values will be returned.
■ Subnet. Use this to map sets of user IP address ranges to a specific Traffic Manager endpoint.
■ Subscription. Select the subscription that will house the Traffic Manager profile.
■ Resource Group. Select or create the resource group that will house the Traffic Manager profile.
■ Resource Group Location. Select the region where the resource group will be located.
■ Click Create.
The configuration of Traffic Manager does place the resource in an Azure region initially. However, the Traffic Manager is a global resource that exists across all regions and does not only operate in specific datacenters.
After the initial configuration and deployment, Traffic Manager will be enabled and ready for use, but it does not contain any endpoints out of the box. This means anything sent to the Traffic Manager has nowhere to go. This will need to be configured by providing endpoints to the service. To do this, complete the following:
From the Traffic Manager resource, select Endpoints under the Settings area of the navigation pane.
Click Add to add an endpoint and provide the following information:
■ Type. The type of resource this endpoint is:
■ Azure Endpoint. A resource running in Azure.
■ External Endpoint. A resource running in another cloud or a corporate datacenter.
■ Nested Endpoint. Leverages another instance of Traffic Manager as an endpoint.
■ Name. The name of the endpoint.
■ Target Resource Type. The type of service this endpoint points to:
■ Cloud Service. PaaS cloud services running in Azure.
■ App Service. Web apps running in Azure.
■ App Service Slot. Specific slots of web applications running in Azure.
■ Public IP Address. Specify a load balancer or the DNS name of an IP address tied to a virtual machine running in Azure.
■ Target Resource. If the endpoint is an Azure endpoint, the target can be selected from a list of available resources.
■ Custom Header Settings. Header information the target might be expecting.
■ Add As Disabled. If this is checked, the endpoint will not be available to receive traffic as soon as it is deployed.
Click OK to add the endpoint.
Note Layers and Layers of Traffic
A new addition to Traffic Manager endpoints is the nested endpoint. This allows one Traffic Manager to reference another instance as an endpoint to which it can route traffic. For example, an application sitting behind DNS at www.contoso.com might need to send traffic to apac.contoso.com, and this site might need to be load balanced between two endpoints specific to Asia Pacific. With a nested endpoint, this is easy to setup.
Configuring additional settings
In addition to endpoints, Traffic Manager must be configured to ensure the endpoints are being monitored properly. Without configuring monitoring for Traffic Manager, or at least reviewing it to ensure correct settings are implemented, this might affect endpoint usage. If an endpoint cannot be monitored or reached by Traffic Manager, it will be marked as down and unavailable for use.
The following items are available within the configuration settings for Traffic Manager:
■ Routing Method. Select the routing method used by the Traffic Manager overall.
■ DNS Time To live (TTL). The number of seconds the client should cache a record before re-querying Traffic Manager for updated information.
■ Endpoint Monitor Settings:
■ Protocol. Should endpoints be monitored over HTTP, HTTPS, or TCP.
■ Port. The port used for monitoring.
■ Path. The path on the endpoint used for monitoring. If there is a status page that should be used instead of the root path, enter the relative path here.
■ Custom Header Settings. Any custom header info that should be applied for all endpoints.
■ Expected Status Code. Configure any status code ranges that should be considered during evaluation of an endpoint. For example, a status code range might be configured if an endpoint does not return
200as a success message or if you are expecting the endpoint to be down rather than up.■ Probing Interval. How often should an endpoint be checked.
■ Tolerated Number Of Failures. How many consecutive failures are okay before an endpoint is considered down.
■ Probe Timeout. Number of seconds before a probe times out when checking an endpoint.
Traffic Manager has two traffic monitoring options outside of the endpoint monitoring options used to route traffic that may be useful for seeing how traffic movement is going: real user measurements and traffic view.
Real user measurements
To enable real user measurements, select the Real user measurements item from the settings section of the navigation pane within the traffic manager resource then click the Generate Key button and include the key in your application, much like an instrumentation key in Application Insights. Once configured, any latency measurements between a client browser and Azure Traffic Manager help keep an eye on latency experienced by the user.
Traffic view
When traffic view is configured, it can collect data about latency from user connections to endpoints behind Traffic Manager. Select the Traffic View item from the settings section of the navigation pane within the traffic manager resource, then click the Enable Traffic View to turn this on. Initial enablement might take up to 24 hours to populate the heat map and display data regarding user connections.
Note Applies to all Instances
When the real user measurements key is created, it applies to all instances of Traffic Manager within a subscription, not just the instance where the Generate Key button was clicked.
Manage and configure Network and Application Security Groups
Security in the cloud is something that should be considered at every step in the process. Microsoft leverages Network Security Groups (NSGs) to provide a method for allowing and denying traffic destined for Azure Resources. Application Security Groups take this a step further by allowing a grouping of similar resources to be targeted by NSG rules. Using these resources can keep security simplified and leverages cloud-native technology that will grow as Azure continues to evolve.
Network Security Groups
Network Security Groups are much like Access Control Lists (ACLs) used in early firewall devices. They allow traffic through to a specified resource or network segment over a specified port or set of ports. At a high level, Network Security Groups provide an allowed/denied method of control for traffic coming into or going out from the resources to which they are applied.
To add a Network Security Group for a virtual machine, complete the following steps:
Log in to the Azure portal (https://portal.azure.com).
Navigate to the resource group containing the virtual machine that will be covered by the NSG.
Select the Add button at the top of the Resource Group page and search for and select Network Security Group. Click Create to start creating the resource.
Specify the Subscription and Resource Group that will house the NSG.
Provide the Name of the NSG.
Choose the Region for the resource.
Click Next: Tags.
Specify any tags used by your organization by adding the name for the tag and its value in the corresponding fields. If you have used a tag previously, its name and value will be selectable once you enter each field. This limits the need to keep a list of used tags outside of Azure.
Note Text Only
Tags are text only. If the plan is to create a tag for username, the value can be anything—tags do not support any logic.
Click Review + Create to review the resource options that will be submitted for deployment.
Click Create to build the resource.
Note NSG Resource Placement
Deciding whether to place NSG resources near the network or near the resource depends on whether the NSG will be associated to the network or one or more subnets. If the NSG will be associated to the network interface card of a virtual machine, place it with the machine. If it will be associated with one or more subnets, place it with the virtual network resource. Remember, this is arbitrary and may not work for everyone, but is a good place to start.
![]() Exam Tip
Exam Tip
When assigning a Network Security Group, even if there is only one virtual machine on a network segment, using a subnet association for the NSG will significantly reduce the number of places where the group is not configured when there is a need for troubleshooting.
Once the network security group is created, it will need some configuration to be useful. With the new resource selected, the initial rules available are:
■ Allow VnetInBound. All traffic from resources on the same VNet is allowed in.
■ AllowAzureLoadBalancerInBound. Any traffic from the Azure Load Balancer is allowed in.
■ DenyAllInBound. Any inbound traffic that does not meet another rule is denied in.
■ Allow VnetOutBound. All traffic to other resources on the same VNet is allowed out.
■ AllowInternetOutBound. All traffic destined for the Internet is allowed out.
■ DenyAllOutBound. Any outbound traffic that does not meet another rule is denied.
You might notice the priority on these rules is 65,000 or higher, placing them at the bottom of the list. The priority number is how rules within an NSG are evaluated, lower numbers first. The default rules created within an environment are evaluated last and any rules added would be hit before them. These are catch-all rules to ensure most traffic is not blocked as soon as the resource is configured. The initial configuration of an NSG is shown in Figure 2-59.
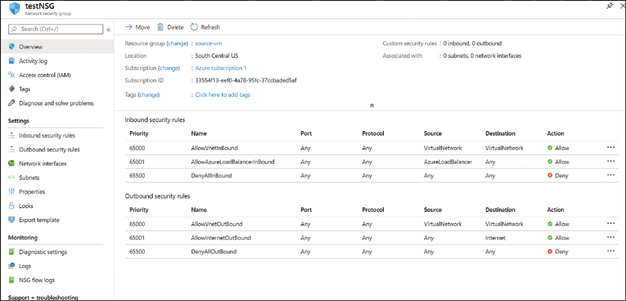
FIGURE 2-59 Network Security Group configuration
To add rules to the NSG, complete the following steps:
Select Inbound Security Rules from the NSG navigation menu.
Click Add and supply the following information:
■ Source. Select IP Address, Azure Service Tag, Application Security Group, or Any.
■ IP Address. A specific resource IP address.
■ Virtual Network. The name of an existing virtual network.
■ Application Security Group. The name of an existing application security group.
■ Any. Any resource that exists on the network where this NSG is configured.
■ Source Port Ranges. The port numbers this rule will apply to.
■ Destination. The resource(s) that will be targeted by this rule:
■ IP Address. A specific resource IP address.
■ Virtual Network. The name of an existing virtual network.
■ Application Security Group. The name of an existing application security group.
■ Any. Any resource that exists on the network where this NSG is configured.
■ Destination Port Ranges. The ports on the inside of this NSG that will be affected by this rule; these do not necessarily need to match the source ports, unless there is a reason to do so.
■ Protocol. Specify the protocol this rule will affect.
■ Action. Specify if the rule will allow or deny access when this rule is triggered.
■ Priority. Specify where in the rules list a rule should be processed. Lower numbers will evaluate at the top.
■ Name. Specify a name for the NSG rule.
■ Description. Specify an optional description.
Click Add to create the rule.
Remember, rules in an NSG are one way—either inbound or outbound. To add an outbound security rule, select the Outbound Security Rules option from the NSG navigation menu and repeat the above process.
With some rules in place to control traffic, the NSG needs to be associated with resources to control traffic. To assign it to a subnet, click the Subnets option in the navigation menu, click Associate, and choose the virtual network (and subnet) where this group should be used.
![]() Exam Tip Same Region Required
Exam Tip Same Region Required
Network security groups being associated with subnets must be in the same region as the virtual network where the subnet exists. If they are not, no networks will be available to associate with.
Association with a network interface is like subnet association: select the Network Interfaces option from the navigation menu, click Associate, and select the network interface resources that this rule should be used with.
That is all there is to configuring NSGs, though this does not mean that there will not be troubleshooting needed or review of rules as things grow, but the process of configuration is straightforward.
One more thing about NSGs
To review the effective security rules applied by a group, complete the following steps:
Select the Effective Security Rules option from the navigation menu for the NSG.
Select the virtual machine (if associated with a VM) or the virtual network (if associated with a VNet).
Rules that are currently in effect on the selected resource(s) will be displayed.
Application Security Groups
Application Security Groups (ASGs) are used as targets within NSGs to ensure the correct traffic is allowed to reach resources within an ASG. They do not specifically allow or deny traffic, but they do provide a way to keep resources of a certain type—web servers, for example—grouped so that all of the traffic coming in on ports 80 or 443 can be routed to one destination and reach any and all configured web servers.
To create an ASG, complete the following steps:
Log in to the Azure portal (https://portal.azure.com).
From the navigation menu, click the Create A Resource button, search for Application Security Group, select Application Security Group from the results, and click Create.
Specify the subscription and resource group that will house the ASG.
Supply a name for the ASG and select the appropriate region.
If your organization uses tags, click Next: Tags to add them; if not, skip this step.
Click Review + Create to review the resource options that will be submitted for deployment.
Click Create to build the resource.
Like Network Security Groups, Application Security Groups will need some additional configuration once created. Because these groups help to bring servers performing similar tasks together, the addition of members to an Application Security Group happens from within the VMs being configured.
To add a virtual server as a member of an ASG, complete the following steps and refer to Figure 2-60:
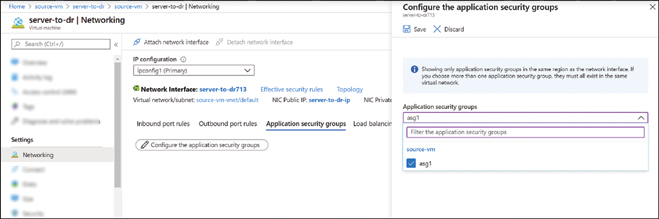
FIGURE 2-60 Application Security Group configuration
Navigate to the virtual machine resource being added.
Select the Networking option in the navigation menu.
Select the Application Security Groups tab.
Click Configure The Application Security Groups.
Select the ASG to which this VM will become a member.
Click Save.
Once the ASG has members assigned, it can be used to help simplify NSGs and the rules used to define traffic flow within an environment.
Because it is likely that ASGs are fairly ambiguous at first—largely because they don’t have individual configuration options—it is ideal practice to ensure that the names of the groups are very specific to the action(s) for which they will be used.
For example, if there is a requirement to configure a rule to allow access to a database but only from specific servers, it might make sense to specify an ASG as the source of the rule. This means only servers in that group would be allowed to access the database resource.
Implement Azure Bastion
Azure Bastion is the Azure service equivalent to a jump or bastion host. Using these machines to access resources on specific networks allows more security to be applied to the targeted environment. For example, my organization might need a specific network to be completely walled off from the Internet, which would remove any public IP addresses or access from other Internet-connected networks. When configured in the same environment, Azure Bastion will allow management access without requiring a multihomed virtual machine or public access to the target servers.
To get Azure Bastion up and running, complete the following steps:
Log in to the Azure portal (https://portal.azure.com).
From the navigation menu, select Create A Resource.
In the search box for new resources, type Bastion, select the Bastion option, and click Create.
Provide the following information to configure Azure Bastion in your environment:
■ Subscription. Select the subscription that will house the Bastion resource.
■ Resource Group. Select or create a resource group for the Bastion resource.
 Tip Location, Location, Location
Keep the Bastion service close to the network it will service. Placing it in the same resource group as the virtual network will ensure it is in the required region.
■ Name. The name of the instance of Azure Bastion being configured.
■ Region. Specify the region for the Bastion resource.
■ Virtual Network. Select or create a virtual network for use with Azure Bastion.
■ Subnet. Azure Bastion requires a subnet named
AzureBastionSubnetto exist or be created on the VNet used. If this subnet exists, it is automatically selected.■ Public IP Address. Select an existing or create a new public IP address for Azure Bastion.
Click Next: Tags to continue and add tags to the Azure Bastion instance.
Once tags have been added, click Next: Review + Create to review your selections.
Click Create to provision Azure Bastion.
An instance of Azure Bastion deployed provides browser-based connectivity to both Windows (over RDP) and Linux (over SSH) for management and general use. Using Azure Bastion does not require these systems to have a publicly accessible IP address or a private IP address reachable from a management station. The Bastion service handles the connection to the target system.
Two things to note:
■ Azure Bastion, when used for Administrative actions only, does not require a Client Access License for the target system.
■ Also, there is currently a limit on the number of hosts that Bastion can connect to concurrently. For RDP sessions, this is 25 and for SSH 50, both depending on the number of other sessions hitting the target system(s).
To connect to a server using Azure Bastion, complete the following steps:
Log in to the Azure portal.
Locate the virtual machine to which you wish to connect and select it to view its options.
Click the Connect option under the Settings section of the navigation menu.
Select Bastion as the connection type.
Enter the username and password and click Connect, as shown in Figure 2-61.

FIGURE 2-61 Azure Bastion connection info
By default, the Bastion connection opens in a new tab, which is sometimes blocked by pop-up blockers.
Once connected, the view though Bastion is the same as with the standard connection tools. It just occurs in a browser tab rather than external applications (see Figure 2-62).
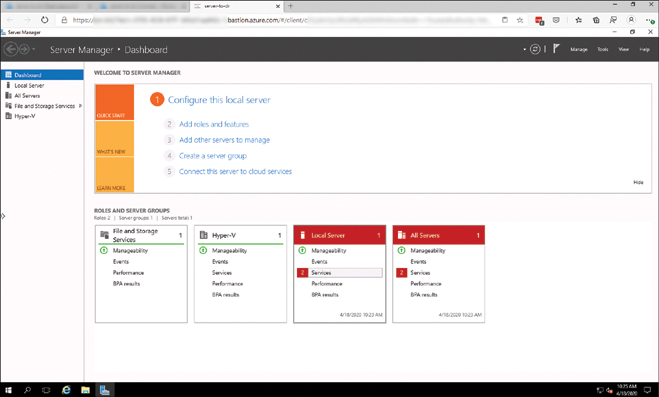
FIGURE 2-62 Connected to an Azure VM using Azure Bastion
Using this connection method removes the need to manage access via NSGs and prevents the addition of another host to patch and manage. In a traditional Bastion host scenario, the Bastion host itself would require maintenance and patching, but because Azure Bastion is a PaaS service, it does not require any additional maintenance.
Need more review? Additional Resources for Load-Balancing Options
Check out the articles at the following URLs for additional information:
■ “What is Azure Application Gateway?” https://docs.microsoft.com/en-us/azure/application-gateway/overview
■ “What is Azure Load Balancer?” https://docs.microsoft.com/en-us/azure/load-balancer/load-balancer-overview
■ “What is Azure Firewall?” https://docs.microsoft.com/en-us/azure/firewall/overview
■ “What is Traffic Manager?” https://docs.microsoft.com/en-us/azure/traffic-manager/traffic-manager-overview
■ “Network Security Groups Overview” https://docs.microsoft.com/en-us/azure/virtual-network/security-overview
■ “Application Security Groups Examples” https://docs.microsoft.com/en-us/azure/virtual-network/application-security-groups
■ “What is Azure Bastion?” https://docs.microsoft.com/en-us/azure/bastion/bastion-overview
You also can review the Azure CLI documentation at https://docs.microsoft.com/en-us/cli/azure/get-started-with-azure-cli?view=azure-cli-latest.
Skill 2.6: Integrate an Azure virtual network and an on-premises network
Azure supports connectivity to external or on-premises networks via two methods:
■ VPN An encrypted connection between two networks via the public Internet
■ ExpressRoute A private circuit-based connection between an organization’s network and Azure
Note Security Details
The connection made by ExpressRoute runs over private circuits between an organization and Azure. No other traffic traverses these circuits, but the traffic is not encrypted on the wire by default. Some organizations may choose or be required to encrypt this traffic with a VPN.
This skill covers how to:
Create and configure Azure VPN Gateway
The virtual network gateway is a router endpoint specifically designed to manage inbound private connections. The resource requires the existence of a dedicated subnet, called the gateway subnet, for use by the VPN.
To add a gateway subnet to a virtual network, complete the following steps:
Select the virtual network that will be used with the virtual network gateway.
Open the Subnets blade of the network resource.
Click Gateway Subnet at the top of the Subnets blade.
Specify the address range of the subnet. Because this is dedicated for connecting VPNs, the subnet can be small depending on the number of devices that will be connecting.
Edit the route table as necessary (not needed by default).
Choose any services that will use this subnet.
Select any services this network will be dedicated to supporting.
Click OK.
Important About Networking
Be mindful of the address space used for virtual networks created as any subnets, including the gateway subnet; they must fit within the address space and have no overlap.
To create a virtual network gateway, complete the following steps:
From the Azure portal, select or create the resource group that will contain the virtual network gateway.
Click Add Link at the top of the Resource Group blade.
Enter virtual network gateway in the resource search box. Select Virtual Network Gateway in the search results.
Click the Create button to begin creating the resource.
Complete the Create Virtual Network Gateway form shown in Figure 2-63:

FIGURE 2-63 Creating a virtual network gateway
■ Subscription. The Azure subscription that will contain the virtual network gateway resource.
■ Name. The name of the virtual network gateway.
■ Region. The region for the virtual network gateway. There must be a virtual network in the region where the virtual network gateway is created.
■ Gateway Type. Choose ExpressRoute or VPN.
■ VPN Type. Choose Route-Based or Policy-Based.
■ SKU. The resource size and price point for the gateway.
■ Virtual Network. The network to which the gateway will be attached.
■ Public IP Address. The external IP address for the gateway (new or existing).
■ Enable Active-Active Mode. Allow active/active connection management.
■ Enable BGP/ASN. Allow BGP route broadcasting for this gateway.
Click Review + Create to review the configuration.
Click Create to begin provisioning the gateway.
Note Provisioning Time
Virtual network gateways can take anywhere from 15 to 45 minutes to be created. In addition, any updates to the gateway also can take between 15 and 45 minutes to complete.
Important About Networking Resources
When you configure networking resources, there’s no way to deprovision them. Virtual machines can be turned off, but networking resources are always on and billing if they exist.
Create and configure site-to-site VPN
Once the virtual network gateway(s) are configured, you can begin configuring the connection between them or between one gateway and a local device.
There are three types of connections available using the connection resource in Azure:
■ VNet to VNet. Connecting two virtual networks in Azure—across regions perhaps
■ Site to Site. An IPSec tunnel between two sites: an on-premises datacenter and Azure
■ ExpressRoute. A dedicated circuit-based connection to Azure, which we discuss later in this chapter
For a site-to-site configuration, complete the following steps:
In the Azure portal, open the resource group containing the virtual network gateway and VNet to be used in this configuration.
Collect the public IP address and internal address space for the on-premises networks being connected to Azure and the virtual network gateway public IP address and address space.
Create a pre-shared key to use in establishing the connection.
Add a connection resource in the same resource group as the virtual network gateway.
Choose the connection type for the VPN, site-to-site, the subscription, resource group, and location for the resource.
Important Keep it Together
The resource group and subscription for connections and other related resources should be the same as the configuration for the virtual network gateway.
Configure the settings for the VPN as shown in Figure 2-64:
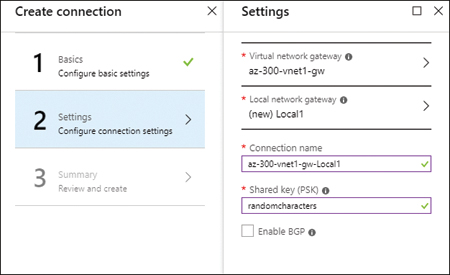
FIGURE 2-64 Configuring the settings for a site-to-site VPN
■ Virtual Network Gateway. Choose the available virtual network gateway based on subscription and resource group settings already selected.
■ Local Network Gateway. Select or create a local network gateway. This will be the endpoint for any on-premises devices being connected to this VPN.
Name the local network gateway.
Enter the public (external) IP address of the on-premises device used.
Enter the address space for the internal network on-premises. More than one address range is permitted.
The Connection Name is populated based on the resources involved, but you can change it if you need to make it fit a naming convention.
Enter the Shared Key (PSK) for the connection.
Enable BGP if needed for the connection. This will require at least a standard SKU for the virtual network gateway.
Review the summary information for the resources being created and click OK.
Verify on-premises connectivity
Once the site-to site-VPN configuration has been completed, verification of the connection will work, or it won’t. If you have everything configured correctly, accessing resources in Azure should work like accessing other local resources.
Connecting to the machines connected to the Azure virtual network using local IP addresses should confirm that the VPN is connected, as the ping test shows in Figure 2-65.
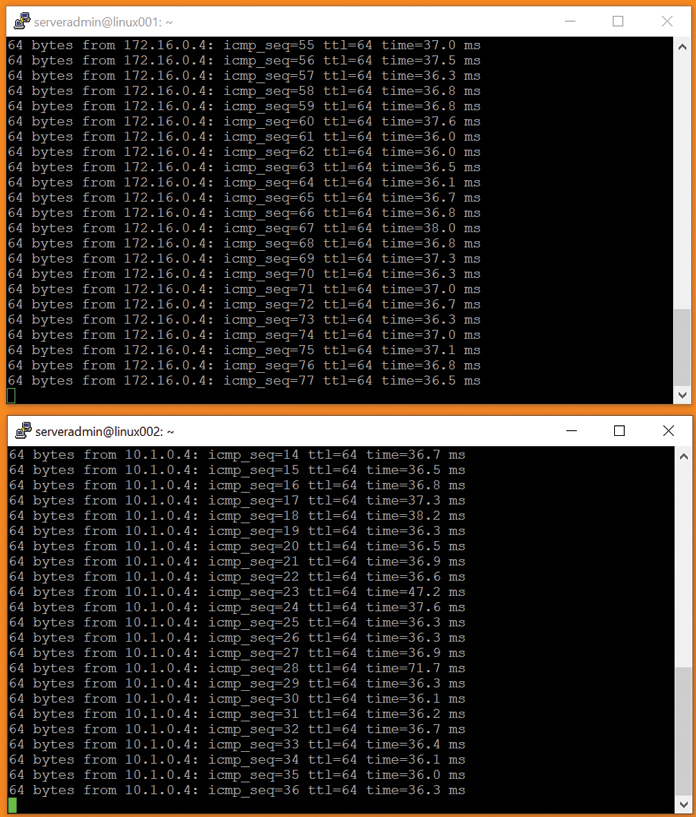
FIGURE 2-65 Traffic between local IP addresses via the VPN
In addition to the ping testing and connections between systems on these networks, the Summary blade for the local connection in Azure shows traffic across the VPN. This is shown in Figure 2-66.
FIGURE 2-66 An active VPN connection in the Azure portal
Manage on-premises connectivity with Azure
In many cases, VPN connections to Azure will be low maintenance once they are connected and in use. There may be times, though, that certain connectivity might need restrictions placed on it—for example, if a server in Azure should be accessed through a load balancer or be accessible only from the local network.
Azure allows these resources to be created without public IP addresses, making them accessible only across the VPN. This is part of the management of these resources; simply removing the public IP takes the machine off of the Internet, but an organization may have additional requirements in that systems in a production environment cannot talk directly to systems in a nonproduction environment. The segregation can be handled via network security groups and routing table entries.
A network security group serves as an ACL list for access (or denial) to resources, so it would help to open or block ports to and from certain machines.
Figure 2-67 shows a simple network security group where port 22 is allowed but only from a source tagged as a virtual network. This allows other resources on Azure virtual networks to reach the device, but nothing from the Internet can connect directly.

FIGURE 2-67 Network security groups
You can use network security groups at the network interface level for a virtual machine or at the subnet level.
![]() Exam Tip Simplify Configuration at the Subnet Level
Exam Tip Simplify Configuration at the Subnet Level
Configuring network security groups at the subnet level ensures uniform rule behavior across any devices in the planned subnet and makes management of connectivity much less complicated.
Note Security
If your organization has requirements for one-to-one access and connectivity, a network security group configured at the interface level for the VM might be necessary to ensure restricted access from one host to another.
Network security groups also allow the collection of flow logs that capture information about the traffic entering and leaving the network via configured network security groups. To enable this, you need two additional resources for all features, as shown in Figure 2-68:
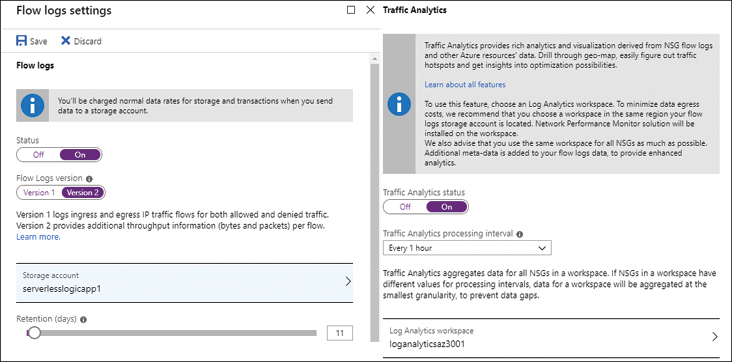
FIGURE 2-68 Flow Log and Traffic Analytics configuration
■ A storage account to collect the flow log data
■ A Log Analytics workspace for traffic analysis
In addition to network security groups, route table entries can be used to control traffic flow between network resources. With a route table entry, you can force all the traffic between subnets to pass through a specific network or virtual network appliance that handles all the rules and access controls. There are reference architectures for this type of configuration in the Azure documentation that walk through configuring this type of network topology.
Configure ExpressRoute
Before you can use ExpressRoute as a VPN connection type, you need to configure it and prepare it as an Azure resource. Complete the following steps to configure the ExpressRoute Circuit resource in Azure:
In the Azure portal, click Create A Resource.
Select ExpressRoute from the Networking category.
On the Create ExpressRoute Circuit page, select to create a new circuit rather than importing from a classic configuration. To complete ExpressRoute setup, provide the following information:
■ Circuit Name. The name of the circuit resource.
■ Provider. Select the name of the provider delivering the circuit.
■ Peering Location. The location where your circuit is terminated; if you’re using a partner like Equinix in their Chicago location, you would use Chicago for the Peering Location.
■ Bandwidth. The bandwidth provided by the provider for this connection.
■ SKU. This determines the level of ExpressRoute you are provisioning.
■ Data Metering. This is for the level of billing and can be updated from metered to unlimited but not from unlimited to metered.
■ Subscription. The Azure subscription associated with this resource.
■ Resource Group. The Azure resource group associated with this resource.
■ Location. The Azure region associated with this resource; this is different from the peering location.
Click Create the resource.
Note Costs and Billing
When you configure ExpressRoute in Azure, you receive a service key. When Azure issues the service key, billing for the circuit begins. Wait to configure this until your service provider is prepared with the circuit that will be paired with ExpressRoute to avoid charges while you’re waiting for other components.
Once the service key is issued and your circuit has been provisioned by a provider, you provide the key to the carrier to complete the process. Private peering needs to be configured and BGP allowed for ExpressRoute to work.
ExpressRoute also requires the virtual network gateway to be configured for it. To do this, when creating a virtual network gateway, select ExpressRoute as the Gateway Type (as shown in Figure 2-69).

FIGURE 2-69 Configuring a virtual network gateway for ExpressRoute
Configuring the peering settings for ExpressRoute happens from within the ExpressRoute configuration settings once the circuit has been set up in Azure. From there, you see three types of peerings:
■ Azure Public. This has been deprecated; use Microsoft peering instead.
■ Azure Private. Peering with virtual networks inside subscriptions managed by your organization.
■ Microsoft. Peering directly with Microsoft for the use of public services like Dynamics and Office 365.
You need to meet the following requirements for peering:
■ A /30 subnet for the primary link.
■ A /30 subnet for the secondary link.
■ A valid VLAN ID to build peering on; no other circuit-based connections can use this VLAN ID. The primary and secondary links for ExpressRoute must use this VLAN ID.
■ An AS number for peering (2-byte and 4-byte are permitted).
■ Advertised prefixes, which is a list of all prefixes to be advertised over BGP.
■ Optionally, you can provide a customer ASN if prefixes that do not belong to you are used, a routing registry name if the AS number is not registered as owned by you, and an MD5 hash.
Review the peering information and complete the following steps to finish configuring ExpressRoute:
Select the type of peering needed and provide the previously mentioned information.
Save the connection.
Important Validation
Microsoft might require you to specify proof of ownership. If you see validation needed on the connection, you need to open a ticket with support to provide the needed information before the peer can be established. You can do this from the portal.
Once you have successfully configured the connection, the details screen shows a status of
configured.Linking (or creating a connection to) ExpressRoute also happens from within the ExpressRoute resource. Choose the Connections option within the settings for ExpressRoute and provide the following:
■ Name. The name of the connection.
■ Connection Type. ExpressRoute.
■ Virtual Network Gateway. Select the gateway with which to link ExpressRoute.
■ ExpressRoute Circuit. Select the configured circuit with which to connect.
■ Subscription. Select the subscription containing the resources used in this connection.
■ Resource Group. Select the resource group containing the resources used in this connection.
■ Location. Select the Azure region where the resources used in this connection are located.
This is like creating a site-to-site connection, as described earlier, but it uses different resources as part of the connection.
![]() Exam Tip
Exam Tip
ExpressRoute is a private connection to Azure from a given location, and it requires high-end connectivity. Much of the discussion of ExpressRoute presented here relies on Microsoft Documentation because we don’t currently have access to an ExpressRoute circuit.
The settings and configurations discussed are high level, but we’ve provided an overview of the concepts for ExpressRoute for the exam.
Skill 2.7: Implement and manage Azure governance solutions
Governance within a cloud environment plays an ever-growing part in the ability of organizations to move to the cloud and keep up with ever-changing technologies. Azure brings solutions centered around governance to the forefront to help organizations of all sizes manage access to resources and ensure that workloads are being deployed and maintained appropriately.
This skill covers how to:
Implement Azure Policy
Azure Policy provides a way to enforce and audit standards and governance throughout an Azure environment. Using this configuration involves two top-level steps:
Creating or selecting an existing policy definition
Assigning this policy definition to a scope of resources
Using Policy can streamline auditing and compliance within an Azure environment. However, it can also prevent certain resources from being created depending on the policy definition settings.
Important Remember to Communicate
Although the intent might be to ensure, for example, that all resources are created in a specified region within Azure, remember to overcommunicate any enforcement changes to those using Azure. The enforcement of policy generally happens when the Create button is clicked, not when the resource is discovered to be in an unsupported region.
Collections of policy definitions, called initiatives, are used to group like policy definitions to help achieve a larger goal of governance rather than assigning 10 policy definitions separately. To hit this goal, they can be grouped into one initiative.
To assign a policy, complete the following steps:
From the Navigation pane in the Azure portal, select All Services.
Search for Policy.
Click the star next to the name of the service. (This will be helpful in the future.)
Click the name of the policy service to go to the resource.
On the Policy Overview blade, compliance information will be displayed (100 percent compliant if this is not in use yet).
Select the Assignments item.
On the Policy Assignments blade, shown in Figure 2-70, click Assign Policy.
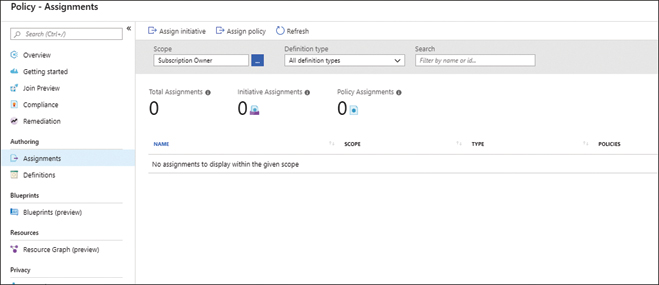
FIGURE 2-70 Azure Policy Assignments
Complete the following information on the Assign Policy screen:
■ Scope. Select the scope at which the chosen policy will be configured.
■ Exclusions. Select any resources that will be exempt from the policy assignment.
■ Policy Definition. Select the policy definition to be assigned.
■ Assignment Name. Enter the name for this policy assignment.
■ Description. Enter a description for the expected outcome of the policy assignment.
■ Assigned By. The name of the Azure logged-in user who is assigning the policy will be listed.
Click Assign to save these settings.
When selecting from the list of available definitions, shown in Figure 2-71, pay attention to the name of the policy. Audit policies are used to capture information about what would happen if the policy were enforced. These will not introduce any breaking changes. Policies that aren’t labeled audit may introduce breaking changes.
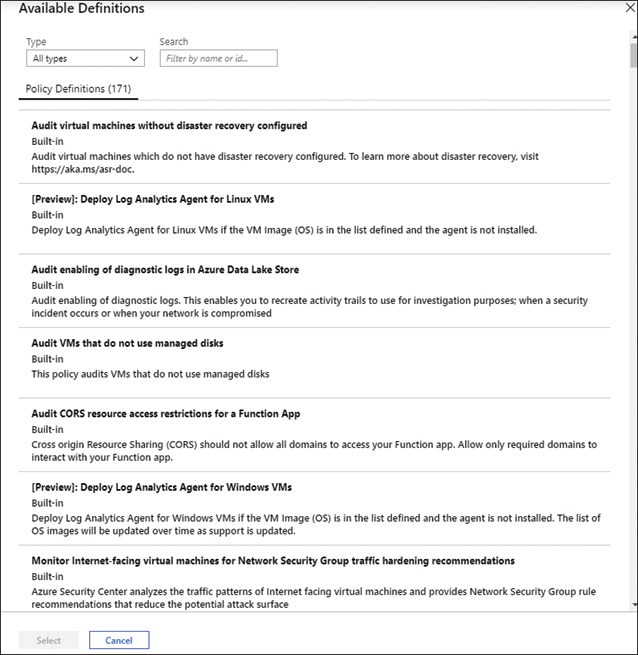
FIGURE 2-71 Policy definitions
Once a policy has been assigned, its compliance state may show as Not Started because the policy is new and has not yet been evaluated against resources. Click Refresh to monitor the state of compliance. It might take some time to reflect the state change.
If a policy runs against a scope and finds items in noncompliance, it may require remediation tasks to be performed. These tasks are listed under the Remediation section in the Policy blade, and they’re only applicable to policies that will deploy resources if they are not found.
Kubernetes gets policy, too
In recent updates to the Azure Policy framework, Azure Kubernetes Service (AKS) has been integrated with the policy services. This allows policy to be applied during the scale out/up process of a container environment to ensure that containerized workloads are following the same rules as other services used within an organization’s Azure environment.
Being able to audit the creation of things like virtual machines and other frontline Azure resources and ensure they are only allowed within certain regions was a great beginning, but if resources deployed inside a container on AKS could be moved to any regions in Azure, this could pose a compliance problem for Azure administrators. By using existing open-source tools to include AKS in Azure Policy, even containerized workloads are subject to organizational governance policy.
Note Limited Preview Alert
Policy for AKS is in limited preview at the time of this writing. It supports only the built-in policy definitions, but as this continues to roll toward general availability, more options are likely to come along for the ride.
To enable the Azure Kubernetes Service Policy, complete the following steps:
Opt in to the preview by registering the
Microsoft.ContainerServiceandMicrosoft. PolicyInsightsresource providers in the Azure portal.Browse to Azure Policy.
Select the option to join the preview.
Choose the subscription(s) to be included in the preview by checking the boxes for each.
Click the Opt-In button.
Once the opt-in has been completed for the preview, there is some work to complete to get the agent for policy installed. Install the Azure Policy Add-on by completing the following steps:
From the Azure CLI, install the preview extension using this code:
Az aks list
Az extension add --name aks-preview
#verify the version of the extension
Az extension show --name aks-preview --query [version]
Once the preview extension is configured, install the AKS add-on into the cluster that will be controlled (or audited) by policy:
■ From the portal, locate and select the Kubernetes Service.
■ Select any of the AKS clusters listed (or create one if there are none).
■ Select Policies (Preview) from the navigation menu.
■ Click the Enable Add-On button on the main section of the page.
The Policy Add-on will check in on AKS once every five minutes via a full scan of enabled clusters. Once this scan completes the details of the scan and the data collected will be returned to Azure Policy and included in the compliance details reporting provided.
Implementing Azure Blueprint
Azure Blueprint is a way to create repeatability within a cloud environment that sticks to standards the organization has configured. Azure Blueprint is a declarative orchestration resource to help build better Azure environments.
Note Better doesn’t mean Better
In this case, better was intended to specify more organized and repeatable. Blueprint is not required to keep things repeatable. Azure is very accommodating to any method of automation and build-out.
One of the advantages of Blueprint is the Cosmos DB back end. This makes the objects used within Blueprint available across regions due to the globally distributed operation of Cosmos DB. Keeping objects available across Azure ensures low latency deployment of the resources regardless of the region where they get deployed. If an organization keeps resources local to them within West US 2, Blueprint will be there and not need to be reached from a different region for use.
To get started and configure Blueprint, complete the following steps (shown in Figure 2-72 below):

FIGURE 2-72 Configure Azure Blueprint
Log in to the Azure portal and select Blueprints from the services list (or search if that is faster).
Select Blueprint Definitions from the navigation list on the left.
On the main screen, select Create Blueprint.
There are some pre-defined Blueprints available to choose from including, but not limited to:
■ HIPAA Policies
■ Resource Groups with RBAC
■ Basic Networking
Select a built-in Blueprint or choose to start with a blank one.
Provide the following for the Blueprint resource (shown in Figure 2-73):
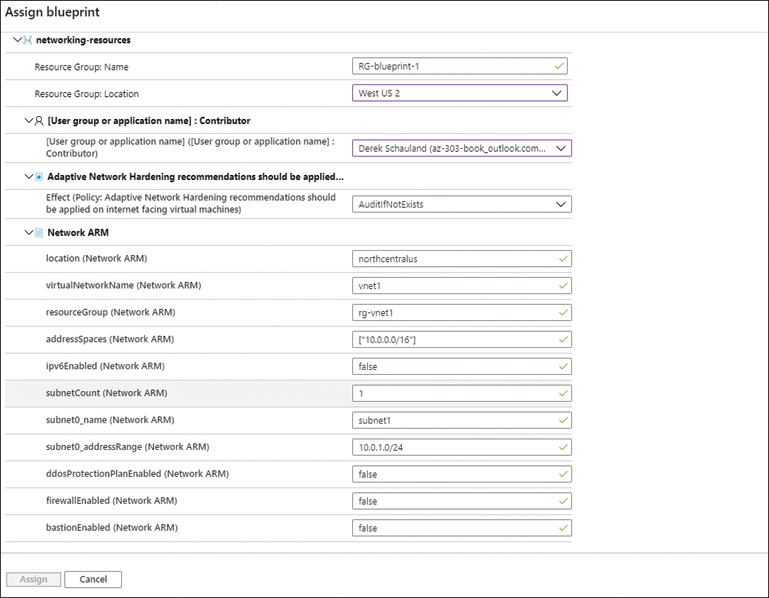
FIGURE 2-73 Blueprint Assignment
■ Blueprint Name. A name for the Blueprint resource
■ Blueprint Description. What does this Blueprint do
■ Definition Location. Where the Blueprint will be saved/scoped
Add the artifacts that this Blueprint will create; available resource types include:
■ Resource groups. For organization and RBAC at build time
■ ARM Templates. The configuration files and variables used to build resources
■ Policies. The control policies assigned to resources created by this Blueprint
■ RBAC Roles. Roles assigned to resources created by this Blueprint
Save the Blueprint draft.
Click the saved draft and then click Publish to make the Blueprint available for assignment.
When things are ready for use, click the newly published Blueprint and click Assign Blueprint, and then provide the following:
■ Assignment Name. The name of the assignment
■ Location. Choose the default location
■ Blueprint definition version. The version number of this Blueprint
■ Lock assignment. Should this Blueprint be locked? If not, users or service principals with appropriate permission can modify the Blueprint
■ Managed Identity. The identity used by the Blueprint
Click Assign.
When deciding if a Blueprint assignment should be locked, consider where the resources are destined to end up. If this will target production level resources, then locking the assignment might make sense to ensure that resources do not get deleted either intentionally or by accident.
If the assignment process cannot collect default values from the resource templates provided in the Blueprint, it might ask you (with some red ink) to assist in providing variables for the assignment. If that happens, provide the needed information, and click Assign to continue.
Once the assignment succeeds, resources requested as part of the Blueprint will be provisioned.
Note JSON is Validated During Creation
When saving the Blueprint definition, the JSON of any template files included will be validated; if it does not pass, the save will fail.
Should Blueprint be used instead of Resource Manager Templates?
The use of Blueprint includes resource deployment with ARM templates to build or rebuild items in Azure. In addition, the security aspects of Azure Policy and configuration of access control using management groups or RBAC can be included as well. This allows Azure Blueprint to cover the whole deployment of an environment all in one overarching configuration.
For example, if my organization is planning to build an application that will leverage things like service bus, Azure DNS, App Services, and APIM, I can certainly handle those resources with ARM templates and automation pipelines. However, I will need to account for security and access configuration as well. Rather than relying on separate templates and configurations, creating an Azure Blueprint of the entire configuration will not only bring all of the needed solutions under one configuration, but it will allow the entire thing to be repeated without needing to reassemble all the necessary individual ARM template files.
If some of the ARM templates already exist, these can be leveraged by Blueprints to reduce reinvention of the resources needed.
Remember, in the end, an assigned Blueprint will deploy (or update) all of the associated resources defined within it. If multiple related items will be managed together and deployed together, a Blueprint might be the logical choice. For smaller, or one-off deployments, an ARM template could be a better fit.
Implementing and leveraging management groups
A management group in Azure is a resource that can cross subscription boundaries and allow a single point of management across subscriptions.
If an organization has multiple subscriptions, they can use management groups to control access to subscriptions that may have similar access needs. For example, if there are three projects going on within an organization that have distinctly different billing needs—each managed by different departments—access to these subscriptions can be handled by management groups, allowing all three subscriptions to be managed together with less effort and administrative overhead.
Management groups allow RBAC configurations to cross subscription boundaries. Using the scope of a management group for high-level administrative access will consolidate visibility of multiple subscriptions without needing to configure RBAC settings in each of many subscriptions. This way, the admins group can be assigned owner access in a management group that contains all the subscriptions for an organization, simplifying the configuration a bit further as shown in Figure 2-74.
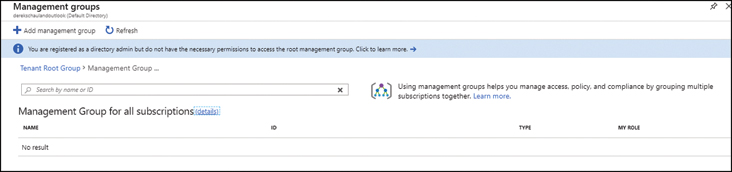
FIGURE 2-74 Management groups can be used across subscriptions for access
Top-level access management groups have a top-level root group scoped to the Azure AD tenant. Administrative users can’t see this with usual administrative or owner RBAC permissions. To allow this visibility, assign the User Access Administrator role to the group that will be working with management groups.
To add subscriptions or management groups to a management group, complete the following steps:
Log in to the Azure portal.
Select Management Groups from the All Services list on the navigation pane.
If no management group exists, click Add Management Group.
■ Enter the ID for the new management group. (This cannot be changed.)
■ Enter the display name for the management group.
Click Save.
Click the name of the management group to which items will be added. There will likely be very little information visible when viewing a management group. Click the Details link next to the name of the group to see more information and take action on the management group, including adding management groups and subscriptions.
For subscriptions, click Add Subscription.
Select the subscription to be managed by this group.
Click Save.
For management groups, click Add Management Group.
Select to create a new management group or use an existing group.
Management groups can be nested to consolidate resource management. This should be used carefully because doing so can complicate management of subscriptions and resources further than necessary.
Select a management group to include and click Save.
Important Changing Management Groups may Require Permission Review
When moving items from one management group to another, permissions can be affected negatively. Be sure to understand the effect of any changes before they are made to avoid removing necessary access to Azure resources.
Need more review? Additional Resources for Governance Options
Check out the articles at the following URLs for additional information:
■ “What is Azure Policy?” at https://docs.microsoft.com/en-us/azure/governance/policy/overview
■ “Understand Azure Policy for Kubernetes clusters” at https://docs.microsoft.com/en-us/azure/governance/policy/concepts/rego-for-aks
■ “What are Azure management groups?” at https://docs.microsoft.com/en-us/azure/governance/management-groups/overview
■ “What is Azure Blueprints?” at https://docs.microsoft.com/en-us/azure/governance/Blueprints/overview
You also can review the Azure CLI documentation at https://docs.microsoft.com/en-us/cli/azure/get-started-with-azure-cli?view=azure-cli-latest.
Skill 2.8: Manage Role-Based Access Control (RBAC)
Role-Based Access Control (RBAC) provides a manageable way to assign access to resources in Azure by allowing permissions to be assigned across job roles. If you’re a server operator, you may be able to start and restart VMs but not power off or delete them. Because every resource in Azure is permissible and requires access, the consolidation of permissions into roles can help keep things organized.
This skill covers how to:
Create a custom role
While Azure provides roles for certain activities—like contributor and reader, which provide edit and read access respectively—there may be job roles within an organization that don’t fit nicely into these predefined items. Custom roles can be built to best suit the needs of an organization. To create a custom role, complete the following steps:
Log in to the Azure portal and select the resource group containing the items for which access will be customized.
In the navigation list for the resource group, select Access Control (IAM).
The IAM blade appears as shown in Figure 2-75 with the Check Access tab selected.
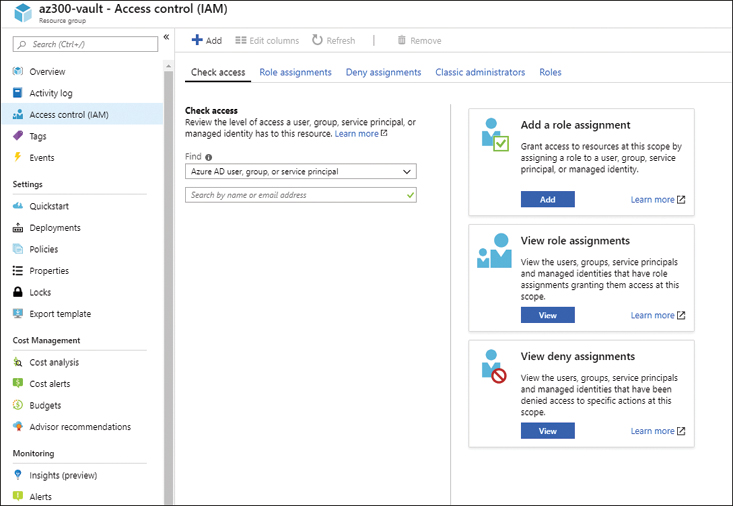
FIGURE 2-75 Check access to Azure resources
Before creating a custom role, it’s a good idea to check the access for the user or group the custom role will include. In addition to determining the need for a custom role, this check helps ensure existing access is known and can be updated after custom roles are created.
In the IAM blade, select Roles at the top right to view a list of the access a predefined role already has.
Click a role that might have some of the access your custom role will need to review its permissions.
The creation of custom roles happens through the Azure CLI or Azure PowerShell because there’s no portal-based method to build roles as of this writing. To create a custom role using PowerShell, complete the following steps:
Open a PowerShell console and connect to your Azure Subscription.
Use the following PowerShell command to collect the role you will start with:
$CustomRole = Get-AZRoleDefinition | where {$_.name -eq "Virtual Machine
Contributor"}
To view the actions this role has already, display the
Actionsproperty:$CustomRole.Actions
To keep the custom role creation fairly simple, create a role for VM operators that can manage and access virtual machines. The role called out earlier is allowed to manage but not access machines. The Virtual Machine Administrator Log in role allows log in but no management of the machine.
$AdminRole = get-azroledefinition | where {$_.name -eq "Virtual Machine
Administrator Log in"}
At this point, the
$CustomRolevariable should contain an object for the Virtual Machine Contributor role, and$AdminRoleshould contain an object for the Virtual Machine Administrator Log in role.As you can see from Figure 2-76, the actions allowing access to the VMs are missing from the Virtual Machine Contributor Role.

FIGURE 2-76 Missing permissions between built-in roles
To complete the custom role, add the missing admin permission to the $customRole object:
$customRole = get-azroledefinition | where { $_.name -eq "Virtual Machine
Contributor" }
$customRole.id = $null
$customRole.name = "Custom - Virtual Machine Administrator"
$Customrole.Description = "Can manage and access virtual machines"
$customRole.Actions.Add("Microsoft.Compute/VirtualMachines/*/read")
$customRole.AssignableScopes.Clear()
$CustomRole.AssignableScopes = "/subscriptions/<your subscription id>/
resourceGroups/<Resource Group for role>"
New-AzRoleDefinition -role $CustomRole
This will create a custom role called Custom - Virtual Machine Administrator and assign all the roles from the Virtual Machine Contributor Role plus the ability to log in to Azure Virtual Machines.
The role will be scoped to the supplied resource ID for the resource group chosen. This way, the added permissions are applicable only to the resource group(s) that need them—perhaps the Servers resource group.
Figure 2-77 shows the output of the command to create this custom role, with sensitive information redacted.

FIGURE 2-77 Newly created custom role
Configure access to resources by assigning roles
Previously, a custom role was created to allow management of and access to virtual machines within an Azure Resource Group. Because the custom role was scoped at the resource group level, it will only be assignable to resource groups.
To make use of the custom role and any built-in roles, the roles need to be assigned to users or groups, which makes them able to leverage these access rights.
To assign the newly created custom role to a group, complete the following steps:
In the Azure portal, locate the resource group to which the custom role was scoped.
Click the Access Control (IAM) link in the navigation pane.
Click Add and select Add Role Assignment.
In the Select A Role box, enter the name of the custom role “Custom –” and click the name of the role.
Note Custom Role Naming
Although the type of any custom roles is set to CustomRole when roles are added, we’ve found prepending the word “Custom –“ to the beginning of the name or following a naming standard predefined by your organization may make custom roles easier to find when searching for them at a later time.
The Assign Access To drop-down menu displays the types of identities that access can be assigned to:
■ Azure AD user, group, or service principal
■ User Assigned Managed Identity
■ System Assigned Managed Identity
■ App Service
■ Container Instance
■ Function App
■ Logic App
■ Virtual Machine
■ Virtual Machine Scale Set
Because virtual machine administrators are generally people, keep the Azure AD user, group, or service principal selected.
In the Select box, enter the name of the user or group to which this new role should be assigned.
Click the resultant username or group to select them.
Important About Groups
Keep in mind that using a group for role assignments is much lower maintenance than individually assigning users to roles.
Click Save to complete the role assignment.
The user (or users if a group was assigned) was assigned new access and might need to log out of the portal or PowerShell and log back in or reconnect to see the new access rights.
Configure Management Access to Azure
Like access to resources running in Azure, access to the platform itself is controlled using RBAC. There are some roles dedicated to the management of Azure resources at a very high level—think management groups and subscriptions.
When you use RBAC roles, the method of assigning access to subscriptions or management groups is the same as other resources, but the roles specific to management and where they’re assigned are different. These would be set at the subscription or management group level.
Important Cumulative by Default
RBAC access is cumulative by default, meaning contributor access at the subscription level is inherited by resource groups and resources housed within a subscription. Inheritance is not required because permission can be granted at lower levels within a subscription all the way down to the specific resource level. In addition, permission can also be denied at any level; doing so prevents access to resources where permission was denied. If denial of permissions happens at a parent resource level, any resources underneath the parent will inherit the denial.
There will always be an entity in Azure that is the overall subscription admin or owner. Usually this is the account that created the subscription but can (and should) be changed to a group to ensure that more than one person has top-level access to the subscription. In addition, this change will account for job changes, staff turnover, and reduce the likelihood that someone forgets about access to Azure during these situations.
To configure access to Azure at the subscription level, complete the following steps:
Log in to the Azure portal and select Subscriptions.
Click the subscription to be managed.
Click the Access Control (IAM) navigation item.
On the IAM blade, select Role Assignments.
The users or groups who have specific roles assigned are displayed. At the subscription level there should be few roles assigned, as shown in Figure 2-78. Most access happens at the resource group or resource level.

FIGURE 2-78 Roles assigned at the subscription level
Click Add at the top of the IAM blade.
Select Add Role Assignment.
Choose the Owner Role.
Leave the Assign Access To drop-down menu set to Azure AD User, Group, or Service Principal.
Select a group to assign to the owner role by searching for the group and then clicking it in the results.
Click Save.
The group has owner access at the subscription level. This access allows members of the group to create, modify, and remove any resources within the selected subscription.
Note Adding a Coadministrator
This is only necessary if Classic deployments are being used (the Classic portal). Assigning Owner RBAC rights in the Resource Management portal achieves the same result.
Troubleshoot RBAC
Identifying the cause of problems with RBAC may require some digging to understand why a user is unable to perform an action. When you’re assigning access through RBAC, be sure to keep a group of users configured for owner access. In addition to a group, consider enabling an online-only user as an owner as well. This way, if there is an issue with Active Directory, not all user accounts will be unable to access Azure.
Because Role-Based Access Control (RBAC) is central to resource access in Azure, using RBAC carefully is paramount in working with Azure. Like permissions in Windows before it, Azure RBAC brings a fair amount of trial and error to the table when assigning access. Also, because Azure is constantly evolving, there may be times when a permission just doesn’t work as stated.
The main panel of the IAM blade has improved considerably in recent time by providing a quick way to check access up front. If someone is questioning their access, an administrator or other team member can easily enter the username or group name where access is being questioned and see which role assignments are currently held. No more sifting through the role assignments list to determine if Fred has contributor or viewer access to the new resource group. This is one of the key tools in troubleshooting—being able to see who has what level of access.
During the times when Fred should have access to a particular resource, but claims to be missing access while Azure shows the correct role assignments, the Roles tab on the IAM blade shown in Figure 2-79 can help determine whether all the needed permissions are available. Sometimes they won’t be.

FIGURE 2-79 Reviewing role assignments for groups and users
Looking at the list of roles is only somewhat helpful. If Fred claims that he can’t read a resource, but he’s listed as having the reader role for the resource, there will likely be something going on behind the role. To see the permissions assigned to the listed role, click on the name of the role.
On the top of the listed assignments page for the role, click Permissions to see the list of permissions that make up the role.
You will see, as shown in Figure 2-80, the list of resource providers that the role meets and whether they have partial access or all access to the provider as well as what data access for a provider the role has.

FIGURE 2-80 Resource provider permissions within a role
Selecting a provider name from this view displays the components used by this role within a given provider and the permissions assigned, as shown for the Azure Data Box provider in Figure 2-81.

FIGURE 2-81 Permissions within the reader role for Azure Data Box
In addition to investigating which permissions get assigned with certain roles, changing roles for certain users or groups to see how access changes is another method that’s useful in working through access issues.
There also can be times when changes to RBAC are being cached—when settings changes just aren’t appearing once they’ve been made. In the Azure portal, changes made can take up to 30 minutes to be reflected. In Azure CLI or a PowerShell console, the process of signing out and signing in again will force settings to refresh when making changes to RBAC. Similarly, when using Rest APIs to manage permissions, updating the current access token will refresh permissions.
There are also times when certain resources may require permissions that are higher than the stated need—for example, working in an App Service may require write permission to the underlying storage account to ensure performance monitoring is visible; otherwise, it returns an error. In cases like this, perhaps elevated access (contributor in this case) might be preferable for a time to allow monitoring. This way, the developers get access to the items they need, but maybe the access doesn’t remain assigned long term.
Chapter summary
■ Virtual machines from on-premises datacenters or other cloud environments as well as physical servers can be migrated to Azure.
■ Azure Bastion removes the need for dedicated IaaS resources used to manage machines within a virtual network. In addition, since Bastion is a Platform-as-a-Service offering, there is no patching or updating that needs to be performed by the user.
■ Application load balancing and network load balancing work in tandem to ensure an all-around solution.
■ Serverless compute and Platform-as-a-Service resources move infrastructure management more to the cloud provider than having all the resources managed by an organization’s IT staff. This can save money in the long term.
■ Azure Traffic Manager can be used to route traffic between regions to help improve high availability for resources running in Azure and elsewhere.
■ Logic Apps perform custom integrations between applications and services both inside and outside of Azure.
■ Virtual network peering allows communication between networks in Azure without need for a VPN, whereas Site-to-Site VPNs connect Azure to existing on-premises networks and ExpressRoute provides completely private connections to Microsoft services from an on-premises environment.
■ Azure Firewall is a cloud-native firewall solution that currently exists per virtual network. Firewall policies can be pushed to multiple Azure Firewall instances for more uniform configuration.
■ Role-Based Access Control aligns user access to Azure resources more closely with job roles. Keep in mind that this alignment is not always perfect and multiple roles may be necessary to provide the correct access.
■ Policies in Azure help to ensure that resources can be audited for compliance and deployment controlled as required by the organization.
■ Managed Identity Services will allow applications to register within Azure Active Directory. Using fully managed tokens for these applications keeps the credentials out of application code and seamlessly provides access to other Azure resources.
■ Azure Key Vault allows managed identity access for secure access to secrets, keys, and certificates with very little overhead.
■ Azure Blueprint provides fully templated resource creation, including policy and role-based access to the new resources. Leveraging these for repeatable deployment can improve the speed and efficiency of deployment.
Thought experiment
In this thought experiment, demonstrate your skills and knowledge of the topics covered in this chapter. You can find the answers to thought experiment questions in the next section.
You are an Azure architect hired by Fabrikam to help them configure Azure networking and access to resources within their environment as they move from an on-premises datacenter to Azure.
Meetings have been productive for the most part in reviewing what they have in Azure today, but in researching the environment you make the following recommendations/requirements:
Connections between virtual networks are incurring a significant cost: this should be reduced if possible.
IaaS workloads in Azure have open access to RDP to allow maintenance and are exposed to the Internet on public IP addresses. To improve security, the public IP should be removed while still allowing access for server management.
A web application has been called out by others in the organization for issues with high availability. This is something that should be done as soon as possible—there is no need at this time to worry about regional boundaries.
Considering the discovered requirements, answer the following questions:
1. How would you reduce the cost of virtual network connections within Azure?
2. What Azure solution(s) could allow you to remove public IP addresses from virtual machines and still access them for management tasks?
3. What could you use to ensure that the web application is failed over to another site in the event of an outage?
Thought experiment answers
This section contains the solution to the thought experiment for this chapter. Please keep in mind there may be other ways to achieve the desired result. Each answer explains why the answer is correct.
1. Connections between Virtual Networks in Azure can be made using VNet Peering. Creating two one-way peers between two VNets should reduce the cost of the connections because there is no need to pay for Virtual Network Gateway resources in each VNet. Since the peers can also cross region boundaries, they will maintain connections between regions as well.
2. Public IP addresses can be a necessary resource to ensure your customers can reach your applications. There are a number of possible solutions here—since the requirement is for management access to servers and no public IP addresses, the least overhead method would be to configure Azure Bastion on the VNet hosting the server(s) and use that for access. This way the public IP addresses could be removed. If the servers are joined to an Active Directory Domain and available over a Site-to-Site VPN, RDP will still work, and a public IP would not be needed.
3. Ensuring high availability for web applications can also take multiple paths. Leveraging an Application Gateway would provide a regional public endpoint that your customers could access. This would also send the inbound traffic to one or multiple backend resources to provide high availability in the event one resource becomes unavailable or needs maintenance. To work across regions, a duplicate configuration would be needed for the Application Gateway and any app services needed. Then a traffic manager would be deployed in front of the Application Gateways to direct incoming DNS-based traffic to the desired Application Gateway.