Chapter 1
Deploy and manage Active Directory Domain Services in on-premises and cloud environments
Identity is the keystone of a successful hybrid cloud deployment. Users want to be able to access resources across on-premises and cloud estates using the same set of credentials. For more than two decades, Active Directory Domain Services (AD DS) has been the foundation of the on-premises Microsoft ecosystem and is still used by hundreds of thousands of customers today. Being able to manage and maintain AD DS is a skill that will be critical for many organizations for decades to come. The identity keystone of Microsoft Azure is Azure Active Directory (Azure AD). In this chapter you’ll learn how to manage and maintain the complex elements of an on-premises identity infrastructure and how you can build a bridge so that on-premises identities can be used to access resources and workloads in Azure.
Skills covered in this chapter:
Skill 1.2: Configure and manage multi-site, multi-domain, and multi-forest environments
Skill 1.5: Manage Windows Server by using domain-based Group Policies
Skill 1.1: Deploy and manage AD DS domain controllers
Domain controllers are the pillars that hold AD DS together and are perhaps the most important servers in your on-premises network. Without domain controllers there is no centralized identity, and with no centralized identity, access to disparate resources becomes at best complicated and at worst logistically impossible. The domain controller server role processes authentication requests, hosts the AD DS database, and maintains all the background processes that keep Microsoft’s on-premises identity infrastructure functioning.
Deploy and manage domain controllers on-premises
Active Directory, the identity glue that binds on-premises Microsoft networks, is at the center of almost all on-premises networks. Although each computer can have its own unique individual user and service accounts, Active Directory provides a central user, computer, and service account store.
But Active Directory is more than an identity store; it can also be used to store data for Active Directory–aware applications. One example of this is Microsoft Exchange Server, which stores server configuration information in Active Directory. Other applications, such as Configuration Manager, are also highly dependent on Active Directory.
Managing Active Directory
You should perform Active Directory management tasks remotely using Windows Admin Center, management consoles, or PowerShell rather than signing on to the domain controller directly using RDP. If you’re doing all your administrative tasks remotely using Windows Admin Center, management consoles, or PowerShell, it won’t make any difference to you that you’ve deployed the domain controller in the more secure Server Core configuration. Using remote administration tools also reduces the chance of malware being introduced to the domain controller. There are countless stories of organizations having their security compromised because an administrator signed in to a server using Remote Desktop, went to download a utility from the internet using the built-in web browser, and ended up with more than they bargained for in terms of malware because they weren’t careful about their browsing destinations.
A general rule about consoles is that if you need to perform a task only a couple of times, you should use Windows Admin Center or a console. If you are new to a task, you’re less likely to mess it up if you use a GUI tool. This is because a GUI tool holds your hand and assists you through the task. If you must repeatedly perform the same task, and it’s a task that you are familiar with, you should automate it using tools such as PowerShell. One caveat is that you should avoid spending days automating a task that takes only a couple of minutes to perform manually unless, over enough time, you’d get those days back because of the amount of time the automation would save you.
There are a number of consoles that you can use to perform Active Directory administrative tasks. These include the following:
Active Directory Administrative Center
Active Directory Users and Computers
Active Directory Sites and Services
Active Directory Domains and Trusts
As of this writing, Windows Admin Center provides some Active Directory administrative functionality but not nearly enough that AD administrators could use it as their primary tool for managing AD DS. Microsoft’s intention is that Windows Admin Center will eventually be the primary tool to manage AD DS. As a part of your AZ-800 studies, you should experiment with what is possible using Windows Admin Center in your own practice lab environment.
Active Directory Administrative Center
Active Directory Administrative Center (ADAC) was introduced with Windows Server 2012, but it never caught on as the primary method of managing AD DS for most administrators. ADAC allows you to manage users, computers, and service accounts to perform tasks with the Active Directory, such as Recycle Bin, and to manage functionality, such as Dynamic Access Control.
ADAC is a newer console that has better search functionality than the other consoles listed in this chapter, which haven’t substantively changed since the release of Windows 2000.
You can use ADAC to manage the following:
User, computer, and service accounts
Domain and forest functional level
Fine-grained password policies
Active Directory Recycle Bin GUI
Authentication policies
Dynamic Access Control
ADAC is built on PowerShell, meaning that it provides a graphical interface to build and enact PowerShell cmdlets. You can use the PowerShell History Viewer to see which cmdlets were used to carry out a task that you configured in the GUI. This simplifies the process of automating tasks because you can copy code straight out of the PowerShell history and then paste it into tools such as PowerShell ISE or Visual Studio Code.
One of the most useful elements of ADAC is the search functionality. You can use this functionality to locate accounts that might require further attention, such as users who haven’t signed in for a certain period of time, users configured with passwords that never expire, or users with locked accounts. Using the Add criteria option in the Global Search node of the ADAC, you can search based on the following criteria:
Users with disabled/enabled accounts
Users with an expired password
Users whose password has an expiration date/no expiration date
Users with enabled but locked accounts
Users with enabled accounts who haven’t logged on for more than a given number of days
Users with a password expiring in a given number of days
Computers running as a given domain controller type
Last modified between given dates
Object type is user/inetOrgPerson/computer/group/organizational unit
Directly applied password settings for a specific user
Directly applied password settings for a specific global security group
Resultant password settings for a specific user
Objects with a given last known parent
Resource property lists containing a given resource property
Name
Description
City
Department
Employee ID
First name
Job title
Last name
SamAccountName
State/province
Telephone number
UPN
Zip/postal code
Phonetic company name
Phonetic department
Phonetic display name
Phonetic first name
Phonetic last name
There are several tasks that you can’t do with ADAC or with PowerShell, such as running the Delegation Of Control Wizard. Generally speaking, when managing Active Directory using a console on Windows Server, you should use ADAC as your first option and fall back to Active Directory Users and Computers if you can’t accomplish what you need to in ADAC.
Active Directory Users and Computers console
The Active Directory Users and Computers console is the one that many system administrators use to perform basic AD-related tasks. They use this console primarily out of habit because almost all functionality present in this console is also present in Active Directory Administrative Center. Active Directory Users and Computers has been around since the days of Windows 2000 Server.
Active Directory Users and Computers allows you to perform a number of tasks, including:
Running the Delegation of Control Wizard
Administering different domains within the forest
Selecting which domain controller or LDAP port the tool connects to
Finding objects within the domain
Raising the domain functional level
Managing the RID Master, PDC Emulator, and Infrastructure Master FSMO role locations
Creating and editing the properties of
Computer accounts
User accounts
Contacts
Groups
InetOrgPerson
msDS-ShadowPrincipalContainers
msImaging-PSPs
MSMQ Queue Alias
Organizational units
Printers
Shared folders
Resultant Set of Policy planning
The View Advanced Features function allows you to see more details of the Active Directory environment. You enable this from the View menu of Active Directory Users and Computers. Enabling this view allows you to see containers that aren’t visible in the standard view. If you’ve ever read a set of instructions that tell you to locate a specific object using Active Directory Users and Computers, and you haven’t been able to find that object, chances are that you haven’t enabled the View Advanced Features option.
The Delegation of Control Wizard is only available in Active Directory Users and Computers. This wizard allows you to delegate control over the domain and organizational units (OUs). For example, you use this wizard to delegate the ability for a specific group to reset user passwords in an OU. This wizard is useful when you want to delegate some privileges to a group of IT operations staff but you don’t want to grant them all the privileges that they’d inherit if you made them a member of the Domain Admins group.
Active Directory Sites and Services console
You use the Active Directory Sites and Services console to manage Active Directory sites, which indirectly allows you to control a number of things, including replication traffic and which server a client connects to when using products such as Exchange Server. Sites are configured for the forest, with each domain in the forest sharing the same set of sites. You’ll learn more about configuring and managing replication and sites later in the chapter.
Active Directory Domains and Trusts console
You use the Active Directory Domains and Trusts console to configure and manage trust relationships. By default, all domains in a forest trust each other. Your primary use of this console is to create trust relationships between:
Domains in separate forests
Separate forests
Kerberos V5 realms
When creating a trust, you can choose among the following types:
One-Way: Incoming In this trust relationship, your local domain or forest is trusted by a remote domain or forest.
One-Way: Outgoing In this trust relationship, your local domain or forest trusts a remote domain or forest.
Two-Way In this trust relationship, your local domain or forest trusts (and is trusted by) a remote domain or forest.
When configuring a trust, you can determine whether you want to configure selective authentication. By default, the trust works for all users in the source or destination forest or domain. When you configure selective authentication, you can limit which security principals are allowed access and which resources they can access. You do this by configuring those users with the Allowed To Authenticate permission on each resource computer in the trusting domain or forest. Trusts are discussed in more detail later in the chapter.
Deploying Domain Controllers
Domain controllers (DCs) are the heart of AD DS. Their primary role is to host the AD DS database, stored in the ntds.dit file. Deploying an AD DS domain controller involves first installing the AD DS binaries and then promoting the domain controller. You can perform this process using the Server Manager console or PowerShell. When you promote the domain controller, you choose whether you want to:
Add a domain controller to an existing domain
Add a new domain to an existing forest
Add a new forest
If you are adding a domain controller to an existing domain, ensure the computer is domain joined before promoting it. When you add a new domain to an existing forest, choose between adding a child domain or a tree domain. When you add a tree domain, you create a new namespace within an existing forest. For example, you can create the Adatum.com domain in the existing contoso.com forest. contoso.com remains the root domain of the forest.
Microsoft’s recommendation is that you use a registered root domain name, such as contoso.com for the domain name, rather than a nonexternally resolvable domain name like contoso.internal. Having a registered externally resolvable domain name simplifies the process when you’re configuring synchronization with Azure AD Connect.
If you choose to use a publicly registered domain name, understand that Windows Server 2022 and Azure DNS both support split DNS. This means that you can configure zones so that a subset of records is resolvable for clients on external networks and that internal records will only be resolvable by internal clients. Many organizations still use nonresolvable domain names, and you should take the Microsoft advice into account only if you are deploying a new forest or reconfiguring a domain in preparation for synchronizing with Azure Active Directory.
When you add a new child domain to an existing forest, you specify the parent domain. For example, you could add the australia.contoso.com child domain to the contoso.com domain. After you’ve done that, you can add the victoria.australia.contoso.com child domain to the australia.contoso.com parent domain. Adding a child domain requires Enterprise Administrator credentials in the forest.
When deploying a domain controller in an environment with multiple sites configured, you can select which site you want the domain controller to belong to. You can change this after deployment using the Active Directory Sites and Services console.
Directory Services Restore Mode passwords
Directory Services Restore Mode (DSRM) allows you to perform an authoritative restore of deleted objects from the AD DS database. You must perform an authoritative restore of deleted items because if you don’t, the restored item is deleted the next time the AD database synchronizes with other domain controllers where the item is marked as deleted. Authoritative restores are covered later in this chapter. You configure the Directory Services Restore Mode password on the Domain Controller Options page of the Active Directory Domain Services Configuration Wizard, as shown in Figure 1-1. Note that even though a computer running Windows Server 2022 is being configured as a domain controller, the maximum forest and domain functional levels are Windows Server 2016. This is because there is no Windows Server 2019 or Windows Server 2022 domain or forest functional level.

FIGURE 1-1 Configuring Domain Controller Options.
In the event that you forget the DSRM password, which, in theory, should be unique for each domain controller in your organization, you can reset it by running ntdsutil.exe from an elevated command prompt and entering the following commands at the ntdsutil.exe prompt, at which point you are prompted to enter a new DSRM password:
set dsrm password
Reset password on server null
Advanced installation options
One of the advanced installation options for domain controllers is to install from media. Installing from media gives you the option of prepopulating the AD DS database for a new DC from a backup of an existing DC’s AD DS database, rather than having that database populated through synchronization from other domain controllers in your organization. This is very useful when you need to deploy a DC at a remote location that has limited wide area network (WAN) connectivity and you don’t want to flood the WAN link with AD DS database synchronization traffic during domain controller deployment. Instead, you ship a backup of the AD DS database to the remote site, and that backup is used to perform initial AD DS database population. After the newly installed DC connects to other domain controllers, it performs a synchronization, bringing the database up to date with a much smaller synchronization than what would be required when synchronizing from scratch.
Server Core
Because the reduced attack surface area of Server Core deployments makes it more secure, domain controllers that don’t have a GUI dependency are one of several perfect workloads for Server Core deployments. Microsoft recommends deploying domain controllers using the Server Core deployment option and managing those servers remotely.
To configure a computer running Server Core as a domain controller, you can:
Remotely connect to the server using the Server Manager console.
Run the Add Roles and Features Wizard to remotely install the Active Directory binaries on the server.
Run the Active Directory Domain Services Configuration Wizard to promote the computer to a domain controller.
You can also use Windows Admin Center to deploy the AD DS feature, but the amount of AD DS configuration you can perform remotely using Windows Admin Center isn’t yet at parity with the older Server Manager or Microsoft Management Console tools. As an alternative to using the wizard or console, you can run the following PowerShell commands, either locally or remotely, to install the AD DS binaries and promote the server to domain controller:
Install-WindowsFeature AD-Domain-Services -IncludeManagementTools
Install-ADDSDomainController -DomainName contoso.internal -InstallDNS:$True -credential
(Get-Credential)
In addition to running this set of commands, you need to specify a Directory Service Restore Mode password before the computer running Server Core completes the domain controller promotion process. You’ll need to use the Install-ADDSForest cmdlet if you are installing the first domain in a new forest, as shown here:
Install-ADDSForest -DomainName contoso.internal -InstallDNS
Virtualized domain controllers
Domain controllers can be run on supported virtualization platforms, including the latest version of VMware and Hyper-V. With the Production Checkpoints feature available in Windows Server 2022 Hyper-V, domain controllers can be restored from a checkpoint without causing problems. Microsoft recommends that you run virtualized domain controllers as shielded virtual machines (VMs) on a guarded virtualization fabric or on Azure Stack HCI because this will minimize the chance that a nefarious or compromised virtualization administrator account could be used to access the contents of the DC VM.
Global catalog servers
Global catalog servers host a full copy of all objects stored in its host directory and a partial, read-only copy of all other objects in other domains in the same forest. They are used when it’s necessary to perform a check of other objects in the forest, such as when a check is performed of a universal group’s membership, which could contain members from other domains in the forest.
You can use the Active Directory Sites and Services console to configure a server to function as a global catalog server by right-clicking the NTDS settings of the server. Alternatively, you can run the Set-ADObject cmdlet. For example, to configure the DC MEL-DC1 in the Melbourne-Site site as a global catalog server, you’d run the following command:
Set-ADObject "CN=NTDS Settings,CN=MEL-DC1,CN=Servers,CN=Melbourne-Site,CN=Sites,
CN=Configuration,DC=Contoso,DC=Internal" -Replace @{options='1'}
Consider the following when choosing to deploy Global Catalog servers:
For optimal performance, make every domain controller a Global Catalog server in a single domain forest.
In multi-domain forests, deploy at least one Global Catalog server to each site that has more than 100 users.
The drawback to deploying Global Catalog servers in multi-domain environments (and the reason why this role isn’t enabled by default) is replication. In multi-domain forests in which universal groups are in use, Global Catalog servers can be responsible for a substantial amount of replication traffic across branch-office WAN links. If a site has fewer than 100 users, you can enable universal group membership caching to achieve a similar result without the bandwidth utilization that deploying a Global Catalog server incurs.
Universal group membership caching (UGMC) performs a function similar to the one that a Global Catalog server performs. UGMC is suitable for small sites that don’t have enough users to justify deploying a Global Catalog server. You enable UGMC at the site level instead of the Global Catalog server level by configuring NTDS Site Settings properties.
Active Directory backup
AD DS is backed up when you perform a backup of the server’s system state. This occurs when you back up all critical volumes on a domain controller. The primary tool you use for backing up this data is Windows Server Backup, which is not installed by default on computers running Windows Server. You can install Windows Server Backup using the following PowerShell command:
Install-WindowsFeature -IncludeAllSubFeature -IncludeManagementTools Windows-
Server-Backup
The majority of restore operations occur because Active Directory objects were accidentally (rather than deliberately) deleted. You can configure objects to be protected from accidental deletion by editing the object properties. When you attempt to delete an object that is protected from accidental deletion, a dialog box will inform you that the object can’t be deleted because it is protected from accidental deletion. This protection option must be removed before you or anyone else can delete the object.
Restoring deleted items
Sometimes an Active Directory account, such as a user account or even an entire OU, is accidentally or, on occasion, maliciously deleted. Rather than go through the process of re-creating the deleted item or items, it’s possible to restore the items. Deleted items are retained within the AD DS database for a period of time specified as the tombstone lifetime. You can recover a deleted item without having to restore the item from a backup of Active Directory as long as the item was deleted in the Tombstone Lifetime window.
The default tombstone lifetime for an Active Directory environment at the Windows Server 2008 forest functional level or higher is 180 days. You can check the value of the tombstone lifetime by issuing the following command from an elevated command prompt (substituting dc=Contoso,dc=Internal for the suffix of your organization’s forest root domain):
Dsquery * "cn=Directory Service,cn=Windows NT,cn=Services,cn=Configuration,dc=Contoso,dc
=Internal" -scope base -attr tombstonelifetime
For most organizations the 180-day default is fine, but some administrators might want to increase or decrease this value to give them a greater or lesser window for easily restoring deleted items. You can change the default tombstone lifetime by performing the following steps:
From an elevated command prompt or PowerShell session, type ADSIEdit.msc.
From the Action menu, select Connect To. In the Connection Settings dialog box, ensure that Configuration is selected under Select a well known Naming Context, as shown in Figure 1-2, and then select OK.

FIGURE 1-2 Connection settings.
Navigate to, and then right-click the CN=Services, CN=Windows NT, CN=Directory Service node and select Properties.
In the list of attributes, select tombstoneLifetime, as shown in Figure 1-3, and select Edit.
Enter the new value, and then select OK twice.

FIGURE 1-3 Tombstone lifetime.
Active Directory Recycle Bin
Active Directory Recycle Bin allows you to restore items that have been deleted from Active Directory but that are still present within the database because the tombstone lifetime has not been exceeded. Active Directory Recycle Bin requires that the domain functional level be set to Windows Server 2008 R2 or higher. You can’t use the Active Directory Recycle Bin to restore items that were deleted before you enabled Active Directory Recycle Bin.
Once it’s activated, you can’t deactivate the Active Directory Recycle Bin. There isn’t any great reason to want to deactivate AD Recycle Bin once it’s activated. You don’t have to use it to restore deleted items should you still prefer to go through the authoritative restore process.
To activate the Active Directory Recycle Bin, perform the following steps:
Open the Active Directory Administrative Center and select the domain that you want to enable.
In the Tasks pane, select Enable Recycle Bin, as shown in Figure 1-4.

FIGURE 1-4 Enable Recycle Bin.
After you have enabled the AD Recycle Bin, you can restore an object from the newly available Deleted Objects container. This is, of course, assuming that the object was deleted after the Recycle Bin was enabled and assuming that the tombstone lifetime value has not been exceeded. To recover the object, select the object in the Deleted Objects container and then select Restore or Restore To. Figure 1-5 shows a deleted item being selected that can then be restored to its original location. The Restore To option allows you to restore the object to another available location, such as another OU.

FIGURE 1-5 Deleted Objects container.
Authoritative restore
An authoritative restore is performed when you want the items you are recovering to overwrite items that are in the current Active Directory database. If you don’t perform an authoritative restore, Active Directory assumes that the restored data is simply out of date and overwrites it when it is synchronized from another domain controller. If you perform a normal Restore on an item that was backed up last Tuesday when it was deleted the following Thursday, the item is deleted the next time the Active Directory database is synchronized. You do not need to perform an authoritative restore if you only have one domain controller (DC) in your organization because there is no other domain controller that can overwrite the changes.
Authoritative Restore is useful in the following scenarios:
You haven’t enabled Active Directory Recycle Bin.
You have enabled Active Directory Recycle Bin, but the object you want to restore was deleted before you enabled Active Directory Recycle Bin.
You need to restore items that are older than the tombstone lifetime of the AD DS database.
To perform an authoritative restore, you need to reboot a DC into Directory Services Restore Mode. If you want to restore an item that is older than the tombstone lifetime of the AD DS database, you also need to restore the AD DS database. You can do this by restoring the system state data on the server. You’ll likely need to take the DC temporarily off the network to perform this operation simply because if you restore a computer with old system state data and the DC synchronizes, all the data that you wish to recover will be deleted when the domain controller synchronizes.
You can configure a server to boot into Directory Services Restore Mode from the System Configuration utility. To do this, select Active Directory repair on the Boot tab, as shown in Figure 1-6. After you’ve finished with Directory Services Restore Mode, use the same utility to restore normal boot functionality.

FIGURE 1-6 System Configuration.
To enter Directory Services Restore Mode, you need to enter the Directory Services Restore Mode password.
To perform an authoritative restore, perform the following general steps:
Choose a computer that functions as a Global Catalog server. This DC functions as your restore server.
Locate the most recent system state backup that contains the objects that you want to restore.
Restart the restore server in DSRM mode. Enter the DSRM password.
Restore the system state data.
Use the following command to restore items (where
Mercuryis the object name,Planetsis the OU that it is contained in, andcontoso.comis the host domain):Ntdsutil "authoritative restore" "restore object cn=Mercury,ou=Planets,dc=contoso, dc=com" q q
If an entire OU is deleted, you can use the Restore Subtree option. For example, if you deleted the Planets OU and all the accounts that it held in the contoso.com domain, you could use the following command to restore it and all the items it contained:
Ntdsutil "authoritative restore" "restore subtree OU=Planets,DC=contoso,DC=com" q q
Nonauthoritative restore
When you perform a nonauthoritative restore, you restore a backup of Active Directory that’s in a good known state. When rebooted, the domain controller contacts replication partners and overwrites the contents of the nonauthoritative restore with all updates that have occurred to the database since the backup was taken. Nonauthoritative restores are appropriate when the Active Directory database on a database has been corrupted and needs to be recovered. You don’t use a nonauthoritative restore to recover deleted items, since any deleted items that are restored when performing the nonauthoritative restore will be overwritten when changes replicate from other DCs.
Performing a full system recovery on a DC functions in a similar way to performing a nonauthoritative restore. When the recovered DC boots, all changes that have occurred in Active Directory since the backup was taken overwrite existing information in the database.
Other methods of recovering deleted items
Although the recommended way of ensuring that deleted Active Directory objects are recoverable is to enable the Active Directory Recycle Bin or to perform an authoritative restore using DSRM, you can also use tombstone reanimation to recover a deleted object. Tombstone reanimation involves using the ldp.exe utility to modify the attributes of the deleted object so that it no longer has the deleted attribute. Because it may lead to unpredictable results, you should use tombstone reanimation only if no backups of the system state data exist and you haven’t enabled the Active Directory Recycle Bin.
Although Active Directory snapshots do represent copies of the Active Directory database at a particular point in time, you should use mounted snapshots to determine which backup contains the items you want to authoritatively restore. It is possible to export objects from snapshots and to reimport them into Active Directory using tools such as LDIFDE (LDAP Data Interchange Format Data Exchange), but this can lead to unpredictable results.
Virtual domain controller cloning
All versions of Windows Server since Windows Server 2012 support virtual domain controller cloning. Rather than redeploying DCs from scratch each time you need one, domain controller cloning allows you to take an existing virtual machine (VM), make a copy of it, and deploy that copy.
Virtual domain controller cloning has the following prerequisites:
The hypervisor must support VM-GenerationID. The version of Hyper-V included with Windows Server 2012 and later supports this technology, as do the most recent versions of VMware.
The source domain controller needs to be running Windows Server 2012 or later.
The domain controller that hosts the PDC Emulator role must be online and contactable by the cloned DC. The computer that hosts the PDC Emulator role must also be running Windows Server 2012 or later.
The source DC must be a member of the Cloneable Domain Controllers group.
You also need to create the DCCloneConfig.xml file. You can do this by using the New-ADDCCloneConfig cmdlet in PowerShell. When running this cmdlet, you must specify the cloned DC’s IPv4 address information and the site the cloned DC is deployed into.
For example, to create the clone configuration file for a clone DC that has the IP address 10.10.10.42 with the subnet mask 255.255.255.0, a default gateway of 10.10.10.1, a DNS server address of 10.10.10.10, and a site name of MEL-SITE, issue this command:
New-ADDCCloneConfigFile -IPv4Address 10.10.10.402 -IPv4DefaultGateway 10.10.10.1
-IPv4SubnetMask 255.255.255.0 -IPv4DNSResolver 10.10.10.10 -Static -SiteName MEL-SITE
After the clone configuration file is created, you import the VM using this file and specify a copy of the source DC’s exported virtual hard disk.
Need More Review? Install Active Directory Domain Services
You can learn more about topic at https://docs.microsoft.com/windows-server/identity/ad-ds/deploy/install-active-directory-domain-services--level-100-/.
AD DS Structure
AD DS is made up of forests and domains. A forest is a collection of AD DS domains that share a schema and some security principals. The majority of organizations in the world have a single forest domain. Multiple domain forests are generally used by larger, geographically dispersed organizations.
Domains
For the majority of organizations in the world, a single domain would be sufficient. There are two general reasons for having multiple domains in a forest. The first is that your organization is geographically dispersed, and there are issues around domain replication traffic. The second is that your organization is very large. A single domain can hold a staggering number of objects. Unless your organization has tens of thousands of users, a single domain is usually more than enough.
A domain tree is a collection of domains that share a namespace in a parent-child relationship. For example, the domains australia.contoso.com and tonga.contoso.com would be child domains of the contoso.com domain.
You should always deploy at least two DCs per domain for redundancy purposes. Make sure that if you have a multi-domain forest, you are making regular backups of the domain controllers in the root domain. There has been more than one organization with a multi-domain forest that has had the root domain AD DS domain controllers fail irreparably, making it necessary to redeploy the entire forest from scratch.
Multi-domain Active Directory environments
The majority of current AD DS deployments in small and medium-sized enterprises have a single domain. This hasn’t always been the case because earlier versions of the Windows Server operating system, such as Windows NT4, supported far fewer accounts. Supporting a smaller number of accounts often necessitated the use of multiple domains, and it wasn’t unusual to see medium-sized organizations that used complicated domain structures.
Each Windows Server domain controller can create approximately 2.15 billion objects during its lifetime, and each domain supports the creation of up to approximately 2.15 billion relative identifiers (RIDs). Given this, however, few administrators implement multiple-domain forests because they need to support a large number of users.
There are many reasons why organizations implement multi-domain forests. These can include but are not limited to:
Historical domain structure Even though newer versions of the Windows Server operating system handle large numbers of objects more efficiently, some organizations have retained the forest structure that was established when the organization first adopted AD DS.
Organizational or political reasons Some organizations are conglomerates, and they might be composed of separate companies that share a common administrative and management core. An example of this is a university faculty in Europe or Australia, such as a Faculty of Science, that consists of different departments or schools, such as the School of Physics and the Department of Botany. For political or organizational reasons, it might have been decided that each department or school should have its own domain that is a part of the overall faculty forest. AD DS gives organizations the ability to create domain namespaces that meet their needs, even if those needs might not directly map to the most efficient way of accomplishing a goal from a strict technical perspective.
Security reasons Domains enable you to create authentication and authorization boundaries. You can also use domains to partition administrative privileges so that you can have one set of administrators who are able to manage computers and users in their own domain, but who are not able to manage computers and users in a separate domain. Although it’s possible to accomplish a similar goal by delegating privileges, many organizations prefer to use separate domains to accomplish this goal.
Domain trees
A domain tree is a set of names that share a common root domain name. For example, contoso.com can have pacific.contoso.com and atlantic.contoso.com as child domains, and these domains can have child domains themselves. A forest can have multiple domain trees. When you create a new tree in a forest, the root of the new tree is a child domain of the original root domain. In Figure 1-7, adatum.com is the root of a new domain tree in the contoso.com forest.

FIGURE 1-7 Contoso.com as the root domain in a two-tree forest.
The depth of a domain tree is limited by a domain having maximum fully qualified domain name (FQDN) length for a host of 64 characters.
Intra-forest authentication
All domains within the same forest automatically trust one another. This means that in the environment shown earlier in Figure 1-7, you can assign a user in the Australia.pacific.contoso.com permissions to a resource in the arctic.adatum.com domain without performing any extra configuration.
Because of the built-in automatic trust relationships, a single forest implementation is not appropriate for separate organizations, even when they are in partnership with one another. A single forest makes it possible for one or more users to have administrative control. Most organizations aren’t comfortable even with trusted partners having administrative control over their IT environments. When you do need to allow users from partner organizations to have access to resources, you can configure trust relationships or federation.
Domain functional levels
The domain functional level determines which AD DS features are available and which operating systems can participate as domain controllers within the domain. The domain functional level determines the minimum domain controller operating system. For example, if the domain functional level is set to Windows Server 2012, DCs must run Windows Server 2012 or later. This rule does not apply to member servers. You can have a domain running at the Windows Server 2016 functional level that still has servers running the Windows Server 2012 R2 operating system. Unlike previous versions of the Windows Server operating system, which introduced new domain functional levels, there is no Windows Server 2019 or Windows Server 2022 domain functional level and Windows Server 2016 is as far as you can go.
You can configure or verify the current domain functional level from the Active Directory Administrative Center console by selecting the domain and selecting Raise Domain Functional Level. You can also perform this task from the Active Directory Domains and Trusts console and the Active Directory Users and Computers console. You can also configure the domain functional level using the Set-ADDomainMode PowerShell cmdlet.
Windows Server 2022 DCs support the following functional levels:
Windows Server 2008
Windows Server 2008 R2
Windows Server 2012
Windows Server 2012 R2
Windows Server 2016
You can introduce a DC running Windows Server 2022 to a domain at the Windows Server 2008 functional level as long as all the appropriate updates are installed and the domain is configured to use Distributed File Service (DFS) rather than File Replication System (FRS) for replication. You can raise the functional level after you’ve retired existing DCs running older versions of the Windows Server operating system. If all your DCs are running Windows Server 2022, you should update your domain functional level to the Windows Server 2016 functional level.
Even when older Windows Server DCs have long been removed, it’s not unusual for people to have forgotten to elevate the functional level. Because you get greater functionality by raising functional levels and there is no downside to doing so beyond not being able to introduce a domain controller running an operating system below that of the functional level, you should raise functional levels as high as possible. Because you should be running only Windows Server 2022 domain controllers to have the best possible security, your organization’s domain functional level should be Windows Server 2016.
Forests
A forest is a collection of domains that share a schema and a Global Catalog. There are automatic trust relationships between all domains in a forest. Accounts in one domain in a forest can be granted rights to resources in other domains. As mentioned earlier in this chapter, forests don’t need to have a contiguous namespace. For example, a forest can contain both the contoso.com and adatum.com domains.
There are several reasons why an organization might have multiple forests with trust relationships configured between those forests. The most common is that one organization has acquired another and multiple forests exist until such a time that the users and resources hosted in the forest of the acquired organization are moved to the forest of the acquiring organization. A less common one is that an organization is splitting off a part of itself and users need to be migrated out of the existing forest and into a new forest prior to the split occurring.
Forest functional levels are determined by the minimum domain functional level in the forest. After you’ve raised the domain functional levels in the forest, you can raise the forest functional level. Unlike in previous versions of AD DS, it is possible to lower both the forest and domain functional levels after they have been raised. An important caveat with this is that the forest functional level must be lowered so that it is never higher than the lowest intended domain functional level.
You can raise the forest functional level from the Active Directory Administrative Center console by selecting the forest root domain and selecting Raise Forest Functional Level. You can also perform this task from the Active Directory Domains and Trusts console. You can also configure the domain functional level using the Set-ADForestMode PowerShell cmdlet.
Account and resource forests
Some organizations with strict security requirements deploy Enhanced Security Administrative Environment (ESAE) forests. In an ESAE forest design, all of the accounts used for administrative tasks in the production forest are hosted in a second forest known as the ESAE, bastion, or administrative forest. The ESAE forest is configured with one-way trust relationships with the production forest.
In their native administrative forest, the accounts used for administrative tasks in the production forest are traditional unprivileged user accounts. These accounts and the groups that they are members of in the administrative forest are delegated privileges in the production forest.
The advantage of this approach is that should one of these accounts become compromised, it can’t be used to alter any permissions or settings in the administrative forest because the account only has privileges in the production forest.
Active Directory database optimization
There are several steps you can take to optimize your Active Directory database, including defragmenting the database, performing a file integrity check, and performing a semantic integrity check.
When you defragment the Active Directory database, a new copy of the database file, Ntds.dit, is created. You can defragment the Active Directory database or perform other operations only if the database is offline. You can take the Active Directory database offline by stopping the AD DS service, which you can do from the Update Services console or by issuing the following command from an elevated PowerShell prompt:
Stop-Service NTDS -force
You use the ntdsutil.exe utility to perform the fragmentation using the following command:
ntdsutil.exe "activate instance ntds" files "compact to c:\" quit quit
After the defragmentation has completed, copy the defragmented database over the original located in C:windowsNTDS tds.dit and delete all log files in the C:windowsNTDS folder.
You can check the integrity of the file that stores the database using the ntdsutil.exe by issuing the following command from an elevated prompt when the AD DS service is stopped:
ntdsutil.exe "activate instance ntds" files integrity quit quit
To verify that the AD DS database is internally consistent, you can run a semantic consistency check. The semantic check can also repair the database if problems are detected. You can perform a semantic check using ntdsutil.exe by issuing the following command:
ntdsutil.exe "activate instance ntds" "semantic database analysis" "verbose on" "go
fixup" quit quit
Active Directory metadata cleanup
The graceful way to remove a domain controller is to run the Active Directory Domain Services Configuration Wizard to remove AD DS. You can also remove the domain controller gracefully by using the Uninstall-ADDSDomainController cmdlet. When you do this, the domain controller is removed, all references to the domain controller in Active Directory are also removed, and any FSMO roles that the domain controller hosted are transferred to other DCs in the domain.
Active Directory metadata cleanup is necessary if a domain controller has been forcibly removed from Active Directory. Here’s an example: An existing domain controller catches fire or is accidentally thrown out of a window by a systems administrator having a bad day. When this happens, references to the domain controller within Active Directory remain. These references, especially if the domain controller hosted FSMO roles, can cause problems if not removed. Metadata cleanup is the process of removing these references.
If you use the Active Directory Users and Computers or Active Directory Sites and Services console to delete the computer account of a domain controller, the metadata associated with the domain controller are cleaned up. The console will prompt you when you try to delete the account of a domain controller that can’t be contacted. You confirm that you can’t contact the domain controller. When you do this, metadata cleanup occurs automatically.
To remove server metadata using ntdsutil, issue the following command, where <ServerName> is the distinguished name of the domain controller whose metadata you want to remove from Active Directory:
Ntdsutil "metadata cleanup" "remove selected server <ServerName>"
Active Directory snapshots
You can use ntdsutil.exe to create snapshots of the Active Directory database. A snapshot is a point-in-time copy of the database. You can use tools to examine the contents of the database as it existed at that point in time. It is also possible to transfer objects from the snapshot of the Active Directory database back into the version currently used with your domain's domain controllers. The AD DS service must be running to create a snapshot.
To create a snapshot, execute the following command:
Ntdsutil snapshot "Activate Instance NTDS" create quit quit
Each snapshot is identified by a GUID. You can create a scheduled task to create snapshots on a regular basis. You can view a list of all current snapshots on a domain controller by running the following command:
Ntdsutil snapshot "list all" quit quit
To mount a snapshot, make a note of the GUID of the snapshot that you want to mount and then issue the following command:
Ntdsutil "activate instance ntds" snapshot "mount {GUID}" quit quitWhen mounting snapshots, you must use the {} braces with the GUID. You can also use the snapshot number associated with the GUID when mounting the snapshot with the ntdsutil.exe command. This number is always an odd number.
When the snapshot mounts, take a note of the path associated with the snapshot. You use this path when mounting the snapshot with dsamain. For example, to use dsamain with the snapshot mounted as c:$SNAP_201212291630_VOLUMEc$, issue this command:
Dsamain /dbpath 'c:$SNAP_201212291630_VOLUMEC$WindowsNTDS
tds.dit' /ldapport 50000
You can choose to mount the snapshot using any available TCP port number; 50000 is just easy to remember. Leave the PowerShell windows open when performing this action. After the snapshot is mounted, you can access it using Active Directory Users and Computers. To do this, perform the following steps:
Open Active Directory Users and Computers.
Right-click the root node, and select Change Domain Controller.
In the Change Directory Server dialog box, enter the name of the domain controller and the port, and select OK. You can then view the contents of the snapshot using Active Directory Users and Computers in the same way that you would the contents of the current directory.
You can dismount the snapshot by using Ctrl+C to close dsamain, and then executing the following command to dismount the snapshot:
Ntdsutil.exe "activate instance ntds" snapshot "unmount {GUID}" quit quitDeploy and manage domain controllers in Azure
Many organizations deploy Windows Server Active Directory Domain Controllers as VMs in Azure, and join other VMs on the same virtual network to the domains hosted on these domain controllers. These domain controllers can be configured as:
A standalone forest In this configuration, the domain controllers function as the domain root in their own forest. Many organizations deploy this simple type of domain when migrating on-premises applications that have a dependency on AD DS and NTLM authentication to Azure. You can configure a trust relationship to an on-premises AD DS forest if a VPN or ExpressRoute connection to that on-premises forest is appropriately configured.
A domain in an existing forest These domain controllers are in a child domain of an on-premises forest and connect to that on-premises forest through appropriately configured VPN or ExpressRoute connections. The Azure Virtual Network that hosts these domain controllers is configured as a separate Active Directory Site.
A site in an existing on-premises domain It’s possible to configure AD DS domain controllers connected through a site-to-site VPN or ExpressRoute connection as simply another site in an existing on-premises domain.
Most organizations that want to use on-premises security principals with resources hosted on Azure infrastructure-as-a-service (IaaS) VMs should configure a forest trust relationship. This allows those security principals to be used to access those resources without the complications of trying to extend an on-premises forest to Azure.
When deploying a Windows Server VM that will function as an AD DS domain controller in Azure, consider the following configuration options:
Configure a separate virtual data disk for the VM to store the Active Directory database, logs, and sysvol folder.
Configure Host Cache Preference to None for this data disk. By default, data disks attached to an IaaS VM use write through caching, and this can cause errors in some circumstances with AD DS.
Ensure that you deploy two VMs in the domain controller role and add them to an availability set.
Configure the VM network interface with a static private IP address.
Configure the virtual network DNS settings to point VMs on the virtual network to the IP addresses of the newly deployed AD DS domain controllers. You can’t configure DNS settings within an Azure IaaS VM as this operation must be performed using the Azure management tools.
As you would with on-premises domain controllers, prevent the VMs hosting this role from direct inbound or outbound communication with any host on the internet. Restrict communication using a Network Security Group to known authorized services. Make remote connections either through Windows Admin Center in the Azure Portal or through a VPN or ExpressRoute connection from an on-premises network.
Need More Review? Deploy AD DS In An Azure Virtual Network
You can learn more about topic at https://docs.microsoft.com/en-us/azure/architecture/reference-architectures/identity/adds-extend-domain.
Deploy read-only domain controllers (RODCs)
Read-only domain controllers (RODCs) are a special type of domain controller. They host a read-only copy of the AD DS database. Rather than storing the passwords for all users in the domain, RODCs only store the passwords of a specific set of accounts that you configure. The first domain controller in a new domain or forest cannot be an RODC.
The justification for RODCs is that DCs sometimes need to be located in places where servers have poor physical security and might be stolen. For example, many organizations had branch offices where servers were kept under someone’s desk. A good rule of thumb is that you should consider a location insecure if it is accessible to anyone other than IT staff. If a janitor can pull out a computer’s power cord to plug in a vacuum cleaner, the computer isn’t in a secure location.
If a server that hosts a domain controller is stolen, the best practice is to reset the account passwords that might have been compromised because it’s possible, with the correct tools, to extract passwords from the AD DS database if you have direct access to it. If an ordinary DC is stolen, you would, in theory, need to reset the passwords of every account in the domain because you could never be sure that someone hadn’t gained access to the AD DS database and found a way to extract the passwords of people in your organization.
With shielded VMs and shielded fabrics, it’s possible to run a DC in a manner where the VM itself is protected by encryption. In the event that the host server is stolen, the AD DS database cannot be recovered because the contents of the virtualization server’s storage are encrypted using BitLocker.
Concerns about the physical security of a DC are the primary reason to deploy an RODC, so it is extremely unlikely that you would have both an RODC and a writable DC at the same site. RODCs are for sites where the domain controller once was placed in a location that wasn’t secure. However, if you do have concerns about the security of a location, it’s probably not a great idea to deploy a domain controller at that location!
RODC password replication
One of the most important steps in configuring an RODC is limiting which passwords can be replicated down to the server from a writable domain controller. The default configuration of an RODC has it store almost everything from AD DS except for user and computer account passwords. In the event that a user or computer account needs to be authenticated against AD DS, the RODC acts as a proxy for a writable Windows Server DC. The authentication occurs but depends on the WAN link to be functional because if you could host a writable DC locally, you wouldn’t need the RODC.
Although you can configure an RODC to not cache any passwords locally, you can configure an RODC to cache the passwords of select staff working at a branch office to speed their login. Caching passwords also allows branch office users to log in if the WAN link fails. If the WAN link fails and the user’s credentials are not cached, the user is simply unable to log in to the domain.
You configure which accounts can authenticate using the RODC by using the Password Replication Policy, as shown in Figure 1-8. By default, only members of the Allowed RODC Password Replication group can use the RODC to authenticate. This is only the case if the user account is not a member of the Account Operators, Administrators, Backup Operators, Server Operators, or Denied RODC Password Replication Group groups.

FIGURE 1-8 Password Replication Policy.
RODC partial attribute set
You can configure Active Directory so that only specific attributes on AD DS objects are replicated to an RODC. You would do this because some applications are configured to store sensitive data such as passwords or encryption keys as attributes for an object. If you add these sensitive attributes to the filtered attributes set, you can ensure that this information will not be replicated and stored on an RODC.
It is not possible to add system-critical attributes to the RODC filtered attribute set. Attributes that cannot be added to the filtered attribute set are those required for AD DS, the Local Security Authority (LSA), Security Accounts Manager (SAM), and Microsoft-specific security services providers to be able to function correctly. You mark an attribute as confidential by removing the Read permission for that attribute for the Authenticated Users group.
RODC local administrators
Because you deploy RODCs as a security measure, they are almost always placed at branch office sites. Resources at branch office sites are often sparse, so it is also likely that you’ll co-locate other services on the server hosting the RODC role. For example, a server that functions as an RODC can also function as a file server, DNS server, DHCP server, and local intranet server. You can allow a user without Domain Admin privileges to deploy an RODC if you have pre-created an RODC account and added it to the appropriate Active Directory Domain Services site and the user is a member of the local Administrators group on the computer. You can perform this task in PowerShell or Active Directory Administrative Center.
If the computer hosting the RODC role also needs to host other roles, you might need to grant administrator access to a user who works at the branch office (but who is not a member of your organization’s usual IT staff) in case your normal remote administration techniques don’t work. RODCs differ from normal domain controllers in that you can grant local administrator access without having to make the user a member of the Domain Admins group.
To configure a user to function as a local administrator on the computer that hosts the RODC role, edit the properties of the RODC’s computer account and configure a security group for the Managed By setting.
Decommissioning an RODC
If you suspect that an RODC has been compromised, you can delete the RODC’s account from the Domain Controllers container in Active Directory Users and Computers. When you do this, you get the option of resetting all passwords for user and computer accounts that were cached on the RODC, as well as the option of exporting a list of all potentially compromised accounts.
Need More Review? Read-Only Domain Controllers
You can learn more about topic at https://docs.microsoft.com/windows-server/identity/ad-ds/deploy/rodc/install-a-windows-server-2012-active-directory-read-only-domain-controller--rodc---level-200-.
Troubleshoot flexible single master operations (FSMO) roles
The FSMO roles are five special roles present on domain controllers. Two of these roles, the schema master and the domain naming master, are unique within each forest. The other three roles, PDC emulator, infrastructure master, and RID master, must be present within each domain in the forest. For example, in a three-domain forest there is only one schema master and domain naming master, but each domain in the forest has its own PDC emulator, infrastructure master, and RID master.
By default, FSMO roles are allocated to the first domain controller in a domain. After you have more than one domain controller in each domain, you should manually start to move FSMO roles to other domain controllers. This protects you from a situation where the first domain controller deployed in each domain goes offline and all FSMO roles become unavailable. When you do need to take a domain controller offline for an extended period of time, ensure that you transition any FSMO roles that it hosts to another domain controller in the same domain.
Schema master
The schema master is the single server in the forest that is able to process updates to the AD DS schema. The AD DS schema defines the functionality of AD DS. For example, by modifying the schema, you can increase the available attributes for existing objects as well as enable AD DS to store new objects. Products such as Exchange Server and Configuration Manager require that the default AD DS schema be extended prior to product installation so that each product can store important data in AD DS.
The domain controllers that host the schema master role should be located in the root domain of the forest. If you need to extend the schema before installing products such as Exchange Server, do so either on the computer that hosts the schema master role or on a computer in the same site. The account used to extend the schema needs to be a member of the Schema Admins security group. If you’re unable to extend the schema, the computer that hosts this FSMO role may not be available.
You can determine which computer hosts the schema master role by running the following PowerShell command:
Get-ADForest example.internal | FT SchemaMaster
Domain naming master
The domain naming master is a forest-level role that is responsible for managing the addition and removal of domains from the forest. The domain naming master also manages references to domains in trusted forests. In a multi-domain environment, the domain controller that hosts this forest-level role should be deployed in the root forest. The domain naming master is also contacted when new instances of AD DS application directory partitions are added, such as when you configure a limited directory partition replication scope for an AD DS integrated DNS zone. If you can’t add new domains or partitions, the computer hosting this FSMO role may not be available.
You can determine which server hosts the domain naming master role by running the following PowerShell command:
Get-ADForest example.internal | FT DomainNamingMaster
PDC emulator
The PDC (Primary Domain Controller) emulator role is a domain-level FSMO role that is responsible for handling both changes to account passwords as well as domain time synchronization. Account Lockout is also processed by the PDC emulator. PDC emulators in child domains synchronize time against the PDC emulator in the forest root domain. You should ensure that the PDC emulator in the forest root domain synchronizes against a reliable external time source. If users are unable to change passwords or accounts aren’t able to be unlocked, the PDC emulator may have failed.
To determine which domain controller in a specific domain hosts the PDC emulator role, run the following PowerShell command:
Get-ADDomain example.internal | FT PDCEmulator
Infrastructure master
The computer that hosts the infrastructure master role keeps track of changes that occur in other domains in the forest as they apply to objects in the local domain. The infrastructure master FSMO role holder updates an object’s SID (Security Identifier) and distinguished name in a cross-domain object reference. If group names or memberships for groups hosted in other domains don’t appear current in the local domain, it may be that the infrastructure master has failed.
You should avoid having the infrastructure master role co-located with a domain controller that hosts the Global Catalog server role unless all DCs in the domain are configured as Global Catalog servers. You can determine which computer in a domain hosts the infrastructure master role by running the following PowerShell command:
Get-ADDomain example.internal | FT InfrastructureMaster
RID master
The RID (Relative ID) master processes relative ID requests from domain controllers in a specific domain. Relative IDs and domain Security IDs are combined to create a unique Security ID (SID) for the object. There is a RID master in each domain in the forest. When a new security principal object like a group or user account is created, a unique SID is attached to that object. SIDs consist of:
Domain SID that will be the same for all SIDs created in the host domain
A RID that is unique to each security principal SID created in a domain
Each AD DS DC has a pool of RIDs that it can allocate to security principals it creates. When this pool becomes exhausted, the DC will query the RID master for additional RIDs to add to this pool. If the RID master is not available, the pool cannot be replenished and new accounts cannot be created. You can use the following PowerShell command to determine which computer hosts the RID Master role:
Get-ADDomain example.internal | FT RidMaster
Seizing FSMO roles
In some cases, a domain controller hosting an FSMO role fails and you need to seize the FSMO role to move it to another domain controller. For example, to move the RID Master, Infrastructure Master, and Domain Naming Master roles to a domain controller named MEL-DC2, run the following command:
Move-ADDirectoryServerOperationMasterRole -Identity MEL-DC2 -OperationMasterRole
RIDMaster,InfrastructureMaster,DomainNamingMaster -Force
Need More Review? FSMO Roles
You can learn more about troubleshooting FSMO roles at https://docs.microsoft.com/troubleshoot/windows-server/identity/fsmo-roles.
 Exam Tip
Remember the symptoms associated with the failure of each FSMO role.
Skill 1.2: Configure and manage multi-site, multi-domain, and multi-forest environments
Trust relationships allow security principals in one Active Directory environment to access resources in another Active Directory environment. In hybrid environments, trusts might be configured between an Azure AD DS forest and an on-premises forest or between domains hosted in different cloud providers and domains hosted in Azure. Sites are the way that server proximity is defined within Active Directory, with site topology determining how AD DS domain controllers in one location communicate with AD DS domain controllers in another.
Configure and manage forest and domain trusts
Trusts make it possible for users in one domain to be authenticated by domain controllers in a separate domain. For example, if there is a bidirectional trust relationship between the domains contoso.local and adatum.remote, users with accounts in the contoso.local domain are able to authenticate in the adatum.remote domain. By configuring a trust relationship, it’s possible to allow users in one domain to access resources in another, such as being able to use shared folders and printers or being able to sign on locally to machines that are members of a different domain than the one that holds the user’s account.
Some trusts are created automatically. For example, domains in the same forest automatically trust each other. Other trusts, such as external trusts, realm trusts, shortcut trusts, and forest trusts, must be created manually. Trusts use the Kerberos V5 authentication protocol by default, and they revert to NTLM if Kerberos V5 is not supported. You configure and manage trusts using the Active Directory Domains and Trusts console or the netdom.exe command-line utility with the /trust switch.
Although trusts themselves are relatively easy to come to terms with, the terminology around trusts tends to confuse many people. It’s important that you understand the difference between a trusting and a trusted domain and how trust direction, incoming or outgoing, relates to which security principals are able to authenticate.
To understand trusts, you have to understand the difference between a trusting domain or forest and a trusted domain or forest. The trusting domain or forest contains the resources to which you want to grant security principals from the trusted domain or forest access. The trusted domain or forest hosts the security principals that you want to allow to access resources in the trusting forest. For example, if you want to grant users in the adatum.remote domain access to resources in the contoso.local domain, the adatum.remote domain is the trusted domain and the contoso.local domain is the trusting domain. In bidirectional trust relationships, a domain or forest is both trusting and trusted.
Trust transitivity
A transitive trust is one that extends beyond the original trusting domains. For example, if you have a trust between two domain forests and that trust is transitive, all of the domains in each of the forests trust each other. Forest trusts are transitive by default. External trusts are not transitive by default. When you create a trust, keep in mind that there may be domains beyond the one you are establishing the relationship with that may be included. You might trust the administrator of adatum.remote not to allow access by nefarious users, but do you trust the administrator of subdomain.adatum.remote?
Trust direction
When you create a new trust, you specify a trust direction. You can choose a two-way (or bidirectional) trust or a unidirectional trust, which is either one-way incoming or one-way outgoing.
When you configure a one-way incoming trust, users in the local domain are authenticated in the remote domain, realm, or forest. Remember that if you are configuring a one-way incoming trust between the single domain forests contoso.local and adatum.remote, users with accounts in contoso.local are able to access resources in adatum.remote. Similarly, if you are configuring a one-way outgoing trust between the single-domain forests contoso.local and adatum.remote, users with accounts in adatum.remote are able to access resources hosted in contoso.local.
The terminology around trusts can be a little confusing. The key thing to remember is that the direction of trust is the opposite of the direction of access, as shown in Figure 1-9. An outgoing trust allows incoming access, and an incoming trust allows outgoing access.

FIGURE 1-9 The direction of trust and direction of access.
Forest trusts
When you configure a forest trust, one AD DS forest trusts the other one. Forest trusts are transitive. When you configure a forest trust, you can allow any domain in the trusting forest to be accessible to any security principal in the trusted forest. Forest trusts require that each forest be configured to run at the Windows Server 2003 forest functional level or higher. Forest trusts can be bi- or unidirectional. You are most likely to configure forest trusts if your organization has two or more AD DS forests. You can configure a trust between a forest hosted in Azure and one hosted on-premises.
You can configure one of two authentication scopes when you configure a forest trust. The type of authentication scope that you configure depends on your security requirements. The options are:
Forest-wide authentication When you choose forest-wide authentication, users from the trusted forest are automatically authenticated for all resources in the local forest. You should use this option when both the trusted and trusting forests are part of the same organization.
Selective authentication When you configure this option, Windows does not automatically authenticate users from the trusted forest. You can then configure specific servers and domains within the forest to allow users from the trusted forest to authenticate. Use this option when the two forests are from different organizations, or you have more stringent security requirements.
Configuring selective authentication
Configuring selective authentication means granting specific security principals in the trusted forest the Allowed to authenticate (allow) permission on the computer that hosts the resource to which you want to grant access. For example, assume you had configured a forest trust with selective authentication. You want to grant users in the Research universal group from the trusted forest access to a Remote Desktop Services (RDS) server in the trusting forest. To accomplish this goal, you can configure the properties of the RDS server’s computer account in Active Directory Users and Computers and grant the Research universal group from the trusted forest the Allowed to authenticate permission. Doing this only allows users from this group to authenticate; you still have to grant them access to RDS by adding them to the appropriate local group on the RDS server.
External trusts
External trusts enable you to configure one domain in one forest to trust a domain in another forest without enabling a transitive trust. For example, you configure an external trust if you want to allow the auckland.fabrikam.com domain to have a trust relationship with the wellington.adatum.com domain without allowing any other domains in the fabrikam.com or adatum.com forests to have a security relationship with each other.
You can use external trusts to configure trust relationships with domains running unsupported Windows Server operating systems, such as Windows 2000 Server and Windows NT 4.0, because these operating systems do not support forest trusts. Even though these operating systems are well beyond their supported lifespan, there are still organizations out there with servers, and even domains, running these operating systems. It’s possible, though unlikely, that you might need to configure a trust relationship between a domain running these operating systems and one running Windows Server 2022 domain controllers.
Shortcut trusts
Shortcut trusts enable you to speed up authentication between domains in a forest that might be in separate branches or even separate trees. For example, in the hypothetical forest shown in Figure 1-10, if a user in the canada.atlantic.contoso.com domain wants to access a resource in the arctic.adatum.com domain, authentication needs to travel up through the atlantic.contoso.com and contoso.com domains before passing across to the adatum.com domain and finally back to the arctic.adatum.com domain. If you implement a shortcut trust between the canada.atlantic.contoso.com and arctic.adatum.com domains, authentication traffic instead travels directly between these two domains without having to traverse the two domain trees in the forest.

FIGURE 1-10 Shortcut trust.
You configure a shortcut trust using the Active Directory Domains and Trusts console by editing the properties of one domain and triggering the New Trust Wizard on the Trusts tab. Shortcut trusts can be uni- or bidirectional. As is the case with the creation of other trusts, ensure that you have name resolution working properly between the trusting and the trusted domains either by having the DNS zones propagate through the forest, by configuring conditional forwarders, or by configuring stub zones.
Realm trusts
You use a realm trust to create a relationship between an Active Directory Domain Services domain and a Kerberos V5 realm that uses a third-party directory service. Realm trusts can be transitive or nontransitive. They can also be uni- or bidirectional. You’re most likely to configure a realm trust when you need to allow users who use a UNIX directory service to access resources in an AD DS domain or users in an AD DS domain to access resources in a UNIX Kerberos V5 realm.
You can configure a realm trust from the Active Directory Domains and Trust console. You do this by selecting the Realm trust option, as shown in Figure 1-11. When configuring a realm trust, you specify a realm trust password that you use when configuring the other side of the trust in the Kerberos V5 realm.

FIGURE 1-11 Configure the realm trust.
Netdom.exe
You use netdom.exe with the /trust switch to create and manage forest, shortcut, and realm trusts from the command line. When using netdom.exe, you specify the trusting domain name and the trusted domain name.
The syntax of netdom.exe with the /trust switch is shown in Figure 1-12.

FIGURE 1-12 The command syntax for netdom.exe.
PowerShell does not include much in the way of cmdlets for creating and managing trust relationships beyond the Get-ADTrust cmdlet, which allows you to view the properties of an existing trust.
SID filtering
In a trusted domain, it’s possible, though extremely difficult, for you to configure an account in your domain to have SIDs that are identical to those used by privileged accounts in a trusting domain. If you use this configuration, then the accounts from trusted domains gain the privileges of the accounts in the trusting domain. For example, you can configure the SIDs of an account in a trusted domain so that it has domain administrator privileges in the trusting domain.
To block this type of configuration, Windows Server 2022 enables SID filtering, also known as domain quarantine, on all external trusts. SID filtering blocks users in a trusted forest or domain from being able to grant themselves elevated user rights in the trusting forest domain by discarding all SIDs that do not have the domain SID of the trusting domain.
It’s possible to verify SID filtering settings on a trust using the Get-ADTrust cmdlet in a PowerShell session run by a user with administrative privileges. For example, to verify that SID filtering is enabled on the trust with the margiestravel.com forest, issue the command
Get-ADTrust tailwindtraders.com | fl *SID*
To disable SID filtering for the trusting forest, use the netdom trust command with the following option:
/enablesidhistory:Yes
Enabling SID history allows you to use SIDs that don’t have the domain SID of the trusting domain. You enable or disable SID filtering on the trusting side of the trust. For example, if you are an administrator in the contoso.com domain and you want to disable SID filtering, you can issue the following command from an elevated command prompt:
Netdom trust contoso.com /domain:tailwindtraders.com /enablesidhistory:Yes
In the same scenario, if you want to reenable SID filtering, you can issue the following command:
Netdom trust contoso.com /domain:tailwindtraders.com /enablesidhistory:Yes
The default configuration, where SID filtering is enforced by default on trusts, is something that you should probably leave as it is. In the past it was necessary to allow SID history when trusts were created with forests running Windows 2000 Server domain controllers. Since Windows 2000 is no longer supported by Microsoft, and SID history is not necessary for trust relationships with Windows Server 2003 or later domain controllers, you probably won’t need to disable it.
Name suffix routing
Name suffix routing enables you to configure how authentication requests are routed when you configure a forest trust between two AD DS forests. When you create a forest trust, all unique name suffixes are routed. Name suffix routing assists when users sign on with a UPN, such as [email protected]. Depending on the UPNs that are configured, you might want to allow or disallow the use of specific UPN suffixes. You do this by configuring name suffix routing on the Name Suffix Routing tab of the trust’s properties.
Need More Review? Forest Trusts
You can learn more about topic at https://docs.microsoft.com/azure/active-directory-domain-services/tutorial-create-forest-trust.
Configure and manage AD DS sites
AD DS sites enable you to configure AD DS so that it understands which network locations have a fast local network connection. Generally this means the computers are in the same building, although if your organization has a group of buildings in the same area that are connected by a high-speed network, you use a single AD DS site configuration.
An Active Directory site is a collection of TCP/IP subnets. Sites allow you to define geographic locations for Active Directory on the basis of TCP/IP subnets. You can have multiple TCP/IP subnets in a site. You should put subnets together in a site where the hosts in that site have a high-bandwidth connection to each other. Usually, this means being in the same building, but it could also mean multiple buildings with very-low-latency gigabit links between them.
For example, imagine that your organization has its head office in Melbourne and a branch office in Sydney. You can set up two sites: one site for Melbourne and the other for Sydney. This ensures that computers in the Melbourne location interact as much as possible with resources located in Melbourne, and computers in the Sydney location interact as much as possible with resources located in Sydney.
You associate the TCP/IP subnets in the head office with the Melbourne site and the TCP/IP subnets in the branch office with the Sydney site. After you do this, functionality such as replication topology is automatically configured.
You configure sites by associating them with IP address ranges. For example, you might associate the subnet 192.168.10.0 /24 with the AD DS Site BNE-Site. Any computers that have an IP address in this range would be located in that site. You can configure network addresses using IPv4 or IPv6 networks. When you install AD DS for the first time, a default site, named Default-First-Site-Name, is created. You configure sites using the Active Directory Sites and Services console, shown in Figure 1-13.

FIGURE 1-13 The Active Directory Sites and Services console.
It’s important that you add sites for each separate location in your organization. If you don’t, AD DS assumes that all computers are located on the same fast network, and this might cause problems with other products as well as with AD DS. Microsoft products such as Exchange Server use AD DS site information when generating network topologies.
Sites enable you to do the following:
Separate different locations that are connected by a slow WAN or expensive WAN link For example, if your organization has a branch office in Sydney and another branch office in Melbourne, and these branch offices are connected by a WAN link that is rated at 512 kilobits per second (Kbps), you configure the Sydney and Melbourne branch offices as separate sites.
Control which domain controllers are used for authentication When users log on to the network, they perform authentication against an available domain controller located in their AD DS site. Although users are still able to sign on and authenticate against a DC in another site if one isn’t available in their local site, you should strongly consider placing a domain controller at any site with a sufficient number of users. What counts as “a sufficient number of users” varies depending on the speed and reliability of the site’s connection to the rest of the organization's network. In some cases you might deploy an RODC to aid authentication at some branch office sites.
Control service localization As mentioned earlier, many Microsoft products such as Exchange Server and technologies such as BranchCache and DFS use AD DS sites as a way of determining network topology. To ensure that these products and technologies work well, you should ensure that each AD DS site is configured properly.
Control AD DS replication You can use AD DS sites to manage domain controller replication. The default settings make it possible for replication to occur 24 hours a day, 7 days a week. You can use AD DS site configuration to instead configure replication to occur according to a specific schedule.
Creating sites
To add a new Active Directory site, right-click the Sites node in the Active Directory Sites and Services console and select New Site. Specify the site name and select a site link object, and then select OK twice.
A site link object represents a connection between two sites. The default site link object is named DEFAULTIPSITELINK. You can change the site link object later. Figure 1-14 shows the creation of a site named Sydney.
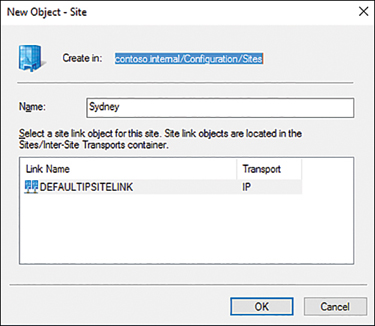
FIGURE 1-14 Creating a new site.
You can use the New-ADReplicationSite PowerShell cmdlet to create a new site. For example, to create a new site named HBA-SITE that is associated with the default IP site link, issue this command:
New-ADReplicationSite HBA-SITE
After you’ve created a site, you need to associate it with IP address ranges. You can’t do that until you’ve added IP address ranges as subnets. When you create a subnet, you specify an IPv4 or IPv6 network prefix. For an IPv4 network. you specify the network address and the subnet in CIDR notation. For example, you specify network 192.168.15.0 with a subnet mask of 255.255.255.0 as 192.168.15.0 /24.
Creating subnets
To add a subnet, right-click the Subnets node in Active Directory Sites and Services and then select New Subnet. You can specify the new subnet in IPv4 or IPv6 format. After you’ve specified the subnet, you have to specify which site the subnet is associated with. Figure 1-15 shows the 10.10.10.0/24 subnet associated with the Melbourne site.

FIGURE 1-15 New subnet.
You can create a new subnet from PowerShell with the New-ADReplicationSubnet cmdlet. For example, to create a new subnet that has the address 192.168.16.0/24 and associate it with the HBA-SITE site, issue the command:
New-ADReplicationSubnet -Name "192.168.16.0/24" -Site HBA-SITE
You can verify which subnets are associated with a particular AD DS site by viewing the properties of that site. You can’t change which subnets are associated with a site by editing the site properties; you can only do so by editing the subnet properties. You can associate multiple subnets with an AD DS site, but you can’t associate multiple AD DS sites with a specific subnet.
Creating site links
Site links enable you to specify how different AD DS sites are connected to each other. When you add a site, you’re asked to specify the site link, and the DEFAULTIPSITELINK site link is the default option even if another site link is available. Sites that are connected to the same site link are able to replicate with each other directly. For example, if all the sites in Figure 1-16 are associated with the DEFAULTIPSITELINK site link, each site assumes that it could replicate directly with the others. When troubleshooting replication, determine whether you want all sites connected to DEFAULTIPSITELINK or if you want them to use separate site links for alternative replication paths. For example, a domain controller in the Melbourne site attempts to replicate directly with a domain controller in the Canberra site. With this topology, you instead configure site links for Melbourne-Sydney, Adelaide-Sydney, and Canberra-Sydney. This way, domain controllers in Canberra, Melbourne, and Adelaide only replicate with the Sydney site rather than attempting to directly replicate with each other.

FIGURE 1-16 Configuring site links that mirror network topology.
You can create a new IP site link using the Active Directory Sites and Services console. When you create a site link, you specify the sites that use the link. You can configure the cost and replication schedule of a site link after it is created by editing the Site Link properties. The default Cost is 100, and site links that have lower costs are preferred for replication over site links that have a higher cost. Replication occurs every 180 minutes by default, 24 hours a day. You can modify when replication occurs by configuring a replication schedule.
If you want replication to occur as quickly as possible, you can enable the Use notify replication option by modifying a site link’s options attribute. You can perform this task by using the Attribute Editor tab in the site link’s properties.
You can create a site link using the New-ADReplicationSiteLink cmdlet. For example, to create a new site link named ADL-CBR that links the ADL-SITE and CBR-SITE sites, issue this command:
New-ADReplicationSiteLink "ADL-CBR" -SitesIncluded ADL-SITE, CBR-SITE
Members of the Enterprise Admins security group can create and modify site links. Members of the Domain Admins security group in the forest root domain can also perform site link management tasks. User accounts that are only members of child domain but not the forest root domain’s Domain Admins security group are unable to manage site links.
Creating site link bridges
Site link bridges create transitive links between site links. Each site link in a bridge must have a site in common with another site link in the bridge. It’s only necessary to create a site link bridge with complex network topologies as site link bridges are automatically created based on the topology created when you configure site links. You are likely to need to create a site link bridge if:
Your IP network is not fully routed. If you disable the Bridge all site links option, all site links will be treated as nontransitive. You can then use your own site link bridges to reflect the manner in which traffic is routed across your network.
You need to control replication flow between sites. By disabling the Bridge all site links for the site link IP transport and creating a site link bridge, you can create a disjointed network. This ensures that site links within the bridge can route AD DS traffic transitively but that they will not route traffic outside of the site link bridge.
Moving domain controllers
When you deploy a new domain controller, the domain controller promotion process performs a lookup to determine which AD DS site the domain controller should be a member of based on its IP address. If you haven’t created a subnet in the Active Directory Sites and Services console that maps to the IP address of the server that you are promoting to the domain controller, the domain controller is instead assigned to the first AD DS site, which is Default-First-Site-Name unless you have changed it.
The domain controller does not automatically reassign itself to a new site if you create the subnet and site objects in the Active Directory Sites and Services console if it has already been added to the Default-First-Site-Name site. In this instance, you need to manually move the domain controller to the new site. You can move the domain controller using the Active Directory Sites and Services console by right-clicking the domain controller that you want to move, selecting Move, and selecting the destination site in the Move Server dialog box.
You can also move a domain controller to a different site using the Move-ADDirectoryServer PowerShell cmdlet. For example, to move the server PERTH-DC to the Perth-Site AD DS site, execute the following command:
Move-ADDirectoryServer -Identity "PERTH-DC" -Site "Perth-Site"
Configure and manage AD DS replication
Replication makes it possible for changes that are made on one AD DS domain controller to be replicated to other domain controllers in the domain and, in some cases, to other domain controllers in the forest. Rather than replicating the AD DS database in its entirety, the replication process is made more efficient by splitting the database into logical partitions. Replication occurs at the partition level, with some partitions only replicating to domain controllers within the local domain, some partitions replicating only to enrolled domain controllers, and some partitions replicating to all domain controllers in the forest. AD DS includes the following default partitions:
Configuration partition This partition stores forest-wide AD DS structure information, including domain, site, and domain controller location data. The configuration partition also holds information about DHCP server authorization and Active Directory Certificate Services certificate templates. The configuration partition replicates to all domain controllers in the forest.
Schema partition The schema partition stores definitions of all objects and attributes as well as the rules for creating and manipulating those objects. There are a default set of classes and attributes that cannot be changed, but it’s possible to extend the schema and add new attributes and classes. Only the domain controller that holds the Schema Master FSMO role is able to extend the schema. The schema partition replicates to all domain controllers in the forest.
Domain partition The domain partition holds information about domain-specific objects such as organizational units, domain-related settings, user, group, and computer accounts. A new domain partition is created each time you add a new domain to the forest. The domain partition replicates to all domain controllers in a domain. All objects in every domain partition are stored in the Global Catalog, but these objects are stored only with some, not all, of their attribute values.
Application partition Application partitions store application-specific information for applications that store information in AD DS. There can be multiple application partitions, each of which is used by different applications. You can configure application partitions so that they replicate only to some domain controllers in a forest. For example, you can create specific application partitions to be used for DNS replication so that DNS zones replicate to some, but not all, domain controllers in the forest.
Domains running at the Windows Server 2008 and higher functional level support attribute-level replication. Rather than replicate the entire object when a change is made to an attribute on that object, such as when group membership changes for a user account, only the attribute that changes is replicated to other domain controllers. Attribute-level replication substantially reduces the amount of data that needs to be transmitted when objects stored in AD DS are modified.
Understanding multi-master replication
AD DS uses multi-master replication. This means that any writable domain controller is able to make modifications of the AD DS database and to have those modifications propagate to the other domain controllers in the domain. Domain controllers use pull replication to acquire changes from other domain controllers. A domain controller may pull changes after being notified by replication partners that changes are available. A domain controller notifies its first replication partner that a change has occurred within 15 seconds and additional replication partners every 3 seconds after the previous notification. Domain controllers also periodically poll replication partners to determine whether changes are available so that those changes can be pulled and applied to the local copy of the relevant partition. By default, polling occurs once every 60 minutes. You can alter this schedule by editing the properties of the connection object in the Active Directory Sites and Services console.
Knowledge Consistency Checker (KCC)
The Knowledge Consistency Checker (KCC) runs on each domain controller. The KCC is responsible for creating and optimizing the replication paths between domain controllers located at a specific site. In the event that a domain controller is added or removed from a site, the KCC automatically reconfigures the site’s replication topology. The KCC topology organization process occurs every 15 minutes by default. Although you can change this value by editing the registry, you can also trigger an update using the repadmin command-line tool with the kcc switch.
Store and forward replication
AD DS supports store and forward replication. For example, the Canberra and Melbourne branch offices are enrolled in a custom application partition. These branch offices aren’t connected to each other, but they are connected to the Sydney head office. In this case, changes made to objects stored in the application partition at Canberra can be pulled by the domain controller in Sydney. The Melbourne domain controller can then pull those changes from the domain controller in Sydney, as shown in Figure 1-17.

FIGURE 1-17 An example of store and forward replication.
Conflict resolution
In an environment that supports multi-master replication, it’s possible that updates may be made to the same object at the same time in two or more different places. Active Directory includes sophisticated technologies that minimize the chance that these conflicts will cause problems, even when conflicting updates occur in locations that are distant from each other.
Each domain controller tracks updates by using update sequence numbers (USNs). Each time a domain controller updates, either by processing an update performed locally or by processing an update acquired through replication, it increments the USN and associates the new value with the update. USNs are unique to each domain controller as each domain controller processes a different number of updates to every other domain controller.
When this happens, the domain controller that wrote the most recent change, known as the last writer, wins. Because each domain controller’s clock might not be precisely synchronized with every other domain controller’s clock, last write isn’t simply determined by a comparison of time stamps. Similarly, because USNs are unique to each domain controller, a direct comparison of USNs is not made. Instead the conflict resolution algorithm looks at the attribute version number. This is a number that indicates how many times the attribute has changed and is calculated using USNs. When the same attribute has been changed on different domain controllers, the attribute with the higher attribute version number wins. If the attribute version number is the same, the attribute modification time stamps are compared, with the most recent change being deemed authoritative.
If you add or move an object to a container that was deleted on another domain controller at the same time, the object is moved to the LostAndFound container. You can view this container when you enable the Advanced Features option in the Active Directory Users and Computers console.
RODC replication
The key difference between an RODC and a writable domain controller is that RODCs aren’t able to update the Active Directory database and that they only host password information for a subset of security principals. When a client in a site that only has RODCs needs to make a change to the Active Directory database, that change is forwarded to a writable domain controller in another site. When considering replication, remember that all RODC-related replication is incoming and that other domain controllers do not pull updates from the AD DS database hosted on an RODC.
RODCs use the usual replication schedule to pull updates from writable domain controllers except in certain cases, RODCs perform inbound replication using a replicate-single-object (RSO) operation. These cases include:
The password of a user whose account password is stored on the RODC is changed.
A DNS record update occurs where the DNS client performing the update attempts to use the RODC to process the update and is then redirected by the RODC to a writable DC that hosts the appropriate Active Directory Integrated DNS zone.
Client attributes, including client name, DnsHostName, OsName, OsVersionInfo, supported encryption types, and LastLogonTimeStamp, are updated.
These updates occur outside the usual replication schedule as they involve objects and attributes that are important to security. An example is when a user at a site that uses RODCs calls the service desk to have their password reset. The service desk staff member, located in another site, resets the password using a writable domain controller. If a special RSO operation isn’t performed, it is necessary to wait for the change to replicate to the site before the user is able to sign on with the newly reset password.
Monitor and manage replication
You can use the Active Directory Sites and Services console to trigger replication. You can trigger replication on a specific domain controller by right-clicking the connection object and selecting Replicate Now. When you do this, the domain controller replicates with all of its replication partners.
You can also monitor replication as it occurs using DirectoryServices performance counters in Performance Monitor. Through Performance Monitor, you can view inbound and outbound replication, including the number of inbound objects in the queue and pending synchronizations.
Repadmin
You can use the repadmin command-line tool to manage and monitor replication. This tool is especially useful at enabling you to diagnose where there are problems in a replication topology. For example, you can use repadmin with the following switches:
replsummary Generates information showing when replication between partners has failed. You can also use this switch to view information about the largest intermission between replication events.
showrepl Views specific inbound replication traffic, including objects that were replicated and the date stamps associated with that traffic.
prp Determines which user account passwords are being stored on an RODC.
kcc Forces the KCC to recalculate a domain controller’s inbound replication topology.
queue Enables you to display inbound replication requests that a domain controller must make to reach a state of convergence with source replication partners.
replicate Forces replication of a specific directory partition to a specific destination domain controller.
replsingleobj Use this switch when you need to replicate a single object between two domain controllers.
rodcpwdrepl Enables you to populate RODCs with the passwords of specific users.
showutdvec Displays the highest USN value recorded for committed replication operations on a specific DC.
Exam Tip
Remember how to control traffic flow between sites using site links and site link bridges. Also remember how traffic might flow given a specific set of site link and site link bridge configurations.
Skill 1.3: Create and manage AD DS security principals
Security principals include user and group accounts, as well as special accounts such as computer accounts and group managed service accounts. Knowing how each of these accounts functions and how to configure these accounts is a critical part of AD DS administration.
Create and manage AD DS users and groups
Accounts represent the identities of security principals in an Active Directory environment. The most common type of account is a user account, which represents a person as they interact with the Windows environment. IT operations personnel also need to regularly deal with computer accounts, group accounts, and service accounts.
User accounts
User accounts almost always represent real people in an Active Directory environment, with the caveat that some user accounts are used for services rather than traditional users signing on to their desktop computers.
In many organizations, a user account is nothing more than a username, a password, and a collection of group memberships. User accounts can contain substantial additional information, including:
First name
Last name
Middle initial
Full name
Office information
Email address
Web page
Job title
Department
Company
Manager
Phone numbers (main, home, mobile, fax, pager, IP phone)
Address
User profile location
Logon script
Home folder
Remote desktop service profile
Dial-in permissions
Published certificates
Remote Desktop Sessions settings
Remote Control settings
You should configure important accounts to be protected from deletion by enabling the Protect from accidental deletion option, as shown in Figure 1-18. Unless you disable this option, the account cannot be deleted. This setting doesn’t stop an account from being removed deliberately, but it does stop the account from being deleted accidentally.
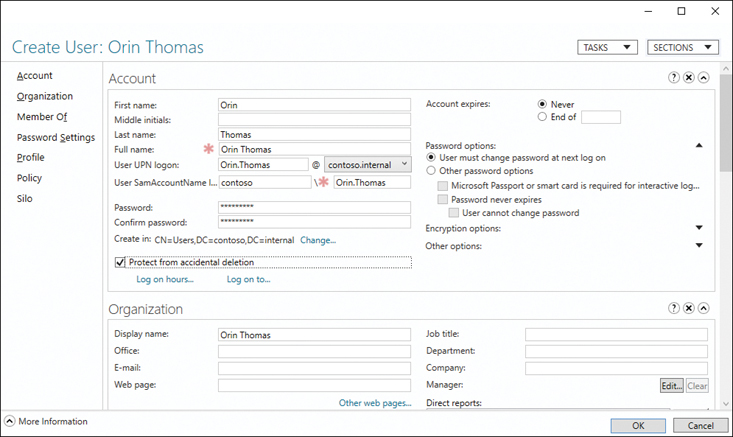
FIGURE 1-18 User account properties.
Computer accounts
Computer accounts represent a domain-joined computer within Active Directory. You often move computer accounts to specific OUs and then apply Group Policies to those OUs as a way of configuring the computer. When you manually join a computer to the domain, the computer account is automatically placed in the default Computers container. You can only join a computer to a domain if it can locate the appropriate domain SRV records in DNS.
If you can’t sign on to a computer using a domain account, it may be because the computer has become desynchronized from the domain. If a computer account becomes desynchronized from the domain of which it is a member and loses its trust relationship, you can repair the relationship by signing in with the local Administrator account and running the following PowerShell command:
Test-ComputerSecureChannel -Credential Domain<AdminAccount> -Repair
If you don’t know the local Administrator account password but suspect that cached domain administrator credentials might be present, disconnect the computer from the network, by either physically removing the Ethernet connection or disconnecting the virtual network adapter; sign in using those credentials; and then run the PowerShell command previously mentioned.
Manage users and groups in multi-domain and multi-forest scenarios
Active Directory supports three different types of group account scopes: domain local, global (the default), and universal. It also supports two group types: Security and Distribution. You use security groups to control access to resources, delegate permissions, and for email distribution. Distribution groups can only be used for email distribution. If your organization uses Exchange Server, you manage distribution groups through Exchange. Best practice is to place users within global groups, add those global groups to domain local groups, and assign permissions and rights directly to the domain local groups. By default, members of the Account Operators, Domain Admins, or Enterprise Admins groups can modify the membership of groups.
Universal
A universal group can hold accounts and groups from the same forest. Universal groups are stored in the Global Catalog. If you change the membership of a universal group, this change replicates to all Global Catalog servers in the forest. Universal groups are great in single-forest environments where replication traffic isn’t an issue or where there are few changes to universal group membership. Universal groups can be nested within other universal groups, or they can be added to domain local groups.
Global
Global groups can contain user accounts from its home domain. Global groups can also contain other global groups from its home domain. Global groups can be members of universal groups and domain local groups.
Domain local
Domain local groups can have universal groups, global groups, and domain local groups as members. Domain local groups can host accounts from any domain in the forest and accounts from domains in trusted forests. Domain local groups can only be added to domain local groups within its own domain. A domain local group can only be assigned rights and permissions within its own domain. Domain local groups cannot be added to global or universal groups.
Implement group managed service accounts (GMSAs)
Service accounts are functionally user accounts used by services to interact with the operating system and resources on the network. By assigning rights to the service account, you can limit what the service can or cannot do. One of the key things to remember about a service account is that it should not have the right to log on locally to a computer but should have the logon as a service right. This is important because administrators in many organizations have bad habits where they grant service accounts unnecessary rights and even go as far as to give all service accounts the same nonexpiring password. Sophisticated attackers know this and use it to compromise service accounts and use them as a way to gain privileged access.
Local System
The Local System (NT AUTHORITYSYSTEM) account is a built-in account. It has privileges equivalent to a local administrator account on the local computer. It acts with the computer account’s credentials when interacting on the network. This is the most powerful service account, and generally you should be reluctant to assign this service account manually to a service given its extensive privileges.
Local Service
The Local Service (NT AUTHORITYLocalService) account has the same level of privilege as user accounts that are members of the local Users group on a computer. This account has fewer local privileges than the Local System account. Any services assigned to this account access network resources as a null session without credentials. Use this account when the service doesn’t require network access or can access network resources as an anonymous user and requires only minimal privileges on the computer it is being used on.
Network Service
The Network Service (NT AUTHORITYNetworkService) account is similar to the Local Service account in that it has privileges on the local computer equivalent to those assigned to a member of the local Users group. The primary difference is that this account interacts with the computer account’s credentials with resources on the network.
GMSA
A group managed service account (GMSA) is a service account that is managed by the domain. This means that rather than having to update the service account’s password manually, Active Directory updates the password in line with the domain password policy. Many organizations that use regular user accounts as service accounts tend to set a static password for these accounts, which is often simple rather than complex.
Group managed service accounts require the forest functional level to be Windows Server 2012 or higher. Forests at the Windows Server 2008 level support a version of a GMSA called an MSA, but this is more limited than a GMSA, with each MSA only being able to be installed on a single machine.
Before using GMSAs, you need to create a Key Distribution Services (KDS) root key. You can do so with the following command:
Add-KdsRootKey -EffectiveTime ((get-date).addhours(-10))
You manage GMSAs using PowerShell. To create a GMSA, specify the name of the account, a DNS hostname associated with the account, and the name of the security principals allowed to use the account. For example, to create a GMSA named MEL-SQL-GMSA for the contoso.internal domain that can be used by servers in the MEL-SQL-Servers security group, enact the following command:
New-ADServiceAccount MEL-SQL-GMSA -DNSHostname MEL-SQL-GMSA.contso.internal
-PrincipalsAllowedToRetrieveManagedPassword MEL-SQL-Servers
To install the account on a specific server so that you can use it, run the Install-ADServiceAccount cmdlet. For example, to install the MEL-SQL-GMSA account on a server so that you can assign the account to services, issue this command:
Install-ADServiceAccount MEL-SQL-GMSA
Before running this command, you may need to install the RSAT ADDS Tools on the local server. You can do so by running this command:
Install-WindowsFeature RSAT-ADDS-Tools
When assigning the account to a service, you should clear the Password and Confirm password options. You’ll need to append add $ to the account name when configuring it, as shown in Figure 1-19. When you do this, Windows Server 2022 recognizes that the account is a GMSA and manages the password settings.

FIGURE 1-19 GMSA configuration.
Virtual account
A virtual account is the local equivalent of a group managed service account. Virtual accounts are supported by products such as SQL Server as an alternative to the default built-in accounts. You can create virtual service accounts by editing the property of a service and setting the account name to NT Service<ServiceName>.
Need More Review? Group Managed Service Accounts
You can learn more about group managed service accounts at https://docs.microsoft.com/windows-server/security/group-managed-service-accounts/group-managed-service-accounts-overview.
Kerberos delegation
Kerberos constrained delegation restricts how and where application services can act on a user’s behalf. You can configure accounts so that they can be used only for specific tasks. For example, Figure 1-20 shows configuring delegation of the account for computer SYD-B, for delegation through Kerberos, for the time service on computer SYD-A. Windows Server 2012 and later enable constrained delegation to be performed where the front-end service and the resource service are located in separate domains. You can configure Kerberos delegation using the Set-ADComputer, Set-ADServiceAccount, and Set-ADUser cmdlets with the PrincipalsAllowedToDelegateAccount parameter.

FIGURE 1-20 Kerberos delegation.
Kerberos policies
Kerberos policies determine how the service and user tickets are used in the Authentication function in an Active Directory domain. Like password and account lockout policy, Kerberos policy is applied at the domain level. Kerberos policies applied at the site and organizational level have no effect on resultant Kerberos policy. Kerberos policies are located in the Computer ConfigurationPoliciesWindows SettingsSecurity SettingsAccount PoliciesKerberos Policy node.
You can configure the following Kerberos policies:
Enforce User Logon Restrictions Ensures that Kerberos checks every request for a session ticket, also known as a service ticket.
Maximum Lifetime For Service Ticket Configures the maximum lifetime of a service ticket, which is also known as a session ticket. The default value for this policy is 10 hours. The value of this policy must be less than or equal to the value specified in the Maximum Lifetime For User Ticket policy.
Maximum Lifetime For User Ticket Determines the maximum lifetime of a user ticket, also known as a ticket-granting ticket (TGT). The default value of this policy is 10 hours.
Maximum Lifetime For User Ticket Renewal Specifies the maximum TGT renewal period. The default is 7 days.
Maximum Tolerance For Computer Clock Synchronization Specifies how much drift there can be in domain controller clocks before ticket errors occur. The default setting is 5 minutes.
Service principal name management
Kerberos clients use a service principal name (SPN) to identify a unique instance of a service on a given computer. If there are multiple instances of the same service hosted on computers in a domain or forest, each service requires a unique SPN. Service instances can be configured with multiple SPNs, as long as those SPNs are unique.
You can use the SetSPN command-line utility to configure SPNs for computers running Windows Server. SetSPN uses this syntax: setspn serviceclass/host:portnumber servicename. You can use SetSPN /? to see a list of all SPN switches. For example, to register the HTTP service using the standard port on a computer named MEL-DC in the contoso.com domain using a GMSA named SYD-SRVC, issue this command:
setpspn -s http/MEL-DC.contoso.com CONTOSOSYD-SRVC
Join Windows Servers to AD DS, Azure AD DS, and Azure AD
When you deploy Windows Server for the first time, it is in workgroup or standalone configuration, with only the local Administrator account and its password, which you configured during installation, available for sign-on. When you join a Windows Server computer to an Active Directory instance, be that AD DS, Azure AD DS, or Azure AD, you’ll be able to sign on to that computer using accounts in the appropriate directory instance. The security settings of the domain, such as which domain accounts have administrative privileges, will also apply to the Windows Server computer.
To be able to perform a domain-join operation, the Windows Server computer must have DNS configured so that it can contact the appropriate directory service. For on-premises AD DS, this means a DNS server that hosts the domain DNS zone, which is usually hosted on a domain controller. For Azure AD DS, this will mean ensuring that the DNS server settings for the virtual network the IaaS VM is hosted on are configured appropriately.
Once the DNS server settings are appropriately configured, you can perform the domain-join operation from within the Windows Server, either by changing the domain membership on the Computer Name tab of the System Properties dialog box or by using the Add-Computer PowerShell cmdlet with the DomainName parameter.
You can also sign on to a Windows Server IaaS VM hosted in Azure using an Azure AD account without configuring Azure AD DS. In this configuration, the Window Server IaaS VM is not traditionally domain-joined, even though it does have a security relationship with the Azure AD tenancy associated with the host subscription. To enable Azure AD login for a Windows Server IaaS VM when deploying the virtual machine through the Azure portal, on the Management tab of the deployment wizard, enable the Login with Azure AD option, as shown in Figure 1-21.

FIGURE 1-21 Azure AD Login.
When the VM is deployed in this configuration, you can configure which Azure AD accounts can access the VM by assigning them the following Azure roles:
Virtual Machine Administrator Login Azure AD users assigned this role will be able to sign on to the Windows Server IaaS VM using Remote Desktop or Remote PowerShell (if configured) and will have local administrator privileges.
Virtual Machine User Login Azure AD users assigned this role will be able to sign on to the Windows Server IaaS VM using Remote Desktop or Remote PowerShell (if configured) and will have nonadministrator privileges.
You can use Azure Resource Manager (ARM) templates to simplify the process of deploying large numbers of Windows Server IaaS VMs to Azure. ARM templates configured with the domainToJoin, domainUsername, domainPassword, and ouPath parameters can automatically join Windows Server IaaS VMs to AD DS domains.
Exam Tip
Remember how to configure and manage group managed service accounts.
Skill 1.4: Implement and manage hybrid identities
In a hybrid environment you need to know how to manage users and groups on-premises as well as how to replicate those security principals so that they can be present in the cloud and people in your organization can access resources without having to reauthenticate using a new set of credentials. Using an on-premises identity to access resources in Azure can occur through identity synchronization or an appropriately configured forest trust relationship.
Implement Azure AD Connect
Azure AD Connect allows you to connect your on-premises Active Directory accounts with an Azure AD instance. Not only is this useful for applications running in Azure, but it allows you to implement single sign-on if your organization is using Microsoft 365 or Office 365. Single sign-on allows you to use one identity to access on-premises and cloud resources. In many scenarios, the user won’t even be required to reauthenticate.
Azure AD Connect is designed to streamline the process of configuring connections between on-premises deployment and an Azure AD instance. The Azure Active Directory Connect tool is designed to make the process of configuring synchronization between an on-premises Active Directory deployment and Azure Active Directory as frictionless as possible.
Azure Active Directory Connect can automatically configure and install simple password synchronization or Federation/single sign-on, depending on your organizational needs. When you choose the Federation with AD FS option, Active Directory Federation Services is installed and configured, along with a web application proxy server to facilitate communication between the on-premises AD FS deployment and Microsoft Azure Active Directory.
The Azure Active Directory Connect tool supports the following optional features, as shown in Figure 1-22:
Exchange hybrid deployment This option is suitable for organizations that have an Office 365 deployment in which there are mailboxes hosted both on-premises and in the cloud.
Exchange Mail Public Folders This feature allows organizations to synchronize mail-enabled public folder objects from an on-premises Active Directory environment to Microsoft 365.
Azure AD app and attribute filtering Selecting this option gives you the ability to be more selective about which attributes are synchronized between the on-premises environment and Azure AD.
Password synchronization This option synchronizes a hash of the user’s on-
premises password with Azure AD. When the user authenticates to Azure AD, the submitted password is hashed using the same process, and if the hashes match, the user is authenticated. Each time the user updates their password on-premises, the updated password hash synchronizes to Azure AD.Password writeback This option allows users to change their passwords in the cloud and have the changed password written back to the on-premises Active Directory instance.
Group writeback With this option, changes made to groups in Azure AD are written back to the on-premises AD instance.
Device writeback With this option, information about devices registered by the user in Azure AD is written back to the on-premises AD instance.
Directory extension attribute sync This option allows you to extend the Azure AD schema based on extensions made to your organization’s on-premises Active Directory instance.
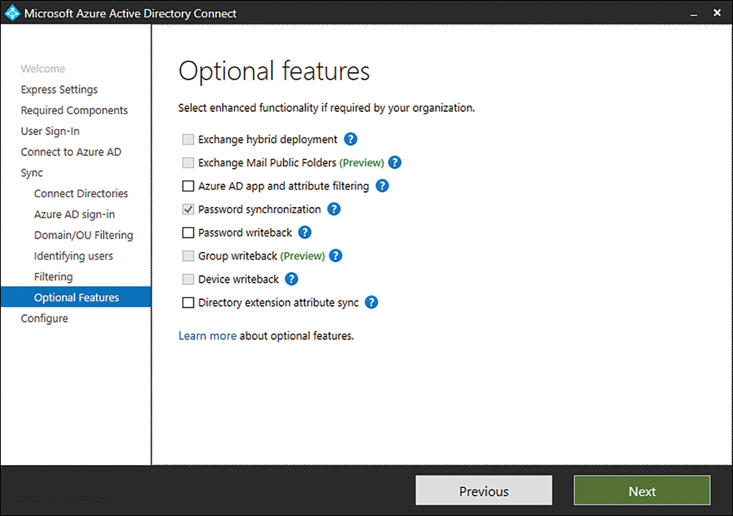
FIGURE 1-22 Azure Active Directory Connect optional features.
Azure AD Connect Server requirements
Azure AD Connect is software that you install on a computer that manages the process of synchronizing objects between the on-premises Active Directory and the Azure Active Directory instance. You can install Azure AD Connect on computers running the Windows Server 2012 or later operating systems.
Azure AD Connect has the following requirements:
It must be installed on a Windows Server instance that has the GUI version of the operating system installed. You cannot install Azure AD Connect on a computer running the Server Core operating system.
You can deploy Azure AD Connect on a computer that is either a domain controller (although not recommended) or a member server or, if you use the custom options, a standalone server can be used.
The server hosting Azure AD Connect requires .NET Framework 4.5.1 or later.
The server hosting Azure AD Connect requires Microsoft PowerShell 3.0 or later.
The server hosting Azure AD Connect must not have PowerShell Transcription enabled through Group Policy.
If you are deploying Azure AD Connect with Active Directory Federation Services, you must use Windows Server 2012 R2 or later for the Web Application Proxy, and Windows remote management must be enabled on the servers that will host AD FS roles.
If global administrators will have multifactor authentication enabled (MFA), then the URL https://secure.aadcdn.microsoftonline-p.com must be configured as a trusted site.
Connectivity requirements
The computer with Azure AD Connect installed must be a member of a domain in the forest that you want to synchronize, and it must have connectivity to a writable domain controller in each domain of the forest you wish to synchronize on the following ports:
DNS TCP/UDP Port 53
Kerberos TCP/UDP Port 88
RPC TCP Port 135
LDAP TCP/UDP Port 389
SSL TCP Port 443
SMB TCP 445
The computer with Azure AD Connect installed must be able to establish communication with the Microsoft Azure servers on the Internet over TCP port 443. The computer with Azure AD Connect installed can be located on an internal network as long as it can initiate communication on TCP port 443. The computer hosting Azure AD Connect does not need a publicly routable IP address. The computer hosting Azure AD Connect always initiates synchronization communication to Microsoft Azure. Microsoft Azure Active Directory does not initiate synchronization communication to the computer hosting Azure AD Connect on the on-premises network.
Microsoft recommends that you do not install Azure AD Connect on a domain controller. If you are going to be replicating more than 50,000 objects, Microsoft recommends that you deploy SQL Server on a computer that is separate from the computer that will host Azure AD Connect. If you plan to host the SQL Server instance on a separate computer, ensure that communication is possible between the computer hosting Azure AD Connect and the computer hosting the SQL Instance on TCP port 1433.
If you are going to use a separate SQL Server instance, ensure that the account used to install and configure Azure AD Connect has systems administrator rights on the SQL instance and that the service account used for Azure AD Connect has public permissions on the Azure AD Connect database.
SQL Server requirements
When you deploy Azure AD Connect, you have the option of having Azure AD Connect install an SQL Server Express instance, or you can choose to have Azure AD Connect leverage a full instance of SQL Server. SQL Server Express is limited to a maximum database size of 10 GB. In terms of Azure AD Connect, this means that Azure AD Connect is only able to manage 100,000 objects. This is likely to be adequate for all but the largest environments.
For environments that require Azure AD Connect to manage more than 100,000 objects, you’ll need to have Azure AD Connect leverage a full instance of SQL Server. Azure AD Connect can use all versions of Microsoft SQL Server, from Microsoft SQL Server 2012 with the most recent service pack to SQL Server 2022. It is important to note that SQL Azure is not supported as a database for Azure AD Connect. If deploying a full instance of SQL Server to support Azure AD Connect, ensure that the following prerequisites are met:
Use a case-insensitive SQL collation Case-insensitive collations have the _CI_ identifier included in their names. Case-sensitive collations (those that use the _CS_ designation) are not supported for use with Azure AD Connect.
You can use only one sync engine per SQL instance If you have an additional Azure AD Connect sync engine or if you are using Microsoft Identity Manager in your environment, each sync engine requires its own separate SQL instance.
Requirements for deployment accounts
You use two accounts when configuring Azure AD Connect. One account must have specific Azure AD permissions; the other account must have specific on-premises Active Directory permissions. The accounts that you use to install and configure Azure AD Connect have the following requirements:
The account used to configure Azure AD Connect must have Global Administrator privileges in the Azure AD tenancy. You should create a separate account for this task and configure the account with a complex password that does not expire. This account is used for the synchronization process between on-premises AD and Azure AD.
The account used to install and configure Azure AD Connect must have Enterprise Administrator permissions within the on-premises Active Directory forest if you will be using Express installation settings. This account is only required during installation and configuration. After Azure AD Connect is installed and configured, this account no longer needs Enterprise Administrator permissions. The best practice is to create a separate account for Azure AD Connect installation and configuration and to temporarily add this account to the Enterprise Admins group during the installation and configuration process. After Azure AD Connect is installed and configured, this account can be removed from the Enterprise Admins group. You should not attempt to change the account used after Azure AD Connect is set up and configured because Azure AD Connect always attempts to run using the original account.
The account used to install and configure Azure AD Connect must be a member of the local Administrators group on the computer on which Azure AD Connect is installed.
Installing Azure AD Connect
Installing Azure AD Connect with Express settings is appropriate if your organization has a single Active Directory forest and you wish to use password synchronization for authentication. The Azure AD Connect Express settings are appropriate for most organizations. You can download the Azure AD Connect installation files from Microsoft’s download center website.
To install Azure AD Connect with Express settings, perform the following steps:
Double-click the AzureADConnect.msi file that you’ve downloaded from the Microsoft Download Center. You’ll be prompted with a security warning. After you select Run, Azure AD Connect will be installed on your computer. When the installation is complete, you’ll be presented with the splash screen detailing license terms and displaying a privacy notice. You must agree to these terms before selecting Continue.
If your organization has an internal nonroutable domain, it will be necessary for you to use custom settings. The best practice is to use domain synchronization when your on-premises Active Directory instance and your Azure Active Directory instance use the same routable domain name. Click Continue.
On the Install required components page, shown in Figure 1-23, choose between the following options:

FIGURE 1-23 Install Required Components.
Specify a custom installation location Choose this option if you want to install Azure AD Connect in a separate location, such as on another volume.
Specify an existing SQL Server Choose this option if you want to specify an alternate SQL server instance. By default, Azure AD Connect will install an SQL Server Express instance.
Use an existing service account You can configure Azure AD Connect to use an existing service account. By default, Azure AD Connect will create a service account. You can configure Azure AD Connect to use a Group Managed Service account. You’ll need to use an existing service account if you are using Azure AD Connect with a remote SQL Server instance or if communication with Azure will occur through a proxy server that requires authentication.
Specify custom sync groups When you deploy Azure AD Connect, it will create four local groups on the server that hosts the Azure AD Connect Instance. These groups are the Administrators group, Operators group, Password Reset group, and the Browse group. If you want to use your own set of groups, you can specify them here. These groups must be local to the host server and not a member of the domain.
Once you have specified which custom options you require—and you can select none if you want—select Install.
On the User Sign-In page, shown in Figure 1-24, specify what type of sign-on you want to allow. You can choose between the following options, the details of which were covered earlier in this chapter. Most organizations will choose Password Hash Synchronization because this is the most straightforward option:
Password Hash Synchronization
Pass-through authentication
Federation with AD FS
Federation with PingFederate
Do not configure
Enable single sign-on
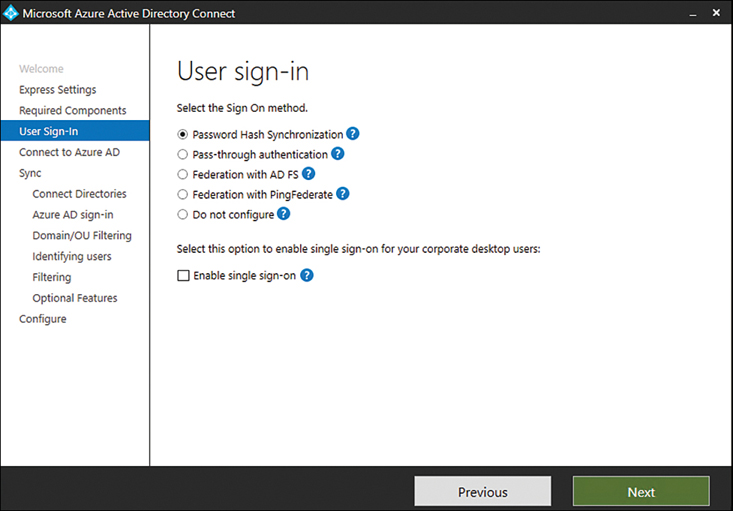
FIGURE 1-24 User Sign-In options.
On the Connect to Azure AD page, provide the credentials of an account with Global Administrator privileges in Azure AD. Microsoft recommends you use an account in the default onmicrosoft.com domain associated with the Azure AD instance to which you will be connecting. If you choose the Federation with AD FS option, ensure that you do not sign in using an account in a domain that you will enable for federation.
After Azure AD Connect has connected to Azure AD, you will be able to specify the directory type to synchronize as well as the forest. Select Add Directory to add a specify forest. When you add a forest by selecting Add Directory, you will need to specify the credentials of an account that will perform periodic synchronization. Unless you are certain that you have applied the minimum necessary privileges to an account, you should provide Enterprise Administrator credentials and allow Azure AD Connect to create the account, as shown in Figure 1-25. This will ensure that the account is assigned only the privileges necessary to perform synchronization tasks.

FIGURE 1-25 AD forest account.
After the credentials have been verified, select Next.
On the Azure AD sign-in configuration page, shown in Figure 1-26, review the UPN suffix and then inspect the on-premises attribute to use as the Azure AD username. You’ll need to ensure that accounts use a routable Azure AD username.

FIGURE 1-26 Azure AD sign-in configuration.
On the Domain and OU Filtering page, select whether you want to sync all objects or just objects in specific domains and OUs.
On the Uniquely identifying your users page, shown in Figure 1-27, specify how users are to be identified. By default, users should only have one representation across all directories. In the event that users exist in multiple directories, you can have matches identified by a specific Active Directory attribute, with the default being the Mail attribute.

FIGURE 1-27 Uniquely identifying your users.
On the Filter users and devices page, specify whether you want to synchronize all users and devices or only members of a specific group. Figure 1-28 shows members of the Microsoft 365-Pilot-Users group being configured so that their accounts will be synchronized with Azure.
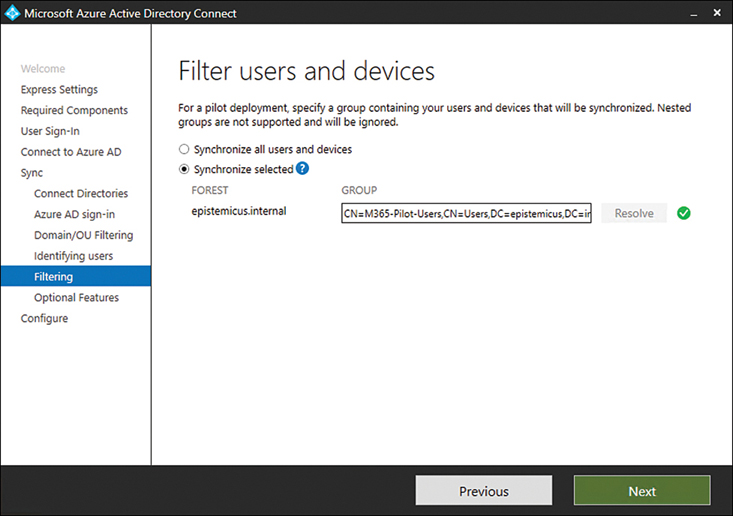
FIGURE 1-28 Filter users and devices.
On the Optional Features page, select any optional features that you want to configure. These features include:
Exchange Hybrid Deployment This option is suitable for organizations that have an Office 365 deployment and where there are mailboxes hosted both on-premises and in the cloud.
Exchange Mail Public Folders This feature allows organizations to synchronize mail-enabled public folder objects from an on-premises Active Directory environment to Microsoft 365.
Azure AD App and Attribute Filtering Selecting this option gives you the ability to be more selective about which attributes are synchronized between the on-
premises environment and Azure AD.Password Synchronization Synchronizes a hash of the user’s on-premises password to Azure AD. When the user authenticates to Azure AD, the submitted password is hashed using the same process, and if the hashes match, the user is authenticated. Each time a user updates their password on-premises, the updated password hash synchronizes to Azure AD.
Password Writeback Password writeback allows users to change their passwords in the cloud and have the changed password written back to the on-premises Active Directory instance. Enable this option if you want to support Self-Service Password Reset (SSPR).
Group Writeback Changes made to groups in Azure AD are written back to the on-premises AD instance.
Device Writeback Information about devices registered by the user in Azure AD is written back to the on-premises AD instance. You need to select this option if you want to allow users on hybrid-joined Windows 10 and Windows 11 devices to sign in using Windows Hello for Business.
Directory Extension Attribute Sync Allows you to extend Azure AD schema based on extensions made to your organization’s on-premises Active Directory instance.
Hybrid Azure AD join Allows computer accounts in the on-premises AD DS forest to register with Azure AD. Configuring this option allows you to use features including conditional access in Azure.
On the Ready to Configure page, you can choose to start synchronization or to enable staging mode. When you configure staging mode, Azure AD Connect will prepare the synchronization process, but it will not synchronize any data with Azure AD.
User principal name (UPN) suffixes
Prior to configuring and performing synchronization between an on-premises Active Directory environment and an Azure Active Directory instance, you must ensure that all user account objects in the on-premises Active Directory environment are configured with a value for the UPN suffix that can function for both the on-premises environment and any application that you want to use it with in the cloud.
This is not a problem when an organization’s internal Active Directory domain suffix is a publicly routable domain. For example, a domain name, such as contoso.com or adatum.com, that is resolvable by public DNS servers will suffice. Things become more complicated when the organization’s internal Active Directory domain suffix is not publicly routable.
If a domain is nonroutable, the default Azure AD instance domain, such as adatum2020.onmicrosoft.com, should be used for the UPN suffix. This requires modifying the UPN suffix of accounts stored in the on-premises Active Directory instance. Modification of UPN after initial synchronization has occurred is not supported. So, you need to ensure that on-premises Active Directory UPNs are properly configured before performing initial synchronization using Azure AD Connect.
Follow these steps to add a UPN suffix to the on-premises Active Directory in the event that the Active Directory domain uses a nonroutable namespace:
Open the Active Directory Domains and Trust console and select Active Directory Domains and Trusts.
On the Action menu, select Properties.
On the UPN Suffixes tab, enter the UPN suffix to be used with Azure Active Directory. Figure 1-29 shows the UPN suffix of epistemicus.com.

FIGURE 1-29 Configure alternative UPN suffixes.
After the UPN suffix has been added in Active Directory Domains and Trusts, you can assign the UPN suffix to user accounts. You can do this manually, as shown in Figure 1-30, by using the Account tab of the user’s Properties dialog box in Active Directory Users and Computers.

FIGURE 1-30 Configure UPN.
You can also use Microsoft PowerShell scripts to reset the UPNs of multiple user accounts. For example, the following script resets UPN suffixes of all user accounts in the epistemicus.internal domain to epistemicus.onmicrosoft.com:
Get-ADUser -Filter {UserPrincipalName -like "*@epistemicus.internal"} -SearchBase
"DC=epistemicus,DC=internal" |
ForEach-Object {
$UPN =
$_.UserPrincipalName.Replace("epistemicus.internal","epistemicus.onmicrosoft.com")
Set-ADUser $_ -UserPrincipalName $UPN
}
Manage Azure AD Connect Synchronization
By default, synchronization occurs between the on-premises directory and Azure every 30 minutes. In some cases, you’ll make a change to a user account or create a collection of user accounts and want to get those changes or new accounts up into the Azure Active Directory instance as fast as possible. You can force synchronization by running the Azure AD Connect wizard again, or you can use the Synchronization Service Manager.
To perform a full synchronization using the Synchronization Service Manager, perform the following steps on the computer on which you have installed Azure AD Connect:
Open the Synchronization Service Manager, either by selecting Synchronization Service from the Start menu or by running miisclient.exe located in the C:Program FilesMicrosoft Azure AD SyncUIShell folder.
Select the Connectors tab.
On the Connectors tab, select the name of your Active Directory domain service, as shown in Figure 1-31.

FIGURE 1-31 Synchronization Service Manager.
In the Actions pane, select Run.
In the Run Connector dialog box, select Full Synchronization, as shown in Figure 1-32, and select OK.
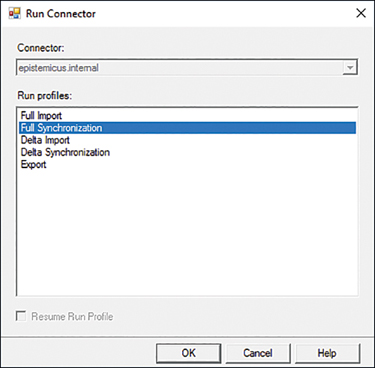
FIGURE 1-32 Full Synchronization.
You can trigger one of the following types of synchronization using the Synchronization Service Manager:
Full Import A full import and full sync is suitable for initiating the first full synchronization or the first full synchronization after you have changed the filtering parameters.
Full Synchronization This option performs a full synchronization.
Delta Import This option imports changed schema and objects.
Delta Synchronization This option synchronizes only objects changed since the last sync.
Export This option writes data from the Azure instance to the on-premises instance.
You can also use the Synchronization Service Manager to configure extensive filtering options, though for tasks such as configuring OU-based filtering, Microsoft recommends that you first attempt configuring filtering using the Azure AD Connect setup wizard and rely on a tool such as Synchronization Service Manager only if problems arise.
Need More Review? Synchronization Service Manager
You can learn more about Azure AD Connect Health at https: https://docs.microsoft.com/en-us/azure/active-directory/connect/active-directory-aadconnectsync-service-manager-ui.
Implement Azure AD Connect cloud sync
Azure AD Connect cloud sync provides an alternative solution for synchronizing identities between an on-premises AD DS instance and Azure AD to Azure AD Connect. Azure AD Connect cloud sync uses a special Azure AD cloud provisioning agent that communicates directly with Azure rather than an on-premises sync agent and database that manages the communication process. Azure AD Connect cloud sync includes the following options:
Supports synchronization from multi-forest disconnected AD DS forest environments.
A lightweight provisioning agent with sync configuration managed in Azure.
Multiple provisioning agent can be deployed, simplifying the process of ensuring high availability.
Because it does not support advanced hash synchronization features, Azure AD Connect cloud sync is not supported to allow an on-premises account to be used to interact with hosts joined to an Azure AD DS domain. Azure AD Connect cloud sync also does not support pass-through authentication, device object synchronization, synchronization filters based on object attribute values, device writeback, group writeback, and groups larger than 50,000 members.
Need More Review? Azure AD Connect Cloud Sync
You can learn more about Azure AD Connect cloud sync at https://docs.microsoft.com/en-us/azure/active-directory/cloud-sync/what-is-cloud-sync.
Manage Azure AD DS
A simple option for domain-joining an IaaS VM is to deploy an IaaS domain controller VM and to then join other VMs to the domain in the same way that you would in an on-premises environment. The challenge with this is that it means that you have to deploy, maintain, and pay for an IaaS VM configured as a domain controller. Or you can deploy, maintain, and pay for two IaaS VMs if you’re following the best practice of having at least two domain controllers for any single domain.
Azure Active Directory Domain Services (Azure AD DS) provides a managed domain service for IaaS VMs running in Azure. This service provides domain join, Group Policy, Lightweight Directory Access Protocol (LDAP), and Kerberos and NTLM authentication, and it is compatible with Windows Server Active Directory Domain Services. Because Azure AD DS is a managed service, Microsoft takes care of the management of the back-end domain controller infrastructure.
Azure AD DS pulls identity data from Azure AD. This includes identities synchronized from an on-premises Windows Active Directory instance through Azure AD Connect. When you deploy Azure AD DS, you select an Azure virtual network on which to make the service available. IaaS VMs placed on that virtual network can then domain-join to Azure AD DS in the same manner as a computer running on a traditional network with a domain controller would.
An Azure AD DS managed domain can also be configured in a trust relationship with an on-premises AD DS domain. This allows you to deploy resources in an Azure AD DS managed domain that functions as a resource forest that is accessible to on-premises accounts stored and managed in an on-premises trusted account forest. You’ll learn more about this configuration later in the chapter.
Need More Review? Azure AD DS
You can learn more about Azure AD DS at https://docs.microsoft.com/en-us/azure/active-directory-domain-services.
Deploying Azure Active Directory Domain Services
Azure AD DS can be enabled within a subscription and can leverage an Azure AD tenancy. Azure AD DS has the following prerequisites:
To enable Azure AD DS, you’ll need Global Administrator privileges within the Azure AD tenancy.
Creating resources in Azure AD DS requires that you have contributor privileges in the Azure subscription.
You must have a virtual network with DNS servers that can resolve Azure infrastructure resources, including storage. You can use Azure’s DNS servers. If you use custom DNS servers that are unable to resolve internet hosts, you may be unable to create an Azure AD DS domain.
Before creating an Azure AD DS domain, you should decide on the properties of the DNS name that you will assign. Take into account the following:
The default option will be to use the built-in domain name of the Azure AD directory associated with the managed domain. (This will have an .onmicrosoft.com DNS suffix.) The challenge with this option is that if you wish to enable secure LDAP, you won’t be able to create a digital certificate that allows a connection to this default domain because Microsoft owns the domain name associated with the DNS suffix.
Nonroutable domain names (such as .local and .internal) will cause problems with DNS resolution and should be avoided.
A custom domain name that you have registered publicly is the best option. Microsoft recommends that you use a domain name separate from any existing or Azure or on-premises DNS namespace. For example, use addstailwindtraders.com for the managed domain, whereas you use tailwindtraders.com for an on-premises domain as well as for some resources in Azure.
The following additional restrictions apply for domain names associated with Azure AD DS managed domains:
The domain prefix element of the domain name (domainprefix.tailwindtraders.com) cannot be longer than 15 characters. The domain suffix (tailwindtraders.com) is not counted toward this limit.
The DNS domain name of the managed domain should not already exist in the virtual network. You cannot already have an AD DS domain with the same DNS domain name present, an Azure cloud service with that name, or a VPN connection to an on-premises network with that name.
Deploying an Azure AD Domain Services managed domain involves performing the following steps:
In the Azure portal, select Create a resource and search for Azure AD Domain Services.
On the Azure AD Domain Services page, select Create.
Choose the Azure subscription and resource group that will host the managed domain.
Enter the selected DNS name for the Azure AD DS domain.
Choose the location in which the domain should be created. If the region supports Azure Availability Zones, the Azure AD DS resources will be distributed across zones for additional redundancy.
Choose a SKU (this determines the performance and backup frequency and can be altered after deployment). You can choose between Standard, Enterprise, and Premium.
Select between a user forest and a resource forest.
User forests synchronize all objects from Azure AD, including any user account synchronized from an on-premises AD DS environment
Resource forests only synchronize objects created in Azure AD and will not include any accounts synchronized from an on-premises AD DS environment. A resource forest can be configured in a one-way trust relationship with an on-premises Windows Server AD DS forest. This allows accounts that aren’t synchronized to Azure to access resources hosted on Azure IaaS VMs that are domain-joined to an Azure AD DS domain.
If you select Review and Create and have selected a User forest, the following occurs:
A new virtual network named aadds-vnet that uses the IP address range 10.0.0.0/24 is created.
A new subnet named aadds-subnet that uses the IP address range 10.0.0.0/24 is deployed within the newly created aadds-vnet.
A new network security group is created that contains rules that allow for service communication.
You can provide alternate options for virtual network and subnet and should extend the vNet’s range at this point if you want to add a VPN gateway.
After deployment has completed, you will need to update the DNS server settings for the Azure Virtual Network associated with the Azure AD DS domain so that the DNS server addresses match those associated with the Azure AD DS domain. You can do this automatically by selecting Configure on the overview page of the Azure AD DS domain.
Azure AD DS domain join
You can only perform a domain join to an Azure AD DS instance with an account that is part of the Azure AD tenant. You can’t perform a domain join using an account that has been synchronized from an on-premises Windows AD DS instance to perform this task. As is the case when configuring Azure AD Connect, you should consider creating a special account using the default tenancy onmicrosoft.com suffix for performing domain-join operations rather than any custom domain name that you have assigned to the tenancy.
You perform the domain-join operation from within the Windows Server VM, either directly by connecting through an RDP or Azure Bastion session or through a remote PowerShell session, either by changing the domain membership on the Computer Name tab of the System Properties dialog box, or by using the Add-Computer PowerShell cmdlet with the DomainName parameter.
Need More Review? IaaS VM Domain Join
You can learn more about domain-joining a Windows Server IaaS VM at https://docs.microsoft.com/azure/active-directory-domain-services/join-windows-vm.
Integrate Azure AD, AD DS, and Azure AD DS
You can configure Azure AD DS so that an account created on-premises synchronizes using Azure AD Connect to Azure AD and is configured with the appropriate hash synchronization that this account can in turn be used to sign on to an Azure AD DS joined VM.
By default, Azure AD does not automatically generate NTLM or Kerberos password hashes for users. For users to log on to computers that are members of an Azure AD DS domain, they need to have passwords stored in a hash format that can be used by NTLM or Kerberos authentication.
You can configure accounts that are only hosted in Azure AD to support authentication on computers joined to an Azure AD DS domain by changing the account’s password once an Azure AD DS instance associated with the Azure AD tenancy is created. Once this is done, generating a new password will create the appropriately stored password hash.
If you are synchronizing accounts and passwords to Azure using Azure AD Connect, you’ll need to perform the following steps:
Open the Synchronization Service on the computer that hosts Azure AD Connect.
On the list of connectors, take note of the connector names.
Run the following script, adding the connector names to the location in the script that defines the
$azureadConnectorand$adConnectorvariables:# Define the Azure AD Connect connector names and import the required PowerShell module $azureadConnector = "<CASE SENSITIVE AZURE AD CONNECTOR NAME>" $adConnector = "<CASE SENSITIVE AD DS CONNECTOR NAME>" Import-Module "C:Program FilesMicrosoft Azure AD SyncBinADSyncADSync.psd1" Import-Module "C:Program FilesMicrosoft Azure Active Directory Connect AdSyncConfigAdSyncConfig.psm1" # Create a new ForceFullPasswordSync configuration parameter object then # update the existing connector with this new configuration $c = Get-ADSyncConnector -Name $adConnector $p = New-Object Microsoft.IdentityManagement.PowerShell.ObjectModel. ConfigurationParameter "Microsoft.Synchronize.ForceFullPasswordSync", String, ConnectorGlobal, $null, $null, $null $p.Value = 1 $c.GlobalParameters.Remove($p.Name) $c.GlobalParameters.Add($p) $c = Add-ADSyncConnector -Connector $c # Disable and re-enable Azure AD Connect to force a full password synchronization Set-ADSyncAADPasswordSyncConfiguration -SourceConnector $adConnector -TargetConnector $azureadConnector -Enable $false Set-ADSyncAADPasswordSyncConfiguration -SourceConnector $adConnector -TargetConnector $azureadConnector -Enable $true
Need More Review? Hybrid Password Synchronization For Azure AD DS
You can learn more about domain-joining a Windows Server IaaS VM at https://docs.microsoft.com/en-us/azure/active-directory-domain-services/tutorial-configure-password-hash-sync.
Manage Azure AD Connect Health
Azure AD Connect Health is a tool available in the Azure Active Directory admin center, shown in Figure 1-33, that allows you to monitor the health of synchronization between your organization’s on-premises directory and Azure Active Directory.
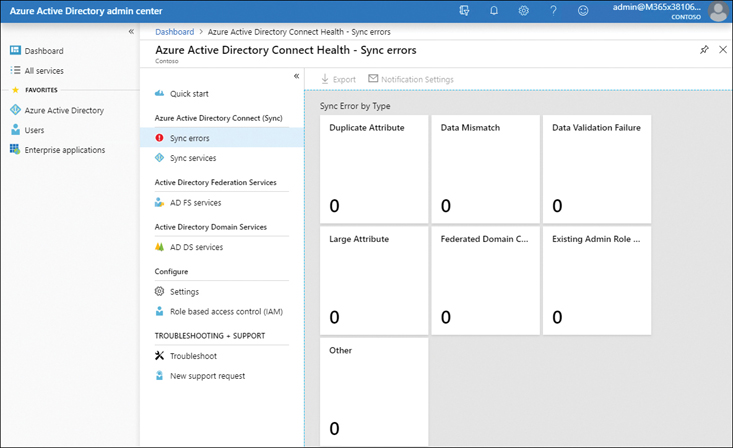
FIGURE 1-33 Azure AD Connect Health.
You can use Azure AD Connect health to view information about the following:
Sync errors This option displays errors such as Duplicate Attribute, Data Mismatch, Data Validation Failure, Large Attribute, Federated Domain Change, and Existing Admin Role Conflicts.
Sync services This option handles information about which services are synchronizing with Azure Active Directory.
AD FS services This option displays information about AD FS when Azure AD Connect is configured for federation. Includes information about errors and issues.
AD DS services This option displays information about domains and forests connected to Azure Active Directory.
Need More Review? Azure AD Connect Health
You can learn more about Azure AD Connect Health at https://docs.microsoft.com/en-us/azure/active-directory/hybrid/whatis-azure-ad-connect.
Manage authentication in on-premises and hybrid environments
Azure AD Connect supports a variety of user sign-in options, which are related to the method you use to synchronize directory information from Active Directory Domain Services to Azure AD. You configure which sign-in option you will use when setting up Azure AD Connect, as shown in Figure 1-34. The default method, password sync, is appropriate for the majority of organizations that will use Azure AD Connect to synchronize identities to the cloud.

FIGURE 1-34 User sign-in.
Password synchronization
Hashes of on-premises Active Directory user passwords synchronize to Azure AD, and changed passwords immediately synchronize to Azure AD. Actual passwords are never sent to Azure AD and are not stored in Azure AD. This allows for single sign-on for users of computers that are joined to an Active Directory domain that synchronizes to Azure AD. Password synchronization also allows you to enable password writeback for self-service password reset functionality through Azure AD.
Pass-through authentication
When authenticating to Azure AD, the user’s password is validated against an on-premises Active Directory domain controller. Passwords and password hashes are not present in Azure AD. Pass-through authentication allows you to apply on-premises password policies. It requires that Azure AD Connect have an agent on a computer joined to the domain that hosts the Active Directory instance that contains the relevant user accounts. Pass-through authentication also allows single sign-on for users of domain-joined machines.
With pass-through authentication, the user’s password is validated against the on-premises Active Directory controller. The password doesn’t need to be present in Azure AD in any form. This allows for on-premises policies, such as sign-in hour restrictions, to be evaluated during authentication to cloud services.
Pass-through authentication uses a simple agent on a Windows Server 2012 R2, Windows Server 2016, Windows Server 2019, or Windows Server 2022 domain-joined machine in the on-premises environment. This agent listens for password-validation requests. It doesn't require any inbound ports to be open to the internet.
You can also enable single sign-on for users on domain-joined machines that are on the corporate network. With single sign-on, enabled users only need to enter a username to help them securely access cloud resources.
Active Directory Federation
Active Directory Federation allows users to authenticate to Azure AD resources using on-premises credentials. It also requires the deployment of an Active Directory Federation Services infrastructure. This is the most complex identity synchronization configuration for Azure Active Directory and is only likely to be implemented in environments with complicated identity configurations.
Configure and manage AD DS passwords
Most of the accounts used in your organization will be domain-based rather than local accounts. Except for the occasional local account, users, services, and computers authenticate against Active Directory Domain Services (AD DS). By using password policies, administrators can specify the rules for allowable passwords. They determine how long and how complicated passwords must be, as well as how often they must be changed, how often they can be changed, and whether previously used passwords can be used again.
Unless you take special steps, the properties of passwords used with domain accounts are determined through domain-based password policies. You configure password policies by editing Group Policy Objects (GPOs) linked at the domain level. This fact is important, and although you can set password policies at GPOs linked at the organizational unit (OU) and site level, these policies have no effect on the properties of user passwords.
Remember that you can have only one set of domain password policies configured through Group Policy. The GPO order at the domain level determines the domain password policy. The exceptions to the rule about one password policy per domain are fine-grained password policies.
Password policies are located in the Computer ConfigurationPoliciesWindows SettingsSecurity SettingsAccount Policies node of a GPO. Although most administrators think of password policy and account lockout policy as parts of the same whole, they are actually separate. Windows Server ships with a default password policy, but account lockout policy is not enabled.
Password policy items
The following list shows five main password policies that you are likely to use when configuring a password policy for your organization, and one that you probably won’t use. These password policies are the following:
Enforce password history This policy means that the configured number of previously used passwords is stored within Active Directory. It stops users from using the same set of small passwords. The default and maximum value is 24 remembered passwords.
Maximum password age This policy specifies the maximum length of time that can elapse before a password must be changed. The default value is 42 days. You can set it to 999 days. Setting the value to 0 days means that there is no maximum password age.
Minimum password age You use this policy to restrict users from changing their password instantly. This policy exists because some users spend a couple of minutes repeatedly changing their password until they have exhausted the password history and return to using their original password. Users can change their password after the specified period has elapsed. The default value is 1 day.
Minimum password length This policy sets the minimum number of characters in a password. Longer passwords are more secure than shorter ones. Windows Server supports passwords up to 128 characters long when changed using GUI tools, and 256 when modified using PowerShell.
Password must meet complexity requirements This policy ensures that passwords use a mix of numerals, symbols, and uppercase and lowercase alphabet characters. When enabled, it also stops users from using their account name in the password.
The policy that you are unlikely to need is the Store Passwords Using Reversible Encryption policy. This policy has been available in most previous versions of the Windows Server operating system. It provides backward compatibility for applications that could not access passwords stored in Active Directory using the native method of encryption. Unless your organization is running some software that was written back when Windows NT 4.0 was the Windows Server operating system, you probably won’t need to enable this policy.
Delegate password settings permissions
People tend to be good at remembering passwords that they have used for a long time. They tend not to be so good at remembering new passwords, especially if those passwords contain a mix of numbers, letters, and symbols. Users who frequently have to change their passwords are more likely to end up forgetting those passwords. If an account lockout policy is enforced, users are more likely to end up calling the service desk to get their password reset. The stricter an organization’s password policy is, the more time the service desk has to spend untangling users from forgotten passwords.
Instead of having users call the service desk to have their password reset, you can delegate the ability to reset user passwords to someone in the user’s own department, such as an administrative assistant or office manager. Taking this step can increase security because someone in the user’s own department can more easily verify the user’s identity than a service desk technician can. It also shifts work away from the service desk, which enables service desk technicians to concentrate on other tasks.
The default Active Directory settings give members of the Account Operators, Domain Admins, or Enterprise Admins Active Directory groups the right to change user passwords. You can delegate the ability to manage password settings on a per-OU basis through the delegation of a control wizard. When you do this, you move user accounts into specific OUs that match your administrative requirements. For example, you can move all user accounts of people who work in the research department to the Research OU, and then delegate the right to reset passwords and force password change at the next logon to the research department’s departmental manager. You can also delegate the ability to manage password settings at the domain level, though most organizations do this by adding users to the Account Operators, Domain Admins, or Enterprise Admins groups.
To delegate the right to reset passwords and force password changes at the next logon, run the Delegation of Control Wizard. You can access this wizard by right-clicking an OU in Active Directory Users and Computers and then selecting Delegate Control. You should be careful to select only the Reset user passwords and force password change at next logon task and not grant non-IT department users the right to perform other tasks.
Larger organizations should consider providing a self–service password reset portal. Self–service password reset portals enable users to reset their Active Directory user account passwords after performing a series of tasks that verify their identity. This process provides users with a quick method of resetting forgotten passwords and reduces the number of password reset requests for service desk technicians. Connecting your on-premises interest of AD DS to Azure Active Directory provides you with the option of implementing self-service password reset.
Fine-grained password policies
Fine-grained password policies enable you to have separate password policies within a single domain. For example, with fine-grained password policies you can have a password policy that applies to general users and have a stricter set of policies that apply to users with sensitive accounts, such as members of the IT department. Unlike Group Policy–based password policies, which apply at the domain level, you apply fine-grained password policies to global security groups or individual user accounts. This means that multiple fine-grained password policies might apply to a single account. In this situation, use precedence settings to ensure that the appropriate policy always applies. (Precedence is covered later in this lesson.) Fine-grained password policies can’t be applied to domain local or universal security groups, only to global security groups. The Active Directory domain must be at the Windows Server 2008 or later functional level or higher before you can use fine-grained password policies.
Managing fine-grained password policies
You create and manage fine-grained password policies through the Active Directory Administrative Center. To create a new Password Settings Object (PSO), open the Active Directory Administrative Center and navigate to the Password Settings Container (PSC), which is located in the System Container of the domain. From the Tasks menu, select New, and then select Password Settings. The PSC enables you to view the precedence of PSOs. Password settings with lower precedence values override password settings with higher precedence values.
Configuring Password Settings Objects
A Password Settings Object (PSO) contains settings for both password policy and account lockout policy. A PSO applies to the groups and users specified in the Directly Applies To area. If a PSO applies to a user account, either directly or indirectly through group membership, that PSO overrides the existing password and account lockout policies configured at the domain level.
PSOs contain the following options:
Name Enables you to configure a name for the PSO.
Precedence When multiple PSOs apply to an account, the PSO with the lowest precedence value has priority.
Enforce Minimum Password Length Minimum password length that can be used by users subject to the policy.
Enforce Password History The number of passwords remembered by Active Directory. Remembered passwords can’t be reused.
Password Must Meet Complexity Requirements A password must contain a mix of numbers, symbols, and uppercase and lowercase letters.
Store Password Using Reversible Encryption Provides backward compatibility with older software and is rarely used in Windows Server 2012 environments.
Protect From Accidental Deletion The user account can’t be accidentally deleted. Although this setting is not available in Group Policy password or account lockout settings, you can edit an object directly to configure it.
Enforce Minimum Password Age The minimum length of time users must have a password before they are eligible to change it.
Enforce Maximum Password Age The maximum number of days that users can go without changing their password.
Enforce Account Lockout Policy You can configure the following three policies with this policy enabled:
Number of Failed Logon Attempts Allowed The number of incorrect password entries that can be made in succession before a lockout is triggered.
Reset Failed Logon Attempts Count After The period of time in which the incorrect password entries must be made.
Account Will Be Locked Out Can be set either to a specific number of minutes or to a setting for which the administrator must manually unlock the account.
Determining password settings
If your organization uses a number of fine-grained password policies, it might be difficult to determine, at a glance, which password policy applies to a particular user because PSOs can be applied to multiple groups and users, and users can be members of multiple groups. Rather than work everything out manually, the Active Directory Administrative Center’s Global Search function provides the following criteria to determine which fine-grained password policy applies to a specific user or group:
Directly Applied Password Settings For A Specific User You can determine which PSOs directly apply to a specific user account. PSOs that apply to security groups of which the user account is a member are not listed.
Directly Applied Password Settings For A Specific Global Security Group You can determine which PSOs directly apply to a specific security group.
Resultant Password Settings For A Specific User You can determine which PSO applies to a specific user account based on directly applied PSOs as well as PSOs that apply indirectly through group membership.
Establishing balanced password policies
Password policies require balance, and a password policy that is too strict can be as detrimental as one that is not strict enough. For example, some organizations that implement strict password policies find that users write complicated passwords down because they can’t remember them. By increasing the severity of their password policies, the IT department may prompt users to behave in a way that makes the organization less secure.
When considering password policies, keep the following in mind:
Users dislike changing their password. Many want to log on and get to work rather than coming up with a new password to remember that also meets the requirements of the password policy.
Users are more likely to forget a new password than one they have been using for some time. Users who constantly forget passwords tend to do things that decrease security such as writing those passwords on notes taped to their monitors.
If you increase the minimum password length, forcing users to use pass phrases, you can also increase the maximum time before the password expires. Increasing password length increases security by making the password less guessable. Although increasing maximum password age reduces password security, this decrease is not as significant as the improvement achieved by increasing password length.
Remember that each call to the service desk costs the organization money and time. You should aim to minimize the number of password reset requests without decreasing password security. An alternative option is to implement Self-Service Password Reset through integration with Azure Active Directory. This strategy is addressed further by the AZ-801 Configuring Windows Server Hybrid Advanced Services exam.
Account lockout settings
An account lockout policy determines what happens when a person enters an incorrect password a certain number of times. The default Windows Server settings do not have account lockout policy configured, so users can keep entering incorrect passwords until they give up in frustration. Unfortunately, enabling users to keep entering incorrect passwords is a security risk because it allows “dictionary attacks,” in which an automated system keeps entering passwords from a list until it locates the correct one.
These policies enable you to do the following:
Account Lockout Duration Use this policy to specify how long an account is locked out. When enabled, this setting defaults to 30 minutes. If you set this policy to 0, the account is locked out until someone with the appropriate privileges can unlock it.
Account Lockout Threshold Use this policy to specify the number of invalid logon attempts that trigger an account lockout. When enabled, the default value is 5, but you can set it to 999. The number of invalid logons must occur within the period specified in the Reset Account Lockout Counter After policy. A value of 0 will mean that account lockout will not be triggered.
Reset Account Lockout Counter After Use this policy to specify the amount of time in which the number of invalid logon attempts must occur. When enabled, this policy defaults to a value of 30 minutes. If the defaults are used and a user enters an incorrect password three times in 30 minutes, the account is locked out for 30 minutes. If a user enters an incorrect password three times in 31 minutes, however, the account is not locked out.
You have to consider balance when configuring lockout policies. How many failed attempts suggest that users won’t remember their password? For the average user, a lockout of 30 minutes is functionally equivalent to a lockout that never expires. Even if you explain to users a thousand times that they have to wait 30 minutes and try again, they will still ring the help desk within moments of being locked out. Consider a 1-minute lockout and mention it using the logon disclaimer Group Policy item. It enables you to protect against dictionary attacks and probably minimize calls to the service desk.
Account management tasks
Having a set of account policies in place is only the first step in a comprehensive account management strategy. Administrators must regularly check the status of user accounts to determine how well account policies are functioning, as well as locate any accounts in which there is suspicious activity.
Accounts with nonexpiring passwords
You can configure an account so that the password never expires. When you do this, the user associated with the account never has to change the password. Password policies don’t override accounts that have been explicitly configured so that their passwords do not expire. Selecting the Password never expires setting, as shown in Figure 1-35, exempts an account from any password-expiration policies.
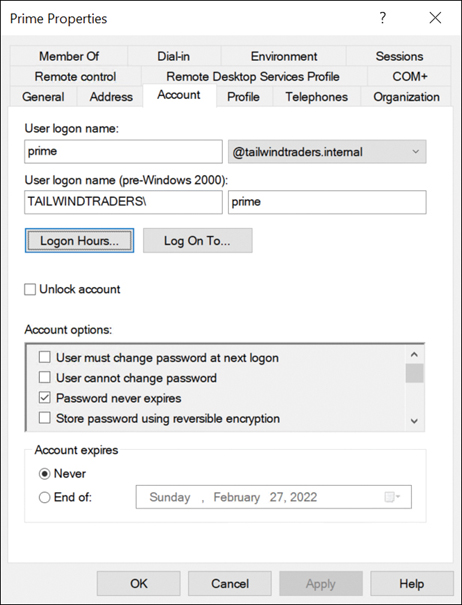
FIGURE 1-35 Password never expires setting.
To configure an account so that password policies apply, you need to deselect the Password never expires option. You should also force the user to change the password at the next logon as if the password was configured not to expire because it is reasonable to assume that the user hasn’t changed it recently. You can figure out which accounts have been configured not to expire by using the Active Directory Administrative Center and performing a query to find all accounts that have been configured with no expiration date, as shown in Figure 1-36.

FIGURE 1-36 Locate accounts with no password expiration.
You can then modify the properties of these accounts by selecting them all and selecting the Password never expires option in the Multiple User Account properties dialog box, which is available when you select and view the properties of multiple accounts in the Active Directory Administrative Center console. When performing this task, you should also force users to change their passwords on their next logon, which ensures that password policies apply in the future.
Many systems administrators have the bad habit of configuring their passwords not to expire simply because they realize how annoying it is to have to change passwords constantly. Given that systems administrator accounts are usually the most powerful in the organization, it is a bad idea to enable them to exempt themselves from an organizational password policy. If anything, systems administrators should be subject to more stringent password policies than ordinary users. You can configure stricter password policies for a specific subset of users using fine-grained password policies.
Locked-out accounts
As you learned earlier, the length of time an account is locked out depends on account lockout policies. Many organizations that permanently lock out accounts when a user enters incorrect passwords in succession wait for the locked-out user to call the service desk to request a password reset. Although most users contact the service desk quickly when their user account is locked out, there are situations in which this does not occur, such as when someone attempts to gain access to a coworker’s account while that coworker is on leave. You can use the Active Directory Administrative Center Global Search option to locate users with enabled but locked-out accounts. You do this by selecting the Users with enabled but locked accounts search criteria. You should further investigate locked accounts when the user associated with the account has not contacted the service desk.
Inactive accounts
Although the IT department is often notified when a person new to the organization needs a new user account, the IT department is not always notified when people leave the organization. As a result, most organizations have a number of inactive user accounts that are associated with people no longer directly associated with the organization. There can be good reasons for the inactivity; for example, a person may be on maternity or long service leave. As an administrator, you should frequently search for accounts in which the user has not signed on for a good length of time. You can disable user accounts associated with users who have temporarily departed the organization. This gives you the option of reenabling the account when the user returns. You can later remove user accounts associated with users who have left the organization.
Disabling an account allows you to reactivate the account if it is necessary to access resources to which the departed user had access. Some organizations have a special “Disabled User Accounts” OU to store these accounts. Deleting an account is a more permanent option. Although it is possible to recover deleted items if backups are available, it gets increasingly difficult once the tombstone lifetime expires.
You can locate inactive accounts by using the Global Search function in the Active Directory Administrative Center to search for users with enabled accounts who have not signed on for more than a given number of days. The value you choose here will depend on the nature of your environment, but you should definitely investigate any active enabled accounts in which a logon has not occurred for more than 50 days.
Azure AD Password Protection
Azure AD Password Protection allows you to detect and block known weak passwords. You can also use Azure AD Password Protection to block specific terms from being used in passwords, such as those associated with your organization, popular anime characters, or the local football team.
Checks for weak passwords occur on the domain controller, and password hash synchronization is not required for the implementation of Azure AD Password Protection. Communication with Azure occurs through a domain-joined computer that has the Azure AD Password Protection Proxy service deployed. This service is responsible for ensuring that password hygiene policies configured in Azure are distributed to domain controllers. Azure AD Password Protection does not require domain controllers to be able to directly communicate with Azure.
Password policies are only enforced on domain controllers where the Azure AD Password Protection agent is installed. To ensure that password protection enforcement occurs consistently, you will need to deploy the password protection agent on all domain controllers in a domain.
Exam Tip
Remember the difference between password synchronization, pass-through authentication, and Active Directory Federation Services when configuring Azure AD Connect.
Skill 1.5: Manage Windows Server by using domain-based Group Policies
Group Policy is the primary method by which you configure settings for users and computers in an Active Directory Domain Services environment. Even though other technologies exist through which configuration of servers and client computers can be accomplished, an understanding of how Group Policies function is critical to the practice of Windows Server administration.
Implement Group Policy in AD DS
Group Policy provides a central way of managing user and computer configuration. You can use Group Policy to configure everything from password and auditing policies to software deployment, desktop background settings, and mappings between file extensions and default applications.
Managing Group Policy Objects
As an experienced systems administrator, you are aware that GPOs enable you to configure settings for multiple users and computers. After you get beyond editing GPOs to configure settings, you need to start thinking about issues such as GPO maintenance. For example, if an important document is lost, you need to know how to recover it from backup. Do you know what to do if someone accidentally deletes a GPO that has hundreds of settings configured over a long period of time?
The main tool you’ll use for managing GPOs is the Group Policy Management Console (GPMC), shown in Figure 1-37. You can use this console to back up, restore, import, copy, and migrate. You can also use this console to delegate GPO management tasks.

FIGURE 1-37 Group Policy Management Console.
There are also a substantial number of cmdlets available in the PowerShell Group Policy module, including the following:
Get-GPO Enables you to view GPOs
Backup-GPO Enables you to back up GPOs
Import-GPO Enables you to import a backed-up GPO into a specified GPO
New-GPO Enables you to create a new GPO
Copy-GPO Enables you to copy a GPO
Rename-GPO Enables you to change a GPO’s name
Restore-GPO Enables you to restore a backed-up GPO to its original location
Remove-GPO Enables you to remove a GPO
Backup GPOs
Backing up a GPO enables you to create a copy of a GPO as it exists at a specific point in time. A user must have read permission on a GPO to back it up. When you back up a GPO, the backup version of the GPO is incremented. It is good practice to back up GPOs prior to editing them so that if something goes wrong, you can revert to the unmodified GPO.
If your organization doesn’t have access to the Microsoft Desktop Optimization Pack (MDOP), you should back up GPOs before you or other people modify them. If a problem occurs, it’s quicker to restore a backup than it is to reconfigure the modified GPO with the existing settings. MDOP provides the ability to use GPO versioning as well as other advanced functionality. You’ll learn about Advanced Group Policy Management later in this chapter.
To back up a GPO, perform the following steps:
Open the GPMC.
Right-click the GPO that you want to back up, and select Back Up. In the Back Up Group Policy Object dialog box enter the location of the backup and a description for the backup and then select Back Up.
You can restore a GPO using the Restore-GPO cmdlet. Restoring a GPO overwrites the current version of the GPO if one exists or re-creates the GPO if the GPO has been deleted. To restore a GPO, right-click the Group Policy Objects node in the GPMC and select Manage Backups. In the Manage Backups dialog box select the GPO you want to restore and select Restore. If multiple backups of the same GPO exist, you can select which version of a GPO to restore.
Import and copy GPOs
Importing a GPO enables you to take the settings in a backed-up GPO and import them into an existing GPO. To import a GPO, perform the following steps:
Right-click an existing GPO in the GPMC and select Import Settings.
In the Import Settings Wizard, you are given the option of backing up the destination GPO’s settings. This enables you to roll back the import.
Specify the folder that hosts the backed-up GPO.
On the Source GPO page of the Import Settings Wizard. select the source GPO. You can view the settings that have been configured in the source GPO prior to importing it. Complete the wizard to finish importing the settings.
Remember that when you import settings from a backed-up GPO, the settings in the backed-up GPO overwrite the settings in the destination GPO.
Copying a GPO creates a new GPO and copies all configuration settings from the original to the new. You can copy GPOs from one domain to another. You can also use a migration table when copying a GPO to map security principals referenced in the source domain to security principals referenced in the destination domain.
To copy a GPO, perform the following steps:
Right-click the GPO that you want to copy and select Copy.
Right-click the location that you want to copy the GPO to and select Paste.
In the Copy GPO dialog box, choose between using the default permissions and preserving the existing permissions assigned to the GPO.
Fixing GPO Problems
Windows Server includes command-line utilities that allow you to repair a GPO after you perform a domain rename or re-create default GPOs. If you need to re-create the default GPOs for a domain, use the DCGPOFix command. If you perform a domain rename, you can use the GPFixup command to repair name dependencies in GPOs and Group Policy links.
Migrate Group Policy Objects
When moving GPOs between domains or forests, you need to ensure that any domain-specific information is accounted for, so locations and security principals in the source domain aren’t used in the destination domain. You can account for these locations and security principals using migration tables. You use migration tables when copying or importing GPOs.
Migration tables enable you to alter references when moving a GPO from one domain to another, or from one forest to another. An example is when you are using GPOs for software deployment and need to replace the address of a shared folder that hosts a software installation file so that it is relevant to the target domain. You can open the Migration Table Editor (MTE) by right-clicking Domains in the GPMC and selecting Open Migration Table Editor.
When you use the MTE, you can choose to populate from a GPO that is in the current domain or to populate the MTE from a backed-up GPO. When you perform this action, the MTE will be populated with settings that reference local objects. If when you perform this action there are no results, then no local locations are referenced in the GPO that you are going to migrate.
GPO management
In larger environments, there is more than one person in the IT department. In very large organizations, one person’s entire job responsibility might be creating and editing GPOs. Delegation enables you to grant the permission to perform specific tasks to a specific user or group of users. You can delegate some or all of the following Group Policy management tasks:
GPO creation
GPO modification
GPO linking to specific sites, organizational units (OUs), or domains
Permission to perform Group Policy Modeling analysis at the OU or domain level
Permission to view Group Policy Results information at the OU or domain level
Windows Management Instrumentation (WMI) filter creation
Users in the Domain Admins and Enterprise Admins groups can perform all Group Policy management tasks. Users that are members of the Group Policy Creator Owners domain group can create GPOs. They also have the right to edit and delete any GPOs that they have created. You can delegate permissions to GPOs directly using the GPMC.
Creating GPOs
Creating a GPO is simply creating a new Group Policy Object. Newly created GPOs have no settings applied. To create a new GPO:
Open the Group Policy Management Console.
Under ForestDomainsDomain Name, right-click Group Policy Objects and select New.
Provide a name for the new GPO and select OK.
If you want to delegate the ability for users to create GPOs, you can add them to the Group Policy Creator Owners group. You can also explicitly grant them permission to create GPOs using the GPMC. To do this, perform the following steps:
Open the GPMC from the Tools menu of Server Manager.
Expand the domain in which you want to delegate the ability to create GPOs, select Group Policy Objects, and select the Delegation tab.
Select Add and select the group or user that you want to give the ability to create GPOs in that domain.
Editing GPOs
To edit a GPO, users must be either a member of the Domain Admins or Enterprise Admins group. Users can edit a GPO if they:
Created it
Have been given Read/Write permissions on the GPO through the GPMC
To grant a user permission to edit a GPO, perform the following steps:
Select the GPO in the GPMC.
Select the Delegation tab.
Select Add, specify the user or group that should have permission to edit the GPO, and then specify the permissions that you want to give this user or group. You can choose from one of the following permissions:
Read
Edit Settings
Edit Settings, Delete, Modify Security
Linking GPOs
Linking a GPO to an object such as a domain or OU involves navigating to the location in the Group Policy Management Console, right-clicking on that location, and selecting Link Existing GPO. You then select which of the existing GPOs you want to link to the domain or OU. You also have the ability to create and link a GPO using this method.
To enable a user to link a GPO to a specific object, you need to edit the permission on that object. You can perform this task in the GPMC. For example, to grant a user or group permission to link a GPO to an OU, select the OU in the GPMC, select the Delegation tab, select Add, and then select the user or group to which you want to grant this permission.
Modeling, Results, and WMI filters
The Group Policy Modeling Wizard allows you to simulate a policy deployment for planning and testing purposes without actually assigning a policy to the production environment. You can determine what the resultant set of policy will be using this wizard without it actually impacting existing users or computers.
Group Policy Results allows you to calculate which policies apply given the existing configuration to a specific user or computer. This wizard differs from the Group Policy Modeling Wizard in that it will tell you what policies apply at the current moment rather than modeling a hypothetical policy deployment configuration.
Delegating permissions to perform tasks related to Group Policy Modeling and Group Policy Results is performed at the domain level. You can delegate the ability to create WMI filters by selecting the WMI Filters node in the GPMC and granting the permission on the Delegation tab.
Advanced Group Policy Management
Advanced Group Policy Management (AGPM) is available to Software Assurance customers through the Microsoft Desktop Optimization Pack. AGPM integrates with the existing Group Policy Management Console, extending its functionality. AGPM has several benefits over the standard Group Policy Management Console.
The biggest advantage of AGPM is that it enables you to apply a workflow to the management of GPOs, allowing you to use versioning and offline editing. This is an advantage over the standard Group Policy Management Console, where any changes made to an active Group Policy are automatically propagated to clients that are influenced by that policy. Having offline functionality for editing GPOs allows GPOs that are already active to be more extensively tested during the revision process than might be the case in a traditional GPO deployment.
AGPM offers a more advanced model for editing GPOs because it allows administrators to track precisely which person in an organization made a specific change to a GPO. In a traditional Windows Server deployment, even though it is possible to control who has the permissions required to edit and apply a GPO, if multiple people have these permissions, it can be almost impossible to determine who made a specific change to an existing GPO. Being able to track the changes made to a GPO is very important in a high-security environment.
AGPM uses the following roles in its delegation architecture:
AGPM Administrator Users assigned this role are able to perform all tasks in AGPM. This includes configuring domain-wide options as well as delegating permissions.
Approver Users assigned this role are able to deploy GPOs into the domain. Approvers are also able to approve or reject requests from users assigned the Editor role. Users assigned this role are also able to create and delete GPOs, but they cannot edit GPOs unless assigned the Editor role.
Reviewer Users assigned the Reviewer role are able to view and compare the contents of GPOs, but they do not have the ability to modify or deploy GPOs. The Reviewer role is designed to review and audit GPO management.
Editor Users assigned this role are able to view and compare GPOs as Reviewers can. They are also able to check GPOs out of the archive, edit them offline, and then check those GPOs back into the archive. They are unable to deploy GPOs but can request GPO deployment.
Group Policy processing
In organizations with large Group Policy deployments, multiple GPOs might apply to a single user account or computer account, or when a user is signed on to a specific computer, or both. Group Policy processing precedence is the set of rules that determines which Group Policy items apply when multiple GPOs are configured.
Group Policies are processed in the following manner:
Local Settings configured at the local level apply first. If multiple local policies apply, settings in machine policies apply first, settings in admin and nonadmin local policies override them, and settings in per-user policies override any configured at the machine and admin/nonadmin level.
Site Policies based on location apply next. Any settings configured at the site level override settings configured at the local level. You can link multiple GPOs at the site level. When you do this, policies with a lower numerical link order override policies with a higher numerical link order.
Domain Settings applied at the domain level override settings applied at the site and local levels. You can link multiple GPOs at the domain level. The Default Domain Policy is linked at this level.
Organizational unit (OU) Settings applied at the organizational unit level override settings applied at the domain, site, and local levels. When an account is a member of a child OU, policies applied at the child OU level override policies applied at the parent OU level. You can apply multiple GPOs at the OU level. Policies with a lower numerical link order override policies with a higher numerical link order.
Group Policy processing precedence is relevant only when there are conflicts in policies. If policy A applies at the domain level and policy B applies at the OU level, both policy A and policy B apply.
Policy enforcement and blocking
When configuring a Group Policy, you can choose to enforce that policy. To enforce a Group Policy, right-click that policy at the location in which you link the policy and then select Enforced. When you choose to enforce a policy, that policy will apply and override settings configured at other levels. For example, normally a policy linked at the OU level would override a policy linked at the domain level. If you configure the policy at the domain level as Enforced, it instead overrides the policy linked at the OU level.
The Block Inheritance function enables you to block policies applied at earlier levels. For example, you can use Block Inheritance at the OU level to block policies applied at the domain and site level. Block Inheritance does not stop the application of policies configured as Enforced.
Group Policy security filtering
Security filtering enables you to configure permissions on GPOs. By default, Group Policies apply to the Authenticated Users group. By changing the default permissions, you can make the Group Policy apply only to a specific group. For example, if you remove the Authenticated Users group and add another security group such as the Melbourne-Users group, the Group Policy applies to only that configured security group.
When considering whether to use security filtering, keep the following in mind:
A security filter applies to the GPO, so it applies wherever the GPO is linked. You can’t have one security filter apply to the GPO when linked at the domain level and another security filter apply to the GPO when linked at the OU level.
Filtered policies still need to be checked during the Group Policy processing process, which can increase the amount of time spent on Group Policy processing. Startup and logon times may increase.
Apply Group Policy and Read permissions are the minimum required for user settings to take effect. If you have removed the Authenticated Users group, you will need to assign the Read only permission to a security principal associated with the computer account so that the computer account can process that user settings element of the GPO.
It is also possible to apply a Deny permission on the basis of security account or group. Deny permissions override Allow permissions. You block a particular security group from receiving a Group Policy by setting the Apply Group Policy (Deny) advanced permission. You can do this on the Delegation tab of a GPO’s properties instead of the Scope tab.
Group Policy WMI Filtering
WMI filtering enables you to filter the application of policy based on the results of a WMI query. For example, you might write a WMI query to determine whether a computer has an x86 or x64 processor, or whether there is more than a certain amount of disk space available. WMI queries are often used with policies related to software deployment to determine whether the target computer has the appropriate system resources to support the installation of the application.
The drawback of WMI queries is that they are complicated for systems administrators who are unfamiliar with programming beyond simple scripting. WMI queries also cause significant delays in Group Policy processing. In environments in which sophisticated logic needs to be applied to targeted application distribution, products such as Configuration Manager are more appropriate. Configuration Manager enables administrators performing software deployment to configure ways of checking hardware configuration before software deployment that do not require writing queries in WMI Query Language (WQL).
Loopback processing
Each GPO has two distinct sections: Computer Configuration and User Configuration. The resultant policies for a user are based on the cumulative user configuration settings in GPOs that apply to the user’s accounts at the site, domain, and OU setting. The resultant computer policies are applied based on the cumulative computer configuration settings in GPOs that apply to the computer’s account at the site, domain, and OU level.
In some situations, you’ll want only the GPOs that apply to the computer account to apply. You might want to do this with conference room computers, for which you want people to be able to sign on with domain accounts but to have a very controlled configuration. When you enable loopback processing, user settings are determined based on the settings in the User Configuration settings area of GPOs that apply to the computer account.
There are two types of loopback processing that you can configure by setting the Group Policy loopback processing mode policy. This policy is located under Computer ConfigurationAdministrative TemplatesSystemGroup Policy node and can be configured with the following settings:
Replace When you configure Replace, only the GPOs that apply to the computer account will apply. Settings in the User Configuration area of the GPOs that apply to the computer account will apply.
Merge The settings in the User Configuration area of GPOs that apply to the user account will still apply but will be overridden by settings in the User Configuration area of GPOs that apply to the computer account.
Slow-link processing enables you to configure Group Policy application to be performed in a different manner, depending on the speed of the connection from the client to the domain controller. It enables you to block activities such as software deployment when the connection between Active Directory and the client is detected as falling below a particular threshold. You configure slow-link detection by configuring the Group Policy slow-link detection policy located under Computer ConfigurationAdministrative TemplatesSystemGroup Policy. When a slow link is detected, Registry settings from administrative templates, security policies, Encrypting File System (EFS) recovery policy, and firewall policies are applied. Policies related to application deployment, scripts, folder redirection, and disk quotas will not be applied.
Group Policy caching
Group Policy caching reduces the amount of time taken to process Group Policy during computer startup and user sign-on. Rather than retrieve the Group Policies that apply to the computer from a domain controller when a computer starts up or a user signs on, the client will use a cached copy of the last Group Policies downloaded from the domain controller. After this initial application of the cached policies during startup and user sign-on, policies will be retrieved and applied normally from a domain controller. You enable Group Policy caching by configuring the Configure Group Policy Caching policy. This policy is located under Computer ConfigurationPoliciesAdministrative TemplatesSystemGroup Policy.
Force Group Policy update
Remote Group Policy update allows you to force a remote computer to perform a Group Policy update without having to sign on to the computer and run the GPUpdate command or the Invoke-GPUpdate PowerShell cmdlet. Remote Group Policy requires that the following firewall rules be enabled on clients:
Remote Scheduled Tasks Management (RPC)
Remote Scheduled Tasks Management (RPC-EPMAP)
Windows Management Instrumentation (WMI-In)
You can run remote Group Policy update from the Group Policy Management Console by right-clicking on a container or OU. An update will run on all computers within the container or OU as well as on any computer accounts stored within child OUs. You can also use the Invoke-GPUpdate PowerShell cmdlet to trigger a remote Group Policy update. The advantage of the PowerShell cmdlet is that you can target a specific computer rather than all computer accounts in an OU.
Resultant Set of Policy tool
The Resultant Set of Policy tool allows you to generate a model of Group Policy application, allowing you to figure out which policies apply to particular objects within the domain. Resultant Set of Policy allows you to figure out why Group Policy application isn’t behaving in the way that you expect and allows you to resolve Group Policy conflicts.
There are two ways you can calculate Resultant Set of Policy. The first is to use Group Policy Modeling. The second is to use Group Policy Results. The difference between these is as follows:
Group Policy Modeling allows you to view the impact of altering site membership, security group membership, filtering, slow links, loopback processing, and the movement of accounts to new OUs on the application of policy.
Group Policy Results allows you to troubleshoot the application of policy by telling you which settings apply to a specific user or computer account.
By default, members of the Domain Admins and Enterprise Admins groups can generate Group Policy Modeling or Group Policy Results information. You can delegate permissions so that users can perform these tasks at the OU or domain level.
Policies linked at the site level in multi-domain forests are stored in the root domain. This can cause challenges with Group Policy application in scenarios in which a site-linked policy applies but where no DC with a root domain membership is present in the local site.
If Group Policy processing takes too long because of site-linked GPOs, the simplest solution is to not link polices at the site level; instead, you apply the links at the domain level and use Group Policy filtering through a WMI query to ensure that location-specific GPOs are applied. An alternative is to place domain controllers that have root domain membership at each site, although this is likely to be more expensive than the policy filtering option.
Administrative templates
Group Policy Administrative Templates allow you to extend Group Policy beyond the settings available in GPOs. Common software packages, such as Microsoft Office, often include Administrative Templates that you can import to manage software-specific settings. In early versions of Windows Server, Administrative Templates were available as files in ADM format. Since the release of Windows Server 2008, Administrative Templates are available in a standards-based XML file format called ADMX.
To be able to use an Administrative Template, you can import it directly into a GPO using the Add/Remove Templates option when you right-click the Administrative Templates node. A second option is to copy the Administrative Template files to the Central Store, located in the c:WindowsSysvolsysvol<domainname>PoliciesPolicyDefinitions folder on any domain controller. You might need to create this folder if it does not already exist. After the folder is present, the template is then replicated to all domain controllers, and you can access the newly imported Administrative Templates through the Administrative Templates node of a GPO.
Implement Group Policy preferences in AD DS
Group Policy preferences work around the idea of eliminating (or at least substantially reducing) the need for traditional start-up and log-in scripts. Log-in scripts have a way of becoming convoluted over time. Group Policy preferences allow simplification of common log-in and start-up script tasks such as drive mappings and setting of environment variables.
By reducing or eliminating some of the complexity of log-in scripts, you can use Group Policy preferences to reduce configuration errors. You can use Group Policy preferences to configure the following:
Applications
Drive mappings
Environment variables
File updates
Folders
INI files
Registry settings
Shortcuts
Data sources
Devices
Folder options
Internet settings
Local users and groups
Network options
Network shares
Power options
Printer settings
Regional options
Scheduled tasks
Start Menu settings
Some of these items can also be configured using a traditional Group Policy. In the event that an item is configured in the same GPO using both policy and preferences, the traditional setting takes precedence. The difference between a Group Policy preference and a normal Group Policy setting is that users can change a Group Policy preference if they have the appropriate permissions. For example, users can unmap a mapped network drive. The drive would remain unmapped until the user logged in again, at which point it would be remapped. Generally, if you want to enforce a setting, use a standard Group Policy. If you want to apply the setting and allow users to change it, use a Group Policy preference. The closest you can come to enforcing a Group Policy preference is to disable the Apply Once and Do Not Reapply setting in the policy item’s configuration. This way, the preference is applied each time Group Policy refreshes.
You can target Group Policy preferences so that different preferences can apply to the same item types within a single GPO. Use the following items to restrict how a Group Policy preference applies:
The computer has a battery.
The computer has a specific name.
The computer has a specific CPU speed.
Apply by or after a specific date.
The computer has a certain amount of disk space.
The computer is a member of a domain.
The computer has a particular environment variable set.
A certain file is present on the computer.
The computer is within a particular IP address range.
The computer uses specific language settings.
The computer meets the requirements of an LDAP query.
The computer has a MAC address within a specific range.
The computer meets the requirements of a WMI query.
The computer uses a specific type of network connection.
The computer is running a specific operating system.
The computer is a member of a specific OU.
The computer has PCMCIA present.
The computer is portable.
The computer uses a specific processing mode.
The computer has a certain amount of RAM.
The computer has a certain Registry entry.
User or computer is a member of a specific security group.
The computer is in a specific Active Directory site.
The computer has a Remote Desktop Setting.
A specific time range is present.
The user has a specific name.
Implement Group Policy in Azure AD DS
Azure AD DS includes two built-in GPOs, AADDC Users and AADDC Computers. You configure all Group Policy settings that you need to have applied in your Azure AD DS domain through these policies. Members of the AAD DC administrators group have Group Policy administration privileges in an Azure AD DS domain. You can manage these built-in GPOs by installing the Group Policy Management Tools on a computer that is a member server of the Azure AD DS domain. Although Azure AD DS does not allow you to create GPOs and link them at the domain level, you can create custom GPOs and link them to a custom OU that you create separately in Azure AD DS.
Need More Review? Group Policy In Azure AD DS
You can learn more about Group Policy in Azure AD DS at https://docs.microsoft.com/en-us/azure/active-directory-domain-services/manage-group-policy.
Exam Tip
Remember the order in which group policies apply and how the Enforced and Block Override settings influence policy application.
Chapter summary
On-premises domain controllers should be deployed using the Server Core configuration. You should minimize who has access and manage them remotely using Windows Admin Center, Microsoft Management Consoles, or PowerShell.
You can deploy domain controllers in Azure as IaaS VMs. When connected via VPN or ExpressRoute, they can be configured as a separate AD DS site, child domain, or trusted forest of the on-premises environment.
Read-only domain controllers allow many AD DS functions but limit which objects are replicated and stored.
When a computer hosting an FSMO role is not available, certain functions such as domain join or password change do not work.
Trusts allow security principals in one domain or forest to be assigned permissions to resources in another domain or forest.
Active Directory sites are used to manage replication, with computers located in a site assumed to be in high bandwidth proximity with each other. Site links allow you to define which sites have network connectivity to each other.
Replication occurs over site links and can be managed with site link bridges.
Active Directory security principals include user, computer, service, and group accounts. Domain Local, Global, and Universal groups all have different properties and visibility within a forest.
Group Managed Service Accounts are a special type of account used by services on domain-joined computers that have their passwords automatically managed.
Azure AD Connect allows you to synchronize on-premises identities to Azure AD.
Azure AD DS allows IaaS VMs to perform a domain-join and leverage Active Directory Domain Services like Group Policy without requiring the deployment of domain controllers.
Group Policy allows you to apply configuration settings to users and computers.
Thought experiment
In this thought experiment, demonstrate your skills and knowledge of the topics covered in this chapter. You can find answers to this thought experiment in the next section.
Tailwind Traders has begun to extend their on-premises infrastructure into Azure. As a part of this move they need to ensure that an appropriate hybrid identity solution exists and that they are able to address the following challenges:
Remediate existing on-premises service accounts that were configured as privileged user accounts with nonexpiring passwords.
Deploy several VMs that rely on an application that requires those VMs to be a part of an AD DS domain to Azure, but minimize the administrative overhead related to directly managing and maintaining domain controllers in Azure.
Ensure that administrative users in the single on-premises AD DS domain have a more rigorous set of password policies than standard users.
With this information in mind, answer the following questions:
What type of account should you create for a service on a set of on-premises Windows Server computers if you want the password for that account automatically managed by Active Directory?
Which service should you deploy in an Azure virtual network if you want to have a set of domain-joined Windows Server 2022 IaaS virtual machines that host an application but do not wish to manage domain controllers directly?
You want to have a separate set of password policies for administrative users compared to standard users in a single domain forest. Which technology should you implement to achieve this goal?
Thought experiment answers
This section contains the solution to the thought experiment. Each answer explains why the answer choice is correct.
You should create a Group Managed Service Account if you want a service account used by multiple computers managed by Active Directory Domain Services.
You should deploy Azure AD DS if you want to have domain-joined IaaS virtual machines in Azure but do not want to manage a domain controller.
You should implement fine-grained password policies.