
Chapter 4. Maintain Windows
After you have deployed computers within your organization, it is necessary for you to maintain those computers. If users experience problems with their computers, you might be required to perform system recovery. If users have lost files, you might be called upon to recover those missing files.
Computers typically do not remain in the same state throughout their use. In most organizations, computers are updated periodically. With the new Windows as a Service model for feature updates, you must be aware of how and when Windows Updates are applied. You might also need to know how to manage updates, and in certain circumstances, troubleshoot the application of updates.
Finally, even in normal circumstances, it is necessary to monitor your users’ computers. This might be to help to ensure the ongoing reliable use of those computers. This chapter covers those aspects of the MD-100 Windows 10 exam that relate to Windows 10 monitoring and maintenance.
Skills covered in this chapter:
Skill 4.1: Configure system and data recovery
In this section, you review how to configure system and data recovery options for Windows 10. If you have experience with an earlier version of Windows, you might be familiar with many of the options because some are included in Windows 10. To prepare for the exam, it is recommended that you work through all the wizards and tools to ensure that you’re comfortable with each process, paying particular attention to the newer features, tools, and options.
Perform file recovery
Windows 10 provides a number of tools that you or your users can use to recover files. These tools include:
Windows Backup and Restore (Windows 7)
WBAdmin
File History
Previous Versions
Use Windows Backup And Restore
Windows 10 includes the Backup And Restore (Windows 7) tool, which allows the creation of backups of your data. This backup feature was not included in Windows 8, but it has returned in Windows 10 to enable users who might have upgraded from Windows 7 to this version to restore data contained in Windows 7 system image backups.
In addition to restoring files and folders, you can also use this tool to create backups of files contained in folders, libraries, and whole disk volumes.
You cannot save your backups to the disk on which Windows 10 is installed, so you must provide another location, such as an external USB drive, network drive, or non-system local disk. To launch the Backup And Restore (Windows 7) tool in the GUI, open the System And Security section of Control Panel or use the Backup And Restore (Windows 7) item listed in the Settings app.
To create a backup of your files and folders and a system image, follow these steps:
Open the Settings app, and then click Update & Security.
In the navigation pane, click Backup, and in the details pane, click Go To Backup And Restore (Windows 7).
In the Backup And Restore (Windows 7) window, click Set Up Backup.
On the Select Where You Want To Save Your Backup page, choose the location and click Next.
On the What Do You Want To Back Up page, click Let Windows Choose (Recommended) and click Next.
On the Review Your Backup Settings page, click Change Schedule.
On the How Often Do You Want To Back Up page, leave the Run Backup On A Schedule (Recommended) check box selected and, if necessary, modify the backup schedule.
Click OK.
On the Review Your Backup Settings page, click Save Settings And Run Backup.
The backup begins, and you see the progress bar as shown in Figure 4-1. The first backup takes the longest time because it is a full backup. Subsequent backups are incremental and can take only a few minutes to complete.

When the backup is complete, use the links on the Backup And Restore (Windows 7) page to see the size of the backup on disk, edit the schedule, and manage the disk space the Backup And Restore (Windows 7) tool uses.
When backing up your system, you can opt for the recommended settings, which create a backup of all files and folders in your user profile (including libraries) as well as a system image. The system image files are large, likely to be approximately 10 GB in size. You can specify the frequency and time when Windows 10 performs backups or retain the default backup schedule of Sunday at 7 PM every week.
If you require more specific scheduling, you can modify the triggers in the AutomaticBackup job in Task Scheduler after you have enabled scheduled backups. Available options to trigger a scheduled backup include:
On A Schedule
At Logon
At Startup
On Idle
On An Event
At Task Creation/Modification
On Connection/Disconnect To A User Session
On Workstation Lock/Unlock
If you want to choose specific libraries and folders for the backup manually, select Let Me Choose on the What Do You Want To Back Up page when initially setting up the backup. Although you cannot select individual files for backup, you can clear the check box to include a system image of the drive.
The Backup And Restore (Windows 7) tool uses the Volume Shadow Copy Service (VSS) to create the backups. The initial backup creates a block-level backup of the files to the backup file and uses the virtual hard disk (.vhdx) file format. VSS greatly enhances the performance of the backup operation because subsequent backups only copy the data that has changed since the previous backup, which is typically a smaller amount of data, thus creating the incremental backup much faster.
Each time you run a backup, the Backup And Restore (Windows 7) tool creates a new restore point, which the Previous Versions feature in File Explorer can use (and is covered later in this chapter).
Note Backup Ntfs Only
The Backup And Restore (Windows 7) tool can only be used to back up data that is stored on file system volumes formatted as NTFS.
To restore libraries, folders, or files from a backup, you can use the Restore My Files link in the lower-right of the Backup And Restore (Windows 7) screen. You can select which backup set to use and restore items to their original locations or to different locations. To restore data from a backup, use these steps.
On the Backup And Restore (Windows 7) page, click Restore My Files.
The Restore Files dialog box presents you with access to the latest backup. If you want to choose an alternative backup, click Choose A Different Date, select the correct backup, and click OK.
Locate the files or folders you intend to restore by using one of the three options for you to find your files to recover.
Search Type part of the name of the file you intend to restore. Click the file or Select All to restore all the found files. Click OK. (The search speed is very fast.)
Browse For Files Click the backup name with the correct date and time stamp and browse to the folder that contains the items you want. Select the items and click Add Files.
Browse For Folders Click the backup name with the correct date and time stamp and browse to the folder that you want. Select the folder and click Add Folder.
You can choose multiple files and folders and use any of the three options or combinations of the options to locate the items you want.
Click Next.
On the Where Do You Want To Restore Your Files page, choose to restore to the original location or browse and select a different location.
If you restore an item to a location that contains the same item name, you are prompted to choose one of the following.
Copy And Replace The item restored from the backup overwrites the item in the destination location.
Don{{#}}8217;t Copy Nothing changes, and no item is restored.
Copy, But Keep Both Files The original items remain as is, and the file name of the restored item is modified to show it is a version of the same item.
Do This For All Conflicts If you’re restoring multiple items, you can apply the same choice to each conflict.
When the restoration is complete, the Your Files Have Been Restored page appears, and you can click the link to View Restored Files.
Click Finish.
Perform a backup and restore with WBAdmin
In addition to the Backup And Restore (Windows 7) tool, Windows 10 includes another backup tool, the Windows Backup tool, which you can use from a command line. This tool is also found in Windows Server and is useful if you need to automate or create a backup job on several computers. Use the WBAdmin.exe command to create, configure, and restore backup jobs. In this section, you review some of the commonly used applications for WBAdmin.
Backing Up Using Wbadmin
The Windows 10 version of WBAdmin is a simplified version of the utility that is available with the Microsoft Server operating systems and offers some of the low-level features such as the generation of index listings of all files and folders within an image data file. To perform a recovery using WBAdmin, you must be a member of the Backup Operators group or the Administrators group, or you must have been delegated the appropriate permissions. You must also run WBAdmin from an elevated command prompt. A number of the subcommands are not supported in Windows 10, and you must boot to Windows RE to perform a restore operation of data that was created using the WBAdmin Start Backup subcommand.
Table 4-1 lists the command-line syntax of WBAdmin.exe.
Table 4-1 WBAdmin.exe command-line syntax
Command |
Description |
|---|---|
Wbadmin get versions |
Lists the details of backups available from the local computer or from a specified computer. |
Wbadmin enable backup |
Configures and enables a regularly scheduled backup. |
Wbadmin start backup |
Runs a one-time backup; if used with no parameters, it uses the settings from the daily backup schedule. |
Wbadmin get items |
Lists the items included in a backup. |
Wbadmin start recovery |
Runs a recovery of the volumes, applications, files, or folders specified. Supported only in a Windows Recovery Environment (RE). |
Need More Review? Wbadmin Command Line Reference
You can find additional detailed information relating to WBAdmin by typing WBAdmin /? at the command prompt. The content provided in this section should be sufficient for your exam preparation, and if required, you can find additional WBAdmin resources on the Windows IT Pro Center at https://docs.microsoft.com/en-us/windows-server/administration/windows-commands/wbadmin.
For example, if you connect a removable hard drive to your computer that uses the drive letter E, the following examples guide you through the process of performing a backup and restore using the WBAdmin command-line tool.
To back up the entire contents of the C drive to a backup drive located on E, follow these steps.
Open an elevated command prompt.
Type the following command.
WBAdmin start backup -BackupTarget:E: -Include:C:
Type Y to begin the backup operation.
The tool creates a shadow copy of the volume and then creates a block copy of the volume, as shown in Figure 4-2. A simple log file relating to the operation is created, and this is stored in C:WindowsLogsWindowsBackup.

Figure 4-2 WBAdmin Command-Line Tool
The WBAdmin utility saves the image backup in a WindowsImageBackup folder on the target drive.
After you have created a backup, you can list backup images created on the system by using the following command.
WBAdmin get versions -backupTarget:E:
Restoring Data Using Wbadmin
To recover from a backup that you have previously created with WBAdmin, boot to a Windows RE Command Prompt, and type WBAdmin get versions backuptarget:d: to provide the version information of the available backups. (You might need to change the drive letter to correspond to your system). For example, to recover a backup of volume E from May 31, 2017, at 17:12, type the following command at a command prompt and then press Enter.
WBAdmin start recovery -version:05/31/2017-17:12 -itemType:Volume -items:\?
Volume{a6f2e427-0000-0000-0000-501f00000000} -BackupTarget:D: -RecoveryTarget:E:
Note Drive Letters Might Vary
The WBAdmin start recovery command is only supported in Windows RE and not in a normal Windows 10 administrative command prompt. Be careful because the drive letters of the mounted volumes can be different in Windows RE from those in Windows 10. You might need to replace the drive letters in your WBAdmin start recovery options.
Configure File History
File History is a file recovery method that provides users with a very easy and user-friendly method of retrieving files after they have been accidently deleted or modified. Once enabled, File History will automatically create a backup of all user files that have been modified on an hourly schedule. So long as the backup destination location does not become full, the File History can continue to store changes indefinitely.
To turn on File History, follow these steps:
Launch Settings, click Update & Security, and select Backup.
Click the Plus (+) icon labeled Add A Drive.
File History will search for drives.
In the Select A Drive dialog box, select the external hard drive that you want to use for File History.
On the Back Up Using File History page, verify that the Automatically Back Up My Files toggle is On.
Once enabled, File History will save copies of your files for the first time. This will happen as a background operation, and you can continue to work normally.
File History saves your files from your user profile and all the folders located in your libraries, including OneDrive, that are synced to your device if OneDrive is used. You can manually include or exclude folders on the Backup Options page. To manually include additional folders to be monitored by File History, you need to perform the following steps:
Open Settings, click Update & Security, and select Backup.
Click the More Options link.
On the Backup Options page, click Add A Folder.
Select the folder that you want to back up and click Choose This Folder as shown in Figure 4-3.
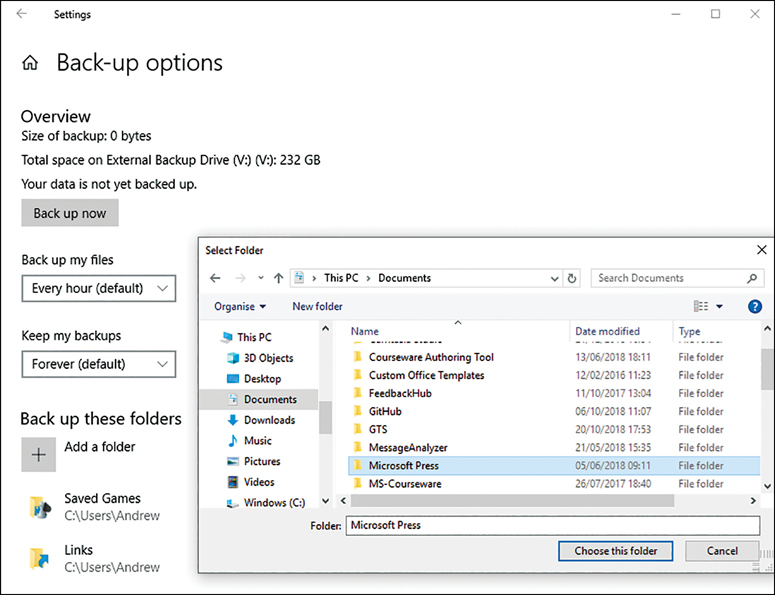
Figure 4-3 Configure File History Backup Options Ensure that the folder is listed in the list of folders under Back Up These Folders.
Close the Backup Options page.
There are two other methods for adding a folder to the File History list of folders:
Add folders to one of the existing libraries already backed up by File History File History will protect these folders.
Use File Explorer Select the folder, click History in the Home ribbon, and then click the Include It In Future Backups link.
You can configure many of the File History settings multiple ways, and you need to be familiar with each of them:
File History in Control Panel
Backup within the Settings app
History item on the File Explorer ribbon
Within the advanced settings screen of File History, accessed from the See Advanced Settings link on the Backup Options page, you configure the following:
Modify the frequency of the File History backup from every 10 minutes to daily.
Share the backup drive to other HomeGroup members.
Open File History event logs to view recent events or errors.
Define the length of time to keep saved versions of your files.
Manually clean up older versions of files and folders contained in the backup to recover space on the backup drive. You could also use the command line tool FhManagew.exe to delete file versions based on their age stored on the File History target device.
Note File History Restore Points
Previous Versions is a feature that uses the File History restore points and allows you to select one of the file version histories; it is accessed within File Explorer. Previous Versions is covered later in this chapter.
File History File Recovery
You can launch File History file recovery, as shown in Figure 4-4, in several ways:
History icon Open File Explorer and navigate to the folder that contains a modified or deleted file, and then click History on the Home ribbon. The File History page will open, and you can view the recoverable files.
Restore personal files Open File History in Control Panel and select the Restore Personal Files link on the left side.
Restore files from a current backup The Restore Files From A Current Backup link is at the bottom of the page within the following location: SettingsUpdate & securityBackupMore optionsBackup Options.

Figure 4-4 Restore your personal files using File History
When the File History page is in view, you can navigate through each restore point by using the left and right arrow buttons. Each restore point has a date and time to help you decide which version of the file or files to restore. You can select one or more files to revert and select which version of the file by navigating through the backups that have been made by File History. If you right-click the file or folder, you can preview the file to view the contents. If you want to proceed to recover the file, click the green button on the File History screen. The file or files selected will be restored, and File Explorer will open with the restored files displayed.
File History Support For Encryption
Protecting files and folders using Encrypting File System (EFS) is supported on NTFS when using Windows 10 Pro and Windows 10 Enterprise versions. File History supports backing up files that are encrypted using the EFS so long as the drive selected for the backup is formatted as a NTFS volume. Without NTFS, data cannot be encrypted using EFS. Therefore, if the destination drive does not use NTFS, File History will not back up encrypted files.
If you use BitLocker Drive Encryption to protect your data on your PC and use File History to back up this data to a removable drive, the data will no longer be protected. You should consider enabling BitLocker To Go on the removable drive to protect the contents. The File History is designed to back up on a per-user basis and is performed using the local user account, which means only files and folders that you have access to will be backed up.
Note Turn Off File History
There is only one Group Policy Object (GPO) relating to File History, located at Computer ConfigurationAdministrative TemplatesWindows ComponentsFile HistoryTurn off File History. When enabled, File History cannot be turned on.
Restore previous versions of files and folders
Previous Versions has been reintroduced in Windows 10 and is a file and folder feature that enables users to view, revert, or recover files that have been modified or deleted by mistake. Previous Versions uses the File History feature or restore points created during backups in Backup And Restore (Windows 7). One of these features must be configured to use the Previous Versions feature.
After you have enabled File History or created a Backup And Restore (Windows 7) backup, you need to browse in File Explorer to the location where the modified or deleted files are stored. If one of these methods has “protected” the file or folders being browsed, the Previous Versions tab shown in File Explorer will list the available restore points for your data. Until one of these tasks has been performed, the Previous Versions tab will be empty.
VSS is used by Previous Versions to monitor and preserve copies of modified files on an automatic schedule. Earlier in the chapter, you saw that the Backup And Restore (Windows 7) tool also creates a restore point each time you create a backup. After the initial File History restore point has been created, subsequent restore points may take only a few minutes to complete.
Note Previous Versions Restore Points
In the Previous Versions tab, a message is displayed, which states that the previous versions come from File History and restore points. The Previous Versions feature uses the restore points that are created by the Backup And Restore (Windows 7) tool and not the restore points that System Restore creates.
If you configure File History and also use the Backup And Restore (Windows 7) tool, multiple restore points will be available in the Previous Versions tab. The Previous Versions feature is available on all file systems if File History is used. The Backup And Restore (Windows 7) can only be used to back up data using New Technology File System (NTFS) volumes.
To revert files to a previous version, use the following steps:
Ensure that File History is turned on.
Create a folder on your computer, for example, C:Travel PlansYork, and then create or save a text file called Things to do in the folder.
In File History, click Run Now.
Open Things to do, modify the contents, save, and exit the file.
In File History, click Run Now.
Right-click Things to do and select Restore Previous Versions.
On the Previous Versions tab, note that the Things to do.txt file has one previous version listed, which is the original file. Modify the file again. There will not be another Previous Version listed until the next Restore Point is created by File History.
To manually create a new Restore Point, return to File History and click Run Now. Return to the Things to do file and notice that it now has two file versions listed, as shown in Figure 4-5.

Figure 4-5 Restore previous versions of files and folders in File Explorer Delete the Things to do.txt file.
To recover the last version of the file that was saved by File History, right-click the C:Travel PlansYork folder and select Restore Previous Versions.
On the Previous Versions tab, select the Travel Plans folder, click the drop-down Open menu item, and select Open In File History.
File History launches. Double-click the folder that contained the deleted file.
Select the deleted file, and choose the green restore button.
Verify that the Things to do file has been restored to the C:Travel PlansYork folder.
Recover files from OneDrive
OneDrive allows you to store your files online. You can sync files between your PC and OneDrive. You can access files from OneDrive.com from just about any device that is connected to the Internet. You can use the OneDrive Recycle Bin to recover files that you accidentally delete from your OneDrive account.
The OneDrive Recycle Bin can retain deleted items for between three and 30 days, if you are signing in using your Microsoft account. If you sign in with your Office365 account, deleted items are retained for up to 93 days. The actual retention period is dependent on the size of the Recycle Bin which is set to 10 percent of the total storage limit by default. If the Recycle Bin is full, old items will be deleted to make room for new items as they are added to the Recycle Bin and this may have an impact on the default retention period
To recover deleted files from your OneDrive.com, follow these steps:
Browse to your OneDrive.com, or right-click the cloud icon in the notification area and click View Online.
On the left side of the page, select the Recycle Bin.
If the Recycle Bin is not visible, click the three horizontal lines in the top left corner of the screen and select Recycle Bin.
Select the items that you want to recover.
Click Restore on the menu.
OneDrive will restore the items and they will be removed from the Recycle Bin.
At present, you are not able to modify the retention settings or increase the size of the Recycle Bin for OneDrive.com. If you use the Recycle Bin often and you are concerned about whether your deleted files will be protected by the Recycle Bin, you could consider increasing the space provided to the Recycle Bin by upgrading to a paid OneDrive storage plan such as Office 365 Personal. If space is limited, you could also review the items currently in the Recycle Bin and select items for permanent deletion to free up space, as shown in Figure 4-6.

When you delete files using the OneDrive.com interface or from your OneDrive folders within File Explorer, the deleted files will be automatically synchronized to the OneDrive.com Recycle Bin and the File Explorer Recycle Bin (or Trash if you are using OneDrive on a Mac). If you use the Restore All or Empty Recycle Bin options, you need to be aware that these tasks are irreversible.
The Search feature within OneDrive.com is a powerful method of locating files stored in your OneDrive. Search results do not include items in the OneDrive Recycle Bin or the File Explorer Recycle Bin.
Onedrive Document Version History
For Office documents, such as Microsoft Word and Microsoft Excel, OneDrive.com maintains previous versions of these documents where available. To view the available versions stored in OneDrive, navigate to the Office file, right-click it, and choose Version History. OneDrive will open the file in a new browser tab. You can then see the list of available versions on the left pane, and you can review the contents of each file as shown in Figure 4-7.

The older versions are listed together with the date and time when the file was last saved. If you select an older version of the document from the list of older versions in the left pane, OneDrive will open the older file in the tab, and it will display the name of the modifier. You can choose to Download or Restore this older version from the link displayed in the left pane.
Recover Windows 10
Windows 10 is a reliable operating system. However, occasionally, you will encounter problems with your users’ devices that require you to perform some sort of operating system recovery. The severity of the problem will determine your particular course of action, and because of this, Microsoft has provided a number of recovery tools in Windows 10.
Some of these are relatively benign and enable you to investigate and resolve the underlying problem with little effect on the operating system. Others are more intrusive and can result in resetting the operating system to an earlier point in time or even to its initial state. These recovery tools include:
Recovery drive
System Restore
Windows Recovery Environment (Windows RE)
Reset this PC
Fresh Start
System image restore
System repair disk
Configure a recovery drive
Most Windows 10 PCs will have a recovery partition, which contains a full image of the system. If your computer does not start properly, you can use the recovery partition to start up.
The contents of the recovery partition can also be copied to a removable storage device so that if your recovery partition becomes inaccessible or corrupted, you will still be able to recover your system.
Disk drive space on many small form factor devices and tablets is often smaller than available on a laptop or PC. This can limit the availability for an original equipment manufacturer (OEM) to include a recovery partition on devices shipped with Windows 10. If there is no recovery partition, you can still create a bootable Universal Serial Bus (USB) flash drive–based recovery drive; you can use this drive to boot into the Recovery Environment (RE). You will then need to access a system image that you have created or that is provided by the OEM.
To create a recovery drive, follow these steps:
Search for Recovery Drive and select Create A Recovery Drive.
Accept the User Account Control (UAC) prompt, providing the necessary credentials, if required.
Select the Back Up System Files To The Recovery Drive option.
Click Next. Windows 10 will prepare the recovery image.
If you have not already connected a backup device to the system, on the Connect A USB Flash Drive page, connect a drive that has at least 16 GB capacity.
On the Select The USB Flash Drive page, select the drive for the recovery drive, as shown in Figure 4-8, and click Next.

Figure 4-8 Creating a recovery drive On the Create The Recovery Drive page, read the warning that the USB drive contents will be deleted, and click Create. The Creating The Recovery Drive page appears with a progress bar, which will indicate which phase of the process is being performed. The process can take up to 30 minutes, depending on the performance of the PC and the media. The tool performs the following actions:
Prepares the drive
Formats the drive
Copies Recovery Drive utilities
Backs up system files
On the last page, click Finish.
When the recovery drive has been provisioned on the removable media, if your device has a recovery partition, you will see a link to delete the recovery partition from your PC. This relates to the Windows 10 device recovery partition and not the newly created recovery drive. If you want to free up the space on your device, you need to select this option. It is important to store the recovery drive in a safe place because you will not be able to recover your device if you have lost the recovery drive and you have deleted the recovery partition.
Note Sdhc Memory Cards
Some devices will support the use of Secure Digital High-Capacity (SDHC) memory cards. The Recovery Drive Wizard can use a SDHC card as an alternative to using a USB flash drive.
You should carefully label your Recovery Drive media after they have been created. Note that a 64-bit (x64) recovery drive can only be used to reinstall a device with 64-bit architecture. The Windows 10 Recovery Drive cannot be used to repair earlier versions of Windows.
Configure System Restore
You might have used System Restore in a previous version of Windows, such as Windows XP or Windows 7, to restore a computer that has become unstable. System Restore has been retained in Windows 10, and it offers a familiar and reliable method of recovering systems by restoring the operating system to a restore point created during a period of stability.
Once enabled, System Restore will automatically create restore points at the following opportunities:
Whenever apps are installed If the installer is System Restore compliant.
With updates Whenever Windows 10 installs Windows updates.
Based on a schedule Windows 10 includes scheduled tasks, which can trigger restore point creation.
Manually You can create a System Restore from the System Protection screen.
Automatically When you use System Restore to restore to a previous restore point, Windows 10 will create a new restore point before it restores the system using the selected restore point.
To turn on System Restore and manually create a System Restore point, follow these steps:
Open Control Panel and click System and Security.
Click System, and then in System, select the System Protection link in the left pane. The System Properties dialog box appears with the System Protection tab open.
To turn on the System Restore feature, select the Local Disk (C:) (System) drive, and then click Configure.
On the System Protection For Local Disk (C:) dialog box, select Turn On System Protection.
Under Disk Space Usage, move the slider for the Max Usage to allow room on the restore points to be saved (five percent is a reasonable amount), as shown in Figure 4-9.

Figure 4-9 Configuring System Restore properties Click OK twice.
You can also use PowerShell to configure System Restore. Some of the available commands that you need to review include:
Enable-ComputerRestore Enables the System Restore feature on the specified file system drive
Disable-ComputerRestore Disables the System Restore feature on the specified file system drive
Get-ComputerRestorePoint Gets the restore points on the local computer
Checkpoint-Computer Creates a system restore point
The following command enables System Restore on the C: drive of the local computer:
PS C:> enable-computerrestore -drive "C:"
Note System Restore Requires Ntfs And Uses Volume Shadow Copy Service
System Restore uses the Volume Shadow Copy Service (VSS) and is only available on drives that are formatted with NTFS.
If the amount of space allocated for the restore points becomes full, System Restore will automatically delete the oldest restore points. If you require more restore points to be available, you need to allocate a larger proportion of the hard disk to the feature.
Once the system has created restore points, you are protected, and the system should be recoverable.
To recover your system, you can launch the System Restore Wizard from either:
System Protection If your system will allow you to sign in to Windows, you can launch System Restore from the Windows 10 graphical user interface (GUI).
Windows Recovery Environment (Windows RE) If the system will not allow you to sign in, you can boot to the Windows RE and launch the System Restore Wizard from the Advanced options.
Note Windows RE
Windows RE is built on Windows Preinstallation Environment (Windows PE), which is a cut-down version of Windows that offers only limited functionality.
Identifying Affected Apps And Files
When using System Restore to restore the computer to an earlier state, the wizard will allow you to can scan the restore point and advise you which apps and files will be affected by performing the operation.
Search for System and click the System Control Panel item.
On the System page, select the System Protection link in the left pane. The System Properties dialog box appears with the System Protection tab open.
Click System Restore.
On the Restore System Files And Settings page, click Next.
On the Restore Your Computer To A State It Was In Before The Selected Event page, choose the restore point that you want to be restored, as shown in Figure 4-10.

Figure 4-10 Applying a System Restore point to your system Optionally, click Scan For Affected Programs, or click Next.
On the Confirm Your Restore Point page, click Finish.
On the warning screen, click Yes.
The System Restore will now prepare your computer and restart. The System Restore process can take some time to complete.
When the process is complete, the system will restart, and you can sign in to Windows.
You will be presented with a summary of the system restore status, and a confirmation that your documents have not been affected.
Click Close.
Note System Restore Within Windows RE
When using System Restore within Windows RE—as a protection against unauthorized access to the system—you need to select a user account and provide the user’s password before you can use the System Restore feature.
Modifying The Task Schedule
After you have enabled the System Restore feature, you can modify the default task schedule for when you want automatic restore points to occur by modifying the SR scheduled task as follows:
Search for a Task and click the Task Scheduler item.
In the Task Scheduler Microsoft Management Console (MMC), expand the node on the left to locate Task Scheduler LibraryMicrosoftWindowsSystemRestore.
Double-click the SR task in the middle pane.
On the SR Properties (Local Computer) dialog box, click the Triggers tab.
On the Triggers tab, click New.
In the New Trigger dialog box, configure the schedule that you require. For example, you can configure Windows to create a daily System Restore point at noon.
Ensure that the Enabled check box is selected and click OK.
On the Triggers tab, click OK.
In the Task Scheduler MMC, the trigger is now displayed and enabled.
Close the Task Scheduler MMC.
Launching Windows RE
To launch the Windows RE and use safe mode or other advanced troubleshooting tools, you can attempt to start Windows 10 in advanced troubleshooting mode by using one of the following options:
If available, select Restart Now under Advanced Startup in the Recovery section of the Settings app.
Restart the device using the Recovery Drive.
Boot the device using Windows 10 installation media and select the Repair Your Computer option.
Press the Shift key and select the Restart option on the Start menu.
In addition to the methods above, Windows will automatically start in the WinRE after detecting the following issues:
Two consecutive failed attempts to launch Windows
Two consecutive unexpected shutdowns that occur within two minutes of boot completion
A Secure Boot error
A BitLocker error on touch-only devices
Once Windows 10 boots to the advanced troubleshooting mode, you need to click Troubleshoot, then on the Advanced Options screen, you can access some or all the following options, as shown in Figure 4-11:
System Restore Use a System Restore point to restore Windows.
Uninstall Updates Remove quality or feature updates.
System Image Recovery Recover Windows using a system image file.
Startup Repair Fix problems that are preventing Windows from starting.
Command Prompt Used for advanced troubleshooting.
Startup Setting Change Windows startup behavior.
If your system has a unified extensible firmware interface (UEFI) motherboard, you will also be offered an additional option:
UEFI Firmware Settings Used to modify UEFI settings.

Note Windows 10 Does Not Support F8 At Startup
Unlike versions prior to Windows 10, you can’t access the advanced troubleshooting mode by pressing F8 during the startup process. However, you can re-enable the F8 support by modifying the boot configuration data (BCD).
The advanced troubleshooting mode shown in Figure 4-11 allows you to select the Startup Settings, which restarts Windows in a special troubleshooting mode that might be familiar to users of other versions of the Windows operating system. Selecting the Startup Settings troubleshooting mode presents you with the following options:
Enable Debugging Start Windows 10 in troubleshooting mode, monitoring the behavior of device drivers to help determine if a specific device driver is causing Windows 10 to behave unexpectedly.
Enable Boot Logging Windows 10 creates and writes to a file named Ntbtlog.txt to record the device drivers installed and loaded during startup.
Enable Low-Resolution Video Start Windows 10 in a low-resolution graphics mode.
Enable Safe Mode Windows 10 starts with a minimal set of drivers, services, and applications to allow you to troubleshoot the system using the GUI. Safe mode does not include network connectivity.
Enable Safe Mode With Networking Safe mode with networking enables network connectivity.
Enable Safe Mode With Command Prompt Safe mode using a command prompt window rather than the Windows GUI.
Disable Driver Signature Enforcement Allows you to load device drivers that do not have a digital signature.
Disable Early Launch Anti-Malware Protection Start Windows 10 without the early launch antimalware functionality running. This mode is useful for identifying whether early launch antimalware is affecting a driver or app from being loaded.
Disable Automatic Restart After System Failure Stops Windows 10 from automatically restarting after a system failure occurs.
You can cancel and reboot your system normally by pressing Enter. To select an option that you require, you need to press the number key or function key F1–F9 that corresponds to the list of items as shown in Figure 4-12.

If you press F10, you are taken to another screen with the option to launch the recovery environment. This option reboots the system and returns you to the Advanced Options screen, as shown previously in Figure 4-11.
Note Last Known Good Configuration
Windows 10 does not support the Last Known Good Configuration startup option that was present in Windows 7 and other versions of Windows.
Reset This PC
If other methods of recovering your system fail or your problems reoccur, you can revert your system to the state similar to how it was when you purchased it or when Windows 10 was first installed. Typical issues that prevent the use of other tools mentioned in this chapter might include a damaged hard drive or a malware attack that encrypts the drive.
Windows 8 first introduced the option to refresh or recycle your computer; Windows 10 has improved the performance and reliability of this feature. You will see the words recycle and reset used interchangeably by Microsoft to mean the same thing, although the Windows interface options typically use the term reset. The Reset This PC option consolidates the two options (Refresh Your PC and Reset Your PC) that were available in Windows 8 and Windows 8.1.
For enterprise users who suffer from an unstable or corrupted system, often the quickest remediation is to deploy a fresh system image from the deployment server to the device. Home users and small organizations can utilize a similar solution, but rather than use a deployment server on the network such as Windows Deployment Services (Windows DS), Windows 10 is able to re-image the device itself. Selecting the Reset This PC option effectively reinstalls the Windows 10 operating system and allows you to either keep your files or remove everything.
To start the recovery process, follow these steps:
Launch the Settings app.
Click Update & Security.
Select Recovery.
On the Reset This PC page, click Get Started.
The screen will be dimmed, and you will be presented with the options shown in Figure 4-13 as follows:
Keep My Files Removes apps and settings but keeps your personal files
Remove Everything Removes all your personal files, apps, and settings
Select Keep My Files.
A warning appears informing you that your apps will be removed; it lists any apps that will need to be reinstalled.
Click Next.
On the Ready To Reset This PC page, you are reminded that resetting the PC will remove apps and reset all settings back to defaults.
Click Reset to restart the PC and allow the reset process to begin.

After the reset process has completed and you’ve signed in, you will have a list of removed apps on the desktop. This file, called Removed Apps, is discussed more in the next section.
Note Recycle The Device
If you want to recycle a device, you can use the Reset This PC option to make the device available for use by someone else. If you choose to Remove Everything, the device reverts to out-of-box experience (OOBE) state. You can then use a deployment process, such as Windows Autopilot, to configure the device for reuse in your organization—with minimal user intervention.
If you selected to Remove Everything, then you are also asked if you want to clean the drive(s), too. Cleaning the drive helps to ensure that your content is not recoverable by the new owner of the device. This option is ideal if you are seeking to recycle your PC and want to make it difficult for someone to recover your removed files. When the system reset is complete, you are offered the OOBE. You must configure the device, install any apps, and modify any settings that you would like.
Perform a Fresh Start
Windows 10 also provides another way to reset the system called Fresh Start. Fresh Start performs three actions:
Reinstalls Windows 10 while retaining your data
Removes all installed apps and bloatware
Installs the latest security updates
You can access the Fresh Start feature using the following steps:
Launch Windows Security, which is a built-in Microsoft Store app.
Select Device Performance And Health and then under Fresh Start, click Additional Information.
On the Fresh Start page, click Get Started and accept the UAC prompt.
The screen will be dimmed, and you will be presented with the warning, as shown in Figure 4-14.

Figure 4-14 Fresh Start options To proceed, click Next.
Fresh Start will then display a list of apps that will be removed. Fresh Start saves a list of apps removed, called Removed Apps, which will be found on the desktop once the process is completed.
Click Next.
On the Let’s Get Started page, click Start.
The PC is then reset, which can take up to 20 minutes.
Note Previous Version Of Windows Will Be Removed
When performing a Fresh Start, if the device was recently upgraded to Windows 10, you won’t be able to go back to the previous version of Windows.
When the device restarts after the Fresh Start has completed, you can sign in with the same username and password, and all your data will be retained. Any applications that you use must be reinstalled. Crucially, any apps that came preinstalled on your system by the OEM will have been removed. If you need access to the list of removed apps, a file is created during the process, which can be found on the desktop after you sign in to the device. Within the Fresh Start page in Windows Security, you will see a history of when the Fresh Start feature has been used and a link to the list of Removed Apps.
Creating a system image backup
As already mentioned, included with Windows 10 is the Backup And Restore (Windows 7) tool, which you can use to back up and restore selected files and folders. You can also use this tool to create a system image of your computer.
To create a system image backup, follow the steps:
In Settings, select Update & Security and then click the Backup tab.
In the Details pane, click Go to Backup And Restore (Windows 7)
On Backup And Restore (Windows 7), click Set Up Backup.
On the Select Where You Want To Save Your Backup page, choose the location and click Next.
On the What Do You Want To Back Up page, click Let Me Choose and then click Next.
Select any folders that you want to back up, but make sure you select the Include A System Image Of Drives check box, as shown in Figure 4-15.

Figure 4-15 Performing a system image backup On the Review Your Backup Settings page, click the Change Schedule Link.
On the How Often Do You Want To Back Up page, leave the Run Backup On A Schedule (Recommended) check box selected, and choose when you want the backup to be performed.
Click OK.
On the Review Your Backup Settings page, click Save Settings And Run Backup.
The backup will begin.
Note Advanced Backup Scheduling
Backup And Restore (Windows 7) allows you to create a simple backup schedule. If you modify the Automatic Backup task in Task Scheduler, you can specify a more complex backup schedule, for example, to back up multiple times per day, or to back up when your workstation is in the locked state.
Using System Image Recovery
When you use the System Image Recovery process within Windows RE, Windows 10 replaces your computer’s current operating system state with the system image that has been created by the Backup And Restore (Windows 7) tool.
You should only use System Image Recovery if other recovery methods are unsuccessful because it will overwrite data on your computer. During the restore process, you can’t choose individual items to restore. All the apps, system settings, and files are replaced. Any data files stored locally on your computer that you have created or modified since the system image was created will not be available after you use the System Image Recovery unless you have saved them onto another location, such as OneDrive.
To recover a device with a system image, follow these steps:
Launch Settings, and then click Update & Security.
Select Recovery, and then, under Advanced Startup, click Restart Now.
In Windows RE, on the Choose An Option page, select Troubleshoot.
On the Troubleshoot page, select Advanced Options.
On the Advanced Options page, select System Image Recovery. Allow the system to reboot, and Windows will prepare for System Image Recovery.
On the System Image Recovery page, select your user account.
On the System Image Recovery page, enter your password and click Continue.
On the Re-Image Your Computer page, verify the system image is correctly selected, as shown in Figure 4-16, and click Next.

Figure 4-16 Using the System Image Recovery Wizard On the Choose Additional Restore Options page, click Next and then click Finish to start the restoration process.
In the Re-Image Your Computer dialog box, read the warning, and then click Yes. The Re-Image Your Computer process will now proceed.
Once competed, Windows will need to restart. Click Restart Now, or you can wait and allow Windows to automatically restart. When Windows restarts, you will be presented with the sign-in screen.
Creating a system repair disk
In addition to a system image, you can use the Backup And Restore (Windows 7) tool to create a system repair disk. You can use a system repair disk to recover Windows 10 in the event of a drive or other catastrophic failure.
A system image can be incorporated into any backup when using the Backup And Restore (Windows 7) tool. However, creating a system repair disk requires that you manually create a repair disk, as follows:
Open Backup And Restore (Windows 7) in Control Panel.
Insert a blank writable CD or DVD into your device.
On Backup And Restore (Windows 7), click the Create A System Repair Disc link.
On the Create A System Repair Disc page, click Create Disc.
Click Create disc, as shown in Figure 4-17.

Figure 4-17 Creating a system repair disc
The system repair disc is useful if Windows 10 will not automatically boot in the advanced startup options. In this situation, insert the system repair disc and your computer will boot from the recovery media automatically. If it doesn’t, you might need to change the boot order.
Troubleshoot the startup process
Windows 10 has an efficient and reliable startup architecture. It is rare that you will need to get involved in resolving startup problems. However, when startup problems do occur, they can be difficult to resolve unless you understand the underlying process.
Components of the startup architecture
There are four main components in the startup architecture. These are:
Windows Secure Boot All computers are potentially vulnerable to malicious software, such as computer viruses. This is especially true during the early startup phases when the operating system’s protective components may not yet be available. To mitigate this issue, Windows 10 implements Secure Boot. If your computer supports the Unified Extensible Firmware Interface (UEFI), you can enable Secure Boot in your computer’s UEFI settings. Once enabled, when the computer starts and before control is transferred to the operating system, each piece of software is checked for a valid digital signature. Only software deemed safe is loaded, including all low-level operating system drivers and files.
Windows Boot Manager This consists of a single file, BOOTMGR, which resides in the root directory of the active disk partition. This partition is not assigned a drive letter. The Windows Boot Manager, BOOTMGR, reads the Boot Configuration Data (BCD) from the boot store. BOOTMGR replaces the NTLDR program from Windows XP and earlier. The BCD identifies the location and state of any operating systems installed on the local computer. The BCD is a database. Windows XP used a simple text file called Boot.ini.
Windows OS Loader Winload.exe is located in the WindowsSystem32 folder on the operating system partition, which is typically assigned the drive letter C. Winload.exe initializes memory and then transfers control to the Windows kernel; this is a file called Ntoskrnl.exe located in C:WindowsSystem32.
Windows Resume Loader Winresume.exe is also located in the WindowsSystem32 folder on the operating system partition. If the boot store identifies that there is a hibernation image (hiberfil.sys) on the local computer, then BOOTMGR has passed control to Winresume.exe rather than Winload.exe. Winresume.exe then returns the computer to its pre-hibernation state.
Note Partitioning
Your computer typically has at least two partitions on its installed hard disk. Both will be primary partitions. The first partition will be marked as active and will contain the files necessary to perform the initial startup of the operating system; this partition, or drive, is often referred to as the System partition (although it contains the boot store and low-level boot files). The second partition automatically is assigned the drive letter C and contains the operating system; it is often referred to as the Boot partition. You might also have a recovery partition, and possibly even a vendor-specific recovery partition.
Note Fast Startup
By default, Windows 10 is configured to use fast startup. When you shut down your computer, part of the operating system’s state is stored in Hiberfil.sys. However, this is not true hibernation; instead, it is a hybrid state. Using fast startup is recommended because it enables your computer to start up far more quickly. You can configure Fast Startup in Power Options in Control Panel.
The Windows 10 startup process
When you start a computer installed with Windows 10, as shown in Figure 4-18, the following process occurs:
Power-on self-test When you power up your computer, the UEFI or, on older computers, the Basic Input Output System (BIOS), performs a number of fundamental checks. This is referred to as the power-on self-test (POST).
The critical check that the POST performs is to verify the presence and accessibility of a configured boot device, such as a hard disk. The hard disk must contain a valid master boot record (MBR). The MBR enables the computer to identify and access partition information on the attached disk. The computer accesses the primary active partition (which contains the Windows 10 boot sector) and loads BOOTMGR.
Read the boot configuration data BOOTMGR accesses the BCD from the system partition. This enables BOOTMGR to determine the location of any installed operating systems and, where necessary, to display a startup menu on computers configured with multiple operating systems (referred to as dual-boot or multiboot systems). BOOTMGR also determines whether the computer has a hibernation file.
Winload.exe or Winresume.exe If a Hiberfil.sys file exists, BOOTMGR passes control to Winresume.exe to restore the operating system from the pre-hibernation state. If no Hiberfil.sys file exists, BOOTMGR passes control to Winload.exe.
Winload.exe initializes memory and scans the computer’s registry to locate device drivers configured with a Start value of 0. These include low-level hardware components, such as hard disk controllers and peripheral bus components. Winload.exe then scans the registry for device drivers assigned a Start value of 1.
Finally, control is passed to the operating system Kernel, Ntoskrnl.exe, and all drivers in memory; the Kernel is then initialized.
Load drivers After the kernel initializes, any remaining required drivers are loaded and initialized.
Session Manager The Kernel loads the Windows Session Manager (Smss.exe), which among other things, initializes the Windows subsystem (Csrss.exe). The display will now switch from character mode to graphical mode.
Sign in After the Windows subsystem loads, the Winlogon service starts. This displays the sign-in page, and the local user can sign in to the computer.

Figure 4-18 The Windows 10 startup process
Available options for startup recovery
If your computer does not start properly, or at all, you can choose from a number of repair and recovery tools, depending on the particular situation. These tools are:
Windows RE If your computer won’t start, then start from the product DVD and select Repair Your Computer In Setup. You can then access the full set of recovery tools in Windows RE, including System Restore, System Image Recovery, Startup Repair, Command Prompt, and Startup Settings. Generally, if the problem is related to low-level startup files, such as the boot sector, BOOTMGR, and the BCD, choosing the Startup Repair option is generally successful in fixing startup problems.
Advanced Startup Settings If the startup problem lies elsewhere than with the startup files, you should be able to successfully start your computer in Safe Mode. Start from the product DVD, and in Setup, click Repair Your Computer. From the Advanced options menu, select Startup Settings, and then choose Safe Mode. Advanced Startup Settings include:
Enable Debugging
Enable Boot Logging
Enable Low-Resolution Video
Enable Safe Mode
Enable Safe Mode With Networking
Enable Safe Mode With Command Prompt
Disable Driver Signature Enforcement
Disable Early Launch Antimalware Protection
Disable Automatic Restart After Failure
System Configuration tool If your computer starts, but with errors, you can access Safe Mode by running the System Configuration tool (Msconfig.exe). On the Boot tab, shown in Figure 4-19, select the appropriate Safe Boot option. Note that the computer remains in Safe Mode until you return to System Configuration to revert to Normal startup on the General tab.
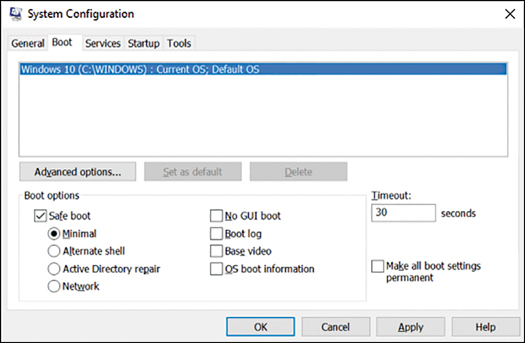
Figure 4-19 System Configuration tool
Automatic Failover If your computer experiences startup problems, assuming that your computer still has the (default) recovery partition, Windows will failover to Windows RE from this recovery partition.
The boot store
The boot store contains information that enables the low-level startup components of Windows 10 to locate any installed operating systems on the attached hard disk(s). Generally, it is not necessary to make changes to the BCD. However, it is important that you know how to make changes in case you must troubleshoot the startup environment.
Typically, you make changes to the BCD by reconfiguring Windows. For example, you might use the System Configuration tool to force Safe Mode. You might decide to make changes to the Startup And Recovery settings to choose the default operating system (assuming several are installed). Both these changes are made in the user interface but are reflected in the BCD. However, you can also work directly with the BCD using a number of command-line tools. For example, Figure 4-20 shows the output from the BCDEdit.exe /Enum command; this command enumerates and displays all boot store entries.

Modifying The Boot Store
There are a number of tools with which you can directly edit the BCD. These are:
BCDEdit.exe You can use BCDEdit.exe from an elevated command prompt. It enables you to
Add BCD store entries
Modify BCD store entries
Delete entries
Export the BCD
Import into the BCD
List entries
Query entries
Make global changes
Change the default time-out
Need More Review? Bcdedit Command-Line Options
You can find more information about the syntax of the BCDEdit.exe command on the Microsoft website at https://docs.microsoft.com/en-us/windows-hardware/manufacture/desktop/bcdedit-command-line-options.
Bootrec.exe You can use Bootrec.exe to manually rebuild the BCD based on a scan that the program performs. You must run Bootrec.exe in Windows RE in the Command Prompt tool. There are a number of parameters that you can use:
/FixMbr Resolves MBR corruption issues
/FixBoot Corrects boot sector corruptions
/ScanOS Scans the hard disk(s) for Windows installations and displays any not listed in the BCD
/RebuildBcd Scans the hard disk(s) for Windows installations and prompts you to add any discovered to the BCD
Managing Devices and Device Drivers
For hardware to function properly, it requires special software designed for Windows 10 to communicate with it. This software is referred to as a device driver. When Windows 10 detects new hardware, the system automatically attempts to install one of the built-in drivers included as part of the operating system. These drivers are either located within the Windows 10 Driver Store, or you can download them through Windows Update. A common reason for a computer to fail to start, or to start with errors, is because a device driver is faulty or corrupted.
Install Devices
New and updated hardware device drivers are regularly submitted to Microsoft by the equipment vendor for testing and cataloging. If the Windows Update feature is enabled, Windows 10 automatically detects the presence of new device drivers, downloads them, and installs them.
New hardware is typically installed automatically when it’s added to Windows 10; the operating system detects and identifies the new hardware through the Plug and Play feature. Windows 10 supports new hardware connected through a variety of connection methods, including USB (1.0 through 3.1), Wi-Fi, and Bluetooth. In addition to backward compatibility for existing and earlier hardware, emerging technologies, such as near-field communication (NFC) and Miracast for wireless displays, also have built-in support in Windows 10.
For advanced users or for managing or troubleshooting a hardware device issue, you can use Device Manager. Device Manager provides information about each device, such as the device type, device status, manufacturer, device-specific properties, and device driver information.
There are multiple ways to load the Device Manager, including:
Right-clicking the Start button and selecting Device Manager
Typing Device Manager into Search
Opening Control Panel, selecting Hardware And Sound, and then selecting Device Manager
The Device Manager default view (devices by type) is shown in Figure 4-21.

You can expand and explore each node in Device Manager and then select a device. All devices have properties, and these can be viewed by right-clicking the desired device and selecting the properties.
The Properties dialog box for a device is shown in Figure 4-22.

If you added a new peripheral and Windows 10 does not immediately recognize it, first check that the device is connected properly and that no cables are damaged. You should ensure that the external device is powered on and not in sleep or standby mode. You can also open Device Manager and launch the Scan For Hardware Changes Wizard from the Action menu, which will locate previously undetected hardware and then configure it for you.
Update Device Drivers
Most computers that you’ll work with have different hardware components, such as mother- boards, disk controllers, graphics cards, and network adapters. Fortunately, Windows 10 is designed to work with an extensive list of hardware devices, and it benefits from Plug and Play, which tries to detect new devices automatically and then installs the correct driver software. If Windows has a problem with a device, you must troubleshoot the cause. This can involve locating the correct or updated device drivers and installing them.
Windows 10 automatically attempts to install a device driver and if one is not available locally, it attempts to locate one through Windows Update. For most systems, devices and their associated drivers remain constant and require no further administrative effort. In the following instances, you might need to update, disable, or reinstate a previous driver.
Windows 10 detects that a newer driver is available through Windows Update.
You want to install a newer device driver manually, typically obtained from the manufacturer’s website.
The device is not performing or functioning correctly with the current driver.
A new or beta version of a driver is causing stability issues.
To update a specific driver, select the device in Device Manager and select Update Driver Software from the context menu.
Windows 10 offers you two choices for updating the driver:
Search Automatically For Updated Driver Software
Browse My Computer For Driver Software
Typically, most users allow Windows to locate, download, and install an updated device driver automatically if one is available through Windows Update. This is the default method.
If you have the installation media that came with the hardware, you can use the browse feature to locate the correct driver. The Windows 10 Update Driver Software Wizard can automatically search through the subfolders in the media and locate all the relevant drivers for the device.
If you have already downloaded a specific device driver from the manufacturer, for example, a video driver from NVIDIA or AMD/ATI, you might need to run the driver installation wizard included in the download files, which includes additional software besides the device driver.
If Windows determines that the current driver is the most up to date or best driver available, you can confirm the version number of the driver by viewing the properties of the driver in Device Manager. If you have a more recent driver that you want to use, you must manually uninstall the current driver and then manually install the more recent driver.
Disable Individual Driver Updates Or Windows Updates
Sometimes it is important to remove a device driver completely from the system. It might be corrupted or incompatible with your system. If Windows determines that the driver is valid and up to date, it is impossible to use another device driver while the current driver is present. To uninstall an unwanted device driver, use the following steps:
Open Device Manager.
Locate the device with the problem driver, right-click it, and choose Uninstall Device.
In the Uninstall Device dialog box, click Uninstall.
If the item relates to an unwanted Windows Update, use the following steps.
Open Settings, click Update and Security, and on the Windows Update tab, click Update History.
Click Uninstall updates. In Control Panel, on the Installed Updates page, locate and uninstall the unwanted update by selecting it from the list and then clicking Uninstall.
If the driver is reluctant to be uninstalled, try restarting the computer and attempting the procedure again. Only as a last resort should you try to delete the software manually. You can use the PnPUtil.exe command-line tool and remove the .inf files that are associated with the device as shown.
PnPUtil.exe -a -d <path to the driver> <drivername>.inf
The use of the PnPUtil.exe command-line tool is discussed later in this chapter.
Note Driver Installation And Removal Are Administrative Functions
You must use administrative privileges to install or uninstall a device or driver package by using Device Manager.
Because different hardware types have different functions and features, review the tabs in the properties screen. Not all devices have the same tabs, and some devices do not offer the ability to view or modify the device driver.
Turn On Or Off Automatic Device Driver Installation In Device Installation Settings
Sometimes installing an updated driver can cause your computer to lose functionality, and you might decide to uninstall the driver. Windows 10 automatically attempts to reinstall the driver, which is not desirable. In this situation, you might want to turn off the automatic device driver installation setting by using the following steps.
Open Control Panel, and under Hardware And Sound, click Devices And Printers.
Under Devices, right-click the icon that represents your computer (it should have your computer name), and click Device Installation Settings, as shown in Figure 4-23.

Figure 4-23 Disabling the automatic device driver software installation In the Device Installation Settings dialog box, choose No (Your Device Might Not Work As Expected). (Yes is the default setting.)
Click Save Changes.
Perform A Driver Rollback
Sometimes a driver problem can cause the system to become unstable. In Device Manager, you can roll back an updated driver to its previous version. If the system allows you to start normally, you can perform this task by using the following steps:
Open Device Manager.
Right-click the device that you want to roll back and then click Properties.
In the Properties dialog box, click the Drivers tab and then click Roll Back Driver.
In the Driver Package Rollback dialog box, click Yes.
The Driver Package Rollback feature can only be used to revert to a previously updated driver. If you have not installed a later driver, the option in Device Manager will be unavailable.
Note No Driver Rollback For Printers
Although Printers and Print queues appear in Device Manager, you cannot use Driver Package Rollback for these devices.
If your system is unstable or won’t start up properly because of a faulty driver, such as a video driver, you might need to restart the computer in Safe Mode to access Device Manager and perform the driver rollback. Windows 10 automatically detects startup failures and should boot into the advanced startup menu. To access Safe Mode, open Settings, click Update & Security, and then select the Recovery tab. Under the Advanced startup heading, click Restart now.
When your PC restarts, select Troubleshoot from the Choose An Option menu.
Select Advanced Options.
Select Startup Settings and click Restart. You see the Advanced Boot Options screen, as shown in Figure 4-24.
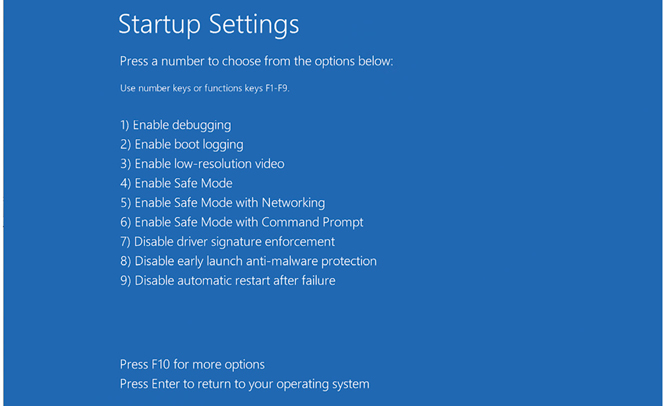
Figure 4-24 Startup Settings options Select Safe Mode by pressing the 4 key.
Sign in to the system and roll back the driver as described earlier.
The rollback feature remembers only the last driver that was installed and doesn’t keep copies of multiple drivers for the same device.
Resolve driver issues
One of the most common issues with device drivers relates to users attempting to install a driver designed for an earlier operating system or a different architecture. In some cases, on previous versions of Windows, it might have been possible to install a Windows 7 driver on a Windows 8–based computer, but this is not a supported operation for Windows 10 and should be avoided in a production environment. As is the case with other software installations, you can’t use a 32-bit driver for a 64-bit resource. You can’t use a 64-bit driver to communicate with a 32-bit resource either.
Disable Updates
Sometimes a specific update or driver will not be compatible with your system. Although all updates and drivers should be thoroughly checked before they are made available for installation, it is almost impossible to test every combination of software and hardware that can coexist on a computer. In some configurations, the new software might produce unsatisfactory results. You saw earlier that one method to avoid this situation is to turn off updates completely.
Disabling automatic driver updates might have a more widespread effect than you want, especially if you only need to disable or prevent the installation of a single driver. To enable you to block a specific update, Microsoft has released the Show Or Hide Updates troubleshooter package, available from the Microsoft Download Center at https://support.microsoft.com/kb/3073930.
This troubleshooter, shown in Figure 4-25, searches for available drivers and Windows updates and then enables you to hide them, which prevents Windows from automatically installing them.
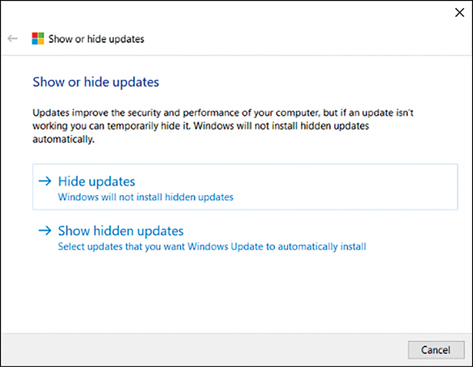
Each time you experience an issue with a driver or update that you don’t want installed, you can run this troubleshooter and select the updates that you want to disable.
Note Device Manager Error Troubleshooting
Device Manager marks a device that is not operating normally with a yellow exclamation point. When troubleshooting a device, you can check the error that Device Manager reports. For a detailed list of errors that Device Manager reports, see the article at https://docs.microsoft.com/en-gb/windows-hardware/drivers/install/device-manager-error-messages.
Use Driver Verification Tools
If you encounter issues with drivers that seem to relate to malware or missing drivers, you can use a command-line tool called Sigverif.exe, which checks whether any drivers have been installed on the computer that have not been signed. The check can take several minutes to complete. To run this tool, perform the following steps.
Open a command prompt. (Standard user privilege level is OK.)
Type sigverif.exe and press Enter. The File Signature Verification Tool appears.
Review the Advanced options.
Click Start and view the results, as shown in Figure 4-26.

Figure 4-26 File Signature Verification tool output
The sigverif.exe tool is useful if you need to locate an unsigned driver. However, there is a more powerful driver verification tool, Driver Verifier, which is built into Windows 10.
![]() Exam Tip
Exam Tip
In the advanced settings of the Signature Verification tool is the file name of the log file; this is a good thing to know for the exam. Review the log file found at %SystemRoot%Sigverif .txt after the operation has completed.
With the enhanced kernel mode operation and reliance on signed drivers, Windows 10 should be less prone to frequent Stop errors. Although less likely, even signed drivers can cause problems, especially if you have an exotic combination of hardware inside your computer. If you do encounter instability, use the built-in Driver Verifier to discover whether a faulty driver is causing the problem.
Driver Verifier Manager can help you troubleshoot, identify, and resolve common device driver problems, and you can then remove, reinstall, or roll back the offending driver with Device Manager.
To run the series of driver tests, follow these steps:
Open a command prompt (Admin), using administrative privileges.
Type verifier.exe and press Enter. The Driver Verifier tool appears.
Review the settings in the tool. Depending on which option you choose, you might need to restart your computer for the tool to recognize all loaded drivers.
After you have selected drivers to be tested, restart the computer, restart the application, and then select Display Information About The Currently Verified Drivers.
Driver Verifier Manager tests each specified driver at startup and then enables you to perform a live test of each loaded driver by running a range of tests, as shown in Figure 4-27. If it detects a problem, the tool can identify the driver, and then you can disable it.

View Device Settings
Device drivers provide Windows 10 with the information required to populate the device details that you find in Device Manager. If only a few details are available to view, the device might have been installed using the built-in driver. You might be able to install a driver from the manufacturer’s website, which will give additional information through Device Manager.
The default Device Manager screen enables users to work directly in the Properties dialog box of a device and provides information about the device that the hardware and device driver provide. The following is a review of Device Manager features that you can use to explore the available information, so that you can configure the driver settings.
In Device Manager, explore these four menu options:
File This menu enables you to exit the console and optionally delete the record of the console customizations you make to the console settings.
Action This menu enables you to access the action-specific tasks relating to the highlighted hardware, including Update Driver Software, Disable, Uninstall, Scan For Hardware Changes, Add Legacy Hardware, Properties, and Help.
View This menu enables you to change how the console view displays advanced information relating to the devices listed in Device Manager. Some hardware is also hidden from normal view, and this option can be set to show hidden devices. The Customize option enables you to show or hide items within the console. You can view devices by
Device type or connection
Resources by type or connection
Help This menu offers access to help topics relating to Device Manager and the console.
There are several advanced views in Device Manager that standard users do not normally use. These include the connection type and hidden device views, as follows.
Show Hidden Devices In previous versions of Windows, printers and non–Plug and Play (PnP) devices could be marked by the device manufacturer as a NoDisplayClass type of device, which prevents it from automatically being displayed in the Device Manager. Devices that have been removed from the computer—but whose registry entries are still present—can also be found in the hidden devices list.
Devices By Type This is the default view, and it shows devices grouped by familiar device name, such as Network Adapters, Ports, and Disk Drives. Each node can be expanded by selecting the > symbol to the left of the node name.
Devices By Connection You can view devices based on the hardware connection, such as physical or virtual.
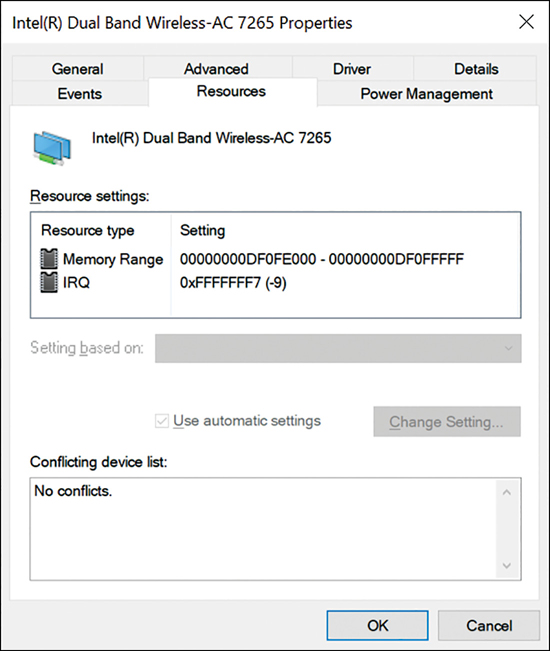
Resources By Type Use this option to view resources organized by how they connect to system resources, including Direct Memory Access (DMA), Input/Output (IO), Interrupt Request (IRQ), and Memory. Unless your BIOS allows you to declare that you are not using a Plug and Play–compliant operating system, you will not be able to modify these settings.
Resources By Connection This view is for advanced users only and is not particularly useful on a modern system. Viewing the device hardware resources by DMA, IO, IRQ, and Memory were useful for earlier versions of Windows prior to the introduction of Plug and Play, which allowed the operating system to manage automatically the resources required by devices.
Support For Older Hardware
Some of the advanced settings in Device Manager are seldom used but have been retained for backward compatibility with older devices that do not support Plug and Play. Modern hardware peripherals must support Plug and Play, which allows Windows 10 to assign hardware resources automatically to new devices. If you look on the Resources tab of a device Properties dialog box in Device Manager, you see that a check box is selected indicating that Windows 10 is using automatic settings, as shown in Figure 4-28. The setting is unavailable and not changeable unless you disable the BIOS/UEFI setting, which declares that the operating system is Plug and Play–compliant.
The Plug and Play standard for connecting devices to Windows is nearly two decades old. Some hardware still exists that requires the administrator to install it manually. In Device Manager, the Add Hardware Wizard enables you to install hardware that does not support Plug and Play. To install such hardware, perform the following steps.
Open Device Manager.
On the Action tab, click Add Legacy Hardware.
On the Welcome To The Add Hardware Wizard page, click Next.
Select one of these options:
Search For And Install The Hardware Automatically (Recommended)
Install The Hardware That I Manually Select From A List
Follow the wizard prompts to finish the configuration of the hardware and provide the driver when requested.
Note Non-Pnp (Older) Devices Are Not Shown In Windows 10
Since Windows 8 and Windows Server 2012, non-PnP devices have not been represented in Device Manager as viewable nodes.
Driver Signing
One of the reasons Windows 10 is more secure than earlier versions of Windows is that kernel mode drivers must now be submitted to and digitally signed by the Windows Hardware Developer Center Dashboard portal. Windows 10 will not load kernel mode drivers that the portal has not signed. To ensure backward compatibility, drivers that are properly signed by a valid cross-signing certificate will continue to pass signing checks on Windows 10.
Windows 10 also introduces a new Universal Windows driver, which is designed to work on all OneCoreUAP-based editions of Windows, such as Windows 10 for desktop editions (Home, Pro, Enterprise, and Education), Windows 10 Mobile, and Windows 10 Internet of Things Core (IoT Core).
A Universal Windows driver has access to the trusted kernel and has a very limited range of the interfaces that are available to a Windows driver. OEMs can supplement the driver functionality by including additional software, but this will be external to the driver. Windows 10 security is more robust by locking down the kernel to signed drivers and encouraging developers to use the Universal Windows driver model.
If you have a specific need to install an unsigned driver—for example, if you are a developer and work with drivers, and you want to test the driver functionality without having to sign the driver digitally each time—you can invoke a special boot-time configuration setting that bypasses the security the Windows 10 driver enforcement model provides. To load an unsigned driver (not recommended), you can follow these steps:
Sign out of Windows 10.
On the sign in screen, click the Power button, hold down the Shift key, and click Restart.
On the Choose An Option screen, choose Troubleshoot.
Choose Advanced Options.
On the Advanced Options screen, select Startup Settings and click Restart.
Advanced Boot Options appears.
Choose Disable Driver Signature Enforcement, as shown in Figure 4-29.

Figure 4-29 Disable Driver Signature Enforcement Install the unsigned driver and then restart the computer.
Manage driver packages
When device drivers are created by the original equipment manufacturer (OEM), they are deployed with the hardware in a driver package that includes all the files and information required for Windows 10 to communicate with the hardware. You see how driver packages are managed and how to install, provision, and import driver packages on Windows 10 devices.
Use The Driver Store
You saw earlier that the driver package can include an information file (.inf file), any files that the .inf file references, and a .cat file that contains the digital signature for the device driver. Windows 10 uses the Driver Store to hold device drivers that have been installed or pre-staged.
All Windows 10 kernel mode drivers must be digitally signed by the Windows Hardware Developer Center Dashboard portal. Windows 10 will prevent the loading of new kernel mode drivers that are not signed by the portal. This is an important change from previous versions of Windows and will make the operating system more secure. Previously, it could be possible for a hacker to gain unauthorized access to a system by using a flaw in an unsigned device driver. Ensuring that all drivers are digitally signed will remove the ability for a hacker to add or modify device driver contents.
If you are creating a custom installation image, or if you build and deploy many computers, you can speed up the driver installation process by pre-loading the Windows 10 driver store with the specific drivers for the peripheral devices that your devices will be using. When Windows 10 finds the drivers it needs in the driver store (located in %SystemRoot%System32 DriverStore), it uses these local drivers and does not download them from Windows Update.
Pre-installing a driver is a two-stage process, and the first stage must be carried out with administrator credentials. You need to add the driver package to the driver store and then ensure that the hardware is attached; Windows 10 then automatically locates and installs the local driver.
There are a few ways to deploy drivers to the Driver Store, and the most appropriate method will depend on your physical network infrastructure, network connectivity, and level of administrative privileges on devices, among other things.
Note Avoid Deleting Files From The Driver Store
You should take care not to delete driver packages manually from the Driver Store. Doing so can cause an inconsistency among the INF file, the Driver Store catalog, and the driver in the Driver Store. For more information, go to https://docs.microsoft.com/windows-hardware/drivers/install/how-devices-and-driver-packages-are-uninstalled.
Use Pnputil.Exe To Manage Driver Packages
To pre-stage the installation of a specific hardware device, you can install a driver manually before connecting the device by using the PnPUtil.exe command-line tool. This could be useful when distributing a laptop to a remote user who you know has a local printer or scanner. Standard users cannot normally install device drivers, but if the driver package is already in the Driver Store, this is possible.
Run the PnPUtil.exe command by using administrative privileges. You can use it to manage the Driver Store; you can add, delete, and list driver packages. You saw earlier that a driver package consists of all the information Windows 10 requires to install and trust the driver, including the following:
Driver files Dynamic link library (DLL) files with the .sys file extension.
Installation files Text files containing all the information needed to install a driver. These .inf files include information, such as driver name and location, driver version information, and registry information. These files are copied to the %SystemRoot%Inf directory during installation. Every installed device must have an .inf file.
Driver Catalog file Contains a cryptographic hash of each file in the driver package. These hashes are used to verify that the package was not altered after it was published (created). Digitally signing the catalog file proves the file has not been altered because only the digital signature owner can sign the file.
Additional files These are files such as a device installation application, device icon, device property pages, and additional files.
For enhanced security, Windows 10 now uses a single kernel model across all editions of Windows 10, and Windows 10 now encourages the use of a new universal driver model. This universal .inf file is required when deploying device drivers to an offline system image, such as when building a Windows 10 Mobile system (which does not support Plug and Play).
The syntax for the PnPUtil.exe command-line tool is as follows.
PnPUtil.exe a <path to the driver> <drivername>.inf
The full list of parameters is shown in Table 4-2.
Table 4-2 PnPUtil.exe parameters
Parameter |
Description |
|---|---|
-a |
Adds a driver package to the Driver Store. |
-d |
Removes a driver package from the Driver Store. |
-e |
Lists the driver packages that are currently in the Driver Store. |
-f |
Forces the deletion of the specified driver package from the Driver Store; cannot be used with the -i parameter. |
-i |
Installs the driver package on matching devices that are connected to the system. Cannot be used with the -f parameter. |
/? |
Displays help. |
An example command to add the .inf? file specified by MyDevice.inf to the Driver Store (located at %SystemRoot%System32DriverStore) is:
PnPUtil.exe -a C:TempMyDevice.inf
![]() Exam Tip
Exam Tip
After a driver has been added to the Driver Store, the driver is referenced in the store through its published name, which might be different from the driver package (.inf) name. You can review the published name by viewing the contents of the .inf file.
In addition to the PnPUtil.exe tool, you can use the following Windows PowerShell cmdlets:
Get-PnpDevice Displays information about PnP devices
Get-PnpDeviceProperty Displays detailed properties for a PnP device
Enable-PnpDevice Enables a PnP device
Disable-PnpDevice Disables a PnP device
An example Windows PowerShell command to enable the device with an instance ID of ‘USBVID_5986&;PID_0266&;MI_007&;1E5D3568&;0&;0000’ is as follows:
PS C:> Enable-PnpDevice -InstanceId 'USBVID_5986&;PID_0266&;MI_007&;1E5D3568&;0&;0000'
For more information about, or for the syntax of, any of the Windows PowerShell cmdlets, you can use the Get-Help <cmdlet name> cmdlet, such as the following.
Get-Help <cmdlet name> -Examples
Download Driver Packages
Drivers are packaged together; each driver package consists of all the software components that are needed for your device to work with Windows.
Most drivers are obtained directly by using built-in tools such as Windows Update. However, if you are provisioning systems, you might want to deploy the PC with the required drivers already imported and configured.
Device drivers can be accessed to perform a malicious attack on your systems. Therefore, you should ensure that driver packages are sourced only from reputable locations, such as the manufacturer’s own website. You should avoid third-party driver repository websites because some sites repackage drivers and include spyware or freeware products in the installation files.
The built-in Windows 10 driver packages are often just the core drivers created by your device manufacturer and provided by Microsoft through the Windows Hardware Quality Labs (WHQL), which tests and digitally signs the drivers. Video drivers often include additional software support and hardware functionality. For example, drivers sourced directly from NVIDIA or AMD for their graphics cards include the NVIDIA Control Panel or the AMD Catalyst control panel, respectively.
If you are seeking the most up-to-date or even a beta version of a device driver, you must download this directly from your device manufacturer. In most cases, you will not need to upgrade your device driver after Windows 10 is installed. If everything is working properly, you probably don’t need to install extra hardware drivers.
If you are a gamer, it can be beneficial to ensure that your graphics card drivers are using the latest versions, so that they support the latest PC games.
You should consider downloading new driver packages in the following scenarios.
If you play PC games Install the latest graphics drivers directly from your graphics card manufacturer because they are often required to play the latest games. Newer versions can also improve graphics performance.
When you need a hardware utility Install the latest version if the manufacturer-provided driver package includes a hardware utility, such as a network configuration tool or ink monitor for your printer.
To resolve a bug Bugs can be found in released drivers and will often be fixed in the most up-to-date version.
To install hardware manually If Windows Plug and Play does not automatically detect and install the hardware, you might need to download the driver package from the manufacturer and install the device driver.
Add Packages Using DISM
The Deployment Image Servicing and Management (DISM) tool is now included as part of the Windows 10 operating system. It is useful for offline image servicing. DISM is a command-line tool that you can use to maintain images and apply them with Windows Updates. It is also used to add and remove Windows features, including language packs, and to manage device drivers.
If you have a custom Windows 10 image, you can use DISM to modify it, and the changes will be visible when you next deploy the image. This can be useful when you know that a driver has been updated since you built the deployment image. Using DISM to inject the new driver saves you from having to rebuild the whole image. Using DISM is similar to using a file compression tool, such as WinRAR, whereby you add or remove new files and then WinRAR reseals the .wim, .vhd, or .vhdx file so that it is ready for deployment.
When you use DISM to install a device driver to an offline image, the device driver is added to the Driver Store. When the image is booted, Plug and Play (PnP) runs, looks for drivers in the store, and associates them with the corresponding devices on the computer on which they’re being installed.
To add drivers to an offline image by using DISM, use these steps:
Right-click the Start button and select Command Prompt (Admin).
Establish the name or index number for the image that you are servicing by typing:
Dism /Get-ImageInfo /ImageFile:C: estimagesinstall.wim
Mount the offline Windows image by typing the following.
Dism /Mount-Image /ImageFile:C: estimagesinstall.wim /Name:"Windows Offline Image" /MountDir:C:estoffline
You can now add the driver, located in the C:Drivers folder, to the image by typing:
Dism /Image:C: estoffline /Add-Driver /Driver:C:driversNew_driver.inf
If you have additional drivers in a folder, you can use the /Recurse option, which installs all the drivers from a folder and all its subfolders. To do this, type:
Dism /Image:C: estoffline /Add-Driver /Driver:c:drivers /Recurse
You can review the drivers in the Windows image by typing:
Dism /Image:C:estoffline /Get-Drivers
In the list of drivers, notice that the added drivers have been renamed Oem*.inf. This ensures that all driver files in the driver store have unique names. For example, the New_Driver1.inf and New_Driver2.inf files are renamed Oem0.inf and Oem1.inf.
To complete the operation, commit the changes and unmount the image by typing:
Dism /Unmount-Image /MountDir:C: estoffline /Commit
Need More Review? DISM
For a detailed reference for the DISM command-line options, you can visit the Microsoft website at https://docs.microsoft.com/en-us/previous-versions/windows/it-pro/windows-8.1-and-8/hh825099(v=win.10).
Manage Driver Packages With DISM
During the life of a Windows 10 installation, the system downloads and installs multiple versions of device driver packages over time. For devices with small hard drive capacity, be aware of how to locate and delete outdated driver packages that the system retains.
You can use the built-in Disk Cleanup tool to remove device driver packages that have been kept after newer drivers are installed.
To clean up old device drivers by using the Disk Cleanup tool, perform these steps:
Click the Start button, type Disk Cleanup, and then select the Disk Cleanup app.
In the Drive Selection dialog box, select (C:) and click OK.
On the Disk Cleanup results screen, select Clean Up System Files.
In the Drive Selection dialog box, select (C:) and click OK.
On the Disk Cleanup results screen, select Device Driver Packages and click OK.
On the Are You Sure You Want To Permanently Delete These Files page, click Delete Files.
All driver packages that were installed during the Windows 10 setup process are stored in a directory called WinSxS, the side-by-side component store. This folder contains driver packages and operating system components, so that you can add devices later without having to supply device drivers. If disk space is limited, you can purge the WinSxS directory contents; doing so can be helpful because it could occupy a significant amount of disk space.
To analyze the Windows Component Store for driver packages and other files that can be deleted, you can use the DISM command by using the following steps:
Right-click the Start button, select Windows PowerShell (Admin), and type the following:
DISM /Online /Cleanup-Image /AnalyzeComponentStore
The tool analyzes your system. Typical results are shown in Figure 4-30.

Figure 4-30 Analyzing the Component Store (WinSxS) with DISM When the analysis is complete, you can initiate a cleanup of the Windows Component Store by typing the following command:
DISM /Online /Cleanup-Image /StartComponentCleanup /ResetBase
Important Do Not Delete The Winsxs Folder
Do not manually delete the WinSxS directory or its contents to reclaim the space because Windows creates many hard links from files in the WinSxS folder to locations in system folders.
Managing Services
Another possible cause of startup problems in Windows 10 is services; these are software components that function with the operating system and usually require no user intervention. Usually, services start before a user signs in to a Windows computer.
If your computer experiences problems when starting, you can use the following tools to help to identify whether the issue relates to operating system services:
Event Viewer If services have problems, then generally, errors are written to the Windows log files. You use the Event Viewer tool to access these log files. Event Viewer is discussed in more detail later in this chapter.
Log files Outside of the built-in capabilities of the Windows logs, you can also enable additional logging within specific Windows components or within a particular app. For instance, you can enable more detailed logging of the startup process by selecting Boot Logging in the Advanced Startup Options menu.
Stop codes Windows 10 is very robust and system crashes are rare. However, when they occur, you can use the stop codes generated to help to identity the cause. These stop codes might suggest that a service is the root cause of a system crash.
Notifications Within the Action Center, you can view notifications from Windows about system events, including possible problems.
If your computer does not start as a result of an issue with services, you can attempt to resolve the problem in a number of ways. These include:
Safe Mode Start your computer in Safe Mode; this reduces the number of services running and might enable you to start your computer successfully. Once started, you can then investigate the possible causes using the tools listed above.
Windows RE Start your computer into Windows RE and then select the Command Prompt tool. Using commands such as Net.exe and Sc.exe enables you to manually control service behavior.
MSConfig.exe The System Configuration tool has a Services tab that you can use to control service startup. You can choose to disable specific services from this console. You can also focus only on those services that are not built in to Windows, as shown in Figure 4-31.
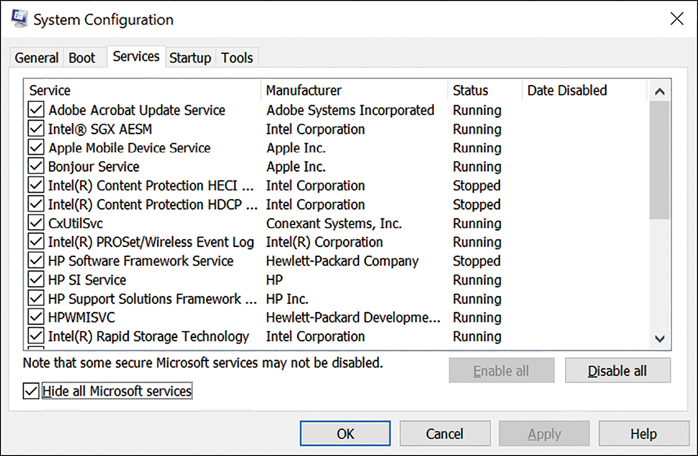
Figure 4-31 Viewing the non-Microsoft services in System Configuration
Skill 4.2: Manage updates
Keeping computers safe and protected from external threats such as malware and hackers is a big challenge. In earlier versions of Windows, you could decide whether the operating system was automatically updated with the latest features, security updates, and fixes through the Windows Update feature. Some users chose to disable automatic updates, and these computers are vulnerable to attack. With over a billion Windows devices worldwide, even if this number is a small percentage of the total, it might mean millions of devices were unprotected.
Windows 10 changes the game with regard to updates and security because it will continually and automatically benefit from new updates rolled out through Windows Update. To enhance the security protection delivered in Windows 10, the consumer can no longer turn off security updates. Enterprise users will have some leeway on the timing of updates and upgrades, and they can still choose to test updates and deliver them internally, using Windows Server Update Service (WSUS) or other management tools to keep their devices updated. For organizations that require deployment of a static installation of Windows 10 that will not have upgrades, Microsoft ships a special build of Windows 10, which is discussed later in this skill.
Select the appropriate servicing channel
In order to keep your Windows computers running efficiently and securely, it is important to install updates from Microsoft when they become available. In the past, these updates were designed primarily to fix identified problems or security vulnerabilities. However, with Windows 10, Microsoft has introduced a new update model: Windows as a service.
With Windows as a service, updates are designed not only to resolve perceived defects in software, but also to add new features to the operating system. Instead of releasing new versions of Windows every few years, Microsoft now provides continual updates—updates that provide new features—to Windows 10.
As an IT professional supporting Windows 10 users, it’s important that you know how to manage updates within your organization. A significant part of this understanding is based on understanding the new Windows as a service model.
Windows as a service
Windows as a service is more about Windows deployment than it is updating; in other words, the update mechanism is used to deliver, or deploy, new builds of Windows instead of relying on more traditional deployment methods.
As an organization, this means that instead of planning and performing operating system upgrades, such as from Windows 7 to Windows 10, you use Windows Update to continually introduce new Windows 10 features as the operating system evolves.
Microsoft now deploys the following types of updates:
Feature updates These add significant functionality to the Windows 10 operating system, and to date, these updates have been deployed twice a year—spring and fall. These updates are usually identified by their year and month. For example, this book and its companion exam, are based on Windows 10 1809, which shipped in September 2018. Other feature updates include Windows 10 1703, Windows 10 1709, and Windows 10 1803.
Quality updates These provide reliability and security updates and fixes. Microsoft deploys these updates monthly on the second Tuesday of the month. They are cumulative, meaning that even if you miss an update, by applying a subsequent update, you receive all previous updates.
Users of Windows 10 Home editions have no control over how their computers receive these updates. However, users in business and educational organizations who are using Windows 10 Pro, Windows 10 Enterprise, or Windows 10 Education editions can control their update experience using
Servicing channels Microsoft provides several servicing channels. These channels determine when updates are applied to a computer. These channels are
Windows Insider Program
Semi-Annual Channel
Long-Term Servicing Channel
Deployment rings You can define deployment rings by using Group Policy Objects (GPOs) or Microsoft Intune. These deployment rings use a selected servicing channel and additional Windows settings to determine when updates apply. By configuring groups of computers with matching settings, you can control updates to that group.
Select the servicing channel
To configure the appropriate servicing channel for a device, use the following procedure:
Open Settings.
Select Update & Security and then, on the Windows Update tab, click Advanced Options.
As shown in Figure 4-32, under the Choose When Updates Are Installed heading, select the appropriate servicing channel. Options are
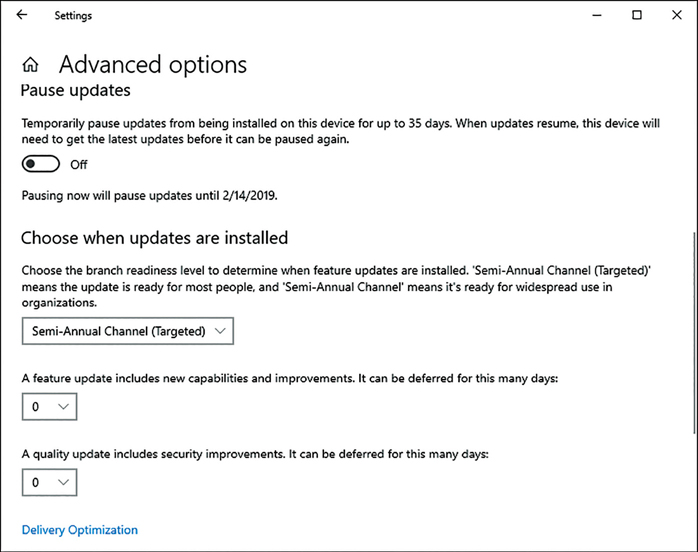
Figure 4-32 Windows Update Advanced Options Semi-Annual Channel
Semi-Annual Channel (Targeted)
You can also choose to defer the application of both Feature and Quality updates by selecting a value from the appropriate drop-down menu. You can defer feature updates for up to 365 days. You can defer quality updates for up to 30 days.
Note Servicing Duration
All releases of Windows 10 have 18 months of servicing across all editions. September feature updates for Windows 10 Enterprise and Education editions have 30 months of servicing from initial release.
The Windows Insider Program enables users of Windows 10 to gain an insight into features update before they’re released. They can also provide feedback to Microsoft during their evaluation of those feature updates. To opt in to the Windows Insider Program channel, use the following procedure:
Open the Settings app.
Select Update & Security and then select the Windows Insider Program tab.
As shown in Figure 4-33, on the Windows Insider Program tab and under the Get Insider Preview Builds heading, click Get Started.

Figure 4-33 Windows Insider Program
Using deployment rings
By selecting an appropriate servicing channel, and then configuring feature update and quality update deferral values, you can create deployment rings. You might decide that you require a test group of computers that get updates early. You may also decide to create a group of computers that receive updates reasonably quickly after release. After testing, you might then want to enable the bulk of your remaining computers to receive the updates. You could achieve this by using the deployment rings described in Table 4-3.
Table 4-3 Suggested deployment rings
Ring |
Channel |
Feature Deferral |
Quality Deferral |
Explanation |
|---|---|---|---|---|
Test |
Windows Insider Program |
0 days |
0 days |
Enables you to evaluate and test pre-release updates before they are deployed to your other devices. During this phase, you can begin to identify any potential issues with the updates. |
Early |
Semi-Annual Channel (Targeted) |
0 days |
0 days |
Enables you to evaluate released updates on a small subset of your devices. This enables you to identify any possible problems before you deploy updates to the rest of your computers. |
Standard |
Semi-Annual Channel |
90 days |
15 days |
For most of your users, the deferment values ensure that you have had adequate time to test updates and to identify possible problems. |
Slow |
Semi-Annual Channel |
365 days |
30 days |
This ring might be used to ensure that updates are applied as long as possible after their release. Devices configured into this ring might be running critical apps or services. |
To configure deployment rings for Active Directory Domain Services (AD DS) domain-joined devices, use GPO settings. These settings are discussed in the next section. To configure deployment rings for non-domain-joined devices, use Microsoft Intune. You can configure the deployment rings using the Microsoft 365 Device Management portal, as shown in Figure 4-34. Details about this process are beyond the scope for this book, as they are not covered in the MD-100 Windows 10 exam. Note, in the Microsoft 365 Device Management portal, deployment rings are referred to as update rings.

Configure Windows Update options
After you have planned your deployment rings, you must configure the Windows Update settings. You can do this either on a per-computer basis, by using the Settings app, or by using GPOs to configure AD DS domain-joined computers.
Configuring settings on an individual computer
To configure the Windows Update settings on an individual computer, open the Settings app and select Update & Security. You can then configure the following settings.
Windows Update
Select the Windows Update tab, as shown in Figure 4-35.
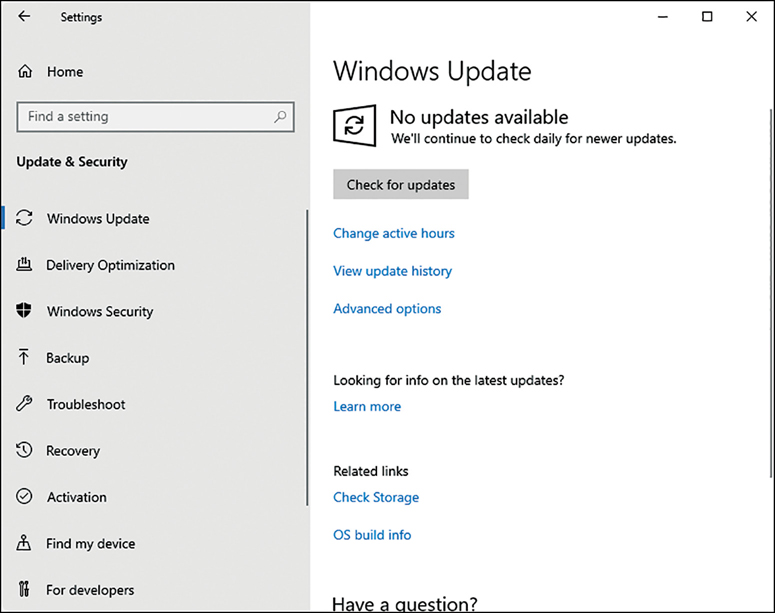
You can then configure active hours, view update history, and configure advanced options (discussed above).
Change Active Hours This setting allows the user to identify the period of time when they expect the device to be in use. Automatic restarts after an update will occur outside of the active hours. The default is 8 AM to 5 PM.
View Update History Provides access to the links to uninstall updates and to access recovery options. You can also see a list of recent updates, as shown in Figure 4-36. To uninstall updates, click the link and select the update you want to remove.

Figure 4-36 Viewing update history
Advanced options On the advanced options page, shown in Figure 4-37, you can configure the following properties:
Give Me Updates For Other Microsoft Products When I Update Windows Users can choose to include updates for other Microsoft products in addition to Windows, and use the users’ sign-in info to automatically sign back in to the device to complete the installation following an update.
Automatically Download Updates, Even Over Metered Data Connections Enables users to ensure they receive updates, even when connected using cellular data.
Update Notifications Allows Windows to display a notification when a restart is required following updates.
Pause Updates Enables the user to turn off updating for a period of up to 35 days.

The remaining settings were discussed earlier in this skill.
Delivery Optimization
In Windows 10, you have several options regarding how Windows updates and Microsoft Store apps are delivered to the computer. By default, Windows obtains updates from the Microsoft Update servers, computers on the local network, and on the Internet. Windows Update Delivery Optimization allows the application of updates more quickly than previous versions of Windows. Once one PC on your local network has installed an update, other devices on the network can obtain the same updates without downloading directly from Microsoft.
This process is similar to popular peer-to-peer file sharing apps. Only partial file fragments of the update files are downloaded from any source, which speeds up the delivery and increases the security of the process. If you allow delivery optimization to take place, you then can choose from the following options how your PC will obtain updates and apps from other PCs:
PCs On My Local Network Windows will attempt to download from other PCs on your local network that have already downloaded the update or app.
PCs On My Local Network, And PCs On The Internet Windows will attempt to download from the PCs on your local network, and Windows also looks for PCs on the Internet that are configured to share parts of updates and apps.
If Delivery Optimization is enabled, your computer can also send parts of apps or updates that have been downloaded using Delivery Optimization to other PCs locally or on the Internet. To enable Delivery Optimization, from Settings, in Update & Security, select the Delivery Optimization tab, as shown in Figure 4-38.

Note that there are additional delivery optimization settings that you can configure by using GPO settings. These settings are discussed in the next section.
Configuring settings using GPOs
Although you can configure all your computers running Windows 10 manually, it is far easier and quicker to use Group Policy to configure your domain-joined computers. You can configure the following Windows Update settings using GPOs:
Computer ConfigurationAdministrative TemplatesWindows ComponentsWindows Update as shown in Table 4-4.
Table 4-4 Windows 10 GPO settings in the Windows Update node
Gpo Setting
Description
Turn Off Auto-Restart For Updates During Active Hours
Allows you to specify the active hours during which the PC won’t restart.
Specify Active Hours Range For Auto-Restarts
Allows you to specify the maximum number of hours that active hours can be set. This time can be set between 8 and 18 hours.
Specify Deadline Before Auto-Restart For Update Installation
Allows you to enforce a restart between 2–14 days after a restart is scheduled.
Configure Auto-Restart Reminder Notification For Updates
Allows you to specify when auto-restart reminders are displayed.
Turn Off Auto-Restart Notifications For Update Installations
Allows you to turn off all auto restart notifications.
Configure Auto-Restart Required Notifications For Updates
Allows you to specify how the restart notifications are dismissed. By default, this is automatic after 25 seconds.
Configure Automatic Updates
Configure whether Windows Update can enable automatic updates on your computer.
If this setting is enabled, you must select one of the four options in the Group Policy setting (note there is no option 1):
2 = Notify for download and auto install
3 = Auto-download and notify for install
4 = Auto-download and schedule the install
5 = Allow local admin to choose setting
If you select option 4, you can also modify a recurring schedule; otherwise all installations will be attempted every day at 03:00.
Specify Intranet Microsoft Update Service Location
Configure whether Windows Update will use a server on your network to function as an internal update service.
Do Not Allow Update Deferral Policies To Cause Scans Against Windows Update
Allows you to prevent update deferral policies to cause scans against Windows Update.
Remove Access To Use All Windows Update Features
Enabling this policy removes user access to Windows Update scan, download, and install features.
Specify Engaged Restart Transition And Notification Schedule For Updates
Enabling this policy allows you to configure settings related to PC restart following a period of time when auto restart settings have been configured.
Do Not Include Drivers With Windows Updates
If you enable this policy setting, Windows Update will not include drivers with Windows quality updates.
Configure Auto-Restart Warning Notifications Schedule For Updates
Controls when users receive notification reminders and warnings to restart their devices following an update installation.
Update Power Policy For Cart Restarts
For EDU devices that remain on charging carts overnight to receive updates to reboot during the scheduled install timeframe.
Defer Windows UpdatesSelect When Feature Updates Are Received
Controls the type of feature updates to receive and when based on branch readiness level.
Defer Windows UpdatesSelect When Quality Updates Are Received
Controls the type of quality updates to receive and when to receive them based on branch-readiness level.
Computer ConfigurationAdministrative TemplatesWindows ComponentsData Collection And Preview Builds as shown in Table 4-5.
Table 4-5 GPO settings in the Data Collection And Preview Builds node
Gpo Settings
Description
Toggle User Control Over Insider Builds
Determines whether users can access the Insider build controls in the Advanced Options for Windows Update.
Allow Telemetry
Determines the amount of diagnostic and usage data reported to Microsoft by Preview Build users, as follows.
0= Security (Enterprise, EDU, Server, and IoT Operating Systems will send minimal telemetry data to Microsoft)
1= Basic (Limited amount of diagnostic and usage data)
2= Enhanced (Sends enhanced diagnostic and usage data).
3= Full (Sends enhanced diagnostic and usage data plus additional diagnostics data during a crash).
Configure The Commercial ID
Allows you to define the identifier used to uniquely associate the device for when telemetry data is being sent to Microsoft.
Configure Authenticated Proxy Usage For The Connected User Experience And Telemetry Service
Allows you to block or allow the Connected User Experience and Telemetry service from automatically using an authenticated proxy to send data back to Microsoft.
Disable Pre-Release Features Or Settings
Determines the level to which Microsoft can experiment with the product to study user preferences or device behavior as follows:
1 = Allows Microsoft to configure device settings only.
2 = Allows Microsoft to conduct full experimentations.
Configure Connected User Experiences And Telemetry
Forward Connected User Experience and Telemetry requests to a proxy server.
Do Not Show Feedback Notifications
Allows you to prevent devices from showing feedback questions from Microsoft.
Computer ConfigurationAdministrative TemplatesWindows ComponentsDelivery Optimization as shown in Table 4-6.
Table 4-6 GPO settings in the Delivery Optimization node
Gpo Settings
Description
Absolute Max Cache Size (In GB)
Allows you to limit the maximum size in GB for the Delivery Optimization cache. The default size is 10 GB.
Enable Peer Caching While The Device Connects Via VPN
Can allow the device to participate in Peer Caching while connected via VPN to the domain network to download from or upload to other domain network devices, while either on the VPN or via the corporate network.
Download Mode
Configure the use of Windows Update Delivery Optimization for downloads of Windows apps and updates as follows:
0=HTTP only: No peering
1=LAN: HTTP blended with peering behind the same NAT
2=Group: HTTP blended with peering across a private group
3=Internet: HTTP blended with Internet Peering
99=Simple: Download mode with no peering
100=Bypass mode: Do not use Delivery Optimization and use BITS instead
Group ID
Used to create a group ID to which the device belongs. Used to limit or to group devices.
Max Cache Age (In Seconds)
Specifies the maximum time in seconds that each file is held in the Delivery Optimization cache after downloading successfully. Default setting is 3 days.
Max Cache Size (Percentage)
Specifies the maximum cache size that Delivery Optimization uses as a percentage of available disk size. Default is 20%.
Maximum Download Bandwidth (In KB/S)
Specifies the maximum download bandwidth that the device can use across all concurrent download activities using Delivery Optimization.
Max Upload Bandwidth (In KB/S)
Defines the maximum upload bandwidth that a device will utilize for Delivery Optimization.
Minimum Background QoS (In KB/S)
Specifies the minimum download QoS (Quality of Service or Speed) for background downloads. Default is 500 KB/s.
Allow Uploads While The Device Is On Battery While Under Set Battery Level (Percentage)
Specify the value between 1 and 100 to allow the device to upload data to LAN and Group peers while on battery power. The device can download from peers while on battery regardless of this policy.
Minimum Disk Size Allowed To Use Peer Caching (In GB)
Specifies the required minimum disk size for the device to use Peer Caching. Default is 32 GB.
Minimum Peer Caching Content File Size (In MB)
Specifies the minimum content file size in MB enabled to use Peer Caching. Default value is 100 MB.
Minimum RAM Capacity (Inclusive) Required To Enable Use Of Peer Caching (In GB)
Specifies the minimum RAM size in GB required to use Peer Caching. Default value is 4 GB.
Modify Cache Drive
Specifies the drive Delivery Optimization will use for its cache.
Monthly Upload Data Cap (In GB)
Specifies the maximum total bytes in GB that Delivery Optimization is allowed to upload to Internet peers in each calendar month. Default value is 20 GB.
Maximum Download Bandwidth (Percentage)
Specifies the maximum download bandwidth that Delivery Optimization uses. The default value is 0.
Computer ConfigurationAdministrative TemplatesWindows ComponentsWindows UpdateWindows Update for Business as shown in Table 4-7.
Table 4-7 GPO settings in the Windows Update for Business node
Gpo Settings
Description
Manage Preview Builds
You can control whether your users’ computers can be configured into the Insider Build servicing channel. Enable this value to configure the device into the Windows Insider Program.
Select When Preview Builds And Feature Updates Are Received
This value enables you to select the servicing channel. You can choose between:
Preview Build – Fast
Preview Build – Slow
Release Preview
Semi-Annual Channel (Targeted)
Semi-Annual Channel
You can then also select a deferment value.
Select When Quality Updates Are Received
If you enable this value, you can then define a deferment value (in days) for quality updates.
To set a GPO to configure Windows Update, complete the following steps:
On a domain controller, open Group Policy Management.
Right-click a suitable GPO and then click Edit.
In the Group Policy Management Editor, shown in Figure 4-39, navigate to the appropriate node and edit the appropriate setting(s) as per the following tables.

Figure 4-39 Editing Data Collection and Preview Builds GPO settings Close the editor when you are finished. The GPOs will refresh to domain-joined computers.
There are seven GPO settings that relate to the Windows 10 Preview Builds, as described in Table 4-5.
The third table of GPO settings allows you to modify the Delivery Optimization settings in Windows 10, so that you can fine tune and regulate the peer caching of updates.
Windows Update for Business settings in GPO enable you to control which deployment ring your users’ computers are configured for. By using these settings, you control which servicing channel your users’ devices use, and deferment values for both feature and quality updates.
Check for updates
It is not usually necessary to check for updates manually. However, you can easily do so by opening the Settings app. In Update & Security, on the Windows Update tab, shown in Figure 4-40, click Check For Updates. Windows connects to Windows Update and retrieves a list of any pending updates.

Note Caution
If updates are available, they will automatically start to download and install, even if you have configured settings in GPO to only notify for download and install.
Validate and test updates
It is important that you know how Windows updates might affect your users’ devices. Consequently, you should take the time to validate and test updates before making them available across your organization.
We have already discussed how using a servicing channel together with deferment values can be used to create the notion of deployment rings. Using deployment rings gives you an opportunity to obtain and test forthcoming updates before ongoing deployment.
In addition, you can consider using additional services to deploy Windows updates rather than relying solely on the Windows Update servers. Table 4-8 describes the additional options.
Table 4-8 Options for deployment of updates
Gpo Settings |
Description |
|---|---|
WSUS |
This is a Windows Server 2019 server role. WSUS downloads updates from the Windows Update server(s). You can then configure how these updates are propagated to your client computers. This gives you time to test and validate updates. |
Windows Update For Business |
Essentially, you can consider this to be similar to WSUS. However, it is maintained in the cloud by Microsoft and is available for devices running Windows 10 Pro or Windows 10 Enterprise. |
System Center Configuration Manager (SCCM) |
If you already have SCCM for managing deployment, you can also use it to manage updates. SCCM gives you great control and flexibility in managing updates. |
Microsoft Intune |
Intune is a cloud-based device and app management tool. It’s especially useful for managing non-domain-joined devices. With Intune, you can approve updates, deploy updates, and remove updates. |
When testing updates, it’s important that you make sure that all devices, peripherals, and apps will work with the new updates. This is particularly relevant when considering the deployment of feature updates.
Troubleshoot updates
If a machine is not receiving updates and you have checked the Settings app and Group Policy settings to ensure that updates are not deferred or paused, you should verify that the two services in Windows relating to Windows Update are running.
The first is the Windows Update service, which checks which updates have been installed locally and what is available on the update servers. The Windows Update service also handles the download, installation, and reporting of the state of updates.
Background Intelligent Transfer Service (BITS) is a supplemental service that handles the transfer of update files in the most efficient manner. Both services need to be running for Windows Update to function correctly.
You can also use the Windows Update troubleshooter. This is located on the Troubleshoot tab in Update & Security in the Settings app, as shown in Figure 4-41.

Click Run The Troubleshooter. Windows attempts to check the required services and attempts to connect to the Windows Update server. If Windows identifies problems, as shown in Figure 4-42, it might make recommendations on how best to resolve the issue(s).

Roll back updates
With the rhythm of regular updates becoming the method of keeping devices secure and up to date, there might be instances when an update causes problems and you need to consider removing the update completely by rolling it back. You might have experience with driver rollbacks; the same concept is used for rolling back Windows updates.
Sometimes you need to remove a single Windows update. You can perform this task in a number of ways–through Control Panel, the Settings app, or the command prompt.
Uninstall A Windows Update By Using Control Panel
If you prefer to use Control Panel, you can see an Installed Updates list in Control Panel by following these steps:
Click the Start button and type Control Panel, click Control Panel.
Open Programs > Programs And Features.
Click View Installed Updates.
Select an update that you want to uninstall.
If Windows allows you to uninstall it, Uninstall appears on the toolbar.
In the Uninstall An Update dialog box, click Yes to confirm.
Accept the UAC if prompted. A restart might be needed to complete the removal of the update.
Uninstall A Windows Update In Settings
The Settings app ultimately opens the same Installed Updates list in Control Panel. Perform these steps if you prefer to use the Settings app.
Open the Settings app and click Update & Security.
Click Windows Update and then click Update History. A list of your installed Windows Updates appears.
Click Uninstall Updates at the top of the screen. The link opens the Control Panel > Programs> Programs and Features > Installed Updates page.
Select an update that you want to uninstall. If Windows allows you to uninstall it, Uninstall appears on the toolbar.
In the Uninstall An Update dialog box, click Yes to confirm.
Accept the UAC if prompted. A restart might be needed to complete the removal of the update.
Uninstall A Windows Update By Using The Command Prompt
Sometimes you will want to remove the same update from multiple devices. After you have tested the command-line tool on your test device, you can use the command prompt or Windows PowerShell to script the command and distribute it to multiple devices by using Group Policy or Windows PowerShell.
You can use the Windows Management Instrumentation (WMI) command-line utility to generate a list of installed Windows Update packages on a Windows 10–based device, as shown in Figure 4-43.
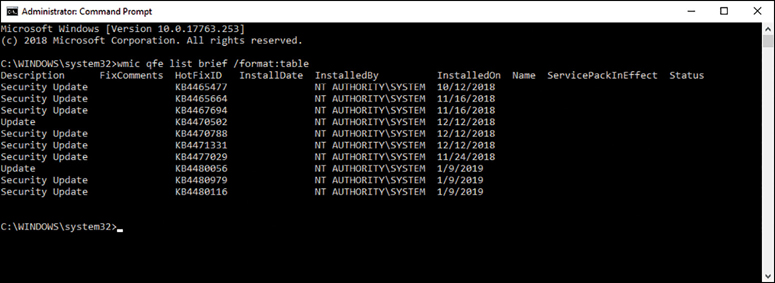
To generate the list of installed Windows Update packages on your device, open a command prompt, (or Windows PowerShell) and type the following command.
wmic qfe list brief /format:table
When you have identified an update that you want to remove, you can use the Windows Update Stand-Alone Installer (Wusa.exe) command-line tool to uninstall updates by providing the package number (from the Microsoft Knowledge Base) of the update to be uninstalled. The syntax for the tool is as follows.
wusa.exe /uninstall /kb:<KB Number>
Substitute <KB Number> in the command with the actual KB number of the update you want to uninstall. The WMIC and WUSA commands work in either the command prompt or Windows PowerShell.
Skill 4.3: Monitor and manage Windows
After your computers are installed with Windows 10, it will be necessary to monitor and manage them. Windows 10 provides many tools with which to monitor your computers, including the Event Viewer, and a number of performance-monitoring tools, including Resource Monitor and Performance Monitor.
In addition to monitoring your computers, it is important you are familiar with how to manage important elements of the operating system, including printers and printing, indexing, and services.
Configure and analyze event logs
A key built-in security tool in all Windows operating systems are event logs, which are accessed in the Windows Event Viewer and provide information regarding system events that occur. Event logs are generated as a background activity by the Event Log service and can include information, warning, and error messages about Windows components and installed applications and actions carried out on the system.
Understand event logs
You can start Event Viewer, as shown in Figure 4-44, by typing eventvwr.msc.

Upon opening, the console retrieves the events that have occurred on your computer and displays them. You can configure the Event Viewer to work with event logs from remote computers; you must enable remote management in your firewall.
There are two types of log files.
Windows logs Includes Application, Security, Setup, System, and Forwarded Events
Applications and services logs Includes other logs from applications and services to record application-specific or service-specific events
Because logs are created as part of the operating system, they can provide forensic-level metadata that can help you understand problems that are difficult to diagnose, using real-time analysis of the system.
The Windows logs are described in more detail in Table 4-9.
Table 4-9 Built-in Windows logs
Log |
Description |
Log File Location |
Default Log Size |
|---|---|---|---|
Application |
Events logged by installed applications. |
%SystemRoot%System32Winevt LogsApplication.Evtx |
20,480 KB |
Setup |
Records events logged by Windows during setup and installation. |
%SystemRoot%System32WinevtLogsSetup.Evtx |
1,028 KB |
Security |
Contains auditable events such as logon, logoff, privilege use, and shutdown. |
%SystemRoot%System32WinevtLogsSecurity.Evtx. |
20,480 KB |
System |
Contains events logged by Windows 10. This is the main system log. |
%SystemRoot%System32WinevtLogsSystem.Evtx |
20,480 KB |
Forwarded Events |
Used when event forwarding is operational. This log records forwarded events from other computers. |
%SystemRoot%System32Config ForwardedEvents.Evtx |
20,480 KB |
The default Windows 10 event log maximum file size is 20 MB. If your system reaches this maximum size, new events will overwrite old events.
Open Event Viewer and take some time to familiarize yourself by reviewing some logs. There are several levels of events, with meanings as follows.
Information These logs provide information about changes related to a component or system process, usually a successful outcome.
Warning These events are not critical, although they could lead to more serious problems and should be investigated.
Error Events warn you that a problem has occurred.
Critical These events are the most severe and could lead to failure or loss of function. They are highly significant and indicate that a problem is occurring or has occurred.
Audit Success/Failure If you have enabled auditing, these log entries appear in the security log.
In Event Viewer, select each of the Windows logs and look at the types of events that have been generated. The Actions pane on the right side provides tools and wizards to help you work with logs, including saving a log, clearing/deleting entries in a log, opening a previously saved log, and attaching a task to an event.
Create a custom view
When you explore Event Viewer, you might find so many entries that it is hard to locate specific issues. You’ll want to remove entries, but you should not clear a log on a production machine without first saving the log. A better method of removing log entries, such as informational or warning log entries, is to create a custom view that shows only specific events. This acts like a saved filter that you can invoke.
To create a custom view in Event Viewer that displays only Critical events in the System log, follow these steps:
Open Event Viewer.
On the Action menu, click Create Custom View.
On the Filter tab, select the Critical check box in Event Level.
In By Log, use the Down arrow and expand Windows Logs; select only the System check box and then click OK.
Type a name, such as System-Critical for the log name, and click OK.
The custom view immediately refreshes and displays log entries that match the criteria.
Your custom view filter—in this case, named System-Critical—is located in the left pane under the Custom Views node.
Close Event Viewer.
With all events, you can double-click the event log entry to reveal its Properties dialog box. The Event Properties dialog box provides you with additional detailed information together with a Copy button so that you can copy the event data to the Clipboard and then work with the data or seek help. Event descriptions have become easier to understand than in previous versions of Windows. The experience of reading event log entries will also help build your understanding.
Configure event subscriptions
You can configure Event Viewer to gather other computers’ event logs. Manually connecting to other computers on a regular basis can be cumbersome. You can automate the collection of event logs from other computers by creating event subscriptions.
All computers participating in a subscription must be configured to allow remote administration. This is achieved by enabling the Windows Remote Management service on the source computer. On the collector computer, start the Windows Event Collector service, which enables the computer to collect events from remote devices. To configure the computers to collect and send events, perform the following two short procedures.
View Subscriptions
To enable the collector computer to view subscriptions:
Open an elevated command prompt.
Type wecutil qc and press Enter.
Type Y and press Enter to start the Windows Event Collector service. Windows Event Collector service announces it was configured successfully.
Close the command prompt window.
To enable remote collection of events on the source computer, follow these steps:
Open an elevated command prompt.
Type winrm quickconfig and press Enter.
Type Y and press Enter; repeat when prompted. The WinRM firewall exception is now enabled.
Close the command prompt window.
You can create two kinds of subscriptions: collector-initiated and source computer–initiated. The subscriptions are described in Table 4-10, with some of the key terms related to event subscriptions.
Table 4-10 Event subscription terms
Term |
Description |
|---|---|
Subscription |
A group of events you configure based on specific criteria you create is called a subscription. Subscriptions enable you to receive events from other computers, called sources. |
Source |
The event source computer is the computer that provides you with events on your network. The source computer can be a PC or a server. |
Collector |
The event collector computer is the computer on which you view the collected events. The collector computer can be a PC or a server. |
Collector-initiated subscription |
In a collector-initiated subscription, the subscription must contain a list of all the event sources that need to be added one at a time. This is used on small networks because each must be configured manually. |
Source computer–initiated subscription |
The source computer transmits local events to the collector computer. This is a push type of arrangement, often configured using Group Policy. |
Create A Subscription
To create a collector-initiated subscription, follow these steps:
Open Event Viewer.
Click the Subscriptions node.
If the option to start the Windows Event Collection Service dialog box appears, click Yes.
In the Action pane, click Create Subscription.
Type a name and a description for the subscription, as shown in Figure 4-45.

Figure 4-45 Creating an event subscription Under Subscription Type And Source Computers, click Collector Initiated and click Select Computers.
In the Computers dialog box, click Add Domain Computers, select the computer to be polled for subscriptions, and click OK.
Under Events To Collect, click Select Events and define the event criteria—such as event levels, log type, and event source—that will be used to match and collect events. Click OK.
Click OK to save and make the subscription active.
The new subscription is listed in the main pane of the Subscriptions node.
If you want to view events on other computers on your network, you can do so without creating a subscription. This is useful for ad hoc monitoring, for example, to see whether a particular event has occurred.
Access event logs remotely
When you need to quickly view event logs on a remote computer, you don’t need to create a subscription. Instead you can view the event logs directly. To view event logs on a remote system, follow these steps:
Open Event Viewer.
Right-click Event Viewer (Local) in the left pane and choose Connect To Another Computer.
When the Select Computer dialog box opens, click Another Computer and enter the name, type the domain name or IP address of the computer, or click Browse to search for the computer on your network.
If you need to specify logon credentials, select the Connect As Another User check box. Click Set User and type the logon credentials for a local administrator or user on the remote device and then click OK.
Note View Events On Remote Computers
You must have administrator privileges to view events on a remote computer. You must also configure Windows Firewall on all participants to allow traffic on TCP port 80 for HTTP or on TCP port 443 for HTTPS.
Manage performance
There are a number of different tools in Windows 10 that you can use to view and manage performance. Some of these provide a snapshot view of system performance. Others provide a means to collect and analyze performance data over a period of time.
You can use the following tools to manage performance in Windows 10:
Task Manager
Resource Monitor
Performance Monitor
Monitor performance using Task Manager
If you have used an earlier version of Windows, you probably have used Task Manager. This is one of the most useful tools available in Windows for gaining an immediate insight into how a system is performing.
Access Task Manager
The Task Manager built into Windows 10 shows you which processes (tasks) are running on your system and, importantly, shows the system resource usage that directly relates to performance. If a particular task or process is not responding or continues to run after you have closed the application, you can use Task Manager to view this behavior and force the offending process to end.
When troubleshooting, you might find that some users are comfortable using Task Manager to review the system status and end problematic tasks.
If you are moving to Windows 10 from Windows 7 or earlier, notice that Task Manager has been redesigned extensively and is now much more user-friendly, informative, colorful, and slightly less technical.
To open Task Manager, right-click the Start button and then click Task Manager. There are several other ways to open Task Manager, including
Pressing Ctrl+Shift+Esc
Right-clicking the taskbar, Cortana, or the Task View button and then clicking Task Manager
By default, the Task Manager opens to show only the running applications, as shown in Figure 4-46. While using this view, you can highlight any of the listed applications and click End Task to stop a running app.

If you click More Details, Task Manager reopens and displays seven tabs, which enable you to review specific areas of your computer activity. The tabs are described in Table 4-11.
Table 4-11 Task Manager tabs
Task Manager Tab |
Description |
|---|---|
Processes |
Shows all running apps and background processes |
Performance |
Shows real-time statistics for CPU, memory, disk, Ethernet, Bluetooth, and Wi-Fi usage |
App History |
Shows historical data for universal and modern apps usage for the previous month |
Startup |
Lists the apps that start when the computer boots |
Users |
Lists all the users currently logged on to the computer locally and remotely |
Details |
Shows detailed statistics on all running and suspended processes |
Services |
Displays all running and stopped system services |
Each tab offers you a different view of the system. Most users might be interested only in the simple view, whereas most IT professionals will only use the detailed version of Task Manager.
Using The Performance Tab
The Performance tab provides a graphical, real-time, statistical view for CPU, Memory, Disk, and Ethernet. If you have multiple Ethernet devices, such as Wi-Fi, these are listed. Figure 4-47 shows the Performance tab with Disk 0 selected. In the lower pane, below the graphics, you see additional information, such as read/write speed, capacity, and average response time. If you are connected to Wi-Fi and click Ethernet, you see the adapter name, Service Set Identifier (SSID), Domain Name Service (DNS) name, connection type, IPv4 and IPv6 addresses, and signal strength.

At the bottom of the Performance tab is an Open Resource Monitor link to the management console.
Monitor performance using Resource Monitor
The Resource Monitor displays more information and activity statistics relating to your system resources in real time. It is similar to Task Manager, but it also enables you to dive deeper into the actual processes and see how they affect the performance of your CPU, disk, network, and memory subcomponents.
Open the Resource Monitor by using the link on the Performance tab of Task Manager or search for Resource on the Start button. The executable for Resource Monitor is Resmon.exe, which you can run from a Run dialog box or command prompt.
When you open Resource Monitor, you see an overview of your system with graphs for each area of the system subcomponent. Four further tabs are available: CPU, Disk, Network, and Memory. The statistics tracked on the Overview tab include the following:
% CPU Usage
CPU Maximum Frequency
Disk I/O Bytes Per Second
Disk % Highest Active Time
Network I/O Bytes Per Second
% Network Utilization
Memory Hard Faults Per Second
% Physical Memory Used
Review each tab; each subcomponent offers additional components, as shown in Table 4-12.
Table 4-12 Resource Monitor components
System Component |
Additional Subcomponents |
|---|---|
CPU |
Processes Services Associated Handles Associated Modules |
Memory |
Processes Physical Memory |
Disk |
Processes With Disk Activity Disk Activity Storage |
Network |
Processes With Network Activity Network Activity TCP Connections Listening Ports |
In each data collector, you can sort the output by clicking the column title. If you select one or more processes in the topmost section, selecting the check box on the left side creates a filter for the items across all four tabs. The selected item is highlighted in orange, so that you can see how the item compares to the overall output, as shown in Figure 4-48.

The Resource Monitor is useful for troubleshooting performance issues that relate to high resource usage, and you need to establish which process is using a more than normal amount of resource such as memory.
For more advanced analysis, you can right-click any column and choose additional columns by choosing Select Columns. Each tab has associated columns; the CPU panel offers the following additional columns.
Average Cycle Average percentage of CPU cycle time for the process (over a 60-second interval).
Cycle Current percentage of CPU cycle time the process is using.
Elevated The elevation status of the process. (If this is Yes, it is an elevated process.)
Operating System Context The operating system context in which the process is running.
Platform The platform architecture that the process is running.
User Name The name of the user or service that is running the process.
If you want to freeze the screen so that you can analyze the display or capture an image, you can click the Monitor menu item and select Stop Monitoring.
Monitor performance using Performance Monitor and Data Collector Sets
You can use the Performance Monitor Microsoft Management Console (MMC) snap-in to monitor and track your device for the default set of performance parameters or a custom set you select for display. These performance parameters are referred to as counters. Performance Monitor graphically displays statistics and offers real-time monitoring and recording capabilities. By default, the update interval for the capture is set to one second, but this is configurable.
You can use the tool to record performance information in a log file so that it can be played back and used as part of your overall benchmarking process on a system being tested, or when collecting information to help you troubleshoot an issue. You can also create alerts that notify you when a specific performance criterion, such as a threshold or limit, has been met or exceeded.
The easiest way to learn how to use Performance Monitor is to run one of the two built-in collector sets and review the results.
System Diagnostics Data Collector Set collects the status of local hardware resources and configuration data, together with data from the System Information tool.
System Performance Data Collector Set reports the status of local hardware resources, system response times, and processes.
Run The Performance Monitor Data Collector
To run the System Performance data collector and view the report, follow these steps:
Type Performance into Start and click Performance Monitor in Control Panel.
On the navigation pane, select Data Collector SetsSystem and click System Performance.
On the toolbar, click the Run icon (green triangle). The collector runs for 60 seconds and then stops.
After the collector has stopped, in the navigation pane, select Reports and expand System.
Click the chevron arrow next to System Performance and then click the Report icon related to the collector you just ran. The latest report should be listed at the bottom. The System Performance Report appears in the results pane.
Review the System Performance Report and then close Performance Monitor.
When you review the report, as shown in Figure 4-49, you can see how extensive and detailed the monitoring is. The report is saved and can be printed and refreshed to provide an up-to-date report, which you can compare to other reports.

The diagnostic or performance-monitoring data collector sets are very useful when identifying the cause of performance deterioration, which might be a warning sign of potential malfunction or failing hardware.
You can manually configure Performance Monitor to report on one or many parameters you select for display. You choose the counters that relate to the hardware and software installed on your system. If you add new hardware, such as a new network card, Performance Monitor updates the set of performance counters for the new resource.
Use Performance Monitor
To use Performance Monitor, you start with a blank canvas and add items that you want to monitor. There are three components that you can add as follows.
Performance objects These relate to any system component that enables monitoring, such as
Physical The memory, the processor, or the paging file
Logical component For example, a logical disk or print queue
Software For example, a process or a thread
Performance object instances These represent single occurrences of performance objects. You can choose individual instances, or you can track all instances of an object.
Performance counters These are the measurable properties of performance objects, such as the Bytes Sent/Sec for the Ethernet Controller as shown in Figure 4-50.

Figure 4-50 Adding objects and counters to Performance Monitor
After some counters have been selected, a moving graphical display shows the activity relating to the counters selected. You can locate the color of the line from the key at the base of the graph and hide/show any counter by clearing the check box on the left of the counter.
A selection of the most common performance objects that you might want to monitor are summarized in Table 4-13.
Table 4-13 Commonly tracked performance objects
Performance Object |
Description |
|---|---|
Memory |
Monitors memory performance for system cache, physical memory, and virtual memory |
IPv4 |
Monitors IPv4 communications |
LogicalDisk |
Monitors the logical volumes on a computer |
Network Interface |
Monitors the network adapters on the computer |
PhysicalDisk |
Monitors hard disk read/write activity and data transfers, hard faults, and soft faults |
Print Queue |
Monitors print jobs, spooling, and print queue activity |
Processor |
Monitors processor idle time, idle states, usage, deferred procedure calls, and interrupts |
Because the monitoring is performed in real-time, the effect of monitoring many counters can have an impact on the host system performance, which could distort the usefulness of the performance information. Therefore, you should test the number of counters and the frequency of data collection and witness the impact. To add new values to the Performance Monitor chart, follow these steps:
Click the Start button and type perfmon. Performance Monitor opens.
Click the Performance Monitor node in the left pane. The default counter for % Processor Time appears.
On the toolbar, click the plus (+) symbol to add an additional counter.
In the Available Counters area, expand PhysicalDisk, and click % Idle Time.
In the Instances Of Selected Object box, click 0 C:, click Add, and click OK.
Right-click % Idle Time and then click Properties.
In the Color box, click blue, and then click OK.
Leave Performance Monitor open.
To create a new Data Collector Set based on a template, in Performance Monitor, follow these steps:
In the left pane, expand Data Collector Sets and then click User Defined.
Right-click User Defined, click New, and then click Data Collector Set.
On the Create New Data Collector Set page, type Disk Activity, and click Next.
In the Template Data Collector Set box, click Basic and click Next.
Click Next to accept the default storage location.
Select Open Properties For This Data Collector Set and click Finish. The Disk Activity Properties dialog box appears and has six tabs.
Review the General, Directory, Security, Schedule, Stop Condition, and Task tabs and click OK.
In the right pane, double-click Disk Activity. Three types of logs are shown in the right pane:
Performance Counter Collects data that is viewable in Performance Monitor
Configuration Records changes to registry keys
Kernel Trace Collects detailed information about system events and activities
In the right pane, double-click Performance Counter.
Select the Processor Counter and click Remove.
Click Add and then click PhysicalDisk in Available Counters.
Click Add and then click OK.
In the left pane, right-click Disk Activity and then click Start.
On the Disk Activity node, a small play icon appears for 60 seconds.
When Data Collector Set has stopped recording, right-click Disk Activity and then click Latest Report.
Review the report, which shows the data that the data collector set collected.
Close Performance Monitor.
Monitor system resources
Every computer system has a performance threshold that, if pushed beyond this level, will cause the system to struggle to perform optimally. If you overload the system, it eventually slows down as it attempts to service each demand with the available resources. Most systems include a capable processor and sufficient amount of RAM for everyday or general needs. Memory is automatically reclaimed from apps that are closed. However, when apps or web browser tabs are left open, and more apps are then opened, the overall ability for the system to perform is degraded.
Understand Baseline Performance Vs. Real-Time Monitoring
You have seen that with tools, such as Performance Monitor, Resource Monitor, and Task Manager, you can monitor your system activity and understand how demands on processor, RAM, networking, and disks affect your computer system. Real-time monitoring information is useful for instant diagnosis. Also, creating a baseline for your computer’s performance can generate a system-specific report that can be useful to show what your performance statistics look like during normal or heavy use.
If you intend to ship a device to a user who will use the device extensively for system-intensive tasks, such as video editing or computer-aided design, it might be useful to create a performance baseline for the device so that you can establish how the system performs normally and when under heavy load. This will be useful to confirm that the device specification is suitable for the user. Also, this will be helpful if the user reports performance issues because you can run another performance baseline and compare the two baselines to evaluate whether the system environment has changed. For example, perhaps the user now regularly multitasks with additional new apps on the system that use additional memory.
In this scenario, when an issue or symptom occurs, you can compare your baseline statistics to your real-time statistic and identify differences between the two instances. When you can diagnose the issue, you can recommend a solution, such as to add more memory.
The most appropriate tool to record a baseline in Windows 10 is Performance Monitor; it will help you review and report on the following areas in your system:
Evaluate your system workload
Monitor system resources
Notice changes and trends in resource use
Help diagnose problems
Create A Performance Baseline
To create a performance baseline that monitors key system components you can use to measure against a future performance baseline, follow these steps:
Click the Start button and type perfmon. Performance Monitor opens.
Click the Data Collector Sets node in the left pane.
Click User Defined, right-click User Defined, click New, and then click Data Collector Set.
In the Create New Data Collector Set Wizard, on the How Would You Like To Create This New Data Collector Set page, in the Name box, type Initial PC Baseline.
Click Create Manually (Advanced) and then click Next.
On the What Type Of Data Do You Want To Include page, select the Performance Counter check box and then click Next.
On the Which Performance Counters Would You Like To Log page, in the Sample Interval box, type 1 and then click Add.
Include the following counters.
Memory > Pages/Sec
Network Interface > Packets/Sec
PhysicalDisk > % Disk Time
PhysicalDisk > Avg. Disk Queue Length
Processor > % Processor Time
System > Processor Queue Length
Click OK and then click Finish.
Right-click Initial PC Baseline and then click Start.
Simulate load on the system by starting several programs, including Internet Explorer, Word 2016, Microsoft Excel 2016, and Microsoft PowerPoint 2016.
Close all Microsoft Office apps, close Internet Explorer, and stop the Initial PC Baseline data collector set.
To view the baseline report, in Performance Monitor, expand the ReportsUser Defined nodeInitial PC Baseline and click the report to open it.
Print the report or view the report and record the values for the following counters.
Memory > Pages/sec
Network Interface > Packets/Sec
PhysicalDisk > % Disk Time
PhysicalDisk > Avg. Disk Queue Length
Processor > % Processor Time
System > Processor Queue Length
Troubleshoot performance issues
In normal operating conditions, the majority of users rarely experience performance issues with their devices after they have been configured with the necessary security, antimalware, productivity, and specialist software. Out of the box, Windows 10 is optimized for general user environments.
Over time, the device might gradually seem to become slower. If the user notices this decreased system performance, he or she might request help from the help desk.
You can avoid some performance degradation by performing regular maintenance, such as using the Disk Cleanup utility to remove temporary or unwanted files. Windows 10 does a good job at self-healing and maintaining the system and schedules many maintenance tasks to run automatically for you.
If poor performance occurs, investigate and troubleshoot the reason to establish whether there is a bottleneck—perhaps a memory-hungry app, multiple startup programs, or even malware. Another gradual but common occurrence is when a system runs out of disk space, especially because the majority of devices are now using solid-state drives (SSDs) that are typically smaller-capacity drives.
When looking at the factors that might influence your PC, consider some of the following.
Windows 10 architecture: x86 or x64
Processor speed, processor quantity, onboard cache memory, and cores
Physical hard disks input/output speed, buffer size, and defragmentation state
Memory: capacity, speed, and type
Graphics card: throughput, memory, onboard processing speed, quantity, and drivers
Network interface throughput, onboard processing capability, quantity, and drivers
Application number, type, available optimizations, and architecture
System, peripheral, and application drivers
Understand how system bottlenecks can occur, how to diagnose a system that is suffering from a performance bottleneck, and how to respond and recover from the problem. Some common performance bottlenecks that are useful to know about when troubleshooting are shown in Table 4-14.
Table 4-14 Performance bottlenecks
Performance Counter |
Bottleneck |
|---|---|
LogicalDisk\% Free Space |
If this is less than 15 percent, you risk running out of free space for Windows 10 to use to store critical files. |
PhysicalDisk\% Idle Time |
If this is less than 20 percent, the disk system is overloaded. Consider replacing with a faster disk. |
PhysicalDiskAvg. Disk Sec/Read |
If the number is larger than 25 milliseconds (ms), the disk system is experiencing read latency; suspect drive failure (or a very slow and/or old disk). |
PhysicalDiskAvg. Disk Sec/Write |
If the number is larger than 25 milliseconds (ms), the disk system is experiencing write latency; suspect drive failure (or a very slow and/or old disk). |
PhysicalDiskAvg. Disk Queue Length |
If the value is larger than 2 times the number of drive spindles, the disk might be the bottleneck. |
Memory\% Committed Bytes in Use |
If the value is greater than 80 percent, it indicates insufficient memory. |
MemoryAvailable Mbytes |
If this value is less than 5 percent of the total physical RAM, there is insufficient memory, which can increase paging activity. |
Processor\% Processor Time |
If the percentage is greater than 85 percent, the processor is overwhelmed, and the PC might require a faster processor. |
SystemProcessor Queue Length |
If the value is more than twice the number of CPUs for an extended period, you should consider a more powerful processor. |
Network InterfaceOutput Queue Length |
There is network saturation if the value is more than 2. Consider a faster or additional network interface. |
Manage Windows 10 environment
In this section, you will learn how to manage printers, control and configure indexing, evaluate system stability, and configure and manage services.
Monitor and manage printers
Windows 10 provides some additional options for you to manage your printing compared to previous versions of Windows. A new Print Management desktop app and the new Printers & Scanners options in the Settings app provide basic printer management such as Add, Remove, and Set As Default Printer.
You still have previous printer tools in the Devices And Printers section of Control Panel or from the link at the bottom of the Printers & Scanners options in the Settings app. The Devices And Printers Control Panel item is the same interface as in previous versions of Windows 7. This section focuses on the new features relating to Printer With Windows 10, but for the exam, you should also review the older printer tools.
Manage Printers By Using Print Management
A new Print Management console is available for you to manage your device printers from a single management console. Print devices connected to your PC can be shared, and you can manage the properties of the device. The Print Management MMC, as shown in Figure 4-51, is included in the Administrative Tools of Windows 10 Pro and Enterprise editions, and it lists all printers, drivers, and other print servers that you are connected to.

You can also launch the Print Management console by typing Printmanagement.msc in the Start menu.
The Print Management console offers you a single location to perform the following printer-related management tasks:
Add and delete print devices
View printers and print servers
Add and remove print servers
Add and manage print drivers
Deploy printers using Group Policy
Open and manage printer queues
View and modify status of printers
Use the filter feature to view printers based on filters
If you right-click a printer, you are presented with a list of some action items that can be performed on the selected printer. These can include the following tasks:
Open Printer Queue
Pause Printing
List In Directory
Deploy With Group Policy
Set Printing Defaults
Manage Sharing
Print Test Page
Enable Branch Office Direct Printing
Properties
Delete
Rename
Help
Note Remote Printers
You can use the Print Management console to manage both local and remote printers. Devices And Printers in Control Panel can only manage locally connected printers.
Manage Printers By Using Windows Powershell
More than 20 Windows PowerShell cmdlets can be used to manage printers. Some of the most common cmdlets are shown in Table 4-15.
Table 4-15 Windows PowerShell printer cmdlets
Cmdlet |
Description |
|---|---|
Add-Printer |
Adds a printer to the specified computer |
Add-PrinterDriver |
Installs a printer driver on the specified computer |
Add-PrinterPort |
Installs a printer port on the specified computer |
Get-PrintConfiguration |
Gets the configuration information of a printer |
Get-Printer |
Retrieves a list of printers installed on a computer |
Get-PrinterDriver |
Retrieves the list of printer drivers installed on the specified computer |
Get-PrinterPort |
Retrieves a list of printer ports installed on the specified computer |
Get-PrinterProperty |
Retrieves printer properties for the specified printer |
Remove-Printer |
Removes a printer from the specified computer |
Remove-PrinterDriver |
Deletes printer drivers from the specified computer |
Remove-PrintJob |
Removes a print job on the specified printer |
Rename-Printer |
Renames the specified printer |
Restart-PrintJob |
Restarts a print job on the specified printer |
Resume-PrintJob |
Resumes a suspended print job |
Set-PrintConfiguration |
Sets the configuration information for the specified printer |
Set-Printer |
Updates the configuration of an existing printer |
Set-PrinterProperty |
Modifies the printer properties for the specified printer |
To list all the available cmdlets, type the following command into a Windows PowerShell console:
Get-Command -Module PrintManagement
Configure indexing options
To maintain the performance of Windows 10 search, the system automatically indexes data on your computer in the background. This data includes user-generated files, folders, and documents. Most users will never modify the default indexing settings, but you can add new areas to be indexed and exclude others. Common locations include your user profile areas and app data that you access frequently, such as Office apps.
If you store a lot of data in a storage space or a removable drive, you can add this location to Indexing Options to significantly speed up the performance of future searches in this location.
To view your existing indexing locations, type Index on the Start screen and click Indexing Options in Control Panel to see the Indexing Options dialog box shown in Figure 4-52.

You can use the Modify button to add or remove locations. In the Indexed Locations dialog box, you see the summary of locations. If you click Show All Locations, Windows 10 displays all the hidden locations, and this enables you to fine-tune the indexing to specific subfolders, if necessary. To select the Downloads and Documents folders within your profile, select the arrow next to the Users folder and then locate and select Downloads and Documents in your user profile.
After you apply changes to indexing, the indexing process doesn’t happen immediately; rather, it runs as a background task whenever your machine is running but not being used. While the indexing process is incomplete, the message in the dialog box indicates that Indexing Speed Is Reduced Due To User Activity. When the process has finished, the message states Indexing Complete.
Be careful not to index everything on your disk. A large index can affect the search performance negatively.
In the Indexing Options dialog box, the Advanced button enables you to configure Index Settings and specify File Types to be excluded. You can include or exclude encrypted files, treat similar words as different words, delete and rebuild the index (useful if you suspect search is not working), and change the index location from the default C:ProgramDataMicrosoft.
On the File Types tab, you can exclude file types from the index and configure whether the index searches in the file contents or just in the file properties. You can also manually add new file types that have not been automatically included to index.
Evaluate system stability by using Reliability Monitor
Members of the desktop support team often report that it is difficult to ascertain the precise nature of calls that relate to poor performance or system instability. Reliability Monitor is an excellent tool for these situations because it enables you to review a computer’s reliability and problem history and offers both the help desk and you the ability to explore the detailed reports and recommendations that can help you identify and resolve reliability issues. Changes to the system such as software and driver installations are recorded, and changes in system stability are then linked to changes in the system configuration.
To launch Reliability Monitor, type reliability in the Start screen and click View Reliability History in Control Panel, or type perfmon /rel at a command prompt. The tool displays a summary of the reliability history for your system, as shown in Figure 4-53.

The top half of the Reliability Monitor screen shows a line graph with a scale of 1 to 10 and date timeline along the bottom axis. You can toggle the view from weeks to days. The graph rises and sinks over time, and at the low points are colored markers in red, blue, or yellow. Below the graph are the details that relate to system configuration changes, such as software and driver installations. When system changes result in a negative system stability, such as an app crashing or a service stopping, there might be a relationship between the two, and these can be further explored. The graph gradually reaches the maximum level of 10 if the system does not experience negative system stability over a prolonged period.
Reliability Monitor is enabled by default in Windows 10. Reliability Monitor requires the Microsoft Reliability Analysis task, RacTask, to process system reliability data, which is a background process that collects reliability data. RacTask can be found in the Task Scheduler library under the MicrosoftWindowsRAC node.
The Reliability Monitor main features include:
System stability chart Provides summary of annual system stability in daily/weekly increments. The chart indicates three levels of stability data: information, warning messages, and critical errors.
Records key events in a timeline Tracks events about the system configuration, such as the installation of new apps, operating system patches, and drivers.
Installation and failure reports Provides information about each event shown in the chart, including:
Software Installs/Software Uninstalls
App Failures
Hardware & Driver Failures
Windows Operating System Failures
Miscellaneous Failures
Because the tool offers a rolling view of reliability history, you can retain a copy of a point-in-time report. Click the Save Reliability History link to save complete details at periodic time points, such as annually. System builders and repair shops often use the report to demonstrate computer stability for future reference.
At the bottom of the Reliability Monitor screen are two additional links that list all computer problems and attempt to locate problem solutions from the Internet. The Problem Reports And Solutions tool helps you track problems that are reported and checks for all available solution information to problems.
Configure and manage services
A service can best be described as a software component that interacts at one level with device drivers and, at another level, with app-level components. In a sense, services sit between apps and hardware devices and are considered a core part of the operating system, controlling user requests, through apps, to hardware resources.
These operating system services provide discrete functions in Windows 10 and require no user interaction. You can manage services in a number of ways, including from the command prompt, by using Windows PowerShell, and by using the management console.
Using The Services Management Console Snap-In
The most straightforward way to manage services is to use the Services management console snap-in, as shown in Figure 4-54.

You can use this console to view and manage services in the operating system. For example, to manage the status of a service (assuming it is not running), right-click the service and then click Start. If you want to stop or restart a running service, right-click the running service and then click either Stop or Restart.
You can also manage the settings of a service by double-clicking the desired service. In the Properties dialog box for the named service, as shown in Figure 4-55, you can then configure the properties shown in Table 4-16.

Table 4-16 Configurable options for a Windows 10 service
Tab |
Options And Explanation |
|---|---|
General |
|
Log On |
Log on as Local System Account or This Account. Some services run in the context of the Local System Account. Others must be configured to use a specific, named account (for example, when communicating across the network with another service). You can create special local user accounts for the purpose of running services. When you define a specific user account and change the user password, you must update the password information on the Log On tab for the services that use that account. |
Recovery |
You can configure what happens when a service fails to start or crashes. Specifically, you can configure Windows 10 to attempt a restart of a service if it fails to start on the first attempt. On second attempts, you can choose another option, such as Restart The Computer. Available options for failures are Take No Action, Restart The Service, Run A Program, and Restart The Computer. If you select Run A Program, you can configure additional options for the path and name of the program, plus any runtime switches you want to apply. |
Dependencies |
Some services depend on other services, or groups of services, to run. In this way, Windows 10 can start efficiently by making sure only the required services are in memory. You cannot make changes on this tab, but it is informative to know whether a service has dependencies, especially when a service is failing to start properly. |
Using Command-Line Tools
You can also use the command line to investigate and troubleshoot service startup. Table 4-17 shows some of the more common command-line tools you can use to work with services. To use these commands, open an elevated command prompt.
Table 4-17 Managing services from the command line
Command |
Explanation |
|---|---|
Net start |
When used without arguments, lists the running services. When used with the name of a service, the service, if not running, is started. For example, net start workstation starts the Windows workstation service. |
Net stop |
Must be used with the name of a running service. For example, net stop workstation will stop the Windows workstation service. |
Sc query |
Displays a list of services. |
Sc stop |
Enables you to stop a named service. For example, to stop the spooler service, run: Sc stop spooler |
Sc start |
Enables you to start a named service. For example, to start the spooler service, run: Sc start spooler |
You can also use Windows PowerShell to manage services. This is particularly useful because you can use Windows PowerShell to administer other computers remotely, including their services. In addition, you can script Windows PowerShell cmdlets, enabling you to store common administrative tasks for future use. Table 4-18 shows the cmdlets you can use to manage services in Windows 10. Open an elevated Windows PowerShell window to use these cmdlets.
Table 4-18 Managing services with Windows PowerShell
Cmdlet |
Explanation |
|---|---|
Get-service |
Lists available services. To get a list of running services, use the following cmdlet: Get-Service | Where-Object {$_.status -eq “running”} |
Stop-service |
Enables you to stop the named service(s). For example: Stop-service - name spooler |
Start-service |
Enables you to start the named service(s). For example: Start-service - name spooler |
Restart-service |
Enables you to stop and start the named service(s). For example: Restart-service - name spooler |
Set-service |
Enables you to reconfigure the startup and other properties of the named service. For example, to change the display name of the Workstation service, use the following cmdlet: set-service -name lanmanworkstation -DisplayName {{#}}8220;LanMan Workstation{{#}}8221; |
Need More Review? Managing Services
To review further details about using Windows PowerShell to manage services, refer to the Microsoft PowerShell Documentation website at https://docs.microsoft.com/powershell/module/microsoft.powershell.management/?view=powershell-6.
Use The System Configuration Tool
If you are experiencing problems with starting your Windows 10 device, and you suspect a service might be the cause of the problem, you can control which services start when you start your computer by using Safe Mode. This reduces the set of services that start to the minimum required to run Windows.
You can force your computer into Safe Mode during startup or use the System Configuration tool, Msconfig.exe. To access the System Configuration tool, run msconfig.exe. You can then configure your computer’s startup behavior. Configurable options are described in Table 4-19.
Table 4-19 System configuration options
Tab |
Options And Explanation |
|---|---|
General |
|
Boot |
|
Services |
The Services tab displays the available operating system services and enables you to configure their startup behavior. For example, you can disable any services that you suspect might be causing issues with your computer. To disable a service, clear the check box next to its name. |
Startup |
The Startup tab enables you to access the Startup tab in Task Manager to control the startup behavior of apps. |
Tools |
The Tools tab provides a consolidated list of available system tools, including: Change UAC Settings, System Properties, Computer Management, Device Manager, and the Registry Editor. |
Thought experiments
In these thought experiments, demonstrate your skills and knowledge of the topics covered in this chapter. You can find the answers to these thought experiments in the next section.
Scenario 1
You want to use the Backup And Restore (Windows 7) tool to create a backup of your files contained on your computer to a removable USB hard drive or SDHC memory card. You want to create a custom schedule. Answer the following questions relating to the Backup And Restore (Windows 7) tool:
What is the default backup schedule for the Backup And Restore (Windows 7) tool?
How would you modify the schedule so that you can be more specific? For example, you want to back up the data every 30 minutes.
What triggers are available that could be used to begin the backup task?
You no longer want to use Backup And Restore (Windows 7) tool for your Windows 10 Pro tablet. What built-in backup tool could you use instead? How could the data be safeguarded from theft?
Scenario 2
You have been asked to review the backup and restore options available within Windows 10 and OneDrive.com. Your manager is developing a backup strategy and wants to ensure that files are backed up and users can easily access the backed-up files for at least six months. Backups will be stored offsite. Answer the following backup-related questions.
How would relying on the OneDrive Recycle Bin feature affect the backup strategy?
You want to examine how the Previous Versions feature found in File Explorer works, but you cannot see any Previous Versions listed. How do you enable Previous Versions?
Could the Previous Versions feature found in File Explorer offer backup and recovery of files as part of the backup strategy?
Scenario 3
Your company has recently upgraded half of its computers from Windows 7 to Windows 10 Pro. Staff members use Office and a web-based line-of-business application. The help desk manager has received several complaints from users who state a variety of problems following the upgrade, including that the following:
Their computers are slow
Apps stop responding
Websites are slow to load
The remaining Windows 7–based computers do not exhibit the same issues. You need to offer the help desk some advice on how to diagnose these problems and recommend how to resolve them as soon as possible.
Answer the following questions from the help desk:
Why might the computers be slow after the upgrade?
Which tool could you recommend to assist the help desk support members verify which apps are freezing?
You suspect that the network card could be a performance bottleneck. How could this suspicion be tested?
How would a network card bottleneck present itself?
Scenario 4
You work as a desktop support technician. Your Windows 10 deployment for 5000 devices is now complete, and you are now busy supporting your users. Answer the following questions about using advanced management tools and techniques for your organization:
You find that you are repeatedly performing the same management task on multiple computers. At the moment, you use several customized Microsoft Management Consoles to perform the required tasks. How could you achieve this more easily?
A number of users are experiencing problems with their computers. You determine that the issue relates to a service that occasionally stops and is then restarted. Where can you track information about this problem?
What command-line tools can you use for managing services?
Thought experiment answers
This section provides the solutions for the tasks included in the thought experiment.
Scenario 1
The default backup schedule for the Backup And Restore (Windows 7) tool is every Sunday at 7 PM.
You need to edit the AutomaticBackup task in the WindowsBackup node found in Task Scheduler and configure the task to repeat every 30 minutes by editing the trigger.
The triggers available for the task to begin include the following: On A Schedule, At Log On, At Startup, On Idle, On An Event, At Task Creation/Modification, On Connection/ Disconnect To A User Session, and On Workstation Lock/Unlock.
You would suggest using File History. This feature allows the backup of files and folders to a removable drive—for example, a USB drive or SDHC memory card—that may be used with the device. Optionally, the external storage may be encrypted using BitLocker To Go or EFS.
Scenario 2
The OneDrive Recycle Bin is not a backup facility. It will only retain files that have been deleted for a maximum of 93 days. This is less than the 6 months required by the backup strategy.
You would need to turn on the schedule to create restore points using either File History or the Backup And Restore (Windows 7) tool. Once the Backup And Restore (Windows 7) tool creates a backup, or when File History runs, previous versions of files will be available on the Previous Versions tab.
Previous Versions could provide the longevity of access to the backed-up files if the backup storage location does not become full. To ensure that the Previous Versions complied with the backup strategy, you would need File History or the Backup And Restore (Windows 7) tool to save the image to a remote storage location, such as a networked attached drive.
Scenario 3
Answers might vary. Several potential areas need to be investigated. The original computers should have met the minimum specification for Windows 10 to upgrade from Windows 7. The computers might be quite old and contain components that are slow in comparison to modern hardware, such as older hard drives without cache, or slow RAM memory. The BIOS or motherboard firmware might be old and need updating. The hardware device drivers might not have been updated to the latest versions for Windows 10.
Recommend to the help desk that it suggest using Reliability Monitor to review the stability history of the computers that are reporting app freezing. The Reliability Monitor report should identify the failing app and how often it is failing; also, the report should identify potential solutions. You should also be able to see whether other failures are occurring that might relate or contribute to the app failure.
Answers might vary. You could review the network card driver version and see whether there are any known issues relating to the network card and Windows 10 on the manufacturer’s website. You could use Performance Monitor to review the performance for the Network Interface counter and monitor the Output Queue Length.
Network-related activities, such as web browsing and opening and saving resources across the network, would be slower than normal. If there is network saturation, the report should indicate that the queue length is more than 2, meaning that the network card cannot process network packets quickly enough.
Scenario 4
You could create Windows PowerShell scripts, as required, that contain the required management cmdlets. Because Windows PowerShell supports remoting, it is easy to run the script against remote computers at the same time. You must, however, ensure that the execution policy for each computer supports the running of PowerShell scripts and that Windows PowerShell remoting is enabled.
Use the System log in Event Viewer. You can group events based on source; in this instance, the source is Service Control Manager.
You can use Windows PowerShell to manage services. Also, the SC.exe and Net.exe command-line tools can be used.
Chapter Summary
Windows 10 File History is the preferred backup option that performs automatic backups of files every hour to a non-local storage.
Previous Versions is a feature that allows you to recover deleted or modified versions of your files directly from File Explorer rather than via a backup or File History.
OneDrive offers you a Recycle Bin, which allows you to recover files you’ve deleted from OneDrive folders and syncs with the File Explorer Recycle bin.
OneDrive can provide a history of older versions of Office documents that are stored within OneDrive, so that you can access, restore, and download previous versions of your files.
A Windows 10 recovery drive can be used to recover your system in the event of failure.
System Restore is useful for restoring the operating system to a previous point in time. For example, you can restore to a point prior to when your computer became unstable.
Windows RE enables you to access the advanced startup options to troubleshoot Windows 10 startup issues.
You can use Reset this PC to recycle a computer for use by another user or to revert the computer to its OOBE state if you experience serious problems with the computer.
Fresh Start within Windows Security enables you to keep your personal files and some Windows settings but remove all apps, including third-party apps that are pre-installed on your device.
Restore points are created when the Backup and Restore (Windows 7) tool creates a backup image. You can use a system image to recover Windows 10 if Windows 10 becomes unstable (for example, if your hard drive has failed and other recovery methods have failed).
Driver Rollback allows you to revert to a previous device driver after your system begins to suffer the effects of upgrading to a new device driver that is poorly performing.
Windows 10 Home users have Windows Updates automatically downloaded and installed on their devices. Windows 10 Pro, Education, and Enterprise customers can defer feature updates for up to 365 days, and they can defer quality updates for up to 30 days.
Windows 10 Pro, Education, and Enterprise customers can pause quality updates for up to 35 days.
Windows Update Delivery Optimization is a method of peer-to-peer sharing of Windows update files. This feature significantly reduces the time that a Windows 10 device is vulnerable from zero-day malware attacks. Peer caching can occur between other users on the local network or optionally across the Internet.
Administrators can use Group Policy to centrally configure and manage Windows Update behavior, location of WSUS servers, and Windows Update Delivery Optimization settings.
If a driver update causes system stability issues, you can uninstall the update, and if necessary, you can disable the automatic application of the update.
Event logs automatically record system activity such as logons, application errors, and services stopping and starting.
If you enable remote management, you can pull event logs from remote computers by using event subscriptions.
Windows 10 includes several tools to view system performance, including Task Manager, Performance Monitor, and Resource Monitor.
In Performance Monitor, you can create benchmarking reports by creating your own user-defined collector sets and running them to generate a performance baseline.
Windows 10 introduces the option, to manage your default printer by setting the default to the last printer you used, rather than the printer at your current location.
The built-in Search feature uses the background indexing service to index areas of your hard drive automatically, including files stored in your user profile.
Reliability Monitor provides a graphical history of your computer’s reliability and offers solutions to resolve issues.