Chapter 2
Manage devices and data
The MD-100 Windows 10 exam focuses on how to manage devices within an enterprise environment, by using a Microsoft 365 subscription, for example. Once you have installed or upgraded devices with Windows 10, you need to know how to join devices to Azure Active Directory. Organizations that do not use the cloud use Active Directory Domain Services, and you must manage both users and devices.
Devices are managed using local or Group Policy, and you have to implement and troubleshoot these policies. To ensure that data and devices remain safe, you must know how to configure Windows security and use Windows Defender Firewall and Windows Defender Antivirus to safeguard Windows 10.
Skills covered in this chapter:
Skill 2.1: Manage local users, local groups, and devices
In this skill, you will review how to manage local users and local groups on Windows 10 devices. If you have experience with an earlier version of Windows, you might be familiar with configuring local users and local groups, as these operations are largely unchanged. Before you use Windows 10 on a device, you must sign in with the credentials for a user account. In an enterprise environment, the device and the user are often used to provide, control, and audit access to resources. Groups may be used for simplifying administration, allowing entities to share a common function or role or require the same set of privileges. You need to understand how local users, local groups, and devices form a key component in Windows security.
Manage local users
A user account is required to log on to a Windows 10 computer, and to secure the device, it should have a password. You need to understand the default user accounts that are created automatically when you install Windows 10 and how to create new user accounts so that users can log on to machines and access resources. In this skill, you will focus on local accounts that are created and operate only on the local device.
Configure local accounts
Local accounts, as the name suggests, exist in the local accounts database on your Windows 10 device; they can only be granted access to local resources and, where granted, exercise administrative rights and privileges on the local computer.
When you first install Windows 10, you are prompted to sign in using a Microsoft account or a Work Account, such as a Microsoft 365 account that is connected to Azure Active Directory. If neither of these options is available or suits your requirements, you can choose an offline account and create a local account to sign in. Thereafter, you can create additional local user accounts as your needs dictate.
Default accounts
In Windows 10, there are three default local user accounts on the computer in the trusted identity store. This is a secure list of users and groups and is stored locally as the Security Accounts Manager (SAM) database in the registry. The three accounts are the Administrator account, the Default Account, and the Guest account.
The default Administrator account cannot be deleted or locked out, but it can be renamed or disabled. When the default administrator account is enabled, it requires a strong password. Another local account called the HelpAssistant account is created and enabled when a Windows Remote Assistance session is run. The HelpAssistant account provides limited access to the computer to the person who provides remote assistance. The HelpAssistant account is automatically deleted if there are no Remote Assistance requests pending.
When you install Windows 10 using a local account, you can create additional user accounts and give these accounts any name that is valid. To be valid, the username
Must be from 1 to 20 characters
Must be unique among all the other user and group names stored on the computer
Cannot contain any of the following characters: / [ ] : ; | = , + ? < > " @
Cannot consist exclusively of periods or spaces
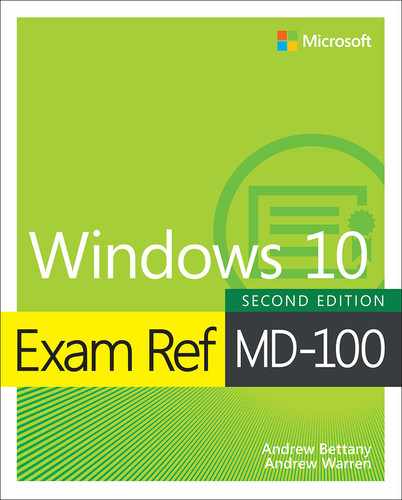
The initial user account created at installation is a member of the local Administrators group and therefore can perform any local management task on the device. You can view the installed accounts, including the default accounts, by using the Computer Management console, as shown in Figure 2-1. If you cannot find the Local Users And Groups section within Computer Management, then you are probably running Windows 10 Home Edition, which does not have the Local Users And Groups Microsoft Management Console (MMC) snap-in.
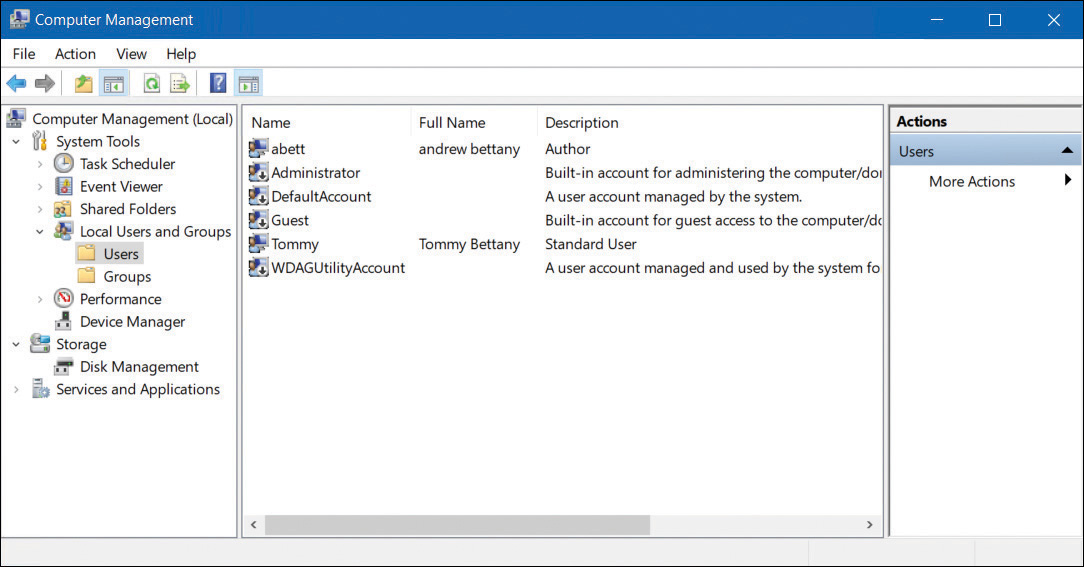
FIGURE 2-1 Viewing built-in user accounts
You can also use the net user command and the get-wmiobject -class win32_useraccount Windows PowerShell cmdlet to list the local user accounts on a device.
 Exam Tip
In Windows 10 Home edition, you must use the User Accounts applet in Control Panel, and you cannot create or manage groups since the Local Users And Groups Console snap-in is not present.
Manage local user accounts
You can manage local user accounts by using Computer Management (except with Windows 10 Home edition), Control Panel, the Settings app, and Windows PowerShell.
Using Computer Management
To manage user accounts by using Computer Management, right-click Start and then select Computer Management. Expand the Local Users and Groups node and then select Users. To create a new user, right-click the Users node and select New User.
In the New User dialog box, configure the following properties, as shown in Figure 2-2, and then select Create.

FIGURE 2-2 Adding a user with Computer Management
User Name
Full Name
Password
User Must Change Password At Next Logon
User Cannot Change Password
Password Never Expires
Account Is Disabled
After you have added the new user account, you can modify more advanced properties by double-clicking the user account. On the General tab, you can change the user’s full name and description and password-related options. On the Member Of tab, you can add the user to groups or remove the user from groups. The Profile tab, shown in Figure 2-3, enables you to modify the following properties:
Profile Path This is the path to the location of a user’s desktop profile. The profile stores the user’s desktop settings, such as color scheme, desktop wallpaper, and app settings (including the settings stored for the user in the registry). By default, each user who signs in has a profile folder created automatically in the C:UsersUsername folder. You can define another location here, and you can use a Universal Naming Convention (UNC) name in the form of \ServerShareFolder.
Logon Script This is the name of a logon script that processes each time a user signs in. Typically, this will be a BAT or CMD file. You might include commands that map network drives or load apps in this script file. Assigning logon scripts in this way is not usually done. Instead, Group Policy Objects (GPOs) are used to assign logon and startup scripts for domain user accounts.
Home Folder This is a personal storage area where users can save their personal documents. By default, users are assigned subfolders within the C:UsersUsername folder for this purpose. However, you can use either of the following two properties to specify an alternate location:
Local Path A local filesystem path for storage of the user’s personal files. This is entered in the format of a local drive and folder path.
Connect A network location mapped to the specified drive letter. This is entered in the format of a UNC name.

FIGURE 2-3 Modifying the profile properties for a user
Using Control Panel
You can also manage user accounts by opening Control Panel, clicking User Accounts, and then clicking User Accounts again. From here, you can do the following:
Make changes to my account in PC settings Launches the Settings app to enable you to make user account changes
Change your account type Enables you to switch between Standard and Administrator account types
Manage another account Enables you to manage other user accounts on this computer
Change User Account Control settings Launches the User Account Control Settings dialog box from Control Panel
If you are an administrator and you select another local user, you can perform these tasks:
Change the account name Enables you to change your account name.
Change the password Lets you change the password for the user and provide a password hint
Change your account type Enables you to switch between Standard and Administrator account types
Delete the account Allows you to delete the user account and optionally any files associated with their account
Manage another account Enables you to manage other user accounts on this computer
You cannot add new accounts from Control Panel. If you want to add a new local account, use Computer Management, Windows PowerShell, or Add A Family Member in the Family And Other Users section of the Settings app.
Using The Settings App
The preferred way to manage local accounts in Windows 10 is by using the Settings app. From Settings, select Accounts. As shown in Figure 2-4, on the Your Info tab, you can modify your account settings, including these:
Sign in with a Microsoft account instead You can sign out and sign in using a Microsoft account.
Create your picture You can browse for an image or take a selfie if your device has a webcam.
Creating a Microsoft account You can create a new Microsoft account using this option.
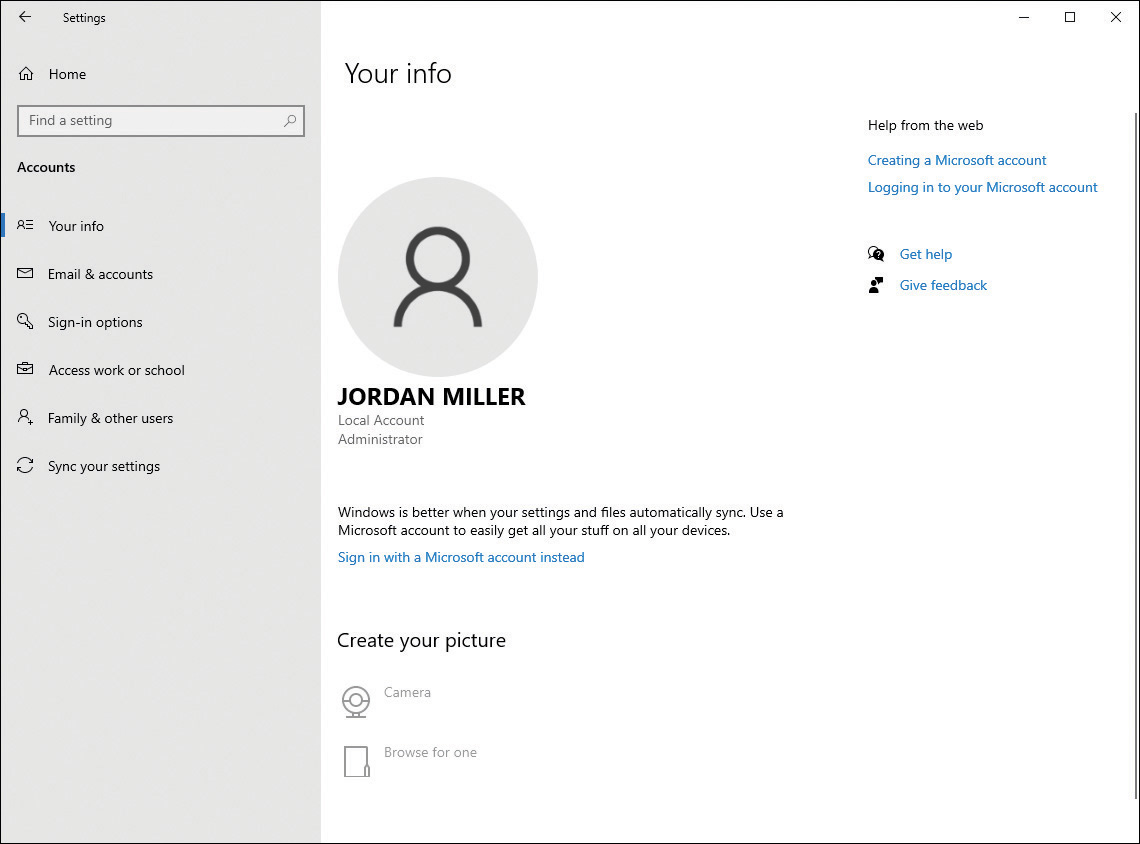
FIGURE 2-4 Modifying your user account properties in the Settings app
If you need to add a new local user account, select the Family & Other Users section and then select Add Someone Else To This PC.
Windows 10 requires you to then enter that person’s email address, typically the address they use to sign in to Office 365, OneDrive, Skype, Xbox, or Outlook.com.
If you do not have the recipient’s email address, you can still add a local account by using the following procedure:
In the Settings app, select Accounts.
On the Family & other users tab, under Other users, select Add someone else to this PC.
In the How will this person sign in dialog box, select I don’t have this person’s sign-in information.
In the Create account dialog box, select Add a user without a Microsoft account.
On the Create an account for this PC page, type the username, enter a new password twice, provide answers to the three security questions, and then select Next to create the local account. The account is listed under Other users.
Using Windows Powershell
You can view local user accounts using Windows PowerShell, but to add or modify local accounts, you will need to run the cmdlets with elevated privileges.
You can use the following cmdlets to manage local user accounts:
Get-LocalUser Gets local user accounts
New-LocalUser Creates a local user account
Remove-LocalUser Deletes a local user account
Rename-LocalUser Renames a local user account
Disable-LocalUser Disables a local user account
Enable-LocalUser Enables a local user account
Set-LocalUser Modifies a local user account
For example, to add a new local user account called User 03 with a password, run the following cmdlets:
$Password = Read-Host -AsSecureString
<<Enter Password>>
New-LocalUser "User03" -Password $Password -FullName "Third User" -Description "User 3"
Need More Review? Local Accounts Cmdlets
To review further details about using Windows PowerShell to manage local accounts, refer to the Microsoft PowerShell reference at https://docs.microsoft.com/powershell/module/microsoft.powershell.localaccounts/?view=powershell-5.1.
Manage local groups
There are several built-in groups with Windows 10, which provide an easy way for users to be granted the same permissions and rights as other group members. Assigning permissions to groups is usually more efficient than applying them to individual users.
You use the Computer Management console, or if you are an administrator, you can create a custom Microsoft Management Console (MMC) and add the Local Users And Groups snap-in, as shown in Figure 2-5, to create and manage local groups.
FIGURE 2-5 Default groups in Windows 10
In Figure 2-5, you can see the default built-in local groups (such as Administrators and Device Owners) and a description for each. These built-in groups already have the necessary permissions associated to them to accomplish specific tasks.
If you select the Users or Administrators group, you should see members that you recognize. Administrators have complete and unrestricted access to the computer, whereas users are unable to make accidental or intentional systemwide changes, but they can run most applications that have already been installed on a device.
Built-in local groups
You can add your own groups, change group membership, rename groups, and delete groups. It is best practice to use the built-in groups wherever possible because they already have the appropriate permissions and are familiar to other administrators. Some built-in local groups are special groups that the Windows 10 system requires (and cannot be managed).
Some of the local groups created on Windows 10 devices, together with their uses, are shown in Table 2-1.
TABLE 2-1 Built-in local groups
Local Group |
Description |
|---|---|
Access Control Assistance Operators |
Members of this group can remotely query authorization attributes and permissions for resources on the computer. |
Administrators |
The Administrators group has full permissions and privileges on a Windows 10 device. Members can manage all the objects on the computer. The Administrator and initial user accounts are members of the Administrators local group. |
Backup Operators |
Backup Operators group members have permissions to back up and restore the file system regardless of any NTFS permissions. Backup Operators can access the file system only through the Backup utility. |
Cryptographic Operators |
The Cryptographic Operators group has access to perform cryptographic operations on the computer. |
Device Owners |
Members of this group can change systemwide settings to the computer. |
Distributed COM Users |
The Distributed COM Users group can launch and run Distributed COM objects on the computer. |
Event Log Readers |
Event Log Readers group members can read the event log on the local computer. |
Guests |
The Guests group has very limited access to the computer. In most cases, administrators disable guest access because guest access can pose a potential security risk; instead, most administrators prefer to create specific users. By default, the Guest user account is a member of the Guests local group. |
Hyper-V Administrators |
Members of this group have complete and unrestricted access to all features of Hyper-V if this feature has been installed. |
IIS_IUSRS |
The IIS_IUSRS group is used by Internet Information Services (IIS). By default, the NT AUTHORITYIUSR user account, used by IIS, is a member of the IIS_IUSRS group. |
Network Configuration Operators |
Members of the Network Configuration Operators group can manage the computer’s network configuration. |
Performance Log Users |
The Performance Log Users group can access and schedule logging of performance counters and create and manage trace counters on a device. |
Performance Monitor Users |
The Performance Monitor Users group can access and view performance counter information on a device. Members of this group can access performance counters both locally and remotely. |
Power Users |
The Power Users group is included in Windows 10 for backward compatibility only. Power Users was a group used on computers running Windows XP and granted members limited administrative rights. |
Remote Desktop Users |
The Remote Desktop Users group members can log on remotely using the Remote Desktop service. |
Remote Management Users |
Members of this group can access WMI resources over management protocols (such as WS-Management via the Windows Remote Management service). This applies only to WMI namespaces that grant access to the user. |
Replicator |
The Replicator group supports directory replication, which is a feature used by domain controllers. |
System Managed Accounts Group |
Members of this group are managed by the system. |
Users |
The Users group is used for end users who require very limited system access. On a fresh copy of Windows 10, members of the Users group are unable to compromise the operating system or program files. By default, all users who have been created on a device, except Guest users, are members of the Users local group. |
As Table 2-1 shows, Administrators group members have full permissions and privileges on a Windows 10 device. A member of the Administrators local group can perform the following tasks:
Access any data on the computer
Assign and manage user rights
Back up and restore all data
Configure audit policies
Configure password policies
Configure services
Create administrative accounts
Create administrative shares
Increase and manage disk quotas
Install and configure hardware device drivers
Install applications that modify the Windows system files
Install the operating system
Install Windows updates, service packs, and hot fixes
Manage disk properties, including formatting hard drives
Manage security logs
Modify groups and accounts that have been created by other users
Modify systemwide environment variables
Perform a system restore
Reenable locked-out and disabled user accounts
Remotely access the registry
Remotely shut down the system
Stop or start any service
Upgrade the operating system
Create and delete groups
Only members of the Administrators group can manage users and groups. When creating a new group, keep in mind that the group name has to be unique on the local computer and cannot be the same as a local username that exists on the computer.
You should make the group name descriptive, and wherever possible, you include a description of the new group’s function. Group names can have up to 256 characters in length and include alphanumeric characters such as spaces, but the backslash () is not allowed.
To create a new group, follow these steps:
Right-click Start and select Computer Management.
Open the Local Users and Groups console.
Right-click the Groups folder and select New Group from the context menu.
In the New Group dialog box, enter the group name. (Optionally, you can enter a description for this group.)
To add group members, select the Add button.
In the Select Users dialog box, type the username, then select OK. In the New Group dialog box, you will see that the user has been added to the group.
To create the new group, select the Create button.
To delete a group from the Local Users And Groups console in Computer Management, right-click the group name and choose Delete from the context menu. You will see a warning that deleting a group cannot be undone, and you should select the Yes button to confirm the deletion of the group.
When a group is deleted, all permissions assignments that have been specified for the group will be lost.
Special identity groups
Several special identity groups (sometimes known as special groups) are used by the system or by administrators to allocate access to resources. Membership in special groups is automatic, based on criteria, and you cannot manage special groups through the Local Users And Groups console. Table 2-2 describes the special identity groups that are built into Windows 10.
TABLE 2-2 Built-in special identity groups
Special Identity Group |
Description |
|---|---|
Anonymous Logon |
When a user accesses the computer through an anonymous logon, such as via special accounts created for anonymous access to Windows 10 services, they become members of the Anonymous Logon group. |
Authenticated Users |
This is a useful group because it includes all users who access Windows 10 using a valid username and password. |
Batch |
This group includes users who log on as a batch job operator to run a batch job. |
Creator Owner |
The Creator Owner is the account that created or took ownership of an object, such as a file, folder, printer, or print job. Members of the Creator Owner group have special administrator-level permissions to the resources over which they have ownership. |
Dialup |
This group includes users who log on to the network from a dial-up connection. |
Everyone |
This group includes anyone who accesses the computer. This includes all users, including Guest accounts and all users that are within a domain or trusted domains. Members of the Anonymous Logon group are not included as a part of the Everyone group. |
Interactive |
This group includes all users who use the computer’s resources locally and those who are not using the computer’s resources remotely via a network connection. |
Network |
This group includes users who access the computer’s resources over a network connection. |
Service |
This group includes users who log on as a user account that is used to run a service. |
System |
When Windows 10 needs to access internal functions, it can perform actions as a system user. The process being accessed by the operating system becomes a member of the System group. |
Terminal Server User |
This group includes users who log on through Terminal Server applications. |
Manage users, groups, and devices in Active Directory Domain Services
Once a network grows larger than a few computers, companies and enterprises configure networks as a domain or directory. A large network is managed by using a domain. On-premises environments will use Active Directory Domain Services (AD DS) and cloud-based environments use Azure Active Directory (Azure AD). Using both on-premises and cloud resources is referred to as a hybrid model. Both directory services are responsible for identity-related management. User and device information is stored in a directory, which creates a logical, hierarchical organization of information, represented as objects.
Users are aware that they are part of an Active Directory domain because they will access shared resources by signing into their device using a domain username and password such as [email protected] rather than a local or Microsoft account.
AD DS can store millions of objects that can be managed and controlled. Objects typically include shared resources such as servers, volumes, printers, and the network user and computer accounts. AD DS also simplifies the administration of user accounts and stores information about them, such as names, passwords, phone numbers, or information about a computer, like the device name or the last user logged on.
One or more Windows servers can be configured with the domain controller role, which then stores the directory and allows administrators to manage AD DS objects using a console app, such as Active Directory Administrative Center (ADAC).
You will learn later in this chapter how user or computer objects’ properties can also be configured by using local policies or managed at scale by using Group Policy Objects. Computers that are managed by Active Directory are referred to as domain joined.
Use Active Directory users
Within Active Directory (AD), there are two primary objects that you need to know: user accounts and computer accounts. These are two forms of common security principals held in AD, and they allow you to manage the account and control access to resources by the entity (a person or a computer). Within a domain you will create domain user accounts for the person in most scenarios. A domain user will use their domain username and password to sign in to any device on the domain-based network (with the correct permissions). This approach allows administrators to centrally manage user accounts across an organization rather than on each individual device, as with a workgroup environment.
Use Active Directory groups
Active Directory groups allow you to collect user accounts, computer accounts, and other groups into units that can be managed. By controlling groups of objects, administrators can manage permissions to resources at scale. It is best practice for users and other objects to be added to a group and then permissions set at the group level, rather than at the user or computer object level. This way, if a specific user or computer account joins or leaves the organization, the group membership can be dynamically updated by Active Directory. A huge amount of time and effort is therefore saved every time a personnel change occurs.
Two types of groups are available in Active Directory:
Distribution groups Used to create email distribution lists used by email applications, such as Exchange Server, to send emails to the group membership. It is not possible to configure security permissions on distribution groups.
Security groups Used to assign rights and permissions to objects within the group.
User rights are assigned to a security group to determine what members of that group can do using their user account. For example, you may want to add a user to the Backup Operators group in Active Directory. The user will then be granted the ability to back up and restore files and directories that are located on each file server or domain controller in the domain.
Permissions are assigned to the shared resource. Best practice is to assign the permissions to a security group and allow AD to determine who can access the resource and the level of access whenever the resource is accessed. The level of access can be fine-tuned using access control entries (ACEs), such as Full Control or Read, which are stored in the discretionary access control list (DACL) for each resource. The DACL defines the permissions on resources and objects such as file shares or printers.
Active Directory default security groups
You can use several built-in groups with Active Directory. Some commonly used security groups are shown in Table 2-3.
TABLE 2-3 Built-in Active Directory security groups
AD Security Group |
Description |
|---|---|
DnsAdmins |
Members of this group have administrative access to the DNS Server service. |
Domain Admins |
Domain Admins are the designated administrators of the domain. Present on every domain-joined computer within the local Administrators group. Receives rights and permissions granted to the local Administrators group and to the domain’s Administrators group. |
Domain Computers |
All computers and servers that are joined to the domain are members of this group. |
Domain Users |
All users in the domain. |
Enterprise Admins |
Enterprise Admins have permissions to change forest-wide configuration settings. Enterprise Admins are members of the domain’s Administrators group and receive rights and permissions granted to that group. |
IIS_IUSRS |
The IIS_IUSRS group is used by Internet Information Services (IIS). By default, the NT AUTHORITYIUSR user account, used by IIS, is a member of the IIS_IUSRS group. |
Print Operators |
Members can administer domain-based printers. |
Remote Desktop Users |
The Remote Desktop Users group members can log on remotely using the Remote Desktop service. |
Understand Active Directory
A detailed knowledge of Windows Server and AD DS is outside the scope of the MD-100 exam, but you should know the difference between an on-premises environment and a cloud-based one. Active Directory Domain Services (AD DS), commonly referred to as Active Directory (AD), is a role of associated services that are installed on physical or virtual Windows servers. Simply hosting a Windows Server running the AD DS role on an Azure-based virtual machine is an example of a “lift and shift” deployment to the cloud running AD DS and does not provide an Azure Active Directory (Azure AD) environment.
Windows Server installed with the AD DS role is a complex environment that has benefited organizations for over 20 years and, as such, has many legacy components necessary to support AD feature backward compatibility. In addition to the directory service, technologies are often provisioned when you add the AD DS role to a Windows server, including:
Active Directory Certificate Services (AD CS)
Active Directory Lightweight Directory Services (AD LDS)
Active Directory Federation Services (AD FS)
Active Directory Rights Management Services (AD RMS)
Active Directory Domain Services has the following characteristics (which are not shared by Azure AD):
AD DS is a true directory service, with a hierarchical X.500-based structure.
AD DS uses Domain Name System (DNS) for locating resources.
You can query and manage AD DS using Lightweight Directory Access Protocol (LDAP).
The Kerberos protocol is primarily used for AD DS authentication.
Computer objects represent computers that join an Active Directory domain.
You can manage objects stored in the directory using organizational units (OUs) and Group Policy Objects (GPOs).
You can establish trusts between domains for delegated management.
Manage devices in directories
Microsoft has designed Windows 10 to be managed using cloud-based tools such as Microsoft Intune for remote device management. As more businesses migrate away from traditional on-premises domain environments to the cloud, you will need to understand how to configure devices to register them in Azure Active Directory.
In this section, you will learn how to register a device so that it can be managed by a business or a school using cloud-based services. You will see how to enable Device Registration and the process of joining devices to Azure Active Directory.
Understand device management
Once devices are managed by Azure Active Directory (Azure AD), you can ensure that your users are accessing your corporate resources from devices that meet your standards for security and compliance. To protect devices and resources using Azure AD, users must be allowed to have their Windows 10 devices managed by Azure AD.
Azure AD is a cloud-based identity authentication and authorization service that enables your users to enjoy the benefits of single sign-on (SSO) for cloud-based applications, such as Office 365. Users can easily join their devices to your organization’s Azure AD once you have enabled device joining in the Azure Active Directory Admin Center.
When you are joining devices to an on-premises domain environment, the types of devices that you can join to the domain are quite restrictive; devices, for example, must be running a supported operating system. This means that any users who have devices running Windows 10 Home editions cannot join the company’s on-premises domain. However, Azure AD is less restrictive in this respect; you can add to Azure AD almost any tablet, laptop, smartphone, and desktop computer running a variety of platforms. When you enable users to add their devices to Azure AD, you will manage their enrolled devices by using a mobile device management solution, such as Microsoft Intune, which allows you to manage and provision your users’ devices.
Devices can be managed by Azure AD using two methods:
Joining a device to Azure AD
Registering a device to Azure AD
Azure Ad–Joined Device
Joining a Windows 10 device to Azure AD is like registering a device with Azure AD, but it allows enhanced management capabilities. Once a device has been joined to Azure AD, the local state of a device changes to enable your users to sign into the device using the work or school account instead of a personal account.
An enterprise will typically join its owned devices to Azure AD to allow for cloud-based management of the devices and to grant access to corporate apps and resources.
Note Bulk-Join Devices to Azure AD
Bulk joining of devices to Azure AD and Windows Autopilot deployment are outside the scope of the MD-100 Windows 10 exam, though you should expect to find these topics covered in the MD-101 Managing Modern Desktops exam.
Organizations of any size can deploy Azure AD Join. Azure AD Join works well in a cloud-only (no on-premises infrastructure) environment. When Azure AD Join is implemented in a hybrid environment, users gain access to both cloud and on-premises apps and resources.
Azure AD–joined devices allow your users to access the following benefits:
Single-Sign-On (SSO) Allows users simplified access to Azure managed SaaS apps, services, and work resources.
Enterprise-compliant roaming User settings can be kept in sync across joined devices using their Azure AD–joined devices (without the need to sign in using a Microsoft account).
Access to Microsoft Store for Business Users can access a Microsoft Store populated with apps chosen by your organization.
Windows Hello Devices can be secured using the enterprise features of Windows Hello.
Restriction of access Devices will only be able to access apps that meet the organizational compliance policy.
Seamless access to on-premises resources Hybrid Azure AD–joined devices can access on-premises resources when connected to the domain network.
Organizations that already have Microsoft 365 or other SaaS apps integrated with Azure AD have the necessary components in place to have devices managed in Azure AD instead of being managed in Active Directory.
Azure Ad–Registered Devices
Once a device is registered into management, it is “known” to Azure AD, and information relating to the device is stored in Azure AD. Effectively, the device is given an identity with Azure AD. You can create conditional access rules to determine whether access to resources from your devices will be granted.
Azure AD–registered devices enable users to use personally owned devices to access your organization’s resources in a controlled manner. Azure AD supports bring-your-own-device (BYOD) scenarios for several types of devices, including devices running Windows 10, iOS, Android, and macOS.
With an Azure AD–registered device, the user will gain access to resources using a work or school Azure AD account at the time they access the resources. All corporate data and apps will be kept completely separated from the personal data and apps on the device. If the personal computer, tablet, or phone that is registered with Azure AD does not meet your corporate standards for security and compliance—for example, if a device is not running a supported version of the operating system, or it has been jail broken—then access to the resource will be denied.
Device Registration enables you to facilitate an SSO experience for users, removing the need for them to repeatedly enter credentials to access resources.
The main reasons to implement Device Registration are:
To enable access to corporate resources from non-domain joined or personally owned devices
To enable SSO for specific apps and/or resources managed by Azure AD
After you enable Device Registration, users can register and enroll their devices in your organizational tenant. After they have enrolled their devices:
Enrolled devices are associated with a specific user account in Azure AD.
A device object is created in Azure AD to represent the physical device and its associated user account.
A user certificate is installed on the user’s device.
Configure device management
Device management requires configuration to ensure that when your users attempt Device Registration, the process will not fail. By default, the setting is enabled, and it allows all Windows 10 devices that present valid credentials to be managed by your Azure AD.
The Azure portal provides a cloud-based location to manage your devices. To allow registration of devices into Azure AD, follow these steps:
Sign in as an administrator to the Azure portal at https://portal.azure.com.
On the left navigation bar, select Azure Active Directory.
In the Manage section, select Devices.
Select Device settings.
On the Device settings blade, ensure that Users may join devices to Azure AD is set to All, as shown in Figure 2-6. If you choose Selected, then select the Selected link and choose the users who can join Azure AD. You can select both individual users and groups of users.
![A screenshot shows the Azure Active Directory Admin Center page with three sections. The left section shows a list of items: Dashboard, All services, Azure Active Directory, Users, and Enterprise Applications. The middle section shows a Manage heading with options for All Devices, Device Settings (selected), and Enterprise State Roaming. Below, sections for Activity and Troubleshooting are shown. In the right pane, Users May Join Devices To Azure AD shows the following options: All (selected), Selected, and None. Below this is another option for Additional Local Administrators On Azure AD[nd]Joined Devices. Two options are available: Selected and None (selected).](https://imgdetail.ebookreading.net/202109/2/9780137472185/9780137472185__9780137472185__files__graphics__02fig06.jpg)
FIGURE 2-6 Enabling Azure AD join
Select Save.
Within the Azure AD portal, you can fine-tune the process of registering and joining devices by configuring the device settings as listed in Table 2-4.
TABLE 2-4 Azure AD device configuration settings
Device Setting |
Description |
|---|---|
Users May Join Devices To Azure AD |
The default is All. The Selected option allows you to select users who can join Windows 10 devices to Azure AD. |
Users May Register Their Devices With Azure AD |
Required to allow devices to be registered with Azure AD by users. Options include the following:
|
Additional Local Administrators On Azure AD Joined Devices |
You can assign the users who are granted local administrator rights on a device and added to the Device Administrators role in Azure AD. By default, global administrators in Azure AD and device owners are granted local administrator rights. Requires an Azure AD Premium license. |
Devices To Be Azure AD Joined Or Azure AD Registered Require Multi-Factor Authentication |
Choose whether users are required to use multifactor authentication to join their devices to Azure AD. The default setting is No. This setting is only applicable to Azure AD Join on Windows 10 and BYOD registration for Windows 10, iOS, and Android. This setting does not apply to hybrid Azure AD–joined devices, Azure AD–joined VMs in Azure, and Azure AD–joined devices using Windows Autopilot self-deployment mode. |
Maximum Number Of Devices Per User |
By default, all users can have a maximum of 50 devices in Azure AD. Once this quota is reached, they are not able to add additional devices until one or more of the existing devices are removed. The device quota is across both Azure AD–joined and Azure AD–registered devices. |
Enterprise State Roaming |
You can configure the Enterprise State Roaming settings for specific users or groups. With Azure AD Premium, you can select a subset of your users and enable this feature for them. Without Azure AD Premium, you can only configure Enterprise State Roaming for all users at once. |
Exam Tip
Each device must be able locate the internet to allow you to authenticate using your Azure AD credentials. If a device cannot locate the cloud-based identity service, there will be a problem accessing resources managed by Azure AD.
Device Management Tasks
Once devices have been registered or joined to Azure AD, they appear in the list within the All Devices section of the Azure Active Directory Admin Center. Devices managed by another management authority, such as Microsoft Intune, are also listed.
To locate a device, you can search using the device name or device ID. Once you have located a device, you can perform additional device management tasks, including the following:
Update devices You can enable or disable devices. You need to be a global administrator in Azure AD to perform this task, which prevents a device from being able to authenticate with Azure AD and thus prevents the device from accessing any Azure AD resources.
Delete devices When a device is retired, or it no longer requires access to your corporate resources, it should be deleted in Azure AD. Deleting a device requires you to be a global administrator in Azure AD or an Intune administrator. Once deleted, all details stored in Azure AD relating to the device—for example, BitLocker keys for Windows devices—are removed. If a device is managed elsewhere, such as in Microsoft Intune, you should ensure that the device has been wiped before deleting the device in Azure AD.
View device ID Each device has a unique device ID that can be used to search for the device; the unique device ID can be used as a reference if you need to use PowerShell during a troubleshooting task.
View device BitLocker key Windows devices managed by Azure AD can have their BitLocker recovery keys stored in Azure AD. You can access this key if the encrypted drive needs to be recovered. To view or copy the BitLocker keys, you need to be the owner of the device or have one of the following roles assigned: Global Administrator, Help desk Administrator, Security Administrator, Security Reader, or Intune Service Administrator.
Note Use Powershell To Back Up the Bitlocker Recovery Key To Azure AD
For Azure AD–joined computers, the BitLocker recovery password should be stored in Azure AD. You can use the PowerShell cmdlets Add-BitLockerKeyProtector, Get-BitLockerVolume, and BackupToAAD-BitLockerKeyProtector to add a recovery password and back it up to Azure AD before enabling BitLocker.
Connect devices to Azure AD
Once the prerequisites have been configured to allow the Device Registration service to take place, you are able to connect devices to Azure AD.
There are three ways to connect a Windows 10 device to Azure AD:
Joining a new Windows 10 device to Azure AD
Joining an existing Windows 10 device to Azure AD
Registering a Windows 10 device to Azure AD
In this section, you will learn the steps required for each method of connecting Windows 10 to Azure AD.
Join A New Windows 10 Device To Azure Ad
In this method, we will take a new Windows 10 device and join the device to Azure AD during the first-run experience. The device could have been previously prepared using an enterprise deployment method, or it could have been distributed by the original equipment manufacturer (OEM) directly to your employees.
If the device is running either Windows 10 Professional or Windows 10 Enterprise, the first-run experience will present the setup process for company-owned devices.
Note Joining A Device To Active Directory During the First-Run Experience
Joining an on-premises Active Directory domain is supported in Windows 10 during the Windows Out-of-Box Experience (OOBE). If you need to join a computer to an AD domain, during setup you should choose the option Set Up For An Organization and then select the Domain Join Instead link. You then need to set up the device with a local account and join the domain from the Settings app on your computer. For the MD-100 Windows 10 exam, you should expect that devices will be cloud- or hybrid cloud–enabled.
To join a new Windows 10 device to Azure AD during the first-run experience, use the following steps:
Start the new device and allow the setup process.
On the Let’s start with region. Is this right? page, select the regional setting that you need and select Yes.
On the Is this the right keyboard layout? page, select the keyboard layout settings and select Yes.
On the Want to add a second keyboard layout? page, add a layout or select Skip.
The computer should automatically connect to the internet, but it if it does not, you will be presented with the Let’s connect you to a network page, where you can select a network connection.
On the How would you like to set up? page, choose Set up for an organization and select Next.
On the Sign in with Microsoft page, enter your organization or school account and password and select Next.
On the Choose privacy settings for your device, choose the settings and select Accept.
On the Use Windows Hello with your account page, select OK.
On the More information required page, select Next, provide the additional security verification information, and select Next again.
Depending on organizational settings, your users might be prompted to set up MFA. On the Keep your account secure page, select Next and set up the Microsoft Authenticator.
Depending on organizational settings, your users might be prompted to set up Windows Hello. By default, they will be prompted to set up a PIN. When prompted to set up a PIN, select Set up PIN. You should now be automatically signed in to the device, joined to your organization or school Azure AD tenant, and presented with the desktop.
Join An Existing Windows 10 Device To Azure Ad
In this method, we will take an existing Windows 10 device and join it to Azure AD. You can join a Windows 10 device to Azure AD at any time. Use the following procedure to join the device:
Open the Settings app and then select Accounts.
In Accounts, select the Access work or school tab.
Select Connect.
On the Set up a work or school account page, under Alternate actions, select Join this device to Azure Active Directory, as shown in Figure 2-7.

FIGURE 2-7 Joining a device to Azure AD
On the Microsoft account page, enter your email address and select Next.
On the Enter password page, enter your password and select Sign In.
On the Make sure this is your organization page, confirm that the details on screen are correct and select Join.
On the You’re all set! page, select Done.
To verify that your device is connected to your organization or school, check that your Azure AD email address is listed under the Connect button, indicating that it is connected to Azure AD.
If you have access to the Azure Active Directory portal, then you can validate that the device is joined to Azure AD by following these steps:
Sign in as an administrator to the Azure portal at https://portal.azure.com.
On the left navigation bar, select Azure Active Directory.
In the Manage section, select Devices > All devices.
Verify that the device is listed, as shown in Figure 2-8.

FIGURE 2-8 Viewing All Devices in Azure AD
Register Devices To Azure Ad
You connect a Windows 10 device to Azure Active Directory using the Add Work Or School Account feature found in the Settings app. Device Registration is used to allow devices to be known by both Azure AD and MDM solutions.
In this method, we will take an existing Windows 10 device and register it to Azure AD. Use the following procedure to register the device:
Open the Settings app and then select Accounts.
In Accounts, select the Access work or school tab.
Select Connect.
On the Set up a work or school account page, enter your work or school email address, select Next, and complete the wizard.
To verify that a device is registered to your organization or school Azure AD tenant, users can use these steps:
Open the Settings app and then select Accounts.
In Accounts, select the Access work or school tab.
On the Access work or school page, verify that your organization or school Azure AD email address is listed under the Connect button.
Note Register BYO Devices To Azure AD
You can register a personally owned device with Azure AD using the Set Up A Work Or School Account Wizard. Personal devices are then known to Azure AD but are not fully managed by the organization.
Enroll devices into Microsoft 365
Microsoft 365 is a bundled subscription that includes Office 365, Windows 10, and Enterprise Mobility + Security. Microsoft 365 comes in three primary bundles:
Microsoft 365 Business Premium For small and medium-sized organizations up to 300 users
Microsoft 365 Enterprise For organizations of any size
Microsoft 365 Education For educational establishments
With Microsoft 365, you use Azure Active Directory for your identity and authentication requirements, and you can (and should) enroll Windows 10 into device management so that your users can gain access to corporate resources. Once devices are joined to your Microsoft 365 tenant, Windows 10 becomes fully integrated with the cloud-based services offered by Office 365 and Enterprise Mobility + Security. Microsoft 365 supports other platforms, including Android and iOS, which can also be managed as mobile devices. However, only Windows 10 devices can be joined to Azure AD.
Note Microsoft 365 Business Premium Does Not Include Windows 10
The Microsoft 365 Business Premium subscription includes Office 365 Business and Enterprise Mobility + Security, but it does not include Windows 10. However, the Microsoft 365 Business Premium subscription does allow businesses to upgrade their existing Windows 7 Professional, Windows 8 Pro, or Windows 8.1 Pro devices to Windows 10 Pro. Windows 10 Pro is then provided with a Windows 10 Business license, which enables businesses to use the set of cloud services and device management capabilities included with Microsoft 365 Business Premium.
Enroll Devices Into Microsoft 365 Business
When you enroll Windows devices into Microsoft 365 Business, they must be running Windows 10 Pro, version 1703 (Creators Update) or later. If you have any Windows devices running Windows 7 Professional, Windows 8 Pro, or Windows 8.1 Pro, the Microsoft 365 Business subscription entitles you to upgrade them to Windows 10 Pro.
Microsoft 365 Business includes a set of device-management capabilities powered by Microsoft Endpoint Manager. Microsoft 365 Business offers organizations a simplified management console that provides access to a limited number of device management tasks, including the following:
Deploy Windows with Autopilot
Remove company data
Factory reset
Manage office deployment
To enroll a brand-new device running Windows 10 Pro into Microsoft 365 Business, known as a “user-driven enrollment,” follow these steps:
Go through Windows 10 device setup until you get to the How would you like to set up? page, as shown in Figure 2-9.

FIGURE 2-9 Windows 10 device setup
Choose Set up for an organization and then enter your username and password for your Microsoft 365 Business Premium subscription (the new user account, not the tenant admin account).
Complete the remainder of the Windows 10 device setup.
The device will be registered and joined to your organization’s Azure AD, and you will be presented with the desktop. You can verify the device is connected to Azure AD by opening the Settings app and clicking Accounts.
On the Your Info page, select Access Work or School.
You should see that the device is connected to your organization. Select your organization name to show the Info and Disconnect buttons.
Select Info to see that your device is managed by your organization and to view your device sync status.
To verify that the device has been granted a Windows 10 Business license, select the Home icon, select System, and then select About.
In the Windows specifications section, the Windows Edition shows Windows 10 Business, as shown in Figure 2-10.
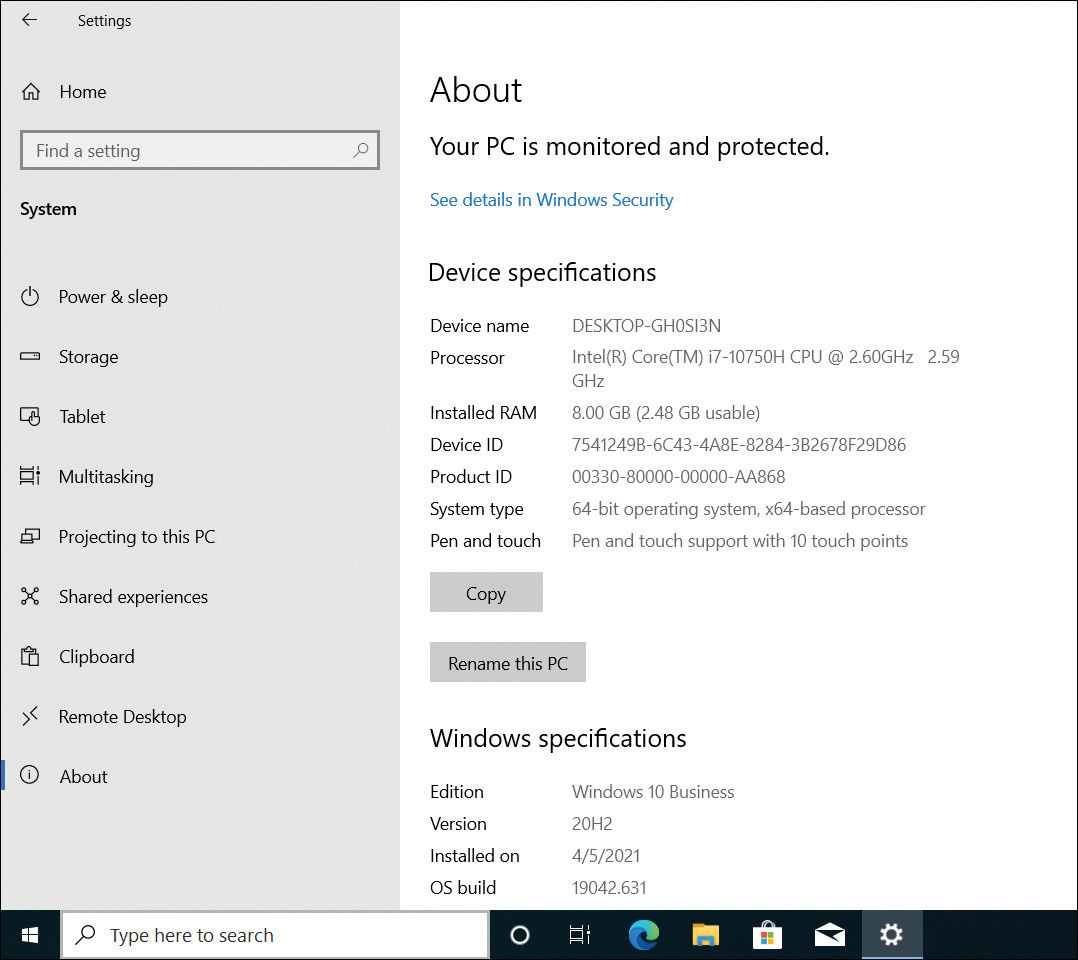
FIGURE 2-10 Windows 10 device setup
Although there is no link to Microsoft Intune within the Microsoft 365 Business Admin Center, the subscription includes the use of the full MDM capabilities for iOS, Android, macOS, and other cross-platform device management. To access the Microsoft Endpoint Manager admin center, launch a browser and sign in with your Microsoft 365 Business Premium credentials at https://endpoint.microsoft.com.
To access Intune App Protection in the Azure portal and view the app protection settings for managed Windows 10, Android, and iOS devices, follow these steps:
Sign in to the Microsoft Endpoint Manager admin center at https://endpoint.microsoft.com with your Microsoft 365 Business admin credentials.
In the left navigation bar, select Apps.
In the Apps blade, select App protection policies.
You can now select Create policy from the menu and configure App Protection Policies.
Enroll Devices Into Microsoft 365 Enterprise
Microsoft 365 Enterprise plans can be chosen by larger organizations with more than 300 users or businesses of any size that require access to the increased levels of compliance and security management over Microsoft 365 Business Premium.
The Microsoft 365 Enterprise solution includes additional functionality, such as business intelligence, analytics tools, and access to the Microsoft Endpoint Manager from the Microsoft 365 Admin Center for device and app management.
When enrolling devices into Microsoft 365 Enterprise, those devices must be running Windows 10 Enterprise, version 1703 (Creators Update) or later. Devices running an earlier version of Windows can be upgraded to Windows 10 Enterprise as part of the Microsoft 365 Enterprise licensing.
Users can perform an Azure AD join using the user-driven enrollment method shown in the previous section to enroll their devices into management. Enrollment can happen during Out-of-Box Experience (OOBE) or after a Windows profile has already been set up. To enroll a device once a user has already set up a Windows user profile, follow the steps outlined in the “Join a new Windows 10 device to Azure AD” section of this skill.
If you want to enroll a large number of devices in an enterprise scenario, you can use the Device Enrollment Manager (DEM) account in Microsoft Intune. The DEM is a special account in Microsoft Endpoint Manager that allows you to enroll up to a maximum of 1,000 devices. (By default, standard users can manage and enroll up to five devices.) For security reasons, the DEM user should not also be an Intune administrator. Each enrolled device will require a single Intune license, but the DEM user does not require an Intune license. You can have a maximum of 150 DEM accounts in Microsoft Intune.
By default, there is no device enrollment account user present in Microsoft Intune. You can create a device enrollment account by performing the following steps:
Sign in to the Microsoft Endpoint Manager admin center at https://endpoint.microsoft.com with your Microsoft 365 Enterprise admin credentials.
In the left navigation bar, select Devices, and then under Device enrollment, choose Enroll devices.
In the left navigation bar, select Device enrollment managers.
Select Add.
On the Add user blade, enter the username for the DEM user and select Add. The user is promoted to the DEM role.
Close the Add user blade.
The Device enrollment managers list now contains the new user, as shown in Figure 2-11.
![A screenshot shows the Microsoft 365 device management page, which includes three sections. On the leftmost pane is a list of items, including Dashboard, All Services, Device Enrollment, and Device Compliance. The center pane is titled Device Enrollment[md]Device Enrollment Managers, and a list of options is shown under the Manage heading. (Device Enrollment Managers is selected.) In the right pane, two users and their respective email addresses are shown.](https://imgdetail.ebookreading.net/202109/2/9780137472185/9780137472185__9780137472185__files__graphics__02fig11.jpg)
FIGURE 2-11 List of Device Enrollment Managers
Need More Review? Enroll Devices Using Device Enrollment Manager
For more information on the DEM in Microsoft Intune, including example scenarios and limitations of devices that are enrolled with a DEM account, visit https://docs.microsoft.com/intune/device-enrollment-manager-enroll.
View and manage devices in Microsoft 365
Microsoft 365 Business Premium subscription administrators can manage their enrolled devices directly from the Microsoft 365 Admin Center screen using the Enroll Devices tile, as shown in Figure 2-12. On the Microsoft 365 Admin Center portal screen, both the Device Enrollment link on the Enroll Devices tile and the Endpoint Manager option (under Admin Centers) will open the stand-alone Microsoft Endpoint Manager admin center This portal can also be accessed at https://endpoint.microsoft.com/#home.
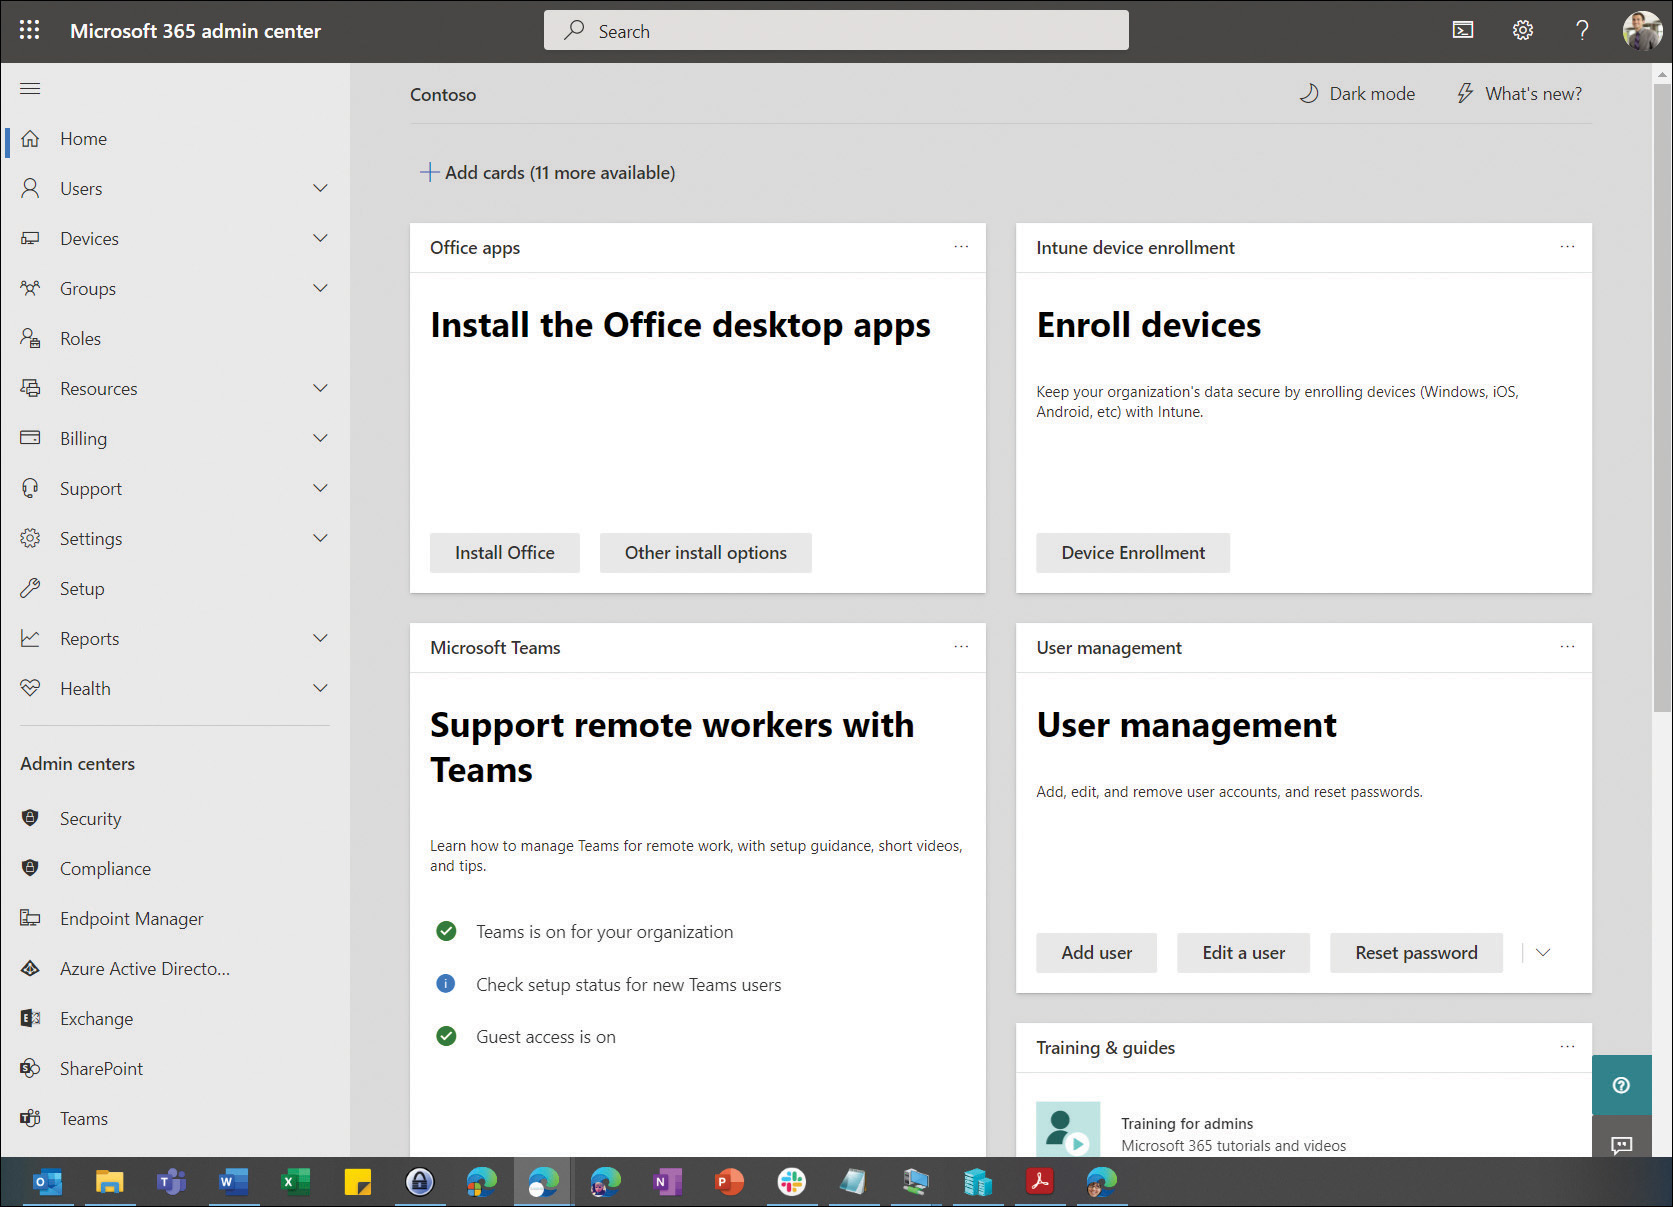
FIGURE 2-12 Microsoft 365 Business Admin portal Home screen
You can perform the following device-related actions on devices from within the Devices section on the navigation bar:
Active Devices Includes viewing device details and managing device actions such as Factory Reset, Remove Company Data, and Remove Device.
AutoPilot Includes adding new devices to be deployed with the Windows AutoPilot service and managing Windows AutoPilot profiles that can be applied to devices.
Policies Includes managing existing policies and assigning policies to groups; adding new application policies to Android, iOS, and Windows 10 devices; and adding new device configuration policies to Windows 10 devices.
Organizations with a Microsoft 365 Enterprise subscription cannot view or manage devices from the Microsoft 365 Enterprise Admin Center and will need to use the following locations:
Azure Active Directory https://aad.portal.azure.com
Microsoft Endpoint Manager admin center https://endpoint.microsoft.com
From these views, you can manage and interact with the devices enrolled in your Azure AD tenant, including retiring or wiping a device. Also, you can perform remote tasks, such as retiring, wiping, or restarting the device, as shown in Figure 2-13.

FIGURE 2-13 Microsoft Endpoint Manager Admin Center
Configure sign-in options
After you have activated Windows 10, you can customize the user interface. In some respects, the Windows 10 user interface is familiar to users of Windows 7. It has a Start menu, a desktop, and a taskbar. These things all appear in Windows 7. However, because Windows 10 is designed to work across a variety of device types, including phones, tablets, and traditional desktop computers, it provides additional ways for users to interact.
As an IT pro, you must understand how to customize the Windows 10 user interface, including Start, taskbar, desktop, and notification settings. This enables you to ensure that the operating system interface meets the needs of the users in your organization.
Configure Microsoft accounts
A Microsoft account (previously called Windows Live ID) provides you with an identity that you can use to securely sign in on multiple devices and access cloud services. You can also use the account to synchronize your personal settings between your Windows-based devices.
If Windows 10 detects an internet connection during setup, you are prompted to specify your Microsoft account details, though you can skip this step and create a local account instead. You can link your Microsoft account to a local or AD DS domain account after setup is complete.
Microsoft accounts are primarily for consumer use. Domain users can benefit by using their personal Microsoft accounts in your enterprise, though there are no methods provided by Microsoft to provision Microsoft accounts within an enterprise. After you connect your Microsoft account to Windows 10, you can:
Access and share photos, documents, and other files from sites such as OneDrive, Outlook.com, Facebook, and Flickr.
Integrate social media services; contact information and status for your users’ friends and associates are automatically obtained from sites such as Hotmail, Outlook, Facebook, Twitter, and LinkedIn.
Download and install Microsoft Store apps.
Perform app synchronization with Microsoft Store apps. After user sign-in, when an app is installed, any user-specific settings are automatically downloaded and applied.
Sync your app settings between devices that are linked to your Microsoft account.
Use single sign-on with credentials roaming across any devices running Windows 10, Windows 8.1, Windows 8, or Windows RT.
Exam Tip
You can browse the Microsoft Store even if you do not sign in using a Microsoft account. However, you cannot install Store apps without using a Microsoft account.
If Microsoft accounts are allowed in an enterprise environment, you should note that only the owner of the Microsoft account is able to change the password. A user can perform a password reset in the Microsoft account sign-in portal at https://account.microsoft.com.
Signing Up For A Microsoft Account
To sign up for a Microsoft account, use the following procedure:
Open a web browser and navigate to https://signup.live.com.
To use your own email address for your Microsoft account, enter it in the web form; otherwise, provide a telephone number to verify that you are not a robot.
To create a new Hotmail or Outlook.com account, select Get A New Email Address and then complete the email address line, specifying whether you want a Hotmail or Outlook suffix.
Select Tab to verify that the name you entered is available.
Complete the rest of the form and then agree to the privacy statement by selecting I Accept.
After you have created your Microsoft account, you can connect it to your local or domain account and access cloud services.
Connecting Your Microsoft Account To Your Device
To connect your Microsoft account to your local or domain user account, use the following procedure:
Sign in with your local account.
Open the Settings app and select Accounts.
On the Your Info page, select Sign in with a Microsoft account instead.
On the Make it yours page, enter the email address and then select Sign in.
On the Enter password page, enter the password associated with your Microsoft account and select Sign in.
If prompted, enter your local account password to verify your local identity and select Next.
The device will now use your Microsoft account to log on. If you want to add additional Microsoft accounts to Windows 10, you can use the Add a Microsoft account option found on the Email & accounts tab of the Accounts page in the Settings app.
Need More Review? Setting Up Microsoft Accounts on Devices
For more information about setting up Microsoft accounts on devices, refer to the Microsoft website at https://account.microsoft.com/account/connect-devices.
Limiting The Use Of Microsoft Accounts
Within an enterprise, you may want to prevent users from associating their Microsoft accounts with a device and block users from accessing cloud resources using their Microsoft accounts.
You can configure Microsoft account restrictions using two GPOs:
Block all consumer Microsoft account user authentication This setting can prevent users from using Microsoft accounts for authentication for applications or services. Any application or service that has already been authenticated will not be affected by this setting until the authentication cache expires. We recommend that you enable this setting before any user signs in to a device to prevent cached tokens from being present. This GPO is located at Computer ConfigurationAdministrative TemplatesWindows ComponentsMicrosoft account.
Accounts: Block Microsoft accounts This setting prevents users from adding a Microsoft account within the Settings app. There are two options: Users Can’t Add Microsoft Accounts and Users Can’t Add Or Log On With Microsoft Accounts. This GPO is located at Computer ConfigurationWindows SettingsSecurity SettingsLocal PoliciesSecurity Options.
Understand multifactor authentication
Traditional computer authentication is based on users providing a name and a password. This allows an authentication authority to validate the exchange and grant access. Although password-based authentication is acceptable in many circumstances, Windows 10 provides a number of additional, more secure methods for users to authenticate with their devices, including multifactor authentication (also referred to as two-factor authentication).
Multifactor authentication is based on the principle that users who wish to authenticate must have two (or more) things with which to identify themselves. Specifically, they must have knowledge of something, they must be in possession of something, and they must be something. For example, a user might know a password, possess a security token (in the form of a digital certificate), and be able to prove who they are with biometrics, such as fingerprints.
Explore Biometrics
Biometrics, like a fingerprint, provides more secure and, often, more convenient methods for both users and administrators to be identified and verified. Windows 10 includes native support for biometrics through the Windows Biometric Framework (WBF), and when used as part of a multifactor authentication plan, biometrics is increasingly replacing passwords in modern workplaces.
Biometric information is obtained from the individual and stored as a biometric sample, which is then securely saved in a template and mapped to a specific user. To capture a person’s fingerprint, you can use a fingerprint reader (you “enroll” the user when configuring this). Also, you can use a person’s face, her retina, or even her voice. The Windows Biometric service can be extended to also include behavioral traits such as body gait and typing rhythm.
Windows includes several Group Policy settings related to biometrics, as shown in Figure 2-14, that you can use to allow or block the use of biometrics from your devices. You can find Group Policy Objects here: Computer ConfigurationAdministrative TemplatesWindows ComponentsBiometrics.
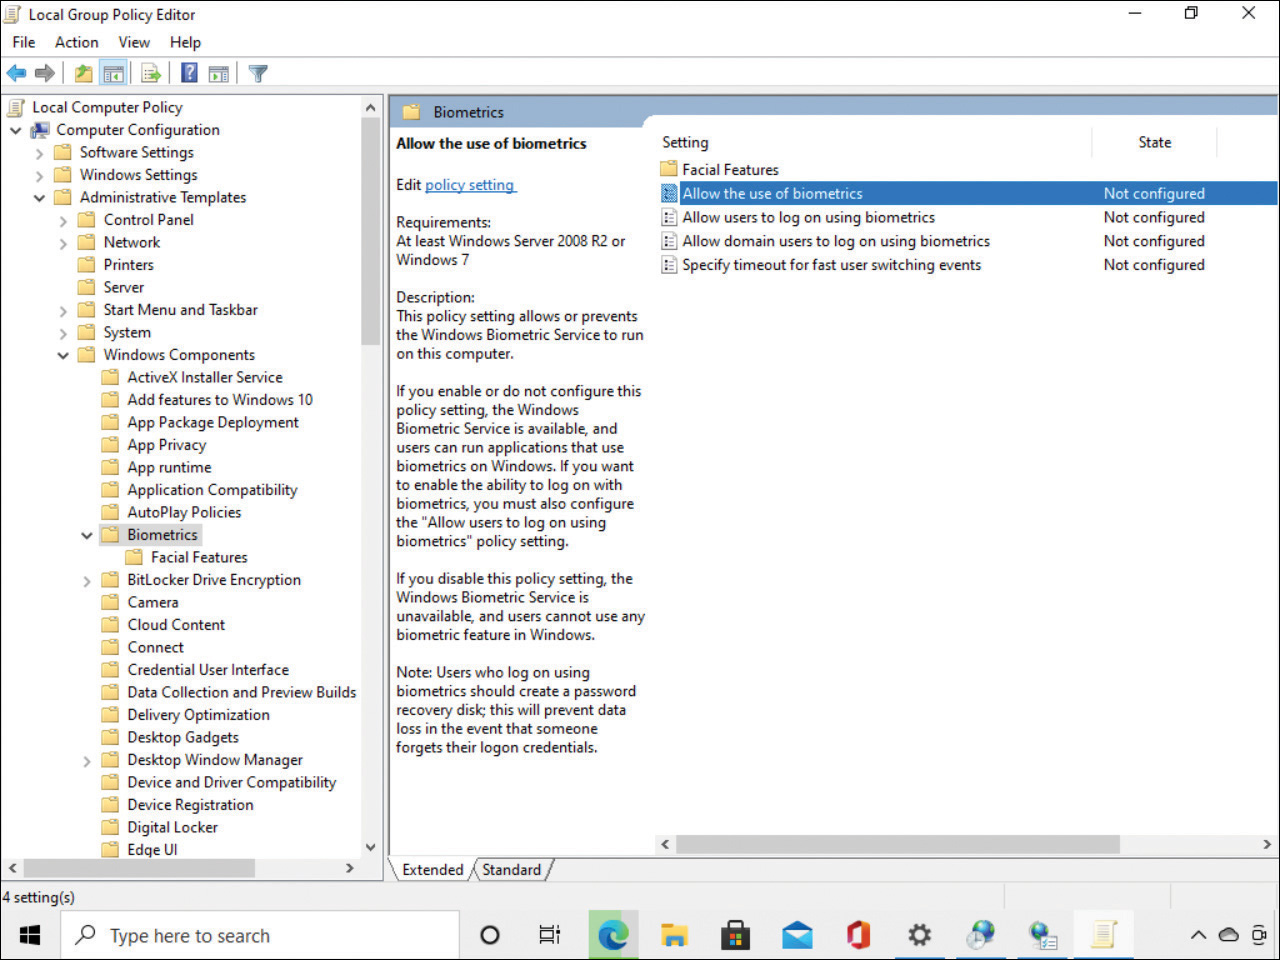
FIGURE 2-14 Biometrics Group Policy settings
Configure Windows Hello and Windows Hello for Business
Windows Hello is a two-factor biometric authentication mechanism built into Windows 10, and it is unique to the device on which it is set up. Windows Hello allows users to unlock their devices by using facial recognition, fingerprint scanning, or a PIN.
Windows Hello for Business is the enterprise implementation of Windows Hello and allows users to authenticate to an Active Directory or Azure Active Directory account, and it enables them to access network resources. Administrators can configure Windows Hello for Business using Group Policy or mobile device management (MDM) policy and use asymmetric (public/private key) or certificate-based authentication.
Windows Hello provides the following benefits:
Strong passwords can be difficult to remember, and users often reuse passwords on multiple sites, which reduces security. Windows Hello allows them to authenticate using their biometric data.
Passwords are vulnerable to replay attacks, and server breaches can expose password-based credentials.
Passwords offer less security because users can inadvertently expose their passwords as a result of phishing attacks.
Windows Hello helps protect against credential theft. Because a malicious person must have both the device and the biometric information or PIN, it becomes more difficult to hack the authentication process.
Windows Hello can be used both in cloud-only and hybrid deployment scenarios.
Windows Hello logs you into your devices three times faster than a password.
If you want to implement Windows Hello, your devices must be equipped with the appropriate hardware. For example, facial recognition requires that you use special cameras that see in infrared (IR) light. These can be external cameras or cameras incorporated into the device. The cameras can reliably tell the difference between a photograph or scan and a living person. For fingerprint recognition, your devices must be equipped with fingerprint readers, which can be external or integrated into laptops or USB keyboards.
If you have previously experienced poor reliability from legacy fingerprint readers, you should review the current generation of sensors, which offer significantly better reliability and are less error-prone.
After you have installed the necessary hardware devices, you can set up Windows Hello by openings Settings, selecting Accounts, and then, on the Sign-In Options page, under Windows Hello, reviewing the options for face or fingerprint. If you do not have Windows Hello–supported hardware, the Windows Hello section does not appear on the Sign-In Options page.
To configure Windows Hello, follow these steps:
Open the Settings app and select Accounts.
On the Accounts page, select Sign-in options.
Under Windows Hello Face, select Set up.
Select Get started on the Windows Hello setup page.
Enter your PIN or password to verify your identity.
Allow Windows Hello to capture your facial features, as shown in Figure 2-15.
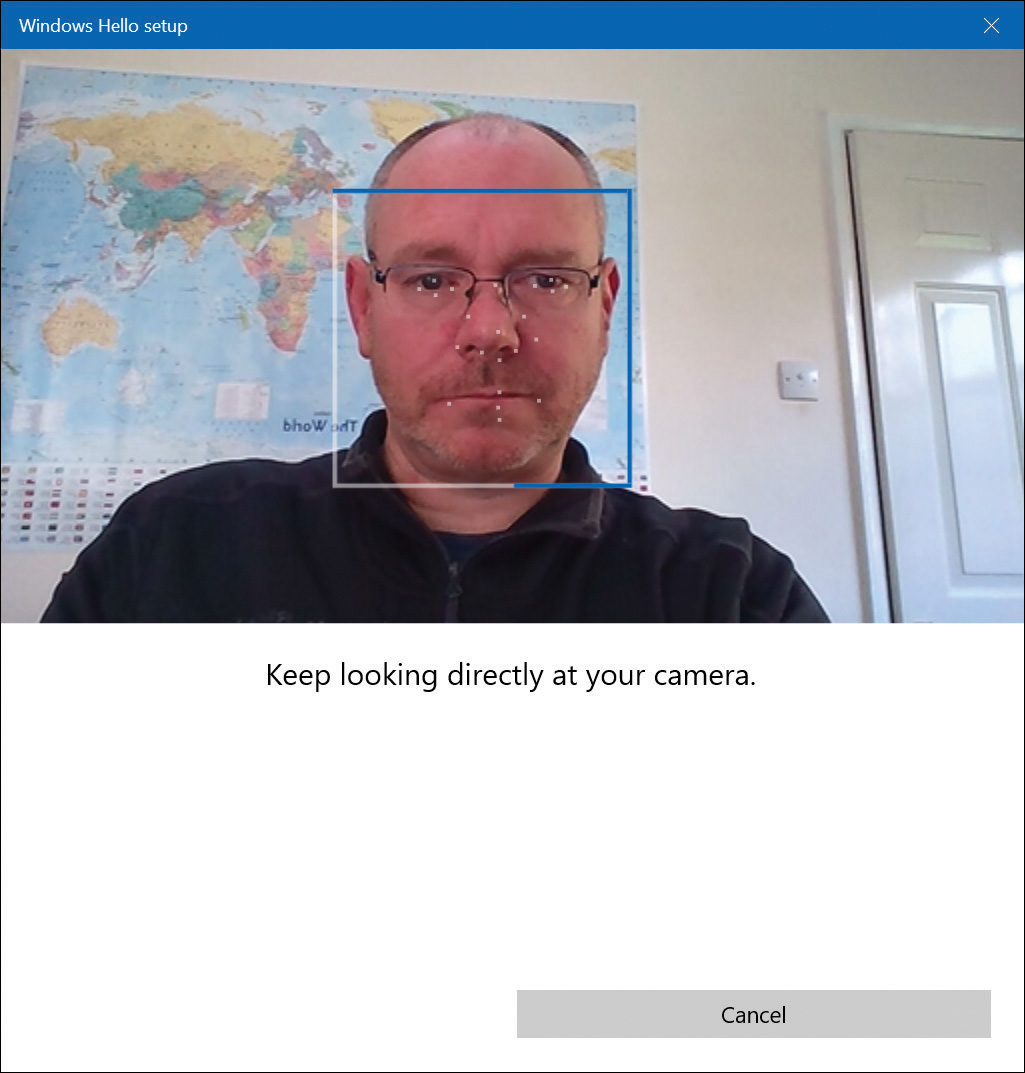
FIGURE 2-15 Configuring Windows Hello
Once Windows Hello has captured your facial features, you are presented with an All Set! message and you can close the Windows Hello setup page.
Users can use Windows Hello for a convenient and secure sign-in method that is tied to the device on which it is set up.
Enterprises that want to enable Windows Hello can configure and manage Windows Hello for Business. Windows Hello for Business uses key-based or certificate-based authentication for users by using Group Policy or MDM policy, or a mixture of both methods.
Need More Review? Windows Hello Biometrics in the Enterprise
To review further details about using Windows Hello in the enterprise, refer to the Microsoft website at https://docs.microsoft.com/windows/access-protection/hello-for-business/hello-biometrics-in-enterprise.
Configure PIN
To avoid authentication with passwords, Microsoft provides an authentication method that uses a PIN. When you set up Windows Hello, you’re asked to create a PIN first. This PIN enables you to sign in using the PIN as an alternative to when you can’t use your preferred biometric because of an injury or because the sensor is unavailable or not working properly. The PIN provides the same level of protection as Windows Hello.
Windows Hello PIN provides secure authentication without sending a password to an authenticating authority, such as Azure AD or an AD DS domain controller. Windows Hello for Business provides enterprises with compliance with the new FIDO 2.0 (Fast IDentity Online) framework for end-to-end multifactor authentication.
Within a domain environment, a user cannot use a PIN on its own (known as a convenience PIN). You will see from the user interface shown in Figure 2-16 that the PIN settings are known as the Windows Hello PIN. A user must first configure Windows Hello and already be signed in using a local account, a domain account, a Microsoft account, or an Azure AD account. The user is then able to set up PIN authentication that is associated with the credential for the account.
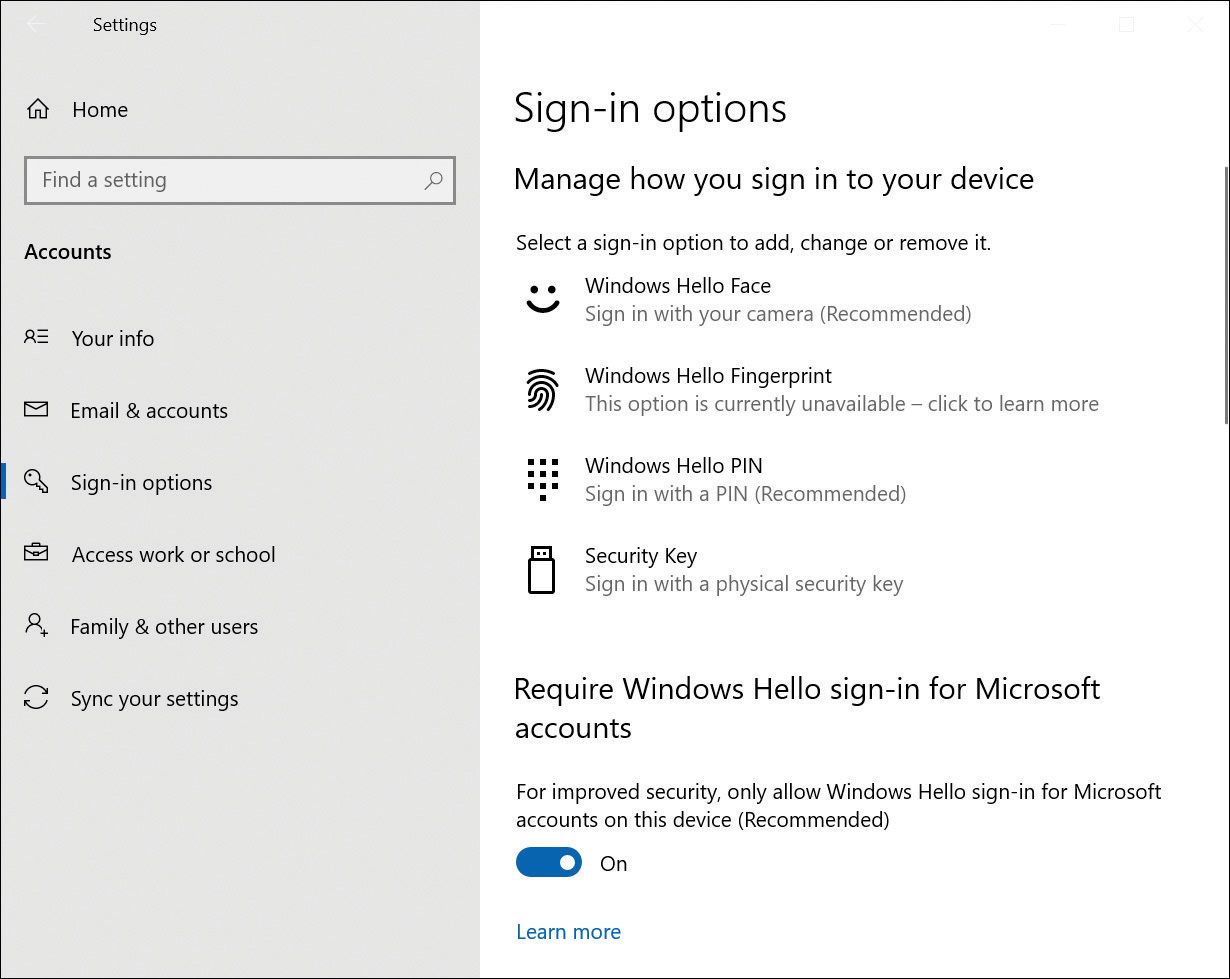
FIGURE 2-16 Configuring Windows Hello PIN
After a user has completed the registration process, Windows Hello for Business generates a new public-private key pair on the device known as a protector key. If installed on the device, the Trusted Platform Module (TPM) generates and stores this protector key; if the device does not have a TPM, Windows encrypts the protector key and stores it on the file system. Windows Hello for Business also generates an administrative key that is used to reset credentials if necessary.
Note Pairing of Credentials and Devices
Windows Hello for Business pairs a specific device and a user credential. Consequently, the PIN the user chooses is associated only with the signed-in account and that specific device.
The user now has a PIN defined on the device and an associated protector key for that PIN gesture. The user can now securely sign in to their device using the PIN and then add support for a biometric gesture as an alternative for the PIN. The gesture can be facial recognition, iris scanning, or fingerprint recognition, depending on available hardware in the device. When a user adds a biometric gesture, it follows the same basic sequence as mentioned in the previous section. The user authenticates to the system by using the PIN and then registers the new biometric. Windows generates a unique key pair and stores it securely. The user can then sign in using the PIN or a biometric gesture.
Need More Review? Windows Hello for Business
To review further details about deploying Windows Hello for Business within an enterprise environment, refer to the Microsoft website at https://docs.microsoft.com/windows/security/identity-protection/hello-for-business/hello-identity-verification.
You can use MDM policies or GPOs to configure settings for Windows Hello for Business in your organization. For example, you can configure a policy that enables or disables the use of biometrics on devices affected by the policy.
Note Enhancing the Security of A Pin
When we think of a PIN, we generally think of ATMs and four-digit PINs. For securing Windows 10 with Windows Hello for Business, you can significantly increase the level of security by imposing rules on PINs so that, for example, a PIN can require or block special characters, uppercase characters, lowercase characters, and digits. Something like t496A? could be a complex Windows Hello PIN. The maximum length that can be set is 127 characters.
To configure Windows Hello for Business in your organization, you use the appropriate GPOs within the following location:
Computer ConfigurationPoliciesAdministrative TemplatesWindows Components Windows Hello for Business
To configure PIN complexity with Windows 10 (with and without Windows Hello for Business), you can use the eight PIN Complexity Group Policy settings, which allow you to control PIN creation and management.
These policy settings can be deployed to computers or users. If you deploy settings to both, then the user policy settings have precedence over computer policy settings and GPO conflict resolution is based on the last applied policy. The policy settings included are:
Require digits
Require lowercase letters
Maximum PIN length
Minimum PIN length
Expiration
History
Require special characters
Require uppercase letters
In Windows 10, version 1703 and later, the PIN complexity Group Policy settings are located at Administrative TemplatesSystemPIN Complexity under both the Computer and User Configuration nodes.
Need More Review? Windows Hello for Business Policy Settings
To review more detailed configuration steps for Windows Hello for Business within an enterprise environment, refer to the Microsoft website at https://docs.microsoft.com/windows/security/identity-protection/hello-for-business/hello-cert-trust-policy-settings.
If an organization is not using Windows Hello for Business, they can still use the option to set a convenience PIN. A convenience PIN is very different from a Windows Hello for Business PIN because it is merely a wrapper for the user’s domain password. This means that the user’s password is cached and replaced by Windows when signing in with a convenience PIN.
Since the Anniversary release (Windows 10, version 1607), the option to allow a convenience PIN is disabled by default for domain-joined clients. To modify the option to sign in with the convenience PIN, you can use the Turn On Convenience PIN Sign-In GPO at Group PolicyComputer ConfigurationAdministrative TemplatesSystemLogon.
Configure picture password
A picture password is another way to sign in to a computer. This feature does not use Windows Hello or Windows Hello for Business, and therefore, it is not available to be used within a domain-based environment.
You sign in to a touch-enabled device by using a series of three movements consisting of lines, circles, and/or taps. You can pick any picture you want and provide a convenient method of signing in to touch-enabled, stand-alone devices. Picture password combinations are limitless because the pictures that can be used are limitless. Although picture passwords are considered more secure for stand-alone computers than typing a four-digit PIN, a hacker may be able to guess their way into a device by holding the screen up to a light to see where most of the gestures are (by following the smudges on the screen). This is especially true if the user touches the screen only to input the password and rarely uses touch for anything else.
To create a picture password, follow these steps:
Open the Settings app and select Accounts.
Select Sign-in options.
Under Picture password, select Add.
Enter your current account password and select Choose picture to browse to and select the picture to use.
Adjust the position of the picture and select Use this picture.
Draw three gestures directly on your screen. Remember that the size, position, and direction of the gestures are stored as part of the picture password.
You are prompted to repeat your gestures. If your repeated gestures match, select Finish.
There is only one GPO relating to this feature. To disable Picture Password using Local Group Policy, you can use the Turn Off Picture Password Sign-In GPO in the following location:
Computer ConfigurationAdministrative TemplatesSystemLogon
Configure Dynamic Lock
Users with smartphones can take advantage of Dynamic Lock, which was introduced with the Creators Update for Windows 10. Dynamic Lock allows users to automatically lock their devices whenever they are not using them. (As of this writing, the iPhone does not support this feature.)
The Dynamic Lock feature relies on a Bluetooth link between your PC and the paired smartphone.
To configure Windows 10 Dynamic Lock, use the following steps:
Open the Settings app and select Accounts.
Select Sign-in options and scroll to Dynamic lock.
Select Allow Windows to detect when you’re away and automatically lock the device.
Select Bluetooth & other devices.
Add your smartphone using Bluetooth and pair it.
Return to the Dynamic lock page and you should see your connected phone, as shown in Figure 2-17. Your device will be automatically locked whenever Windows detects that your connected smartphone has moved away from your desk for 30 seconds.

FIGURE 2-17 Configuring Dynamic Lock
You can configure Dynamic Lock functionality for your devices using the Configure Dynamic Lock Factors GPO. You can locate the policy setting at Computer ConfigurationAdministrative TemplatesWindows ComponentsWindows Hello for Business.
Skill 2.2: Configure devices by using local policies
In this skill section, you review how the Windows 10 registry can be used to configure computer settings that may not be available within the Settings app or Control Panel.
Group Policy is a key technology designed to help manage and control how users use Windows 10–based computers. Local Group Policy is the local implementation of these policies, and you need to understand how to configure local settings on your computer using policies.
Finally, in this skill, you will review how to troubleshoot group policies on a computer to identify what policies are effective and how to resolve issues. Some of the tools used to fix policy issues on a local computer can be directly applied to domain-joined devices, and this knowledge is valuable if you must apply the same type of settings to thousands of computers in a domain environment.
Configure local registry
All settings within Windows 10 are ultimately stored in the Windows Registry. This is a database that contains details of all Windows settings, installed software, device drivers, and much more. Without the registry, Windows would not work.
Every reference to working the registry always stipulates that you should take great care when working with or editing the registry. An incorrect registry change can prevent your system from booting and can result in you needing to completely reinstall the operating system. You should always take care and create a system backup before editing the registry.
Understand the registry structure
The registry is a database that is split into multiple separate files known as hives, together with associated log and other support files.
You can find the registry files located in %systemroot%System32Config, though you will need to be an administrator to access this folder. Within this system folder, you should find several binary format “files” that the registry uses:
SAM (Security Accounts Manager used to store local passwords)
SECURITY
SOFTWARE
SYSTEM
DEFAULT
USERDIFF (used only for Windows upgrades)
In addition to the system files, the user-specific settings stored within the user profile are loaded into system memory when a user signs in. These registry files are located in the following locations:
%userprofile% tuser.dat
%userprofile%AppDataLocalMicrosoftWindowsUsrClass.dat
Other notable registry files include the Boot Configuration Data (BCD) store, which stores its own file on the boot drive. The local services are located in %SystemRoot% ServiceProfilesLocalService and network services are stored in %SystemRoot% ServiceProfilesNetworkService.
The vast majority of changes to the hive files are made automatically by Windows whenever you install an application or change a setting or configuration by using the Settings app or Control Panel,
The main hives, or subtrees, that store settings for Windows 10 are shown in Table 2-5.
TABLE 2-5 Registry hives
Hive |
Description |
|---|---|
HKEY_CLASSES_ROOT |
This hive relates to file association information relating to applications installed in the device. For example, it defines that the application for DOCX files is Microsoft Word. This hive contains application information derived from the settings that are stored in the HKEY_LOCAL_MACHINESoftwareClasses and HKEY_CURRENT_USERSoftwareClasses hives. |
HKEY_CURRENT_USER |
This hive contains information for the signed-in user. Personalized settings such as background image, Windows color scheme, and font settings are stored in this hive. |
HKEY_LOCAL_MACHINE |
This hive stores computer-related configuration settings. |
HKEY_USERS |
This hive contains user-related configuration settings for all users who have signed in locally to the computer, including the currently signed-in user. The HKEY_CURRENT_USER hive is a subkey of HKEY_USERS. Edits to this hive will affect the user settings for the currently signed-in user. |
HKEY_CURRENT_CONFIG |
This hive contains current hardware profile information for the local computer. |
Should you need to make a manual change, create a new entry, or modify an existing registry entry, these will typically take place in the following two hives:
HKEY_LOCAL_MACHINE
HKEY_CURRENT_USER
The primary tool for managing and editing the registry is the built-in registry editor.
Within the hives, settings containing values are stored in subtrees, keys, and subkeys. The hierarchical nature of the registry makes it easy to locate a registry value. Here is an example of a key, subkeys, and value:
ComputerHKEY_CURRENT_USERControl PanelMouse
This key holds many subkeys, which Windows uses to store settings for the mouse.
The mouse settings can be modified in the registry, as shown in Figure 2-18, or by using the Mouse item within Control Panel. If you enable mouse pointer trails in Control Panel, the registry subkey for MouseTrails is modified to have a value of 7.
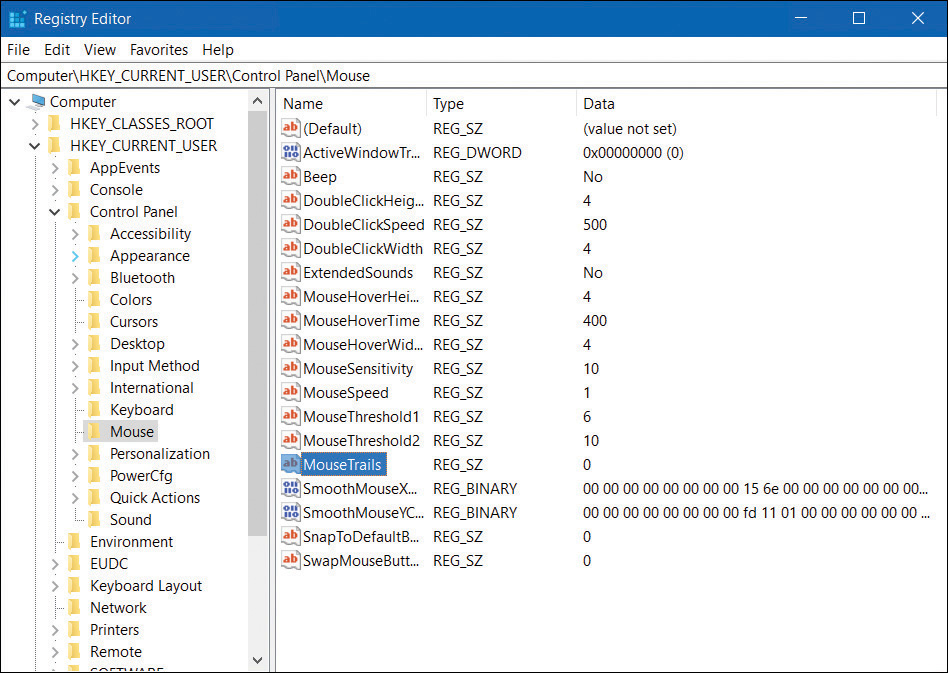
FIGURE 2-18 Registry keys
Values are stored within each key and subkey that are used to configure the operating system. Several value types are used to store information such as numerical data, text, and variables such as file paths. Often a value is empty or not defined, as shown in the (Default) subkey in Figure 2-18, which shows (value not set). Table 2-6 lists common types of registry values.
TABLE 2-6 Registry value types
Value Type |
Data Type |
Description |
|---|---|---|
REG_BINARY |
Binary |
Raw binary data. Values are normally displayed in hexadecimal format. Hardware information is often stored in these values. |
REG_DWORD |
DWORD |
4-byte numbers (a 32-bit integer). Device-driver and service-related values are stored in these values. |
REG_SZ |
String |
A fixed-length text string. Most of the values listed in the HKEY_CURRENT_USERControl PanelMouse keys are REG_SZ values. |
REG_EXPAND_SZ |
Expandable string |
A variable length text string. Windows uses REG_EXPAND_SZ values to contain variables, such as file system paths. |
REG_MULTI_SZ |
Multiple strings |
Multiple string values. These values are typically used when multiple values are required. |
Understand the Registry Editor
The built-in Registry Editor (Regedit.exe) allows you to view, search, and modify the registry’s contents. Some common tasks that administrators can perform using the Registry Editor tool are as follows:
Search the registry for a value, value name, subkey, or key
Create, delete, and modify keys, subkeys, and values
Import entries into the registry from an external (REG) file
Export entries from the registry into an external (REG) file
Back up the entire registry
Manage the HKEY_LOCAL_MACHINE and HKEY_USERS registry hives on a remote computer
You can also import registry keys and values directly into the registry using a text file with the .reg extension.
All REG files will use the following syntax for Registry Editor to understand them:
Windows Registry Editor Version 5.00
[<Hive name><Key name><Subkey name>]
"Value name"=<Value type>:<Value data>
Because REG files are associated with the registry, executing a REG file will merge it with—or import it to—the local Windows Registry. The contents of the REG file will add, delete, or modify one or more keys or values in the registry. Depending on the changes contained within the REG file, you might need to restart your computer after the changes have been made.
You can also use the Import option on the File menu within the Registry Editor to import the settings, or you can use the command line with a script similar to the following example:
regedit /s C:\Registry\regsetting.reg > nul
Use PowerShell to manage registry settings
The registry can be accessed directly using Windows PowerShell. The registry provider within PowerShell displays the registry like a file system, displaying the keys and subkeys as subfolders within a registry hive.
Windows PowerShell uses the abbreviated form of the hive nomenclature where the HKEY_LOCAL_MACHINE hive becomes HKLM and HKEY_LOCAL_USER becomes HKLU.
To view the registry using Windows PowerShell, open an elevated Windows PowerShell command prompt and then type the following, pressing Enter after each line:
Get-ChildItem -Path hklm:
Dir
You can also obtain a richer output by using this PowerShell command:
Get-Childitem -ErrorAction SilentlyContinue | Format-Table Name, SubKeyCount, ValueCount
-AutoSize
To create a new registry key, you can first use the Set-Location cmdlet to change to the appropriate registry subtree and key as shown here:
Set-Location "HKCU:Software"
Alternatively, you can use the full path to the registry key in the cmdlet as follows:
New-Item -Path HKCU:Software -Name "Demonstration" –Force
Use the following cmdlet to assign the new registry key a value of “demo”:
Set-Item -Path HKCU:SoftwareDemonstration -Value "demo"
To validate that the key value has been stored correctly, view the key in the registry, or enter the following:
Get-Item -Path HKCU:SoftwareDemonstration
Implement local policy
Local Security Policy allows you to configure various security policies on a local computer. The computer may or may not be domain joined. When used in a domain-based environment, local policies can be used to affect all computers in the domain. Only the Windows 10 Pro, Enterprise, and Education editions provide access to the Local Security Policy console. For Windows 10 Home edition, the settings and rights are predefined and unchangeable.
With Local Security Policy, you create rules so that you can manage users’ computers. You can apply configuration settings that can affect a single device when deployed using the Local Group Policy Editor. When settings are configured using Group Policy within a domain environment, the settings can be deployed from one to thousands of targeted devices. When a policy has been configured, standard users cannot modify a managed policy setting.
Local Security Policy is a subset of the Local Group Policy Object Editor (gpedit.msc). You can see the same settings by using the dedicated tool called Local Security Policy Editor, as shown in Figure 2-19. To launch the tool, follow these instructions:
Log on to Windows 10 with administrative privileges.
Select Start and search for Secpol.msc.
Select the Secpol.msc link to open the Local Security Policy editor.
Expand both Account Policies and Local Policies.
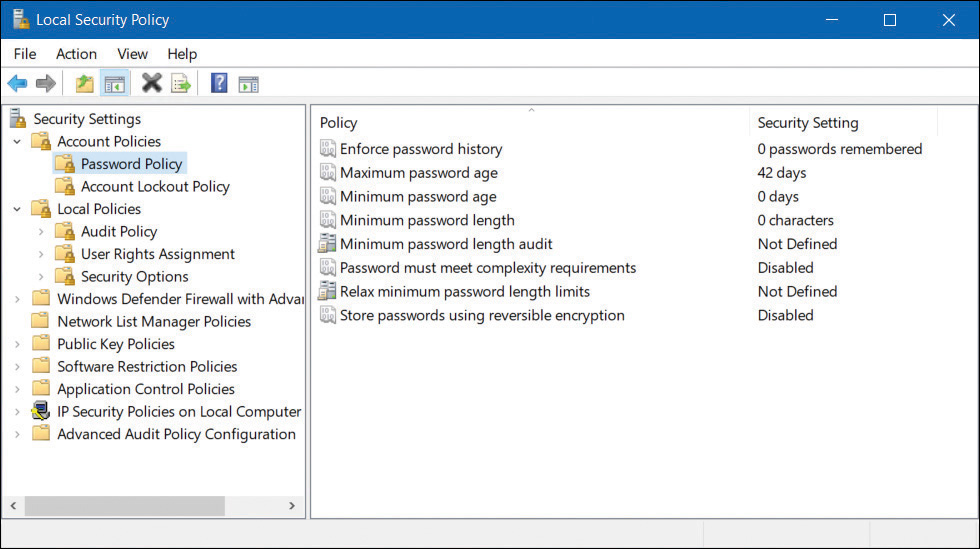
FIGURE 2-19 Local Security Policy
Within Local Security Policy, you can find the following sections:
Account Policies These include local account Password Policy and Account Lockout Policy. These allow you to configure the device password history, maximum and minimum password age, password complexity, and password length. You can also configure what action will be taken when a user enters an incorrect password during logon.
Local Policies These include Audit Policy, User Rights Assignment, and Security Options, and they allow you to enable/disable auditing, configure user rights (including the ability to log on locally to the device), access the computer from the network, and have the right to shut down the system. In this section, you will also find settings to configure many security settings, such as interactive logon settings, User Account Control settings, and shutdown settings.
Windows Defender Firewall With Advanced Security These are used to configure the local firewall settings.
Network List Manager Policies These enable you to configure whether users can configure new network properties, including the network name, location, and icon.
Public Key Policies These allow you to configure settings for Certificate Auto-Enrollment and the Encrypting File System (EFS) Data Recovery Agents.
Software Restrictions Policies These are used to identify and control which applications can run on the local computer.
Application Control Policies These are used to configure AppLocker.
IP Security Policies on Local Computer These allow you to create, manage, and assign IPsec policies.
Advanced Audit Policy Configuration These allow you to provide additional fine-tuning and control when using audit policies.
Configure a password policy
On a local device, if you want to ensure that all users use secure passwords and that the passwords are changed after a set number of days, you can configure a password policy as follows:
Log on to Windows 10 with administrative privileges.
Select Start and search for Secpol.msc.
Select the Secpol.msc link to open the Local Security Policy editor.
Expand Account Policies and select Password Policy.
Select Enforce password history. You can now enter a value that represents the number of unique new passwords that a user account must have used before an old password can be reused.
Enter 5 and select OK to set this policy.
Double-click Maximum password age. The default setting is 42, which allows a user to use their password over a 42-day period before they are forced to change it. The best practice is to have passwords expire every 30 to 90 days.
Enter 90 and select OK.
Double-click Minimum password age. The default setting is 0 days, which allows users to change their passwords whenever they like. A setting of 14 days prevents users from changing their password in rapid succession to bypass the password history setting.
Enter 14 and select OK.
Double-click Minimum password length. The default is set to 0 characters. A setting of 8 would require that a password must be at least 8 characters long.
Enter 8 and select OK.
Double-click Password must meet complexity requirements. This setting is disabled by default. Once set to enabled, all passwords need to be complex.
Double-click Store passwords using reversible encryption. The default is disabled. If you enable this policy, all passwords are stored in a way that all applications are able access the password, which also makes them vulnerable to hackers to access.
Close the Local Security Policy editor.
The changes relating to local passwords become effective immediately once the policy is configured. Users with existing passwords can continue to use them until they need to be changed. The next time a user changes their password, the new password will need to conform with the settings in the Password Policy.
Note Password Must Meet Complexity Requirements
When the Password Must Meet Complexity Requirements policy is enabled, passwords must meet the following minimum requirements:
Must not contain the user’s account name or parts of the user’s full name that exceed two consecutive characters
Must be at least six characters in length
Must contain characters from three of the following four categories:
English uppercase characters (A through Z)
English lowercase characters (A through Z)
Base 10 digits (0 through 9)
Nonalphabetic characters (for example, !, $, #, %)
Complexity requirements are enforced when passwords are changed or created.
Configure an account lockout policy
When you implement a strong password policy, it is recommended that you also configure an account lockout policy, which helps to protect accounts from password-cracking tools, which can attempt thousands of different passwords every hour in the hope that they succeed. Within a local environment, even an employee can try to guess a password to gain access to a system.
This brute-force attack on a system cannot be prevented. However, you can implement measures within the account lockout policy that monitor incorrect attempts to log in to a local device. If a brute-force attack is suspected (for example, five incorrect passwords are entered in quick succession), then the account can be locked for a period of time.
To define that lockout policy, use the following steps:
Log on to Windows 10 with administrative privileges.
Select Start and search for Secpol.msc.
Select the Secpol.msc link to open the Local Security Policy editor.
Expand Account Policies and select Account Lockout Policy.
Double-click Account lockout threshold, enter 3, and select OK.
When the Account lockout threshold has been set, Windows suggests two other settings:
Account lockout duration This setting specifies how long, in minutes, the user account will remain locked once the threshold has been reached.
Reset account lockout counter after This setting specifies how long, in minutes, before the count of incorrect passwords entered is set back to 0.
Leave these settings as recommended and select OK.
Configure local policy
Local policies are used to control users once they have logged on and gained access to a system. You can configure policies that implement auditing, specify user rights, and set security options.
Audit policy
Audit policies are used to track specified user actions on a device. These actions are recorded as a success or a failure, such as accessing a file or being blocked from printing a document. Auditing is costly because system resources are required to constantly monitor a system and record actions to the audit logs. Audit settings can generate many log items, and this may impede a computer’s performance. Therefore, you should use auditing on selective actions and turn off the feature when it is no longer required.
Auditing allows you to create a history of specific tasks and actions, such as file access (Audit Object Access policy), user account deletion (Audit Account Management) or successful logon attempts (Audit Account Logon Events). Often, auditing is used to identify security violations that arise; security violations could include, for example, when users attempt to access system management tasks or files within File Explorer for which they do not have permission. In this example, failed attempts to access resources will be logged in the audit log, with details of the user account, time, and details of the resources for which access was denied because of insufficient privileges.
Configuring audit policy involves three components:
Enable auditing within Local Policies for success or failure (or both) for specific events or actions.
For object access, such as file system files and folders, enable auditing on the objects to be audited.
Use Event Viewer to view the results of the audit in the security log.
To view the various settings that can be configured using audit policy, view the audit policy options in Table 2-7.
TABLE 2-7 Audit policy options
Policy Description |
Description |
|---|---|
Audit Account Logon Events |
Tracks user logon activity on their local device or to a domain (if domain auditing is enabled). |
Audit Account Management |
Tracks user and group account management, including creation, deletion, and password changes. |
Audit Directory Service Access |
Tracks access to Active Directory objects by a user within a domain. |
Audit Logon Events |
Audits events related to local account activity, such as running a logon script, accessing a member server, or using a device that uses a local account to generate a logon event. |
Audit Object Access |
Enables auditing of access to the file system and registry objects, including files, folders, printers, hives, and values. |
Audit Policy Change |
Tracks any changes to user rights assignment policies, audit policies, or trust policies, such as assigning, removing, creating, changing, starting, or stopping policies. |
Audit Privilege Use |
Tracks each instance of when a user exercises a user right that has been assigned to their user account. |
Audit Process Tracking |
Tracks events when a program is activated, when a new process is created or exited, or if a user attempts to install a service. |
Audit System Events |
Tracks system events, such as when a user shuts down or restarts their computer and when an event occurs that affects either the system security or the security log. |
To configure an audit policy to monitor account logon events, use these steps:
Log on to Windows 10 with administrative privileges.
Select Start and search for Secpol.msc.
Select the Secpol.msc link to open the Local Security Policy editor.
Expand Local Policies and select Audit Policy.
Double-click the Audit account logon events policy and select Success and Failure.
Select OK.
Log off the device and attempt to log back on as an administrator, but use an incorrect password. Allow the logon to fail.
Log on as an administrator using the correct password.
Select Start and search for Event Viewer.
Select the Event Viewer app to open the Event Viewer.
Expand Windows Logs and select the Security Log. You should see the audited events listed with an Event ID of 4624 and a Task Category of Logon, as shown in Figure 2-20.
FIGURE 2-20 Review audited events within the Security Log
User rights assignment
The user rights policies are used to determine what rights a user or group of users have on a device. Often, there is confusion between rights and permissions, and you should be clear that user rights, or privileges, apply to the system and relate to activities or tasks that the user can perform.
Here are some of the activities that you can grant to a user:
Add Workstations To Domain
Allow Log On Locally
Allow Log On Through Remote Desktop Services
Back Up Files And Directories
Change The System Time
Deny Log On Locally
Shut Down The System
Take Ownership Of Files Or Other Objects
To configure a user to have the right to perform a backup of a device, use the following steps:
Log on to Windows 10 with administrative privileges.
Select Start and search for Secpol.msc.
Select the Secpol.msc link to open the Local Security Policy editor.
Expand Local Policies and select User Rights Assignment.
Double-click the user right Back up files and directories.
Select Add User or Group. The Select Users or Groups dialog box appears.
Enter the name of the user or group to which you want to grant the right or select the Advanced button and then select Find Now. Select the user or group of users within the list.
Select OK.
Select OK in the Select Users or Groups dialog box.
In the Back Up Files and Directories properties dialog box, select OK.
Note User Rights Assignment
A user may be given a right that could contradict any existing permissions. For example, if a user is given the right to Back Up Files And Directories, the user can back up files and folders even if the user does not have specific NTFS-level permissions to the files or folders.
Remember, a right authorizes a user to perform specific actions on a device, such as logging on to a computer interactively or backing up files and directories on a system. Before leaving this section, you should review the list of user rights policies, which can be found within the User Rights Assignment node of the Local Policies.
Security Options
The Security Options section of the local policies includes many options, which are used to allow or restrict activities on the device.
Here are some of the activities that you can configure with Security Options:
Accounts Block Microsoft Accounts
Interactive Logon Do Not Require CTRL+ALT+DEL
Interactive Logon Don’t Display Username At Sign-In
User Account Control Admin Approval Mode For Built-In Administrator Account
Nearly all the several dozen settings have their default settings set to Not Defined. Once configured, a setting can have the following statuses:
Enabled or Disabled
Text entry (For example, a user account name, or a system path)
Value (For example, the number of previous logons to cache for when a domain controller is not available)
One area of the Security Options that you should pay attention to is the User Account Control (UAC) settings. We will cover UAC in detail in the next skill, but you should note that you can configure UAC using policy settings in this area of Local Policy.
Exam Tip
For the exam, you should know how to set local group policies and understand the purpose of account policies and local policies. Work through the examples showing how to configure password policies and account lockout policies. Review the various audit policies, user rights assignments, and security options that are available.
Configure Windows 10 settings by using Group Policy
Generally, when we refer to Group Policy, we are referring to Group Policy Objects (GPO) containing GPO settings that are created by IT administrators and pushed over the network to affect devices within a domain environment. Local policy, or Local Group Policy, refers to policy settings that are locally administered and configured.
Within a managed environment, IT administrators can control nearly any setting on a device using policy. When AD DS is installed on one or more Windows servers with the domain controller role, administrators can centrally manage AD DS objects using a console app, such as Active Directory Administrative Center on Windows Server. Centrally managing Group Policy allows for easier and more efficient management of the settings, as well as the ability to manage devices at scale.
Devices that are managed by Active Directory are commonly referred to as domain-joined. User accounts that are managed by AD are often referred to as domain users, and their domain username or LDAP username is used when they sign on to their device to access resources.
Group Policy settings
When you configure a Group Policy setting, you are configuring a specific change to apply to an object (something configurable such as a device, a user, or a printer) that is held within AD DS. Group Policy has thousands of configurable settings. Nearly every aspect of Windows 10 can be modified by Group Policy, such as the Edge browser, the firewall, users’ rights, and security settings. Group Policy also allows IT administrators to configure settings in older versions of Windows Server and Windows operating systems, and therefore the number of GPOs has grown with each new version of Windows. Only settings that are compatible with the device receiving the policy will be applied, and if a device is configured with an older Group Policy setting, then the Group Policy setting will be ignored.
Most Group Policy settings have three states that can be configured:
Not Configured The GPO does not modify the existing configuration of the setting for the user or computer.
Enabled The GPO applies the policy setting.
Disabled The GPO reverses the policy setting.
By default, most Group Policy settings are set to Not Configured.
Group Policy Management Editor
The Group Policy Management Editor is the tool that enables you to view and configure the individual Group Policy settings on a Windows 10 device. GPOs are organized in a hierarchy as shown here:
Computer Configuration Settings These settings modify the HKEY_LOCAL_MACHINE hive of the registry.
User Configuration Settings These settings modify the HKEY_CURRENT_USER hive of the registry.
These top-level settings each have three areas of configuration, as described in Table 2-8.
TABLE 2-8 Group Policy settings structure
Section |
Description |
|---|---|
Software Settings |
Contains software settings that can be deployed to either the user or the device. Software that deploys or publishes to a user is specific to that user. Software that deploys to a device is available to all users of that device. |
Windows Settings |
Contains startup and shutdown script settings and printer settings for both the user and the device, and password policies and firewall settings for the device only. |
Administrative Templates |
Contains hundreds of settings that modify the Windows operating system to control various aspects of the user and computer environment. New administrative templates can be downloaded from vendors or Microsoft and then imported to expand the number of GPOs available on a device. |
IT administrators use the Group Policy Management Console to the configure GPOs that are then managed by AD DS. An IT administrator or local administrator can manage individual devices using the Local Group Policy Editor. To open the Local Group Policy Editor, follow these steps:
Select Start and enter gpedit.msc.
Select Edit Group Policy to launch the Local Group Policy editor.
Even if a device is managed using GPOs within an AD DS environment, each device will also have the default local policy. This local GPO is the least influential of all GPOs and any settings can be overwritten by GPOs that are created at higher levels within the environment such as a site, domain, or organizational unit (OU). You should be careful when using GPOs because misconfiguring a GPO can lock you out of specific apps or even the device itself.
Troubleshoot Group Policies on devices
Diving deep into Group Policy would double the size of this book, but you should understand how to perform basic troubleshooting of Group Policies on Windows 10 devices.
Sometime a Group Policy can fail to be applied successfully. There can be many reasons for these failures, including incorrect GPO settings, poor network connection, or failure of the Group Policy Client service.
Troubleshooting tools
You can use many tools to investigate GPO-related issues, including the Resultant Set of Policy (RSoP.msc) tool within the GUI and Group Policy Result (GPResult) from the command line.
Connection Issues
There are several preliminary troubleshooting areas that you should verify before proceeding to use the specialist GPO tools. These relate to the essential services, network connection, and time synchronization:
Group Policy Client Service Before troubleshooting Group Policy, you should verify the status of the required services for the GPO. Check that the Group Policy Client service has the status of Running or Automatic within the Services utility.
Network Connection Verify the network connection and configuration. This can be achieved by running the Network Adapter troubleshooter within the Settings app to find and fix issues automatically. Without a reliable network connection, your device will not be able to connect to the domain controller and obtain Group Policy.
Time The device time needs to be within five minutes of the time on the server. If there is more than a five-minute time difference, then problems with Active Directory synchronization can occur, which can then affect GPO delivery.
Resultant Set Of Policy Tool
The Resultant Set of Policy (RSoP) tool is a diagnostic tool that is used to check and troubleshoot Group Policy settings. RSoP is built into Windows 10 and can be used to view the policies being applied to users and devices, and it can identify where the policy settings are coming from. It can also be used to simulate GPO settings for planning purposes.
There are two modes in which RsoP can be run: Logging Mode and Planning Mode.
Logging Mode Generates a report on policy settings for users and computers and is used to verify and troubleshoot Group Policy settings.
Planning Mode Used for “what if” scenarios, such as: If a user or computer is moved to a different Active Directory AD group, will they still receive the expected GPOs?
To run RSoP to determine computer and user policy settings, perform these steps:
Log on to Windows 10 with administrative privileges.
Select Start and enter rsop.msc.
Select the rsop.msc link to open the Resultant Set of Policy tool.
RSoP will run and generate a report for the user and computer policy settings.
Review the policy settings that have been applied to the system by any Group Policy Objects that are in effect.
To verify that the policies that you have linked are being applied, you should compare the system results to those that are expected.
To simulate GPO policy settings, you can use the planning mode of the Resultant Set of Policy tool. You would open the RSoP tool from Microsoft Management Console and add the Resultant Set Of Policy snap-in, follow the wizard, and select Generate RSoP Data while in Planning Mode.
Gpresult
The GPResult command-line tool provides a powerful method of verifying what Group Policy Objects are applied to a user or computer. The tool creates a report that displays the GPOs that have been applied to a system and separates the results into the user and computer settings.
Follow these steps to display all GPOs that have been applied to a system:
Log on to Windows 10 with administrative privileges.
Right-click Start and select Windows PowerShell (Admin).
Confirm the User Account Control warning, if prompted.
Type gpresult /r and press Enter. You should see the RSoP data for your logged-in user and device.
The output of the gpresult /r command will display information such as the following:
The applied GPO(s) name(s)
Order of GPO application
GPO details and the last time Group Policy was applied
Domain and domain functional level
Which domain controller issued the GPO
Network speed link threshold
Which security groups the user and computer are a member of
Details of GPO filtering
You can fine-tune the report to select only the user or computer GPOs by limiting the command scope as follows:
If you don’t want to see both user and computer GPOs, then you can use the scope option to specify a user or computer.
To display GPOs applied to a specific user:
gpresult /r /scope:user
To display GPOs applied to a specific computer:
gpresult /r /scope:computer
To display GPOs applied on a remote computer, you can use this command:
gpresult /s Laptop123 /r
To generate an HTML report of the GPResult, as shown in Figure 2-21, you can use this command:
gpresult /h c:GPOreport.html

FIGURE 2-21 Generate an HTML report using GPResult
Skill 2.3: Manage Windows Security
In this skill section, you review how to keep Windows 10 secure by using features built into Windows. Devices and users need to be protected while online, and they rely on the built-in defense features, which provide resilience against ever-increasing threats.
You will review the Windows Security features and options that help maintain your device’s health and manage threat-protection settings.
You will also review how to use User Account Control (UAC) to help you control administrative privilege elevation in Windows 10 to reduce security risks.
Windows Defender Firewall provides a significant security barrier that helps isolate and protect Windows from external threats, and you will need to understand how to configure and maintain the firewall.
Finally, you need to understand the various encryption methods available with Windows 10 and when to use Encrypting File System (EFS) and BitLocker.
Configure Windows Security
The Windows Security feature is an app accessible from within the Settings app that provides a single portal for users to control and view their device security, health, and online safety. The Windows Security section within the Settings app, as shown in Figure 2-22, contains an overview of the status of Windows security features, as well as links to other settings and support.
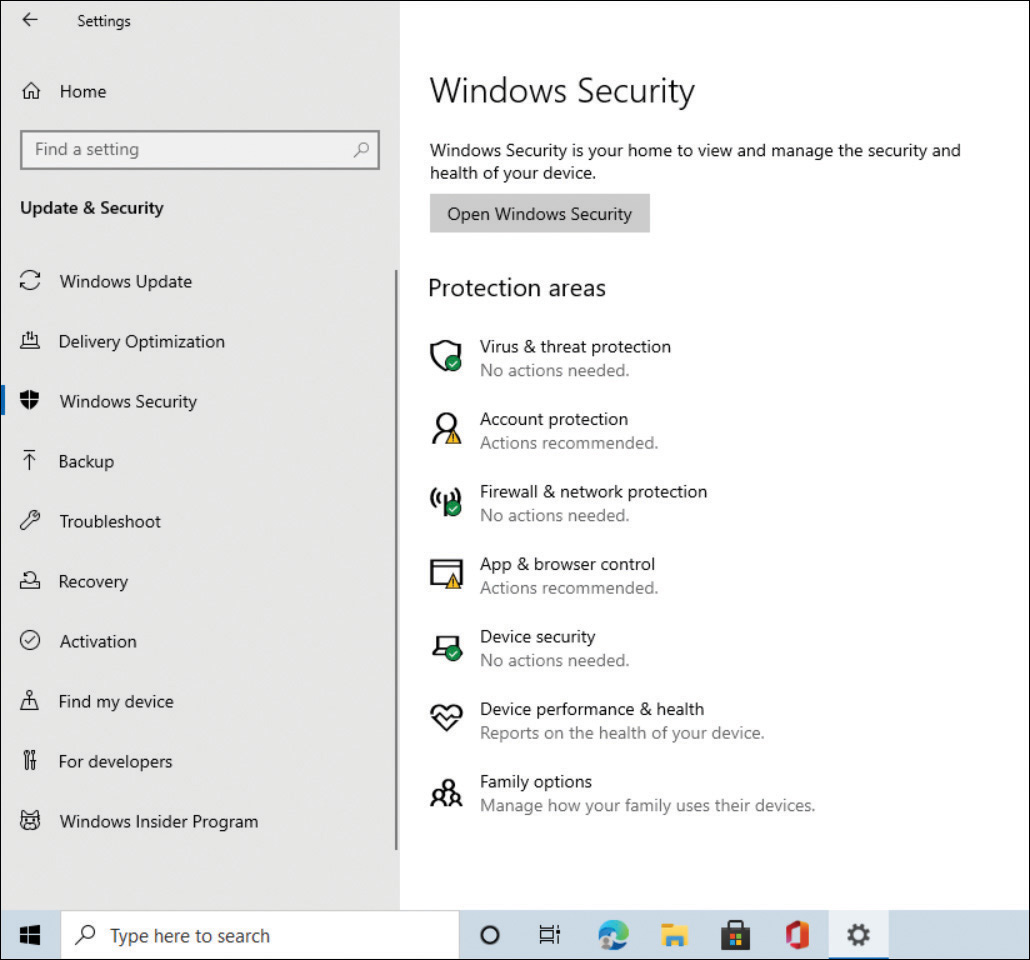
FIGURE 2-22 Windows Security within the Settings app
The Windows Security page in the Settings app provides a status report covering seven areas of security:
Virus & Threat Protection Monitor threats to your device, run scans, and get updates to help detect the latest threats.
Account Protection Access sign-in options and account settings, including features such as Windows Hello and Dynamic Lock.
Firewall & Network Protection Manage firewall settings and monitor network and internet connections.
App & Browser Control Review and update settings for Windows Defender Smart-Screen and configure exploit protection settings.
Device Security Review built-in security options that use virtualization-based security to help protect your device from attacks by malicious software.
Device Performance & Health View the status information about your device’s performance health.
Family Options Use features, such as Parental Controls, that allow you to keep track of your kids’ online activity.
From the summary portal, you can review the color-coded status icons, which indicate the level of safety of the system:
Green tick The device is sufficiently protected, and there aren’t any recommended actions.
Yellow exclamation There is a safety recommendation that should be reviewed.
Red warning This is a warning indicating that something needs immediate attention.
From within the Settings app, you can launch the individual security elements, or launch the stand-alone Windows Security app by clicking the Open Windows Security button, shown previously in Figure 2-22.
Note Windows Defender Security Center
In previous versions of Windows 10, Windows Security is called Windows Defender Security Center.
When a Windows Security item requires action from the user, like updating the virus and threat protection definitions, the shield icon within the notification area of the taskbar will show a red cross to indicate action is required.
The Windows Security app, as shown in Figure 2-23, collects the status from each of the included security features and allows you to perform some configuration. As updates are collated by the Windows Security app, they will also trigger notifications through the Action Center.

FIGURE 2-23 Windows Security App
It is possible to customize the view of the Windows Security app. Administrators can add support information about your organization in a contact card to the Windows Security app, and admins can hide entire sections of the app by using Group Policy. Hidden sections will not appear on the home page of the Windows Security app, and their icons will not be shown on the navigation bar on the side of the app.
Need More Review? The Windows Security App
To review further details about configuring the Windows Security app, refer to the Microsoft website at https://docs.microsoft.com/windows/security/threat-protection/windows-defender-security-center/windows-defender-security-center.
Configure User Account Control
Once a user has gained access to the operating system following successful sign-on, the Windows 10 feature called User Account Control (UAC) prevents unauthorized changes to the system.
Systems that suffer from malware attacks can easily be compromised if the malware can effectively use administrative access and wreak havoc on the system. This creates extra work for the help desk, increases support costs, and reduces productivity. UAC has been very successful in preventing users and malware from using administrative credentials to harm a system.
Beginning with Windows 10, administrators no longer have “always on” full access to the system. Rather than enabling administrators to implement systemwide changes, UAC presents administrators with a challenge pop-up prompt to force them to confirm their actions. Similarly, a standard user who attempts to change system settings will receive a UAC prompt, which requires administrative credentials to be provided. If the proper admin credentials are not provided, the user is denied the ability to make the requested changes.
Since the introduction of UAC in Microsoft Vista, Microsoft has fine-tuned the UAC process with the aim of making the use of UAC less frustrating for all users by reducing the number of application and system tasks that require elevation.
UAC offers various layers of protection, with the UAC prompt being the most visible to the user. The following features complement UAC:
File and Registry Redirection
Installer Detection
UAC prompt
ActiveX Installer Service
Secure Desktop
Application Information Service
Note Access Denied
For UAC to function properly, the Application Information Service component must be running. If this service is stopped or disabled, applications that require administrative access will not be able to request UAC elevation and therefore will not launch, resulting in Access Denied errors.
Standard users
Except for administrators, all users are standard users with few privileges and limited ability to make changes to the system, such as installing software or modifying the date and time. Standard user accounts are described as “operating with least privilege.” Here is a list of system tasks that a standard user can perform:
Change the desktop background and modify display settings
View firewall settings
Change the time zone
Add a printer
Change their own user account password
Configure accessibility options
Configure power options
Connect to a wireless or LAN connection
Install drivers, either from Windows Update or those that are supplied with Windows 10
Install updates by using Windows Update
Use Remote Desktop to connect to another computer
Pair and configure a Bluetooth device with the device
Perform other troubleshooting, network diagnostic, and repair tasks
Play CD/DVD media
Restore own files from File History
View most settings, although elevated permissions will be required when attempting to change Windows settings
UAC prevents you from making unauthorized or hidden (possibly malware-initiated) changes to your system that require administrator-level permissions. A UAC elevation prompt is displayed to notify you, as follows:
Prompt For Consent This is displayed to administrators in Admin Approval Mode whenever an administrative task is requested. Select Yes to continue if you consent.
Prompt For Credentials This is displayed if you are a standard user attempting to perform an administrative task. An administrator needs to enter their password into the UAC prompt to continue.
When an administrator provides permissions to a standard user via a UAC prompt, the permissions are only temporarily operative, and the permissions are returned to a standard user level once the isolated task has finished.
Standard users can become frustrated when they are presented with the UAC prompt, and Microsoft has reduced the frequency and necessity for elevation. Following are some common scenarios wherein a standard user would be prompted by UAC to provide administrative privileges. You will see that they are not necessarily daily tasks for most users:
Add or remove a user account
Browse to another user’s directory
Change user account types
Change Windows Defender Firewall settings
Configure Windows Update settings
Install a driver for a device not included in Windows or Windows Update
Install ActiveX controls
Install or uninstall applications
Modify UAC settings
Move or copy files to the Program Files or Windows folders
Restore system backup files
Schedule automated tasks
Administrative users
Administrative users need to be limited to authorized personnel within the organization. In addition to the ability to perform all tasks that a standard user can perform, they have the following far-reaching permissions:
Read/Write/Change permissions for all resources
All Windows permissions
From this, it looks as if administrators have considerable power, which can potentially be hijacked by malware. Thankfully, by default, administrators are still challenged with the UAC prompt, which pops up when they perform a task that requires administrative permissions. However, they are not required to reenter their administrative credentials. This is known as Admin Approval Mode.
A user who signs on to a system with administrative permissions will be granted two tokens:
The first token enables them to operate as a standard user.
The second token can be used when the administrator performs a task that requires administrative permissions.
Just as with the standard user, after the task is completed using elevated status, the account reverts to a standard-user privilege.
Note Turning Off UAC Is Not Recommended
UAC helps prevent malware from damaging PCs and should not be turned off. If UAC is turned off, all Universal Windows Platform apps will stop working.
Types of elevation prompts
UAC has four types of dialog boxes, as shown in Table 2-9. The Description column explains how users need to respond to the prompt.
TABLE 2-9 UAC elevation prompts
Type of Elevation Prompt |
Description |
|---|---|
A Windows 10 setting or feature needs your permission to start. |
This item has a valid digital signature that verifies that Microsoft is the publisher of this item, and it is usually safe to use the application. |
A non-Windows 10 application needs your permission to start. |
This application has a valid digital signature, and it is usually safe to use the application. |
An application with an unknown publisher needs your permission to start. |
This application does not have a valid digital signature from its publisher. Use extra caution and verify that the application is safe before using. Search the internet for the program’s name to determine whether it is a known trustworthy application or malware. |
You have been blocked by your system administrator from running this application. |
This application has been blocked because it is known to be untrusted. To run this application, you need to contact your system administrator to remove the restriction, if appropriate. |
Within large organizations, nearly all users will be configured to sign in to their computer with a standard user account. On a managed system that has been provisioned and deployed by the IT department, standard user accounts should have little need to contact the help desk regarding UAC issues. They can browse the internet, send email, and use applications without an administrator account. Home users and small businesses that lack a centralized IT resource to provision and manage their devices are often found to use administrative user accounts.
As with previous versions of Windows, an administrator can determine when the UAC feature will notify you if changes are attempted on your computer.
To configure UAC, use the following procedure.
Log on to Windows 10 with administrative privileges.
Select Start and enter UAC.
Select Change User Account Control Settings to be shown the User Account Control Settings screen where you can adjust the UAC settings, as shown in Figure 2-24.

FIGURE 2-24 Changing User Account Control Settings
You need to review the information in this dialog box by moving the slider to each position in order to determine how the UAC feature will behave with each setting. The default is Notify Me Only When Applications Try To Make Changes To My Computer.
Table 2-10 shows the four settings that enable customization of the elevation prompt experience.
TABLE 2-10 User Account Control Settings
Prompt |
Description |
|---|---|
Never notify |
UAC prompting is disabled. |
Notify me only when applications try to make changes to my computer (do not dim my desktop) |
When an application makes a change, a UAC prompt appears. However, if the user makes a change to system settings, the UAC prompt is not displayed. The desktop does not dim. |
Notify me only when applications try to make changes to my computer (default) |
When an application makes a change, a UAC prompt appears. However, if the user makes a change to system settings, the UAC prompt is not displayed. Secure desktop feature is active. |
Always notify |
The user is always prompted when changes are made to the computer by applications or by the user. |
The settings enable changes to the UAC prompting behavior only, and do not elevate the status of the underlying user account.
Need More Review? User Account Control
To review further details about configuring UAC, refer to the Microsoft website at https://docs.microsoft.com/windows/security/identity-protection/user-account-control/user-account-control-overview.
In addition to the UAC settings within the GUI, there are many more UAC security settings that can be configured via Group Policy. These can be found here: Computer ConfigurationWindows SettingsSecurity SettingsLocal PoliciesSecurity Options.
Exam Tip
You need to take time to review the UAC settings configurable by Group Policy, with attention to the settings that feature Admin Approval Mode.
Secure Desktop
When UAC prompts the user for consent or elevated credentials, it first switches to a feature called Secure Desktop, which focuses only on the UAC prompt. In addition, Secure Desktop prevents other applications (including malware) from interacting with the user or influencing the user response to the UAC prompt.
While it is possible for malware to generate a screen that imitates the look of Secure Desktop (and even re-create the visual UAC prompt), it is not possible for malware to actually provide UAC with the correct credentials. If a system was infected with malware, it could try to bypass the UAC security setting—using a bogus credential prompt to harvest usernames and passwords from unsuspecting users—and then use these credentials on genuine UAC prompts. Therefore, it is important that administrators are vigilant against potential malware attacks, and all devices are set to ensure that their malware protection is configured to automatically update.
Note UAC Integration with the Antimalware Scan Interface
The Antimalware Scan Interface (AMSI) enables Windows applications and services to integrate with antimalware products on a device. If the AMSI detects malware behind the UAC elevation request, the admin privilege is blocked.
Configure Windows Defender Firewall
After you connect a computer to a network, you might expose the computer to security risks. To mitigate these possible risks, you can implement several network security features in Windows 10, including Windows Defender Firewall.
Windows Defender Firewall blocks or allows network traffic based on the properties of that traffic. You can configure how Windows Defender Firewall controls the flow of network traffic by using configurable rules. In addition to blocking or allowing network traffic, Windows Defender Firewall can filter traffic, implement authentication, and apply encryption to this filtered traffic.
The way in which you configure Windows Defender Firewall and your network location profiles can have a significant effect on file and printer sharing, and it can affect the discoverability of your device on connected networks.
Configure Firewall & Network Protection
Within the Windows Security app is the Firewall & Network Protection page. This page provides a unified interface for accessing firewall and network protection features, and it consolidates several firewall-related components that are found within the Windows Defender Firewall in Control Panel.
To access the Firewall & Network Protection page as shown in Figure 2-25, open Windows Security, and on the Home tab, select Firewall & Network Protection.

FIGURE 2-25 Firewall & Network Protection
On the Firewall & Network Protection page, you can view the current Windows Defender Firewall status and access links to enable you to configure firewall behavior. Much of the functionality is duplicated between the Firewall & Network Protection page and Windows Defender Firewall. You can choose to perform the configuration and monitoring task outlined in this chapter using either tool. Eventually, the Windows Defender Firewall located within Control Panel will be deprecated.
Manage and monitor Windows Defender Firewall
Windows Defender Firewall is a software-based firewall built into Windows 10 that creates a virtual barrier between a computer and the network to which it is connected. Windows Defender Firewall protects the computer from unwanted incoming traffic and protects the network from unwanted outgoing traffic.
To access the Windows Defender Firewall, select Start, enter Firewall, and then select Windows Defender Firewall.
A firewall allows specific types of data to enter and exit the computer while blocking other data; settings are configured by default (but they can be changed). This type of protection is called filtering. The filters are generally based on IP addresses, ports, and protocols. A description for each filter type includes the following:
IP addresses are assigned to every computer and network resource connected directly to the network. The firewall can block or allow traffic based on an IP address of a resource (or a scope of addresses).
Port numbers identify the application that is running on the computer. For example:
Port 21 is associated with the File Transfer Protocol (FTP).
Port 25 is associated with Simple Mail Transfer Protocol (SMTP).
Port 53 is associated with DNS.
Port 80 is associated with Hypertext Transfer Protocol (HTTP).
Port 443 is associated with HTTPS (HTTP Secure).
Protocols are used to define the type of packet being sent or received. Common protocols are TCP, Telnet, FTP, HTTP, Post Office Protocol 3 (POP3), Internet Message Access Protocol (IMAP), HTTPS, and User Datagram Protocol (UDP). (You should be familiar with the most common protocols before taking the exam.)
Although many rules are already configured for the firewall, you can create your own inbound and outbound rules based on ports, protocols, programs, and more to configure the firewall to suit your exact needs.
You can monitor the state of the Windows Defender Firewall from either the Firewall & Network Protection area or the Windows Defender Firewall. It’s easy to tell from here if the firewall is on or off and whether it is the active network.
To make basic changes to the state of the firewall within the Firewall & Network Protection area, select the network and choose to turn the Windows Defender Firewall on or off. In the left pane of Windows Defender Firewall, select Turn Windows Defender Firewall On Or Off. From there, you can change settings for both private and public networks. There are two options for each:
Turn on Windows Defender Firewall (selected by default)
Block all incoming connections, including those in the list of allowed apps
Notify me when Windows Defender Firewall blocks a new app (selected by default)
Turn off Windows Defender Firewall (not recommended)
You can also use the links on the page to allow an app or feature through the firewall and the links to the advanced settings options.
Allow an app through the Windows Defender Firewall
Some data generated with and by specific apps is already allowed to pass through the Windows Defender Firewall. You can see the list of which apps are allowed by clicking Allow An App Or Feature Through Windows Defender Firewall in the left pane of the Windows Defender Firewall window in Control Panel. As you scroll through the list, you’ll see many apps (some you recognize and some you don’t), including Candy Crush Saga, Cortana, Groove Music, and of course, Microsoft Edge.
You can modify which firewall profile apps can use by selecting the Change Settings button and providing administrator approval to the UAC prompt. The list will be editable. You will notice from the list that not all apps listed are enabled by default, including Windows Media Player Netlogon Service, Windows Remote Management, and Remote Shutdown. The list of apps and settings may vary depending on your existing configurations.
If you don’t see the app you want to allow or block, select Allow Another App. You can then browse to the app executable and select the app from the list of applications in the Add An App dialog box, as shown Figure 2-26. You can configure the app to allow or stop it from communicating through the appropriate network profile by selecting the network type option in the dialog box. For existing apps, you can choose the network profile within the Allow An App Or Feature Through Windows Defender Firewall dialog box. There are two options for each app: Private and Public.

FIGURE 2-26 Adding an app through Windows Defender Firewall
You can also configure Windows Defender Firewall by using either the command-line tool Netsh.exe or by using Windows PowerShell. For example, to configure an app exception in Windows Defender Firewall with Netsh.exe, run the following command:
netsh firewall add allowedprogram C:Program Files (x86)MyAppMyApp.exe
"My Application" ENABLE
Need More Review? Using Netsh.exe To Configure Windows Defender Firewall
To find out more about controlling Windows Defender Firewall with Netsh.exe, refer to the Microsoft Support website at https://support.microsoft.com/kb/947709.
There are a significant number of Windows PowerShell cmdlets that you can use to configure and control Windows Defender Firewall. For example, to allow a new app through the firewall, you can use the following command:
New-NetFirewallRule -DisplayName "Allow MyApp" -Direction Inbound -Program "C:Program
Files (x86)MyAppMyApp.exe" -RemoteAddress LocalSubnet -Action Allow
Need More Review? Using Windows Powershell To Configure Windows Defender Firewall
To find out more about controlling Windows Defender Firewall with Windows PowerShell, refer to the Microsoft Support website at https://docs.microsoft.com/en-us/powershell/module/netsecurity/?view=win10-ps.
Configure Windows Defender Firewall with Advanced Security
Although you can configure a few options in the main Windows Defender Firewall window, you can perform more advanced firewall configurations by using the Windows Defender Firewall With Advanced Security management console snap-in, as shown in Figure 2-27. To access the snap-in, from Windows Defender Firewall, select the Advanced Settings link on the Firewall & Network Protection page within Windows Security or from the Windows Defender Firewall.

FIGURE 2-27 Windows Defender Firewall With Advanced Security
The Windows Defender Firewall With Advanced Security configuration is presented differently. Traffic flow is controlled by rules, and there is a Monitoring node for viewing the current status and behavior of configured rules.
Here are the options and terms you need to be familiar with:
In the left pane, your selection determines which items appear in the middle and right panes:
Inbound Rules Lists all configured inbound rules and enables you to double-click any item in the list and reconfigure it as desired. Some app rules are predefined and can’t be modified, although they can be disabled. Explore the other nodes as time allows. You can also right-click Inbound Rules in the left pane and create your own custom rule. Rule types include Program, Port, Predefined, and Custom. They are detailed later in this section.
Outbound Rules Offers the same options as Inbound Rules, but these apply to outgoing data. You can also right-click Outbound Rules in the left pane and create your own custom rule.
Connection Security Rules Connection security rules establish how computers must authenticate before any data can be sent. IP Security (IPsec) standards define how data is secured while it is in transit over a TCP/IP network, and you can require a connection to use this type of authentication before computers can send data. You’ll learn more about connection security rules in the next section.
Monitoring Offers information about the active firewall status, state, and general settings for both the private and public profile types.
In the right pane, you’ll see the options that correspond to your selection in the left pane.
Import/Export/Restore/Diagnose/Repair Policies Enables you to manage the settings you’ve configured for your firewall. Policies use the .wfw extension.
New Rules Enables you to start the applicable Rule Wizard to create a new rule. You can also do this from the Action menu.
Filter By Enables you to filter rules by Domain Profile, Private Profile, or Public Profile. You can also filter by state: Enabled or Disabled. Use this to narrow the rules listed to only those you want to view.
View Enables you to customize how and what you view in the middle pane of the Windows Defender Firewall With Advanced Security window.
When you opt to create your own inbound or outbound rule, you can choose from four rule types. A wizard walks you through the process, and the process changes depending on the type of rule you want to create. The rules are as follows:
Program A program rule sets firewall behavior for a specific program you choose or for all programs that match the rule properties you set. You can’t control apps, but you can configure traditional EXEs. Once you’ve selected the program for which to create the rule, you can allow the connection, allow the connection only if the connection is secure and has been authenticated using IPsec, or block the connection. You can also choose the profiles to which the rule will be applied (domain, private, or public) and name the rule.
Port A port rule sets firewall behavior for TCP and UDP port types and specifies which ports are allowed or blocked. You can apply the rule to all ports or only ports you specify. As with other rules, you can allow the connection, allow the connection only if the connection is secured with IPsec, or block the connection. You can also choose the profiles to which the rule will be applied (domain, private, public) and name the rule.
Note Connectivity and Security
When you create inbound and outbound rules and when you opt to allow the connection only if the connection is secured by authenticating the connection with IPsec, the connection will be secured using the settings in the IPsec properties and applicable rules in the Connection Security Rules node. The next section covers how to create connection security rules.
Predefined This sets firewall behavior for a program or service that you select from a list of rules that are already defined by Windows.
Custom This is a rule you create from scratch, defining every aspect of the rule. Use this if the first three rule types don’t offer the kind of rule you need.
Exam Tip
You might encounter questions regarding how to create a rule on the exam. Therefore, you should spend a few minutes working through the wizard a few times, selecting different rule types each time, to become familiar with the process.
With Windows Defender Firewall With Advanced Security selected in the left pane and using the Overview section of the middle pane, select the Windows Defender Firewall Properties link to open the dialog box shown in Figure 2-28. Here, you can make changes to the firewall and the profiles, even if you aren’t connected to the type of network you want to configure.
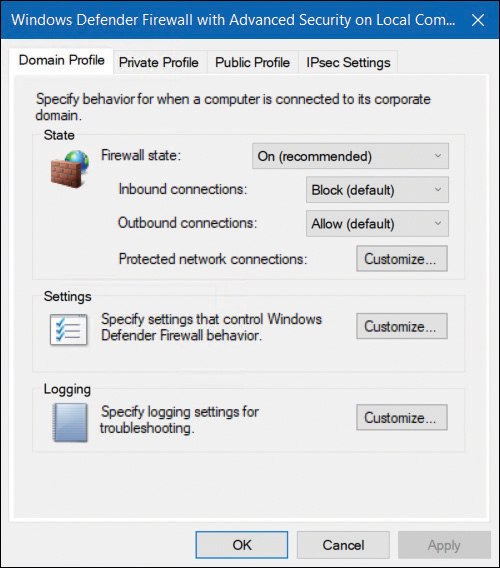
FIGURE 2-28 Viewing the Windows Defender Firewall properties
In Figure 2-28, the Domain Profile tab is selected. If you want, you can configure the firewall to be turned off when connected to a domain network. Additionally, you can strengthen the settings for the Public Profile and customize settings for the Private Profile. Finally, you can customize IPsec defaults, exemptions, and tunnel authorization on the IPsec Settings tab. Make sure to explore all areas of this dialog box and research any terms with which you are not familiar.
Configure connection security rules with IPsec
By default, Windows 10 does not always encrypt or authenticate communications between computers (there are exceptions). However, you can use Windows Defender Firewall With Advanced Security connection security rules to apply authentication and encryption to network traffic in your organization.
You can use IPsec network data encryption to ensure confidentiality, integrity, and authentication in data transport across channels that are not secure. Though its original purpose was to secure traffic across public networks, many organizations have chosen to implement IPsec to address perceived weaknesses in their own private networks that might be susceptible to exploitation.
If you implement IPsec properly, it provides a private channel for sending and exchanging potentially sensitive or vulnerable data, whether it is email, FTP traffic, news feeds, partner and supply-chain data, medical records, or any other type of TCP/IP-based data. IPsec provides the following functionality:
Offers mutual authentication before and during communications
Forces both parties to identify themselves during the communication process
Enables confidentiality through IP traffic encryption and digital-packet authentication
Connection security rules are used to force authentication between two peer computers before they can establish a connection and transmit secure information. To secure traffic with IPsec using a connection security rule, you must allow the traffic through the firewall by creating a firewall rule. Connection security rules do not apply to programs and services. Instead, they apply only between the computers that are the two endpoints.
Exam Tip
Connection security rules specify how and when authentication occurs, but they do not allow those connections. To allow a connection, you must create an inbound or outbound rule. During the inbound or outbound rule creation, you choose the required conditions for the connection, including requiring that the connections have been authenticated by using IPsec. When you do, connections will be secured using the settings in the IPsec properties and rules in the Connection Security Rule node.
Windows Defender Firewall with Advanced Security uses IPsec to enforce the following configurable rules:
Isolation An isolation rule isolates computers by restricting connections based on credentials, such as domain membership or health status. Isolation rules allow you to implement an isolation strategy for servers or domains.
Authentication Exemption You can use an authentication exemption to designate connections that do not require authentication. You can designate computers by a specific IP address, an IP address range, a subnet, or a predefined group, such as a gateway.
Server-To-Server This type of rule usually protects connections between servers. When you create the rule, you specify the network endpoints between which communications are protected. You then designate requirements and the authentication that you want to use.
Tunnel This rule enables you to protect connections between gateway computers. It is typically used when you are connecting across the internet between two security gateways.
Custom There might be situations in which you cannot configure the authentication rules that you need by using the rules available in the New Connection Security Rule Wizard. However, you can use a custom rule to authenticate connections between two endpoints.
Need More Review? Layering Security Using Windows Defender Firewall with Advanced Security
To find out more about using and configuring Windows Defender Firewall with Advanced Security refer to the Microsoft website at https://docs.microsoft.com/windows/security/threat-protection/windows-firewall/windows-firewall-with-advanced-security.
Create firewall rules
To create a rule, from within the Windows Defender Firewall With Advanced Security management console, first select the appropriate node and then select New Rule from the Actions pane. You can then complete the wizard to create your rule. As an example, to create a new inbound rule to enable network traffic for a program, perform the following procedure:
Select Inbound Rules and then select New Rule in the Actions pane.
On the Rule Type page, select Program and then select Next.
On the Program page, select This program path, browse and select the program executable, and then select Next.
On the Action page, choose Allow the connection and select Next.
On the Profile page, select which network location profiles are affected by the rule and select Next.
Provide a name and description for your rule and select Finish.
Exam Tip
To configure port-based or custom rules properly, you might need to know about the TCP and UDP ports that common networking apps use. For further information, visit https://www.iana.org/assignments/service-names-port-numbers/service-names-port-numbers.xhtml.
In addition to using the Windows Defender Firewall With Advanced Security management console, you can use the following Windows PowerShell cmdlets to configure and manage firewall settings and rules.
Get-NetFirewallRuleDisplays a list of available firewall rulesEnable-NetFirewallRuleEnables an existing firewall ruleDisable-NetFirewallRuleDisables an existing firewall ruleNew-NetFirewallRuleCreates a new firewall ruleSet-NetFirewallRuleConfigures the properties of an existing firewall rule
Need More Review? Using Windows Powershell To Configure Windows Defender Firewall with Advanced Security
To find out more about controlling Windows Defender Firewall With Advanced Security Administration with Windows PowerShell, refer to the Microsoft website at https://docs.microsoft.com/en-us/windows/security/threat-protection/windows-firewall/windows-firewall-with-advanced-security-administration-with-windows-powershell.
Implement encryption
Two encryption technologies are available for Windows 10 devices: Encrypting File System (EFS) and BitLocker. Both tools are available for use on all Windows 10 editions except for Windows 10 Home. Although both technologies offer robust methods of encryption, you need to understand how to implement each method as well as the use case for each so that you can decide the more appropriate tool to use in a given scenario. Just because BitLocker is more modern, you should not assume it is better or worse than EFS. Both provide Windows 10 users with strong encryption.
Implement Encrypting File System
The built-in Encrypting File System (EFS) is a powerful method of restricting access to files within an NTFS environment. Although EFS has been available since Windows 2000, very few organizations routinely implement file- and folder-level encryption. Most organizations requiring encryption will choose to use BitLocker Drive Encryption, which encrypts complete drives.
Where EFS is utilized, most issues reported to the help desk relating to EFS often result from an overly enthusiastic member of staff encrypting some of their own files. By default, they have permission to encrypt their own files because they have the Creator Owner special identity.
The best way to ensure that EFS is not inadvertently used, potentially causing problems later, is to implement some or all of the following measures:
Stand-alone computers that are not domain-joined should back up their encryption keys to ensure they can be used for recovery purposes later.
Explain the (strict) usage criteria of EFS in the staff handbook/policy.
Train IT staff on the use of EFS and the potential implications of unauthorized usage.
Plan and document where EFS will be applied and who will apply it.
Place sufficient restrictions across the domain to prevent unauthorized use of EFS.
Implement an EFS Data Recovery Agent (DRA) so that if EFS is misused, then an administrator within the organization can recover any encrypted files.
Implement employee-leaving procedures and scan for encrypted files to ensure all encrypted files are decrypted or ownership transferred.
Disable, rather than delete, user accounts for a fixed time period in case the user account needs to be reactivated in order to remove EFS from corporate resources.
It’s necessary to ensure that selected users and members of IT departments appreciate that EFS is an extremely secure method of protecting files and that often this level of protection is not necessary. Only the original file owner who applied the encryption can access the file and remove the encryption.
If an organization does not have a DRA in place, one needs to be created as soon as possible. Doing so will enable subsequent files encrypted with EFS to be decrypted by the DRA, if needed.
The process for creating a DRA certificate in Windows 10 for a device that is not domain-joined can be performed using this procedure:
Open a PowerShell window or a command prompt window. (This does not require administrative privilege.)
Navigate to the location where you want to store your DRA certificate.
Type cipher /r: file name and press Enter.
Provide a password to protect the DRA certificate. (This can be null.)
To install the DRA so that a user can use it, follow these steps:
Sign in with the user credentials of the user for whom you want to create access to the DRA.
In the search box, type secpol.msc.
In the left pane of Local Security Policy, double-click Public Key Policies, right-click Encrypting File System, and then select Add Data Recovery Agent.
In the Add Recovery Agent Wizard, select Next.
Browse to the location of the DRA recovery certificate. (It will have a .cer file extension.)
Select the certificate, and then select Open.
When you are asked if you want to install the certificate, select Yes > Next > Finish.
In the right pane of Local Security Policy, scroll across and note that Intended Purposes for the certificate is set to File Recovery.
Open a command prompt window, and enter gpupdate to update Group Policy.
Once the DRA has been created, all EFS encrypted files can be recovered by the DRA.
The encrypted files that are already encrypted are not automatically updated when a DRA is created. Existing encrypted files cannot be recovered by the DRA unless they are opened and closed by the resource owner, which causes the DRA to update the file. To update all encrypted files on a local drive, you can enter cipher.exe /u in an elevated command prompt on the system containing the encrypted files.
Encrypt Files And Folders By Using Encrypting File System
When used with a Data Recovery Agent (DRA), Encrypting File System (EFS) is a very secure method to protect sensitive data by encrypting files and folders. Because EFS was first introduced in Windows 2000, EFS often suffers from being dismissed as being old or obsolete. Many people pass over EFS in favor of BitLocker Drive Encryption or BitLocker To Go. Don’t be fooled, though. EFS offers functionality that BitLocker does not, and despite EFS having been available for many years, it still offers an incredibly secure method of enterprise-grade encryption.
It is important to use EFS and a DRA together. Without a DRA available within your organization, you may never regain access to an EFS-encrypted resource. The DRA will help to recover data if the encryption key is deleted or if the machine has been lost or compromised.
EFS offers encryption at a file and a folder level, and it cannot be used to encrypt an entire hard disk. Instead, you would use BitLocker (covered later in this section) to encrypt an entire drive. Users can encrypt any file or folder they have created on an NTFS-formatted hard disk by right-clicking the resource and selecting Properties from the context menu that appears. In the Advanced Attributes dialog box (shown in Figure 2-29), select Encrypt Contents To Secure Data.
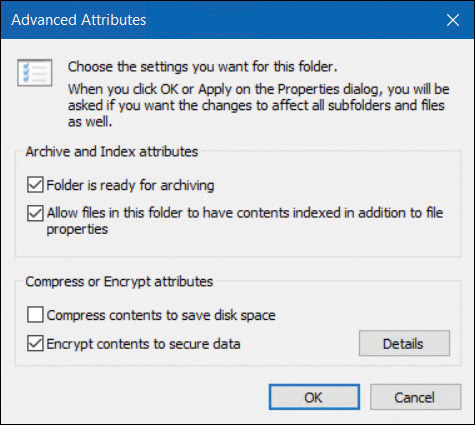
FIGURE 2-29 Enabling EFS encryption
Encryption should not be used without prior planning and establishing some safeguards to secure the encryption keys that are used. EFS protects data from unauthorized access, and it is especially effective as a last line of defense from attacks, such as physical theft.
EFS uses Windows Public Key Infrastructure (PKI) and a fast encryption algorithm to protect files. The public and private keys generated during encryption ensure that only the user account that encrypted the file can decrypt it. Encrypted data can be decrypted only if the user’s personal encryption certificate is available, which is generated through the private key. Unless exported by the user, this key cannot be used by anyone else, and EFS prevents any access to the data. EFS will prevent attempts to copy or move encrypted data by anyone except users who have the proper credentials. If the user deletes their account or leaves the company, any encrypted resources will not be accessible, which could lead to data being lost. The only way to prevent data loss is to ensure that a DRA has previously been created so that an administrator can use the DRA to decrypt the resource.
Here are some key points you need to learn about EFS:
The process of encryption and decryption happens behind the scenes and is not visible to users.
Encryption occurs when you close files; decryption occurs when you open them.
EFS is available only on NTFS volumes.
EFS keys aren’t assigned to a computer; they are assigned to a specific user.
If a hacker gains access to the user’s PC while the user is signed in, the hacker will be able to access and open EFS-protected files.
The file owner can move or copy an EFS-protected file.
You can’t use EFS and compression together; it’s one or the other.
If the file owner moves an EFS-protected file to a volume that does not support EFS (such as FAT32), the file will be decrypted.
Encrypted files and folders are no longer colored green in File Explorer; now they include a padlock icon on each file.
EFS uses Advanced Encryption Standard (AES), which uses a 256-bit key algorithm, a credible industry standard of encryption.
EFS is only available on Windows 10 Pro, Enterprise, and Education editions.
By default, any user can use EFS to encrypt any file for which they have ownership. Unless company policy requires EFS, you should consider disabling EFS with Group Policy until a DRA is created.
It is vital that a DRA be in place before EFS is enabled. Without a DRA, even an administrator is unable to recover EFS-protected files and folders. For the exam, you need to be able to configure a DRA using the command-line tool Cipher.exe.
Once you have created a DRA, you should update the encryption of each currently encrypted file to have the new DRA applied by using cipher /u. You can continue to encrypt your files and folders within File Explorer using the Encrypt Contents to Secure Data option shown previously in Figure 2-29.
Note DRA and EFS: The Sequence Is Important
Only encrypted files that are created after the DRA has been created can be recovered using the DRA.
Perform Backup And Recovery Of Efs-Protected Files
Built into Windows is a wizard for users who want to use EFS to create a file encryption certificate and key and back up these files. After you first encrypt files or folders, you will see the EFS pop-up notification in the notification area of the desktop asking you to back up your encryption key.
You can use the following steps to start the wizard and complete the process to configure an EFS certificate:
Open Control Panel and select User Accounts.
Select Manage your file encryption certificates to open the Encrypting File System Wizard.
Select Next. The wizard asks for your file encryption certificate; you can select your existing certificate, or you can create a new certificate.
Select Create a New Certificate, and then select Next.
On the Create A Certificate page, select Make a new self-signed certificate and store it on my computer and select Next.
Provide a backup location and password and select Next.
On the Update your previously encrypted files page, select All Logical Drives and select Next.
On the Your encrypted files have been updated page, select Close.
In addition to the Cipher.exe command-line tool, you can use the Certificates MMC (CertMgr.msc) to manage or back up your personal EFS certificate. You can also import your certificates to a new computer that doesn’t already contain your certificate. In the event of your certificate being lost, perhaps due to a failed computer or corrupted profile, you can import the DRA certificate onto a new computer, which would allow recovery of the encrypted files.
To import your EFS certificate into your personal certificate store via the Certificate Import Wizard, you should follow these steps:
Open Certificates MMC by entering CertMgr.msc into the search box.
Select the Personal folder.
Select Action > All Tasks > Import.
Work through the Certificate Import Wizard to import the PFX certificate.
Need More Review? Cipher.exe
For more information about Cipher.exe, refer to https://docs.microsoft.com/windows-server/administration/windows-commands/cipher.
Some common parameters used with the Cipher.exe command include:
/cDisplays information about an encrypted file/dDecrypts specified files and directories/s:<directory>Performs the specified operation on all subdirectories in the specified directory/uUpdates all encrypted files on the local drives (useful if you need to update previously encrypted files with a new recovery certificate)/u /nFinds all encrypted files on a local drive/?Displays help/xBacks up the EFS certificate and keys to the specified file name/r:<FileName>Generates an EFS recovery agent key and certificate, based on the user account, and then writes them to a PFX file (Personal Information Exchange file, which contains a certificate and private key) and a CER file (Security Certificate file, which contains only the certificate)
After you have encrypted your first file or folder, Windows 10 will prompt you to make a backup of the EFS certificate and key, as shown in Figure 2-30. This reminder will appear in the notification area and it will reappear on a regular basis until you back up the EFS certificate and key or choose Never Back Up. You need to ensure you do take a backup and store it safely in a location separate from that of the files.

FIGURE 2-30 Backing up the file encryption certificate and key
Troubleshoot Encrypting File System
When users report that they are unable to use EFS to encrypt files, you need to verify that all the four statements are correct:
A recovery agent policy has been defined, which prevents the use of EFS unless a DRA has been created.
The file volume is NTFS; EFS is only supported on NTFS.
The file is not compressed. NTFS allows files to be encrypted or compressed, not both.
You have Write access to the file. You need to be able to save the encrypted file.
Other examples of help desk EFS issues include the following scenarios and possible answers:
I can’t open files I have encrypted. Only users with the correct EFS certificate and private key for the file can open EFS-protected files. Has the user account been deleted/re-created since the file was created? Use a DRA to recover the file and have the user encrypt the file again.
Will I get a warning that I will lose the EFS protection on my file when I copy my file a FAT32 USB drive? If the user has the necessary NTFS permissions to move or copy the file, then Windows will carry out the operation without error or warning. Encrypted data copied to a drive not formatted with NTFS will lose the EFS protection.
I saved a file that is protected using Windows Information Protection (WIP) to a FAT32 USB drive. The file looks like it is encrypted using EFS. Is this correct? WIP is supported in Windows 10 to protect files. Protected files look and behave like EFS files, but they do not use EFS. The file is an encrypted PFILE that stores the Enterprise Data Protection metadata, which can be stored on a FAT32 drive.
I can’t open an EFS file after upgrading from a previous version of Windows. You can still recover the files by importing the EFS certificate and key from your old computer into your new computer.
My antivirus check program runs but I get “Access Denied” error messages. An antivirus check program can only read your encrypted files. If the device is a shared computer and other users have encrypted files on the hard disk, the antivirus tool will not be able to access these files. Other users need to perform a virus check for files by signing in on the device.
Configure BitLocker
BitLocker Drive Encryption enables you to encrypt an entire hard disk, which can be the Windows operating system drive or a data drive. Only the Windows 10 Pro, Enterprise, and Education editions support BitLocker in both x86 and x64-bit varieties. During the encryption process, BitLocker Drive Encryption will configure the drive that contains the operating system to have a system partition and an operating system partition.
Exam Tip
Two partitions are required to run BitLocker because pre-startup authentication and system integrity confirmation must occur on a separate partition from the drive that is encrypted.
If these partitions are not present the process will automatically modify the partitions as required.
Exam Tip
You can enable BitLocker before you deploy the operating system. When you do, you can opt to encrypt used disk space only or encrypt the entire drive.
Many modern computers now ship with a Trusted Platform Module (TPM), which is a microchip that is used to securely store cryptographic information, such as the encryption keys that BitLocker uses. BitLocker supports versions 1.2 and 2.0 of the TPM specification, and information contained on the TPM is more secure from external software attacks and physical theft. If a device has been tampered with—for instance, a hard drive has been removed from the original computer—BitLocker will prevent the drive from being unlocked. BitLocker will seek remediation from the user by entering BitLocker recovery mode and requiring the user to enter a 48-digit recovery key. Although a TPM is the most secure option, BitLocker technology can also be used on devices without a TPM by configuring a GPO to require that BitLocker obtain the required cryptographic information from a USB flash drive. This information must be presented to unlock the volume.
Need More Review? Overview of Bitlocker Device Encryption in Windows 10
For more information about Windows BitLocker, visit https://docs.microsoft.com/en-us/windows/security/information-protection/bitlocker/bitlocker-device-encryption-overview-windows-10.
When configuring BitLocker, you must consider the following:
The requirements for hardware and software These include TPM versions, BIOS configuration, firmware requirements, drive size, and so on.
How to tell if your computer has a TPM An administrator might opt to enter
TPM.mscin Search. An end user might opt to access Control Panel, All Items, open BitLocker Drive Encryption, and see if they can turn on BitLocker. If a TPM isn’t found, you’ll have to configure the Group Policy setting called Require Additional Authentication At Startup, which is located in Computer ConfigurationAdministrative TemplatesWindows ComponentsBitLocker Drive EncryptionOperating System Drives. You need to enable this policy and then select the Allow BitLocker Without a Compatible TPM check box.The credentials required to configure BitLocker Only administrators can manage fixed data drives, but standard users can manage removable data drives. (The latter can be disabled in Group Policy.) Standard users can also change the PIN or password on operating system drives to which they have access via BitLocker.
How to automate BitLocker deployment in an enterprise One way is to use the command-line tool Manage-bde.exe. Manage-bde command-line tools you might use in your own work are detailed later in this section. There are other ways to automate BitLocker deployment in an enterprise, including using Windows Management Instrumentation (WMI) and Windows PowerShell cmdlets.
The reasons BitLocker might start in recovery mode Reasons include disabling the TPM, making changes to the TPM firmware, making changes to the master boot record, and faults on the drive, motherboard, or TPM.
How to manage recovery keys Recovery keys let you access a computer in the event that BitLocker doesn’t permit access. There are many ways to store these keys for fixed drives, including saving them to a folder or your Microsoft account online, printing them, and storing the keys on multiple USB drives.
Note Using Bitlocker Without TPM
You can only enable BitLocker on an operating system drive without a compatible TPM if the BIOS or UEFI firmware can read from a USB flash drive in the boot environment. This is because BitLocker requires a startup key. If you do this, though, you won’t be able to take advantage of the pre-startup system integrity verification or multifactor authentication.
Understand BitLocker key protectors
BitLocker offers users several protection options. Administrators can choose which type of protection users should adopt to unlock a BitLocker-encrypted drive. BitLocker supports multifactor authentication for operating system drives, enabling you to require additional authentication, such as adding a smart card or a USB drive with a startup key on it or requiring a PIN on startup. These are called key protectors.
BitLocker offers multiple key protectors that can be used to unlock a protected system:
TPM + startup PIN + startup key This is the most secure combination. The encryption key is stored on the TPM chip. The user might find this option cumbersome because it requires multiple authentication tasks.
TPM + startup key The encryption key is stored on the TPM chip. The user needs to insert a USB flash drive that contains a startup key.
TPM + startup PIN The encryption key is stored on the TPM chip. The user needs to enter a PIN to unlock the device.
Startup key only The user needs to insert a USB flash drive with the startup key on it. The device doesn’t need to have a TPM chip. The BIOS must support access to the USB flash drive before the operating system loads.
TPM only The encryption key is stored on the TPM chip, and no user action is required.
With all the BitLocker authentication methods, the drive is encrypted until unlocked. When the BitLocker encrypted drive is in recovery mode, you can also unlock the drive by using either the recovery password or recovery key:
Recovery password This is a 48-digit number typed on a regular keyboard or by using the function keys (F1–F10) to input the numbers.
Recovery key This is an encryption key created when BitLocker is first employed and is used for recovering data encrypted on a BitLocker volume. Often, the encryption key is stored on removable media.
Because the TPM chip together with BitLocker protects the hard drive, administrators can also configure BitLocker to operate without additional unlock steps; provided the device (and TPM) recognize the drive, it will be unlocked.
With BitLocker enabled, the drive is no longer susceptible to data theft. On a system that is not encrypted, simply removing the drive from the PC and attaching it as a secondary drive in another PC allows the data to be read, which bypasses all NTFS security.
Exam Tip
Administrators can fine-tune the settings within Group Policy for BitLocker, and you would do well to review the available GPOs in detail because they are likely to appear on the exam. Review the GPOs located in Computer ConfigurationPoliciesAdministrative TemplatesWindows ComponentsBitLocker Drive Encryption.
Enable BitLocker without a TPM
By default, a modern Windows device such as a Surface Pro will contain a TPM, and BitLocker Drive Encryption will be already enabled when shipped. When the user signs on to the device for the first time with a Microsoft account, the recovery key is saved to their Microsoft account.
If a TPM isn’t found, select Cancel on the BitLocker Drive Encryption and follow the displayed instructions to configure Require Additional Authentication At Startup GPO located in Computer ConfigurationAdministrative TemplatesWindows ComponentsBitLocker Drive EncryptionOperating System Drives. Enable this GPO and select the Allow BitLocker Without A Compatible TPM check box, as shown in Figure 2-31.
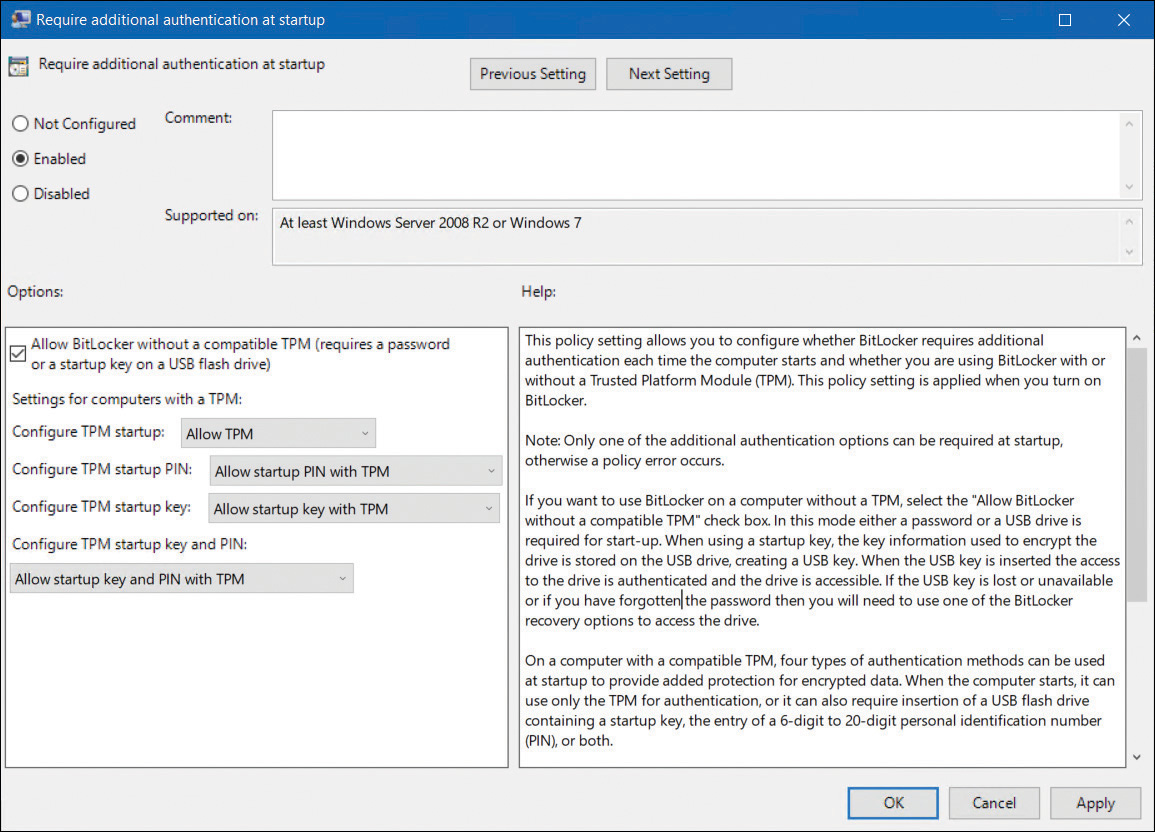
FIGURE 2-31 Configuring BitLocker to work without a TPM
Note Bitlocker Is More Secure with A TPM
Although BitLocker is fully supported and can be enabled on a Windows 10 device without a TPM present, you should fully understand that the most secure implementation of BitLocker is with a TPM present. The TPM also provides pre-operating system startup system integrity verification, which will not take place otherwise. Additionally, if you store the decryption key on a USB flash drive, you should protect the key with a PIN.
A new GPO is included with Windows 10 and can be found at Computer ConfigurationPoliciesAdministrative TemplatesWindows ComponentsBitLocker Drive EncryptionOperating System DrivesConfigure Pre-boot Recovery Message And URL. This GPO enables administrators to configure a custom recovery message and to replace the existing URL that is displayed on the pre-boot recovery screen when the operating system drive is locked. This enables administrators to provide information to the user, such as help desk support contact information.
Configure BitLocker
If you want to use BitLocker to encrypt the operating system drive on a supported Windows 10 device, the drive must be formatted as NTFS. Perform these steps to encrypt the drive using BitLocker:
Launch Control Panel, select System and Security, and then select BitLocker Drive Encryption.
Select the operating system drive and select Turn on BitLocker. (If you receive an error that the device can use a TPM chip, either enable the TPM within the BIOS or Unified Extensible Firmware Interface (UEFI) settings or enable the Require additional authentication at startup Group Policy setting, which is referred to earlier in this section.)
On the BitLocker drive encryption setup page, select Next.
On the Preparing your drive for BitLocker page, if prompted, select Next. (If your system has a Windows Recovery Environment, this will need to be manually enabled and moved to the system drive after the drive is encrypted.)
If you are presented with a warning message regarding the Windows Recovery Environment, select Next.
Choose how to unlock your drive at startup. (Enter A Password is used in this example.)
Enter the password, reenter to confirm, and then select Next.
On the How do you want to back up your recovery key? page, select one of the options, then select Next and back up your key. (Optionally, you can choose to back up the key in a secondary location.)
On the Choose how much of your drive to encrypt page, select to encrypt either the used disk space or the entire drive and select Next.
On the Choose which encryption mode to use page, select either the newest encryption mode or the compatible mode and select Next.
On the Are you ready to encrypt this drive? page, choose to allow the option BitLocker system check to take place (default), or deselect the option and then select Continue.
Restart the PC, enter the BitLocker password, and allow the drive to be encrypted in the background. In the taskbar notification area, there should be an icon indicating that BitLocker Drive Encryption is in progress.
Note BitLocker Is Immediately Enforced
When BitLocker Drive Encryption starts to encrypt the device, the drive is protected, and it will require unlocking during startup, even if the encryption process has not fully completed encrypting every file.
From within the BitLocker Drive Encryption page in Control Panel, you can review the BitLocker status and perform additional tasks, including suspending protection, backing up your recovery key, changing the BitLocker password, removing the password, and turning off BitLocker.
Note Used Disk Space Only
An improvement to BitLocker enables administrators to choose whether to encrypt only the used disk space or to encrypt the entire drive during the initial deployment of Windows. Choosing the first option significantly reduces the time to deploy and requires less administrative effort, though purists will tell you this is slightly less secure.
Configure BitLocker using command-line tools
Administrators can also manage BitLocker Drive Encryption using the command-line tool Manage-bde.exe or by using the command prompt, PowerShell, and WMI. Managing recovery keys is discussed later.
Several parameters can be used with the Manage-bde command to manage BitLocker, as listed in Table 2-11.
TABLE 2-11 Manage-bde command parameters
Parameter |
Description |
|---|---|
Manage-bde -status |
Provides information about all drives on the computer, whether or not they are BitLocker-protected. |
Manage-bde on |
This encrypts the drive and turns on BitLocker. Use the UsedSpaceOnly switch to set the encryption mode to Used Space Only encryption. |
Manage-bde -off |
This decrypts the drive and turns off BitLocker. All key protectors are removed when decryption is complete. |
Manage-bde -pause & Manage-bde -resume |
Use with a drive letter to pause or resume encryption or decryption. |
Manage-bde -lock & manage-bde -unlock |
Use with a drive letter to lock and unlock access to BitLocker-protected data. |
Manage-bde -autounlock |
Manages automatic unlocking of a data drive. |
Manage-bde -protectors |
Manages protection methods for the encryption key. |
Manage-bde -changepassword |
Modifies the password for a data drive. |
Manage-bde -changepin |
Modifies the PIN for an operating system drive. |
Manage-bde - forcerecovery |
Forces a BitLocker-protected drive into recovery mode on restart. |
Manage-bde -changekey |
Modifies the startup key for an operating system drive. |
Manage-bde WipeFreeSpace |
Wipes the free space on a drive. |
Manage-bde -help or -h |
Displays complete Help at the command prompt. |
Need More Review? Manage-Bde Command-Line Tool
More information on using the manage-bde command-line tool is available in this article at https://docs.microsoft.com/windows-server/administration/windows-commands/manage-bde.
Windows 10 offers built-in support for BitLocker PowerShell cmdlets, as listed in Table 2-12. You can also use Get-help <BitLocker cmdlet>, such as Get-Help Enable-BitLocker -examples.
Note Powershell Help
You may need to use the update-help cmdlet to allow PowerShell to display the most current help files and examples, which may assist your understanding.
TABLE 2-12 BitLocker PowerShell cmdlets
Cmdlet |
Description |
|---|---|
|
Adds a key protector for a BitLocker volume |
|
Saves a key protector for a BitLocker volume in Active Directory Domain Services (AD DS) |
|
Removes BitLocker automatic unlocking keys |
|
Disables BitLocker encryption for a volume |
|
Disables automatic unlocking for a BitLocker volume |
|
Enables encryption for a BitLocker volume |
|
Enables automatic unlocking for a BitLocker volume |
|
Gets information about volumes that BitLocker can protect |
|
Prevents access to encrypted data on a BitLocker volume |
|
Removes a key protector for a BitLocker volume |
|
Restores BitLocker encryption for the specified volume |
|
Suspends BitLocker encryption for the specified volume |
|
Restores access to data on a BitLocker volume |
Need More Review: Configure BitLocker Using Powershell Cmdlets
For more information about how to configure BitLocker using PowerShell cmdlets, visit this reference article at https://docs.microsoft.com/powershell/module/bitlocker/?view=win10-ps.
Using PowerShell, you can obtain very detailed information from systems, including status, key protectors used, encryption method, and type. If you run the Get-BitLockerVolume | format-list cmdlet to provide information about an encrypted drive without first unlocking the drive, the amount of information obtained will be restricted.
Upgrade a BitLocker-enabled computer
BitLocker is designed to protect your computer from preboot changes, such as updating the BIOS or UEFI. If you upgrade your computer, for example, with a BIOS firmware upgrade, this can cause the TPM to perceive it is under attack. In order to prevent Windows 10 from entering BitLocker recovery mode, you should take some precautions when upgrading a BitLocker-enabled computer. Before updating the BIOS, carry out the following steps:
Temporarily suspend BitLocker by opening the BitLocker Drive Encryption in Control Panel and selecting Suspend Protection on the operating system drive, which places it in disabled mode.
Upgrade the system or the BIOS.
BitLocker protection will be automatically turned back on following a reboot, but if this default behavior has been modified, you should turn BitLocker on again by opening BitLocker Drive Encryption in Control Panel and selecting Resume Protection on the operating system drive.
Forcing BitLocker into disabled mode keeps the data encrypted, with the volume master key encrypted with a clear key. The availability of this unencrypted key disables the data protection that BitLocker offers, but it ensures that the subsequent computer startup will succeed without further user input. After the BIOS upgrade, BitLocker is reenabled so that the unencrypted key is erased from the disk and BitLocker protection is functional again. The encryption key will be resealed with the new key that has been regenerated to incorporate new values of the measured components that may have changed during the system upgrade.
Note Throughout Suspension, Data Is Encrypted
Although BitLocker is suspended, the drive remains encrypted and all new data written to the disk is still encrypted. Suspension prevents BitLocker from validating system integrity at startup and is a security risk; therefore, the protection status should be resumed at the earliest opportunity.
Move a BitLocker-encrypted drive to another computer
Moving a BitLocker-encrypted drive to another BitLocker-enabled computer requires that you turn off BitLocker temporarily (by using the Suspend Protection option). After the move is complete, you need to reenable BitLocker, which will then resume BitLocker protection.
The PowerShell command for suspending BitLocker encryption on the system drive is:
Suspend-BitLocker -MountPoint "C:"
Sometimes a system change can cause the BitLocker system integrity check on the operating system drive to fail. This prevents the TPM from releasing the BitLocker key to decrypt the protected operating system drive and requires the user to enter recovery mode. Examples of system changes that can result in a BitLocker system integrity check failure include:
Moving the BitLocker-protected drive to a new computer
Installing a new motherboard with a new TPM
Turning off, disabling, or clearing the TPM
Making changes to any boot configuration settings
Making changes to the BIOS, UEFI firmware, master boot record, boot sector, boot manager, Optical ROM, or other early boot components or boot configuration data
When Windows 10 upgrades itself from one version to another, such as 1803 to 1809, there should be no issues with BitLocker because the system will automatically perform the suspend and resume actions during the process.
Configure startup key storage and recovery options
You know that without access to the encryption key contained in the TPM or stored in the startup key, you are unable to unlock a BitLocker-encrypted drive.
You should ensure that you’re familiar with BitLocker-related terminology:
Recovery password and recovery key When you first configure BitLocker, it will create a recovery key and prompt you to store it safely. You’ll need to provide this recovery key if the TPM is unable to validate that the drive hasn’t been tampered with or if the startup key, password, or PIN have not been supplied during boot time.
Password A password or passphrase is created to protect fixed, removable, and operating system drives with or without a TPM. The password length can be set in Group Policy and can consist of eight to 255 characters.
PIN When you use a TPM, you can configure BitLocker with a PIN that the user must type during the initial startup of the device to allow Windows 10 to start. The PIN can consist of between 4 to 20 digits, and the length can be set in the Configure Minimum PIN Length For Startup Group Policy setting.
Enhanced PIN This enables administrators to force the use of a complex PIN, just like a password or passphrase (including spaces), by configuring the Allow Enhanced PINs For Startup GPO setting. This policy is applied when you turn on BitLocker and is configurable only for operating system drives.
Startup key This is stored on a USB flash drive and can be used with or without a TPM. To use this method of unlock, the USB flash drive must be inserted every time the computer starts. The USB flash drive can be formatted by using NTFS, FAT, or FAT32.
TPM Lockout By default, TPM 2.0 will lock the user out for two hours whenever the TPM is under attack. (TPM 1.2 lockout duration varied by manufacturer.)
Configure BitLocker To Go
A portable version of BitLocker, BitLocker To Go, is aimed at protecting removable USB devices and uses the same technology as BitLocker Drive Encryption, but it does not require use of a TPM. BitLocker To Go can protect flash drives, Secure Digital (SD) cards, and removable hard disks formatted with NTFS, FAT16, FAT32, or exFat file systems. BitLocker To Go is available for users with Windows 10 Pro, Windows 10 Enterprise, or Windows 10 Education.
To create a BitLocker To Go drive, follow these steps:
Insert a removable drive.
Open Windows Explorer (though it may open automatically).
Right-click the removable drive and select Turn BitLocker on.
After the BitLocker Drive Encryption Wizard opens, choose how to unlock the drive and select Next.
On the How do you want to back up your recovery key? page, choose an option, and then once the password is saved, select Next.
On the Choose how much of your drive to encrypt page, select to encrypt either the used disk space or the entire drive and select Next.
On the Choose which encryption mode to use page, select either the newest encryption mode or the compatible mode and select Next.
On the Are you ready to encrypt this drive? page, select Start encrypting.
The encryption process will commence. Once the process is complete, you can close the wizard.
If the option to encrypt the drive is not available, you need to check that you are using a supported version of Windows and that the feature has not been disabled by Group Policy.
Once a removable drive has been encrypted, each time you insert the removable drive into a device, you will need to unlock it with one of the following methods:
A recovery password or passphrase. (This complexity can be set within Group Policy.)
A smart card.
Select the option Always Auto-Unlock This Device On This PC.
The last option is useful for users who frequently use removable drives because it reduces the likelihood of frustration of entering the password every time they use their removable drives. If the removable drive is used on other devices once the user unlocks the removable drive, it can also be configured to auto-unlock if required.
Standard users can turn on, turn off, or change configurations of BitLocker on removable data drives. They are also able to change their own password for encrypted drives via BitLocker Drive Encryption in Control Panel. However, if a user loses or forgets the password for the data or removable drive, you need to have access to the BitLocker recovery key to recover the data and unlock the drive.
Exam Tip
It is important to remember that a TPM is not required for BitLocker To Go. The encryption keys are secured using a password or passphrase or smart card, and not by a TPM.
The following GPOs are available within the BitLocker To Go settings found at Computer ConfigurationPoliciesAdministrative TemplatesWindows ComponentsBitLocker Drive EncryptionRemovable Data Drives:
Control use of BitLocker on removable drives.
Configure use of smart cards on removable data drives.
Deny Write access to removable drives not protected by BitLocker.
Configure use of hardware-based encryption for removable data drives.
Enforce drive-encryption type on removable data drives.
Allow access to BitLocker-protected removable data drives from earlier versions of Windows.
Configure use of passwords for removable data drives.
Choose how BitLocker-protected removable data drives can be recovered.
Users of Windows 10 Home cannot encrypt removable data drives, but they can access BitLocker To Go–enabled data drives and have read-only access to the data, if they provide the correct recovery password, passphrase, or smart card.
Understand BitLocker and BitLocker To Go data recovery
You need to support users who have devices that will not boot into Windows because of BitLocker-related issues during boot time. There are several situations in which BitLocker will enter into BitLocker recovery mode because of a perceived threat to the system, such as one of the following:
Repeatedly failing to provide the startup password.
Changing the startup boot order to boot another drive in advance of the hard drive.
Changing the NTFS partition table, such as creating, deleting, or resizing a primary partition.
Entering the PIN incorrectly too many times so that the anti-hammering logic of the TPM is activated.
Turning off, disabling, deactivating, or clearing the TPM.
Upgrading critical early startup components, such as a BIOS or UEFI firmware upgrade, causing the related boot measurements to change.
Adding or removing hardware (for example, inserting a new motherboard or video card into the computer).
You can also force a BitLocker-protected device into recovery mode by pressing the F8 or F10 key during the boot process.
Note BitLocker Recovery Guide
The following article provides a useful list of examples of specific events that will cause BitLocker to enter recovery mode when attempting to start the operating system drive: https://docs.microsoft.com/windows/device-security/bitlocker/bitlocker-recovery-guide-plan.
When the device has entered the BitLocker recovery mode, you need to recover the drive by using one of these methods:
Supply the 48-digit recovery password.
Allow a domain administrator to obtain the recovery password from Active Directory.
Allow an administrator to obtain the recovery password from Azure Active Directory.
Run a script to reset the password, using PowerShell or VBScript, which uses the key package.
For stand-alone and small-business users, the BitLocker recovery key is stored in the user’s Microsoft account at https://onedrive.live.com/recoverykey. You will need to use the keyboard number or function keys to enter the number to unlock the drive. Once the operating system has started, users can then re-create a new startup key; otherwise, the BitLocker recovery mode will remain in place.
For corporate users, there are several settings that can be configured in Group Policy that will define the recovery methods that require Windows to save BitLocker recovery information to Active Directory. The GPOs found in the subfolders of Computer ConfigurationAdministrative TemplatesWindows ComponentsBitLocker Drive Encryption are as follows:
Choose How Bitlocker-Protected Operating System Drives Can Be Recovered
Choose How Bitlocker-Protected Fixed Drives Can Be Recovered
Choose How Bitlocker-Protected Removable Drives Can Be Recovered
For each of these GPOs, you can also select the Do Not Enable BitLocker Until Recovery Information Is Stored In Active Directory check box to keep users from enabling BitLocker unless the device is connected to the domain and the backup of BitLocker recovery information to Active Directory has succeeded.
Once BitLocker recovery information has been saved in Active Directory, the recovery information can be used to restore access to a BitLocker-protected drive by using the Manage-bde command-line tool introduced earlier.
Note BitLocker FAQ
You need to take some time to review BitLocker. It is an important feature that protects against data loss. Read the BitLocker frequently asked questions (FAQ) resources at https://docs.microsoft.com/windows/device-security/bitlocker/bitlocker-frequently-asked-questions.
In an Azure Active Directory environment, you can locate the BitLocker key within the Azure Active Directory Admin Center. Locate the device, and if the Windows 10 machine has been encrypted, you can use the BitLocker recovery key or provide it to the user to recover their device.
To view or copy the BitLocker keys within Azure Active Directory, you need to be the device owner or have one of the following roles assigned:
Global Administrator
Help Desk Administrator
Security Administrator
Security Reader
Intune Service Administrator
Configure Windows Defender Antivirus
Microsoft Defender Antivirus is built into Windows 10 and helps protect your computer from spyware, malware, and viruses. Microsoft Defender Antivirus is compatible with Hyper-V and therefore it can detect malicious software within a virtual machine. Microsoft Defender Antivirus uses antivirus definition files to determine whether software it detects is malicious and will alert you to potential risks found. The definitions are automatically installed as they are released.
You can use Microsoft Defender to run several types of scan; Quick, Full, or Custom, as shown in Table 2-13. In addition to the automatic detection, if you suspect spyware has infected a specific area, you can run a targeted scan on a drive or a folder.
TABLE 2-13 Microsoft Defender Antivirus scan options
Scan Options |
Description |
|---|---|
Quick |
Checks common areas that malicious software are likely to infect. |
Full |
Checks all files and all running apps on the device. |
Custom |
Allows targeted scanning of specific drives and folders. |
Windows Defender Offline Scan |
Allows users to find and remove difficult-to-remove malicious software. The system will need to reboot, and the scan can take about 15 minutes. |
There are several options and settings available for users to fine-tune how Microsoft Defender Antivirus will operate. For example, you can configure the scan schedule, choose when Microsoft Defender Antivirus excludes processes, and configure the behavior when a scan identifies malicious software on your system.
Microsoft Defender Antivirus real-time protection is configured to detect and prevent spyware and other unwanted software from running on a device. Not all unwanted software seeks to destroy or corrupt your files. There are many types of malicious software that give unauthorized parties remote access to your device or stealthily collect and transmit information from your device to unauthorized third parties.
Here are some common types of malware:
Computer viruses Designed to replicate malicious code, often using email attachments or embedded within files.
Computer worms Designed to automatically replicate across networks and overload systems due to increased volume of traffic.
Trojan horses Files are hidden within other files or applications and, once activated, aim to provide unauthorized third parties with remote access to the infected device.
Ransomware Targets files and encrypts them. Users are then asked to pay a nominal ransom fee, often in Bitcoin or other hard-to-trace cryptocurrency, to recover the data. Often after paying the ransom, the files remain inaccessible.
Spyware Tracking software, such as a keylogger, that reports to the third party how a device is used.
Email provides attackers with the most common attack vector for delivering malware. Increasingly, attacks from websites, pirated software, video, and music files are also becoming common.
You can help protect against infection by following these guidelines:
Windows Defender is automatically enabled. Do not disable it.
Antimalware definitions should be updated automatically.
All software should be from a reputable source.
All software and Window 10 updates should be applied automatically.
Deter using or installing pirated or unsigned software.
Be vigilant and suspicious of email attachments.
Don’t open links in spam or phishing emails.
Microsoft has improved the performance of Windows Defender Antivirus, and it provides an excellent antimalware solution that reduces the probability that malware will compromise your device.
In addition to the built-in protection that runs in real time on your device, if you believe your system has been infected you can run use the Microsoft Defender Offline scanning tool. This tool will run from a trusted environment, without starting the operating system. The scan can take up to 15 minutes, and you will need to reboot your system for the scan to complete.
To run a Microsoft Defender Offline Scan from Windows Defender Security Center, perform these steps:
Open Windows Security, and select Virus & threat protection.
Select Scan options under Current threats.
Select Microsoft Defender Offline scan, and select Scan now.
In the Save your work dialog box, select Scan.
If prompted by UAC, select Yes. The message that You’re about to be signed out will appear and your device will restart to run the scan offline. When your PC restarts, you will see Microsoft Defender Offline tool initiating. Microsoft Defender Offline will then perform a quick scan of your device, as shown in Figure 2-32. When the offline scan has completed, your device will automatically restart.
FIGURE 2-32 Microsoft Defender Offline scanning tool
For your device to be protected, you should ensure that Windows Defender Antivirus is correctly configured. To review the Windows Defender Antivirus configuration, follow these steps:
Open the Settings app and select Update & Security.
On the Update & Security page, select Windows Security.
On the Windows Security page, select Open Windows Security.
Verify that your device is being protected and that Virus & threat protection is active. (You’ll see a tick mark on a green background.)
Select the Protection history and review all recent items. Here, you can view Current, Quarantined, and Allowed threats. Review the results of any Quarantined or Allowed items that were on your device.
To verify that the threat definitions are up to date, select Virus & threat protection.
On the Virus & threat protection page, view the Last update date under Virus & threat protection updates, as shown on Figure 2-33. This should be within 24 hours of the current time. You can also select the Check for updates option to force a sync to the update server.
FIGURE 2-33 Viewing the Virus & Threat Protection settings
Close the Windows Security App.
If you prefer to automate device antivirus actions using PowerShell, there are 12 cmdlets that you can use to perform tasks that protect your device, as shown in Table 2-14.
TABLE 2-14 Microsoft Defender Antivirus PowerShell cmdlets
Cmdlet |
Function |
|---|---|
|
Modify Microsoft Defender Antivirus settings. |
|
View the status of Microsoft Defender Antivirus software. |
|
View Microsoft Defender Antivirus scan and update preferences. |
|
View threat detection history. |
|
View list of known threats from the definitions catalog. |
|
View active and previous detected malware threats. |
|
Remove default actions or exclusions. |
|
Remove an active threat. |
|
Configure Microsoft Defender Antivirus scan and update preferences. |
|
Trigger a scan on the device. |
|
Trigger a Microsoft Defender Offline scan. |
|
Update a device’s antimalware definitions. |
If you prefer to use the command prompt, you can use Mpcmdrun.exe to trigger a Microsoft Defender Antivirus scan and other tasks. You need to run Mpcmdrun.exe from within the following location:
%ProgramFiles%Windows DefenderMpCmdRun.exe
For example, to trigger a full scan, run the following command:
MpCmdRun.exe -Scan -ScanType 2
To discover all command-line options for this tool, use the following command:
mpcmdrun.exe /?
Note Configure and Manage Microsoft Defender Antivirus with the Mpcmdrun.exe Command-Line Tool
The following article provides a useful list of examples of specific tasks that you can perform using the Mpcmdrun.exe command-line tool: https://docs.microsoft.com/en-us/microsoft-365/security/defender-endpoint/command-line-arguments-microsoft-defender-antivirus?view=o365-worldwide.
Chapter summary
Local accounts are local to the Windows 10 device, and the password is stored in the SAM database.
Most settings are configured within the Settings app and not Control Panel.
The administrator has full permissions and privileges on a Windows 10 device and can manage all the objects on the computer.
The Creator Owner is a special identity that has special administrator-level permissions to the resources over which they have ownership.
Azure Active Directory (Azure AD) is a cloud-based identity authentication and authorization service.
Devices can be joined or registered to Azure AD.
Azure AD supports registering of bring-your-own-device (BYOD) scenarios for multiple types of devices, including Windows 10, iOS, Android, and macOS.
Only Windows 10 devices can be joined to Azure AD.
Existing Windows 10 devices can be joined to Azure AD using the Accounts section of the Settings app.
The Device Enrollment Manager (DEM) account in Microsoft Intune is a special account that allows you to enroll up to a maximum of 1,000 devices.
Windows 10 supports NTFS as the default file system.
The Quick Access area is new in Windows 10 and appears at the uppermost left area of the File Explorer navigation pane. It shows the frequently used files and folders.
Effective Permissions is useful to determine the permissions a particular user would have through NTFS permissions.
Windows 10 NTFS uses six Basic Permissions and 13 Advanced Permissions for securing files and folders.
When you apply permissions to groups, an explicit Allow setting will override an implicit Deny permission.
Use the ICACLS command-line tool to configure and view permissions on files and folders on a local computer and reset them to defaults.
Inheritance of permissions can be useful when applying permissions to a large environment because the permissions will be automatically propagated based on the default inheritance setting.
You can use the Effective Access feature to ensure that your NTFS permissions are as expected.
If you have administrative privileges, you can take ownership of an object, such as a file, and allocate it to another user or group.
You can reset the permissions of all the folders, files, and subfolders using the command
icacls <file name> /reset.Only files stored on a NTFS-formatted hard drive have a Security tab in their File properties.
Windows 10 uses a feature called Network Discovery, which uses a new layer 2 protocol called Link Layer Topology Discovery (LLTD) to identify other devices present on the local subnet.
Share permissions can be Read, Change, or Full.
The registry is a database, which is split into multiple separate files known as hives.
You use the built-in Registry Editor (Regedit.exe) tool to view, search, and modify the registry’s contents.
Local Security Policy allows you to configure security policies, such as a password or audit policy, on a local computer.
User Rights policies are used to determine what rights a user or group of users have on a device and relate to activities or tasks that the user can perform.
User Rights assignments affect what users can do to a system, and Security Permissions affect which access permissions a user has.
Use the Resultant Set of Policy (RSoP) tool to check and troubleshoot Group Policy settings.
Use the GPResult command-line tool to verify what Group Policy Objects have been applied to a user or computer.
The Windows Security app collects and displays the security status of your device and will trigger notifications through the Action Center.
User Account Control (UAC) helps protect the operating system from unauthorized configuration changes and app installations.
UAC elevation prompts can be prompts for consent or prompts for credentials.
Whenever UAC prompts the user for consent, it uses a feature called Secure Desktop to focus the activity only on the UAC prompt and prevents malware from interacting with the UAC process.
Windows 10 is protected by the Windows Defender Firewall, which acts as a network barrier.
You can allow an app through the Windows Defender Firewall or create connection security rules using Windows Defender Firewall With Advanced Security.
Windows 10 supports two encryption technologies: Encrypting File System (EFS) and BitLocker.
Windows 10 Home does not support encryption.
You should always create a Data Recovery Agent (DRA) whenever EFS is used within an enterprise so that encrypted files can be recovered.
EFS can be managed through the GUI or by using the command-line tool Cipher.exe.
BitLocker Drive Encryption enables you to encrypt an entire hard disk.
Devices with a Trusted Platform Module (TPM) can securely store the encryption keys that BitLocker uses.
BitLocker supports versions 1.2 and 2.0 of the TPM specification.
BitLocker offers users several key-protection options, including storing the key protectors on a TPM, a smart card, or a USB drive with a startup key on it. BitLocker also allows you to require a PIN on startup.
On a modern Windows device, BitLocker Drive Encryption will be already enabled when shipped. When the user signs in to the device for the first time with a Microsoft account, the recovery key is saved to their Microsoft account.
For personal and small-business users, a BitLocker recovery key is stored in their Microsoft accounts at https://onedrive.live.com/recoverykey.
On devices without a TPM, you can configure the Require Additional Authentication At Startup GPO setting to allow BitLocker to be used without a compatible TPM.
Before upgrading your computer—for example, performing a BIOS firmware upgrade—you should suspend BitLocker Drive Encryption. By default, after a reboot, protection will be automatically resumed.
If a device enters BitLocker recovery mode, you will need to recover the drive by supplying the 48-digit recovery password.
The BitLocker recovery password can be stored in Active Directory or Azure Active Directory.
Thought experiment
In these thought experiments, demonstrate your skills and knowledge of the topics covered in this chapter. You can find the answers to these thought experiments in the next section.
Scenario 1
Adatum has 3,000 workstations currently running Windows 10. Most of the users belong to the Active Directory domain, but 50 research engineers in the R&D department do not. The research engineers need to access special 3D printing hardware that is located within their secure area. Adatum needs to ensure that only the research engineers can use the specialized printing devices.
As a consultant for Adatum, answer the following questions:
1. What type of group will you use for the research engineers?
2. How will you ensure that only the research engineers are able to print to the 3D printer?
3. You find that a user has been using the 3D printer for personal use outside of normal office hours. How would you investigate this matter?
4. What measures could you undertake to reduce the likelihood of users printing outside of normal office hours?
Scenario 2
Your organization, Contoso Electronics, has recently deployed Windows 10 laptop devices. All devices run Window 10 Pro. The company security policy requires that all company data stored on devices must be encrypted.
A remote worker had their laptop stolen and purchased a replacement device from the local computer store. The device is installed with Windows 10 Home edition and does not have a TPM.
You must ensure that the company data stored on devices is encrypted at all times.
Answer the following questions for your manager:
1. What encryption technology should be implemented at Contoso Electronics?
2. On devices without a TPM chip available, how can you configure encryption?
3. You create a provisioning package to enable encryption and send the PPKG file to the remote worker. The provisioning package failed to configure the AES-CBC 128-bit encryption method required by the security policy. What could prevent the encryption method from being configured?
Scenario 3
Your organization wants to use Group Policy to configure power settings on the sales department laptops. All laptops are identical. You add a new Group Policy to remove the sleep feature on the laptops. Some members of the sales department report that they can still put their laptops into sleep mode. You access one of the sales departmental laptops and confirm that the GPO has not been applied.
Answer the following questions for your manager:
1. What GUI tool could you use to verify whether the GPO is being delivered to the laptop?
2. Some members of the sales department work out of the office, often in rural locations. How could location affect the effectiveness of the GPO?
3. How could you ensure that all members of the sales department receive the GPO?
4. What command-line tool could you use to verify what GPOs have been delivered to the laptop?
Scenario 4
Adatum Corporation uses Microsoft 365 and has an IT security policy in place that requires company laptop devices to be encrypted at all times. Many of the remote workers operate from home, and the IT policy allows these users to choose a corporate-owned device from an authorized device list. Employees selected various devices, including the Surface laptop, which come preinstalled with Windows 10 Home.
All company data is stored in Microsoft 365 cloud-based storage, such as OneDrive for Business and SharePoint Online. The sales department often needs to leave customers with USB thumb drives that contain presentations, which include sensitive information.
Respond to the security manager, who has raised the following concerns:
1. The Surface laptops do not currently support EFS or BitLocker Drive Encryption. What should you do first?
2. You need to recommend an encryption solution for the company data stored on the sales department laptop devices so that they comply with the IT security policy. What should you recommend?
3. How will your encryption solution be deployed to the remote staff?
Thought experiment answers
This section provides the solutions for the tasks included in the Thought experiments section.
Scenario 1
1. Create a Research Engineers Local Group.
2. Add only the research engineers to the Research Engineers Local Group and grant print permissions for the 3D printer to the Research Engineers Local Group.
3. Investigate the logs within Event Viewer, and look for instances in which a print job has been sent to the 3D printer outside of normal office hours. You could enable logging within the Microsoft-Windows-PrintService Operational logs.
4. You should restrict the hours that the printer is available. Within the Print Servers section of the Printer Management console, select the correct printer and then open the Advanced tab of Printer Properties. Configure the Available From and Available To times for the printer.
Scenario 2
1. Contoso Electronics should implement BitLocker drive encryption technology on all Windows 10 devices.
2. On the new device purchased by the remote worker, you should configure and enable the Require Additional Authentication At Startup GPO.
3. The provisioning package should upgrade the edition of Windows 10 from the Home to the Pro edition on the new device purchased by the remote worker.
Scenario 3
1. Use the Resultant Set of Policy (RSoP) tool to diagnose and troubleshoot Group Policy settings.
2. The GPOs are only delivered once the user connects to and logs into the Active Directory Domain. If members are unable to connect their laptops to the organization, such as by using a VPN or via a wired or a Wi-Fi network, they might be using cached credentials, and therefore, they will not receive the new GPO.
3. Ask the members of the sales department to connect to the corporate network using a VPN or via the internal wired or Wi-Fi network. Once connected, they should then log on so that they can receive the new GPO.
4. Use the GPResult tool to display a report of the GPOs that have been applied to a system.
Scenario 4
1. You need to upgrade the device license on the Surface laptops to Windows 10 Pro or Windows 10 Enterprise before encryption can be used.
2. You could ensure that devices use BitLocker Drive Encryption. In this way, all data stored on the device will be encrypted.
3. The Surface laptops can be joined to Azure Active Directory by the user or by using Windows Autopilot. Once joined, they can be auto-enrolled into Microsoft Intune. Once managed by Intune, they will receive device policies to enforce encryption.